

Specifications and Main Features
- Model: Kenmore 100 Stitch Sewing Machine.
- Power Supply: The machine draws its electricity from a 110 to 120 volt AC socket.
- Light Bulb: The wattage of the sewing machine is 15 Watts.
- The Machine has a memory capacity of: Up to three eleven stitch patterns.
- Does it have automatic buttonhole? Yes.
- Has a variety of stitch patterns: uss and embroid for both style and function, up to one hundred key patterns.
- The width of the stitch patterns can be adjusted from the default: Up to seven millimetres.
- The length of the stitch can be altered from being changed from the default setting. Adjustable.
- The sewing speed is: A variable controlled by foot pedal.
- There are various types of presser feet such as zigzag foot, overedge foot, quilting foot, zipper foot, satin stitch foot, blind hem stitch foot, sliding buttonhole foot, automatic buttonhole foot.
- Arm-Living sewing machine enables circular stitching.
- A storage accessory box is part of the package.
- Regulator for Thread Tension.
- Dial to Feed balance for fabric action.
- An Adjusting Accessory Presser Foot contact.
- Cutter for Thread.
- Darning Plate for sewing control.
- Also included are instructions for different fabrics and suggests sewing techniques that can be applied on those fabrics.
Frequently Asked Questions
- Q: What sort of power supply does the Kenmore 100 Stitch require?
A: This machine uses power mains rated between 110 and 120 volts and ac.
- Q: Does it have automatic buttonhole?: Yes.
- Q: Does this machine have the capacity to make buttonholes automatically?
A: You will be pleased to learn that this machine does facilitate automatic buttonhole sewing.
- Q: Is there some method of controlling the width and length of stitches?
A: Certainly, you are able to adjust the length and size of the stitches on the sewing machine.
- Q: Where can I put the attachments of the sewing machine?
A: The sewing machine comes with an accessory storage box that can be used for holding sewing accessories.
- Q: What is the memory button supposed to do?
A: You can store up to 31 stitch patterns which can be used later with the use of a memory button.
- Q: Will it be able to sew through many fabric layers?
A: Absolutely, the machine is capable of sewing through many fabric layers which is ideal for heavy fabric applications.
- Q: What can I do to ensure my stitches are even?
A: Tighten the thread if it is loose and make sure that the presser foot is properly set and adjusted.
User Manual
Page 1

OWNER'S _MANUAL
i
SEWING MACHINE
MODEL 385. 19601
Page 2

IMPOIRTANT SAFETY
INSTRUCTIONS
Your sewing machine is designed and constructed only for HOUSEHOLD use,
Read all instruction before using this sewing machine.
DA N G E R -- To reducethe risk of etectric shock:
1.
An appliance should never be left unattended when plugged in. Always
unplug this appliance from the electric outlet immediately after using
and before cleaning.
2.
Always unplug before retamping. Replace bulb with same type rated
15 Watts.
3.
Do not reach for the appliance that has fallen into water. Unplug
immediately.
4,
Do not place or store appliance where it can fall or be pulled into a tub
or sink. Do not place in or drop into water or other liquid.
WAR N _ N G-- To reduce the risk of burns, fire, electric shock,
or injury to persons_
1.
Do not allow to be used as a toy. Close attention is necessary when this
appliance is used by or near children.
2,
Use this appliance only for its intended use as described in this manual.
Use only attachments recommended by the manufacturer as contained in
this manual.
3_
Never operate this appliance if it has a damaged cord or plug, if it is not
working properly, if it has been dropped or damaged, or dropped into
water. Return the appliance to the nearest authorized dealer or service
center for examination, repair, electrical or mechanical adiustment,
4.
Never operate the appliance with any air opening blocked. Keep
ventilation opemngs of the sewing machine and foot controller free from
accumulation of lint, dust, and loose cloth.
5,
Never drop or insert any object into any opening.
6.
Do not use outdoors.
7.
Do not operate where aeroso| (spray} products are being used or where
oxigen is being adminlstered.
.
To disconnect, turn all controls to the off ("0") position, then remove
plug from outlet.
9,
Do not unplug by pulling on cord. To unplug, grasp the plug, not the
cord.
10.
Keept fingers away from all moving parts. Special care is required
around the sewing machine needle.
11.
Always use the proper needle plate. The wrong plate can cause the
needle to break.
12.
Do not use bent needles.
13.
Do not pull or push fabric while stitching.
It may deflect the needle causing it to break.
14.
Switch the sewing machine off ("0") when making any adjustment in
the needle area, such as threading needle, changing needle, threading
bobbin, or changing presser foot, and the like.
15.
Always unplug the sewing machine from the electrical outlet when
removing covers, lubricating, or when marking any other user servicing
adjustments mentioned in the instruction manual.
SAVE THESE INSTRUCTIONS
Page 3
SEARS, ROEBUCK AND CO.
Dear Homemaker.
CONGRATURATIONS!
You have lust purchased a Kenmore t O0 Stitch seWmg machine that can, with some easy setting by you,
do both decorative and utility sewmg more quickly and accurately than you ever dreamed possible.
This machine can take the guesswo[k, the l_ustratmg tr_a| and error out at sewmg, wrtually elimloat=ng
hand-sewing. BY just pressing a button or two, you can sew a seam or smock a dress, reinforce a sleeve
or dam socks, create a border or embroider a sampler.
This mantra| wil_ show you how to pertorm these wonders, making yo_Jr sewmg creations and crafts the
'°talk at the town'*, and make you the "star at the bazaar"
You can also program this machine to autornat_ca|ty sew your borders and monogram your clothing], and
It "_viHremember the entire sequence and _epeat _t when you press the toot control agam
Practice makes an expert ! Follow these directions and suggestions earetuliy. Go! to know your
machine mtfmateIy and it wil_ _.urn your sewing tasks iota a |oy
These _ostructtons will help you obtain the b_st sewing results and avoid _-.foneeessary setwce expense tar
conditions beyond our control. Advice on the operation and care at your machine =s always available at
your nearest _;ears Retail S_ore. Please rememb0r, if you |'_ave questions aboo! your machine, always
mention '[he model number and serla| number when you inquire.
Write them here, tar easy relerence: Mode| No, 385-
Serial No,
Page 4

SECTION1.
SECTION2.
TABLEOFCONTENTS
KNOWYOURMACHINE
APortableCase or Cabinet ISAvailable .............. 4
Locate and Identify the Parts ................. 5_6
Identify the Accessone_ ........................ B
PREPARE YOUR MACHINE FOR SEWING
Set Up the Machine ........................ 7_11
= Plug m the Machine and Switch on the Power ...... 7
* Set the FOOt Controt ........................ B
, Cheek Your Feed Balance Diat ................. 8
- Set the Pressure Dial ....................... 8
- Setting Spool Pins .......................... g
• Adiust the Presser Foot Lever ................. 9
• Thread Cutter ............................ 9
, AccessOry Storage Box .................... t0
, Free-Arm Sewing: the RemovaNe
Extension Table ........................ 10_11
Know What the Praiser Feel Will Do ........... 12_15
* Foot Storage Compartment ................. t2
Presser Foot Types ...................... t3_15
A. Zigzag Foot .......................... 13
C. Overedge Foot ........................ 13
D. Quiher ............................ 13
E. Zipper Foot .......................... 13
F. Satin Stitch Foot ...................... 13
G. Blind Hem Stitch Foot .................. 14
H. Stra=ght Stitch Foot .................... 14
J. Siiding gultonhole Foot ................ 14
N. Automatic Buttonhole Foot ............... t4
,, Check Your Presser Foot .................... 15
, Chan_e the Presser Foot ..................... 15
Choose Your Needle and Thread .............. 16_17
* Check Your Needie ........................ t6
- Fabric, Needle. Thread and Stitch Length Chart ..... 17
* TO Change Your Needle ..................... I7
Prepare the Bobbin ........................ t8_20
To Remove tt_e Bobbin tram the Machine ......... 18
SECTION 3.
SECTION 4.
• Wind the Bobbin ...................... t8_%9
• Insert the Bobbin IntO the Bobbin Holder ......... 20
Prepare Your Top Thread .................... 21_24
- Thread Your Needle ....................... 21
- Pick Up Your Bobbin Thread ................ 22
= Adjust the Top Thread Tension .............. 23_24
For Stralght Stitch ....................... 23
For Zigzag Stitch ......................... 24
LEARN TO USE THE CONTROLS
Reverse Stkch Bulton ........................ 2B
Up/Down Needle Position Button ................ 26
Control Panel .............................. 27
Pattern Indicator ........................... 28
Pattern So|action Buttons ...................... 28
Direct Entry Stitch Buttons .................... 2g
Memory Butlon ............................ 29
Clear Button .............................. 2g
Twin Needle Barton ........................ 30
Auto-Look Button .......................... 30
M#mr Image Button ......................... 30
Editing Butlon ............................. 31
Editing Pattern Combinations ................... 31
Stitch Width and Length ButtOns ............... 32_33
= Stitch Width Button ...................... 32
• Stitch Length Button ...................... 33
PRACTICE COMMON STtlCHING SKILLS
Use the Seam Guides ......................... 34
Turn a Square Corner ........................ 34
Sew on Heavy Fabrl_ ........................ 35
Use the Darning Plato ........................ 35
Basting _ .............................. 36
Darning [] .............................. 37
Sew a Button .............................. 3B
Put m a Zipper ........................... 39_41
Page 5
SECTION 5.
LEARN THE STITCHES
C_ert of Sewing Functions ..................... 42
Stitch Pattern Char[ ...................... 43_,19
Stratgi_tStitches [] _ [], [] and _ .... 50_59
Straight Stitch .......................... 50
• Topstitehing ........................... 51
• Position Your Needle tor Topst_tcbing .......... 52
• Pintucking .............................. 53
• Quilting .............................. 54
. Gathering .............................. 55
Straight Stretch [] ........................ 56
Lock.a-Mac, it Seam 1_ ...................... 57
Outline Stretch [] ......................... 58
Saddle Stitch [] .......................... 5g
zigzagstitches_ ~ _. []. [] and[] .... 00-06
• Bas_a Zigzag _ ......................... 60
o Satin Stitch _ ........................ 61
Overcasting Stitch [] .................... 62
• Mending [] .......................... 63
• Overedga Seam [] ...................... 64
o KmtStitch [] ......................... 65
• Double Edge Zigzag [] ................... 65
• Rick-Rack Stretch _ .................... 66
Automatic Darning _ ................... 67_68
• OarmngSmalI Rips ........................ 68
Adjusting Evenness of Darmng ................ 68
Automat,e Buttonholing __ .......... 69--7_
Adjus_ the Stitch Width and Density ........... 71
Manual Buuonhofing _ ................... 72_73
, Stitch Density on One Side .................. 73
Corded Buttonho|es _ ...................... 74
Hemming and Edging Stitches _, _, _. _+
[] and [] ......................... 75_79
• Blind Hem Stitch [stretch) [] .............. 76
. Blind Hem Stitch (woven) _ .............. 76
• She!l Sdtch _ ........................ 77
• SeaIIop Stitch [] and [] ................ 78
- C_t.Out Work Edging and Applique [] and _j . . , 79
Rmoiormng Stitches _0 ___, [_ and _ .... 80_82
• Feather Stitch 2_ ........................ 80
• Fagotmg Stitch [] ....................... 81
• Elastic Casing Stitch _ .................... 82
Elastic Stretch Stitch _ .................. 82
Tw,n Needle Stitching 2_11J, _, [_, _-_, _,
[]. [] and[] ...................... 83
Decorate wlth Geometric P_tterns [] _ [] ...... 84
Decorate with Stretch Stitch Patterns [] _ [] and
_ .......................... 8_
Cro_s Stitch [] ........................... 86
S_ocking_. _, _;, [] and[] ....... B7
Sand Stitch _ .......................... 88
Shading Stitches [] and _ ................. 89
Program Decorative Stitch Patterns
[] _ [] eta ........................ 90-92
, One Cycle Stitching ...................... 90
• Two Cycle Stitching ...................... g0
• Cycle Stitching by Pressing Mirror Image Button .... 91
- Test Sewing Pattern Combinations .............. 91
• Pattern Single Umts ....................... 92
Mooog,am_,ng[] ~ _. [] ~[] ......... 93
Adjusting Patterns .......................... 9_
• To Adiust Distorted Patterns ................ 84
o To Ad!ost Distorted Letters or NzJmbers .......... 94
SECTION 6. PERFORMANCE PROBLEMS CHART
What to Do When ......................... 95_96
SECTtON 7. CARE FOR YOUR MACHINE
CI_an the Bobbin Holder ...................... 97
Clean the Hook Race and Feed Dogs ............. 98
Oiling the Machine ......................... 99
Replace the Light Bulb ....................... 99
PARTS LIST .................................... 100_01
INDEX ........................................ 102_t03
Page 6
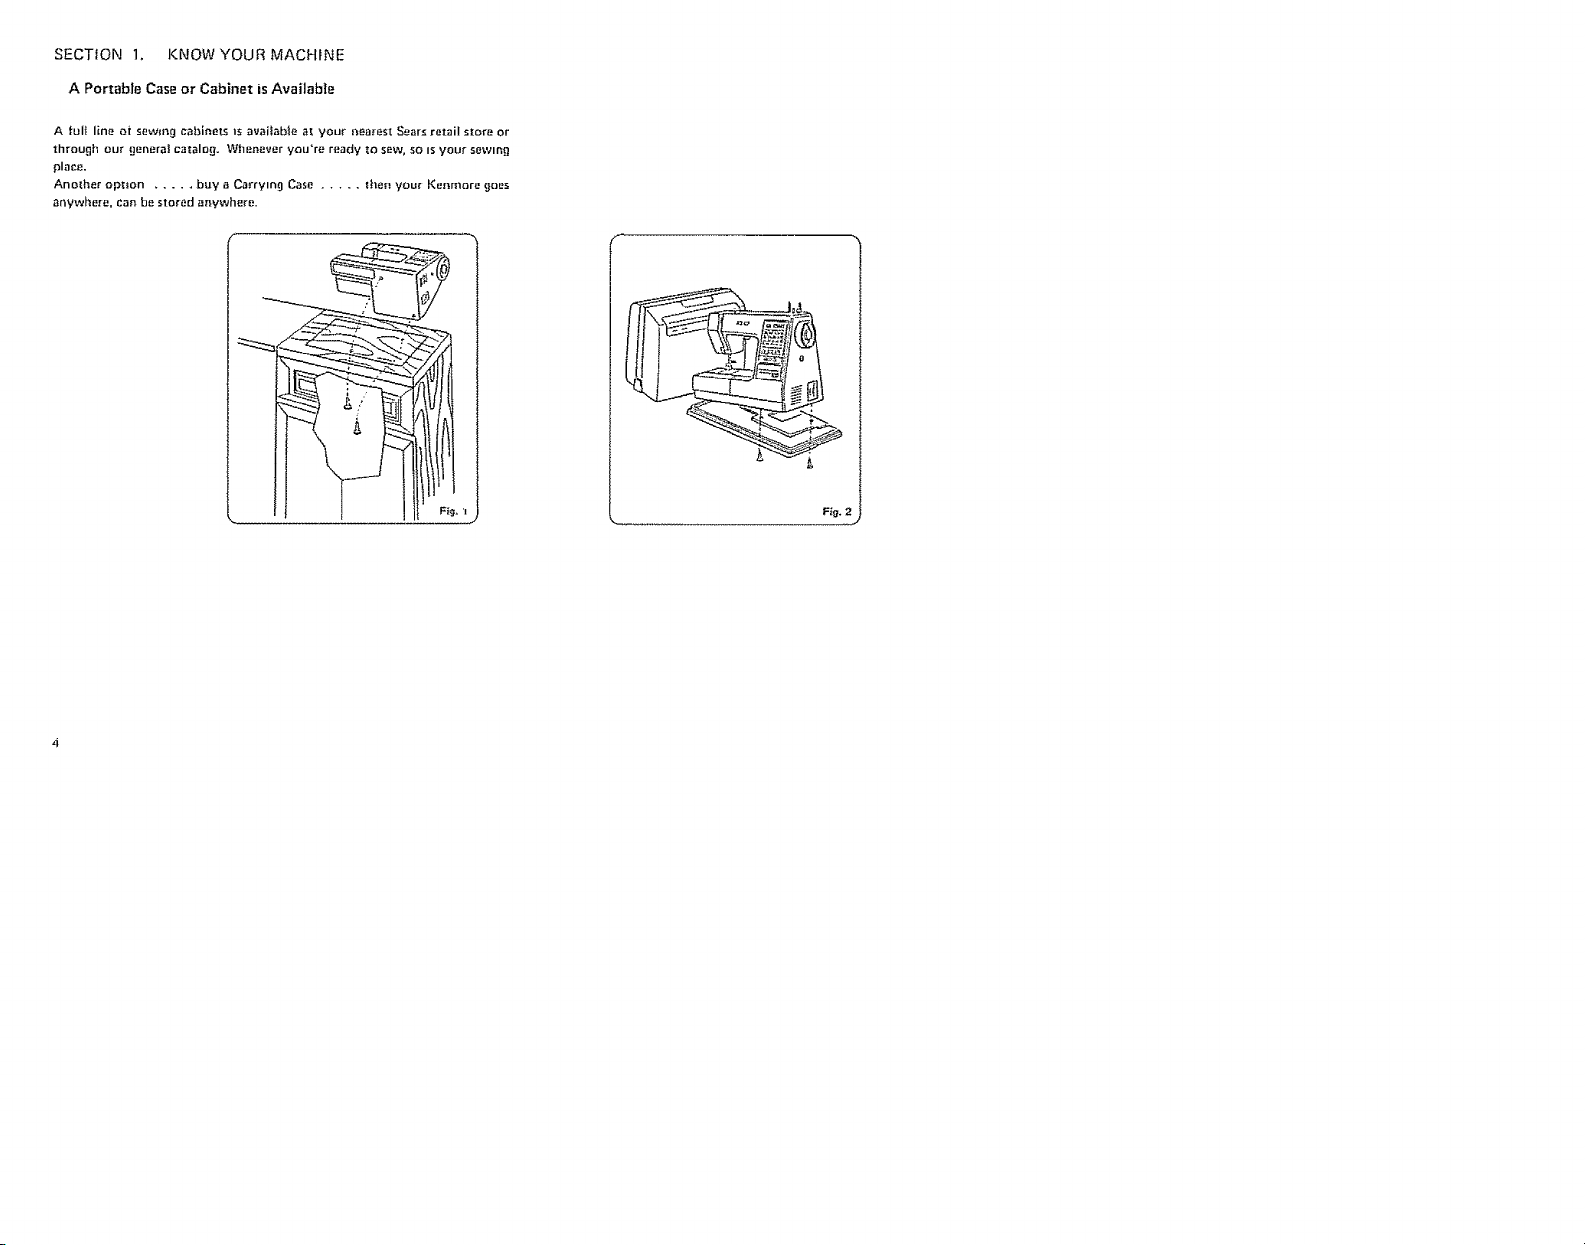
SECTfON 1. KNOW YOUR MACHINE
A Portable Case or Cabinet is Available
A tult line ot sewing cabinets i$ avai}ab_e at your nearest Sears retail s[ore or
through our genera! catalog. Whenever you're ready to sew, so Is your sewing
piece.
Another option ..... buy a Carryln O Case ..... lheo your Kenmore goes
anywhere, can be .stored anywhere.
Fig.
J
Page 7
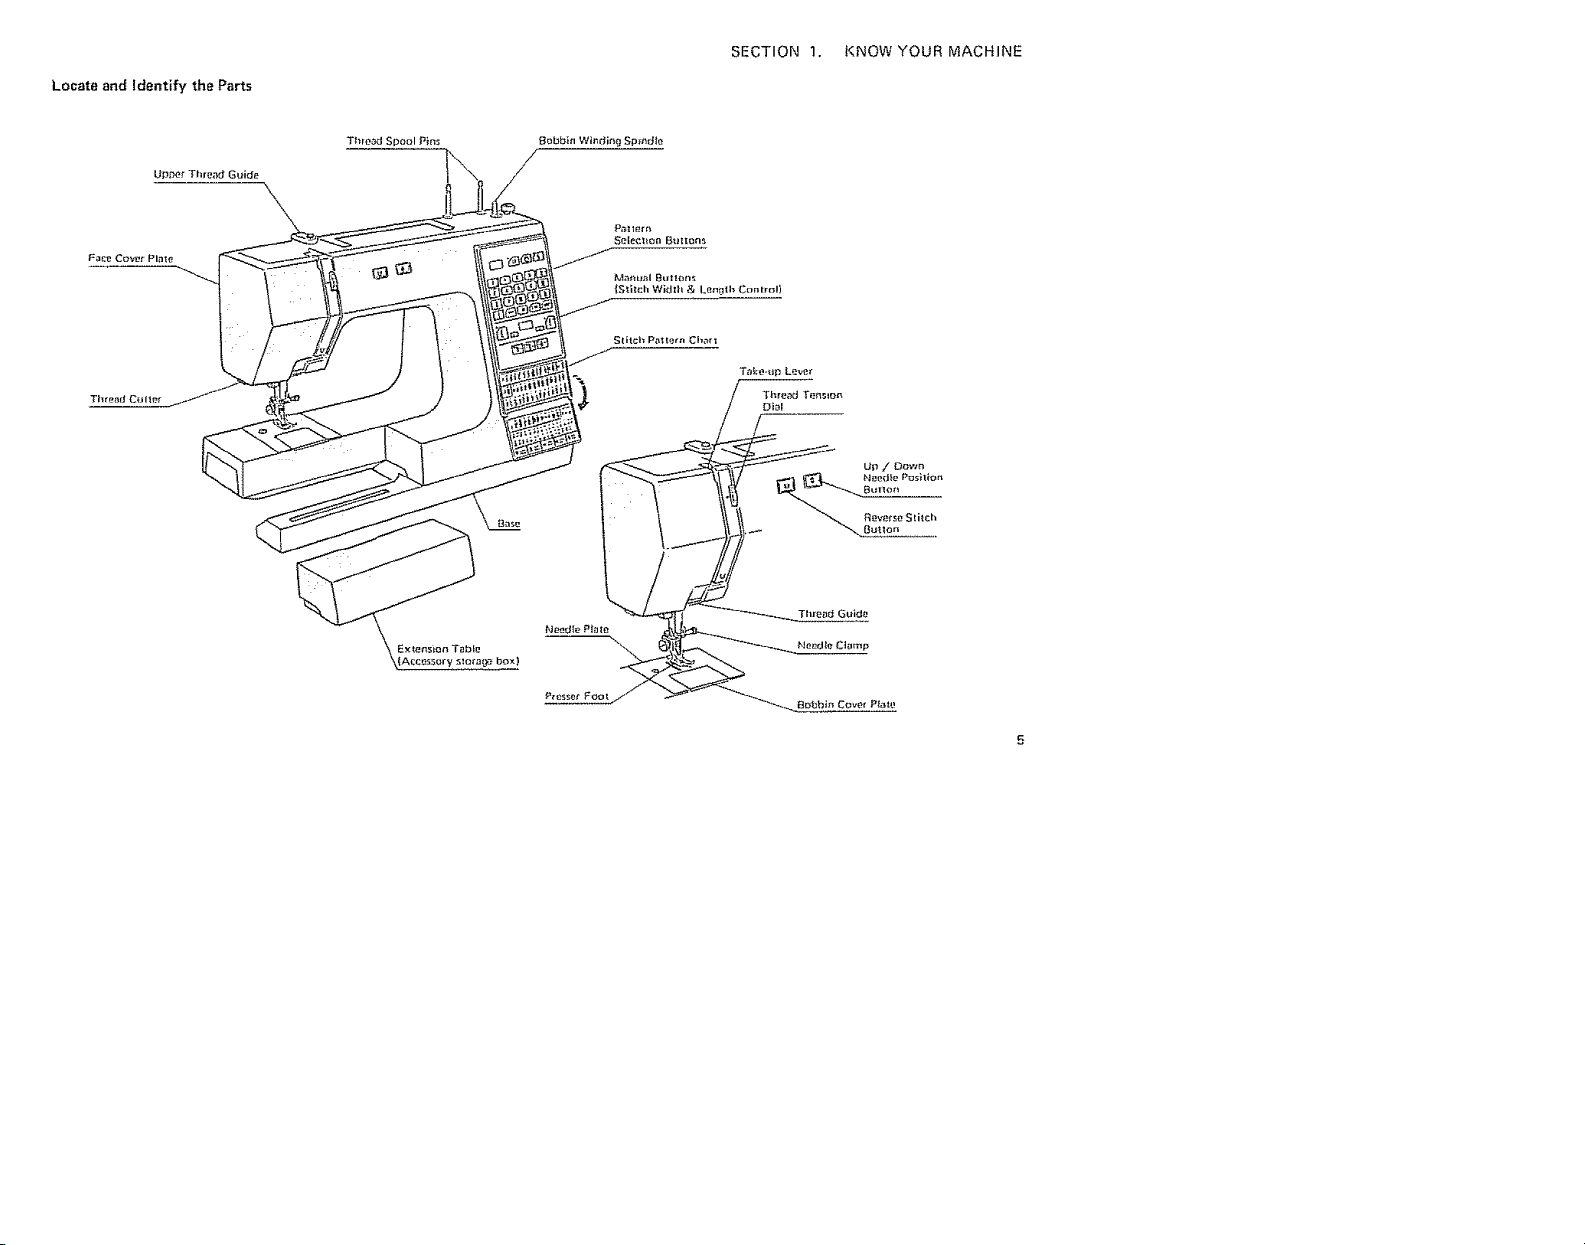
Locate and Identify the Parts
SECTION 1. KNOW YOUR MACHINE
Page 8
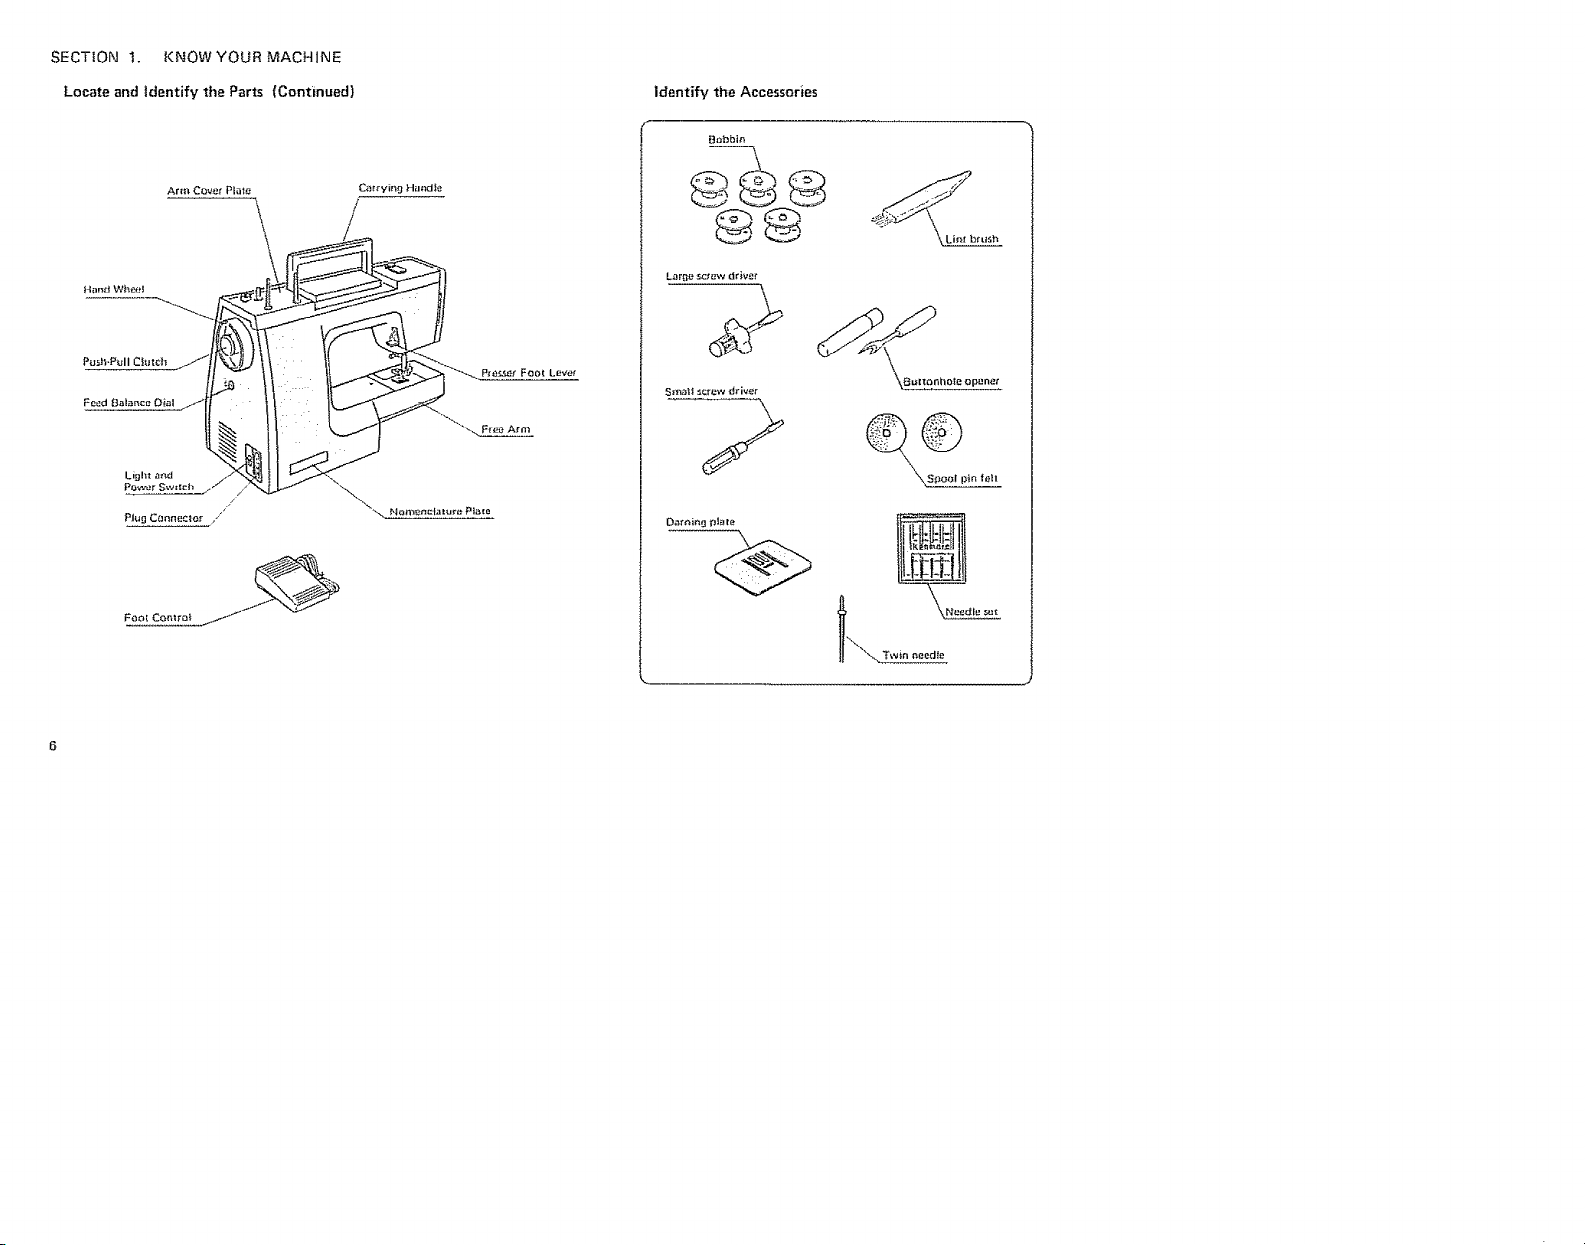
SECTION1. KNOWYOURMACHINE
Locate and identify the Parts (Continued)
Arm Covet Plate Ca_ t yi_j Hil_d|e
Identify the Accessories
Bobbi_
\
Darning flt_te
Page 9
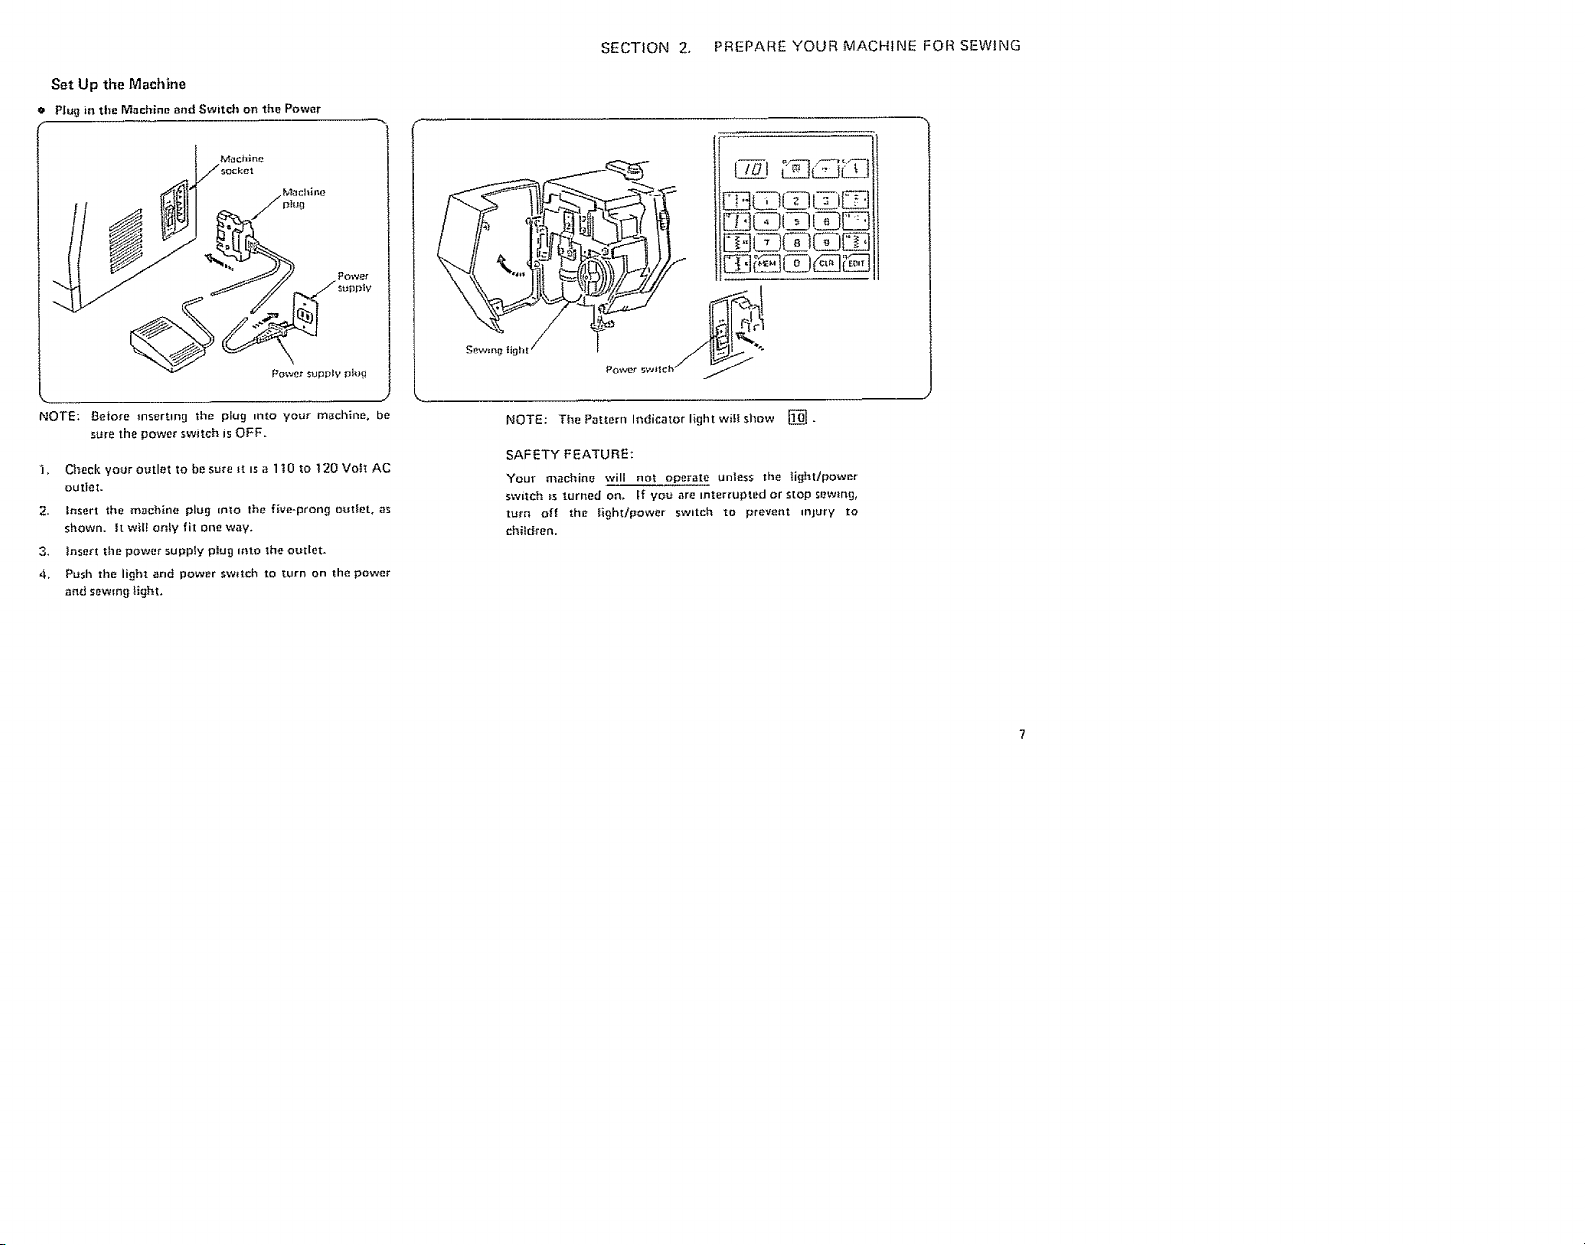
Set Up the Machine
a Plug in tim Machine end Switch on the Power
Madllrte
_ockel
Powe_ SUpplypk_g
SECTION 2. PREPARE YOUR MACHINE FOR SEWING
NOTE: Beiore mserUng the plug into your machine, be
sure the power switch is OFF.
l. CI_eck your outlet to be sure _t_sa 1 tO to 120 Voll AC
outlet.
2- Insert the machine plug mto the five-prong o_Ilet, as
shown. It wiI! on!y fit one way.
3, Insert the power supply plug Into the outlet.
4, Push the light and power sw_tch to turn on the power
and sewing light,
NOTE: The Pattern Indicator light will show [] .
SAFETY FEATURE:
Your machine will not operate unless lhe ]ight/'power
swiIch _s [urned on, ff yo_ are interrupted or slop sewmg,
turn ofl the fight/power switch tO prevent injury to
children.
Page 10
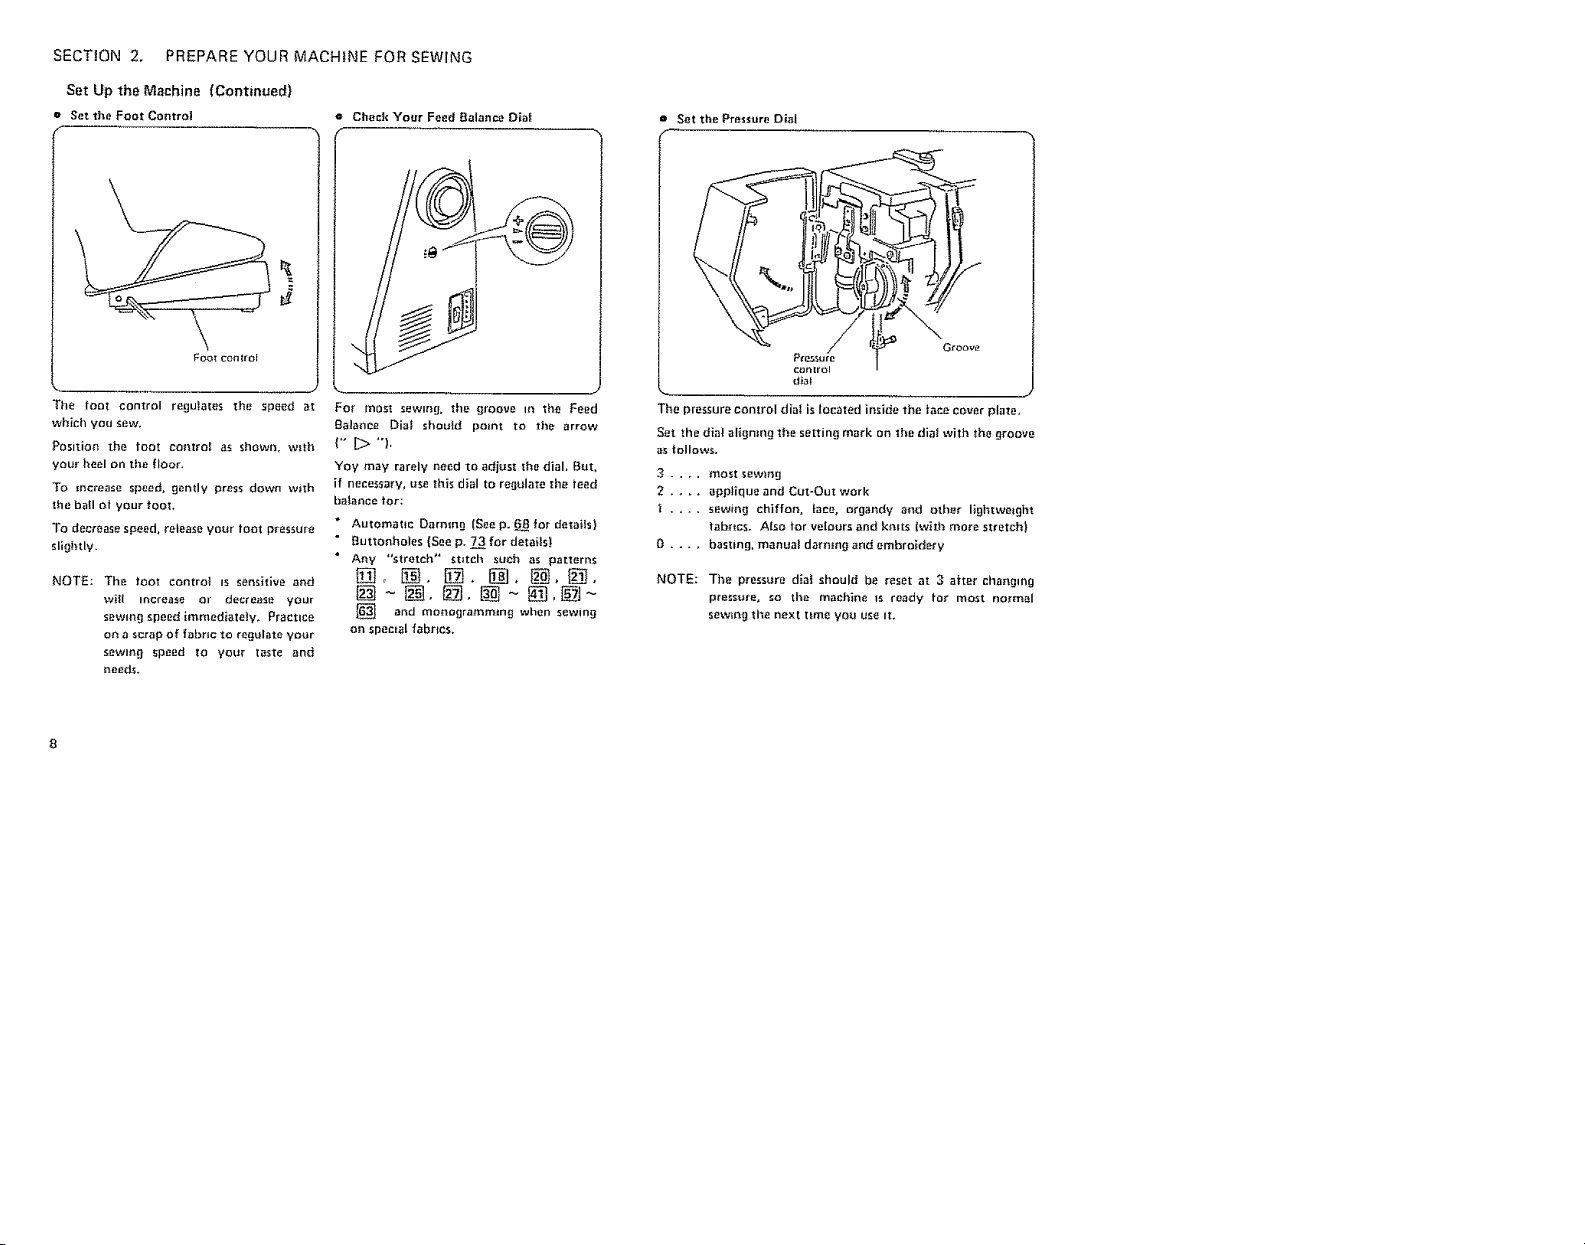
SECTION 2. PREPARE YOUR MACHINE FOR SEWING
Set Up the Machine {Continued)
Set the Foot Control @ Check Your Feed {3alance Dial
J
The foot control reguIales the speed at
which you sew,
Position the foot control as shown_ with
your heel on tile floor.
To increase speed, gently press down with
tile ball of your _ooL
To decrease speed, release your tOOl pressure
slightly,
NOTE: The tOOt control Is sensitive and
will increase or decrease your
sewing speed immediately. Practice
on a scrap of fabric to regulate your
sewing speed to your taste and
needs+
For most sewing, the groove in the Feed
Balance Dial should point to the arrow
l°"D"i,
Yoy may rarely need to adjust _he dial. But,
if necessary, use this dial to regulate the teed
balance tot:
* Automatic Darning {See p. 68 for details}
• Buttonholes {See p.73fordetai{s)
• Any *'stretch" stitch such as patterns
[] and monogramming when sewing
on Spemal fabrtcs.
= Set the Pressure Dial
dial
The pressure control dial is {oeated inside the race Cover plate,
Set the dial aligning the setting mark on the dial with the groove
as tullowso
3 .... most sewing
2 .... applique and Cut-Out work
.... sewing chiffon, lace, organdy and other lightweight
fabrics. Also for velours and kn_ts twith more stretch)
0 .... basting, manual darning and embroidery
NOTE: The pressure dial should be reset at 3 after changing
pressure, so the machine is ready for most normal
sewing the next lime you use it.
Page 11
SECTION 2, PREPARE YOUR MACHINE FOR SEWING
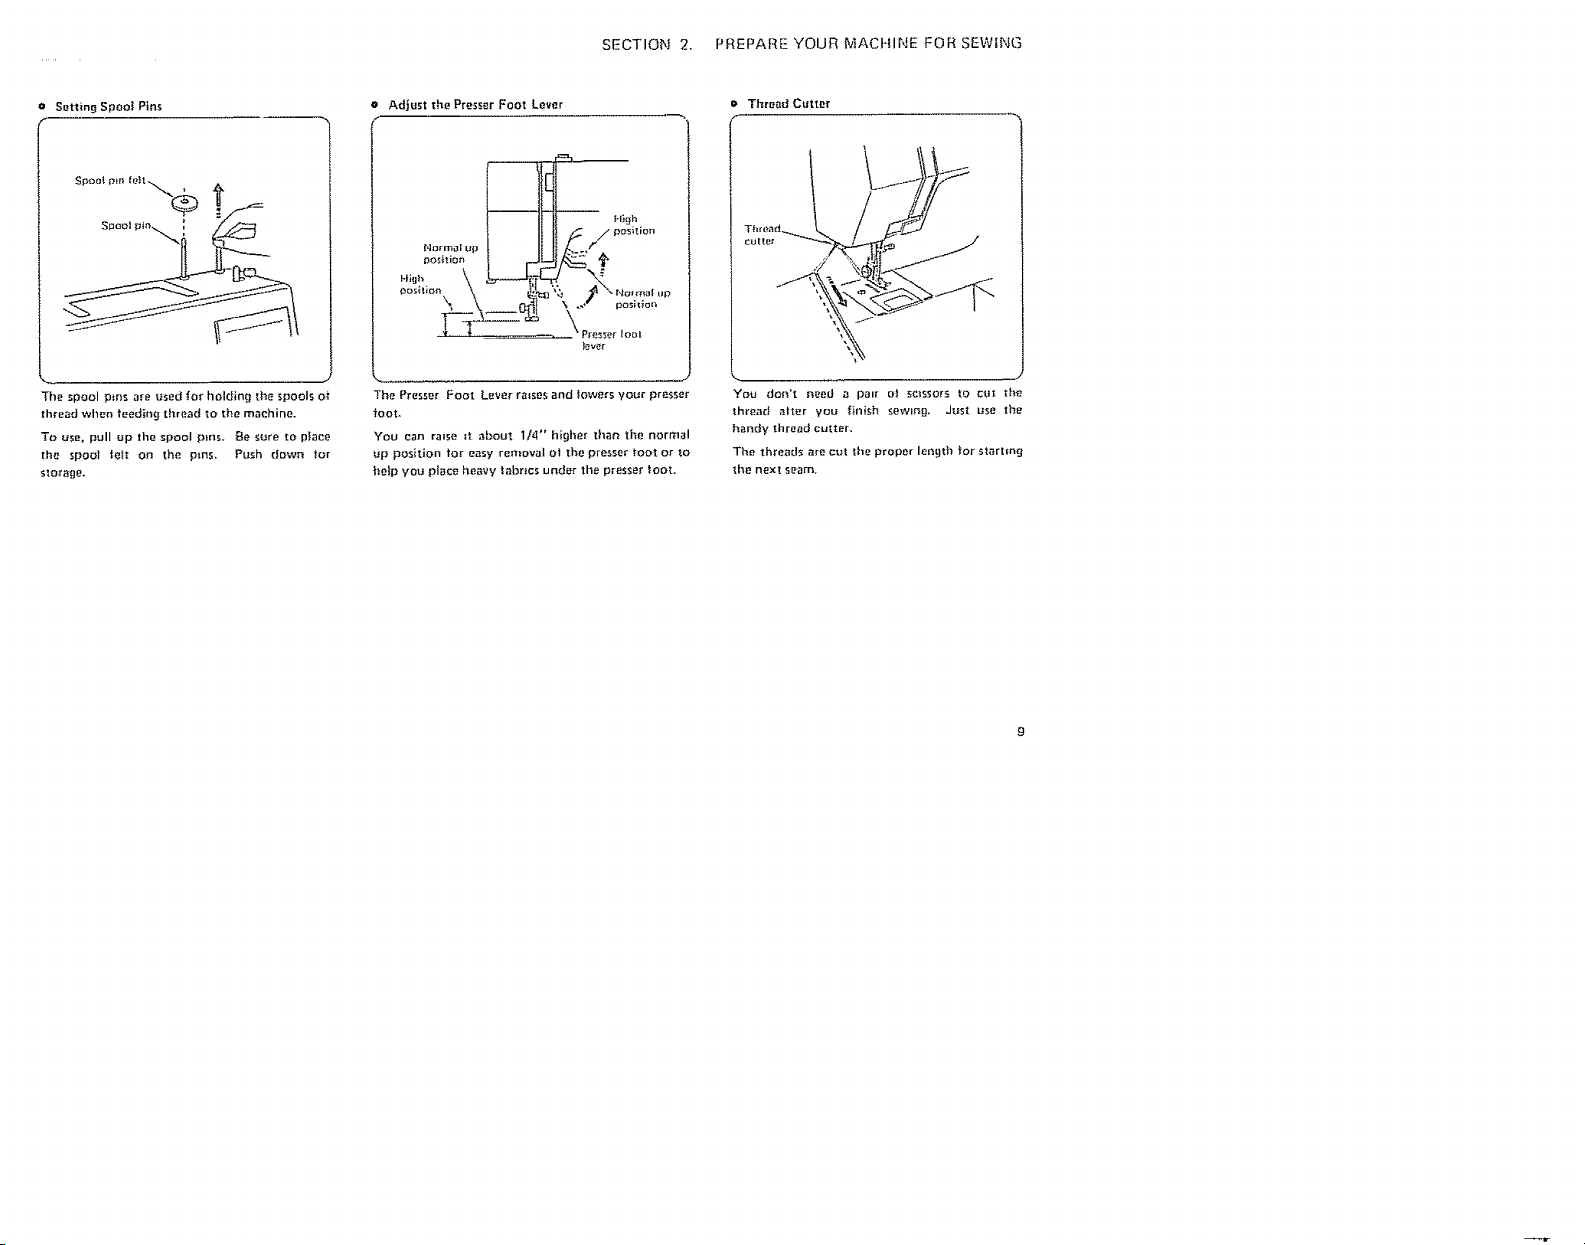
Setting Spoof Pins
The spool p_ns are used for holding [he spools of
thread when teeding thread to the machine.
To use, pull up the spool pros. Be sere to place
the spool lett on the pins. Push down for
storage,
e Adjust the Presser Foot Lever
The Presser Foot Lever raisesand lowers your presser
foot.
You can rinse _t about 1/4 °' higher than the normal
up position for easy removal ot the presser toot or to
help you place heavy tabr=cs under the presser too{.
Thread Cutter
You don't need _ palr o| $_ssots Io CUt lhe
thread after you _in_sh sewing, Just use the
handy thread cutter.
The threads are cut l|le proper length for starting
the next seam.
Page 12
SECTION 2. PREPARE YOUR MACHINE FOR SEWING
Set Up the Machine _Continued)
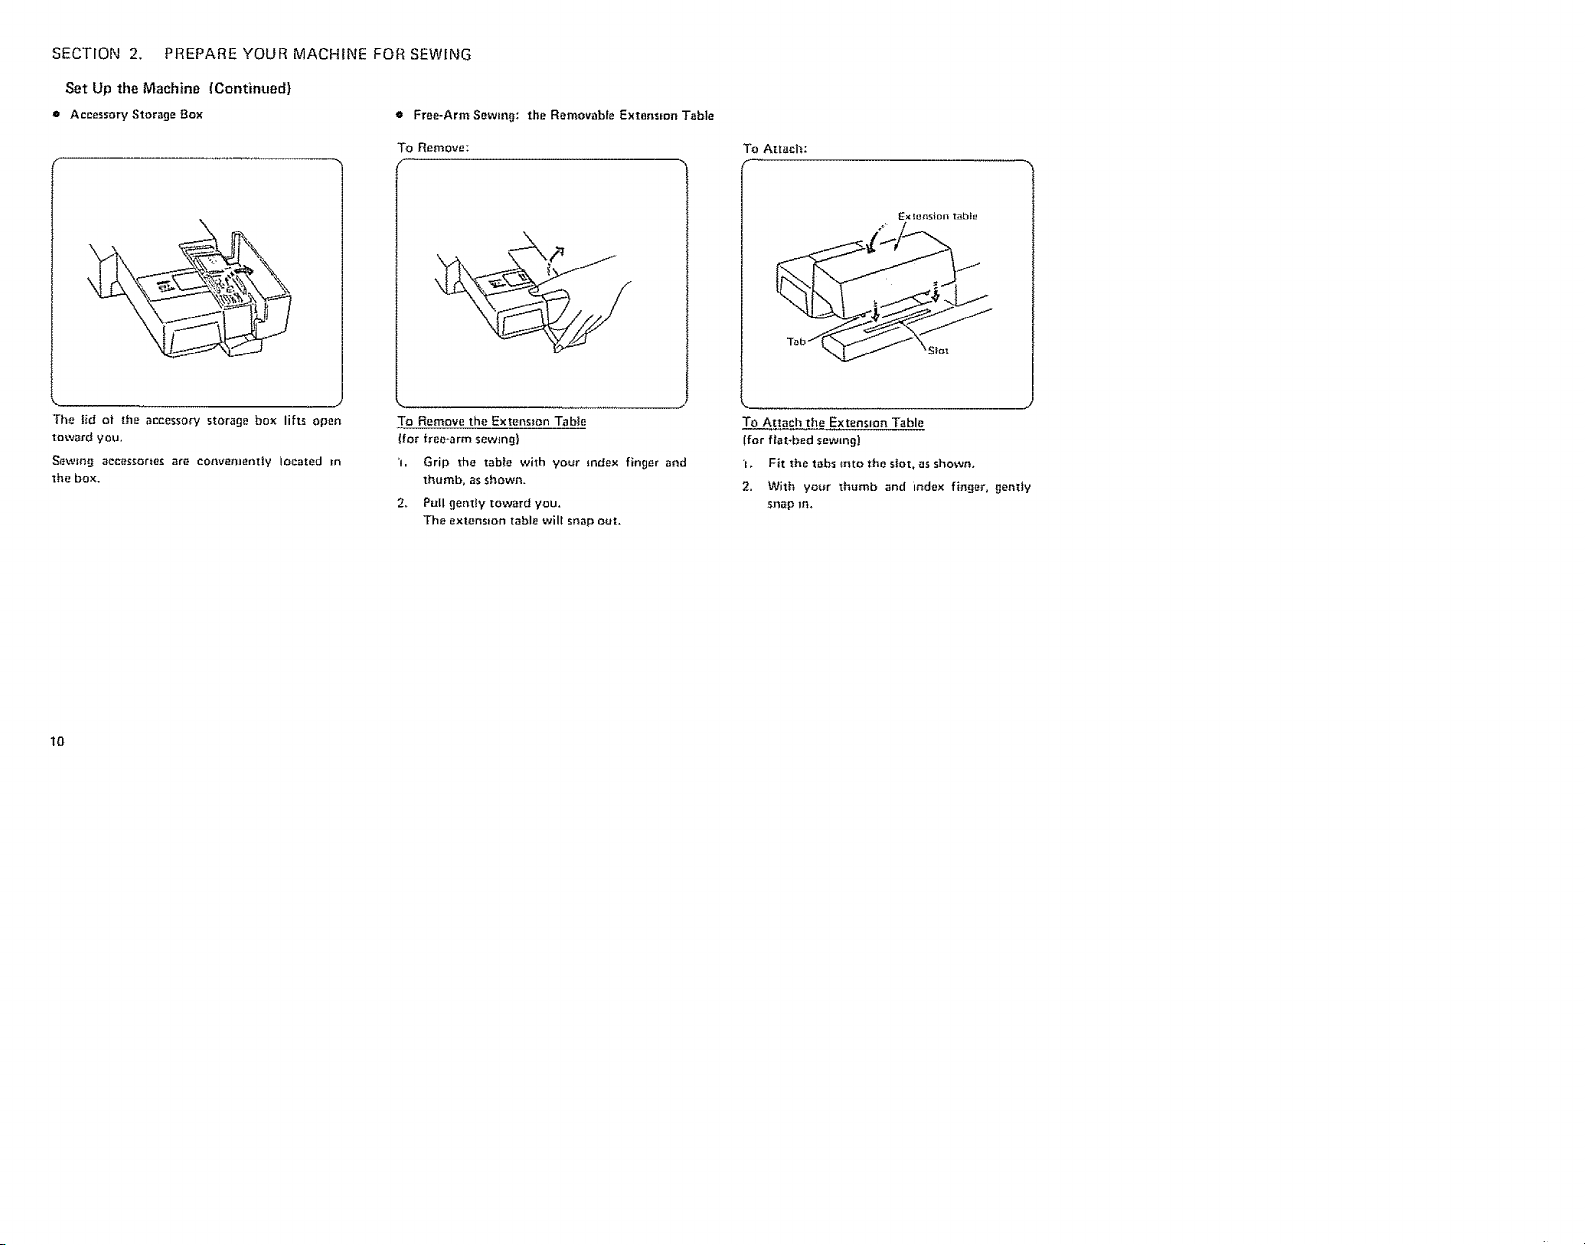
e Accessory Storage Box e Free-Arm Sewing: the Removable Extensmn Table
To Remove:
To Attach:
Ex i_sloll t_bl_
The lid o| the accessory storage box lifts open
toward you,
Sewln{_l eccessorles are eonvenlenlly located In
the box,
IO
To Remove the Extension Table
(for iree-arm sewm_])
'h Grip the table with your index finger and
thumb, as shown.
2, Pull gently toward you,
The extension table will snap out.
To Attach the Extension Table
(for flat-bed sewing)
"h Fit the tabs into the slot, as shown,
2. With your thumb and index fin_er, gently
snap in.
Page 13
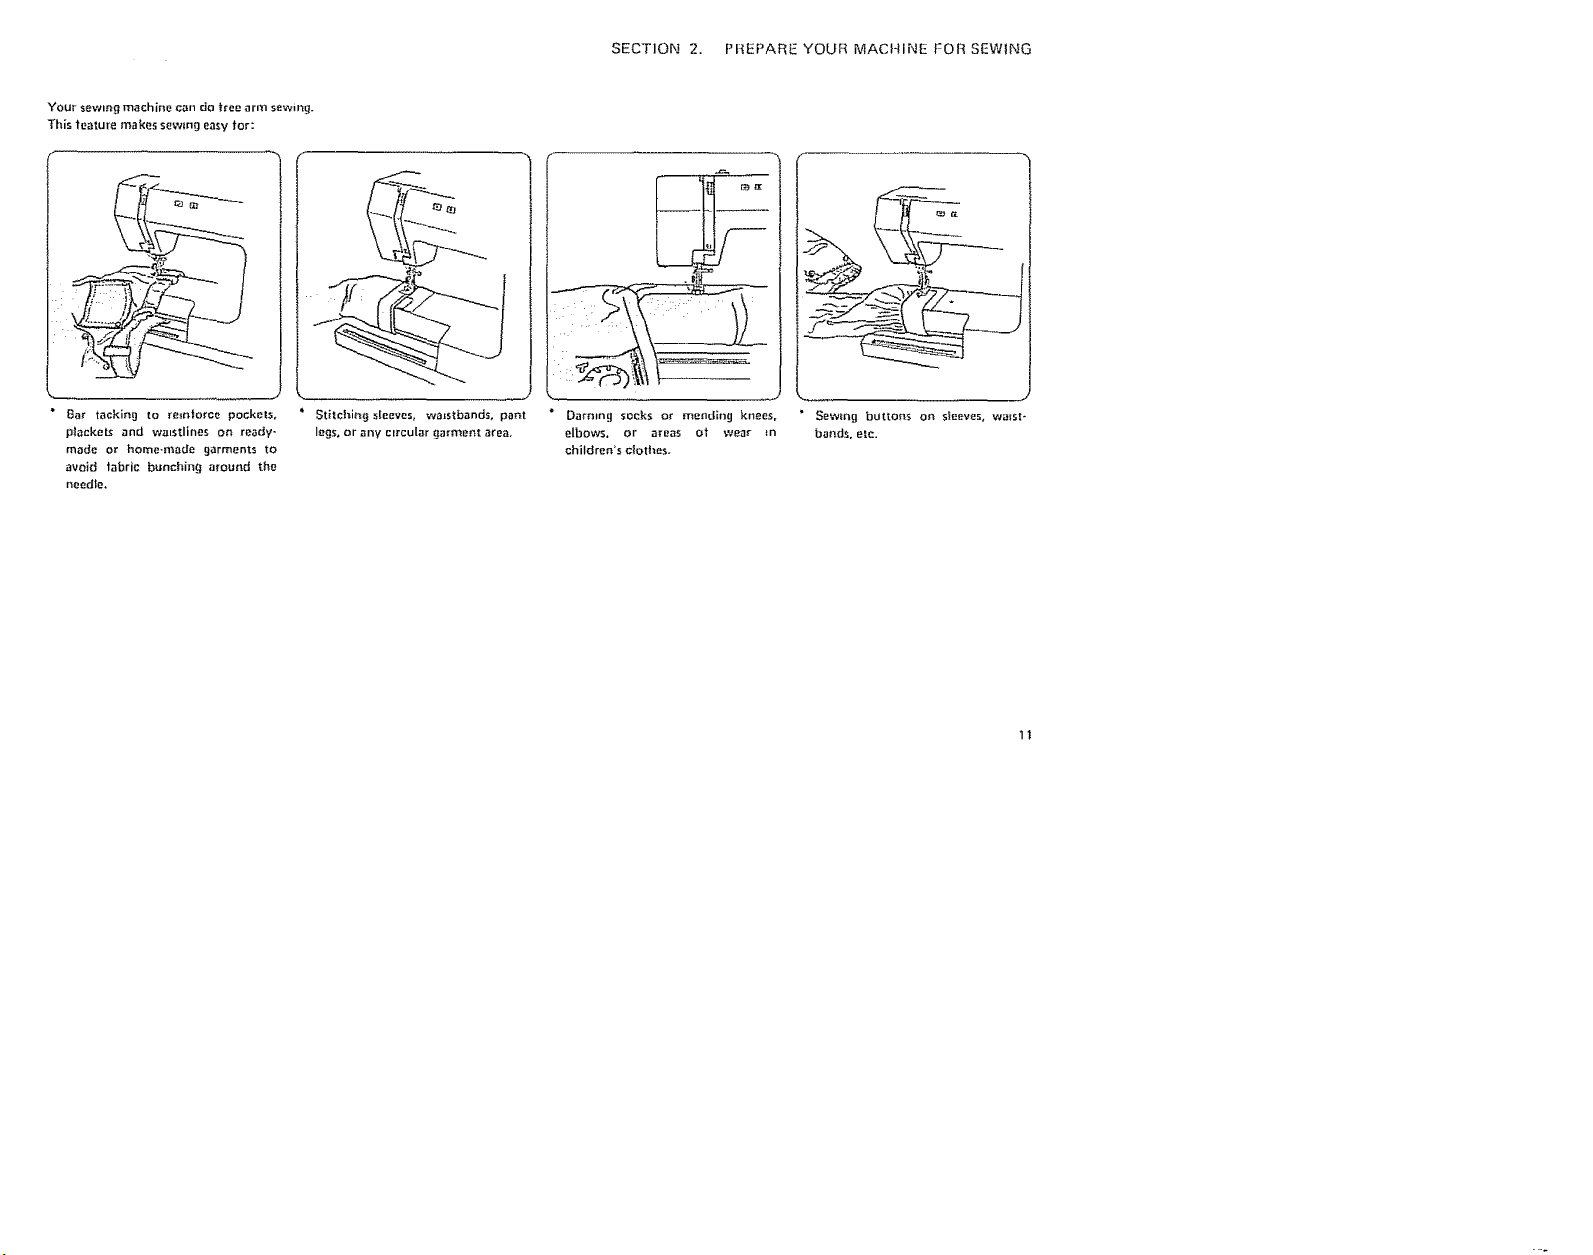
Your sewing machine can do tree arm sewing.
This feature makes sewing easy tar:
SECTION2. PREPAREYOURMACHINEFORSEWING
÷ 8at tacking to reinforce pockets,
p_ackeLs and wa=stlines on ready-
made or home.made garments to
avoid tabrie bunching at'ound the
needle,
Stilchirtg sleeves, waistbands, pant
legs, or ally circular garment area.
Darning socks or mending knees,
elbows, or areas ol wear _n
children_s clothes.
Sewing buttons on sleeves, wrest-
bands, elc.
11
Page 14
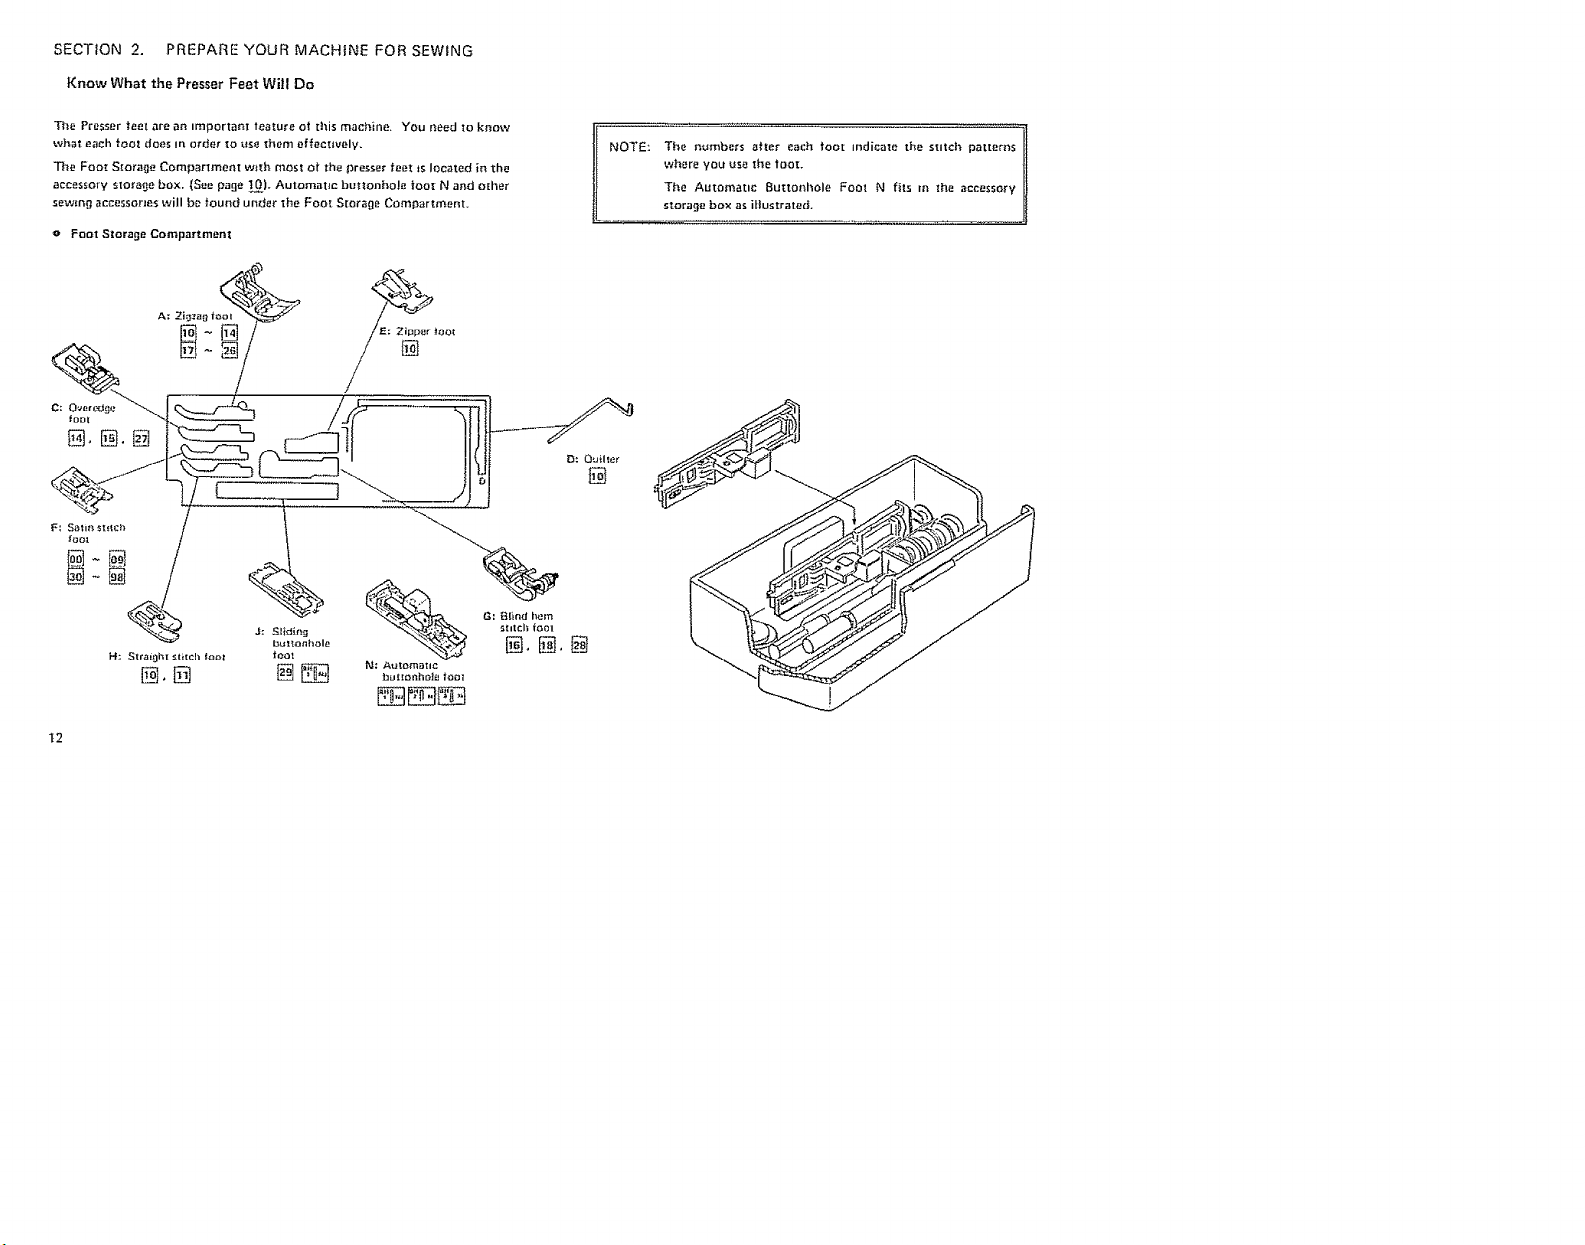
SECTION2. PREPAREYOURMACHINEFOR SEWING
Know What the Presser Feet Will Do
The Presser feet are an important teature at this machine. You need to know
what each toot does in order to use them effectively.
Tke Foe[ Storage Compartment with most o9 the presser feet ts located in the
accessory -',torase box. {See page t0). Automatic buttonhole toot N and other
sewlnrj accessories will be round under the Foot Storage Compartment.
o Foot Storage Compartment
NOTE: The numbers offer each toot indicate the stitct_ patterns
where you use the tool
The Automatic Buttord_ole Foot N fits in the accessory
storage box as illustrated.
ltl,+ A_;tomatlC
t_u!!oriho!f! lo{lz
t2
Page 15

o Presser Foot Types
A. Zigzag Foot
D, Quilter
SECTION2. PREPAREYOURMACHINEFORSEWING
F. Satm Stitch Foot
A: Zi#za{$ tQo_
Use this foot tot bath stra=ght
and z=gzag st=rching.
The black b_ttoft on the right
side ot the toot sets the toot to
tomato r_gld SO that you can
sew on heavy fabrics,
(See p. 35 tot detailed _nstruo
ctloos.)
Stitch Patterns: _ _
%
This toot _sespemal|y constru-
cted tar shtching and!or over-
casting seams. The sma[_ brush
and wire guides he|p control
the labric, hold the raw edge
m p_ace and keep tt from
puckering, espeeJal|y when
sewing on knit ;abr_cs.
You may use thSs |oat for "_be
_egu[ar z_gzag stitch {_ or
with the overedge sutch _,
See p, 62 and 64 _ 65 for derails,
Stitch Patterns: _, _ aad
@
Dz O_ilter
This attachment turns your
ztgzag toot fnto a quilting l;oot.
See p. 54 tot detailed _nstruc-
IrOnS.
Stitch Pattern:
This |oat can be set to sew on
each side at your zipper.
The edges ot the toot gu_de the
zipper and keep the seam
straight.
For deta_ts on Sewing zipperS,
see p. 39 _ 4 I,
Stitch Pattern:
F: _ati$_ S/{tC'h
tool
%
Use this transparent tOOt _Of
outlinmg applique and Cut.Out
Work. as we_l as _or el| your
Decorative St_tch{nrj and
moRogram_o_,
Stitch Patterns; _ _
t3
Page 16
SECTION 2.
KnowWhat thePresser FeetWil! Do (Continued)
• PresserFoot Types {Continued)
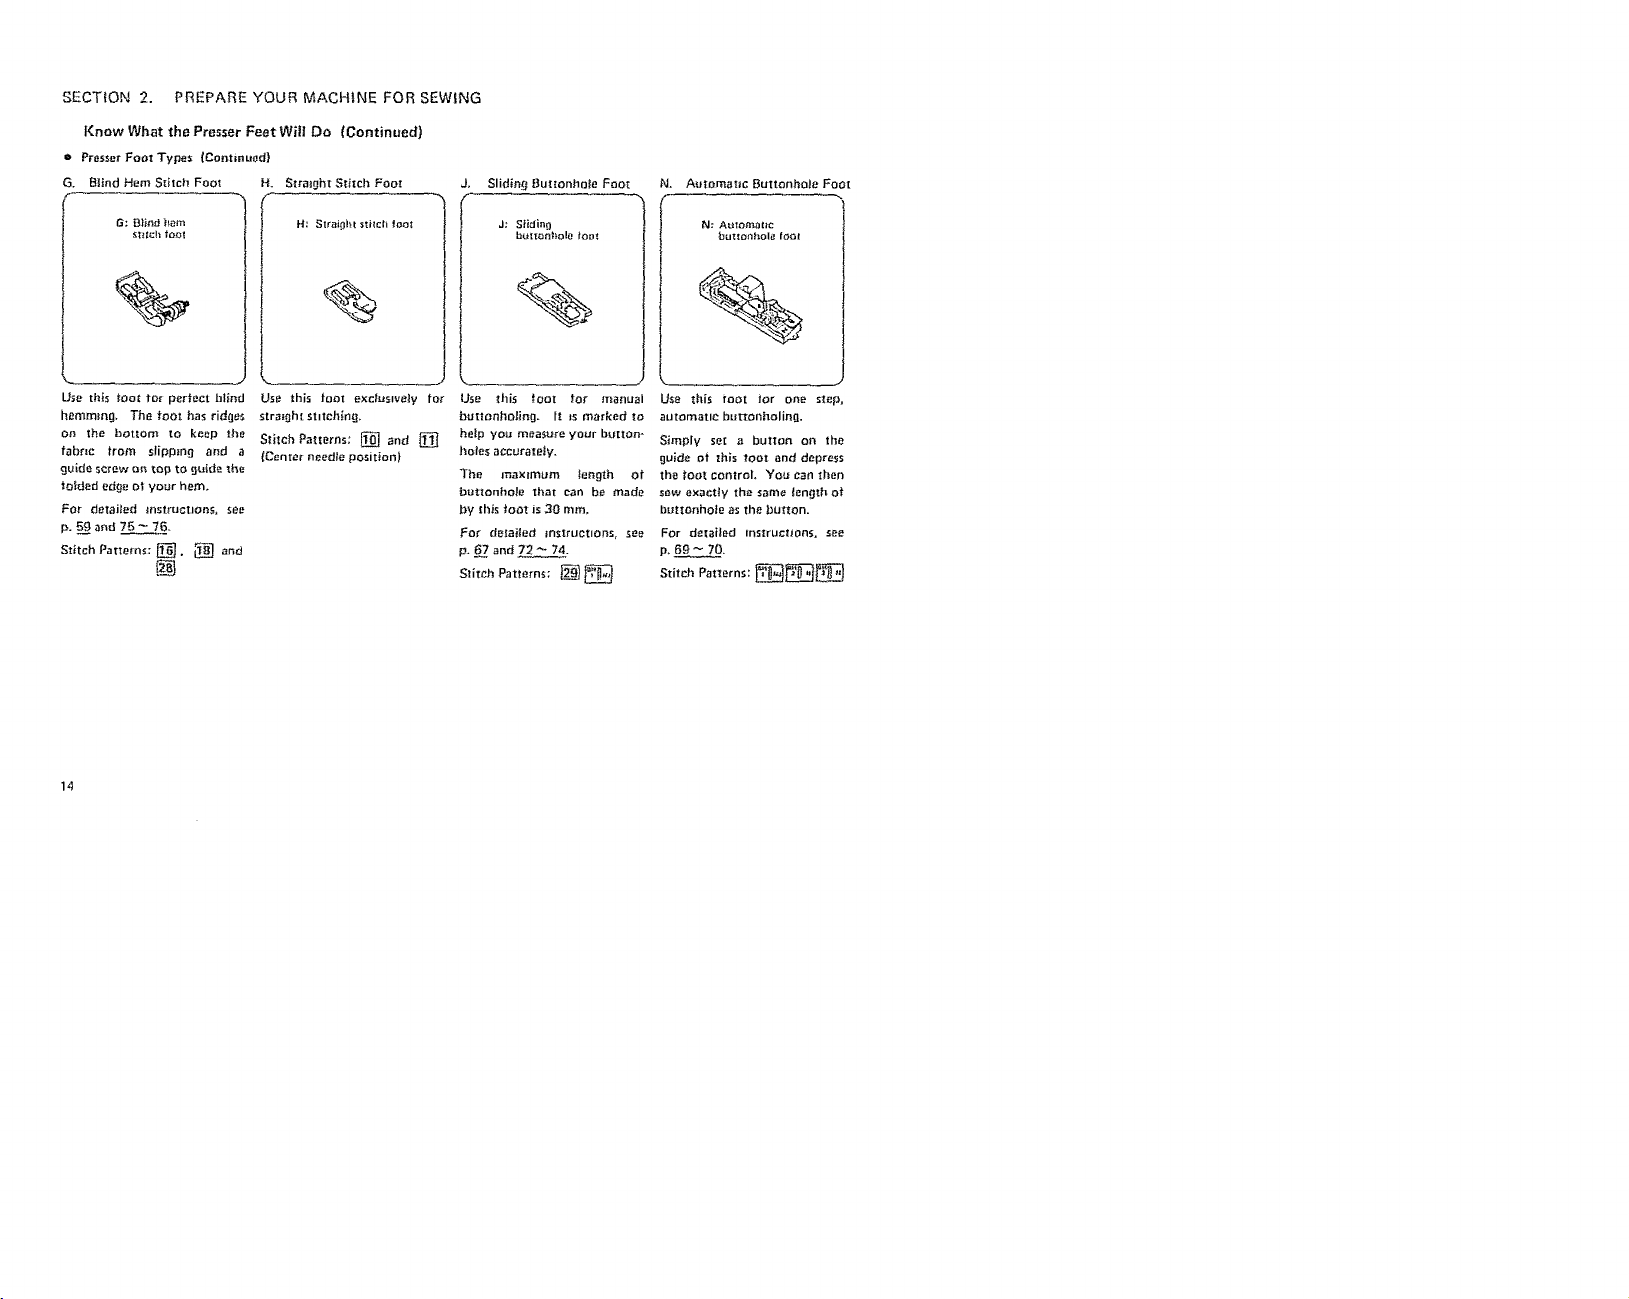
G. Blind Hem S_iteh Foot
PREPARE YOUR MACHINE FOR SEWING
Slidin_lBut{onhole Foo_
N. A_tomat_c Buttonhole Foot
G: Blind ham
%
Use this toot to, perfect blind Use this foot exclusively for
hemming, The foot has ridges straight stiteh{n_,
on the bottom to keep the SIiIch Patterns; _ and _]
fabric tram stippmg and a {Center needfeposition)
guide screw on top to _}u_de _he
to_ded edge Of your hem,
For detailed fnstructlons, see
p. 59 and 75 _ 76.
Stitch Patterns: _, _ erie
J: Slidino
h_._t_onhole10_I
%
Use this toot tar manual
buttonholing. It _s marked to
help you measure your b_[tOn_
boles accurately.
The maximum length of
buttonhole thet can be made
by this foot is 30 turn,
For detailed instructions, see
p. 67 and 72 _ 74.
Stitch Patterns; _
N: AUtO_OIIC
bullonf=ol_ fOOl
Use this toot tar one step,
automatic bu_onholing.
Simpl V set a button on the
guide at _hls tout and depress
th0 toot control, You Can then
sew exactly the same length of
buttonhole as the button.
For detailed mstru_ti0ns, see
p, 69 _ 70.
Stitch Patterns: __
J
Page 17

SECTION 2. PREPARE YOUR MACHINE FOR SEWING
o Cf_eck YaurPresser Foot
Your presser toot Is held in place by a Foot Holder. Each presser toot
merely snaps on the toot holder, which is seldom removed.
If you need to remove or attach the toot holder, here is what you do:
To Remove:
Foo_
To Remove:
Turn the screw toward the back Of I.
tile maehine. Use the large screw
driver.
To Attach:
To Attach;
Match the hole in the toot
holder with the threaded hole
in the presser bar,
2.
Fit the lOOt holder screw _nto
the hole.
3. Tighten the screw by tumm 9 _t
toward you.
o Change the Presser Foot
Use the correct presser toot _or the stitch Yoo wish to sew. Consult the Stitch Pattern
Chart and the detailed directions _or sew_n_j with the varloUs presser _eet.
To snap o|f :
1_ p/DOw
b_tten
meyer
To Snap Off the Presser Foot:
l, Press the Up/Down Needle PosLtion Button
to raise the needle to _ts highest position.
2, Raise the presser toot_
3, Press the red button on the back ot the toot
bolder. The presser tOOt will drop oil,
NOTE: If you do not hear the presser toot soap _o place, press down on the presser
_ioot holder firmtv until you hear the snap.
To Snap On:
To Snap On the Presse_
Foot:
h Set the Pressure Dial at
2+ Place the presse_ toot
So tire hor+zonta! pm on
the _oot lies lust under
the groove ot the toot
holder.
3, Lower the presser foot
bolder to lock the
presser toot m place.
t5
Page 18
SECTION2. PREPAREYOURMACHINEFORSEWING
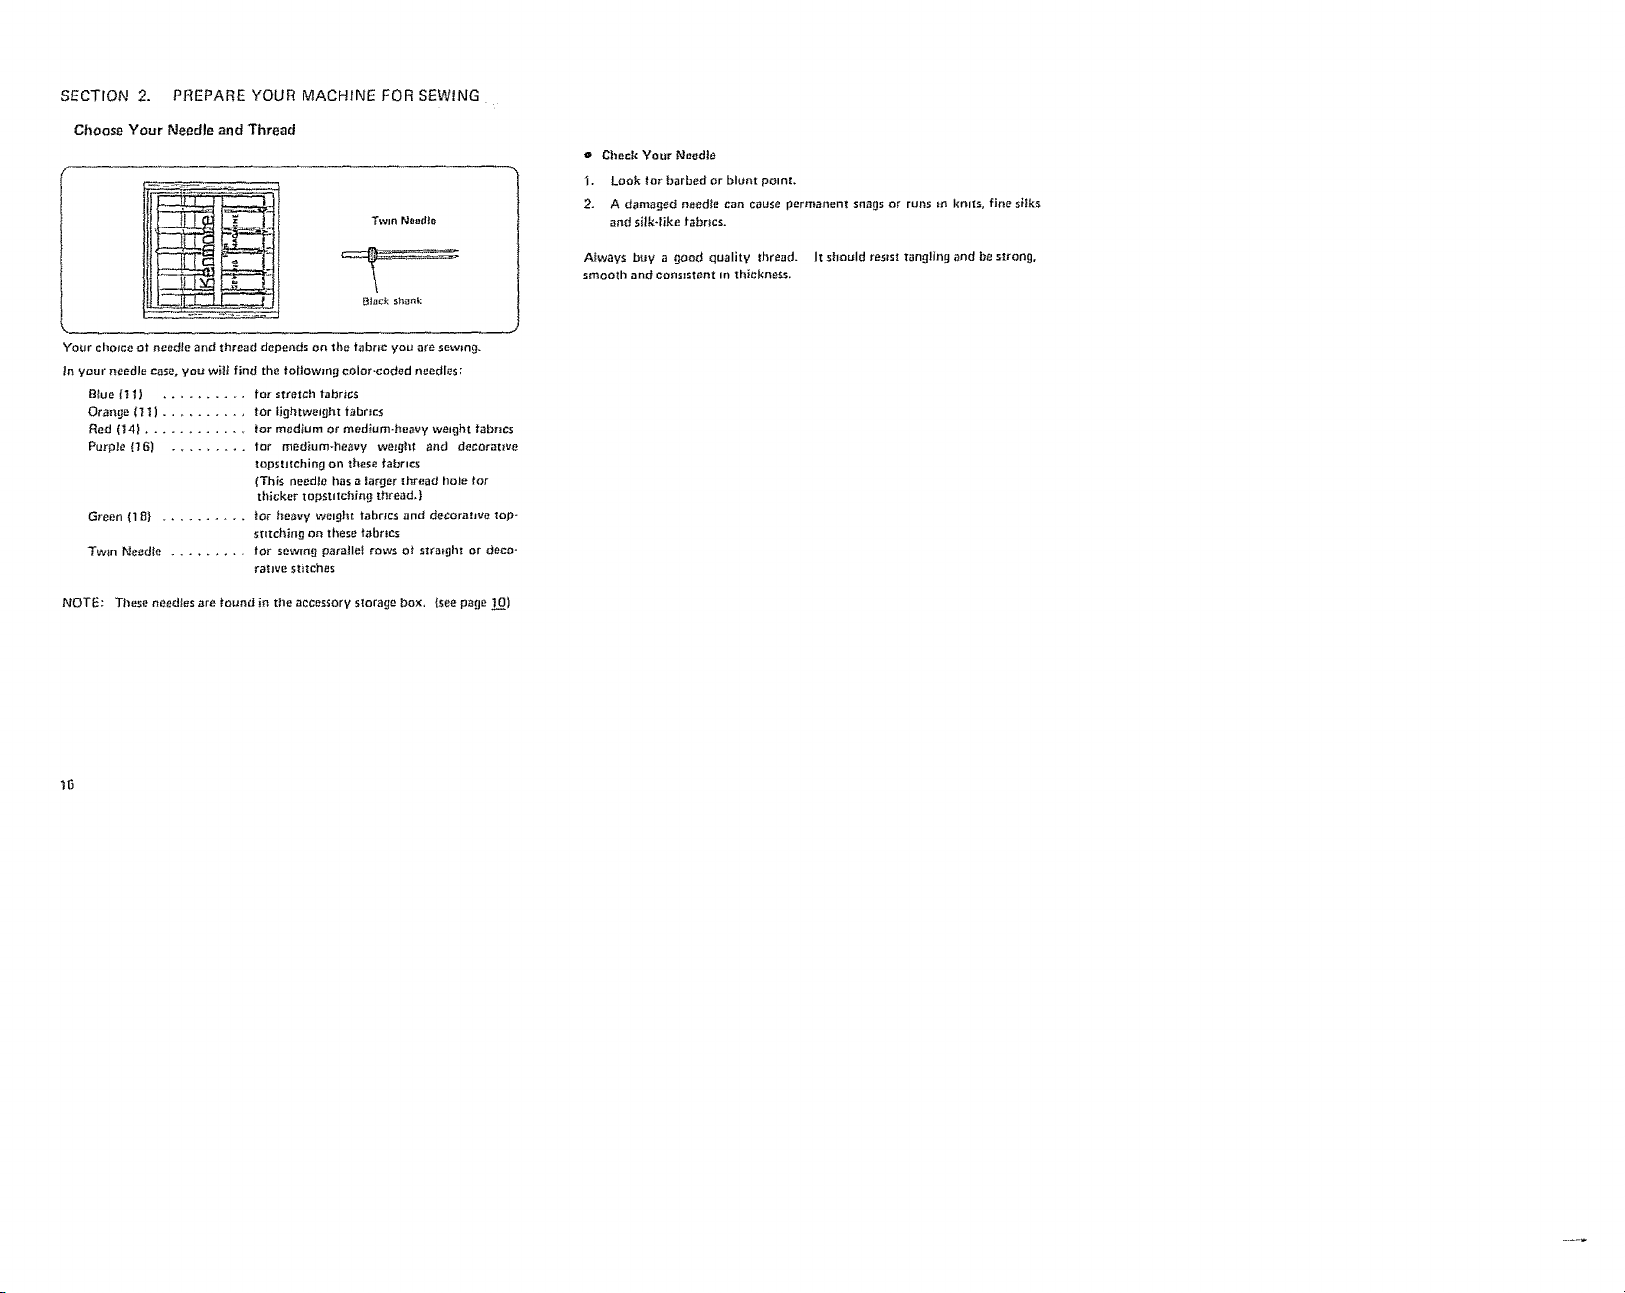
ChooseYourNeedleandThread
Twin Needt_
DJ_c_ s_nk
Your choice of needle and thread depends on the fabric you are sewing.
tn your needle case. you wil_ find the foltowmg color-coded needles :
Blue [11 ) .......... for stretch tabr_cs
Orange _t_I) .......... for lightweight fabrics
Red (t4) ............ tot medium or medium-heavy weight fabrics
Purple {16) ......... 1or medium-heavy weight and decorative
topstJtehing on these fabrics
(This needle has a larger _hread llole for
thicker topstJtchin(J thread,)
Green {18} .......... for heavy weight fabrics and decorative top-
stitchingon these tabrtcs
Twin Needle ......... for sewm_ parallel rows o| strmgh_ or deco-
rative stitches
NOTI_: These needles are tound in the accessory storage box, {see page 10)
e Check Your Needle
I. Look lot barbed or blunt point.
2. A damaged needle can cause permanenZ sn_gs or runs _n knits, fine silks
and silk-like fabrics.
Aiways b_y a good quality thread. Jt should res=st Xangling and be strong.
smooth and consistent in thickness,
10
Page 19
SECTION2. PREPAREYOURMACHINEFOR S£WING ........
Fabric, Needle, Thread and Stitch Length Chart
FABRIC SiZE AND THREAD SIZE ST|TCH LENGTH
L_ghtwaight:
Batiste, Dimity, Chiffon+ Polyester CoretCotton 2.0
Silks, Fine L_ce, Organza, 11-ORANGE Wrap {12 s_:=tches pat
Crepe. Taffeta, Voile, Fine Mercerized Cotton
Organdy
Med_t_m W_igl_t:
C_tton. Cotton _I_nds.
Pu_cale. Gingham, 50 Mercerized Co_ton 2.0 ~ 2.5
Shantung, Pique, t4-RED Pofv'esr#t Co,e/Cat,on {10 -- 12 still;has
SeersL_ckar, Salt#, "<n_t_, Wrap pe_" inch)
Vinyl Saitin0_;, Linen, Sil£ A
WOO| Crepe, L0athef
Mediem H_avy Weiuht; 50 Marc_rized Cotton
Cor_url3y= Denim, WOo{, 14-RED Mercerized Heavy-Defy 2.5 - 3.0
Set|cloth, Wool Flannel, or POIyes_er Coret'Co_ton 18 - 10 srirct_es
Gabardine, Velvets, 16_PURPLE Wrap per lath)
Leather Silk A
Hea_'y Wa_{jht,' Heavy Duty Mercr_r=zed
Coat_S, Upho#stery 18_OREEN Polye;t_r Co_'e/Cotto_ (_ _tltche$ por
Cotton D_ek. Heavy W_p mchl
Twills, Canv'#s Silk A
D_co_atlvo tep_stiteh_r_g 16-PURPLE B_tt_hsi_ Tw_( 4+O _ 4.5
On eH types Or"f_bt|c _8_GR_EEN (U_e as _op thread on_yl |4 _ G sr_tch_ pe_
S_tet_h F_bt _=:
Po|yester De_ble Knits, f t-STRETCH Po!ye_ter Co_e/Corm_ 2.0 - _2.5
f_ylon Tt_eh Jersey, FAEtRIC N_DLE- Weep t_D _ f 2 _titche_
_tretch TerrY. Sp_,ndex. }]LU£ 50 Mercerized Cotto_ p_r _ocl_)
(:ire Trlcol
NEEDLE RECOMMENDED
COLOR SETTING
Silk A in_h)
Cotton 3.0
inch)
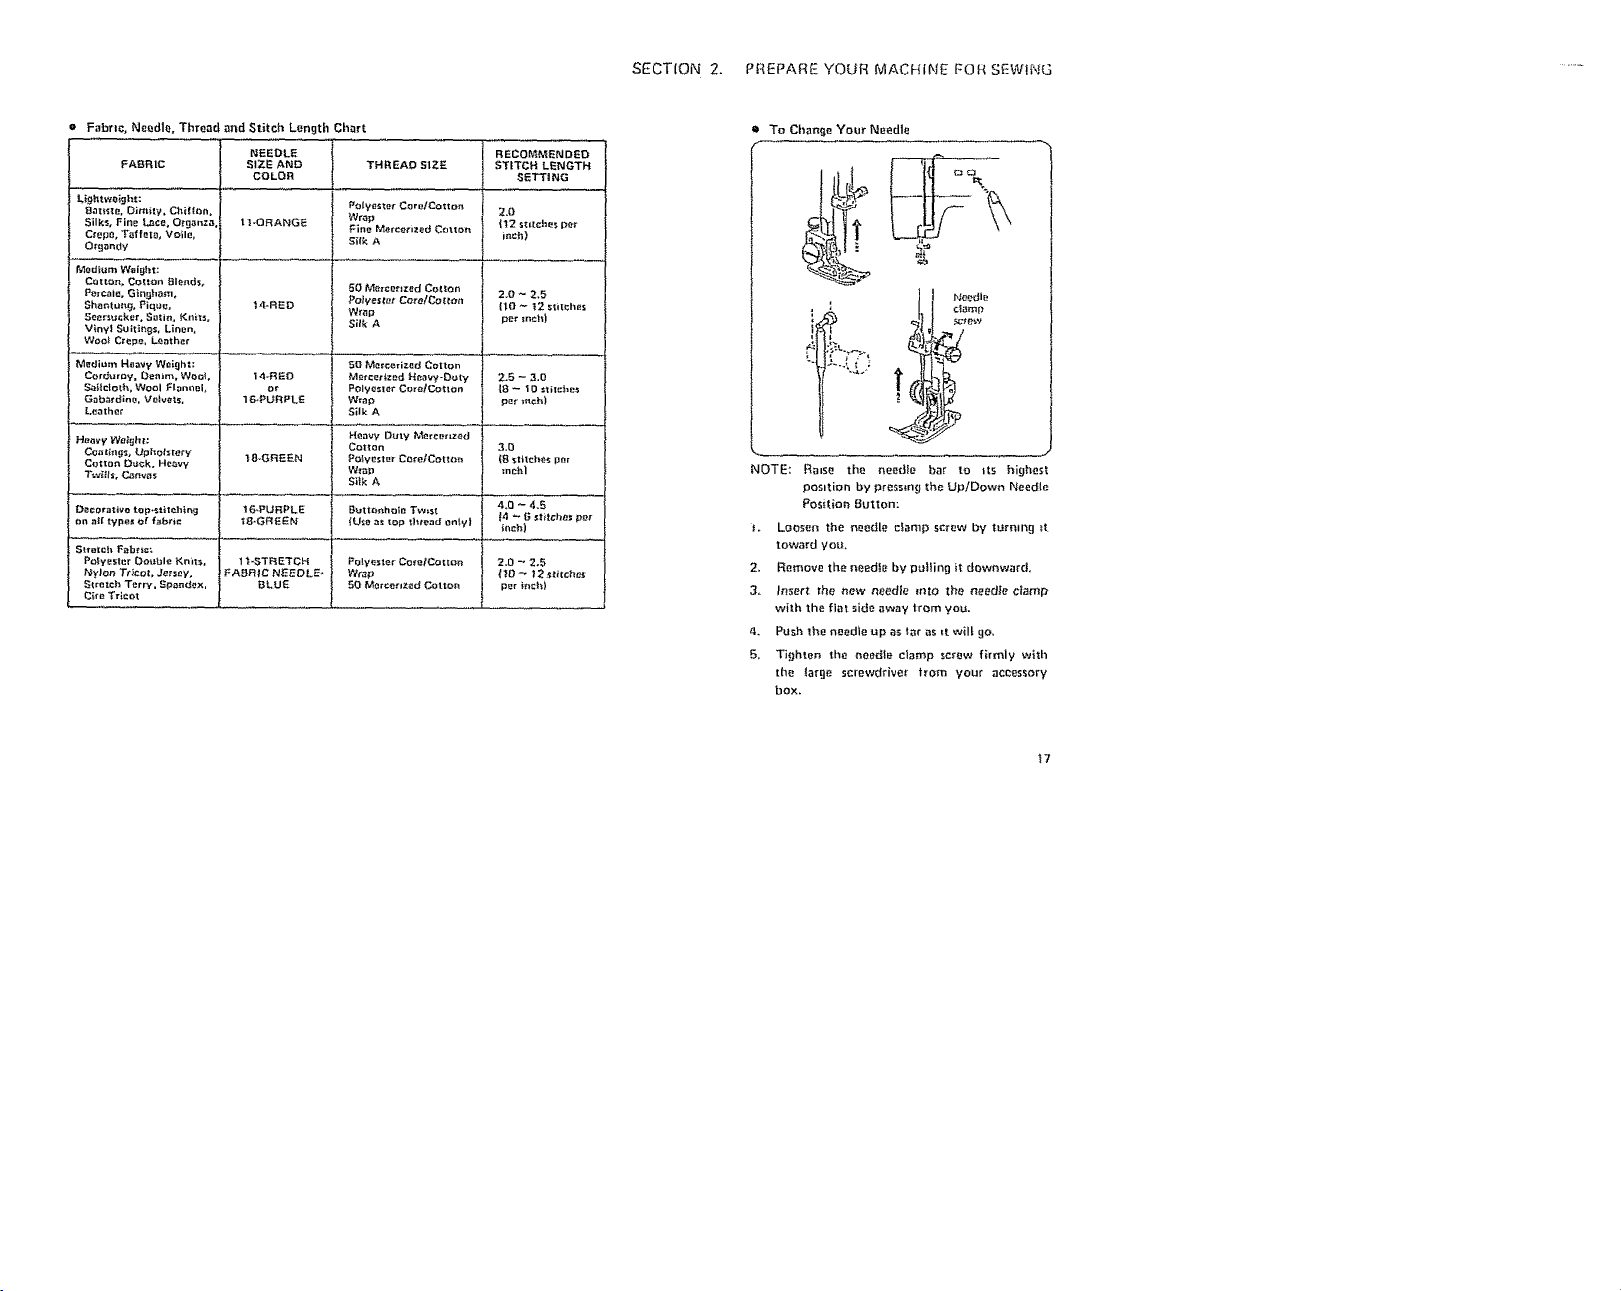
• To Chan_e Your Needle
l : c_amp
Ne_e_]l_
NOTE: Re=so the needle bar to its highest
position by pressing the Up/Down Needle
Posit{on 8often:
6. Loosen the needle c_amp screw by turreng _t
toward yot_,
2. Remove the needfe by pulling _t downward.
3, Insert _he new needle rnto the needJe clamp
with the flat side away tram you.
_. Push the needle up as far as _t wit!gO,
5, Tighten the needle clamp screw firmly with
the large screwdriver _rom your accessory
box,
_7
Page 20
SECTION 2o PREPARE YOUR MACHINE FOR SEWING
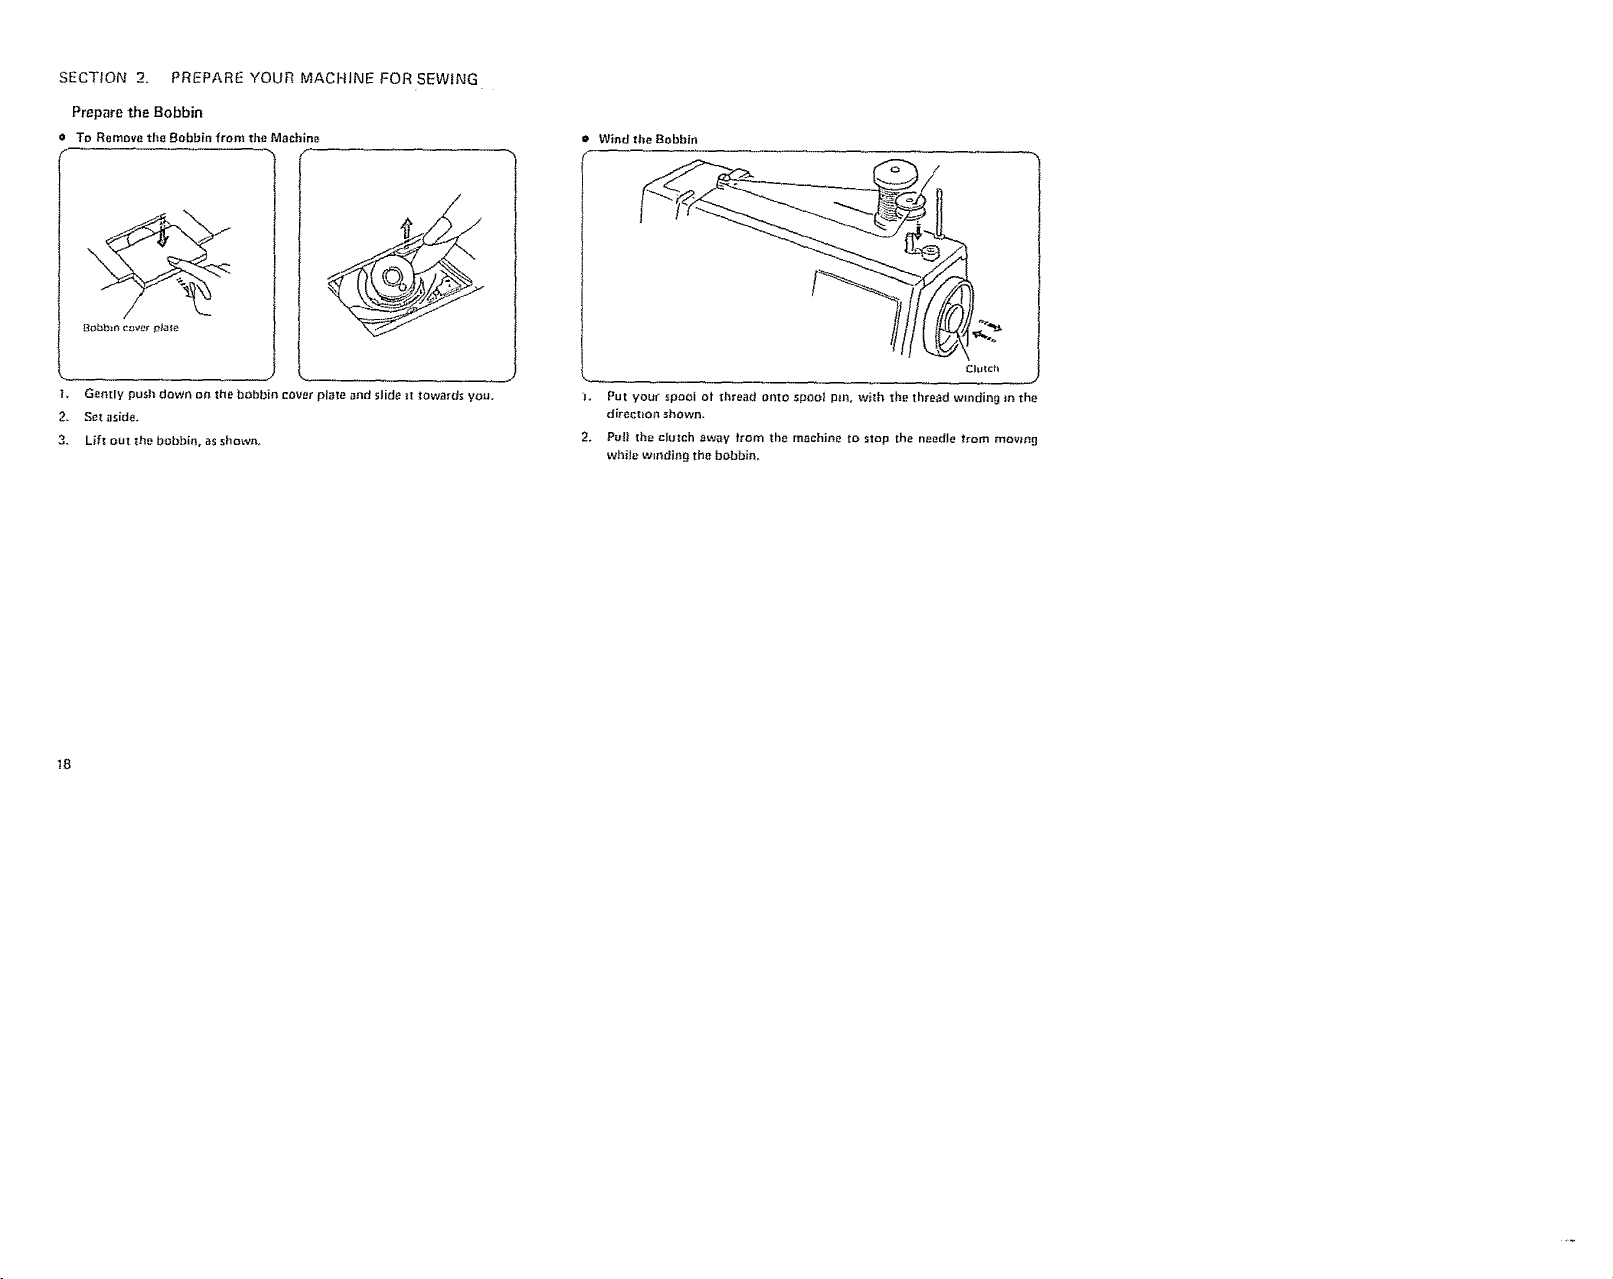
Prepare the Bobbin
To Remove the Bobbin from the Machine • Wind the Bobbin
l, Gen[Iy push down on the bobbin cover pl_te and slide tt towards you.
2. Set aside.
3. Lift out the bobbin, as shown°
J, Put your spool ot thread onto spool pin, with the thread winding in the
direction shown.
2. Pull the clutch away Item the machine to step the needle trom mevt_g
while winding the bobbin,
Chinch
_8
Page 21
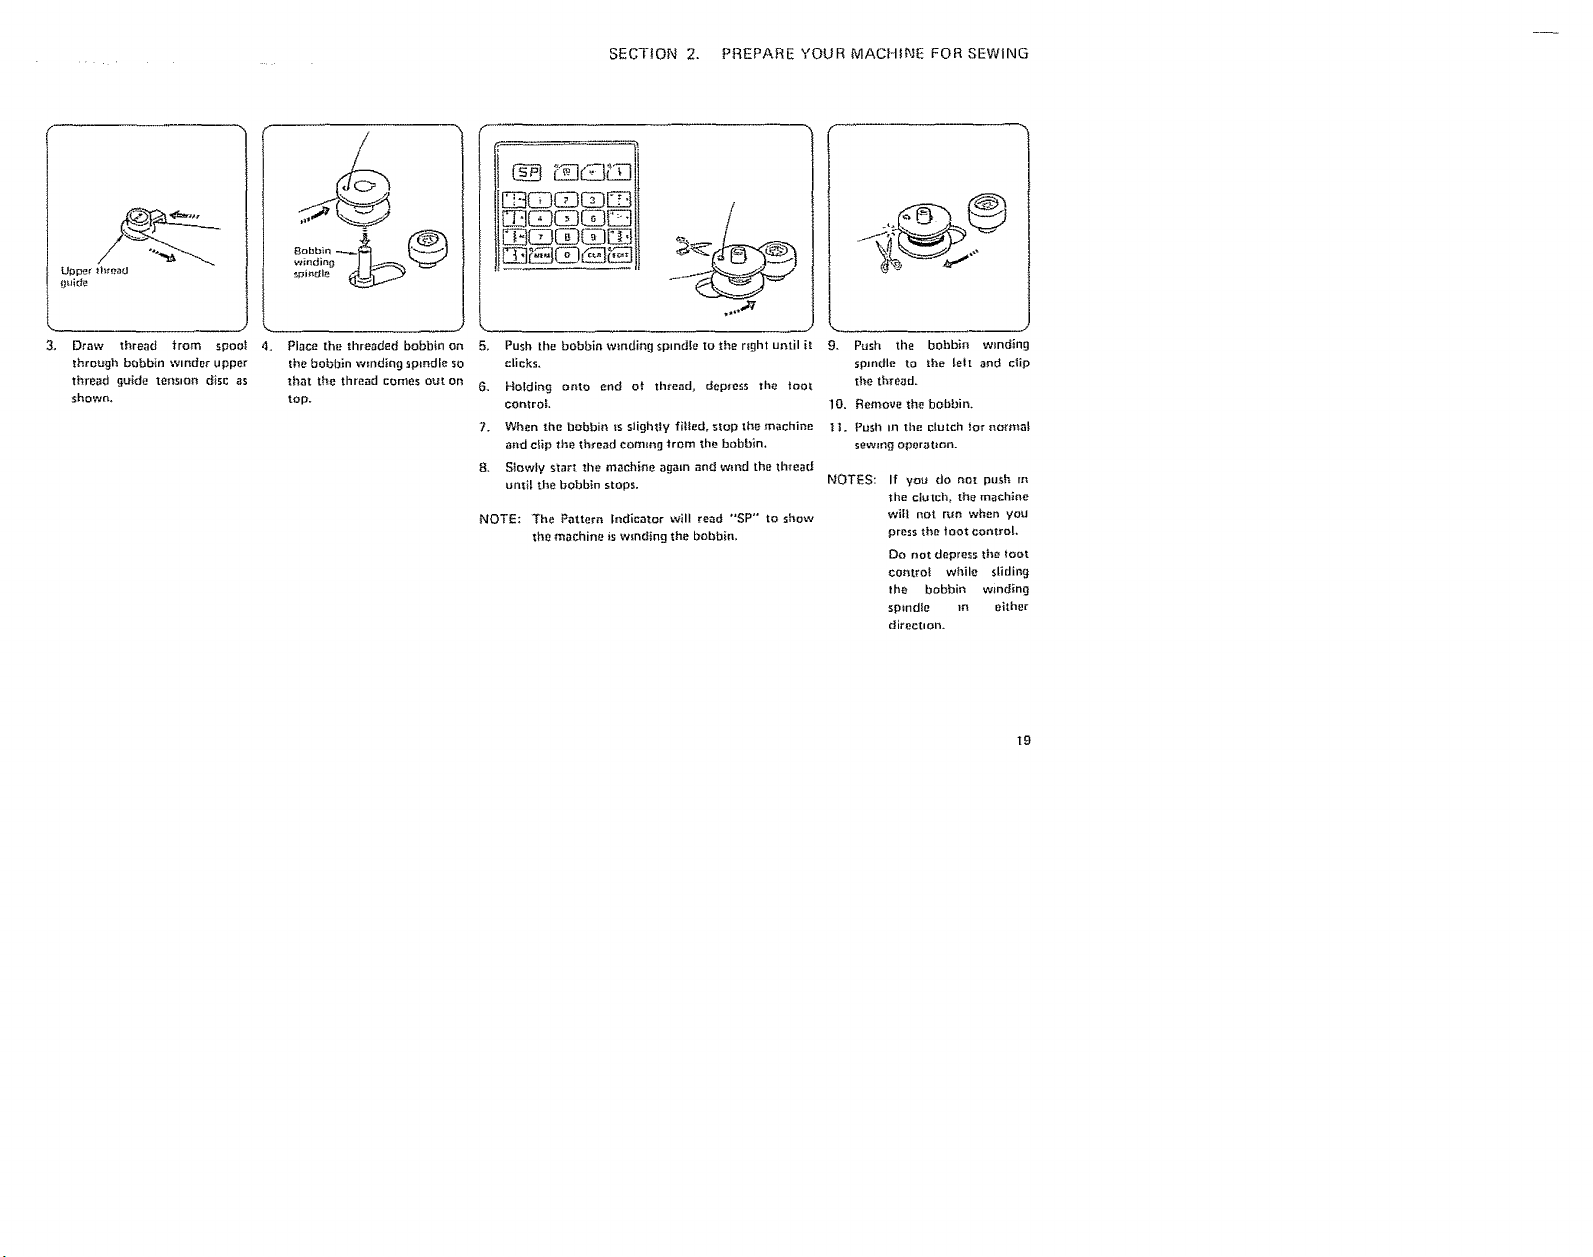
Upper _ht_ad
e_lide
SECTION 2. PREPARE YOUR MACHtNE FOR SEWING
DQGGQ
m_QG
m_QQ_
Draw thread from spool 4.
through bobbin winder upper
thread 9uide teas=on disc as
shown.
Place the threaded bobbin on
the bobbin wmding spmdle so
that the thread comes o_s on
top.
5,
Push the bobbinwmdingspmdte tuthe right until it 9- Push the bobbin wmdinl
clicks, spmdle to lhe tell and clip
6. Holding onto end ot thread, depress the toot
control,
7. When the bobbin ts slightly filled, stop the machine
and clip the _b_ead commg trom the bobbin,
8, S_owly start '_he machine agam and w_nd the thread
until the bobbin stops.
NOTE: The Pattern indicator will read "SP" to show
the machine is wmding the bobbin.
the thread.
10. Remove the bobbin.
"_3. Push In th_ clutch |or norn'_al
sewing operation.
NOTES:
If ¥0# do not push m
the clutch, the ma_:hine
will not run when you
press the toot contro!,
Do not depress the _oot
contro! while sliding
the bobbin winding
spindle m elthe[
direction.
t9
Page 22
SECTION2. PREPAREYOURMACHINEFOR SEWING
Prepare the Bobbin (Contmued)
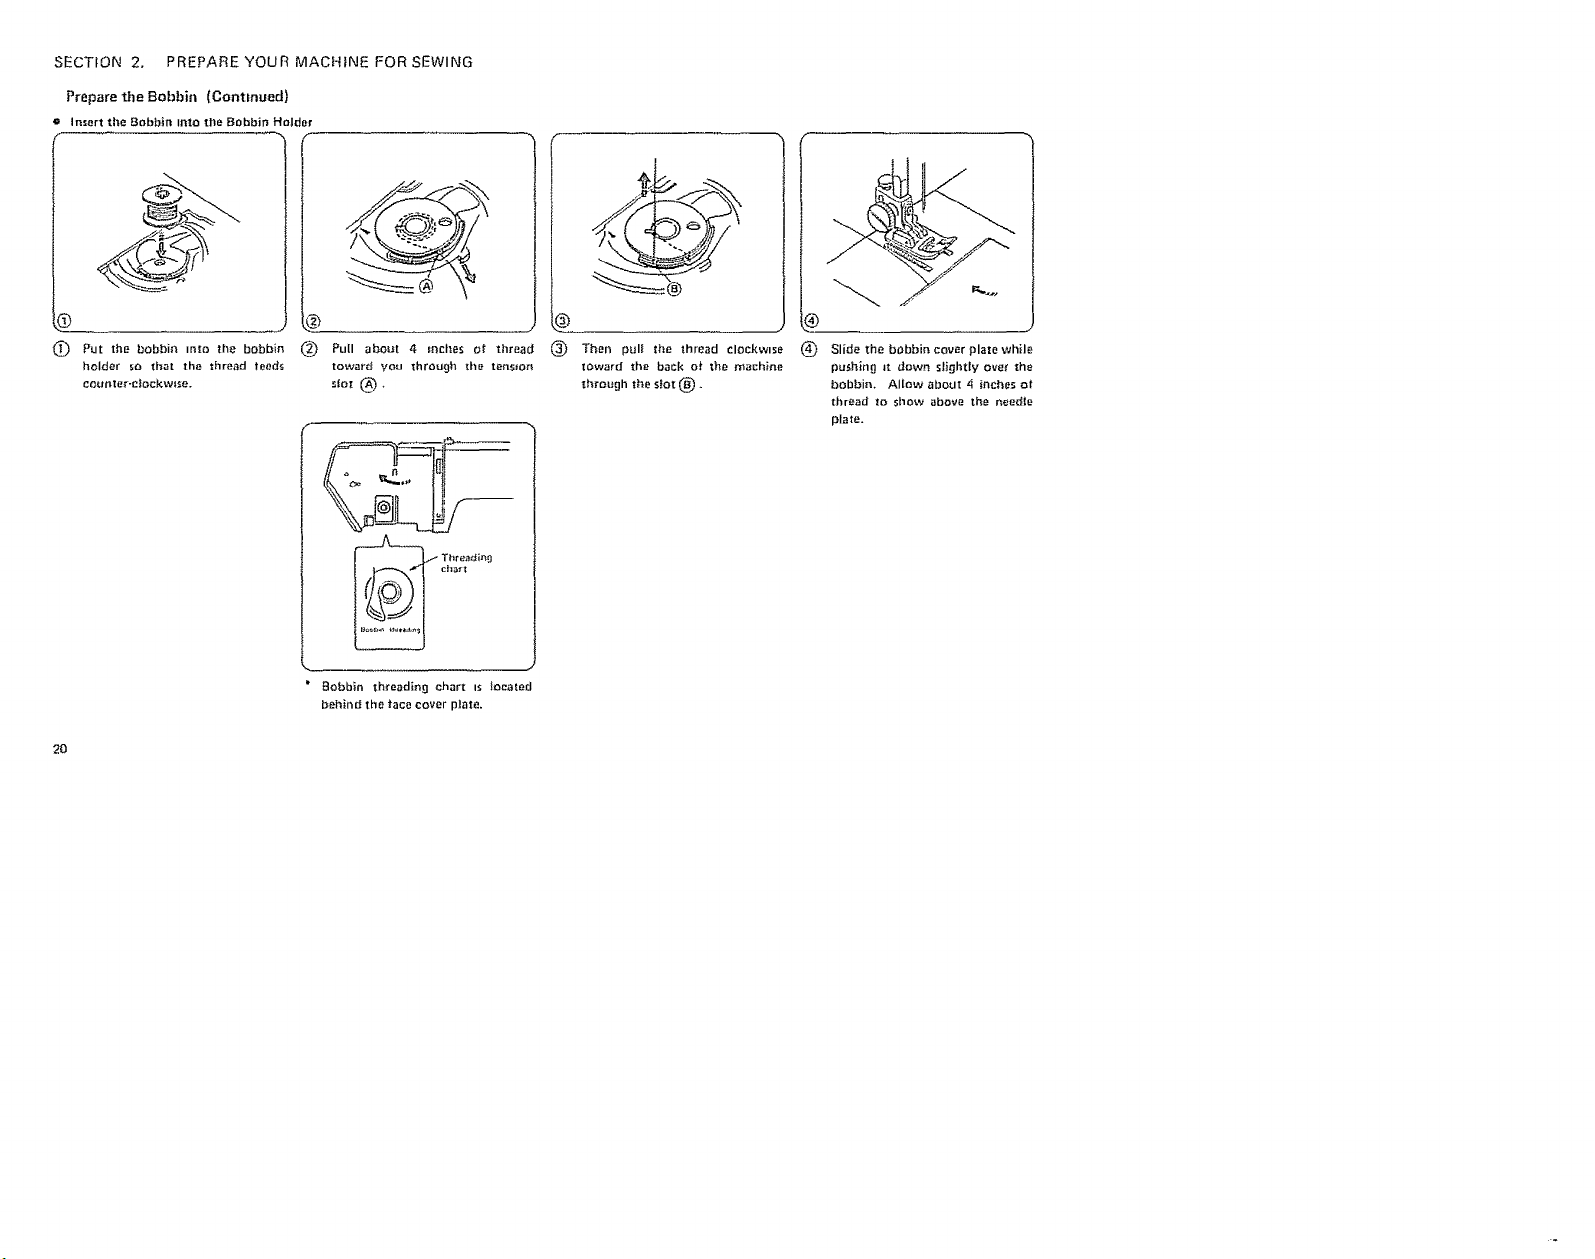
e Insert the Bobbin Into the Bobbin Holder
(_ Put the bobbin _nto the bobbin
holder so that the thread leeds
eo_nter-elockwlse.
2O
(_ Pull about 4 inches ot thread
to,yard you Ihrough the teos_on
_|o[ @ +
_ Tt_rea_ie_3
C|I_}*[
Bobbin thteadin 9 char[ is located
behind the taee cover plate,
(_) Then pul! the thread clockwmse
toward the back o_ the machine
through the sfot (_).
(_ Slide the bobbin cover plate while
pushing it down slightly over the
bobbin. Allow about 4 inches of
thread Io show above the needle
plate.
Page 23
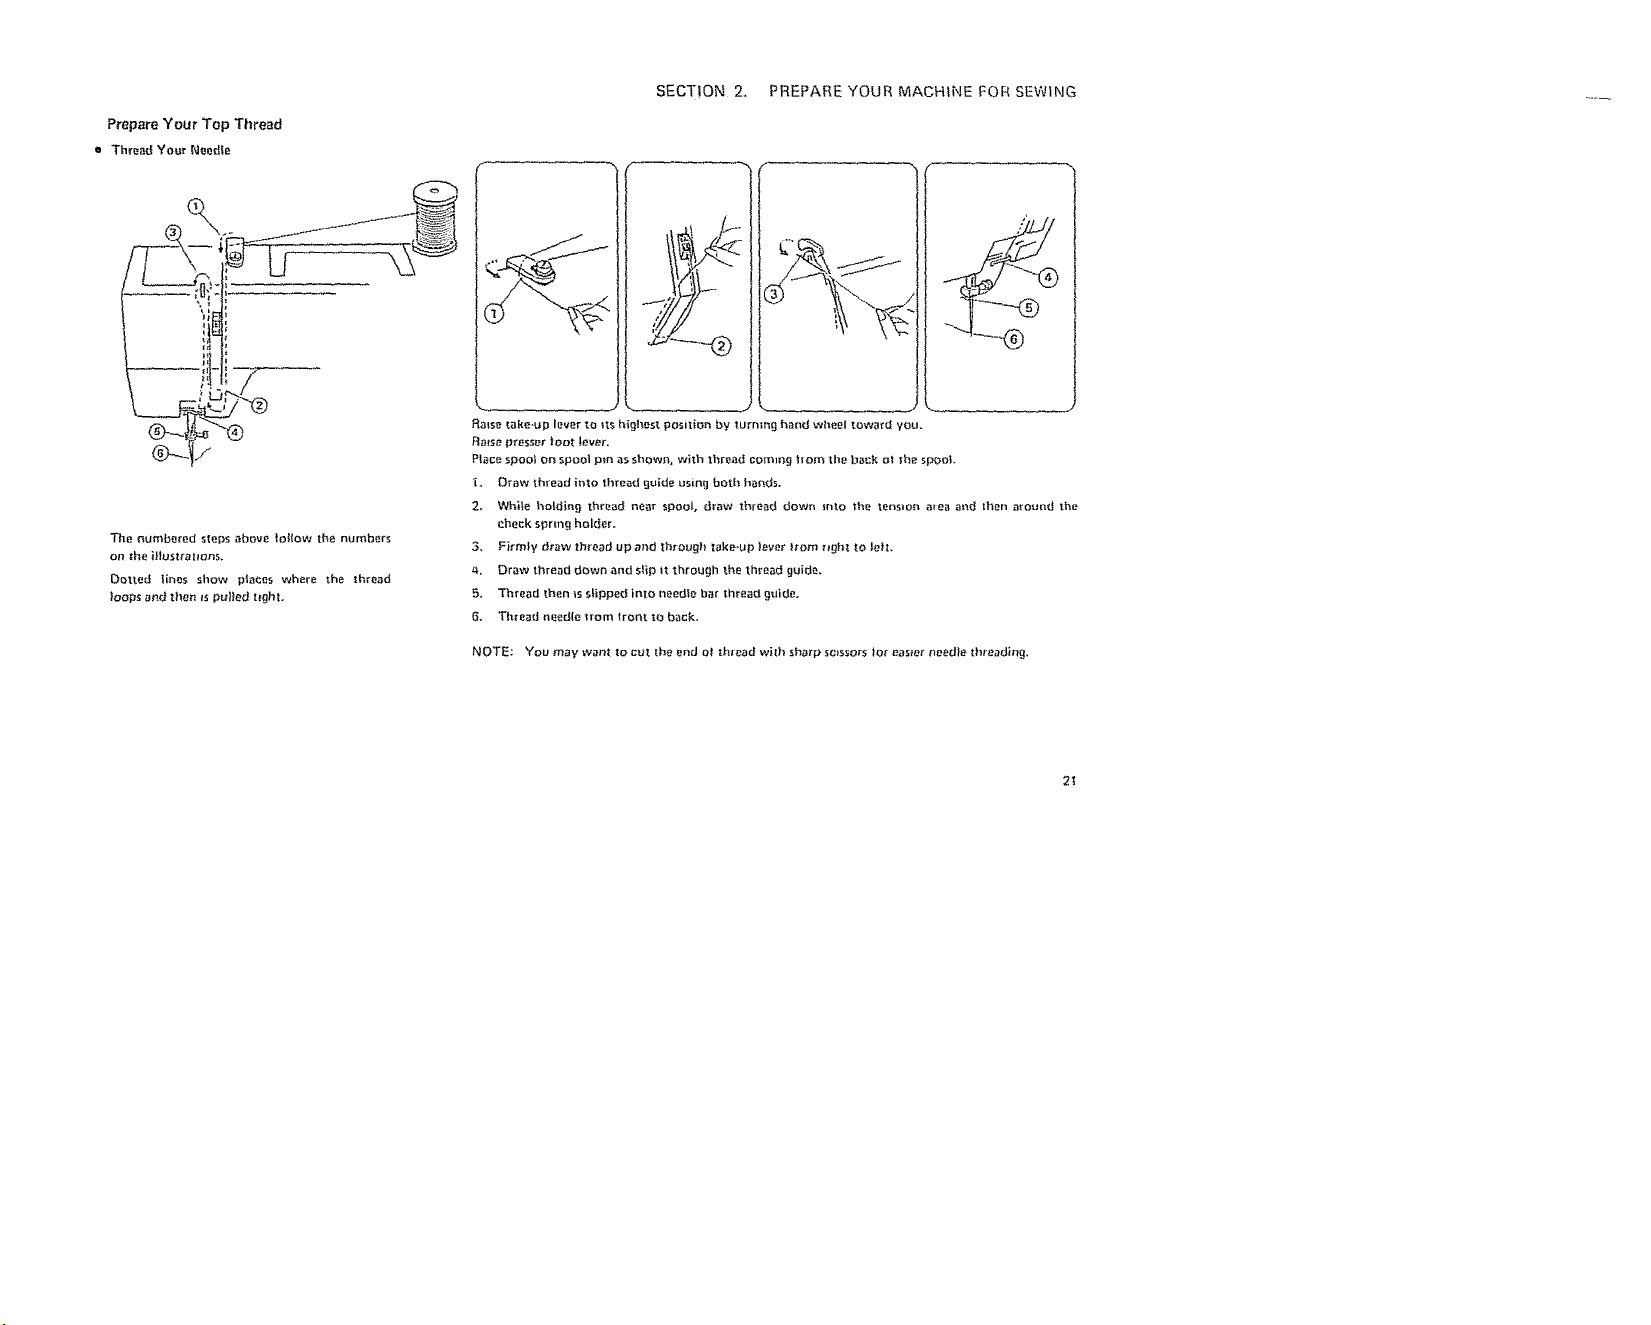
Prepare Your Top Thread
e Thread Your Needte
The numbered steps above to||ow the numbers
on the ittustrattons.
Dotted lines show places where the thread
loops and then Is polled t_ght.
SECTION2. PREPAREYOURMACHINEFORSEWING ......
I. Draw thread into thread guide using both hands.
2, While holding thread near spool, draw thread down into the tension area al'_d then around the
check spnng holder.
3, Firmly draw thread up and through take.up lever trom r_£ht to tell
#,. Draw thread down and slip it through the thread guide.
5, Thread then _sslipped into needle bar thread guided
6. Thread needle from trent to back,
NOTE: You may want to cul the end ul thread with sharp se}ssors tor easJer needie threadin(j,
2_
Page 24
SECTION 2. PREPARE YOUR MACHINE FOR SEWtNG
Prepare Your Top Thread lContinued}
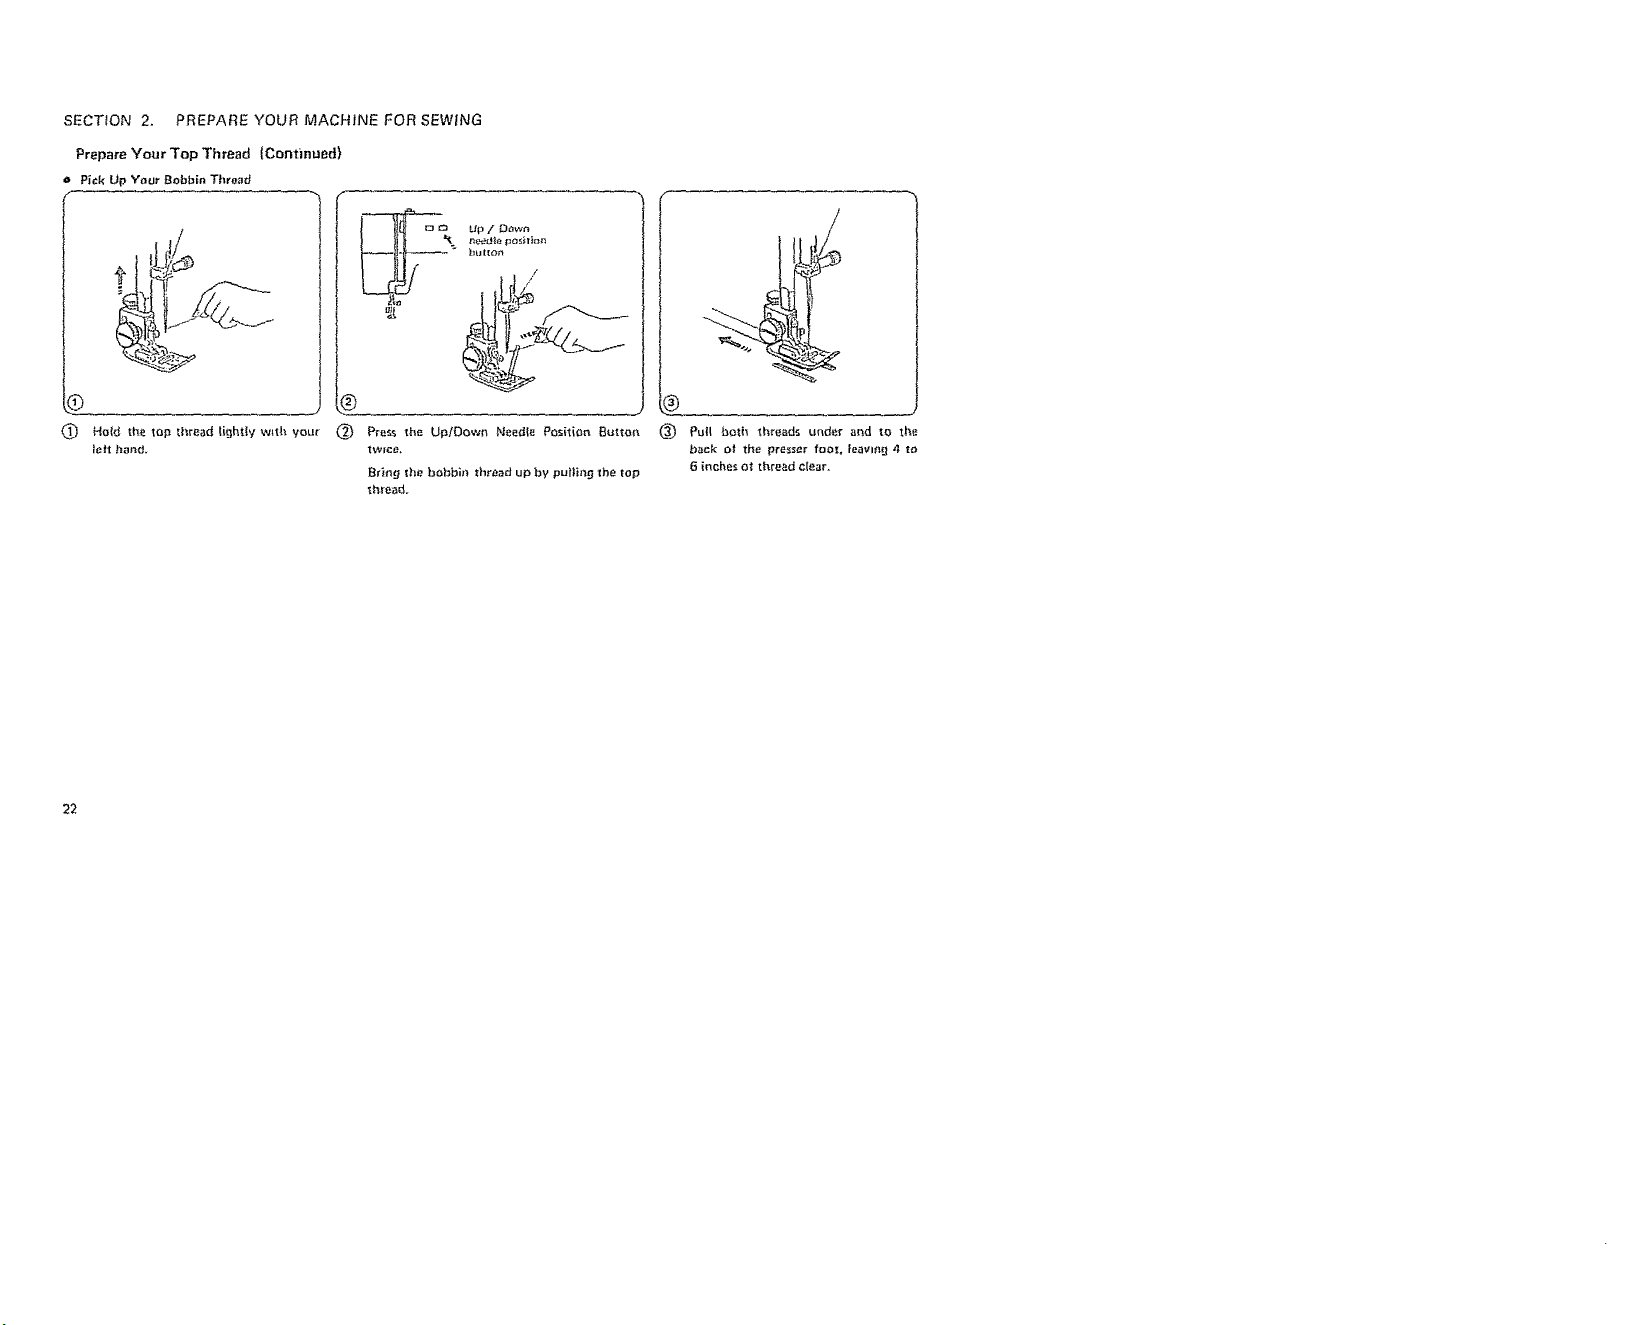
e Pick Up Your Bobbin Thread
@ Ho{d the top t|_read li(}ht_y w_t|_ your @ Pre_s th_ Up/Down Naedl_ Po_itian Buttoa _)
le_t bard. twrr.:e.
Br_n_ lhe bobb_ lhread up by puI|_n9 Ibe top
_breado
22
Pull b_th _hread_ under and to tt_
back o_ the presser fool leavm_ 4 t{}
6 inches at iF, read c{ear.
Page 25
SECTION2. PREPAREYOURMACHINEFORSEWf_IL_
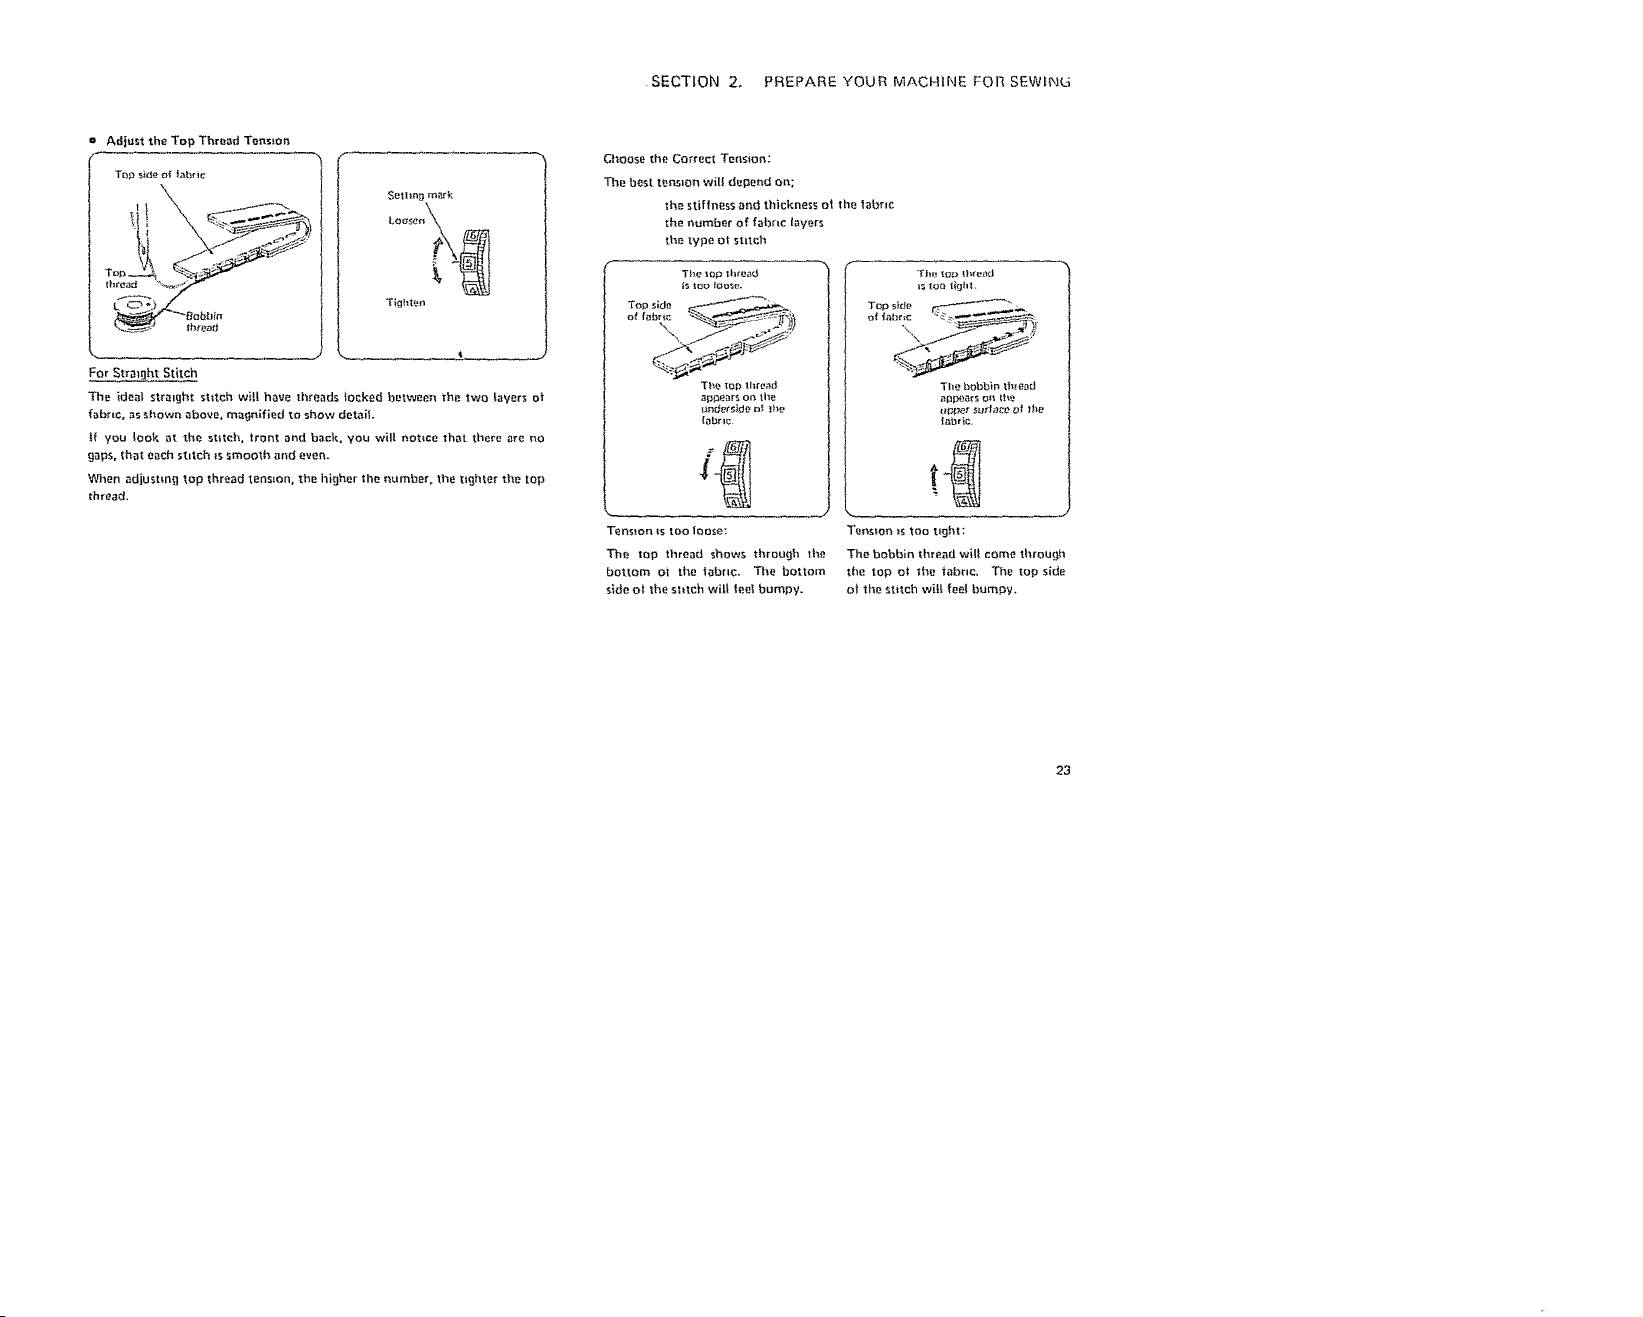
Adjust the Top Thread Tens=on
T{)ps_c_eo{ l_b_ic
Too_ %7
_bir_
For Straight Stitch
The ideal stra=ght stitch will haue threads {oeked between The two layers o_"
fabric, as shown above, magnified to show detail
tf you look, at the stitch, front and back, you will notice _hat there are no
gaps, {hateach stltch _ssmooth and even.
When adjusting top thread tension, the higher the number, the ughler the top
thread.
Tighten
Choose the Correct Tension:
The best t_oslon will depend on;
!he stiffness and thickness ot the fabrle
the number of fabnc layers
the type Ot _tl_._;h
The lop ltlre_
is too loo_.
T_I_ IOI) thread
appearson III_'
(obrl_
Tension tStOO |OI3se:
The top tl_read shows through the
bottom ot the _abr{c. Tbe botlom
side ol the stitch will feel bumpy.
t_;_ootlght.
Top s_e ,.--'_ ,
"rh_'bobbin lb_eotl
al_peats o_ilhe
t_pet s,uda_:e of )he
|_brle,
Tens_ol_ _stoo tl_cjht;
The bobbin thread will come through
the top at the fabr=c, The top side
at the stitch will feel bumpy,
23
Page 26
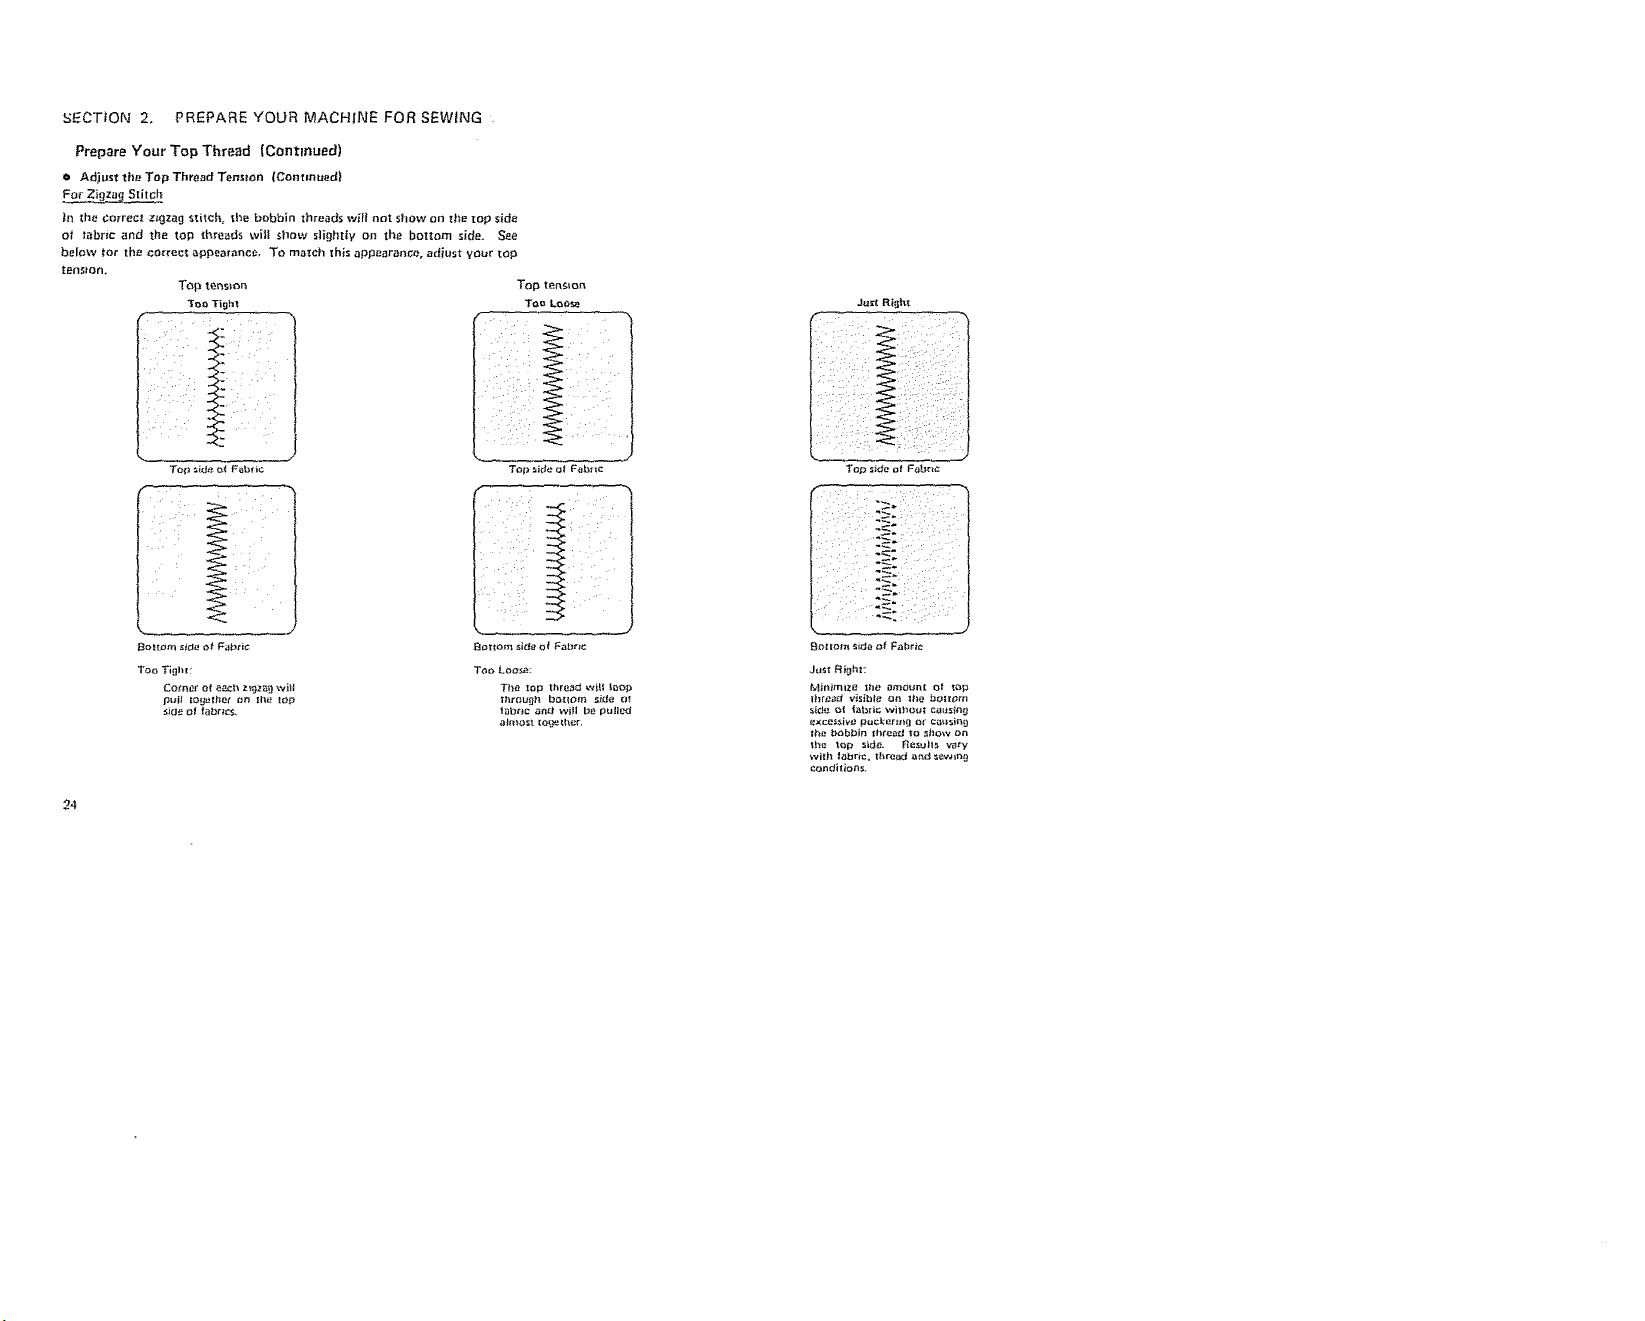
SECTION2, PREPAREYOURMACHfNEFORSEWING
Prepare Your Top Thread (Continued)
o Adjust th_ Top Thread Tens+on |Continued|
in the Correct zigzag _titch+ t!_e bobbin threads wilt not show on the top side
of t_bric and the top threads wil! sinew slightly on the bottom side. S_e
below tot tile co_rect _ppoa_aoce, To match this appearanct_, adiust veer top
teNston+
Top tension
Too Tight
Jtj_t Ri_ht
To_ re+de of Fobr+c
+otter++3 _id_ O_ Fabric
Too Tight:
Co,toe++ ot e_ch z_,9;zagw+i+
pui+ tO,+the+ + t_t_+hi top
_+d_ Of t_br+_S,
EI_ttom sid_ Of F+_r+_
TOo LO_ f,P-:
Th_ _Op thre;_d wi_| l{_¢xp
thfotJgh bottom s_d_ O_
t_br_¢ _ff wi}l be p_sll_d
+3#++O0_t tot3ett\gr.
_o++om mid+ _f Fab+'+c
Page 27

SECTION 3. LEARN TO USE TttE CONTROLS ....
"The illustration shows the Reverse Stitch Sutton, Up/Down Need|e Position Sutton and the control paneI el your Kenmore t 00 Stitch.
The control buttons, LED |_ghts and indicator screens enable you to control your machine and kr, ow what it _sdoing at al_ times.
tn this section, you wifl learn what these buttons are and how to use them. Each t_me you press a eontro_ button you wilt ]':ear a "beep'"
Ptacbce using these controls to see what they w_tl do.
Let's look care|ully at each control butte,q, be#innm[] w{tb the Reverse Stitch Button and continuing dowo the Control Panel.
Twin Needle B_It_e_ Au_-Lo_;_ B_=tlen
\ f
Pntte_n
I nd_cator
LED LLght
'__ tJpiDr_wn
t_ f1_orv _uttDt]
Mitt'or linage
Bt_tSe_
Pat t{_rn
fJutt_
_,litch Width //
_titch LengthlW_Jlh
Oecr_a_e [_ut to_l /
.... _,.... _ Q-- _ glitch ke[tatl_
[_d_cator .__ _ _nc_ea_ B_t _on
25
Page 28
SECTION 3. LEARN TO USE THE CONTROLS
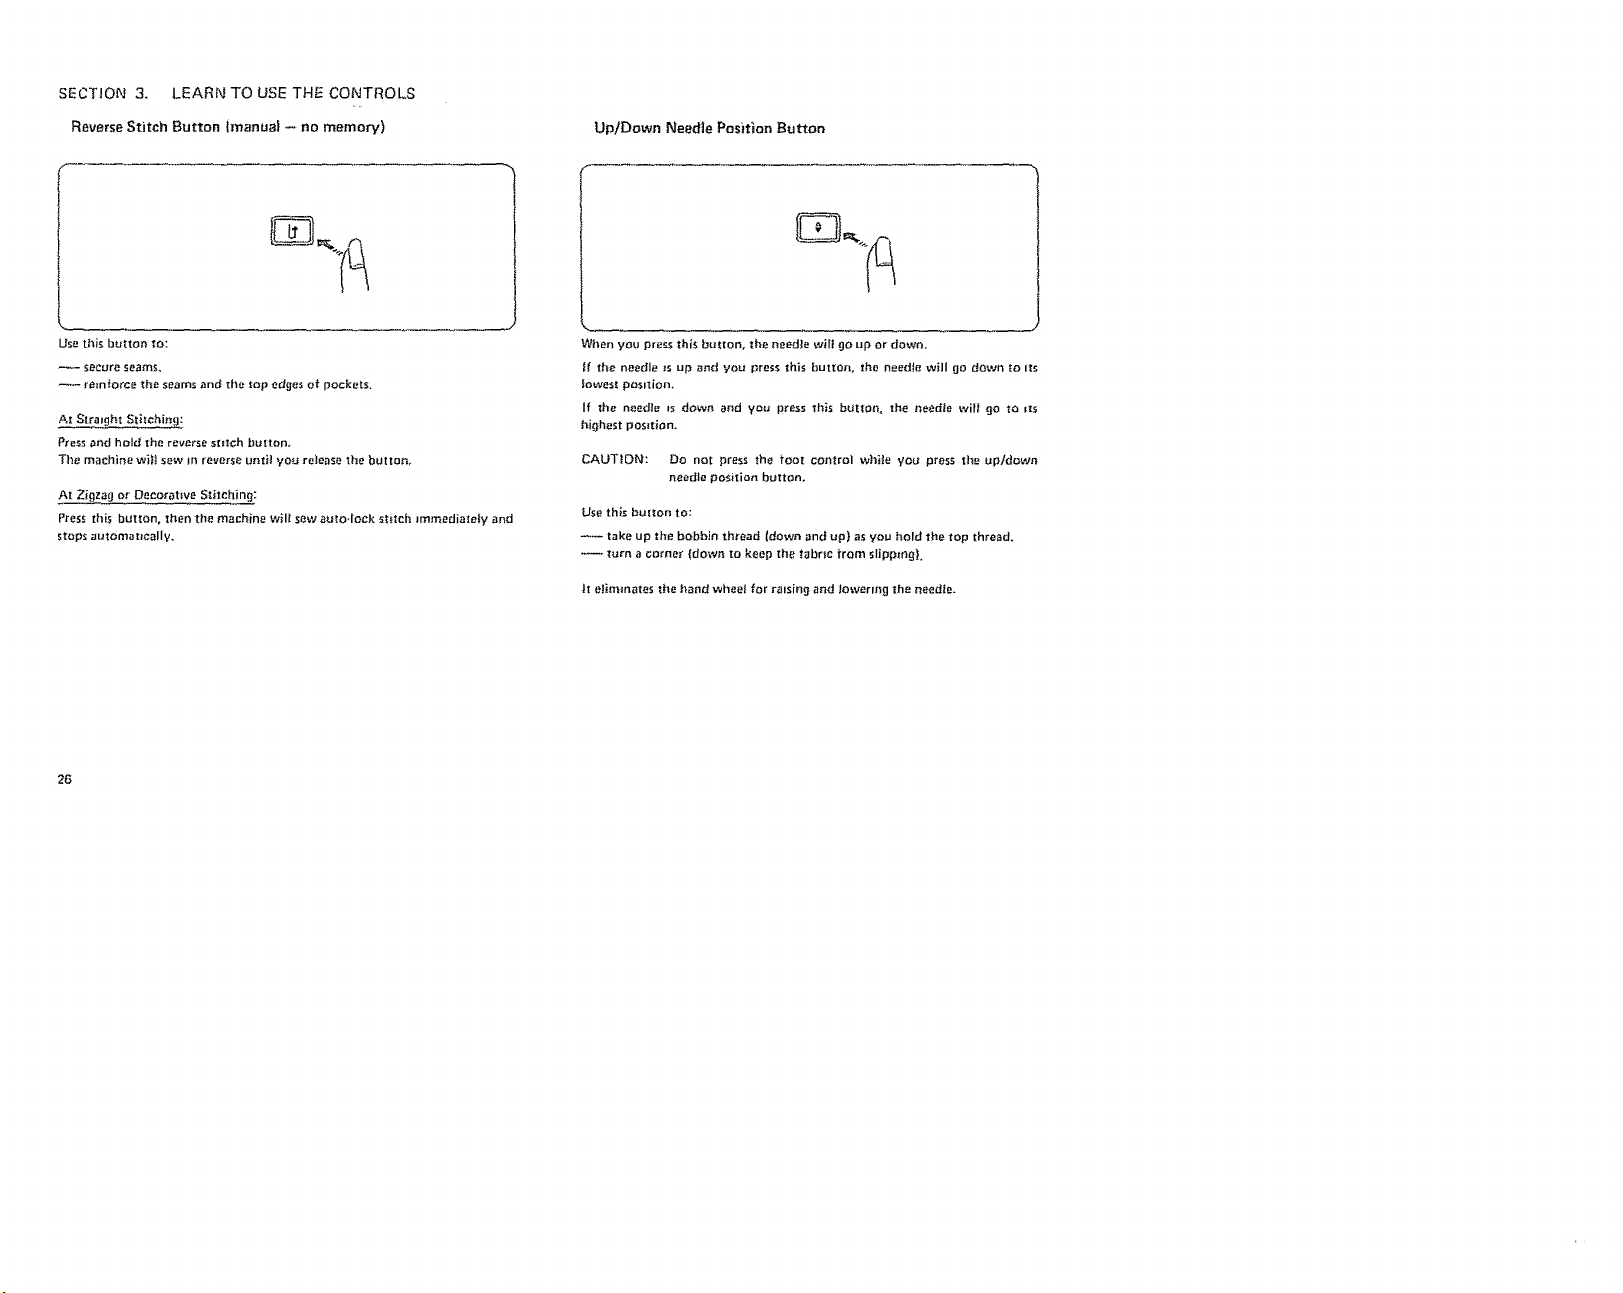
Reverse Stitch Button {manual -- no memory)
Up/Down Needle Position Button
Use this button to:
Secure seams,
rmnforce the seams and the top edges ot pockets.
AtStralgh_ .. t Stitching:
Press and hold the reverse st=tch button.
The machine w_|t sew In reverse until yo_ reIease the button,
At Zigzag or Decorative Stitching:
Press this button° then the machine wilt sew auto-lock stitct_ _mmediate!y and
stops automatlcallv.
26
When you press this bulton, the needle will go up or down.
If the needle _s up and you press this button, the needte will go down to its
|owest position.
If the needle _s down and you press this button, the needte will eo to _ts
highest position.
CAUTION: Do not press the foot control while you press the up/down
needle position button,
Use this button to:
-- take up the bobbin thread (down and up) as you hold the top thread,
turn a corne_" (down to keep the fabric from slippmg}.
_t eliminates the band wheel for raising and Jowermg the needle.
Page 29
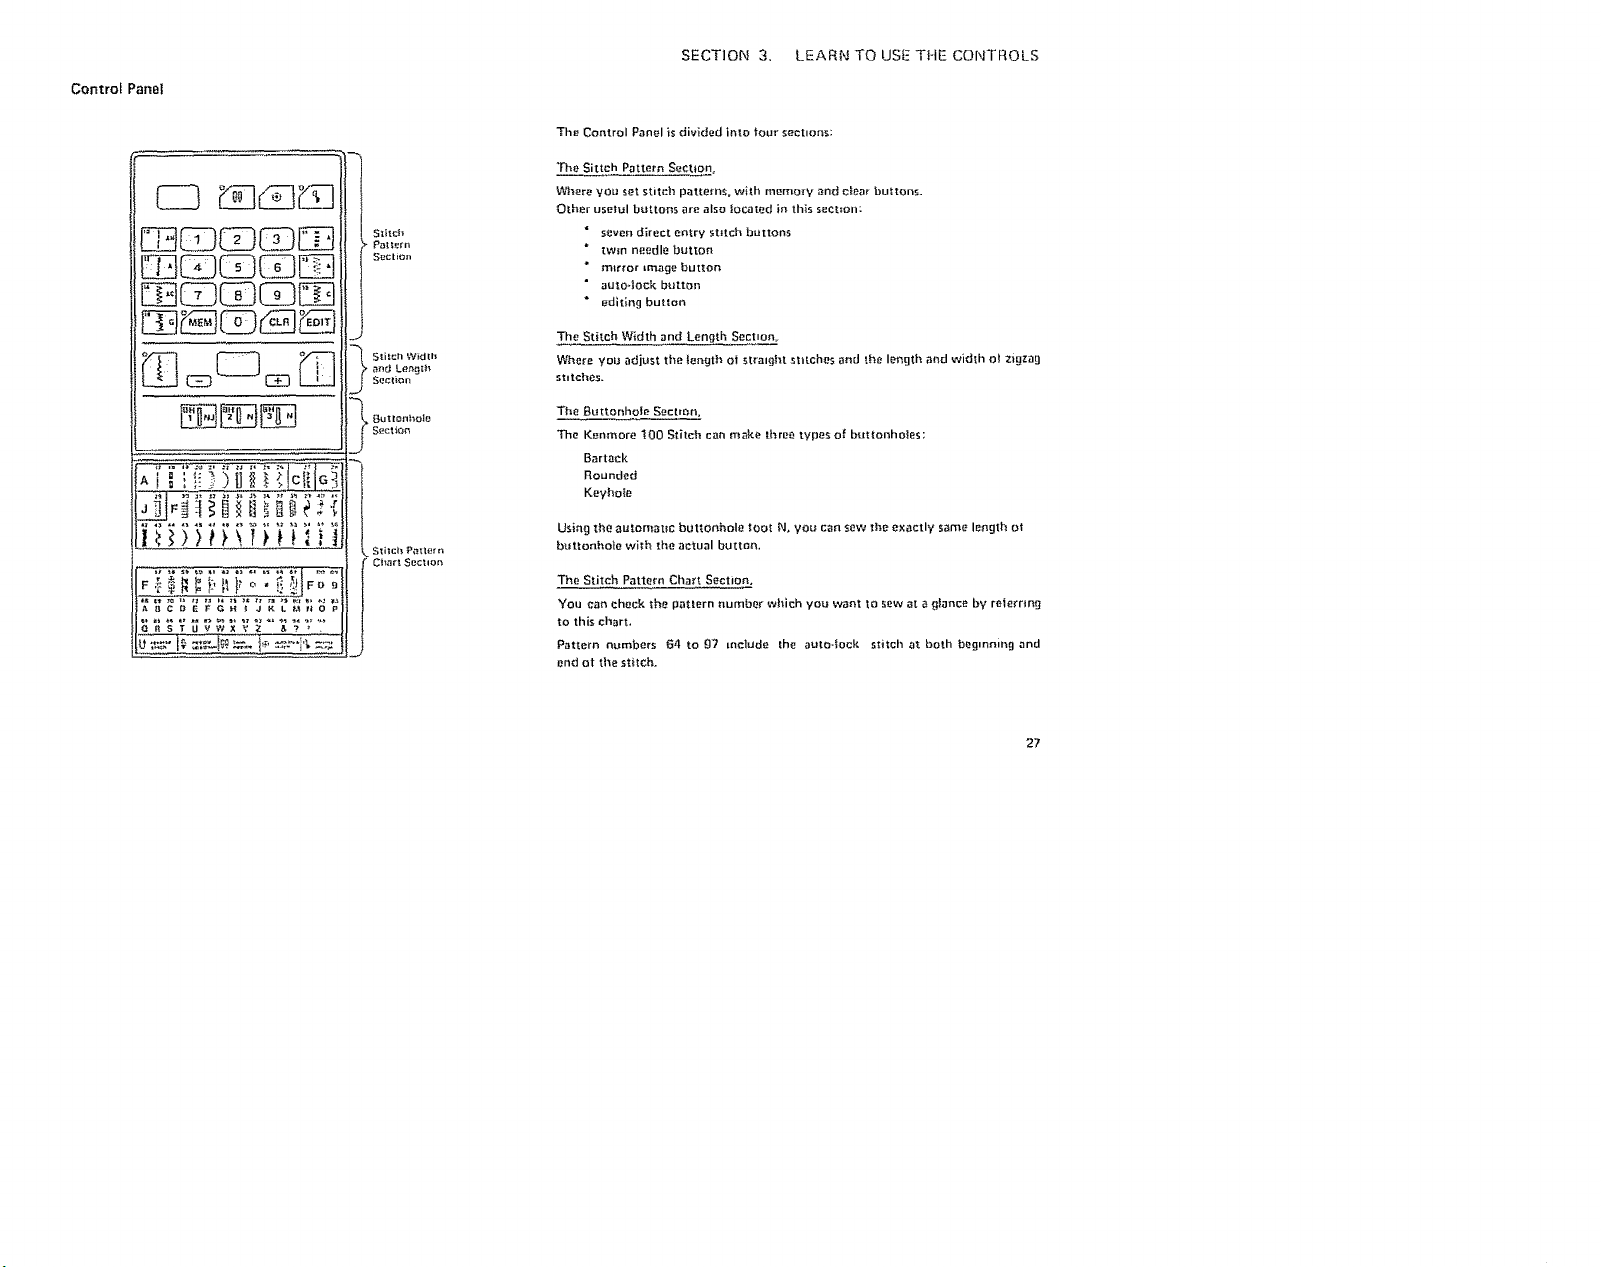
ControlPanel
StitcJ_
Patl_m
Section
iJ
anrJ Leh_Jth
Secl_on
S_eli_n
_ Outlonhole
Stltcl_ P_tter n
_"Ct_ft Section
SECTION 3. LEARN TO USE THE CONTROLS
The Control Panel is divided into tour seehons;
The Sittch Pattern Section,
Where you set stitch patte_-ns, with memoTy and clear buttons.
Other usetul b_-lttons are also located in this seehon:
* s_ven direct e_'_try stitch buttons
twin needle button
• mirror image button
auto-lock button
" edlt{ng button
The Stitch Width and Length Sect=on.
_/_e[e you adjust the length ot stralg|}t stitches and the length and width el zigzag
st=tches.
The Buttonhole Section,
The Kenmore !00 Stitch can make three types el buttonholes;
Barrack
Rounded
Keyhole
Using the aul_omat_c buttonhole tool N, you can sew theexactly same length el
b_ttonhoie wit|_ the actual button.
The Stitch Pattern Cha_t Section,
You can check the pattern number which you want to sew at a glance by r_le_rmg
to this chart.
Pattern numbers 84 to 97 mctude {he auto-lock stitch at both b_glnning and
end ot the stitch.
27
Page 30
SECTION3. LEARNTO USE THE CONTROLS
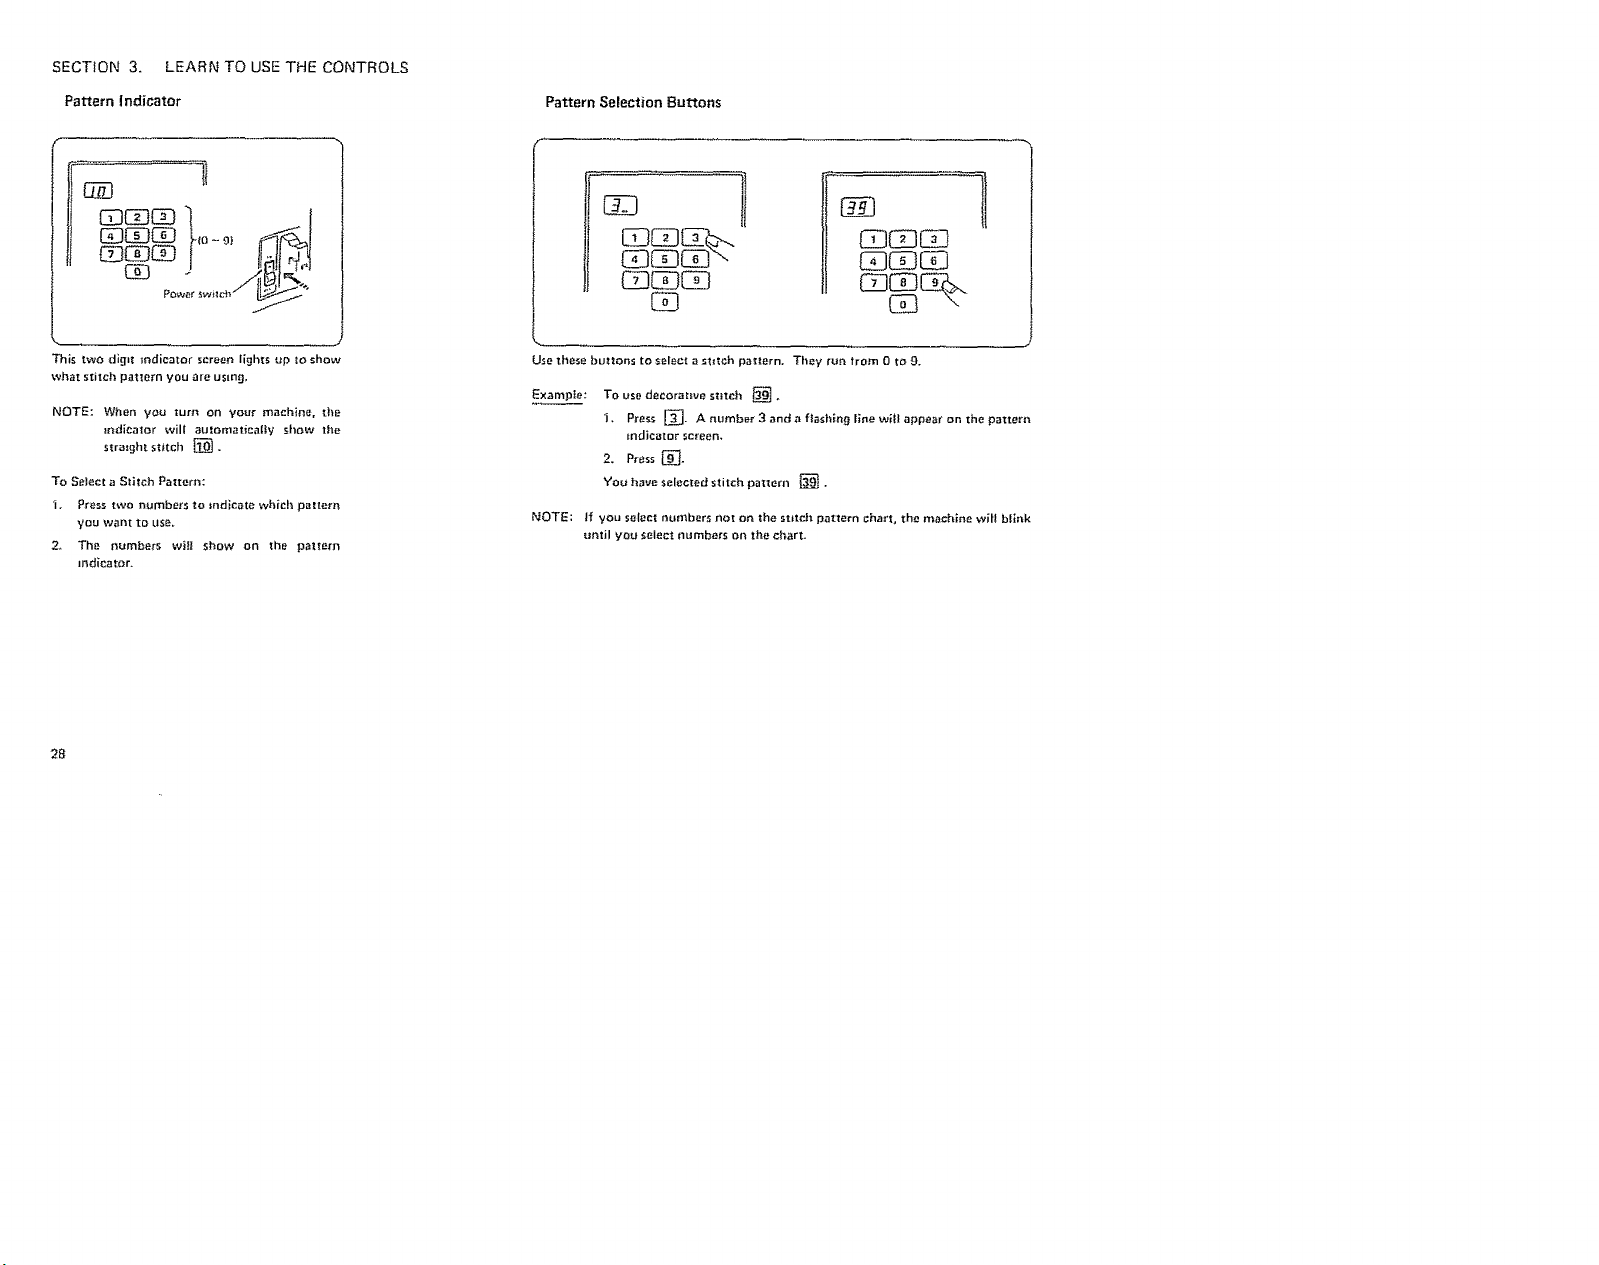
Pattern indicator Pattern Selection Buttons
C_3
_c_oc_ l J
(E3CE3CZ__lo-01 _-_i
QCO
c_cD_o_ HJ
C23C23CO
Power sw_Ic{_ _÷"
E_3
_DC_3CX3
G0C_C_3
This two digit indicator screen lights up to show
whet stitch pattern you are usln_l,
NOTE: When you turn on your machine, the
indicator will automatically show the
straight stitch _.
To Select a Stitch Pattern:
I. Press two numbers to indicate which paltern
you want to USe,
2, Th_ numbers will show on the pattern
indicator.
28
Use these buttons to select astitch pattern. They fij_ trom 0 to O.
Examp|e:
NOTE; if you select numbers no[ on the stitch pattern chart, the machine will blink
To use decorative stitch _.
1. Press _. A number 3 and a flashing line will appear on the pattern
indicator screen,
2. Press _.
YOU haw selected stitch pattern [].
until you _elect numbers on the chart.
Page 31

DirectEntry Stitch Buttons Memo_ Button
DCOE3_
E!_IZ3CO_
SECTION 3. LEARN TO USE THE CONTROLS
Clear Button
You can set each of lol|owing most frequently used stitches
by pressing bust one button, The pattern indicator screen
wi|| show the selected pattern number.
You can also sElEct these patterns by pressing pattern
selection buttons.
f
Stitch No.i Stitch il|ostratfon
10
14 AAi_AAA
15 _XX//t _ Overedge Stitch
Name of Stitches
Straight Stitch
Straight Stretch Stitch
Lock-A-Marie Stitch
MEnding Stitch
Zigzag Stitch
i yW y B.od.emSt.oh
The Memory Button. with Its LED Light.
will "memorize" your pattern selection.
Your machine can remember up to 3_
stitch patterns. Including the Auto.Lock.
which automatmally rEmlorces or locks
the stitch you have chosen. T'nis button
IS most typically used when monogram-
ruing or combining patterns,
To Set the Memory:
Press th_ Memory Button a|ter you select
your stitch p_tttern. The LED bight wilt
go on to show that the machine has
record0d your selection.
NOTE: I{ you are selecting a series oJ
different stitch patterns, you
must press the memory button
alter Each sElectlon,
ll_e machine Kenmore 100
Stitch will remember them in
order,
The Clear Button will Erase the stitch
pattern you have selected and automati-
cally return your machine to _] the
strmght stitch pattern.
The ClEar Button works in two ways to
clear a series ot stitch patterns, depend{ng
on whether you have pressed the loot
control.
I. Foot Control Not Pressed:
The C_ear Button clears one stitch
pattern at a time. beginning with the
!aSt selected and ending with the first
selected until it comes to "10" prtor
to editing. This attows you tocorrect
any m_stakes made while program.
mmg a series o_ patterns, The Clear
Button will delete all stitches at once
if pressed alter editing.
2. Foot Control Pressed:
The Clear Button deletes all stnch
patterns m the series at once, The
indicator returns to _ .
NOTE: Turning off the machine will
clear the memory completely.
29
Page 32

SECTION 3. LEARN TO USE THE CONTROLS
Twin Needle Button
Auto-Lock But-ton
lautomatic with memory}
Mirror Image Button
Just press this button, and the machine
automatically reduces the maximum
width for twin needle sewing.
Press button a_aln to single needle sewing,
For detailed instructions, see p. 83.
30
Use this button to secure seems Wltll an
auto.lock s_i_ch at the first and fast stitch
you sew,
To Use the Auto-Lock Stitch;
Pre_ the Auto-Lock Button.
The pattern indicator screen wi!i show
"AL",
The machine will take a few stitches =n
place and stop automatically.
To Use the Auto+Lock Memory:
L Press the Auto-Lock Button.
2. Prow the Memory Button.
3. Press the Stitdt Pattern Buttons you
desire. {Be sure to press the Memory
8u_on attar each stitch pattern
selectton.t
See p, 90 for more details.
4, Press the Auto-Lock Button.
5. Press the Memory Button.
Use this button to;
-- sew & memorlze patterns =n a m_rror
ima_e.
sew & memorize letters and numbers
m two third SlZe.
NOTE: Since this control memorizes the
pa_em selected, press the Clear
Button or Power Switch to clear
the memo_ prior to s_Ioctin_
another stitch,
_How to us_ the Clear Button,
see p. 29,)
Page 33

SECTION 3. LEARN TO USE THE CONTROLS
EditingButton
Use this button to;
check and co_rect pattern combi.
nations berate sewing.
-- press again when editing is complete,
the light will go out,
Editing Pattern Combinations
To check your programming tar possible errors tn a lung pattern sequence, your
Kenmore 100 Stitch has abuilt-in editing system (EDIT).
After programming louoh the editing button. A flashing light will appear and_
the pattern indicator will show the first pattern number programmed. Each 11me
the memory button is pressed the pattern indicator will advance to the next
pattern. Continue pressing the memory button untie you teach the lastpattern
or you find an error, Pressing the Mirror Image Button will sequence from last
to first.
To Delete and Add Patterns: You wanted to program 0_i, 02, 03 and 04 but 05
was programmed =nstead ul 03. Press the edil_ng button. Then press the
memory button until 05 appears m the pattern _ndicator, Press the clear button,
02 will appear In the pattern indicator. Now select pattern 03 and press the
memory button. Pattern 05 has been deleted and pattern 03 added,
To Delete Patterns Without Adding; You programmed 0t_ 02. 03, 04 and 05.
You want to delete 02 and 04. Press the editing button. Press the memory
button until 02 appears, Press the clear button. Advance until 04 appears.
Press the clear button, 02 and 04 have been deleted.
To Add Patterns Without Deleting: You programmed 0_, 03 and 04. You want
to add 02, Press the editing button. Ot will appear. Because you want 02 to
come alter 0t add it when 01 is In the paltern indicator, Select pattern 02 and
press the memory button,
If your programming is correct, press fhe editing button agatn. The flashing light
wilt disappear and you're ready to sew, The machine will not sew when the
editing slgnal is flashing,
In editing, pressing the memory button advances the patlerns trom first to last
while the m_rror _mage button shows the sequence tram last to first;
3_
Page 34

SECTION 3. LEARN TO USE THE CONTROLS
Stitch Width and Length Buttons
Aft stitches in your Kenmore t00 Stitch are pro-set _or the best
stitch length _nd width. But if you wish to change the settings
he_*_'S how:
You can set stitch width and length with those two buttons.
(Use one el: a time+ The machine wil_ remember the first one
whffe you set the other.)
Use the P_us "'+'" or Minus "'--" buttons t6 increase or decrease
the stitch width or length.
The tndicator screen wilt show the stitch width or length you
have selected.
• Stitch Width Button
This button controls the width of z_gza# stitches,
NOTE;
If Vou press the stitch width button while doing
straight stitching, the stitch width light wilt go on and
][he mdicator screen will show "'C" Your needte is
in the "Center'" If you press the "'+°" button, the
_ndicator w_tt show °'R" (Right). If you press the
°'-" button, the mdicator will show ""L'" (Left),
When you press this button for ZlgZa{.] stitches, the st#[£h width
light wiII _o on and the mdicator screen wffl show the preset
stitch width o_" "5.0""
NOTE: The range of stLtch width depends on the stitch pattern you selecL
To Decrease the Stitch Width:
P_ess the "'--'° button, The width will decrease Press the "+" button. The zigzag width will
by 0.5 mm to "0.0" each time you press the mcrease by 0.5 mm up to "7,0" each time you
button, press the button,
To Adjust the Stitch Width Quickly:
Hold Down the "-" or "+'" button until you reach the stltch width you desire.
To Return to the Preset Stitch Width (or clear the stitch widIh):
Press the Stitch Width b[_tton agam _or press the C_ear button },
The stitch width light and the mdicator screen will go off,
To Increase the Stitch Width:
32
Page 35

e Stitch Length Button
This butto_ sets the stitch length tot both strmght and z=gzag stitches.
When you press the stitch length button, the stitch length light wit! go on and
the indicator screen will show the pro-set stitch length:
"2.0" for straight stitching
-- "1-5" for zigzag stitching
NOTE: The r_nge o| stitch length depends on the stitch pattern you so|oct.
To Decrease the Stitch Length:
Press the "-" button.
The stitch length will decrease
-- by 0.1 mm trom "I .0" down to "0.0"
-- by 0.5 mm from "4.5" down to "1.0'"
SECTION3, LEARNTOUSETHECONTROLS
To Increase the Stitch Lenglh:
Press the "+" button.
The stitch length will increase
-- by 0,t mm trom *'0.0 °' up to "L0"
-- by 0.5 rnm _rorn "1.0"" up to "'4.5"
To Adjust the Stitch Length Quickly;
Hold Down the "+'" or "'--'" button until you reach the desired length.
To Return to the Preset Stheh Length
lot clear the st_.ch leng_.l_setting}, press the Stitch Length butlnn again
lot press the Clear button}. The stitch length light and the mdlcator screen
will go off.
33
Page 36

SECTION 4. PRACTICE COMMON STITCHING SKILLS
The sewing covered in this section require some
specia! ski_ls. For aI! other stitches, your machine
does most of the work. Even if you are skilled at
these stitches, you will want to learn ttle |eatures
at th_s machine that may be new to you,
Use the Seam Guides
Cornering guide
The seam guides on the needle p_ete help you
measure seam width, The lines are t/8" apart,
with the 5/8" and 7/8" lines marked,
Turn a Square Corner
To turn a square corner 5/8" from the fabric edge:
1. Stop stitching and lower the needle by pressing the Up/Down Needle
Position button when the fabric edge |acing you lines up with the
cernermg _uide, as shown,
2, Raise the presser toot and turn the fabric to line the edge with the 5/8"
seam guide.
3, Lower the presser loot and begin stitching m the new direction,
34
Page 37

SECTION 4, PRACTICE COMMON ST[TCI41NG SKILLS
Sew on Heavy Fabrics
When sewing from 3 to 12 layers of fabrrc, such as sewing over welt seams
when hemming leans-
Io Use Foot A IZJgzag foot) with the black spring button.
NOTE: This black button locks the toot so It does not g_ve with the tabr_c.
2. Sew as usual.
3- Stop when your needle reaches the pn{nt where _he tabrrc tavers Increase,
4, Lower the needle and ra{se the presser toot.
5. Press and hold the black button as you lower the presser toot.
6, Release the btack button and continue sewing.
Use the Darning Plate
Sometimes when you sew, you want to control the _abr=c yourseIL
The Darning Plate covers the |eed dogs so that they do no_ _o#eh the |abr_c.
To Put on the Darning PIate:
NOTE: The rectangular hol_s m the Darning P|ate match the holes m the
needle plate. In the darning p_ate, these holes are stighHy to the
r_ght of center.
"1. Position the darning plate with the pins on the bottom.
2, F{t the darning pinto pins Into the needle plate holes at the
518" mark, The teed dogs will show through the darning plate
holes.
Use the darning pIate in the following ways:
Basting tP÷ 36)
Darm_g (p, 37}
Button Sewing (p, 38}
35
Page 38

SECTION 4. PRACTICE COMMON STITCHING SKILLS
Basting [_
S_t l}_ti t_ta_hit_a
{_ Threm:l le_{s_or_
A: Z{gzag tao_
" Blue needle NO, 11
Jse the darning plate ++orbastm 9.
{See p. 35 for details.)
Use this st+tch to:
_Ste _ea_s.
tailor tack+
-- task quilt layers.
CAUTION: Do not use thit, stitch if the
0 +oZ5
_arni+++_Orate
B
needle wi|t leave permanent
marks in the tabmc. A small
needle wit+ be less ffketv to
leave parmanet_t marks.
36
. /
1+ Press the foot eoOtroL
The machine will take one st+tch and stop
automatica++y+
2. Release the toot control
3. Hold the _abnc taut and slide it to the
pla{:e where you wan_ the next stitch,
st, P_ess the foot control,
_+ Take out the darning ptate when finished,
NOTE: Reset the tension and pressure dlal
++orstra+P_ht sew+n++
Page 39

Darning []
Set the M_chino
T_ead _ension
2[o5
SECTION 4. PRACTICE COMMON STITCHING SKILLS
F: S=3l_tt _,t_lch
_t_ss_#re
@
Oarnin_ pl_t_
I, Put the darning plate on the needle plate (see p. 35)-
2. Stretch the tabr}c with the hole m ttle center between
embroidery hoops, as st;own.
3, Lower the presser bar and sew as a slow speed,
4. Move the fabric back and forth slowfy until you have
covered the darnmg area.
5. Turn Ibe fabric 1/4 turn and sew another laver otstitching
over the first layer.
NOTE: If your tabr_c is thin or badly damaged, use a separate
piece of fabric under the hole to re_nloree it.
6. When you finish darmngo rettJrn the pressure dial _o 3 and
remove the darning platm
NOTE: See the p. 67 _ 68, automatic darning for a qu_ck, easy
way to mend rips & ho_es.
How tO darn correctly
Make the ttJrnmg points el each row blunt
or the stttching w_t| draw litt|e holes at the
ends. Beginners may preler the L or M
movement,
Take care not to get circles.
The quick mastermg oi th{s work depends
on regu{ar guiding.
Therefore:
-- Hold the hoop correctly.
-- Atways work from lefl to r_ght.
_Move work lengthways (not sideways}.
37
Page 40

SECTION4. PRACTICECOMMONSTITCHINGSKILLS
SewaButton
Set the Mat;hine
[_ Thre#d le_sierl
F: Satil*_sI_{cl_
S=_tchwin'Jibc_mro|
but{an
38
3to5
Oarnin9 plate
6. Stitch several times.
8, Draw _he thread tt_ the reverse side ot the
fabr=c and knot the threads,
Page 41

Put in a Zipper
It's as easy at A - B- C
S_t thai Ma_h_rl0
Threod tens+nn
2to6
++ +i=
A,
Attach the zipper toot, as shown.
i.
To sew on the fett s_de ot the zipper,
atlach the presse[ bar to the right pins on
the zipper loot+
2.
To sew on Ihe right side o_ the zipper.
attach the p_esser bar to the left pins on
the zipper Soot+
SECTION 4. PRACTICE COMMON STITCHING SKILLS
jr'../
7 = x
Top s+de '%.,_ \ \%.
oÁ tabrlc "::_, "- +_
_End olopemng
Top edge of hlb_ic
1
B+ Prepare your iabric.
l+ Put the ;op sides ot the tabric together
end sew to the end ol the zipper opening+
Use the reverse to lock the stitches.
2- Set the stitch length at '+4+5+,_nd Sew the
zipper opening+
39
Page 42

SECTION 4, PRACTICE COMMON STITCHING SKILLS
Put in a Zipper (Continued)
c
C+ Sew m thezlppet
"i. Fold back {he left seam a_towance as
showR.
2. Turn under the right seam allowance to
term a 1/8"" fe_d.
3. Place the zipper teelh next to the 1/8"
fold and pin _n place.
NOTE: Be sure the top ot the zipper (the
slider} is at the top el the garmenL
4O
4. Attach the presser ba_ to The right pros
on the z_pper toot+
5. Lower the zipper toot on the _op side
at t_e bottom of the zipper so that the
needle pierces the told and the zipper
tape.
6- Sew through the told and the zipper
tape to the point where the slider begins.
7. Lower the needle Io hold the fabricand
raise the p_esser foot.
8. Open the zipper.
9. Lower the presser foot and stitci_ the
rest Ol the seam,
Page 43

SECTION 4. PRACTICE COMMON STITCHING SKILLS
11. Remove the zipper toot and attach the
presser bar to the _ett pins on the zipper
_00;[-
12. Stitch across and below the bottom ot
the z_pper.
13. Turn the corner and continue to {3u_de
the toot _}ong the z{pper teeth_ as
ShOWn*
Stitch through the fabric and the ztpper
[ape.
14. Stop about two _ncbe_ from the top ot
_be z_pper.
15. Lower the needle into _l_e |abr_c and
raise the p_'esser foot.
16. Remove the basting stitches and open
the Zlgper.
17. Lower the toot and stitch _-herest ot the
seam. Make sere the lOId is even.
41
Page 44

SECTION 5, LEARN TIdE STITCHF£
Chart of Sewing Functions
Now that you are familiar with vour machine and read,/ to sew. what are ¥0_ going to sew? The toi]owmg char_ tel{_Vou (in alphabetical order) what sewing tunct=ons
this machine performs and directs you to the proper [>agefor detailed io._truct_ons. In manv cases,you also havea choice of _;t_tches.
FUNCTION STITCH PA'rFERN|S} Raf. Page FUNCTION STITCH PA'rTERNIS) Rot. P=g_
APPLIQUE
_3ARTACK
BASTE
BATHING SUIT, SEW
BLtNO HEM
BUTTON, SEW
BU'F£ONHQLE
BARTACK
ROUNOED
KEYHOLE
CROSS STITCH
CUT-OUT WORK
DARN
EDGE A GARMENT/PROJECT
DECORATE {WITH STITCHES)
ELASTIC, APPLY
EMBROIDER
FAGOTING (cre_te open work}
FINISH RAW eDGE
3{}. 31
13. _4
10. _9
29
lG, 28
t4
34
30. 31t
_0. 13. '_4.29
TS, 20. 2t. 27.2S
30, 35
_t3_25. _.8, 36. 37 _
41 _54
25, 33.35
t0. "_4, 34, 31], 55, 56
46, 79
43. 63
35. 43. 44
45. 65
44.4_;. 76
38. 43
49. 69-74
47. B6
46. 79
37, 43. 48. 67. 68
44_46. 64~65° 7S,
7B--79
45_ 48. 77. 80. 83° 87
45, 47. 80, B2
43, 47_48. 6t, 85.
88 ~89
45, 47, 8_
43-46.62_65. ?S
GATHER
HEMS
KNITS, STRETCH _ABRIC
MEND
P|NTUCK
QUILT
REINFORC_ SEAMS
SHELL TUCKS
SMOCK
STRAIGHTSEAM
STRETCH STITCH
TOPSTITCH
SADDL£ STITCH
OUTLINE STITCH
TRIMS, SEW
TWIN NEEDLE STITCH
ZtPPEFt
T0
15. iS. 20. 27. 28
See _',II St_;ch_
_rked "S"
|0, T3, 14_ 29
tO
lO
13o _7, 25, 25, 33.35
28
23,24o36,37,4_
tO, t2
I_ _nd gllStlt_he_
marked "3"
t8
t7
20_22
2L22,24,25,30
36,40.4t
lQ
43. 55
44_46,64.65.76
43~4&56.58~59,
64_66.76.78_83.
87~88
37,43,6D. 63,57_68
43, 53
43.54
43.45o5B. 63,80_82
46,77
47,87
43, 50_55. 57
43_48.56o58_59,
64-66.75,78_83.
_7--88
43, 51
44, 59
44,58
65.78
45,83
39_41_43
42
Page 45

Stitch Pattern Chart
S_hch No, i
P=tt_tn i
STRA|GHT 10 1
STRAIGHT 1 _ i
STRETCH
H_
HI
--I
s
LOCK-A- 12 :
MAT|C SEAM
MENDING I3
Slra{gfu (HI
Zigzag |A|
Straight {N}
Zigzag {A}
Zigzag {A) |
i
,
Foot
Attach.
l Oth_
Ouil_er
D_mlng plate
Zipper _oot
_Hr_d hem
51_l_h |O_I
_t{t_ _tilch 1o_I
I °_Pg
E
onD. 17
?
Ch_ck
Chn_'t
on p. 17
Thread
Tens{on
2-6
2~6
2_G
3_6
SEC]IO[q 5- LEAR5J THE STITCHES
pressure
-t
a {
Re_3u{ar se_n'_s, pi_lu;ki_g, quilting, zipper's,
g_t_ering_ _zc.
3 I
Us_ _n km_ts _nd o_her stretch f_br_¢_, g_od for
{lop mt it rJt i t_J,
Us_ f_r sewtng patches_ repalri_ stt_ig{tt or
I
_orr_er Tears, f|_ishir_ _om_ O_ _erryclolh
_wg_g b_r _.cks _or b_t Ioop_ and drapery
Us_
Ftelor to Page
37,
3g ~ _11,
50 _ 55
56
57
63
ZIGZAG 14
(_egular}
D_rni_g pl_o
Satin ttitch loot
Cha{k
Chart
on p, _'/
3~8
Mend, _Jntn, llni_h ed_e_, apply t_im$o crab{older,
_th_t_ b_llon$, Sa_irt _t_tch: monogram
de _otal _- St_tches•
i
38,
60 _ 62
43
Page 46

SECTION5. LEARNTHESTITCHES
Stitch Pattern Chart (Continued)
Sfit-_h
Potlern
OVEREDGE
SEAM
BLIND HEM
STITCH
OUTLINE
STRETCH
SADDLE
STITCH
BASTING
s
s
s
s
I N_o t"
Foot Otl=er
Biing Horn
Sdtch {G)
Z_gzag (A)
Zigzag |AI
8_nd H_m
Stitch {G_{
Zigzag {A)
Attach.
{3arni_ pl_t_
Noedl_ Tht'=;_d i PrP_sl
Tension i Dia
Che_:k 3 - 7
Cha_{ E
or,p, f_ i
Che=k 2-- 6 i 3
Ch_rt 'I
i
m
Blue 111 3 _ 6
E
E
i
Check 2 _ 6
Ch;_rt
on p, _7
I
Us_
Uso tor o_etc_stin0, tot knits and woven
fabric_ needin9 extra _trangth, fol" narrQw
_oam_ o_ k_its _}_hear V w_Jht w_ven I_b_cs.
Use f_r s_etch _0brics, more _I_ttc.
U_e H'l }'1lace ot s=r,3iuht _t_fA;h on kn_S, b_a_
se_m_, Iri¢o= chiffon IOr a {lat, non-puckering
_ea_n.
T_p${=t£hing s_#ts, blazert,,lump_rs d_mm
_as_:i_g, ta{_or rOCkS, lz_k quilI Ioyer_,
I
Refer t_ Page i
64
75 -- 76
58
5_
36
44
Page 47

Stitch Pattern Chart
SECTION 5. LEARN THE STITCHES
Pattern
Stitch
KNIT 20
STITCH
TWIN NEEDLE 21
STITCHES _2
S 41_
SCALLOP 2t
STITCH 22
FEATHER 25
STITCH 26
DOUBLE _.OGE 27
ZFGZAG
24
30
35
Ce
Foot Attach,
Zigzag (A)
Zigzag |A}
or
Zigzag tA}
Ove_edge (C)
OthQr
Twin N_dle
Nsedto TO nsion { Oi_l Uses
Blue {'11}1 3 -- 6 3 Use Ior sw=mwear and stretch velour.
!
1
i
3_7
Check I 3 ~ 6
Chart I
Ch_ck 1 2 _ 6
Ch_rt t
o._.t7 t
{
Check { 3 -- 7
Chart
on p, 1_7
m
J
Refer to Page
65
83
78
8O
65
45
Page 48

SECTION5. LEARN THE STITCHES
Stitch Pattern Chart (Continued)
P_t_er_ No,
Stitch t
aLIND HEM
STITCH
SHELL
STITCH
AUTOMATIC
DARNtNG
APPLIQUE
CUT-OUT WORI{ 3_
Foot Othe,
S_ilch |G}
£11nd Hem
Satin (FI
8uztonhole
13}
AttiC|z,
N dl_ Thread
t °° 1T0-0_0.
I Ch_ck ( 2 ~ 5
t Ch_t[
_6.-9°nP" 17
Chart ._ I
2
Fch_t . 1
to-p-_ I
Pre==ur=
Oi_i
3
U_;e to_ Woven fal_rtC_;: b]_nd h#K} _nd
overc_stln_
3
Finish horns, s|_ev_ ;_n_ neck Qp_nings.
U_;e on _ylo_ tricot #rid ozher Iinaerio to
Do shell z=_in_ _ blouses and lin0e_i_
3
Darn rip_ _d holel q_ic_;iy and aulomali-
caI|y.
2
Use_
Refe_ _o Page
?6
77
67 -- 68
79
46
Page 49

Stitch Pattern Chart
SECTION 5. LEARN THE STITCHES
Stitch
P_._tern
RICK-RACK
STR£TCH
ELASTIC CASING 33
FAGOTING
S
CROSS 34
STiTCHiNG
ELASTIC 35
STR ETCH
SMOCt¢tI_G 23
STITCHES 24
S
NO, Foot
32
Zigzag {A)
Satin {F) [_
S_tin iF)
S_tm iF)
I
Zigzag {A] |
Satin iF)
Zigzag |A)
35
37
Satin IF}
NN
Other
A_tgc_t.
U_;_ papm"
behind
Thread P_essuL*e Uses Roi0t to Pago
Ne_dlo
Tans,on Diai
Check
Char[
on p. 12
Ch_ck 3 --8 3 El_stIc Casing: Replace bias I_pe casm£_
Chart i_ wt{_t_ _nd w_lst_; ta_k
on p. 17 do_n e|ast)c.
Check 2 _ #3 3 U_# i._*_e_r.bro{detV, combin0 with lett_r_ a_d
i Cho_t n_mber_ to_ _amplo_.
i on p. _7
Check
Chart
on p. 1=Z7
CI_eck 2; _ 6
Cha_t
on p. _7
2 _ 6 3 Oeco_at_ g_rm_nts w_th one _ow o_ _vera_ 66
I Fago_)_g: Jo_n two {old_d _dge_ !or
i de€afar _ve ope_-wo_k
3 _ 6 3 U_e Ior appIy_ng elastic.
Smocklttg on children's dethes, blouse=*,
cur tarns, etc.
appear anc_.
8_ - 82
86
82
87
47
Page 50

SECTION5. LEARN THE STITCHES
Stitch Pattern Chart (Continued)
$_tCh
Pattern
SAND
ST|TPH]NG
DECORATIVE
GEOMETRIC£
SHADING
STITCH
STRgTCH STITCH
DECORATIVE
I No.
d2_
54
55 ]
56 I
m
39_ I
67 I
:
Foot Other
Sa{in tF)
S_t+n {Ft
Sa[tn (F)
Salin (F)
Attach.
Tlir_ad
Needl_ Ten_io.
Check 2 -- 6
Chart
o. p, I._7
Ct_k 2 ~ 8
Cllart
o_ p, 1,7
Check 2 -- 8
Chart
on p. }7
i
Check ! 2 _ 6
Ch_3tt i
Dial Us_
Pte_ure I
t or 2 i Fill io designs ol_dy outline(1 whl} _oti_}
or other en_htoidetV slitch.
3 Decorate 0_¢¢fl_ntl _ith One row or _ev_OI,
one s_itch or _ coml_in011on_
or 2 U_ _or _re_ h_nd m_chine embrold_W and
_tr_ctive _hodln_ _titeh _pF_Iique,
3 Oecot_le _,_ilh fJo_e4_tor te_I _eSlflns>
Use in gom_inot_on (pro_3rammable} Ot/lnZll y.
Ruler to Pasa
88
84
B9
B5.
90 _ 91
48
Page 51

Stitch Pattern Chart
SECTION 5. LEARN THE STITCHES
Sthch
Patt0rn
MONOGRAM
Numbet_,
Letters,
Spar;e
Rounded
Keyho_o
09,
68~
98
NO.
S_tin (F)
Foot
OIher
Attach.
N_ " Th,..----_ p,_,.su,o7
I .... ITo_-.... I o_o,!
onp. 17
Uses
p{otJtarnmed i_ sequence _or mor_)_I{amm{tlg.
I Reter to P09o
93Numbers a_d letters or Sen_eaces {_av be
@@@@@@@@@@
SHdin 9
ButtonhoIe
(J)
2
3
Autonlat_c
bUtIQnho_
iN)
hOC:k
Chat| } I | b_ttortholes.
np. 17 I
Buttonholes in Ih_ee sh_p_'s: alSO corded G9 _ 74
Battack
4g
Page 52

SECTION 5. LEARN THE STITCHES
StrmghtStitches [] _ [], [] and
_hen you Iurn on your m_chine, _t iS au_o-
matmally set [o sew a stratght stitch (pattern
H).
0 Str_ltlht Stitch
Sat the Ma;|li+t_
Thmod tensmn
2m6
o,
H: St¢_ight A: Zigzag 1oo_
s_itci_ foot
The StiIch and Its Uses
You can USe your bas+e stra+ght stitch in
many ways besides _ust sewing a stra+ght
seam, Three common uses lot the straight
stitchare_
Pintucking
Quilting
TopstHching
All ale discussed in this sectmn.
5O
[]
To sew a stra+ght stHch:
l- Raise [he p_'esser toot.
2. Rinse the needle to =tshighest position,
3+ Place the edge o{ the tabrm next to a
stHching guide line on the needic plate
(5t8" is most common}.
4. Draw the thread_ towards the back and
lower the presser toot.
5. Press the toot control.
G, Hold the tabnctoosely and gently gdde
Jt along the guide line, so tha'_ _t reeds
naturally.
Do not toree the fabric of try to pull it
_lghL
7. At the end o! the seam, you may wont
to r_verse tO _OCk the stitch.
8. When you stop sewing, the needle will
automatmaUy rise to Hs highest petition,
9, Rinse the presser loot and remove the
tabnc.
t0, Cut the threads,
Page 53

Topstltchirtg
_t the M_¢l_in0
Thread tsnslo_
2tog
SECTION 5. LEARN THE STITCHES
A_ Zigz_ foP| G: 131it_dIt_'m
The Stitch and Its Uses
TopstltChing emphasizes the lines el your
garment and keeps seams and edges fiat and
crisp.
Accent suits or blouses with one or two rOWS
ot tops|itching around the outer edges ot
cuffs, lapels or collars.
Use the Auto-Lock button to secure your
tops|itching and eliminate unsightly back-
tacking,
stitch foot
Here's How
"h Lower the presser tool.
2. Keep the ed_;e el the fabric next to the
right edge of Foot A.
3. Evenly guide the fabric along this edge
to prodt_ce an even row ot topst_tching
3/8" from the edge.
NOTE: You can easily adjust ,/our needle
trom left to right for topstitching
wlthout moving your fabric from
under the presser toot, See the
next page for instructions.
51
Page 54

SECTION 5. LEARN THE STITCHES
StrmghtStitches [] _ [], [] and [] (Continued)
e Position Your Needle for Topstit ehing
The needle has three posftions;
lotto center and rt#hr.
©
To position the needle to the left:
!. Pressthe stitch width control button,
2.
Press the" stitch length/width decrease button.
3,
The stitch length/width indicator will show
"'L*" or left needle position.
NOTE:
52
C3:)
To position the need|e at the center;
1- Press the stitch width control button.
2- The stitch _ength/width Indicator shows "C*'
or center needle position.
C3)
To position the needle to the right:
I, Press the stitch width control button.
2. Press thestltch Ien#thiwidth increase button.
3. The stitch indicator wilt show "R'" or right
need|e position.
C3#
Left or r[_]ht needle position is recommended for stitching edge of the fabric.
Besides the normal stra=_ht stitch method ot topstltching, this machine does other types o|
topstttching that are better for knits or produce a more elaborate decorative effect,
Always use zigzag _oot A for Jail and right needle position,
Page 55

Pintucldng
_t the _*'l_chi_o
Thread lens_on
2t06
The Stitch and Its Uses
Pintucks are narrow tucks spaced close
together to add design interest on such {terns
as blouses and pillowcases. One pmtuck can
term a permanent tro_t crease on knit pants.
SECTION5. LEARNTHESTITCHES
"t. Attach the blind stitch hem _'oot.
2- Place the raided fabr_cunder the wesser teat.
3. Poslt_on the needle 1/I_6" inside tram the lolded edge and lower the presser toot,
4. Adjust the slidin!] guide on the blind hem toot to the raided edge by lurmng the guide
_;orew, a5 ShOWn.
5, Feed the to|ded edge smoothly agamst the sliding guide.
NOTE: ff the tabr_c tends to pucker, hold the materlaI slightly taut while sEwmg. Also,
decrease the upper tension slightly.
53
Page 56

SECTION5, LEARNTHESTITCHES
Straight Stitches []
Qu]it}ng
Satethe Mach{l_a
D; OuJ_ter
A; Zigzag font Fh Slrai_jht _;t_ch t_ol
Tile Stitch and |ts Uses
Quihing is stitching two layers ot tabr{c
together with batting _n between to add
dimension and warmth.
You can use quilting on entire garments or
parts o| garments, such aS yokes, pockets,
cuf(s and co(|ars. It _salso popular tar table
lashioos, In addition to strmght stitch
quitting, you can quilE with decorative
stitches or stitch pattern combinations.
[], [] and [] (Continued)
Thread t_.ns$on
21o6
f
NOTE: When you are quilting large areas, tack the layers together with the basting stitch.
Then quilt tram the center out,
Another q_ilting variation:
Instead of quilting with rows o! straight stitches, you can barrack your quiit at regu|ar lnterva{s.
Set up the machine as if y0u were going to sew a button {see p_ 38), Pos_ti0n your tabrlc and
barrack.
54
Page 57

SECT!ON 5. LEARN THE STITCHES
Gatherm9
S_t the M_¢|tine
Thread tensior_
1 to4
A: Z_gz_8 _oot
Stlt_h Le_#th: f
The Stitch and Its Uses
Use this stitch to gather trims, skirts, sleeves at the top, smocking or any [tree
you want more {ullness, Use two rows o| stitches.
Here's How ffar medium weight tabrtcs and tight, firm gathers)
'i. Set the stitch length to "4.0'*
2. Loosen the needle thread tension to "2" or as desired,
/
L_
NOTE: Steps 3 and a are for 5/8"" seam aIIowances. For other widths, adjust
your iabnc aceordingl%
3, Sew the first row ot slttches with the right edge of Foot A on the edge ot
the tabric_
4_ Sew the second row with the right edge of Foot A tollowmg the first row o_
stztches.
5. Using both hands, pull the bobbin threads Item each end o| the labrlc uotil
you have the gathers you want.
6. Kr_ot the threads at each end even out the gathers,
Here's How {for l_ght weight tabr=cs, ruffles and [lounces)
I, Set your _titch length at "4.5"
2. Secure your gathering rows at the beginning.
3. St:itch two rOWS, as m steps 3 and 4 1or medium wmght _ab!'lcs,
4, Do not lock the threads at the end ot your stitching rows.
S. Pull the bobbin threads to produce the fullness you desire.
13. Knot the threads and even out the gathers.
55
Page 58

SECTION5. LEARN THE STITCHES
Straight Stretch [_
,S_t the Ma_hine
Thread I_nSio_
2106
A: Z[ff_a_ +oot H; SI_aighI stitch loot
The Stitchand ItsUses
This stitch +s the stretch var_at=on o+, the
slratght stitch, especla[fy developed for kn_ts
and stretch labrJcs,
This stitch can also be used for topst_tehing.
A NOTE ON STRETCH STITCHING
Stretch stitching was developed to be used on stretch tabNcs and kmts. It can be used on other
fabrics as well It works well on curved seams and on any garments that wilt rece+ve a great deal
of strain (ieo child+'en's clothes),
The stretch stitch does not actually stretch at It +s being sewn, but It stitched in a forward and
back motion (sometimes called a "reverse-action" stitch), so that it wilt g+ve instead of break
when the |abFtc stretches.
56
Page 59

Lock-a.Matic Seam
SOt _bO Ma_hinu
ThrP._ _ensio_
2to0
A: ZigZ:a_loot
For general sewing, the lock-a-matlc stitch _s
the tastest way tO SeW and secure a s_am.
It tS programmed to automatically sew
reverse stitches at the beglnnmg and when
the reverse stit_:h button Is pressed at the
end Ot a seam.
Seams are ,sewn qolckl¥ and sec_areiy.
SECTION 5. LEARN THE STITCHES
The machine will _;ew tour stitches _orward, The machine will sew lout reverse stitches,
to,Jr stitches in reverse _en continue sewm_] lOUt )_rward _lliches, then stop 5eWlr1_.
forward.
57
Page 60

SECTION 5. LEARN THE STfTCHES
Outline Stretch []
Set =he Mach_n_
3_o6
_1_o n_edle No. _t
T_e Siitch and Its Uses
This stitch pattern, a vanaIlon ol the straight
stitch, is a narrow stretch slIt_:h deslgned to
eliminate pueker_n[l on knit fabrics end bias
seams,
On tricot and filmy chiffons, it can be used
to seam a_d overcast at the same [_me _o
produce a narrow, almost mvisSble seam or
seam finish.
58
Here'_ MOW:
t. Place your tabria edge on the 5/8" seam line m order to produce a 518"
seam.
2, Sew as you would a straight slltch.
Helplul Hints (for lightweight fabrics)
1, Set the pressure dlat at "'t'" or *'2'"
2, To seam and overcast tricot:
a. SeI the stitch width at "3"
b. Sew with the ri_]ht hand sutch tailing of[ the fabric edge.
Page 61

Saddle Stitch []
• ll the Mschine
Thread len_iotl
2106
A: Zigzag iO_ G: Blind hem
The Stitch and I_s Uses
The saddie stitch is formed with one Stitch
forward, two _t+tches backward, and a
fourth stitch forward.
You con achieve a lovely hand-worked look
when toPStltching suits, blazers, Iumpers,
and demm outfits with the saddle stitch.
NOTE: Adjust the needle posttlon for _he
etfect you want.
_lilCh fO0!
SECTION 5. LEARN THE STITCHES
Hefe*s How
"t. Sew as you would for topstltching,
2. To turn _orners:
a. Lower the needle _nlo the t_br_c on the lourfll sIJtch.
b. Rinse the presser loot and turn the tabrlC.
c+ Lower the presser !oot and continue tO SeW.
Helpt_l Hint
The Blind hem st)lob tool _s good to use when topstltching near the edge el lhe
garment. Just set lhe edge guid_ wilh the guide screw.
59
Page 62

SECTION 5. LEARN THE STITCHES
Zi gStitches[]- [], and[]
Basic Zi#zag
_t lhe M_ch}n_
T|_ead lensio fi
3_u8
The Stitch and ItsUses
T':ne zlsZ_g stitch is one el the most common
and most versatile stitches on your machine.
|tcan be a uti{_tystitch lot sewing buttons,
buttonholes, hemmMgo ore[castro{I,mending
and datum{,), It can also be used to decorate
with trims, applique_ and CUI-OUl work of as
a d_ori_t{ve StltCb.
Here's HOw
The m_ny ways tO sew a ZigZag stitch are as varied as the $litch
pa_'lerI_s on this machine or as the width and ler_g_h seTllrigs allow.
Consult the specific vanatlons lot detailed directions.
The ztgza_j stitch as a utitity stitch has seveTal var|atlon!;, discussed in
this sectlon:
Satin Stitch []
Ove_ca_lln[IStitch []
Multiple Zigzag
Ove_edge Seam []
Kmt Stitch []
6O
Page 63

e Satin Stitch
_e_ the M_ch|no
3rob
Thread te/_slon
A: Zigzagloot F: Satinstltct_i=;ot
SI_c_ Len_lh; {32 to 1.0
Pre._ufe
Stitch
Z_#za!
i
SECTIONB. LEARNTHESTITCHES
width:
t.5 2 2.5
The Stitch and Its Uses
The Satin st=tch is a versatil_ and otten used
decorative stitch_ but it can also be used to
overcast a raw edge {for example_ btankets,
tinens, tablecIoths and napkins).
The Satin stitch _s espemaHy attractive m
appl_qt_e and is the basis _or the geometric
st+tches _ to _5_ on thlsmachine.
Here*s How
Once your machine is set up to stitch, you may want to experiment on a
tragment ot the fabric you are planning to use, Too t_ght a satin stttch may
pucker some light we_g_L tabrics.
Otherwise0 stitch as usual
6t
Page 64

Blaek ridge and
brush e#ide
Tile Stitch and Its Uses
Tl_is z_gzag variation is very osetul In
garment constroctlon and m fimshing raw
edges el any sewing prelect.
Here's Now
_. The black ridge and brush and the
guide w_res on the overedge toot keep
the edge neat and the fabricstralght.
2, Place your tabric so that the double
guide wires come to the edge,
62
NOTE; These wires keep light weight tabrtc
;ram ro_fing Into a ridge and hold
medium weight tabrlc flat.
The mac_ioe will stitch over these wires.
"]'he black ridge and brush will keep the
loose threads m so that the needle can stitch
OUer them.
3. AS you Sew, be sure your fabric edge
For overcasting tolded fabric:
You can also told the raw edge ot the seam
and overcast.
I. ${art the fold by sliding it under the
needle and lowering the needle,
NOTE: Be sure your needle is tn the te{t
positiOn,
pushes against the black ridge and brush
guide,
4. When you stop sewing, remove the
tabrie by drawing it to the back and
out. The tabric will catch on the wire
2. Lower the presser toot so that both
guide wires are on the fabric.
3, Fold the fabric to the teit t/8" as you
teed it into the machine and stitch.
guides if you pull _t toward you,
Hetptul Hints
Start overcasting about I/8" inside the raw eorner ot yourseam, lfyoustart
right at the edge, the fabric witl bunch up and the stitches will become
tangled.
Page 65

o Mending 1_
Thread Ions_on
3to8
SECTION 5. LEARN THESTI'ICHES
.%
The Stitch and its Uses
"t-:no mending or multiple ZigZag _s a combi-
nation ZigZag and straight sf|tch. Use the
mending everywhere you would use the
bas=c zigzag stitch, h has more strength.
elasticity, and is flatter than a regt_tar zigzag,
The mending st{tch is especially usefu! for:
sewing pa_ches smoothly and securely,
repairing straight tears.
-- finishing seams on terrycloth,
--sewing bar tacks _or belt loops and
drapery pleats.
Here's How to Repatr a Tear:
Sl,ralght- position the tear under the needle so that the stitching will catch
both sides,
Cornered --stitch trom each end to the center. Use a piece of fabric under
the tear to reinforce your mending.
63
Page 66

SECTION 5. LEARN THE STITCFtES
zigzogst_tche,[]- []. [_. [] and[] _Co,t_,ueat
• OveredgeSoam
Sat tim _l=_hlne
Th{ead tension
3lo7
The Stitch and Its Uses
This slItch pattern combines the straight and
tt_e ZigZag stitches, using the overedge toot,
to stitch and overcast teams m one slep.
it atso iS a stretch stitch to provide elasttcity
for kntts and extra strength for woven
fabrics.
Use this stitch when you wan_ a r_arrow
seam that you do no_ need to press open
flat, tt Js ideal tor 1/4" seams on knits
{when al_aching ribbing) or on medium to
heavyweight woven fabr*cs where you want
a narrovd seam.
64
Here's HOW
_. Place your tabt{c so that the raw edges
fit under the wire guides and touch ttle
black ridge and blush guide,
2. Gently guide the tahoe so that the raw
edges always touch the black ridge and
brush guide.
NOTE: Wl_en sewing over several thick-
hess {under arms, m crotch, ere,)
raise the presser toot slightly to
ease the presser toot over the hump
and keep stitches from bunching.
3. When you stop SSWltlg, remove the
tabnc by drawing _t to the hack and
out, The fabric or stflching will catch
on the w_re guides if you pug it toward
you.
Page 67

SECTION 5. LEARN THE STITCHES
o Kmt Stitch []
Set tho M+lCh_NB
Thread _e+;sioP-
3to6
Pressuted_at: i
A: Z_gzag [_ot
Set the Pressure Dial to "+_+'+so that
the knit wilt retain st+shape as you are
sewing.
The Stitch and Its Uses
This kmt Stitch Is ideal tot sewing
swtmwear and stretch re[our,
because it provides the greatest
amount ot elasttcRy and strong',h+
Hero's How
1+ P|ace your +abrlc to aIIow a
5]8 `°seam.
2+ Trim the seam allowance a_,tet
sewing+
NOTE: Be care|ut not to c+Jt th+
stitches.
Double Ed_3e Zigzeg
Set t3_eM_chit_e
Threa_ T+nsi(]n
3_o7
The Stitch and |Is Uses
This stitch can be used |or sewing
|abncs that trend to tray extensively
such as +inens and gabardines,
Here+s How
Two rows el zigzag st+aches are
Simultaneously sewn over the edge
tO InSure that your seams wit! not
ravel
65
Page 68

SECTION& LEARN THE STITCHES
Zi.za.Stltch0s[] ~[_, ._, [] a.d[]
Rick-Rack Stretch []
Set the Machine
2 to6
A: Zigzag3{oet F: Sa{t_ s_it_h
Tile Stitch and its Uses
Sew on stretch _abr_cs In a,rly area that you
might use a Zl_]Za_]stitch.
This stitch can be used as a decorative top
stitct_ as wotI,
(Continued)
66
Page 69

Automatic Darning []
SECTION 5, LEARN THE STITCHES
C_ Th_d tonsto=t
J-' Stiding buoonh_te
_00_
Tb.e Ker_more tOO Stitch automaticall
dm-ns rips and holes. Large and small
holes can be mended qu_ckI¥ and easily
with this unique stitch.
Buttonhole toot J _s _sed to hold the
fabric securely while darning,
For extra support, or strengthen tile darn,
pin or baste a backing _tabr_c such as
organdy under the hole to be darned.
2 t_6
Start
Press down the _oot control The
machine wilt tack the stitches, sew '16 the machine stops Sewing.
rows O_;darmn9, lock the stlIches and
stop au_omaticalIy.
Keep the too[ conttoI depressed until For extra strength on btue leans o{
other work clothes the darn can be
rein|arced as shown above.
The finished darn measures 2+0 em
(415") long by 0,7 cm (1/4"') wide,
If bole _s |arger, move the tabric and
sew additional darmng um_s ootil the
hole Iscovered.
67
Page 70

SECTION 5. LEARN THE STITCHES
Automatic Darning [] (Continued)
Darning Sina!! Rips
Ad|ustmg Evenness of Darning
Small rips can be repaired by pro-
grarnm_ng the machine to sew
shorter dDrn,
Begin the firs[ row of the darn
stopping the machine when you reach
the bottom edge of the r_p. For
example, you may only need to sew .5
sli_ches. Press _he reverse button bu;
do not hold ih The machine will now
complete the t6 rows with 5 stitches
m each row and Stop automatically.
]t is simple to make a darning of same
size as the first one,
Press memory bu_ton when you have
completed _he first darning, and
depress the toot control. Then the
second darmng is automatically made,
Pressing mfrror _ma_e button instead
el memory bulton will !]*vethe same
result but the darning _s made _n _he
reverse sequence.
68
When the Ielt side _s
lower, turn the leed
balance dial to °'+°"
When the right side _s
lower, turn the feed
balance dial [o *'-"
" Aher darning. _eturn
setting mark _o'r>"
Page 71

Automatic Buttonholing
S_z the Machi_ta
£#rlack Thread tensie_
N: AiJtonla[_¢ buttor_hote fo_at
Rounded
Keyhole
"¢he Kenmore 100 Sthch sews three
different types at buttonhole to meet
every sewing need, All three buttonholes
are made in she same way.
Automatic buttonhole toot will gauge the
buttonhole Iength,
Be|ore you sew buttonho|es on the actual
garment, make several practice button-
holes.
2 to6
=CGO- -GZ3
l. a. Press the Up/Down Needte Posnion
Sutton to raise she need|e to ItS
highest position+
b, Rinse the presser toot.
c. Remove the toot holder,
d. Attach the automatic buttonhole
toot by tightening the toot holder
screw.
Thickness
Oiameter
2.5 cm |31t32"1
SECTION5. LEARNTHESTITCHES
Pull
2. a, Draw both threads toward the lest under the toot,
b, Lower the needle to the bottom mark.
C. Lower the presser foot,
d. Open the button holder by pul|ing it back as shown above,
e, Place the button you intend to use on the button holder at the
automatic buttonhole foot N,
t. Press the back at the holder towards you to secure the be|Ion,
NOTE: if the thickness ot button |s more than 0A cm {3t16"),
measure thickness and diameter and set the button holder as
shown.
EXAMPLE: tf _[he button _s 2 cm (3/4") {n diameter and 0.5 em
(3/t6"] in thickness, set the measure 2,5 cm (3t/32"L
6£
Page 72

SECT{ON5. LEARNTHESTrTCHES
AutomaticButtonholing(Continued)
® ® ©
% •
3. a. Select and press one of the buttonholing buttons which yo_ want to sew.
Bartack
Rounded
Keyhole
b, Depress the toot conlrol unti! the machine stops aotomal_cally.
4, a. If you want to sew another buttonhole identical to the first, press the
same selectedbuuonholing bollOn.
b. Pressthe loot control unti!the machine slops by llself.
7O
5. Cut the opening with the buttonhole opener Jn your accessory box.
NOTE: tf you want to wind the bobbin _n the middle of buttonholing.
press the clear button. Then. place the threaded bobbin on the
bobbin winding spindle and push the. spindle to the r_ght until it
clicks. Depress the toot control and wtnd the bobbin.
Page 73

• Adiust the Stitch Width and Density
Stitch Width; Stitch Density tn Entire Buttonhole:
D°
Fine Caar_
SECTION5. LEARNTHE STITCHES
The stitch width button controls the st=tch
width. It is pre-set at "5.0"
Press "'+" or "'-" to adjust the st{tch width
ot the entire buttonhoIe,
The stitch length button controls the stitch
densitv, It _ pre-set at "0,4"
Pi'ess "=+" or "--" to adjust the stitch density
ot the ent{re buttonhole-
71
Page 74

SECTION5. LEARN THE ST{TCHES
Manual Buttonholing
Sat "ths _Ma=hlne
Th_e_d;ens:on
21o_
NOTE :
Do not put fin_Jer, screw driver or
any other object near under the
sensor when sewing buttonholes bv
using sliding buttonhole toot J0
otherwise the sewing procedure m
the pattern Indicator may advance
to the next step,
_®
(_ a, Carefully mark the buttonhole _ength on
your garmeoL
b. Change to the s|iding buttonhole toot,
eo ln'_ert the garment under the too_ with
the buttonhole mark{ng runmno toward
you.
Slide both threads tO the left,
® a- Move the slider (A) away from you so
that the bottom mark |C) on the slider
meets the start mark (B).
b, Line up tha merkings on the foot with
the bottom mark on your _jarment,
c. Lower the pre_er too_ and press BH 1
(bar-tack) burton.
NOTE: The markings on the slider are engraved
an centimeters,
® The machine will automaticafly barrack and
sew up the leh side ot the buttonhole.
Stop the machine at the top mark,
72
Page 75

(_ Press the memory button.
The machine will automatically
barrack and sew down the r,ght
side.
Stop the machine when you are
directly opposite the first stitch
On the felt hand side.
SECTION 5. LEARN THE STITCHES
• Stitch Density on One Side:
The sf_tehes on each side of the buttonhole should be the same stitch density,
To adjust, _se the feed balance dial below the Hand Wheel.
Feed
,'f //'_"_ /dia!
B
For Condition A: For Condition B:
Left Side Stitches too Far Apart Right Side Stitches too Far Apart
Iseeabove} (see above}
Turn the teed balance dial slightly Turn tile _eed balance dia_ slightly
toward °'+°" Use the large screw toward "--"
driver tn your accessory box.
After adjusting tl_e feed baldnce dial, sew another test buttonhole to be sure
your adjustment ts correcL
NOTE: Remember to return the feed balance dial to the standard mark ( _> )
when you have completed the buttonholes.
73
Page 76

SECTION 5. LEARN THE STITCHES
Corded Buttonholes
Sat the M,lchinD
Thread tenshon
2 Io6
J: Slidinjr b=J{to_fmfa
Use this procedure when you want to
achieve a tailored, mote attracuve raised
buttonhole.
Use filler cord let toast 15 inches of heavy
thread).
Try a practice buttonhole f_rst.
74
With the buttonho|e loot raised, hook the fffte_ cord on the cord spur at t!_e back ot the buttonhole foot.
2.
Bring the ends toward you under the buttonhole Toot until they clear the trent end.
3.
Hook the rifler cord into the forks on the front of the J foot to hold them tight.
4.
Lower the needle into The garment where the buttonhole will start and lower the foot.
5.
Sew the b_Itonholc according to the buttonhole sewing instructions on p. 72 to 73,
Each side of the buttonhole and the barracks wiJt be sewn over the cord.
6.
Remove the fabric trom the machine and cut the sewing threads.
7.
Pail the nght_ end of the fffler cord to tighten =t,
8_
Thread the end through a darmng needle, draw to the bottom side of the fabric and cut.
NOTE: To adjusI sutch density, see p. 73,
Page 77

Homm,.g_.dEdg._gSt.oh_IN, []. _, [], [] _nd[]
S,_! tho Machir_
SECTION 5. LEARN THE STITCHES
[_ Thread l_n_n
G: B_indh_m stilch tool
StiIch width: 5.0
2_o_
!;il;!i:ii_!:,
The Stitches ¢.oveted in this sectmn are:
Blind Hem Stitch [_] {stretch} []
)iiii}!!ii_ii__;:i_!::i!!!:!_:_
Shell Stitch _-_
Scallop Stitch [] and
Cut-OutWork Edging [] and []
Applique [] and
;!i;ilil;i ii;!i!iii:i iiiiiiiii' il
Hemmm_J and Edging garments, tablecloths,
napkins and craft items have otten required
careful hand sewing to produce a protes.
smnaI, finished look.
The Kenmore 100 Stitch can do thes_
precision stitches much taster and more
precisely than you ever dreamed possible.
J J
A G F F
75
Page 78

SECTION5. LEARNTHESTITCHES
Hemming and Edging Stitches
= Blind Hem Stitch (stretch}
Set tt_a Mochln_
Th_'e_d le_sto_]
2 to6
G; B[ind h_m giJt¢.]_ |¢,t)t
The Sthches and Their Uses
The stretch Blind Hem Stitch _ |s to be
used for stretch tabrlc.s because |t _s the 3.
stronger and more eIastm of the blind hem
stitches. 4,
[_. [_, [_, [], [] and [] (Continued)
NO
NO B.
YEs
The regular blind item St|t(th_ IS strong
enough for woven tebr|es.
Blind HemStitch (woven}
1/8"
_Li_|_| W_i_hl Fa/ogle
jo "V8
Heavy Wei_hl Fabric;
Here's HOw
t. Finish the raw edge at your hem any way you des=re, (See Overcasting, p. __22)
2_ Measure, turn op your hem and pro.
NOTE: For light weight tahr_es0 you may need a double told.
Fold the mater|al {Bottom side out) on the edge to be stitches, as shown, leaving 1/8" el the finished hem edge
showing.
Turn the sliding guide screw so that the sliding guide |s very close {t/16") to the lett side at the blind hem toot.
Place the told of the hem aga|nst the sliding guide so thai the t/8" extending edge shows on the t|ght.
The long zigzag stitch should barely p|etce the folded edge of the fabric, hut still sew on the 1/8" extended
edge. See at tett tar proper st|tch appearance.
After hemming0 p_ess both sides at the finished hem. The r|ght side of the garment witt show only the blind
StitCheS-
Hetptul Hint
Heroin|rig Thin Fabrics:
Reduce pressure on the presser loot to avoid a dist|nct line.
76
Page 79

e Shell Stitch []
Set th_ M_chine
Threa(J [et_on
6Io9
SECTION 5, LEARN THE STITCHES
Woven Fabrics
F: Sat+_ stlt:h foot
Stitch width: 4.0 to 6+0
The Stitch and Its Uses
The Shell Stitch is termed by sewing a blind
hem over tolded fabrLc. S_ver_f rows el shei{
stitching are called shelltucks.
Shell stitching can be used to finish t_ems,
sleeveand neck openings,
Shell tucking can be used to c_eate scalloped
tucks on b_ouses and lingerie.
Here's How
"++ For best effect
-- set the st_t¢h width and length as you des+re+
-- you may need to tighten the top thread slightly,
--- allow the needle to !ust clear the folded edge ot the fabric when +t
zigzags+
if you sew rows ot shell stitches, space the rows 112" apart+
You can sew Shell Stitch on knits or sort silky wovens In any direction+
77
Page 80

SECTION 5. LEARN THE STITCHES
Hemming and Edging Stitches []. [], []. _], [] and [] (Continued)
= S_llop Stitch [] and []
:_.Otthe Mach[n_
31o6
Here's How
A: Zigzag lOOt
1. Sew your scallops at least 3/8" from the folded edge.
"2, After stitching, trim fabric close to the stitching, Be careful not to cut the
thread.
The Sl:{tch and hs Uses
Use this attt'act_ve scallop stllch to create
scallop edges or decorate your sewing
prelects, such as collars, pockets or place-
mats. You can create a delicate appearance
on thin fabrics, such as chiffon, using a single
layer of fabric with a tear-away backing tar
support while stitching,
You can also use this scallop stitch to sew
decorattve edgings on the hemlines at dresses
or sleeves.
78
Hetpiul Hints
For thin fabrics:
Use a stogie layer of fabnc with a tear-away backing for support while stitching.
For hemlines and sleeves:
Use a tear-away backing, if necessary.
For collars, pockets or craft pre!ects:
Place interlacing between the layers of fabric to provide stiffness,
Page 81

* Cut-Out Work Edging and Applique _ and
Set th_ Machine
Threa,'[ tension
2to6
F: Satl_ stitch
i_tOt
The Stitch and Its Uses
OJt-Out Work and Applique are the meier
uses tot this stitch, but _t can also be used to
provide edging on many sewing prelects,
including placemats, blankets, collars, cuffs
and pockets.
Pte_s_re dlat: 2
Here's How -- For Applique
1. Use a _usible heavy weight inter-
tamog behind each piece o_ your
applique.
2. Cut the interfacing slightly smaller
than the design p_eces.
3. Tape or baste the applique m p|ace
and sew a_oond each piece with
stitch pattern [] or _ ,
NOTE: You may also use a satin stitch.
4. When sewing curves, leave the needle
in the tabrlc0 rinse the presser toot
and turn the iabri¢.
5. Lower the presser toot and stitch,
SECTION 5. LEARN T_tE STITCHES
He[e's How - For CutoOut Work
_/. Choose a simple design and trace the
outline on the right side el the labnc.
2. Place a p_ece O! tulle or organdy
under the design and pin m place.
NOTE: You may want _o use a con-
trastln_ insert fabric to accent
your work,
3, Basle the _ayers together, stitching
!ust outside the outline. Remove the
plns_
q. Stitch around the design, using stitch
pattern[] or _.
NOTE: You may also use a narrowsatm
Stitch _see p, 6_3|.
5. Remove bast|ng and cut the tabrJc
inside the design close to the
stitching, using an embroidery
scissors.
79
Page 82

SECTION 5. LEARN THE STITCHES
Reinforcing Stitches []. [_, [] and 3_
Q F_athor Stitch
Set Zt_ MacMna
Thread Ien$to_
2to6
The Stitch and Its Uses
This stitch ts strong, useful and decorative.
It can _emtorce stretch and woven tabrms.
You can use it to sew spandex undergar-
ments or decoratively hem eIastm fabric.
You may also use this stitch in patchwork
quilting,
mleeelo_
• • _ : _e, mB° o
**
:o • t_ "
s B •j
:,D I
t •
• 0: o • i
Here's How
I. Sew this pattern on a seam that Is
already !omed and pressed flat.
;o°o•o _"
2.
BUtt two folded edr2es together and
use this stitch to |ore them.
8O
Page 83

e Fagoting Stitch []
Set t|_e Machine
Thfea_ len,_iar_
3rob
The Stitch and Its Uses
Use this stitch tD loin tWO pieces of fabric
to create an open work appearance and add
design mterest.
For other stitches that may be used in
lagotlng, see stitch patterns _ and
(p, 80).
_i_ Top,i.° ::_::
:i ilil i/;
:: L_ br!= ::
Paper
Here's How
L Fold under each fabric edge 112" and
press.
2- Pin the two edges to paper or tear-
away backing t/B" apart,
3. Sew slowly, guiding the _abnc so the
needle catches the folded edge on
eac|_ side,
Helpful Hint
You may want to set _he stitch width on
"7,0" for maximum effect.
SECTION5. LEARNTHESTI£CHES
81
Page 84

SECTION & LEARN THE STITCHES
Reinforcmg Stitches [_, [], [] and [] (Contmued)
o Elastic Casmg Stitch []
Set the _,_ach_n_
= ElastlcStretch Stitch []
S=t the Machine
(_ Thread le_ion
3t08
The Stitch and Its Use_
Use this stitch to replace bias tape casings
in such areas as wr_sts and Waists. jn
children's clothing, thi_ sUtch _sespeetaIly
helpful, because st reduces bulk.
82
Here's How
......... J
l, Slide a piece 0_' 1/8" elasue
under the tool then up
through the slot m Foot F
(saI_nstitch}.
2. Sew the elastic On the bottom
side of the tabneo pulling _t
!]ently to _void se',',_ngthrough
the elashc,
3. Pu_l on the elastic to gather [he
fabric and barrack atboth ends.
Thread len_lon
31o6
_ o_[_
A; Zi,],ta_3 fool F: Satin stilch
The Stitch and Its Uses
Choose this stitch to attach elastic to
garments.
_OOt
Here's How
1. Mark the elasuc _nto quarters
and match these to the center
trent, center beck and side
seams.
2- Place the middle ot the efest_c
under the center ot the presser
tool and stitch into place,
making sure the eia;nc =s
evenIv distributed.
Page 85

Tw,n Needle Stitching !_, [], _, [_, [_, [], [] and []
Sat the _%chi_e
Tw_ needle
burton
Th;e_d tel_iot_
3to7
A, Zigz#_} _oot
or
f:; S,_in _l*tCh _OO1
Twin t_eedle
When threading the machine lot _w_n needle sewing follow this charI making
sure yea separate the threads, placing o_e m each thread guide on the needle
bar.
SECTION 5. LEARN THE STITCHES
Your Kenmo_e 100 Stitch Js equipped
with a twin needle that can be used tO
sew parallel rows of strafght or decorative
stitches adding an exquisite touch to
table Iioens and clothing.
.................... j
Use toot A or F. Select pattern [] for paratlel rows el straight stitching.
At corners, rinse the needles till they c_ear the taboo, Partially raBe the
p_esser toot and carefully p_vo[ the labrlc.
To return to single needle sewing, press The Twin Needle Button or turn off
the Power Switch,
83
Page 86

SECTION5. LEARNTHESTITCHES
DecoratewithGeometricPatterns[] _ []
Set the P,_achine
Thread te_sio_
2to8
Tile Stitches and Their Uses
Thet;e stitches are purely decorative.
YOU can SeW On_ rUW or several or var_ the
stitch width and length fur special el{eeLs.
Experiment on a scrap ut fabrtc to see what
spemal effect_are p0ssib|e.
84
Here's Huw
"{. Adius! the stitch width and length as
you destre.
2. Practice the stitchon a scrap of fabric.
3. Mark the lines lot decoration on the
|abr_c, using a washable |ahr]c marker,
4. Lower the needle at the starting point,
5- Lower the presser tOOt.
6- Luck t_,e StlICh at the beginning (press
auto-lock),
7. Gently guide the fabric atong the
marked line,
B. Use the auto-lock to secure the row el
stitches at the and,
Helplul Hint
You may wan[ tu cumbine these geumelr_c
decuratlve stitches with uther decorative
sbtches. See "Programming Oecoratwe
Sthch Patterns" {P- 9._0)tot detailedinstrUc*
IIORS.
Page 87

Decorate with Stretch Stitch Patterns [] _ [] and [] _ []
_ _h_ M3chlne
2to6
The Stitches and Thetr Use_
Decorative stretch patterns can be used tot adding creative and persona|ized
touch to the items you sew tor your home and family+
SECTION 5, LEARN THE STITCHES
85
Page 88

SECTION5, LEARN THE STITCHES
Cross Stitch [_
Set I:ha M_.c.hi_e
2_06
Tile Stitch and Its Uses
You can make beautiful designs with this
embroidery stitch pattern, in half the t_me
_t would take if embroidered by hand. You
can also combine cross stitches with the
other decorative patterns and letters or
o#mbers |or attractive samplers and other
sewing pro!ects_
86
Here's How
i. Choose a plain close weave fabric such a_ linen
or wool flannel for the background fabric.
2. If yo_ choose ti_jht weight fabric, use a tear-
away fabric backing for support.
3. Adjusl the stitch w_dth and length as you
desire to malch the pattern you have or plan,
4. Find the center ot the design, or if the desLgn
_Sa border, choose a starting point.
5, Count the cross sIitches from the center up
and program the number.
ISee p, 92_., Pattern Singte Umts.)
Use Auto, Lock to begin and encL
For Cross-Stitching Without a Pattern:
IF. Start in the center of the destgn and sew the
{irst row, letting the taboo teed naturally.
2. Then count the next row el stitches to the
leltor r=ght.
3. Add or delete stitches by pressing the Clear
button and teprogrammmg,
4. Begin each row by lowering] the needle at the
corner of a previous stitch.
5. Use the placement, arrow " z_ " on Foot F to
insure straight, even rows.
Page 89

Smocking [], _], []0 [] arid []
S_r the Machtno
Tl_t_ad t_l_ion
2to6
_side
Stepl (Ito6}
SECTION5, LEARNTtlESTITCHES
Slep fl (7 tO B)
f ....
_ o, [_
A: Zigzag foo_ F:: Sat_n s_tt_h
The Stitches and Their Uses
Smocking is a delicate decorative treatment
for children's clothes or women's blouses,
tOOt
Here's How
% Choose a sort, lightwmght ]abrtc such as batiste, gingham or chatlis,
2- Cut the inbr=e three times the fimshed width.
3, Set the stitch length control b_tton at "4.5" and sew rows el slratght
gathering stitches 3/8" apart across the area to be smocked,
NOTE: Loosen the need!e thread tensfon to make gathenng easter.
4, Knot the threads along the edge,
5. Pull the bobbin threads and distribute the gathers evenly.
6. Secure the threads at the other end.
7. Sew the decorative stitches o} your chotce between the gaT;h_rlng shtches.
8. PoI_ out the gather|ng stitches.
Helplul Hint
These stitches can be used in combination w_lh others ior any decorative effect
you desire.
87
Page 90

SECTION 5. LEARN THE STITCHES
Sand Stitch []
,_d_llhO Mnchin_
Thread tensiDn
2_e6
F: Salin slitch
fool
The StiIch and Its Uses
_l_i_osand stitch fills in outlined embroidery
desl_lns-
Presst_re diaI: _ or 2
88
Here's How
f. OuIIine lhe pattern with a Satin Stitch
IN.
Set stitch width a_ "'t ,5"
Set stitch length at "'0.3 "° or as you
desire.
:2.
Fill in the design with the sand stitch.
3.
Decrease the stitch width to fill in small
spa_es.
4.
Sew in rows, starting at the edge, until
the pattern tS filled in.
Page 91

ShadingStitches [] and []
SECTION 5. LEARN THE STITCHES
Set Ihe Macl_ine
_@ T|lt i_0d fe_SlOn
F: Satf_ St_l_
toot f_ressu_'edlal: _ at 2
The Stitches and Their Uses
These stitches can be used to qulckfy and
neatly outline designs. Use them to anhanee
appliques and create your own machine
embroidered motifs.
2lob
P,3llem
\
Here_s How
Draw the destgn on the right side ot the labrlc. Place a tear away backing or
_ron.on interlacingbeneath the tabnc to_"_*Jpp0rtwhere necessary.
Use the automatic settings or man_affy adjust the st{tch length and width to
achieve a desired effect. Reduce the p_essure to |aciIitate sewing curved areas
and you may need to pivot on sharp c_Jrves.
A second row in the same or vaned thread color can be sewn inside the first
row tar a more pronounced outiine.
Pattern
89
Page 92

SECTION5. LEARNTHE STITCHES
Program Decorative Sutch Patterns _ _ [] etc.
To program stitch pattern combine{ions, press the pattern selection buttons m
the order shown.
e One Cycle Stitchin_
i. Press the Auto-Lock.
2- Press Memory.
t
_ 3, Press thest_tch pattern.
_, Press Memory.
{_ 5, Press the Auto*Lock,
l
6, Press Memory
See the Pattern Single Umt Chart.
You will sew one flower.
NOTE: The Auto-Lock stitch _s atready programmed rote the buttonhole
stdches and pattern numbers of 64 to 97, but not on any other stitches.
You must press Auto-Lock to lock the decorat}ve stitches.
9O
o Two Cycle Stitching
To sew two el any stitch pattern, press the memory button twice a_ter selecting
the stitch pattern numbers.
NOTE: Continue to press the foot control until the machine stops automati-
cally.
Combine Stitch Patterns
[_ _. Press the Auto-Lock.
2. Press Memory.
t
3. Press the stltch pattern.
l
4. Press Memory.
[_ 5. Press the next stitch pattern.
} 6, Press Memory.
_ 7. Press the stitch pattern.
$
8- Press Memory.
_ 9. Press the stitch pattern,
t
1O- Press Memory.
I I, Press the Auto-Lock.
_12. Press Memory.
To repeat the same combinatlon of stitches, lust press the toot control again
alter stltching the first combinatiOn.
NOTE: To delete errors made wbileprorjrammmgaseriesofpattems, pressthe
Clear Buttoo {see p._) and cent{hUe the programming.
Page 93

SECTION 5, LEARN THE STITCHES
e Cycle Stitchirt 9 by Pressing Mirror _mage
Button
Step
61
h
I Test Sewing Pattern Combinations
p_egtatnm_d
pattarns
To Start Sewing at the BeglOmng ot Your Pattern
Combination:
There may be ms{antes when you want to test a
patlern without sewing all the patterns,
Sew as much as necessary then press the Memory
button,
The machine will now start sewing at the beginning
ot your pattern combination,
Programmed
patterns
To Start Sew=no at the Beginning el the Pa|tern You
Have Been Sowing:
If you run out el thr0ad in the middle el a pattern,
press _he Mirror Image Button.
Remove tf_e stitching of the last pattern only,
Lower the needle at the end el the last completed
parterre
The machine wil_ start sew=no at the beginning ot the
patte[n you have been sewing when you have run out
of thread and conltnue sew_rlg the remmmng patterns,
91
Page 94

SECTION 5, LEARN THE STITCHES
Program Decorative Stitch Patterns [] _ [] etc. (Continued)
e Pattern Single Umt_
{Aid to Programming)
The patterns _hown In the upper panel are the units el each pattern
sewn when the memory button as touched once,
Each buttonhole is automa_:_cally locked at the end.
"Auto-Lock" _lltch _ already programmed on the buttonhole
stitching and pattern numbecs ol 54 to 97, but on no o_her stitch
patterns shown here.
92
Page 95

Monogramming [] _ []. [] _ []
Your machine will sew the 26 letters el the alphabel:, the per_od and Ieave a
space, plus the numbers from 0 to 9. You can program entire words and
sentences.
Each number and letter _s automatically locked at the beglnnlt_g and end so you
can clip connecting threads,
Eel:lets and numbers can be sewn two,thirds their regular s_ze by press{og m_rror
image btttlon instead of memory button when programming.
Step
SECTION 5. LEARN THE STITCHES
E=
e_
'j L_"
rrl
T}_e chart above shows wt;ere to clip the connecting 1breads and where
each pattern starts, marked by "'0"
You can program words and sentences m lhe same way as you program
other stitch patterns, Press the memory bul_on altar each stitch pattern
selection up to 31 seleataons. See example.
93
Page 96

SECTION 5. LEARN THE STITCHES
Adjusting Patterns
e To Adjust Distorted Patterns
If decorative .stitch patterns, letters or
number.s arc uneven when you sew on a
particular |abr{_, adjust them with the feed
balance dial,
94
Compre_;sed PalIerns:
Correct by turning the 'teed balance dial
toward the "+" Use the large .screw driver
In your aeces5ory bOX,
= To Adiust Distorted Letters or Numbers
Compressed Letters or Numbers: Drawn Out Letters or Number.st
Correct by turning the |eed batance dial Correct by turning the teed balance dial
toward the "+" toward the "'--"
Drawn Out Pattern:
Correct by turning the teed balance dial
toward the "'--'"
Page 97

SECT1ON 6. PERFORMANCE PROBLEMS CHART
What to Do When
PROBLEM PROBABLE CAUSE CORRECTION
The machine does not work. A single digit number was programmed, Two digit number must be programmed,
The machine does not work and the The area of feed dogs is filled wlth dust Clean the area at the teed dogs.
Pattern Indicator reads "'Er °" and lint-
Irregular Stitches
Breaking Needle
Bunching of Thread
Puekermg
Monograms and butlonhotes are
not identlcalduring memory sewing.
A number without pattern was selected. A number m the stitch package chart must be selected.
Incorrect size needle.
tmproper threading.
Loose upper thread teosron.
Pulling fabric.
Light pressure on presser toot.
Loose presser toot,
Unevenly wound bobbin,
Nicks or burrs at hole at needle plate.
Polling labrlc.
Incorre_:t size needle.
Incorrect setting el needle,
Loose presser toot.
Upper and lower threads not drawn back
under presser foot before starting seam.
Incorrect thread tensson(s).
Light pressure on presser toot,
Using two different sizes or kinds of thread.
Bent or blunt needle,
Loose presser tool
Fabric too sheer or too sort.
Fabric teed is restricted in some way.
Choose correct slze needle |or thread and fabric,
Relhread machin_-
Tigi_ten Upper thread tension.
00 not putt (abrrc; guide tt gently.
lncrease pressure on presser toot.
Reset presser _ooL
Rewind bobbin,
Replace needle plate, or polish off burrs completely,
DO not put1 fabr=c; guide it gently.
Choose correct size needle for thread and [abr_c.
Reset needle,
Reset presser toot,
When starting a seam be sure to draw both threads under and
back at presser tool about 4" and hold until a few stitches are
|armed,
Reset thread tenslon{s).
Increase pressure on presser tOOt,
Upper thread and bobbin tbread should be same s_ze and kind.
Insert new needle,
Reset presser toot.
Use underlay at tissue paper,
Cheek threads tar tangles,
Check leed dogs and clean, if necessary,
Be sure tabrm does not pileup behind the presser_oot.
See pages 69 to _ tar buttonholing instructions.
95
Page 98

SECTrON 6.
What to Do When (Continued)
Monograms and buttonholes not Machine was not allowed to complete the Hold down the fOOT control until the machine h_s
ident{caI. !asl tow stitches, stopped.
Skipping Stitches Incorrect setting of needle. Reset needle.
Breaking Upper Thread Tight upper thread tenslon. Loosen upper thread tension.
Breaking Bobbin Thread improper bobbin holder lipreading. Check bobbin holder threading.
Fabric not Moving Thread knotted under fabric. Place both threads back under presser toot before beginning
Machine Jamming Knocking Noise Thread caught in hook race. Disassemble and clean hook race,
Buttooholes are not identical
in lenf_th and shape.
PERFORMANCE PROBLEMS CHART
PROBLEM PROBABLE CAUSE CORRECTtON
Incorrect size needle. Choose correct size needle tot thread end fabric.
Bent or blunt needle, lnsert new _eedle.
Tight upper thread tension. Loosen upper thread tension.
Light pressure on presser loot. Increase pressure on presser toot.
Starting to stitch too last. Start to stitch at a medium speed.
Improper threading. Re_hread machine,
Incorrect slze need|e. Choose correct slze needle lot thread and fabric.
Sharp eye In needle, insert new needle,
Nicks or burrs at hote of naedIe plate. Replace needle plate, Or polish off burrs completely.
Lint m bobbin holder or hook race. Clean bobbin holder and hook race,
Darning plate m place. Remoue darning plate.
Light pressure on p_esser loci, tncrease pressure on presser toot,
Push-put! clutch _sdisengaged. Push m the clutch,
Lint in bobbin holder or hook race. Clean bobbin holder and hook race.
Fabric _s pulling and distorting the
automatic fabn_ teed.
Fabric ts too thick near the seam and the
buttonholes.
to StITCh.
i.
Keep the fabric _rom fallinrj off the edges of the sewing
surface.
2,
Bunch the taboo slightly all around the needle.
Use the J Foot in These instances.
2.
Start the buttonhole so that you sew toward the edge of
the fabric.
3.
Put standard writing paper {not tissue paper) under The
garment to aid fabric teed {for woven and stretch taboos},
Do not use the Automatic Buttonhole function,
Sew each button individuaIIy,
96
Page 99

Clean the Bobbin Holder
To insu(e that ,/our machine operates at _s best, you need to keep the
essential parts clean at all times.
The bobbin area can attract dust and lint, Your machine can become s|uggish
or knock loudly if a thread is caught.
SECTION 7. CARE FOR YOUR MACHINE
Follow these directions:
_. Turn off the power or unplug
the machine,
2. Remove the bobbin cover p_ate
by firm|y pulling it toward you,
3. Remove the bobbin.
¢_, _rush or vacuum the dust and
tint Out, Of the bobbin holder.
5. Replace the bobbin,
6- Slide on _he bobbin cover p_ate
by pushing _t into tile grooves,
97
Page 100

SECTION7, CAREFORYOURMACHINE
CleantheHookRaceandFeedDogs
Unplug the machine and remove
tbe presser toot and needle,
2.
Remove the bobbin cover pla+,e.
3.
Remove the screw on t|le ]e|t
side of the need+e plate with the
large s_rew driver from your
accessory box,
Remove the needle ple_e,
98
5. Take out the bobbin. Lift up 6+ Use the _int brush m the 7+ Line up the red marks and place
the bobbin holdar and remove it- accessory box to clean the teed the bobbin holder so the knob
dogs. hook ra_e and bobbin fhs next to the stopper in the
holder. ALso use a sort. dry hook race. as sbown above.
Cloth.
 Loading...