

Sears 374.288450 Service Manual
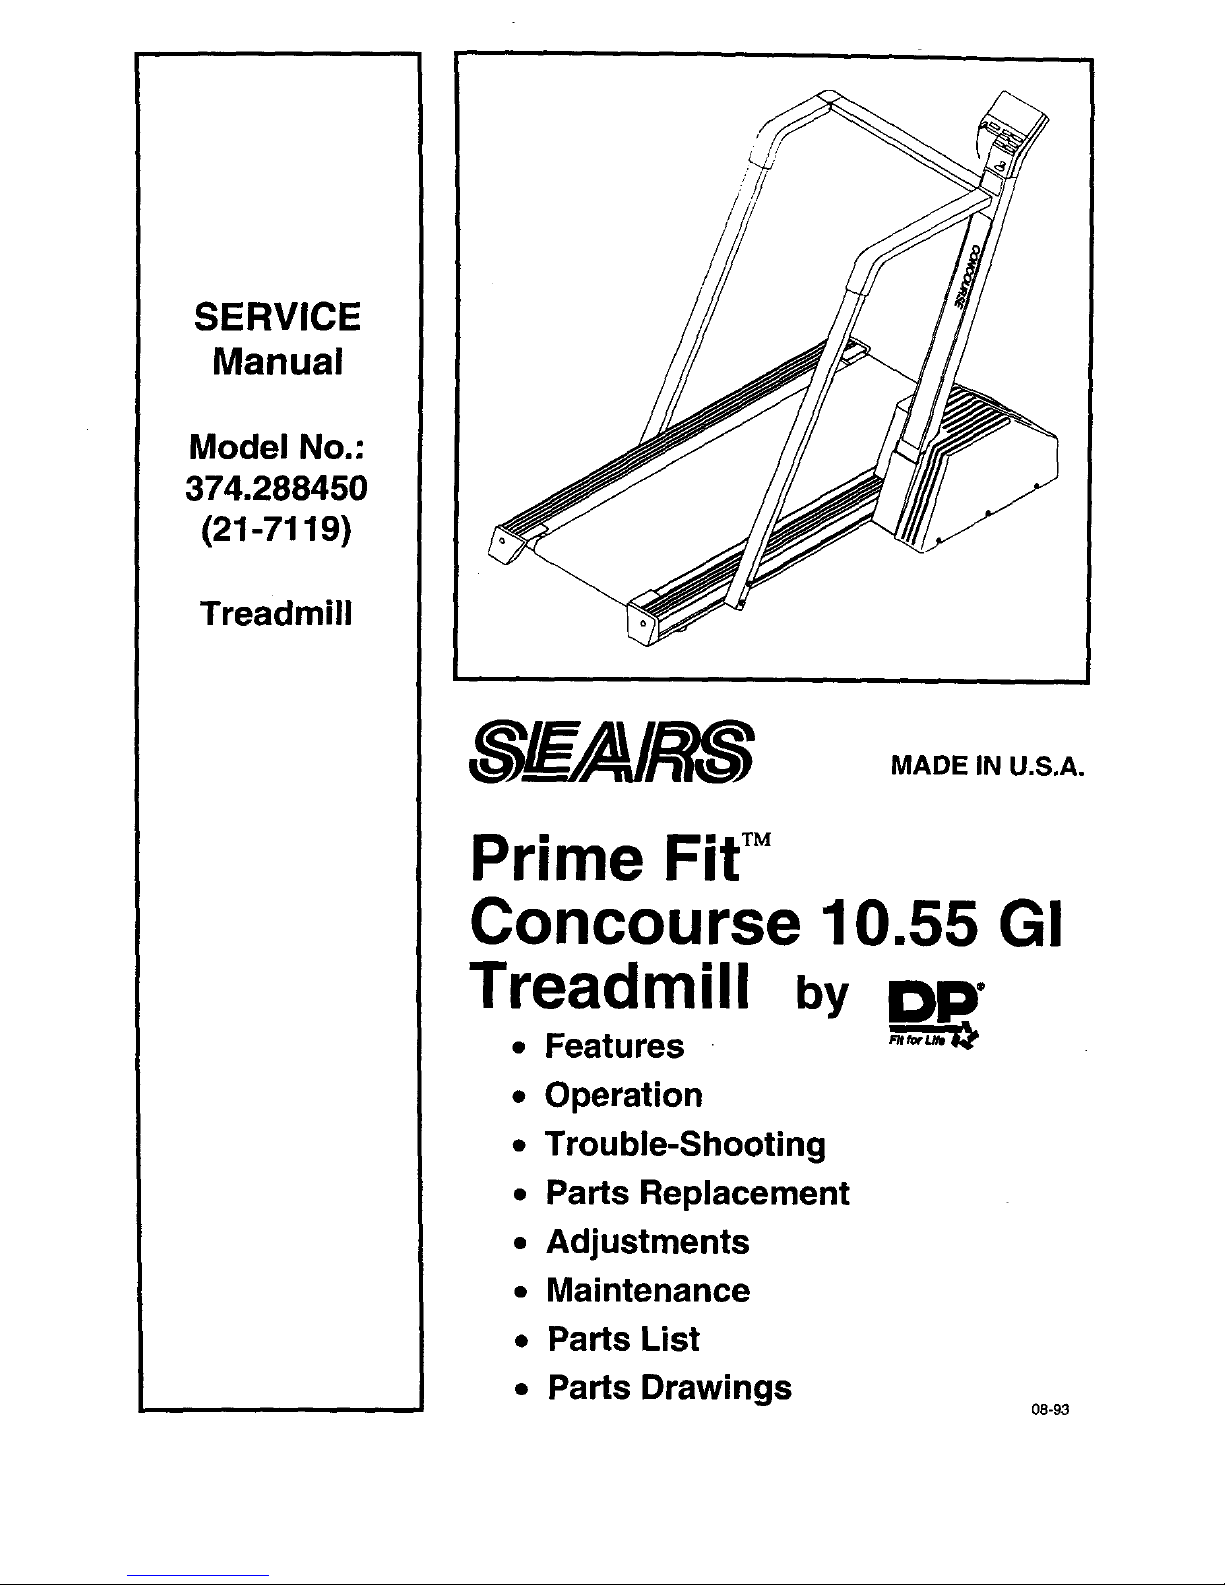
SERVICE
Manual
Model No.:
374.288450
(21-7119)
Treadmill
MADE IN U.S.A.
Prime Fit_"
Concourse 10.55 GI
Treadmill by p_p"
• Features
• Operation
• Trouble-Shooting
• Parts Replacement
• Adjustments
• Maintenance
• Parts List
• Parts Drawings
08-93
TABLE OF CONTENTS
FEATURES .................................................... 3
OPERATION ................................................... 4
Grounding Instructions ........................................... 4
Treadmill Operation .............................................. 4
Incline Adjustment ............................................... 4
Fitness Computer Operation ...................................... 6
Using The Pulse Pickup .......................................... 7
Operation Trouble-shooting ....................................... 8
SYSTEM TROUBLE-SHOOTING .................................. 9
Console ....................................................... 9
Interface Board ................................................ 9
Motor Controller ................................................ 9
Motor ......................................................... 9
Speed Control System Trouble-shooting ............................. 11
Speed Control System Wiring Diagram .............................. 12
PARTS REPLACEMENT ......................................... 13
Drive Belt, Front Roller, Treadbelt, Treadboard, and rear Roller Replacement 13
Motor/and or Flywheel Pulley Replacement ......................... 14
Motor Controller Replacement ..................................... 14
Interface Board Replacement ...................................... 14
Reed Switch Replacement ........................................ 14
Reset Switch Replacement ........................................ 15
Console, Fitness Computer, and / or Power Switch Replacement .......... 15
Wiring Harness Replacement ..................................... 15
Incline Lever Replacement ........................................ 16
Gas Cylinder Replacement ........................................ 16
ADJUSTMENTS ................................................ 17
Treadbelt Adjustment ............................................ 17
Reed Switch Adjustment ......................................... 17
Gas Cylinder Adjustment ......................................... 17
MAINTENANCE ................................................ 18
PARTS LIST
Treadmill ...................................................... 19, 20
Console ....................................................... 22
PARTS DRAWINGS
Treadmill ...................................................... 21
Console ....................................................... 23
2
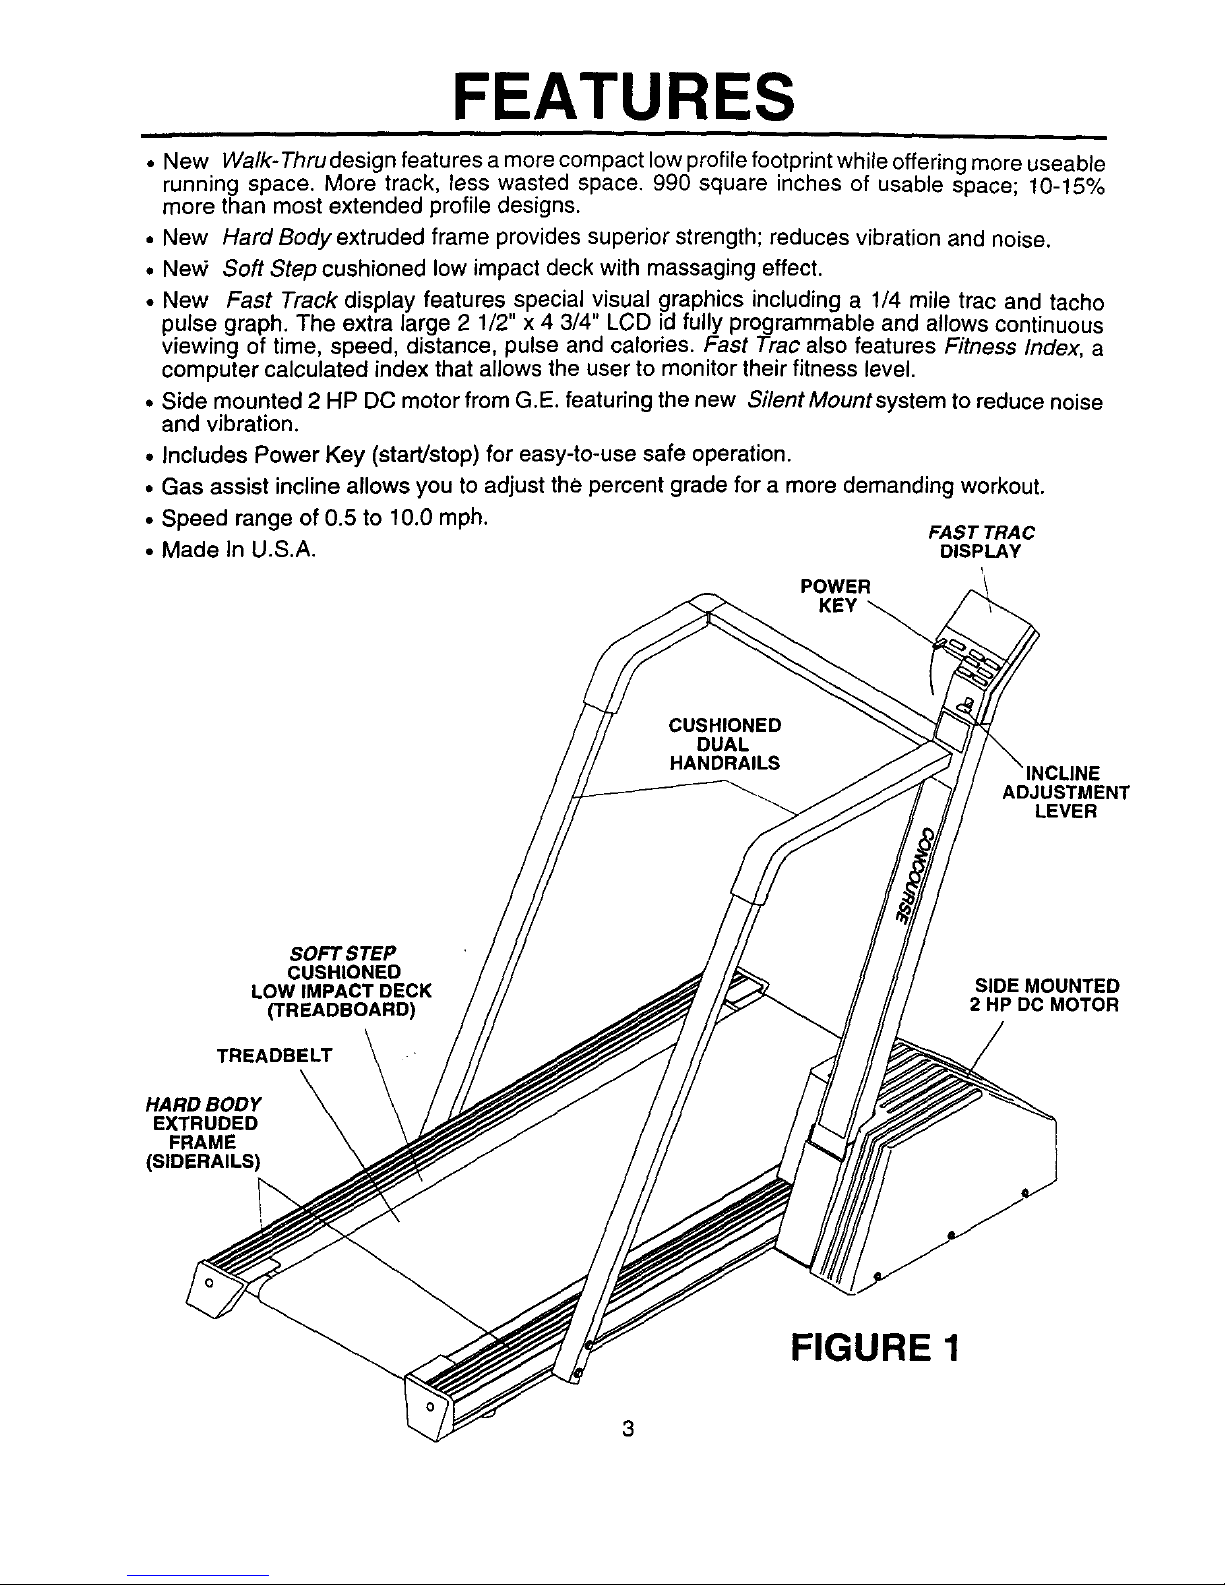
FEATURES
• New Walk-Thru design features a more compact low profile footprint while offering more useable
running space. More track, less wasted space. 990 square inches of usable space; 10-15%
more than most extended profile designs.
• New Hard Body extruded frame provides superior strength; reduces vibration and noise.
• New Soft Step cushioned low impact deck with massaging effect.
• New Fast Track display features special visual graphics including a 1/4 mile trac and tacho
pulse graph. The extra large 2 1/2" x 4 3/4" LCD id fully programmable and allows continuous
viewing of time, speed, distance, pulse and calories. Fast Trac also features Fitness Index, a
computer calculated index that allows the user to monitor their fitness level.
• Side mounted 2 HP DC motor from G.E. featuring the new Silent Mountsystem to reduce noise
and vibration.
• Includes Power Key (start/stop) for easy-to-use safe operation.
• Gas assist incline allows you to adjust the percent grade for a more demanding workout.
• Speed range of 0.5 to 10.0 mph. FAST TRAC
• Made In U.S.A. DISPLAY
POWER
KEY
CUSHIONED
DUAL
HANDRAILS
ADJUSTMENT
LEVER
SOFT STEP
CUSHIONED
LOW IMPACT DECK
(TREADBOARD)
TREADBELT
HARDBODY
EXTRUDED
FRAME
(SIDERAILS)
SIDE MOUNTED
2 HP DC MOTOR
FIGURE 1

OPERATION
• This TREADMILL is intended for home use only.
Be sure your TREADMILL is sitting on a level surface.
The TREADMILL should be plugged into a three prong (grounded) outiet in a 115/120 volt-60 Hz AC circuit separate
from all other appliances - see GROUNDING INSTRUCTIONS.
GROUNDING INSTRUCTIONS
This product must be grounded. If it should malfunction or breakdown, grounding provides a path of least resistance
for electric current to reduce the risk of electric shock. The plug must be plugged into an appropriate outlet that is
properly installed and grounded in accordance with all local codes and ordinances.
WARNING -- Improper connection of the equipment-grounding conduc-
tor can result in a risk of electric shock.
GROUNDED
OUTLET
Check with a qualified electrician or serviceman if you are in doubt as to whether
the product is properly grounded. Do not modify the plug provided with the product GROUNDED
-- if.it will not fit the outlet, have a proper outlet installed by a qualified electrician. PIN __
This product uses a nominal 120 volt circuit and has a grounding plug that looks
similar to the plug illustrated.
No plug adapter should be used with this product. __,_pL :G_ _
The use of an extension cord with this product is not recommended, but if an
extension cord is needed, use a short (less than ten feet), heavy gauge (14 gauge U
or better) extension cord with a three prong (grounded) plug and receptacle.
TREADMILL OPERATION
NOTE: Before operating your treadmill, become familiar with all operating parts and controls - their location and
function - see FIGURE 3.
Step 1.
Step 2.
Step 3.
Step 4.
Step 5.
To Operate
CA UTION--To avoid injury, hold ontoHANDRAILS while mounting and dismounting TREADMILL.
Place feet on SlDERAILS. Do notatand on TREADBELT. Securely attach POWER KEY CLIP to your
clothing. If you slip or fall while exercising, POWER KEY will pull out of CONSOLE, turning power off.
Insert POWER KEY fully into SLOT in CONSOLE, to turn treadmill's power "ON".
Push SPEED CONTROL UP BUTTON to adjust treadmill to slowest speed (0.5 mph).
Step onto TREADBELT and begin walking.
Push SPEED CONTROL UP BUTTON until you reach your desired speed.
NOTE: The TREADMILL is capable of speeds from around "0.5" to "10" miles per hour. Due to manufacturer
tolerances, the upper and lower speed limits may vary by + or - 0.2 mph. The speed is read from the DISPLAY
in the CONSOLE.
Step 1.
Step 2.
Step 3.
Step 4.
To Stop
Push SPEED CONTROL DOWN BUTTON to adjust treadmill to slowest speed (0.5 mph)
Hold onto HANDRAILS and place feet on SIDERAILS.
Push STOP / PAUSE BUTTON.
Remove POWER KEY, to turn treadmill's power "OFF".
To Adjust Incline
CA UTION-- POWER KEY must be removed before incline adjustments are made.
RAISING .... Dismount the treadmill, pull up the INCLINE LEVER and release when the treadmill reaches the
desired incline angle.
LOWERING - - - Mount the treadmill, pull up the INCLINE LEVER and release when the treadmill reaches the
desired incline angle.
4
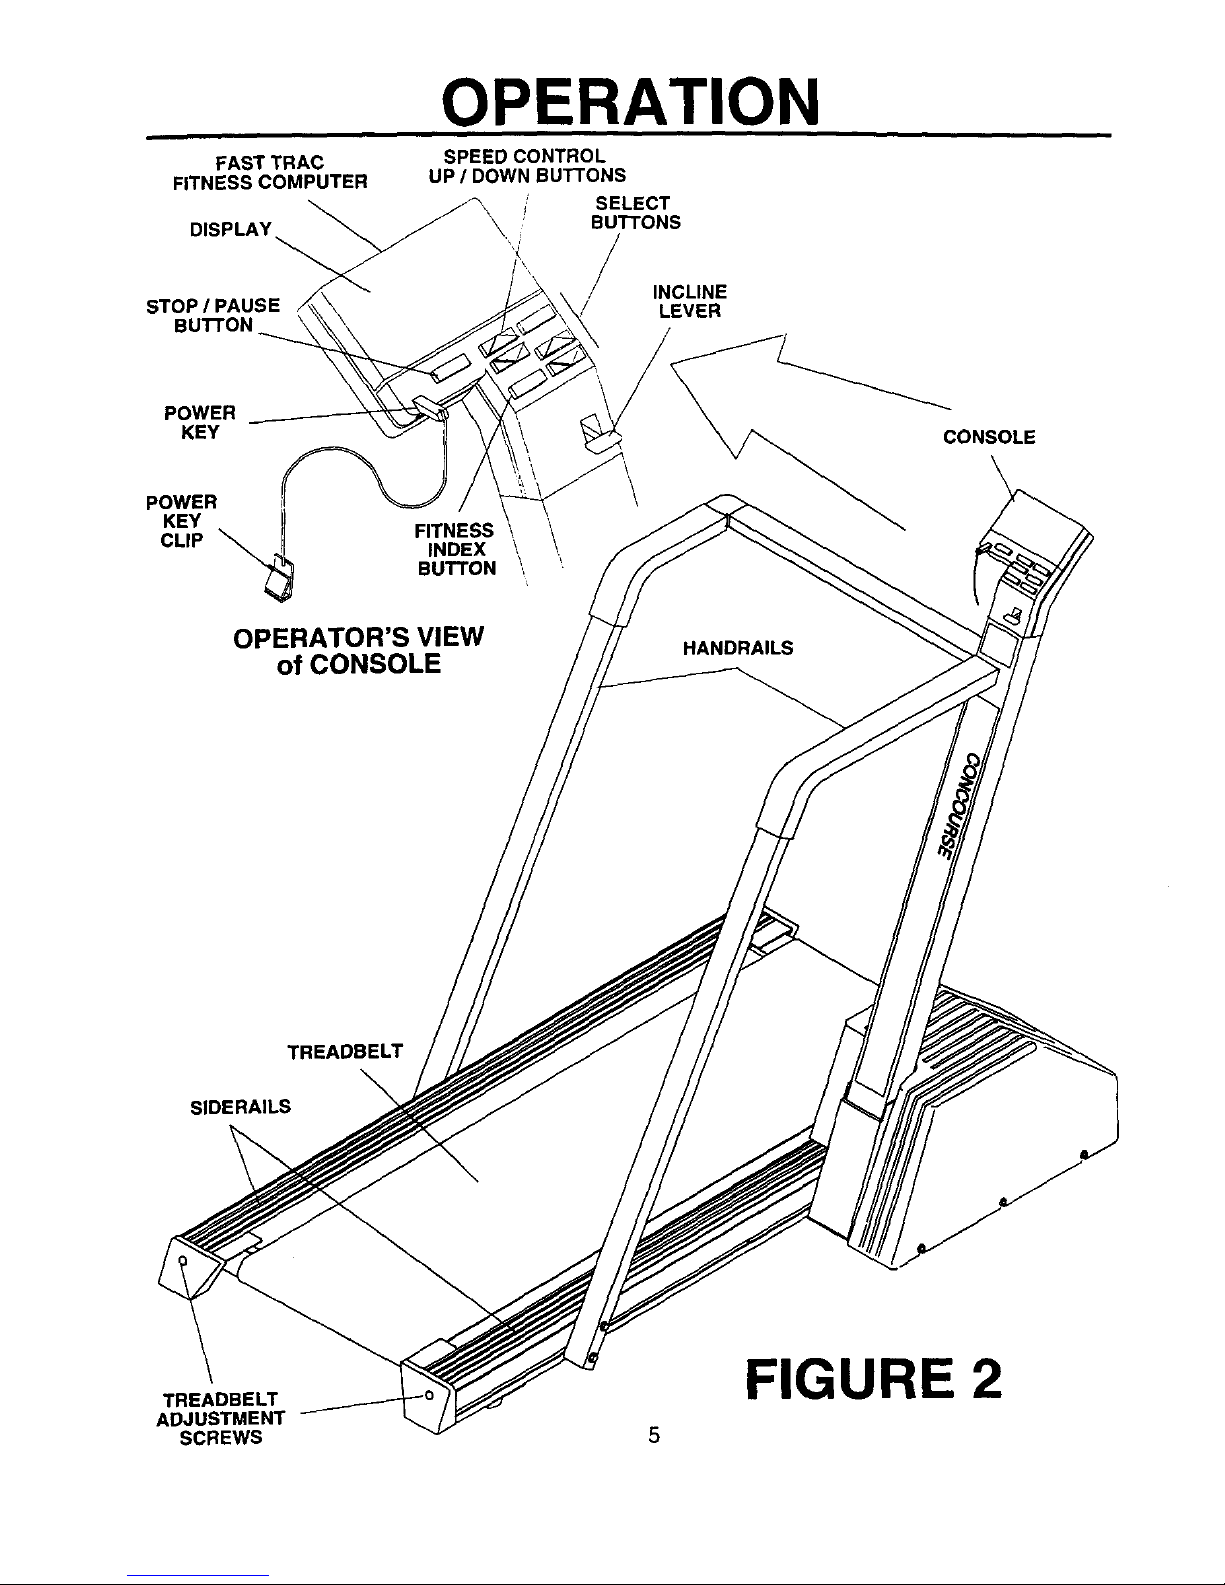
OPERATION
FAST TRAC SPEED CONTROL
FITNESS COMPUTER UP/DOWN BUTTONS
SELECT
DISPLAY \,,i BUTTONS
J
STOP/PAUSE
BU1-FON
INCLINE
LEVER
POWER
KEY
POWER
KEY _
CLIP
FITNESS
INDEX
BUTTON
OPERATOR'S VIEW
of CONSOLE
\
HANDRAILS
CONSOLE
TREADBELT
SlDERAILS
FIGURE 2
TREADBELT
ADJUSTMENT
SCREWS 5

OPERATION
FITNESS COMPUTER
The FITNESS COMPUTER is designed to provide five
functions displayed automatically, four programmable
functions and a fitness index function.
Automatically Displayed Functions
1. TIME:
2. SPEED:
3. DISTANCE
a. MILES:
b. LAPS:
4. CALORIES:
PULSE:
Counts up from 0:00.
Displays speed in miles per hour.
Counts up from 0 in total miles.
Counts up from 0 in total laps.
(1 lap = 114 mile)
Counts up from 0.
Displays your heart rate.
Programmable Functions
1. TIME:
Time can be preset from 0:00 to
99.00 in one minute increments.
2. DISTANCE: Distance can be preset from 0 miles
(0 laps) to 49 3/4 miles (199 laps) in
1/4 mile (1 lap) increments.
3. CALORIES: Calories can be preset from Oto 990
in 10 calorie increments.
4. PULSE A pulse target can be preset from 90
TARGET: to 180 in 1 beat per minute incre-
ments or "--"for pulse display only.
The FITNESS INDEX button tracks your fitness level
with computer calculated fitness rating.
Insert POWER KEY. Functions will start countingwhen
the treadmill speed is greater than Omph.
Press SELECT BUTrON until only display area of the
KEY
SELECT
BUTTON
FITNESS
INDEX
BUTTON
UP/DOWN
BUTTONS
I
desired function to beprogramed (TIME,
DISTANCE or CALORIES) is displayed.
Press UP or DOWN BUTTON until desired numberis
reached. Wait 4 seconds. When treadmill
speed is greater than 0 mph, desired pro-
_amed function (TIME, DISTANCE or
LORIES) will start counting.
1LAP
• Refer to TRAINING CHART on page 15 in owner's
manual for your recommened PULSE TARGET.
• Refer to "USING THE PULSE EARCLIP" section and
attach eamlip as directed,
Press SELECT BUTTON: until "PULSE" appears in
pulse display area.
Press UP or DOWN BUTTON : untildesired PULSE
TARGET set point is
reached.
START I FINISH
Ij POINT
!lllllillilW
,.LAP---j m-- ,LAP
1/2 LAP
1 LAP = 1/4 MILE
6
10Beats Per Pulse Target 10 Bests Per
Minute Below Set Point MinuteAbove
Pulse Target I Pulse Target
_ v i _ v / \_ v /
\_" / \_" / \_" /
PULSE PULSE PULSE
BELOW WITHIN ABOVE
TARGET ZONE TARGETZONE TARGETZONE
OPERATION
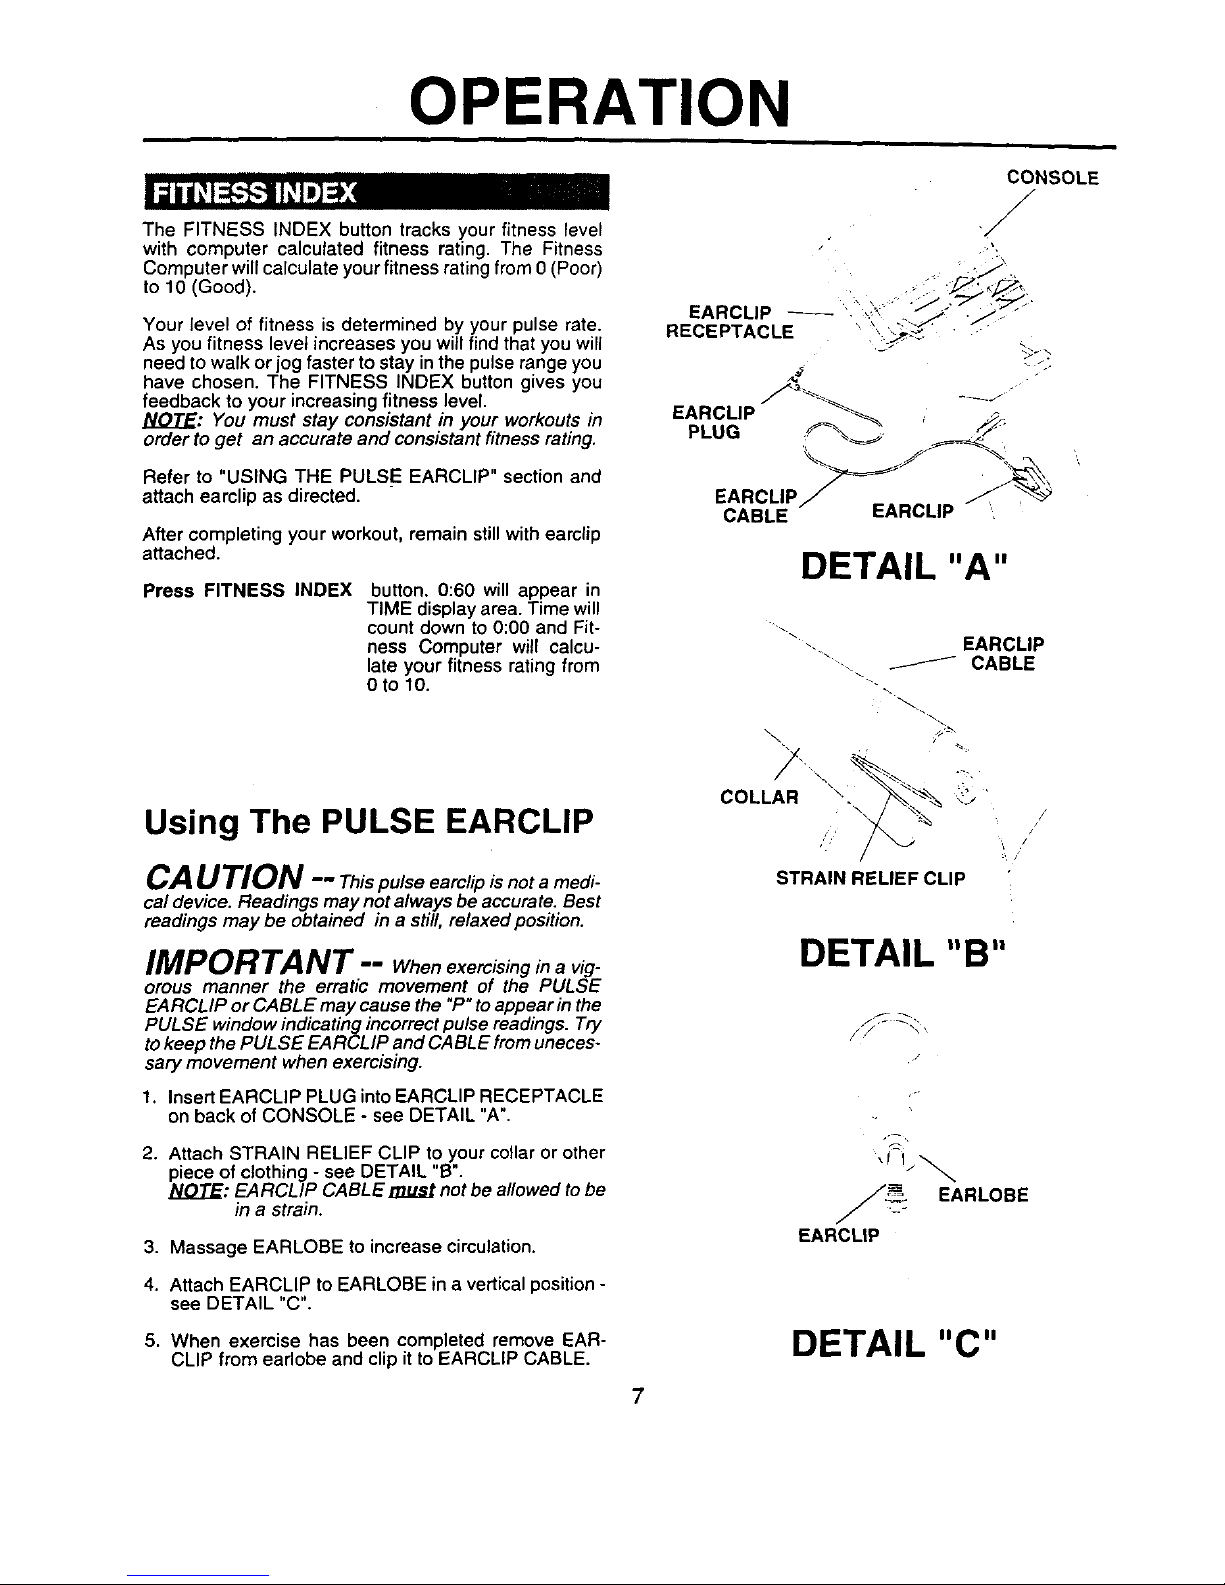
The FITNESS INDEX button tracks your fitness level
with computer calculated fitness rating. The Fitness
Computer will calculate your fitness rating from 0 (Poor)
to 10 (Good).
Your level of fitness is determined by your pulse rate.
As you fitness level increases you will find that you will
need to walk or jog faster to stay in the pulse range you
have chosen. The FITNESS INDEX button gives you
feedback to your increasing fitness level.
NOTE: You must stay consistant in your workouts in
order to get an accurate and consistant fitness rating.
Refer to "USING THE PULSE EARCLIP" section and
attach earclip as directed.
After completing your workout, remain still with earclip
attached.
Press FITNESS INDEX
button. 0:60 will appear in
TIME display area. Time will
count down to 0:00 and Fit-
ness Computer will calcu-
late your fitness rating from
Oto 10.
Using The PULSE EARCLIP
CA UTION -- This pulse earclip is not a medi-
cal device. Readings may not always be accurate. Best
readings may be obtained in a still, relaxed position.
IMPORTANT-- When exercising in a vig-
orous manner the erratic movement of the PULSE
EARCLIP or CABLE may cause the "P" to appear in the
PULSE window indicating incorrect pulse readings. Try
to keep the PULSE EARCLIP and CA BLE from uneces-
sary movement when exercising.
1. Insert EARCLIP PLUG into EARCLIP RECEPTACLE
on back of CONSOLE - see DETAIL "A".
2. Attach STRAIN RELIEF CLIP to your cellar or other
piece of clothing - see DETAIL "B".
]Y..Q.TJ_:EARCLIP CABLE must not be aflowed to be
in a strain.
3. Massage EARLOBE to increase circulation.
4. Attach EARCLIP to EARLOBE in a vertical position -
see DETAIL "C".
5. When exercise has been completed remove EAR-
CLIP from earlobe and clip it to EARCLIP CABLE.
DETAIL "A"
\\
\
COLLAR ""
"\
-. EARCLIP
-.. / CABLE
/:/
STRAIN RELIEF CLIP
/
DETAIL "B"
/._- _-.
// // -, •
/_: EARLOBE
EARCLIP
DETAIL "C"
7
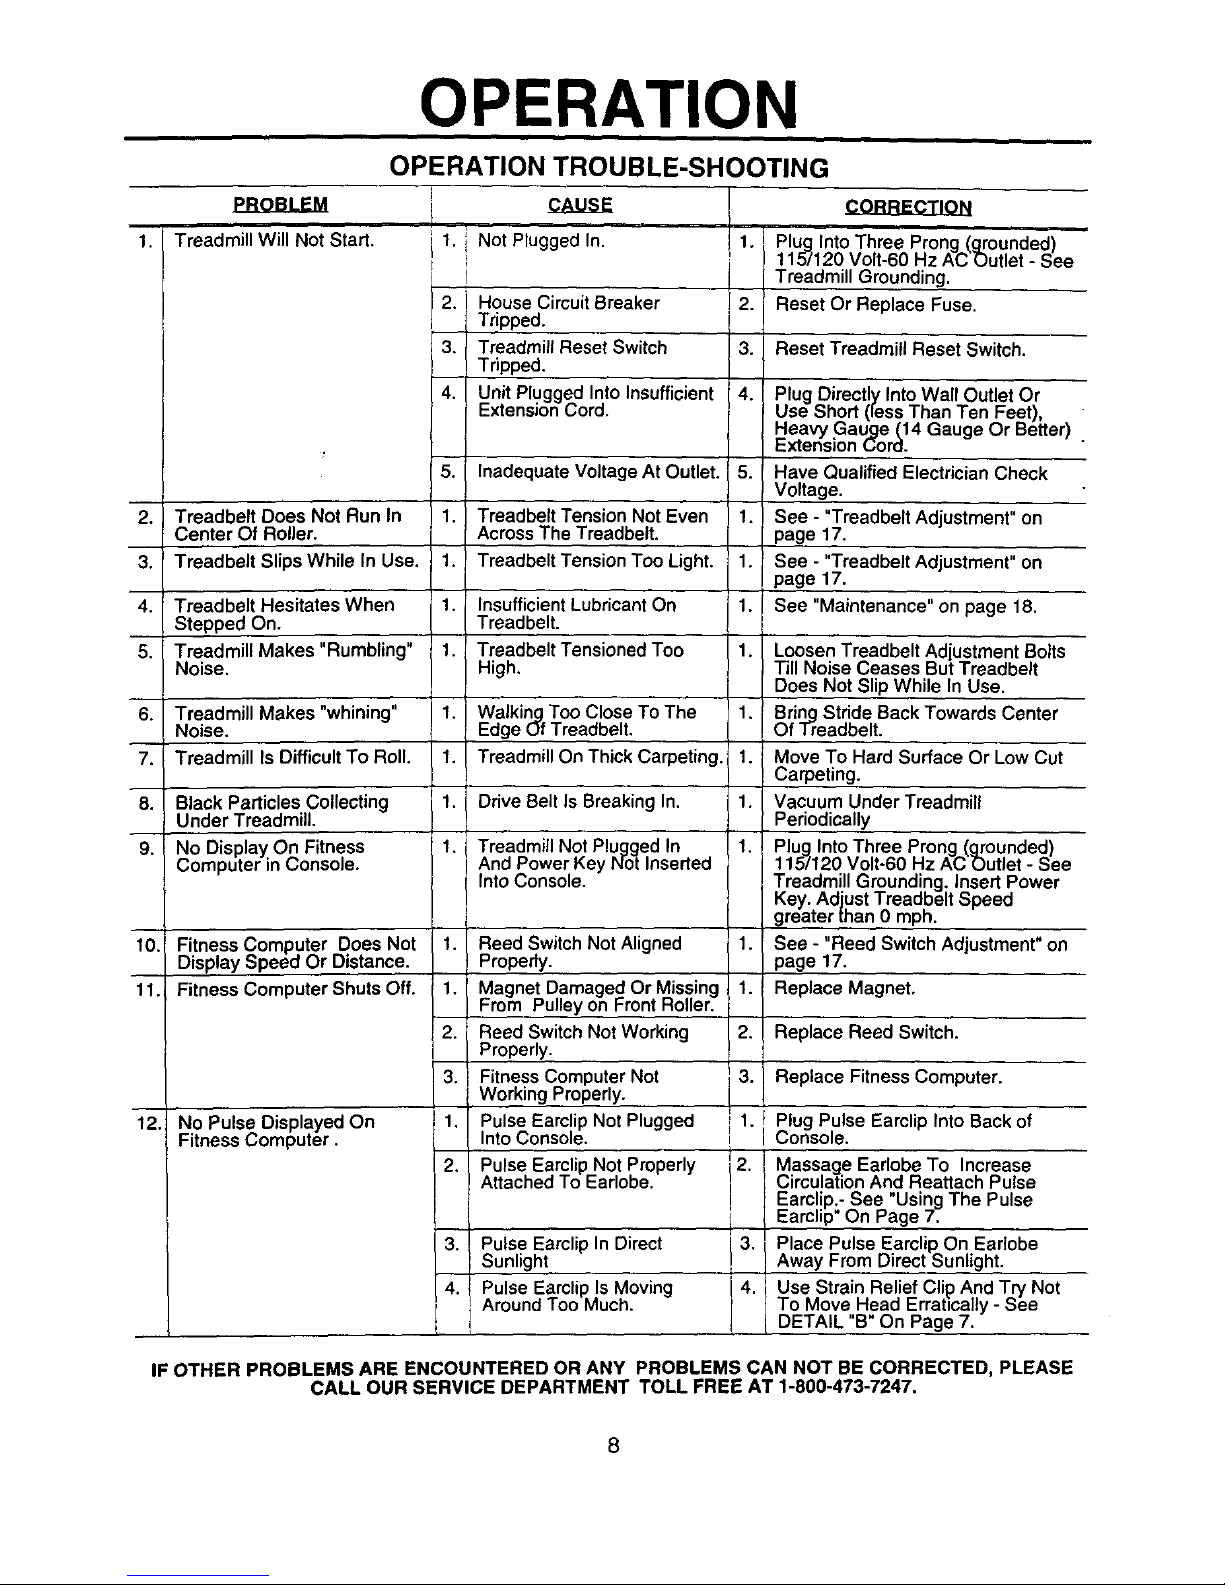
OPERATION
1.
2.
3.
4.
5.
6.
7.
8.
9.
10.
11.
12.
Treadmill Will Not Start.
Treadbelt Does Not Run In
Center Of Roller.
Treadbelt Slips While In Use.
Treadbelt Hesitates When
Stepped On.
Treadmill Makes "Rumbling"
Noise.
Treadmill Makes "whining"
Noise.
Treadmill Is Difficult To Roll.
Black Particles Collecting
Under Treadmill.
No Display On Fitness
Computer in Console.
Fitness Computer Does Not
Display Speed Or Distance.
Fitness Computer Shuts Off.
No Pulse Displayed On
Fitness Computer.
OPERATION TROUBLE-SHOOTING
il. ! Not Plugged In.
i2.[
House Circuit Breaker
Tripped.
3. Treadmill Reset Switch
Tripped.
4. Unit Plugged Into Insufficient
Extension Cord.
5. Inadequate Voltage At Outlet.
1. Treadbelt Tension Not Even
Across The Treadbelt.
1. Treadbelt Tension Too Light.
1. Insufficient Lubricant On
Treadbelt.
1. Treadbelt Tensioned Too
High.
1.
Walking Too Close To The
Edge Of Treadbelt.
1. Treadmill On Thick Carpeting.
1. Drive Belt Is Breaking In.
1. Treadmill Not Plugged In
And Power Key Not Inserted
Into Console.
1. Reed Switch Not Aligned
Properly.
1. Magnet Damaged Or Missing
From Pulley on t-ront Roller.
2. Reed Switch Not Working
Properly.
! 3. Fitness Computer Not
[ Working Properly.
21 Pulse Earclip Not Plugged
Into Console.
Pulse Earclip Not Properly
Attached To Earlobe.
3.
4.
Pulse Earclip In Direct
Sunlight
Pulse Earclip Is Moving
Around Too Much.
Plug Into Three Prong (grounded)
115/120 Volt-60 Hz AC Outlet - See
Treadmill Grounding.
Reset Or Replace Fuse.
Reset Treadmill Reset Switch.
Plug Directly Into Wall Outlet Or
Use Short (less Than Ten Feet),
Heavy Gauge (t4 Gauge Or Better)
Extension Cord.
Have Qualified Electrician Check
Voltage.
See - "Treadbelt Adjustment" on
page 17.
See - "Treadbelt Adjustment" on
page 17.
See "Maintenance" on page 18.
Loosen Treadbelt Ad ustment Bolts
Till Noise Ceases But Treadbe t
Does Not Slip While In Use.
Bring Stride Back Towards Center
Of Treadbelt.
Move To Hard Surface Or Low Cut
Carpeting.
Vacuum Under Treadmill
Periodically
Plug Into Three Prong (grounded)
115/120 Volt-60 Hz AC Outlet - See
Treadmill Grounding. Insert Power
Key. Adjust Treadbelt Speed
greater than 0 mph.
See -"Reed Switch Adjustment" on
page 17.
Replace Magnet.
Replace Reed Switch.
i 3. I Replace Fitness Computer.
r 1. ! Plug Pulse Earclip Into Back of
t
i Console.
2. Massage Earlobe To Increase
Circulation And Reattach Pulse
Earclip.- See "Using The Pulse
3. I Earclip" On Page 7.
Place Pulse Earclip On Earlobe
. I Away From Direct Sunlight.
I 4. Use Strain Relief Clip And Try Not
I To Move Head Erratically - See
DETAIL "B" On Page 7.
IF OTHER PROBLEMS ARE ENCOUNTERED OR ANY PROBLEMS CAN NOT BE CORRECTED, PLEASE
CALL OUR SERVICE DEPARTMENT TOLL FREE AT 1-800-473-7247.
8
 Loading...