

Page 1

SEARS
OWNER'S
MANUAL
Model No.
919,329150
m4PORTANT;
Read the Safety Guidelines
and All Instructions Carefully
Before OpsmUng
Sold by Sears R'oebuok and Co., HoffTnan Estates, I1. 60179 U.S.A.
D2Gs_ Rev.o e/WOO
120/240 VOLT • 5500 WATT
GENERATOR
• SAFETY GUIDELINES
• ASSEMBLY
• OPERATION
• MAINTENANCE
• TROUBLESHOOTING
• REPAIR PARTS
Page 2
Warranty ...................................................... 2
Safety Guidelines ..................................... 3-8
Assembly ................................................ 9-11
Operation ............................................. 12-15
Maintenance ........................................ 16-17
Service Adjustments ................................ 18
Storage ...................................................... 18
Troublesho_ing Guide ............................. 19
Generator Parts ................................... 20-24
Engine Parts ........................................ 25-29
Emissions Statement .......................... 30-31
How To Order Parts .................... Back Cover
I
DATEPUR_:
I
MODELNO: --
SI_RIALNO:
STORE WHERE PURO_D;.
ADDRESS:
CITY:. ....
TELEPHONE: ......
Reoord the above information about your unit
so that you will be able to provide it in case of
lose or theft.
FULL ONE YEAR WARRANTY ON SEARS GENERATORS
Foroneyearfromthe date ofpurchase,whenthisSearsgetlarater!8mainle4nedandoperatedamm_lingtotheInstruc-
tJon8inthb owner'smaflual,Seamwillrepolr,free of charge,anydefectInmatedel_ndworkmanship.
IfyourSearsGenerateris usedfo_commemlalormntaipurposes,thiswsrrenlyappliesforonly90d_yefromtheordinal
dale of purchase.
FULL ONE YEAR WARRANTY ON SEARS ENGINE
Forone yearfromthedateof pur_., whenthisT_ engineismaintained ;Indoperatedam_=rdingtothe Isetmc-
Uoi18inthisowner'smanual,:SeerswiJ!mJ_, frm)of charge,orff defe_ inmaterialandworlqcanshfp.
HORSE POWER 10 HP i
GASOLINE CAPACITY' 7 GALLON
[
OIL CAPACITY 26 07-
MAINTENANCE AGREEMENT
"TheCraftsmanWartime, plusa Maintenance Agreement,
provide maximum valuefor your Seam products. Con-
toct your nearast _nrs store for detmls.
CUSTOMER RESPON$1BIUTIES
Reed and observe the safety rules.
Follow a regular sohedule in maintaining, caringfor and
using your generator.
Follow the instructions under "Customer Resporalbll|-
ties"and "Storage" sections of tbls owner's manual.
!
I
Ifyour Te¢t_ hengineisusedforcommercialor rentalpurposas,this warrantyapplies_ for gOdw_'sfromthedat_
ofpurchase.Ths warrantydoesnot cove.,:.Expandable]tamssuchasspark_ug8 end airfirm. which becomew_rn
duringnormaluse,
_oaJm ne__ becau_o of opa_tor _use or negll_ense, Including damage rea_tln_ from no _1 being 8uppfled to
IRe englne or fallem to maintein the equll_nalt eccar_ng to _ Irm_uctic_s €_tsinea in thl8 owners manU_, are not
covered under wwr_.
WARRANI'Y SERVIGE ISAVAILABLE BY RETURNING THE GENERATOR TO THE NEAREST SEAP_ SERVICE CENTER.
_dS warrardy givse yOUSpeolflClegal rlghle _ yOu may aiso have other rights, which vow from b-lATE TO STATE.
Seam, Roebuck and Co,, DI817 WA, Hoffman I=otates, IL 60179
Page 3
ThismanualcontainsinformeflcmthatIII important for you to Knowand underetond. This information relatesto
proteotlng YOUR SAFETY and PREVENTING EQUIPMENT PROBLEMS, To h_dpyou recognize this information,
we use the symbo/s to the right. Please read the manual and pay attention to these eeouorm.
DANGER Indicatesanimminentlyhazardoussituation CAUTIONledlcakm a potentiallyhazardousedtuaifon
Which,W_Otavoided, willresultin_ whloh,if notavoided,may nmJR in
m
WARNING ]ndi_tea a potentiallyhazardouss;tuation CAUTIONusedwithoutthesafety alertsymbolindicmesa
which,ifnot avoided,_ resultIn_ potentiallyhazardoUssifuatlanwhich, if riotavoided+may
],1,_. .e_if inmua_ubnm_.
This produot is not equipped with a spark arresting muffler. Ifthe pmduot will be used around flammable
materials, or on land covered with materials such as agrtcuRumlcrops, forast, brush, grass, or other similar items,
then an approved spark arrester must be installed andis legally required In the stats of CaJ'rromia.It isa violation
of California statutes section 130050 and/or sections 4442 and 4443 of theCalifOrnia PubAc;Rasoumes Code,
unless the engine isequipped with a spark arrestOr,as defined In section 4442, and maintained in effective
working order. Spark amJotem sre also required on soma'U. S. Forest sarvioe land and may also be legally
required under other statutes and ordinances..
This product may oofltain ohernicale known to the state of Californiato cmJsetender, birth defects, or other
reproductive harm. This warning isgiven in compliance w!th California Proposition 65, as detestable amounts of
chemic.sissubject to proposition 65 may be contained inthis product.
• SAVE THESE INSTRUCTIONS •
When using this produot basis precautions should always be
Attempting to €onnect generator
directlyto the electrical system of an
building atruotum.
followed including the following:
Back feeding alastrk:ity through a
bullding'selectrical system to the
outside otillty fe_ lines could en-
danger repair persons a_terepting to
: restore service.
Attempting to connast to the incom-
Ing ut_ltyservice oould resultin
ek_ctrooation.
RastoratJonof ekm_cal service while
the generator isconnected to the
incoming ufflitycould mouJtin • fire or
seriousdamage ifa Isolator switch Is
notinstalled.
Falklreto use adouble throw transfer
switch when connsoting to a
atruefure's alect_cal system con
damage appllanoes and WILL VOID
the manufacturer's warranty.
Never baskfeed electricity through
a structure's electrify/system.
To conneot to a struutum'a electri-
cal system in a safe manner.
always have s Double-Threw
TransferSwitch installed bYa
qualified electrician and in oompli-
ands w_th10o81o_:linancas. (When
installing a Double-Threw
"rransf_ b-'witch,a minimum of
1° gauge wiring must be used.)
3 -- ENG ¢ao_e p_e_
Page 4
READ AND UNDERSTAND ALL WARNINGS BEFORE
ATTEMPTING TO OPERATE GENERATOR.
B!$K OF ELECTROCUTION AND FIRE (€ont'd)
HAZARD
.t
Operation of generator in rain. wet,
icy, or flooded conditions.
of worn damaged, undersized
or ungroundodextension cords.
Placing generator on or against
highlyconductive surrane, such as
a steel walkway or metal roof.
WHAT COULD HAPPEN
i,, .., .,,
Water is an ex0ellent €onduofor of
electricity|Water wh|oh €ornea in
contact with aleottlcafly charged
components can transmit electdolty to
the frame and other sudace8, rnsutting
in electrical shock to anyone €ontact-
ing them,
Contactwithwornordamaged
extensioncendscould resultin
ebctmcutlon.
Use of underslseexter'dsldncords
could msuRIn overheating of the
wires or attanhed Items, resultingIn
fire.
Use of ungrounded €ordsofs could
prevent operation of olmuit breakers
and resultin electrical shock.
Ac_Jdentelleakage ofelectricaJ
current could charge conductive
surfaces in contact with the gonemtor.
HOW TO PREVENT IT
Operate generator in a €lean, dry.
well vonti|ated area. Make sum
hands are dry before touching unit.
Irmpcotextension c_rds before
use and raplane with new cord if
mqulred.
Use proper size (wiregauge)
co_ism for applbaelon See chert in
the Auombly section of this
mareJaJ.
Alwaysusea €ordsethavinga
groundingwirew;thonappropriate
groundingplug. DONOTusean
ungroundedpkJg.
Place ge_leratoron low conductiv-
ity surfaoesuch a.sa concrete
slab.
ALWAYSoperate generator a
minimum of six feet from any
conductive surface.
Improper connectionof itemsto
generator.
operation of unitwhen damaged.
or witll guards Orpanels removed.
_o41m R¢_ 0 e/Woo
Exceeding the loadcapacityofthe
genm_torbyatta_ir_ too many
items,oritemswithveryhighload
ratingsto ItcouldresultInoverheating
of some Items or theirattm,-hmant
widng rasuNng in fireorelectrical
shock.
Attempting to use the unitwhen it has
been damaged, orwhen it isnot
functioningnormally onuld msuit in
tim or electrocution.
Removal of guardin9 could expose
eisstrioslly charged compononte and
msdt in eisctrocutlon.
4 -- ENG
Read the load rating chart and
irmtruetlorBin the Wsttage Calcu-
lation section. Make sum that the
summatlco of elec'zdcalloads for
all attachments does not exceed
the load rating of the generator.
Do not operate generator with
' meohaNcel or electrical problem.
Have unit repaired byan Autho-
rized Service Center.
Do not operate generator with
:_mtestlvegua_ling removed.
Page 5
READ AND UNDERSTAND ALL WARNINGS BEFORE
ATTEMPTING TO OPERATE GENERATOR.
i
.,,
Attempting to fill the fuel tank while
the engine is running.
Sparks,fire,hotobjects
Ir_properstoregsoffuL_ '
Inadequate ventilation for generator
Tampering with factory set engine
speed settings,
i,,
WHAT ¢OLILD HAPPEN
Gasoline end gasoline vapors san
become ignitedby coming in €omact
with hot components such as the
muffler, engine exhaust gases, or
en eled,ztcalspark,
Cigarettes, sparks, rims, or other hot
objects can cause gasoline or gaso-
linevapors to ignite.
improperlystored fuelcould load to ac-
cidental Ignliton. Fuel improperly co-
outed could get into the hands of chil-
dren or other unqualified pemor,.s.
Materials placed against or near the
generator oroperating thegenerato_ In
areas where the temperature exceeds
-104° F.ambient (such 8sstorage rooms
or garages)can interferewith its proper
ventilation fasfum_ causing overhast-
ing end possible ignition of the materi-
als or buildings.
,, ,,,
Enginespeed has been factory set to
providesafe operation.Tampering with
the engine speed adjustment could m- ;
suit in overheating of attachments aid
could cause a fire,
HOW TO II_EVERIr I1"
Turnengine off and allow It to cool
beforeeddlng fuelto the tank. Equip
area of oper_lon with a tim extin-
guishercertified to handle gasoline
or fuel fire==.
Add fuel tO tank in well ventilmed
area. Make sure there ==reno
source=of ignitionnear the genera-
tor.
8tom fuelIn a OSHA approved €on-
tainer demgned to hold gasoline.
Store container Inseems location to
)invent use by others,
Operate generator in a oleen, dry,
well ventilated area a minimum of
four feet from any building, object
or wall, DO NOT OPEFL_TIEUNIT
INDOORS OR IN ANY CONFINED
AREA.
Never attempt to "speed-up e the
engineto obtainmore pe_/orrrmnee.
Both the output voltage end fre-
quency will foethrown out of Slrall-
dam by this practice, endangering
attachments end the user.
Overtllling the fuel tank - fuel s_ll-
age.
Spilledfuelendits vaporscanbecome
ignitedfromhotsurfaces orsparks.
Use cam In fillingthe tank to avoid
spillingfuel. Meko sum fuel cap is
secured _ghtly and dteok engine
forfuel leaks before starling
engine. Move gene_dot away
from refuelingarea or any spillage
before starting engine. /_low for
fuel expansion. Keep maximum
fuel level _ inch below the tip of
the fualtank. Never refuel with the
engine running.
Page 6
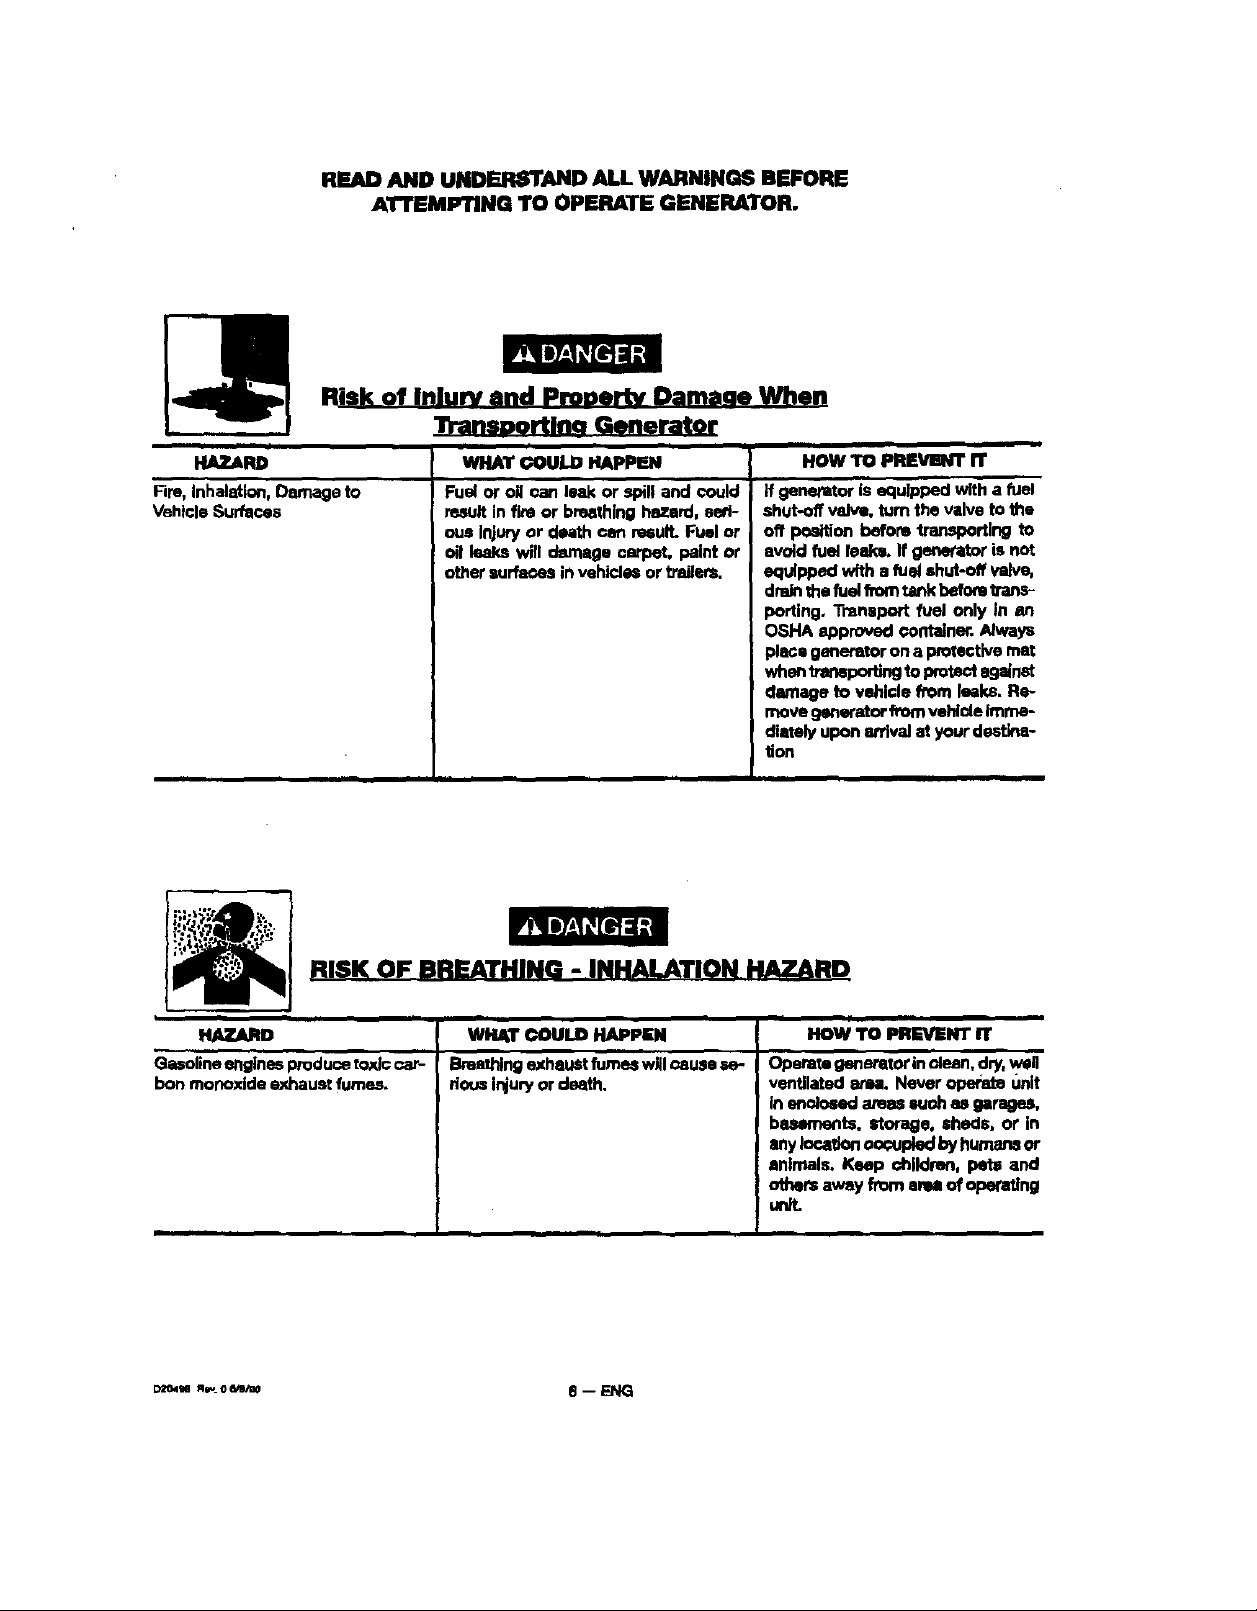
READ AND UND_AND ALL WARNINGS BEFORE
Risk of Inlurv and pronertv Damage When
iii iiii J
HAZARD
Rre, Inhalation, Damage to
Vehicle Surfaces
AT'rEMPTING TO OPERATE GENERATOR.
Transnortlna Generator
i
WHAT GOULD HAPPEN
Fuel or oU can leak or q_ill end could
result in fire or breathing hazard, serf
oue Injuryor death can result. Fuel or
oil leaks will damage oarpet, paint or
other surfaces in vehicles or trailers.
if genemtor'is equipped with a fill
shut-off valve, turn the valve to the
off position betom transporting to
avoid fue_leaks. If generator is not
equipped with a lust shut-off valve,
dmJnthe fuelfTomtank befumVans-
porting. Transport fuel only in an
whentransportingto protectsgs/nst
HOW TO PREVENT IT
OSHA approved aonta_ner, Always
place generator on a pmmctive mat
damage to vehicle from leaks. Re-
move generator _ vehicle frame-
dimly upon arrivalatyour destina-
tion
r_:',_!"__,
'_ L."_
RISK OF BREATHING - INHALATION HAZARD
w i
HAZARD
;asolineenginespmdul:e toxic oar-
_onmonoxide exhaust fumes.
WHAT _OULD HAPPEN
Breathingexhaust fumeswilloaues
riousIqlu_ or death.
Ui
HOW TO PREVENT IT
Operate generator inalean, dry, well
ventJlat_l ema. Never opem_ Unit
in enolesed aress esoh as garageS,
bm_nonts, storage, sheds, or in
amy/oca_onoocupledbyhurna_ or
animals. Keep d"llldmn, pl_ and
others away from area of operating
un_
Page 7
READ AND UNDERSTAND ALL WARNINGS BEFORE
ATTEMPTING TO OPERATE GENERATOR.
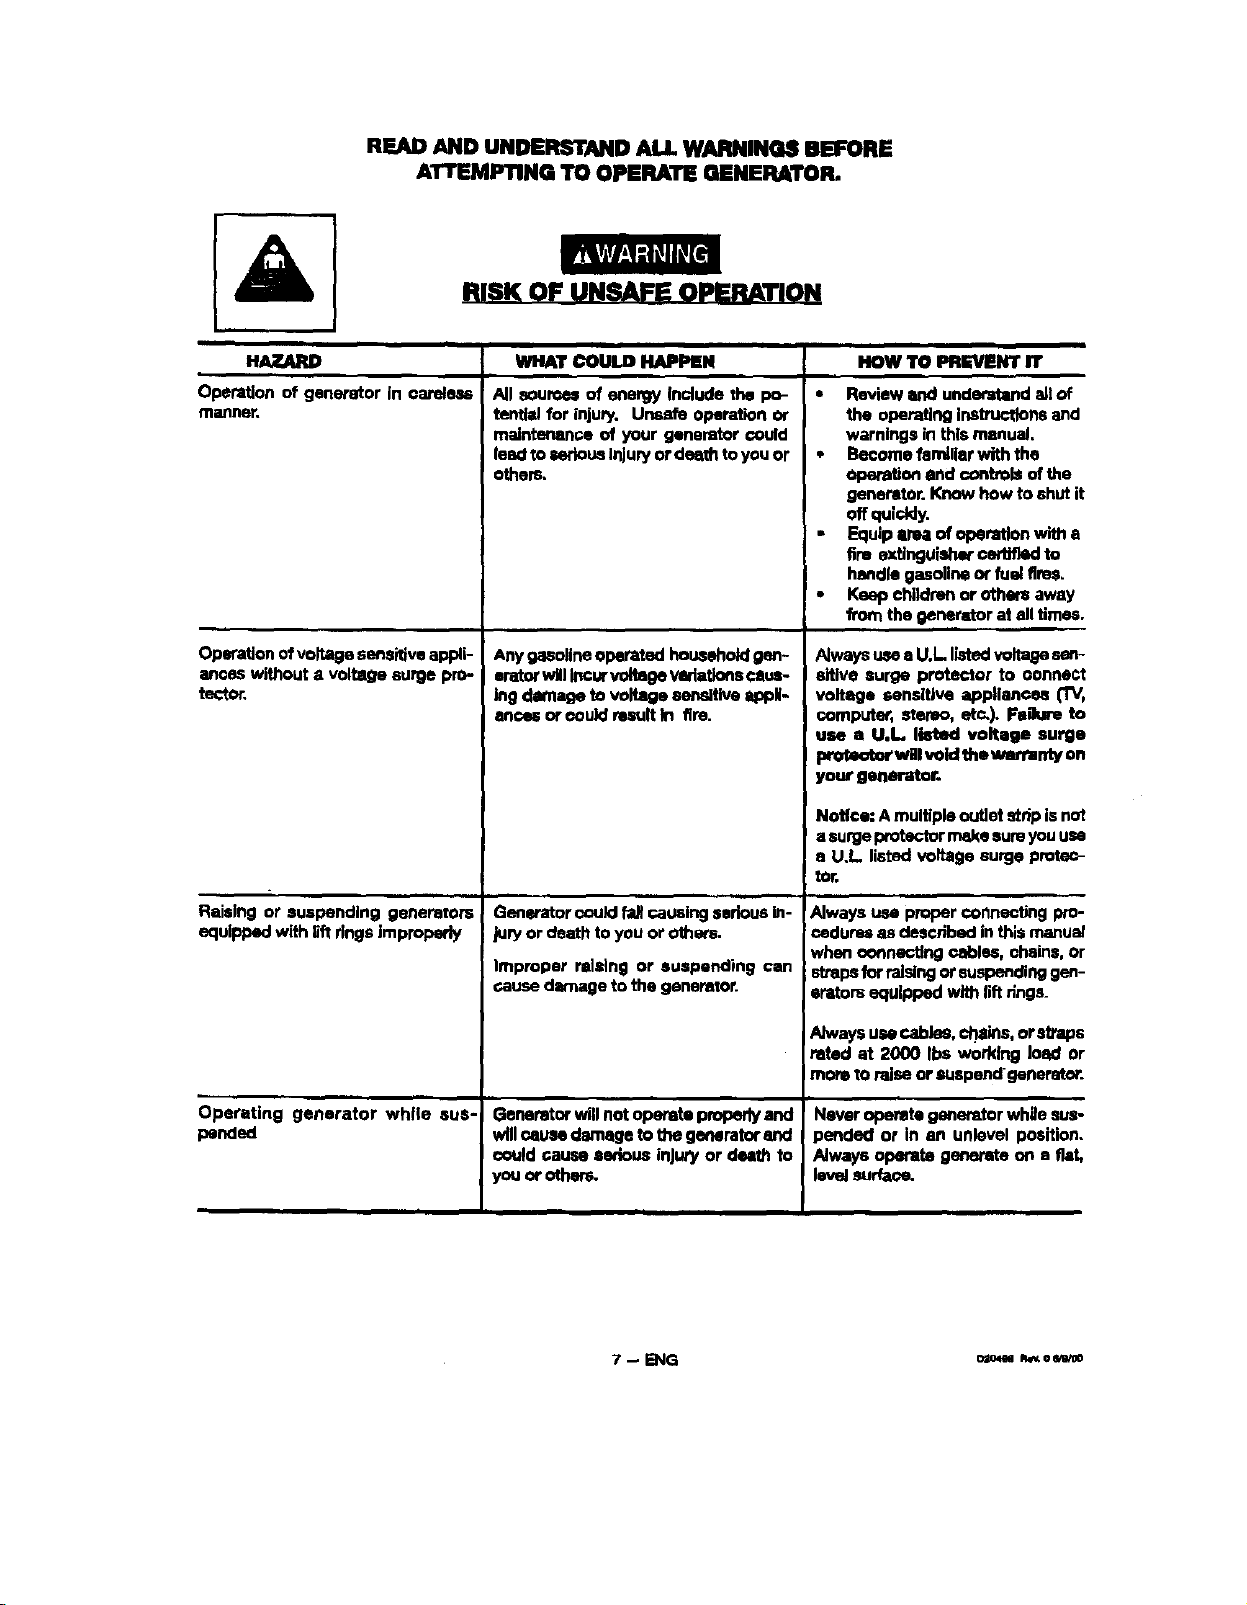
RISK OF UNSAFE OptERAT!ON
ii
HAZARD
Operation of generator in carsiese
manner.
Operationofvoltagesensitiveappli-
ancaswithouta volfagesurge pro-
tector.
Raising or suspending generators
equipped with lift rings Improperly
WHAT COULD HAPPEN
U i
All sources of energy Include the po-
tential for injury. Unstde operation or
malrdenan_e of your generator could
lead to _dous Injuryordee_l to you or
others.
' Any gasoline operated household gen-
eratorwJilincurvoifagevariationscaus_
Ing damage to voltage sensJtlve appl-
ancse or ¢oukf result In tire.
Generator o0uldfal_Causing serious in-
jury or death to you or oth_n.
Improper raising or suspending can
cause damage to the generator.
i i i
HOW TO PREVENT IT
• Review and undemtand aJlof
the operating instruc_ns and
warnings in this manual.
• Become familiar with the
operation and cootmls of the
generator. Know how to shut it
off quickly.
• Equip llma of operation with a
fire extinguisher certitk_ to
handle gasoline or fueltim,
• Keep children or others away
from the generotor at all times.
Always use a U.L listedwltage ser--
sltlve surge protector to connect
voltage sensitive appliances (TV,
computer, stereo, etc.). Fagum to
use a U.L. listed voltage surge
prc_mtor will vofdthe wurranty on
your generator.
Notice: A multiple outlet stripisnot
a surge protectormake sum youuse
a U.L listed voltage surge protec-
t_.
Always use proper connecting pro-
cedurse as described inthis manual
when connecting cables, chains, or
strapsforraisingorsuspendinggen-
erators equipped with lift rings_
Operating generator while sue-
pended
Generator will not operate properlyand
will cause damage to the generator and
could cause sedous injury or dse_ to
you or others.
Nways use cables, chains, or straps
rated at 2000 Ibs working load or
moreto raiseor SUspasdgenerotor.
Never operate generator whlie sus-
)ended or in an unlevel position.
Always operate generate on a flat,
leveJasda_.
Page 8
READ AND UNDERSTAND ALL WARNINGS BEFORE
AI"FEMPTING TO OPERATE GENERATOR.
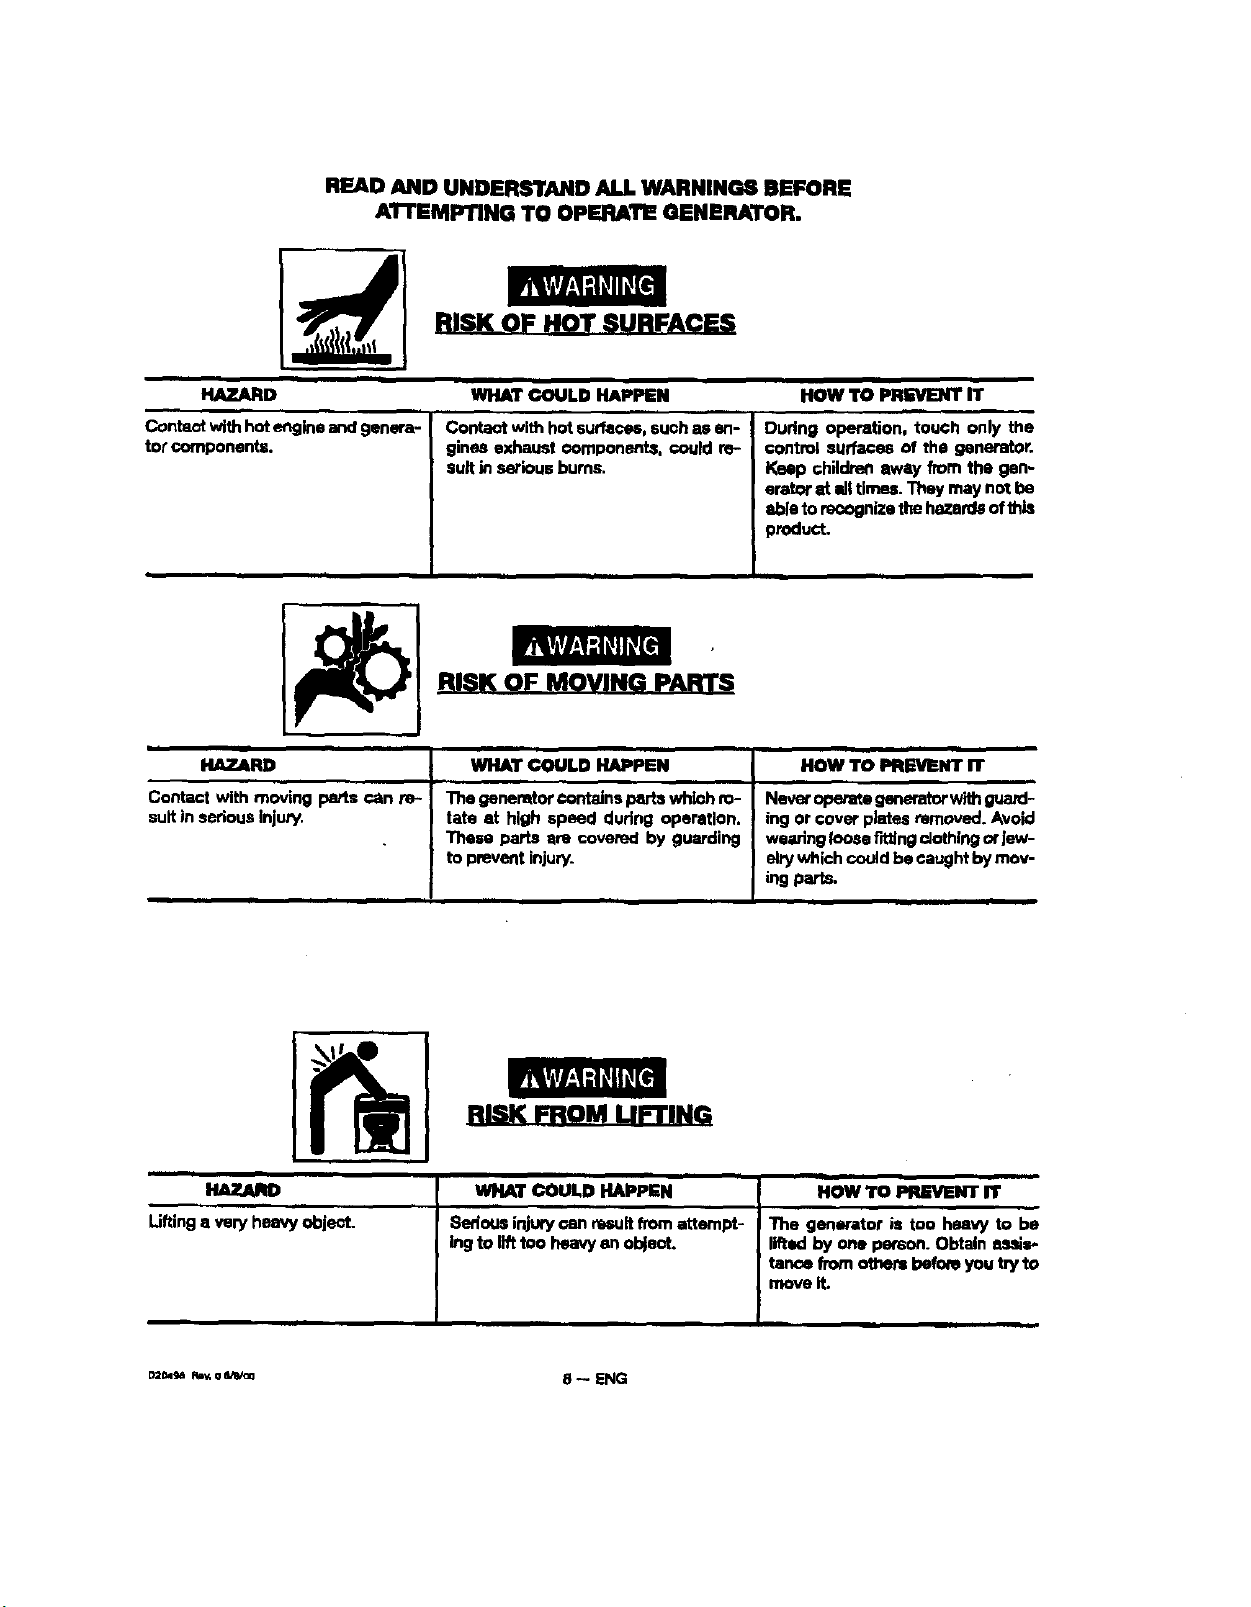
RISK OF HOT SURFACES
HAZARD
imlll
Cont_ot with hat engine and genera-
tot components.
i i
HAZARD
Contact with moving parts can re-
sult in serious injury.
WHAT COULD HAPPEN
Co_=t with hot surfaces, such as en-
gines exhaust components, €ould re-
sult in serious bums.
RISK OF MOVING PAI_S
WHAT GOULD HAPPEN
The generator containsp_ts which ro-
tate at high speed during operation.
These parts am covered by guarding
to prevent injury.
I!OW TO PREVENT IT
During operation, touch only the
€ontrol surfaces of the generator.
Keep children away from the gen-
erator at alltimes. They may not be
able to recognizethe hazards ofthis
product.
HOW TO PREVENT IT
Never operate generatorwithgusrd-
ing or cover plates removed. Avoid
wearing loose fftUng'-JothlngorJew-
elrywhich could be caught by mov-
ing parts,
HAZARD
Lifting8 veryheavyobject.
RISK FROM UFTING
WHAT €OULD HAPPEN
8edous injuryran result from attempt-
Ing to lifttoo heavyon ol_act.
HOW TO PREVENTrr
The generator is too heavy to be
lifted by one person. Obtain e,_i_-
tance from others before you try to
move it.
Page 9
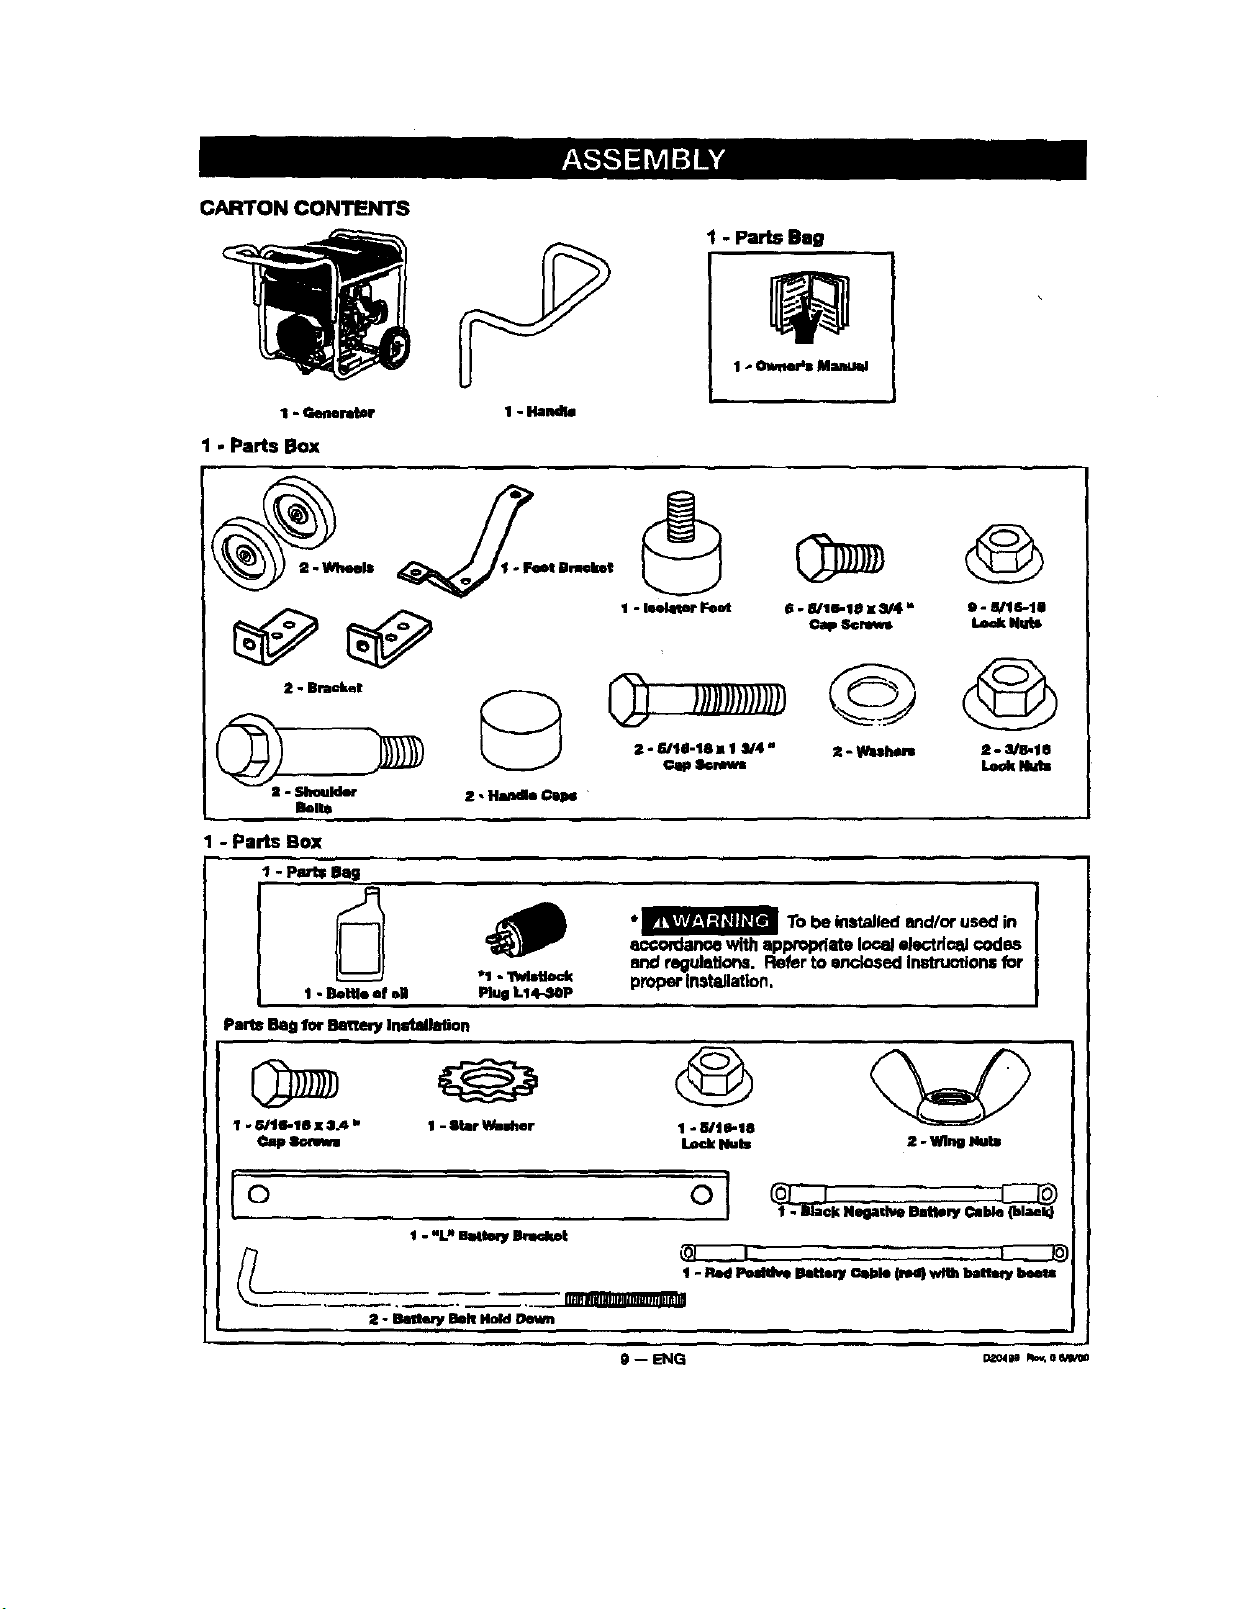
CARTON CONTENTS
1 - Generat_
1 - Parts Box
1 - Parts Bag
1 - Owner'l MamJZd
I - 8/tG-18 • :1.4b I - Star Wudler 1- 8/t Ik.18
r.ap Z_,mm Lock Nuls 2-Wlme rods
,0 0 I @" _ _ I@
t - "L" Ba4tmy Ilmcket
t - P.edPodd_ BeUeW c_e (me) w_h b*u,ny Ix_s
_, "_ _ _ iiHi]JrflNlUflliflllllllillli111l I
2 - BateW Bolt HoM Pewn
1 _Jllack Negative nntleW Cable (bla_M
Page 10
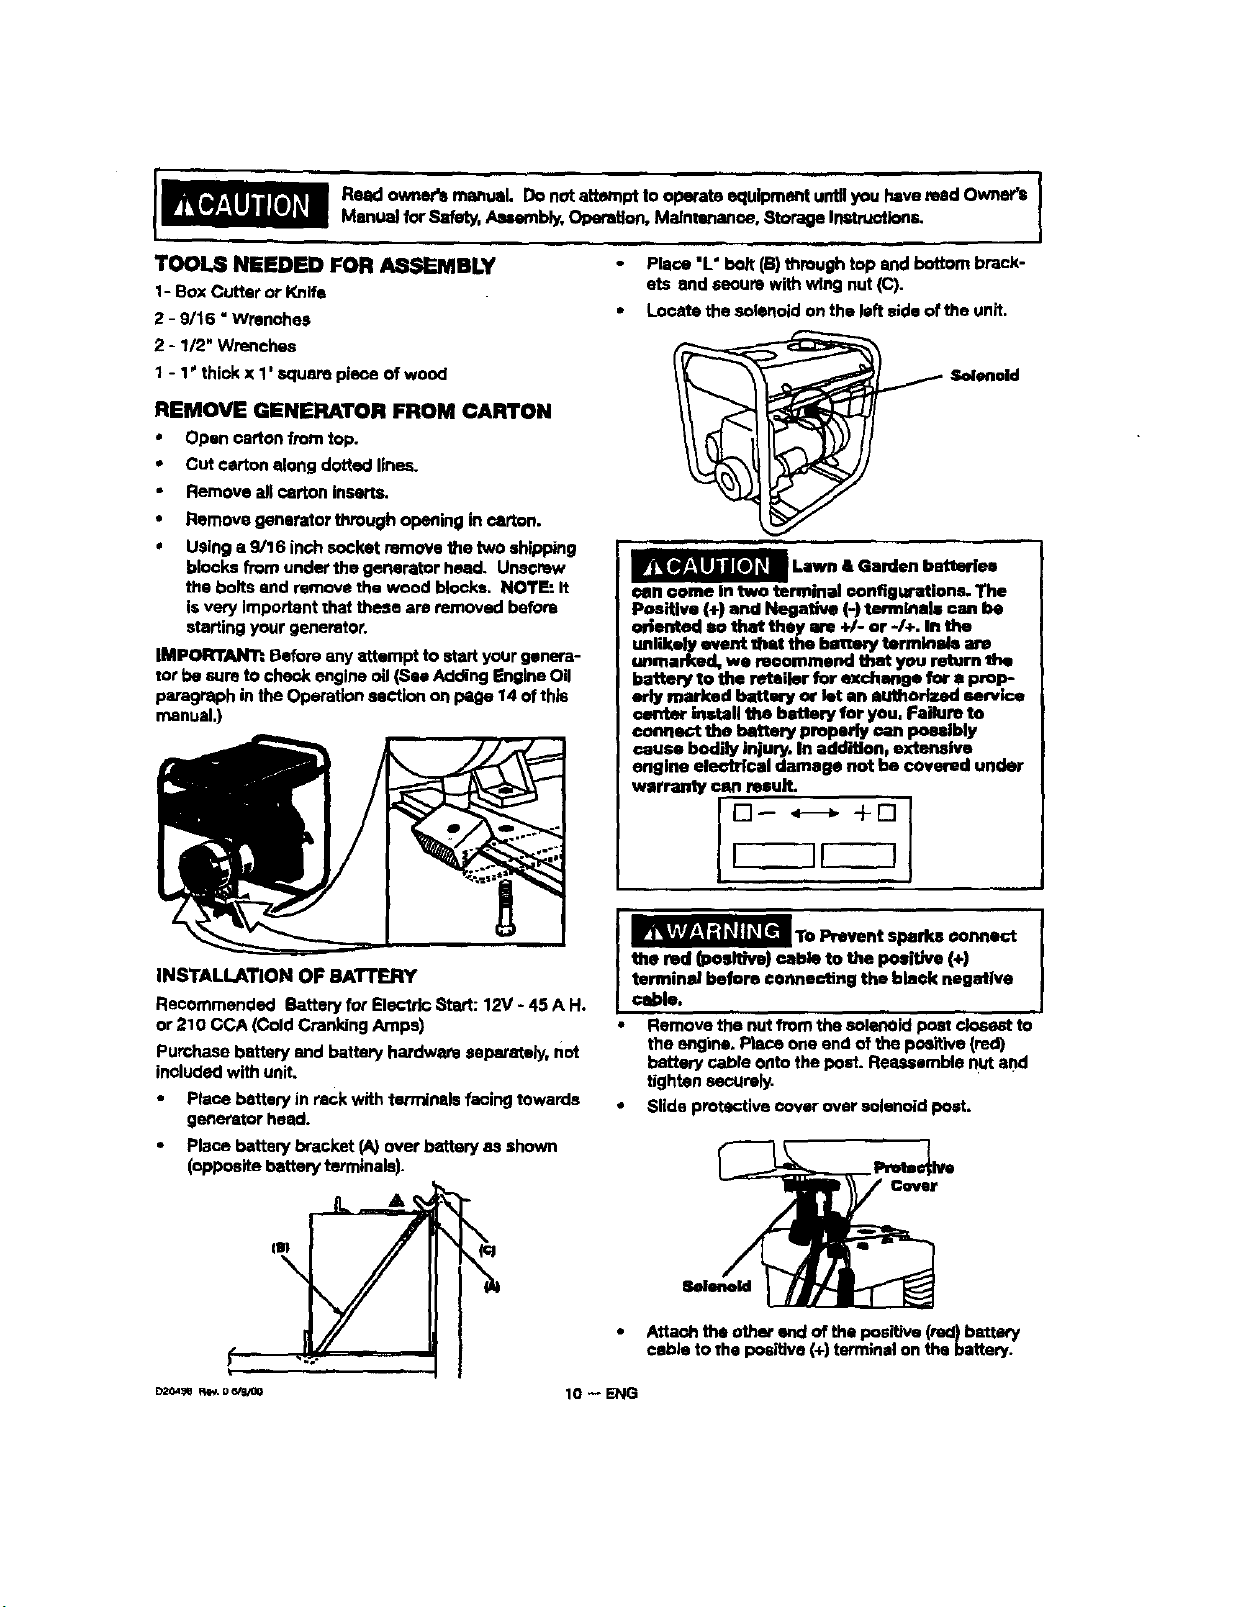
Read owner's rnenual. Do notattempt to operate equipment untilyou haveread Owne_ ]
Manual for Safety, Assembly, Opomtlon, Maintenenea, Storage Irlstruc_ions.
TOOLS NEEDED FOR ASSEMBLY
1- Box Cutter or Knife
2 - 9/16 "Wrenches
2 - 1/2" Wrenches
1 - 1' thick x 1' square piece of wood
REMOVE GENERATOR FROM CARTON
* Open carton from top.
• Cut carton along dotted lines.
Remove allcarton inserts.
* Remove generator through opening in carton.
, Using a 9/16 inchsocket remove the two shipl_ng
blocks from under the generator head. Unscrew
the bolts and remove the wood blocks. No'rE It
isvery Important that these are removed before
starting your generator.
IMPORTAJI_h Before any attempt to start your genera-
tor be sure to check engine oil (See Adding Engine Oil
paragraph in _e Operation section on page 14 of th/s
manual.)
,,,,, ,
Place "L° belt (B) through top and bottom brack-
ets end aeoure with wing nut (C).
• Locate the solenoid on the left side of the unit.
/ S,cdenold
Lawn & Garden baitarlea
_in come In two terminal configurations. The
Positive (÷) and Negative (-) terfninale can be
oriented so that they ere +/- or -/÷. In the
unlikely event that the bartmy termlnale amp
unmarked, we nmommeed that you return _m
battery to the retailer for exchange for 8 Imp
erly marked battery or let an authorized service
center Install the battery for you, Failure to
connect the battery properly can possibly
cause bodily Injury. In addition, extensive
engine electrical damage nat be covered under
w_rranty ©anresult,
|
;
INSTALLATION OF BATTFJ:IY
Recommended Battery for Electric Start: 12V - 45 A H.
or 210 CCA (Cold Cranking Amps)
Purchase bake W and battery hardware separately, not
included with unit,
Place batfeP/in reck with terminals faning l_wards
generator head.
Place better/" bracket _ over battery as shown
(opposite battery terminals).
"7)
lO -- ENG
I-]-- _ +r-] I
the red _osit_e) cable to the positive (÷)
terminld before ¢enneclfng the binck negative
I cable.
• Remove the nut from the solenoid post closest to
the engine. Place one end of the pcaitive (red)
battery cable onto the post. Reassemble nut ar)d
tighten securely.
* Slide protective cover over solenoid post,
8efeneld
• Attach the other end of the positive (red)batt_m_f
cable to the positive {+) terminal on the battery.
Page 11

NOTE: Make aura red batteey boots cover
positive battery oable ton'ninals at battery mid
emkmoid
Attimh one end of the negatNe (black) cable te the
negative (-) terminal on the battery.
Attach the other end of the negative (blaok)cable
to the tYanteas shown. Install the star washer
between the cable and the frame,
IMPORTAN'r: See Caution on page 10
before assembling batter/.
GROUNDING THE GENERATOR
A grounding lug Is suppNed with the generator for use
when required by ]oQelelectrical ordinances. Refer to
article 250 of the National Ek_ctrlcalCode to clarity
any needed grounding information. Your Ioeel electric
oompany or s certified electflclan should be able to
help you with this informetlon.
anether potash. _t the generat_ and rset the
rm_l abl_er en the wood. _ This will support
the gaecane engine dudnOn_mrnbly and meke
assembly easier.
• Plaoe ahandle cap (7) onto _ end of handle
prior toInatalletfon,
• The handle should be installedon the eleetdcal
outlet end of the generator.. Place one washer (12)
on long cap screws (1t). Align the handle brack-
ets with the upper holes pro-drilledin the gerlem-
forframe. Place mentioned screws through frame
and handle brackets. Secure with lock nuts
(8)and tighten.
• Locate the engine support. Place one wheel
_'ackst (4) 0_1top of support as shown in Ilisetra-
tion. Align with the pre,.drilledholes in support.
Piece 2 cap screws (9) through holes in bracket
and support. Secure with 2 lock nuts (8) end
tighten.
• Insert nee shoulder bolt (2) into Wheel(1). Insert
threaded end of her through wheel bracket,
secure with look nut (3) and tighten. NOTE: The
wheel wHI not rub frame If instannod properly,
• Repeat the above steps for the opposite side.
• insert the threaded stud of rubber foot (10)
through the middle hole of the foot bracket (5),
Secure with lock nut (8) and t_ghten.
• Lecete the support under the elestrioal outlet end
of the generator. Position foot bracket (5), with
rubber foot instead, under the support and al)gn
the holes In the foot bracket (5) with the slots in
the support. Place one sap screw (9) through each
slot in the support end the holes inthe foot
bracket. Secure with the lock nuts (8) and tighten.
• Once completed, the wheel Mt is readyfor use,
NOTE:Yourengineisalready g_undedtOthe frame
bya groundingstrap.
INSTALLING WHEEL KIT
The Craftsman Wheel Kit was dse|gned to gmmly
improve the portabll/ty of your generator.
kit. Fall
kit. Failure to die so will cause damxge to the
JI UlJ?-'o
engine.
NOTE: AJwaysfollow stets regulations for proper ell
dispcesi.
Place generator on level ground; d_dn allgas and
oil fromthe engine (sea engine manual for ocrmct
assembling the portability
pressure).
• Piaceal'thiokxl"squampleceofwoodonthe
ground In front ofthe engine, With the help of
11 -- ENG
1
12
8
g
1o
DtoJ|lr _o_
Page 12

KNOW YOUR GENERATOR
Read this Owner'_ Manual and Safety Rules before operation of your Generator. Compare this illustre
lion with your generator to familiarize yourself with the location of various controls and adiustments. Save the
l "
manual for future references.
FUEL CAP
FUEL TANK
CHOKESWITCH
120 VOLT RE
2.40VO
CIRCUIT BREAKERS
AIR CLEANER
OFF/RUN/START
SWITCH
FUEL TANK- Capacity of 7 US gallons,
CHOKE SWITCH- Lever used to start cold engirle.
ENGINE OIL FILL- Place where engine oil is poured.
ENGINE OFF/RUN/START SWITCH- Used to start
and stop engine,
CIRCUIT BREAKER_ Each receptacle has a circuit
breaker _o protect the generator from overloading,
120 VOLT RECEPTACLES- Used to supply 2750 watts
of electrical power per receptacle or a combination of
5500 watts on the 120 side for operations. Protected by
circuit breakers.
b2f_,_m a.- I,lw#n,j 12 _ ENG
ENGINE OIL FILL
240 VOLT TWISTLOCK RECEPTACLE- Used to
supply 5500 watts of electrical power for' operations.
Protected by circuit breakers.
AIR CLEANER- includes filter element and foam
pro-cleaner that limits the amount of dirt that enters
the engine.
RECEPTACLES
Your generator isequipped with duplex 120 volt
receptacles end a twiatlock 240 volt receptacle,
The unit is also equipped with circuit breakers to
protect the generator against electrical overload. If the
circuit breaker, trips, unplug electrical load from
receptacle. Let circuit breaker cool down and then
push circuit breaker button to re, st.
Page 13

LOW OIL SHUTDOWN
Your Craftsmen generator engine is equipped with
Low Oil Shutdown. Low (311Shutdown isa safety
device designed to protest your engine from damage
Jnthe event the oltlevel in the crankosee is low.
If while the engine is running, the oll gets low, it will
automatically shut itself down and will net msteft until
the oil isadded. If the oHis low before start-up, the
generator willnot start until oll is added.
NOTE: The Low Oil Shutdown mechanism is very sen-
sitive. You must fill the engine to the _Jll mark on the
dipatk::kto inactivate tl'dssidaty devicEL
GENERATOR CAPACITY
Exceeding the rated capacity of your generator can
result in serious damage to your generator and
connected eleotdaal devices. You should observe the
following to prevent overloading the unit:
• Starting end running w,=ttage requimrnents should
always be e_lculated when matching a generators
wattage capacity to the 8pplianoeor tool.
There ere two types of elantricel appliances that
can be powered by your gerlerator:
A. Items such as radios, light bulbs, tdevision
sets. end mk=roweves have a "resistive lead'.
Starting wattage and runningwattage am the
SI_TIO,
B. Items such as refrigerators, sir compressors,
washer, dryer, and hand tools that use an
elantdcal motor have an "induotlva load".
Inductive load appHan_se and toolsrequire
approximately 2 to 4 times the listed wattage
for _ the equipment. This initial load
only lasts for a few seconds on atart-up but is
very important when figuring your total
wattage to be used.
NOTE: Some inductive appliances and tools will list
on the motor name plate, the turfing and running
voltage and amperage requirements. Use the follow-
ing formula to convert voltage and amperage to
wattage: (Volts XAmp = Watts)
', Always start your large.stelectric motor first, and
then plug in other items, one at a time.
NOTE: On 120-volt loads the maximum starting watt-
age should NOT exceed one half of the rated generator
wattage. Example: a 5000 rated wattage generator ==
2500 maximum starting wattage.
The guide is provided to assist you in determining the
appliances end tools that can be ranwith the wattage
capec;ityofyour generator.
nltllll!!
OBTAINING ELECTRICITY FROM
GENERATOR
There am baskmlly two ways to obtain eleot_o{tyform
• generator:
- Use of extension cords directly from the genera-
tor to the appliance, lights, tools, etc.
Use of a double-throw transfer switoh installed
directlyto the rosin electrical supply outside of
the house.
Extension Cord
When using an appliance st'fed at s €onsiderable
distance from the generator, a 3-wire extension cord
that has e 3-blade grounding plug and • 3-slot
reeeptocis that accepts the toors plug MUST be
used in order to reduce the riskof electrioal shock. A
cord of adequate size must be used. A mLnlmum of 12
gauge wire size with at least • 20 amp draw can be
used. When amperage exceeds 20 amps e 10 gauge
wim size should be used.
I hot
Repstr or replace damaged exfenston €olds
I,
Immediately.
13 -- ENG ezo4Ja_1,,v.o_
Page 14

Connecting Generator To Main Electrical
Supply
PotantfaJhazards exist whorl s electrical generator is
oonnected to the main elecVtaal supply oomleg into
the house. It is st that point that the generator could
feed back into the utilitycompany's system causing
pogldble electrocution of workers who am repaJltng
electrical lines, Toavoid beck feeding of ele,.-td_ty into
utility systems, a double-throw transfer switch
should be installed between the generator and utif;ty
power. This device should be inst-Jled by a licensed
electrician and in compliance with all local eisctdcal
codes.
NOTE: When installing a Double-Throw Transfer
Switch. a minimum of 10 gauge wiring must be used.
BEFORE STARTING ENGINE
Alwayscheck engineo, level
before every start. Running
engine low of ell or out of oil could result in
serious damage to the engine.
Adding EngineOn
Your generator has been elllpped without oil in the
engine. Begin by removing the oildipstick end plug.
Start pouring the oil In slowly.
The engine will hold approximately 28 ounce4;of oil. To
check the oil, clean end replace the dipstick. Do not
s_rewthe dip stinkin when checking the ONlevel. NeXt,
removethe dipstick to check the level. The oil dipstick
iselasdy marked with lines that tell you when the
engine hasenough oil. Do not fill sb;'ve this point.
• Remove gas cap.
Add unJeadedgasoline, alowty, to fuel tank.
Use (:lean, fresh, mgulor unleaded gaecllne with a
minimum of 85 ootane. Do not mix oil with gasoline.
Never fill fuel tank €orn-
plntely. Fill tank to 1/2"
below the bottam of the filler neck to provide
spaoe for fuel expansion. Wipe any fuel spillage
from engine and equipment bofum starting
eng ,k_e.
Do not overfill.
migine hi running or hot. DO not smoke when
filling fuel tank.
To Start Your Generator
inenclosed, poor ventUated
m, fingine athaust contains cerben monox-
ide, en odorless end doa_qy gas.
IMPORTANT;. Make sum the battery is properly
serviced, fully charged, end assembled before starting.
• Open the fuel shut-Off valve. Turn counter clock-
wise until the valve stops,
NOTE: When adding ollto the engine_ar_,..case, usea
high quality detergent eli classified "For Service
SF,SG,SH" ratedSAE30 weight. Use nospadaladd_ve_
Selecttheoil'sviscoldtygrade accordingto yourexpected
operating temperatures.
Gasoline
Your generator engine is 4 cycle. Use unleaded fuel
only.Never mix ell with gasoline.
0zo41t _0_m0 14 -- ENG
Move the choke control located on the engine to
"FULL CHOKE" pasRIon.
_t_ _lmm; plmt_4
Page 15

NOTE: No choke is required on wa_n ehginex. Mike
surechoke isin the "NO CHOKE" posRIon on warm
engine atal_,
[ I_KM,_UlIII[II¢I ¢ou Mus'r unplug any load
I lmll_lll:l from the g eosr_or before
| tarring to prevent pern-4nent damage Io any
I applisn©es.
For electric start:
Plaoe OFFIRUN/START sw)tsh in the START
position.
NOTE: When the engine starl_ the switch will
remain in the RUN position.
F_ rm=_ sta_'.
Place OFFIRUN/STARI" switch in the RUN posi-
tion.
Grasp handle on rope starter lind pull slowly until
roslatance isfelt. Let the rope rewind slowly. Pull
rope with a rapid full arm stroke. Let rope rewind
slowly. Repeat if necessa W,
NOTE: IF ENGINE OIL LEVEL IS TOO LOW, EN-
GINE WILL NOT START. CHECK OIL LEVEL AND
ADD IF NECESSARY,
When engine warms up, gradually push choke
control In to the N° CHOKE posit!on.
IMPORTANT: Allow generator to run at no load
for 5 minutes upon eilch Initial start-up to allow
engine end generator to stabilize,
STOPPING ENGINE
• Dlscoonect all elecffical loads.
* "nJrrlOFF/RUN/START switoh to 'oFF" position.
Cle=mfuel shut-off valve.
indoors, orin enclosed, poorly ventilated orees or
where fuel fum_ may reach an open {lame.
CONNECTING ELECTRICAL LOADS
• Lat onglne mn and warm up for five minutes after
aterdng with no electrical lead.
COnnect loads in the following manner to prevent
damage to equipment:
• Connect inductive IoQdequipment first, inductive
loads oon_;at of refrigerators, freezers, water
pumps, air conditionem, or small hand toots.
Connect the items that requirethe most wattage
first.
• Connect the lights next.
Voltage sensitive equipment should be the last
equipment oonnectad to the generator.Plug
voltage sensitive appliances such at TV's, VCR's.
mi_rowavos, over.s, oomputem, and cordless
I
telephones into a UL listed voltage surge protec-
tor, then oonne_t the UL Ilstad voltage surge
protector to the genmtor.
IMPORTANT: You should always add up the rated
watts of all lights, tools and appllan_s you are
powedng at one tim, This total should not
exceed the rated oapacPff of you generator or
olmuit breaker rating of the receptaole supplying
power.
I
15 --L:NG O_4Nq,_oul_
Page 16

CUSTOMER RESPONSIBILITIES TABLE ., ,
Before each
UsD
EveryaS
Hours of Every
Season
Bvory50
Horn of Evew
Seea_
Every 100
Houm of Every
Season
M_NTENAN_T_K
Checko_IIovsl
.Chwlge oli
creanAlrRlterAasembTy
CheckSpark Plug
PrepareUnitforStorage
X'
Sea Nollm2
_ Note I
X
X x ,
Prepare unit for storage if it is to remain idle for more than 30 dayo.
Note 1: Change oil after first two (2) operating houm and every50 operating hours thenmfter, more oftenif operated
in extreme dusty or dirty conditions.
Note 2: Check oil _ler S hours of operation (See the Oil paragraph on page 15 ofthis section)
GENERAL RECOMMENDATIONS
The warranty of the generator does not cover items
that have Peon eubje¢'mdto operator abuse or negli-
gence. Toreceive full value from the warranty,opera-
tor must maintain the generator as instructed inthis
manual.
Someadjustmentswillneedto bemade periodicallyto
maintainyourgenerator.
GENERATOR MAINTENANCE
Your generator should be kept clean and dry at all
times. The generator should not be stored or oper-
ated in environments that include _cesslve moisture,
dust or any corrosive vapom. If these substanoes we
on the generator, eleen with a cloth or soft bristle
brush. DO not use a garden hose or anyU1ingwith
water pressure to clean the generator. Water may
enter the cooling air slo_ and could possibly damage
the rotor,stator end the internal windingsof the
generator head,
All adjustments in the Malntananoe section of this
manual should be made at least once eanh smmon.
0il
OII level _'_uld be shacked prior to each use and
at least every 5 hours of operation. Toshack oil
SeeAdding Engine O|1 paragraph in the Operation
section on page 14.
Changing Engine Oil
For a new engine, change oil after the first 2oparatlRg
hours. Thereafter, change oil after every 50 hours of
operation.
Change the oilwhile the engine is stillwarm. The all
willflow freely and catty away more impurities. Make
sure the engine is level when filling,checking or
changing OIL
Change the oil aa follows:
* To keep dirt, grass clippings, etc. out of _le
englne_otsanthe area around the drain plug and
dlpstickbefore removing it.
. Remove the oil dr_n plug and dipstick. Tilt the
engine slightlytowerde the oil drain to obtain
better drainage. Be sure to allow ample time for
complete drainage.
ENGINE MAINTENANCE
NOTIG_ Maintenanoe, mplacemeet _trspalr ofthe
emission _troi devices and rams may be
performed by any nooroed engine repatt mdabllahment
or indMdual. Howe--, to obtoln no _mRle mpaim
under 1shetmlns and provlkllonll of _ ehg_ne
mamJ_aoturers warranty ststoment_ any servloe or
emiaslco ©ontrsl part repair or nqplacement must be
pertm.med by a tom_ory astlmdamd dealer.
0_o4. _oem,o 16 -- ENG
Page 17

Reinstall the drain plug. Make lure it is tightened
securely.
Fillthe erankeaee with new oil ofthe proper type
(See Adding Engine Oil In the Operation Section),
to the Full msrk on the dipstick, Always oheck the
level with the dipstick before adding. more oil.
securely.
Service Air Cleaner
NOTE: Do not use petroleum solvents, e.g.. kerosene.
which will cause the cartridge to deteriorate. Do not
use pressurized airto clean cartridge. Pressurized air
Can damage the cartridge,
To _Jce air cleaner follow these stops:
Unscrew wing nut. Remove cover and air (:leaner
eartddge.
• Remove cartridge from €over.
To service cartridge, dean by rapping gently on a flat
servioe, DOnot oil cartridge, Replaoe If dirty or dam-
aged.
Replaoe air cleaner r.,e_fdge. Place (:ever over
cartridge and tighten nutfinger tight and then turn
it one more complete turn.
PAPER FIL'nER
HUT
Glean Guard/Muffler
Do not ,,Jeanwtth a fomeful _otay of water hecause
water oould oont_nlnate fuel system, With a brushor
cloth clean finger guard after every use to prevent
engJrmdamage caused by overheating. Before running
engine, clean muffler area to remove all €ombustll:de
debds.
Clean and Replace Spark Plug
Check spark plug yearly or every 100 opamtiog hours.
• Clean area around spark p_ug.
• Remove and inspect spark plug.
• Replace spark plug If electrodes are pitted, burned
or porcelain is cracked. For replacement USe
Champion RJI?LM resistor spark plug.
• Check electrode gap with wire feeler gauge and
set gap .030 if necessary.
• Install spark, tighten secure/y.
_lSm4
WlM_
17 -- ENG _o41e_,_o_v_
Page 18

Garburetor
The carbumtur of your generator is pm-_at at the fag-
tory. The o_oumtor should not be tampered wl_ Ifyour
generator is used at an altitude in excess of 4000 font
performance may be affected. If so consult with your
nearestCraftsman ServiceCenter regardinghighaltitude
sat oh_nges.
Governor
Your engine governor maintains the oonstant operating
speed of your generator. DO NOT tamper with the en-
gine governor which is factory set for pl'oper engine
speed.
Over_=sedlngyourengineabesefactoP/highq=endset-
tlagcan be dangerousand couldpossiblycause per
eenalInjuryor propertydamage If you be,evethe an=
ginsisrunningtoofastorslow,takeyourgeneratorto a
AuthorizedCraftsmanServiceCenterforrepairand ad-
justment
_r_j_ Low engine speeds Impose a
_heavyload on the engine and ]
when aufflelent power Is not available the engine I
I life could be .hortaned. I
If you am going to stere your generator for more then
30 days. use the following information as a guide to
)mpare the generator fOrstorage.
- - - fuel in the tank Indoors er
in enclosed, poorly ventilated areas, where
fumes can reach an open time, qpark or pilot
light as on a furnace, water heater, clothes
dryer or other gas appliances.
Engine Preparation
Add fuel stabilizerto fuel tank to minimize the
formation of fuel gum doposRs during storage.
• Run engine at least 10 minutes after adding
atabillzel" to allow Itto enter the fuel mjatera.
Disoonnent the spark plug wire and remove the
spark plug.
Add one teaspoon of oll through the spark plUg
hole
Never store generator with
Pku_ rag over eperk plug hole and pull the recoil a
few times to lubricate the oombustion chamber.
Replene the _ plug, but do notconnect the
spark plug wire
NOTE: If a fuel stabilir.e_"isnot used, all gasolinemust
be drained fromthe tank end carburetor to prevem gum
depOsitsfrom forming on these parts and causing pos-
sible malfunction of the engine
Generator
Clean the generator as outlined in the Generator
Melntananee paragraph on page 18
- Check that coolingair slots end openings on
generator are open end unobstructed.
Battery
• Store battery as described by the battery menu-
factumr.
NOTE: After sterlng battery for ellong period of time it
may lose it's charge, ff the battery loses it's r,harge,
manually start the engine with the battery connected.
The engine will recharge me battery en It runs
_ P_ __WWJ 1B -- ENQ
Page 19

ii
PROBLEM
EnsUewdJ'not=tart
i iii n • ii
CAUSE
1. Low on fuel or o11.
2. Igrdtion switch In "Off' position.
3. Faultyep_k p|ug.
4. Choke Inwrong position.
5. Fuel shut-off valve in do_md
position.
8. Unit loaded during start-up.
7. Spark plug wire loose.
ii
CORRECT/ON
1. Add fuol or oil.
2. Tumto 'ON' polltlon
3. Replace spark plug.
4. Adjust choke accon:lingly.
5. Open fuel shut-off valve.
6, Remove load from unit.
7. Attach wire to spark plug.
No elecfK_aloutput
Repeatedcircuitbreaker
tripping
Genorator overheating the
circuit I_oaker depressed
1. Faulty reaep_acla.
2, Circuit breaker kicked out.
3. Oefectlve capacitor.
4. Faulty power oord,
5. GFCI receptacle c/muir breaker
kicked out.
1. Ovadoad
2. Faulty cords or equipment.
1. Generator overloaded.
2. Insufficient ventilation.
1. HaveAuthodzed Sears Service
Center replace.
2. Depress and reset.
3. Have Authodzad Sears Service
Centor replace capacitor,
4. Repair or replace cord.
S, Det_mw and _et.
1. Reduce load.
2. Cheokfordamaged,bare,or
frayedwireson equipment.
Replace.
1, R_uoaload.
2. Move to adequate supply of
fresh air.
ii =l
19 -- ENG _u e,,,,.owL_o
Page 20

CRAFTSMAN BIOO QIINliR_'I'OR SIQ.IIIIIBO
No_
1
2
3
4
5
6
?
8
9
10
11
12
q3
14
15
16
17
18
19
21
22
23
24
25
26
27
28
29
3O
m _ NUMa_
FUELTANKSCREWS 81896680
FUELTANK G8-0795
FUELGAP GS-O443
FUELHOSE GS-0P.,25
FUELLINECLAMP GS.0227
DRAINCOCKGROMMET GS.0448
FUEl.SHUT-OFFVALVE GS-0437
ENOCOVER G8-0077
SCREW#10-24x 9/16 SSF-553-1
ISOLATOR GS..0033
WASHER1-1/20D SSN-1014-ZN
LOCKNUT _-16 SSF.8111-ZN
GROUNDLUG GS-0117
SCREW5/16-18 x 3/4 SS-12=CD
SCREW3/8-18 x I 68F-3140-ZN
NUT5/16'-18 $8F-8150
SCREW,HEXHEAD5/16-18 8SF-99S-1
LOCKWASHER BEN-1819-ZN
GROUNDSTRAP GS,-0110
._'_IGIN_e(modelHM100-159462R)
FRAMEASSEMBLY D20_4
HEATSHiB.D GS_-I
SCREW5/18-18 X .5 SSF_541)
PANELASSEMI_.y D20528
SPACER_IGINE GS,.0746
WASHER.87500.3751D .083"11,-IK .S_hF832
LABEL,OPERATION LA-3O29-1
LABEL.WARNING LA-2911
LABEL,PANEl. 1:)20502
*SEE ENGINEPAGES
Page 21

CRAFI'SMAN emoo OlINERAlrOR 019.,_m180
33
37
43 _ a_o o,;VNo
QROOyE.mR'roF==
KEY
_o. gr=_BteZL_
31 CAP SCREW 5/16 - 24X1
32 ROTOR ASSEMBLY
33 STATORTHRU BOLT
34 STATORASSI_IBLY
35 WASHER 11/18OD x 11/'32
36 NUTS/10-24
37 ROTOR THRU BOLT
38 BF,ARING SUPPORT
39 HE)( NUT 1/4-20
40 CAPACITOR
41 CAPACITOR BRACKET
42 SCREW 10 - 24 x g/16
43 O-RING
44 DRIVE END ADAPTER
45 LOCK WASHER 3/8
21 -- ENG u=s4e__ o
SSF-616-ZN
GS-0883
GS-0110
GS-0884
SS-6506-CD
SSF-576
G8-0091-1
GS-0861
SSF..575
GS-0873
GS-O595
SSF-S,T_I
GS-0862
GS-0511
SS-1503-CD
Page 22

ORAJF'rsMAN 680o GIENImAlrOR 9,11LW2J;180
47 TORQUE2-10 IN-LB,S
46 TOFIQUE2-10 IN..LB8 4g TORQUE2-10 IN-LBS
KEY
ug, _ pJJ_:CJmzm)_
46 SCREW #6 - 32 X .5 TORX SSF-583
47 NUT, 10 - 9 X .SOPLASTffE SSF-3158
49 NUT,,HEX JAM "I/16 $8F-595
50 SPEED NUT #6 - 32 8SF-584
51 WASHER 3/8 S.R-1525-CD
52 SWITCH ON/OFF GS-0048
53 COVER, PANEL GS-0598
54 DUPLEX RECEPTACLE GS..0019
5S 4 PRONG TWISTLOCK GS-0455
56 CIRCUIT BREAKER25A 020573
KEY
NO. _
57 SCREW, 1/4-20x.75 81895680
58 LOCK WASHER SSN-1019-ZN
59 GROUND STRAP GS,.0118
60 NUT, 1/4-20 SSF-575
61 SOLENOfD GS-0545
62 CABLE ASSY
_o,,ee FI_ ns/eim 22 -- ENG
(SOLENOID-STN=Ci'ER) 132O54O
Page 23

6
2
8
1
8
8
10
Key
t Wheel (2 used) AC_014
2 Shoulder Bolt (2 used) CAC-60
3 Loc,k NUt 3/8"-I 6 (2 use¢l) .,_F-8111-ZN
4 Wh_m_B,"acket(2 used) GS-0581
5 Foot Bl'scket GS-0582
8 HlmdFe GS-0564
7 H_dle Cap (2 used) es-os6s
8 Lock Nut 5/1_"-78 (9 UaMK_ $8F_150
9 CIp Screw S/16"-18 x 3/4"
(6 used) SS-12-CD
10 Isolator Foot GS-0587
11 Cap Screw 5/16-18 x 1.75"
ur,ed) _F.-Sge-1
12 Washer (2 used) SS-eS06-CD
23 -- ENG m_ _o_wao
Page 24

€_tA_ s'JOOGlflqEHAYORe_J_5'_tolso
CONTROLPANEL
REARVIEW
_rP,TotqLr_J_ I1._)
NIX.
W
J
|
!
I!o
gu
_yl_ uNf
-. J
1 WIRE #12 AWG
:_ WIRE #12 AWG
3 WIRE #1(5 AWG
4 WIRE 112 AWG
S WIRE #12 AWe
6 WIPE e12 AWG
7 WIRE #12 AWG
8 WIRE #12 AWG
9 WIRE #12 AWG
D2OdN"_. _ 24 _ ENG
GREEN
REI_
GREEN
BLACK
BLACK
RED
GREEN
GREEN
ORANGE
Page 25

¢RL_'SI_tN_GJDIERATOReIL_.91S0 s'r_q'rER ew?4e
m,
CRAF'mr_I_I_IOOGENERATOMOIO,$1g|IO
_4
_2
1
2
3
4
5
8
7
8
11
12
13
P,_r No. ia_sr,BIEzto.N
590598A Spring Pin (Incl. 4)
590600 W,_her
590678 Retainer
590601 Washer
590878 Brake Spdng
590680 Stirrer Dog
590412 Dog Spring 2
590681 Pulley& Rewind
Spring Assembly 1
590747 Starter Housing
Assembly 1
59O,535 Starter Rope
(Le_lh _' x9/64' dla,) 1
590701 Starter Handle 1
lrr_ #_o7o4 {o_ioo_)
9.rY
1
1
1
1
1
2
NO
1
2
13
3
4
5
6
7
8
11
12
13
25 -- ENG _o48e _ a S/WOO
_Frr NO.
5106_ Spring Pin (Incl. 4)
590800 Washer
590696 Retainer
590601 Washer
590897 Brake Spring 1
5908o8 St_.er Dog 2
59o699 DogSpdng 2
59O700 Pulk_y&
Rewind Swing Ass'y. 1
590705 Starter Housing Ass'y. 1
SSO6SS S_ter Ro_
(98" X 9/64" dia.) 1
590701 Starter Handle 1
1
1
1
2
Page 26

_MAN _00 GllNEP,ATOR es0,,1_ltso
400
I_CUMBIU_ 4-_Lm ENCMNE MODEL _ItHIM100*llm482R
182
t11A
Page 27

I_I_APT8M&N 6800 _ II111,_1191E0
RE_
BaSZ._LO. J_liBr.d_lE2tQ_ o'rv
1 35948A Gyinder _ld. 2 20 &?2)
2 276_2 Dowel Pin
14 28277 Washer
15 9O065C Governer Rod (Ir_. 15A & 188)
ISA 30700 Go_mor Yoke
13B 850494 8omw, 6-40 x 5/16"
16 374_'W Gov_nor Ltwer _ni. 21P.A)
17 29916 Govaltof LeverClemp
18 6510_8 8crew, Torx T-15, 6.32 x 3/8'
20 35319 Oil Seal
25 36460 BloWer HoulslMgBaffle
25A 36244 Air Ew_]e
26 650561 Screw. 1/4-20 x 5/8"
20 30a22 Look Nut, 8-32
30 3T302 Crankarmft
35 29826 Screw. 1Q-32 x 3/4"
36 20910 Lock Washer
37 29216 Lock Nt_ 10"32
33 23642 Retaining Ring
40 35776A Pistol1,P_n& Ring Set (Std.)
40 35777A Piston. Pin & Ring 8M (.010" O6)
40 35TZBA Pleto_t.Pin & Ring Set (,020' OS}
41 35773A I_Jdon& Pin A_'y, (gtd.) (In0f, 43)
4t 35774A Piston & Pin Ass',,/.(.010_ OS) (Incl. 43)
41 35775A Pietoo & PinAss'y. (,020 OS)(Incl. 43)
42 35779 Ring Set (STY.)
42 357o0 Ring Set (,OLO"08)
42 35781 Ring Set (.020" OS)
43 35772 Piety1 Pin RetainingRing
45 3sege Connecong Rod .,_s',/, _-_ol.47 & 49)
47 ,651(_3 Corme©tlngRod Bol(
48 34034 Valve Ll_ar
49 3€,896 OHDip_r
50 35375 Camshaft (MCR_
60 33273A Glower Honslng Extension
05 650138 S_mW. 10-24 x 1/2'
69 37342 Cylinder Cover Gasket
70 35376 Cyfinder Germ 0ncl. 71, 75 & 9O)
71 35377 Crankshaft Bush_
72 27642 Oil Drain Plug
75 35319 OffSeal
80 318A8 GoVernor Shaft
81 30590A wuh_
32 35378 Goverr_ Gear Ass_/(incl. 81)
83 36588A GoYwnor Spool
84 29193 Ftatain._gRing
36 6_0833 Screw, 1/4--20 x 1-3/16'
37 650832 Screw, 114-20 • 1-11/16"
. 32539 RF_= Key
90 61t 093
92 060080 Lo¢k War_er
9_ 650081 Rywheel Nut
94 _101B Lock NI_, 10-32
95 30_36A F.xtanmon8pdn9
98 30645A R.RM. A.d_kletk_ElOIt
100 35t65A 8olld Stete Ignition
101 610118 Spark Plug Cover
102 651024 8ofld State Mounffi_ b'tud
1o_ 651007 _rew, Torx1"-15,t0-;_4 x 15/18"
110 35589 Ground
111 611220 Low O_ Shut.Oown 8wl_=h (Ind. t 12)
111A 611223 Low Oil kl(deator Light
112 35067A Gusket, Oil Sensor
113 65659o S_,_v, Torx T-;_, 16.24 x 5/8 °
119 36451 Cyfl_nde_H_ld G68ket
120 83440 Cylinder Head
125 27870A Exlhat_t Val_ (dtd..)Jlncl.151)
1_'5 27880#. F_d'.auoi[VelVe(1132 C_)0ncl. 151)
126 34035 Intake VaJve(did,) (Incl. 1$1)
127 8308_1 Washer
120 850690 Bffll_vl]feWasher
BEE
130
130A
185
139
140
140
149A
150
t51
16_
170
171
172
_17_
174
1170
la3
184
212A
2_3
N
N
_75
1P
1
2 287
1 :'92
1 29o
1 311
1 314
I 315
7
1 N
1
I 323
1 324
1 _ZSA
1 381
1 37O
1 371_1
_, $70K
2 870L
1P
NOTE: 11_15ongkm cot_l have bmeflbulRwRh590704 _art_.
4
4O0 364O2B Gsld(_ _et
1P
1
1
1
1 418
9
9
OARBUIqfflTOItHODEL dl14M100,,111e481_
. ,,,.,
_,w_. m m'_
6506_1A 8crew. 5/16-15 X2" 9
651031 8crow, 1/4-20 x 9/13" 1
33638 Redetor Spark Plug (RJ171.M) 1
33361; Go_rno_ Gear Bnmket 1
65033_ 8_rew, 10-24 X 1/2" 2
_73_2 vabe Spdn_ Cap 1
35882 Valve Spdng Cap 1
27881 Valve_ 2
32581 ValVe_)drlg Keeper 2
27_ B_uher 6aud<et 2 P
2O423 Brother Body 1
26424 BreatherElement 1
28425 ValveCovet 1
33350 Bmether Tube 1
650128 S_rew, t0-24 x 1/2" 2
297_. Nut & Lock Washer. 1/4-2B 1
30658A Scow, t14-28 x I" 2
93263 Cerbumtor To Intake Pipe G_ 1 P
33877 Inm_¢ePipe I
37448 Throttle Link 1
88288 Bu_hlng • I
65G379 Scrmv, Tom 1"-30,5/16-18 X 1-1/8 9
27915& Intake pibe Gasks( 1 P
28820 Screw, 10-32 x 1/2" 2
27272A AirClsaoer Gasket 1 P
33286 Air Gle4_r Bracket I
33267 Air Cleaner Bracket 1
_3208 Air Gleaner _ I
33239A Air _ Cover 1
37444 Wtng Nut, 1/4-20 1
8_4OA BloWerHouslr)g 1
650?88 Screw, 5/16-18 x 3/4" 2
29?478 SOnsW,"rOB1"-40.5/16-24 X21/'32" 2
6508O2 SCn_w,114-20 X-_US" 1
33272D Gyl_lde_Head Cover 1
34185B Muffler 1
31588 Locking Pl_te • 1
650729 Screw, 5/18-18 x 3_/16 2
35985B Starter Cup 1
23752 Nut & Lock Washer, 1/4-28 4
30_H_2 Fuel Une 1
26465 Fue_Line Clamp 2
3427OB Fuel I_dter(ff_l. 092) 1
351141 Gll RII Plug 1
8508?3 Screw. 114-23 x 3/4" 2
811113 Altenlato_Co_l
611161 Diode 1
8109_1 Coflrmctor Body 1
610022 Temlln_ 2
33177 TemllnaJ I
29443 Wire C_ip I
27275 Wke CglP 1
3008_ Screw, Ton(T-30, 1/4_.20Xl/2" 1
65C99o S¢'rew,T-30, 1/4-20 _ 1/2" • 4
345261 Identification De¢aJ 1
3,,4274 IP,etmotion Decet 1
3SS0S Smd_ Deoal 1
56980 Low Oq De_d 1
_402110_ _o_ (in_d. 184 & 21P..A) 1
89O746 Rewind 8rater I
58880 Elec_lo 8tertar Motor (12 VOlO 1
34479A Spark ArrestorKit (Irl_. 4t ?){Optional) 1
13AIlI) OC)(_cl. 32,1-32_) 1
(Ind. Items Marked PK In Notes) I
_I), _5317 {I), 8_87A (I), 30451 {1), 37342 (I)
27 -- ENG _,o4ee_ oe_oo
Page 28

CRAFTM4SN OS00 r, ENFRA1 OR oto,slStlO
171
¢AA_ MODm,. 164,0S_gOS
I
27
"$7
B_B.T.B_L__ nn,
1 _k32798 11_tUe 8_t & Lev6r Assembly I
IA 38288 Throttle Link Bu_11ng 1
2 631970 Throttlo ReturnSpdn9 1
4 631184 Duet Seal Washer 1 p
5 631183 _ Seal (rhroffie) 1p
6 640108 'll_oUle 8hurter 1
7 650606 ShuIwr $orew_ 4-40 X 114" 2 P
10 632740 0hoke _18fl & Lover A_m-nbly 1
11 632043 Choke Return Spdno 1
12 631184 Dust SealWasher I P
13 63111_ Dust $msl (CtnoKe) I P
14 63175S C;_oke_ndter 1
15 630735 Choke _nlng 8prlh9 1
16 623164 'throttle-FuelRffingcm_;crew/ 1
17 _lO'a
18 IS30766 Tension Spdng 1
20 84002_ Idle Rlldrlotor Seamy 1
I_IJeSpeed Screw 1
BE£
No. _urr_ m aft
20A 840053 Idle Resfric_arSorew Cap 1
25 621M7 FloatBowl 1
27 631024 ROilt Shllft I P
28 632019 Float 1
29 8310_8 FIOl Bowl O-Ring 1 P
30 6310_1 Ird_ Neaple, Seat & Olip gnc:f.31) 1 P
31 .1_J2 bh_ -Nm_l_=dng Clip. 1
36 840113 Tube 1
37 632547 Main Noezle Tube "O" I_ng 2 P
40 640137 High Speed BowlNut 1
44 27110A it_Vl N_ Wa_er 1
47 630748 WeJchPlug, k:lle_Wd 1P
48 631027 Weldnl_g, _= Vent 1 P
6O 63276O Rapelr k;t
tlncl. Irons Ivlmked p In Notes) 1
Page 29

C_L_MANHO0 GENm_M'M g_lJmq 10 m.iCTlUO i'I"ARI'ER Ik16180
15
14
P*S'T_. B an,
1 _2798 Throttle Shaft & Levw AsHmbly 1
1A 36"288 Throttle Link Bushing 1
1 _k_ 1 DustCover 1
2 3Se42 Re_ Rk_g 1
3 _,_._o ,SpdngRetainer 1
4 33er,_. ,_'_'..dtilt Sprit,9 1
370G0 Gear & Nut (InGL2_ 1
7 33450 LockNut 2
s ._eo4 DriveEndCap _'y. 1
9 3S_ _ 1
10 _ Houldh9Aml'y. 1
,,,,,,
P-EE
NO. E_Z.B_ m o'ry
12 3_196 Brush&_ Kit 1
14 S5897 1Y,m_ Wmher 1
1_ M896 Bol_,10-32 X 4-t 1i_L" 2
15 3Mgg End Cap &8rush C4m Ass'y.
17 8_168 Washer I
18 _ Nut 2
20 650000 Somw,TorxT-30,1/4-2O x lS/'J2" •
29 -- _'_IG _ n_oeAvuo
_.12,14,17,18) 1
Page 30

CALIFORNIA & US EPA EMISSION CONTROL WARRANTY STATEMENT
The U. S. Envimnrmm_ Pm_dk_ A_m_ ('EPA'). theG_=n_ Nr Re=mm:m B0wd _ a_d Te=umeeh Pmduas _.
eq_pmenl engine, _ _. nN 1_ =.d kaeruWymd _wnard =_be _ mt_no=mu_b=d_naa, bu_cad
equ_ped to rant _e Sills _deaanl =ml-maog x_amlmd=. In eJlor =latm_ now 1_? mad Ime_ med_ year g_ltee must be
defigned, 0uiRand eqtdppe4014 tho ffme of eale, to meet rite U.& EPA _aUenm for mind non-reed ant_nes. Te_amQh
Products Co, w_l wen'ant 1he emhudoa €ordro;syld(mlon yo_' uLqltyor lean and gasden equlpm_l _9_ _ _ _a _ U_
listed bek)w, provided Ihoro hH bean no alum, nogle_., tmapproved modifJ_16o_,or improper maintenonoe of y_ur uglbym'lawn
and garden equipmenl e_lirm.
Your emission control syslem may Include p_ts suchas Ihe cmbwelor, ignJ_msystem and _ aystarll. Also Jack.red may
be Ihe compression release syldem and other imlh_don-relMed asNmblies.
Wherea warrenr_e €ondi_onexlm, Tenumeel_ProduclSCo.wigrepe_your_ ortam andgm'e. _uipment engineatno
costtoyoufordiagnosis,partsandr_x.
MANUFACTURER'S EMISSION CONTROL SYSTEM WARRANTY COVERAGE
Emission €astro] sys_en_son 1S95 w_d_er model year California uti/Ity end _ 8rid 01uriahequipment en_mm af_ wanluded
for two yam as hereirtafler notecL Inotherstetes, 19_Tendlalermodelyeafenginesgceidsowarmi_ledfortwoyears. If.dtll_
such war'_n_ period, any amiulon-relaled pert on yaw arena Jsdefects in n_e_Vs or wodm_nshlp, the pad wmbe repaired
or replaced by Tecufl-,aeh Pmducls Co.
OWNER'S WARRANTY RESPONSIBILITIES
_ theuli_y or _w and Oan_mequllpme_anginaow_, yo_are _ _r Ihe p_.ormm of _ _ _m
I_ted inyourOwrr_r'sManold,butTecuree_ Pmdu_l CO.WIllnotdeny.wu'rm_ sol_yduetoItm_ _ _ _ _ _
_rum topmvk_ v_lnenevkkmm ofUwpeKom_noeo_ellscheduled_
_ theuUl_,yor lean and g_den equlpmen_e_lino or,w.er,youal_dd, however,I_eaware#_t Tecums_ Pr0ducu_Co. may
denyyouwarranly€overa0eifynor_dil_or I_m and 0e..denequ_rmnl ora pat the_m__ _ _ _ _. _.
k,pro_- malmenoe_ or unolspmv__.
You am responsible for pceserfdngyo_ uity or lean wld prden equipment engkw M a T_h A_d _ _
(e,'lyTecumuh Reg_red Sea,ice DHI_, Tecumeeh Aulhod,/.edServl_t Obbib_lor or Tecumlmh Cen_';d Wltmhoum Dlsvibu-
(or)Im scol as a la_t_lm eslsts. The wMmmy re_ _lOtdd be €oaSted bl a relisonal_le afflour4 d Ume, hal Io uceed 30
days,
WMr_lly urvlco osn be ampn4_e_by €offlaclJngIv_01e_'a Te_cumsahAul_oY_zed8er,4ce Outlet of by €olltacldnOTe_lmsen
Produc_ CO., _'o _mdoe Manager, En0tne and Ttans_ulon Group _ Dtv]skm, 000 Notlh 8mat, Gref_on,_4 53024-t499.
Telel_hone 1-2_.3Y'r-270o, _r sea your kx:adbde_ho_e yellow p_es under"EnglMs, GasoJJne"for d_ename, eddrm;s _nd
telephone number of a Tecumseh _utho_ed 8endce Ouht r,e_' you.
IMPORTANT NOTE
Thiswemm_y_nt explainsyour_hla andol_illaio_ underihe _ Conf_ol8ymamWen'anty_S _ .
whichIsprovl4edtoyoubyTe_seh PmdudsCo.pumuareto GaWomixlaw, Teoanmh PmdudaCO,also W0vfde_to od_lM
purcham_ o( nowTe_nmmh ProductsCo. _. The Tecunmh P._ Co, Lk_ed Vv_nin_s fo_NewTecsa_h En_
end_ 10nl6onModlulm(-rmh Produc_Co.Wan_ v_k:hIs endoHd v4h _dlnowTecumNh Pmduds_
en0_mmonmupwa_e eheeL The ECswamlr4y mp_lNe,_y tod_eem_doncnntrolqamm_ofyournoweq_ne, Todwexter_
IJ_tIfmmI_anymrdllctIntannobete,.mm_e EG8W_ru_ andI_ Tectanuh Pradu_s_. _, _ _S _ _
_y _m=q=t _qm_f dlt_r_tsn_es _ t_:h Ihe Te_m_seh P_ C_ W_ M_y p_de = k_gor w_ period. B_h
Wanenty Mtd Ihe Tecurneah Produots Co, W_n'an_ de_dbe k11po_umtdgh_ end o_ v*tthnml_ _oyour flew
o.-a,0e_ a_,,=_ 30 -- ENG
Page 31

EMISSION CONTROL SYSTEM WARRANTY
2. Free from de_ls kl madlrleb and _ip vdlkit, Mstay lime dudqi 1heECS _P_, wW_ • _
imlalonl.-mlb4 NIl _ lift Io Ix) klemkal In idl nile_ll rellpedmto Ill piut el dNcrbld _ _ _m m_0
C. The ECS WwTamy only pe_Jns to embldoni_m_-d IMnl on your er,glne, N tolmvs:
urger the EC$ Wanamy _rmUbe w_ranled for eny reminder of _ EGSWamm_ P_!od,
2. Any wmn-_lmd._ pofl which II I_hl4ulld _lly lot'mgllklr klspe_on lUl Ii_ldlled irl ihe _s _
shaUbewan'a_ed forme ECliWammlyPerlod. Aslidenm_lnsu_v, tl_en _lt',lefredof mpak'o_ml_
_ bev_me_d f_rd_ Nd_do_0meW_ _oU_Am_k_ed _ _ to_thd_t _mep_t f__ p_r_
the Ik_ _d_ed_led mp_c4pm_ the p_lehe8 M mpe_d or re_a_d by Tecum_h ProduCe Co, _oon_no _ S_
4. Ropeir _, _ d Imy_m__. emlell_nll,4_lktedJ_l_tunderIbisECS WlmllV_ ehaJlbe i_lld Id no _ _
_. The mWl_ IhMI no_be _hmged fo_d_wi_ _whk:h kmd_ tn toe _on _h_ • p4_ _ _ _
Wamm_ J__ f_s de_m_, pm_ed _ such d_ms_€ work ,., p_k_ned m _ Tecums_ _ed Se_ O_
for _em_itJon.
"o_fler _T_ Te_u_ms41__ _k_ ov0_ ....
7. l_oughout dl_ ECS W_m_dy Pedo_ ToourmmhPriers Co, _ rr_n_n a supp_/of wen-arid er_es_n-mle_ed F_uls
su_€_ent to m_H_tIhOexpec_d _ml_l for _ om_mion-r_aled par_.
o, Any TImumuh _ Co,imlhodzed lind Ipl_oved emluk_releled mpl_;en_nt I_rl my be _ In_e p_
o_i_ ECS Wanm_y rmdnlen_ ot'mpak an4 _dll be Ffovk_4 _ charSeIo thwo_tix. Sigh me ehall nol red_0e
Te_rnleh Products Co. EC$ Wanrlnly obl_llions.
9. UnaPpmveda(_d`_n_rntu_ii_od_44snvnynaib_uud_m_d_jry_f_Tan_m1sehPr_du¢_C_im_ St_huN
iu_, _n_ add-_,ormd_d llt.
EMISSION-RELATED PARTS INCLUDE THE FOLLOWING:
Carb_mr ge_e_
u_
_ake p_pe
Page 32

imml
For in-home major brand repair service:
Call 24 hours a day, 7 days s week
1-800-4-MY-HOME _" (1_)
Pare pedir servicio de reparaci6n s domicillo -- 1-800676-5811
In Canada for all your service and parts needs call -- 1-800-665-4455
Au Canada pour tout le service ou les pk_ces
For the repair or replacement parts you need:
Call 6 am - 11 pm CST, 7 days a week
Parts Direct"
1-800-366-PART (1-_0-se_7_s)
Pars ordenar plezas con entrega e domicillo -- 1-800-1659-7084
For the location of a Seam Parts and Repair Center in your area:
Call 24 hours a day, 7 days a week
1-800-488-1222 ,
For Information on purchasing a Sears Maintenance Agreement
or to inquire about an existing Agreement:
Call 9 am -- 5 pm, Monday -- Saturday
1-800-827-6655
SEARS
i iii
HomeCentral"
b_
 Loading...