

Page 1
Use & Care Guide
Manual de Use y Cuidado
English/ Espa_ol
Model/Modelo:
116.28014
Ke
P/N C01ZDDU30U00-KC01ZDDU30U0
Sears Brands Management Corporation,
Hoffman Estates, IL 60179 USA
www.kenmore.com
www.sears.com
Page 2
BeforeUsingYourNew
Vacuum Cleaner .................... 2
Packing List ...................... 2
Kenmore Vacuum Cleaner Warranty . . . 3
Important Safety instructions .......... 4
Parts and Features ................ 5-7
Assembly Instructions .............. 8-9
Pet PowerMate ®Storage .............. 9
Operating instructions .............. 10
How to Start .................. 10-11
Vacuuming Tips ................. 12
Suggested Pile Height Settings ...... 13
Attachments .................. 13-14
Attachment Use Table ............ 14
Performance Features .......... 15-16
Please read this guide. It will help you assemble and operate your new Kenmore vacuum
cleaner in the safest and most effective way.
For more information about vacuum cleaner care and operation, call your nearest Sears
store. You will need the complete model and serial numbers when requesting information.
Your vacuum cleaner's model and serial numbers are located on the Model and Serial
Number Plate.
Use the space below to record the model number and serial number of your new Kenmore
vacuum cleaner.
Canister Care ..................... 16
Removing Clogs ................. 16
Bag Changing ................... 17
Cleaning Exterior and Attachments .. 17
Motor Safety Filter Changing ...... 18
Exhaust Filter Changing ......... 18-19
Dirt Sensor ...................... 19
PowerMate ®Care .................. 20
Belt Changing and Agitator
Cleaning .................... 20-21
Agitator Servicing ............... 22
Troubleshooting ................ 23-24
Master Protection Agreements ........ 25
Requesting Assistance
Or Service ................ Back Cover
Model No.
Serial No.
Date of Purchase
Keep this book and your sales check (receipt) in a safe place for future reference.
PACKING LIST
Your KENMORE VACUUM CLEANER is packaged
nents assembled separately in the carton:
1 Canister Vacuum Cleaner
1 PowerMate ®
1 Pet PowerMate ®
1 Hose Assembly
1 Contour Brush_
Each of the above assemblies are shown in detail inside this repair parts list. _These
items are found under the Tool Cover.
-2-
with the following parts and compo-
1 Crevice Tool_
1 Combination Brush_
1 Extension Wand
1 Owner's Manual
1 Parts List
Page 3
Vacuum Cleaner Help Line:
1-877-531-7321
8:00am-5:00pm EST,M-F
(U.S.A. and Canada)
One Year Limited Warranty
When assembled, operated and maintained according to all instructionssupplied with
the product, if this vacuum cleaner fails due to a defect in material or workmanship
within one year from the date of purchase, return it to any Sears store, Sears Parts &
Repair Center or other Kenmore outlet for free repair.
if this vacuum cleaner is used for other than private family purposes, this warranty
applies for only 90 days from the date of purchase.
This warranty covers only defects in material and workmanship. Sears will NOT pay for:
1. Expendable items that can wear out from normal use, including but not limited to
filters, belts, light bulbs, and bags.
2. A service technician to instruct the user in correct product assembly, operation or
maintenance.
3. A service technician to clean or maintain this product.
4. Damage to or failure of this product if it is not assembled, operated or maintained
according to all instructions supplied with the product.
5. Damage to or failure of this product resulting from accident, abuse, misuse or use for
other than its intended purpose.
6. Damage to or failure of this product caused by the use of detergents, cleaners,
chemicals or utensils other than those recommended in all instructions supplied with
the product.
Z Damage to or failure of parts or systems resulting from unauthorized modifications
made to this product.
Disclaimer of implied warranties; limitation of remedies
Customer's sole and exclusive remedy under this limited warranty shall be product
repair as provided herein. Implied warranties, including warranties of merchantability or
fitnessfor a particular purpose, are limited to one year or the shortest period allowed
by law. Sears shall not be liable for incidental or consequential damages. Some states
and provinces do not allow the exclusion or limitation of incidental or consequential
damages, or limitations on the duration of implied warranties of merchantability or
fitness, so these exclusions or limitations may not apply to you.
This warranty applies only while this vacuum cleaner is used in the United States and
Canada.
This warranty gives you specific legal rights, and you may also have other rights which
vary from state to state.
Sears Brands Management Corporation., Hoffman Estates, IL 60179
-3-
Page 4

Read all instructionsin the manual before assembling or using your vacuum cleaner
WARNING
Your safety is important to us. To reduce the risk of fire, electrlcal shock, injury to persons or
damage when using your vacuum cleaner, follow basic safety precautions.
Use your vacuum cleaner only as described in
this manual. Use only with Sears
recommended attachments.
Disconnect electrical supply before servicing
or cleaning out brush area. Failure to do so
could result in electrical shock or brush
suddenly starting.
Do not leave vacuum cleaner when plugged
in. Unplug from outlet when not in use and
before servicing.
To reduce the risk of electrical shock - Do not
use outdoors or on wet surfaces.
Do not allow to be used as a toy. Close
attention is necessary when used by or near
children.
Do not use with damaged cord or plug. If
vacuum cleaner is not working as it should,
has been dropped, damaged, left outdoors,
or dropped into water, return it to a Sears
Service Center.
Do not pull or carry by cord, use cord as a
handle, close door on cord, or pull cord
around sharp edges or corners. Do not run
vacuum cleaner over cord. Keep cord away
from heated surfaces.
Do not unplug by pulling on cord. To unplug,
grasp the plug, not the cord.
Do not handle plug or vacuum cleaner with
wet hands.
Do not put any objects into openings.
Do not use with any opening blocked; keep
free of dust, lint, hair and anything that may
reduce airflow.
Keep hair, loose clothing, fingers, and all
parts of body away from openings and
moving parts.
Turnoffall controlsbefore unplugging.
Use extra care when cleaning on stairs. Do
not put on chairs, tables, etc. Keep on floor.
Do not use vacuum cleaner to pick up
flammable or combustible liquids (gasoline,
cleaning fluids, perfumes, etc.), or use in
areas where they may be present. The fumes
from these substances can create a fire
hazard or explosion.
Do not pick up anything that is burning or
smoking, such as cigarettes, matches, or hot
ashes.
Do not use vacuum cleaner without dust bag
and/or filters in place.
Always change the dust bag after vacuuming
carpet cleaners or freshener, powders and
fine dust. These products clog the bag, reduce
airflow and can cause the bag to burst.
Failure to change bag could cause permanent
damage to the vacuum cleaner.
Do not use the vacuum cleaner to pick up
sharp hard objects, small toys, pins, paper
clips, etc. They may damage the vacuum
cleaner or dust bag.
Do not operate vacuum cleaner without the
exhaust filter or exhaust filter door in place.
The hose contains electrical wires. Do not use
when damaged, cut, or punctured. Replace if
cut or worn. Do not pick up sharp objects.
Always turn off and unplug the vacuum
cleaner before connecting or disconnecting
either hose, Handi-Mate Jr.® (if applicable),
or nozzle.
Hold plug when rewinding onto cord reel. Do
not allow plug to whip when rewinding.
You are responsible for making sure that your
vacuum cleaner is not used by anyone unable
to operate it properly.
SAVE THESE INSTRUCTIONS
Proper assembly and safe use of your vacuum cleaner are your responsibilities. Your
vacuum cleaner is intended for Household use. Read this Owner's Manual carefully
for important use and safety information. This guide contains safety statements under
warning and caution symbols.
=4=
Page 5
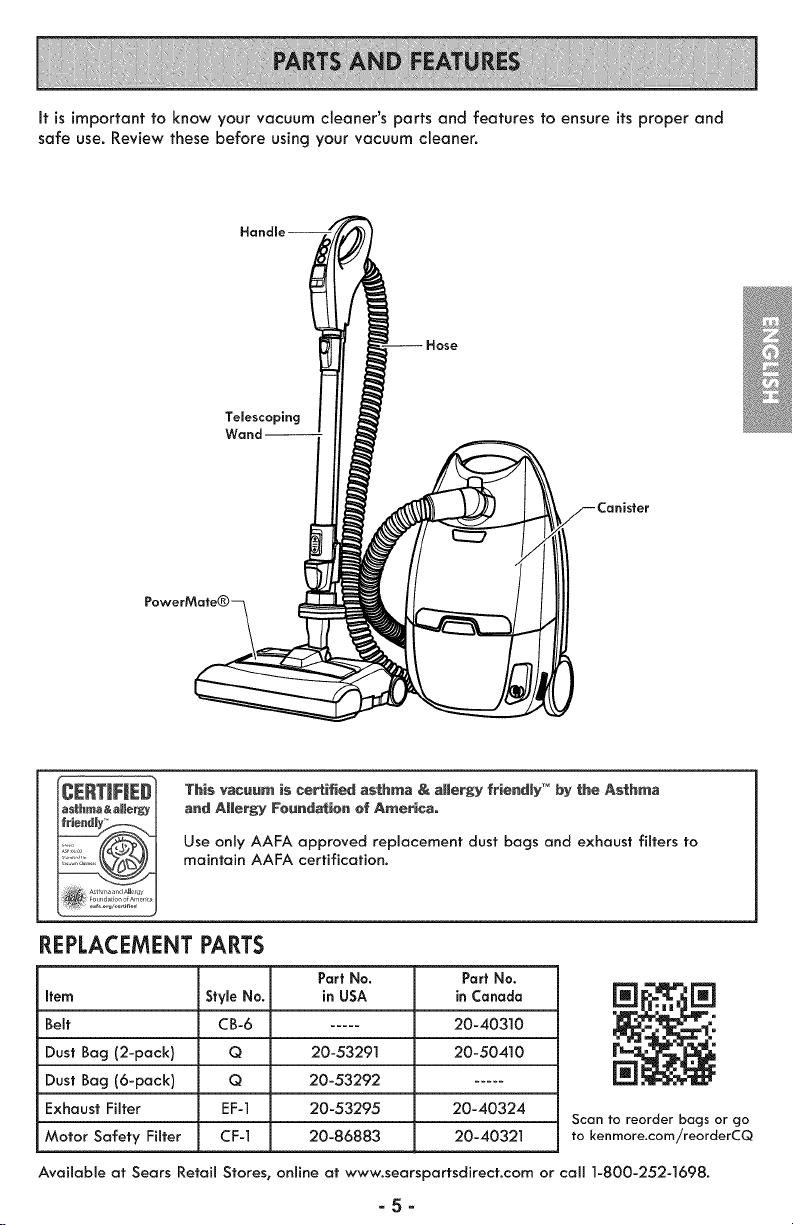
It is important to know your vacuum cleaner's parts and features to ensure its proper and
safe use. Review these before using your vacuum cleaner.
Telescoping
Zanister
This vacuum is certified asthma & a|lergy fr_endJy TM by the Asthma
and A|lergy Foundatien of America,
Use only AAFA approved replacement dust bags and exhaust filters to
maintain AAFA certification.
REPLACEMENT PARTS
Part No.
Item Style No. in USA
Belt CB-6 .....
Dust Bag (2-pack) Q 20-5329]
Dust Bag (6-pack) Q 20-53292
Exhaust Filter EF-] 20-53295
Motor Safety Filter CF-] 20-86883
Available at Sears Retail Stores, online at www.seorspartsdirect.com or call 1-800-252-1698.
-5-
Part No.
in Canada
20-403]0
20-504]0
20-40324
20-4032]
Scan to reorder bags or go
to kenrnore.com/reorderCQ
Page 6
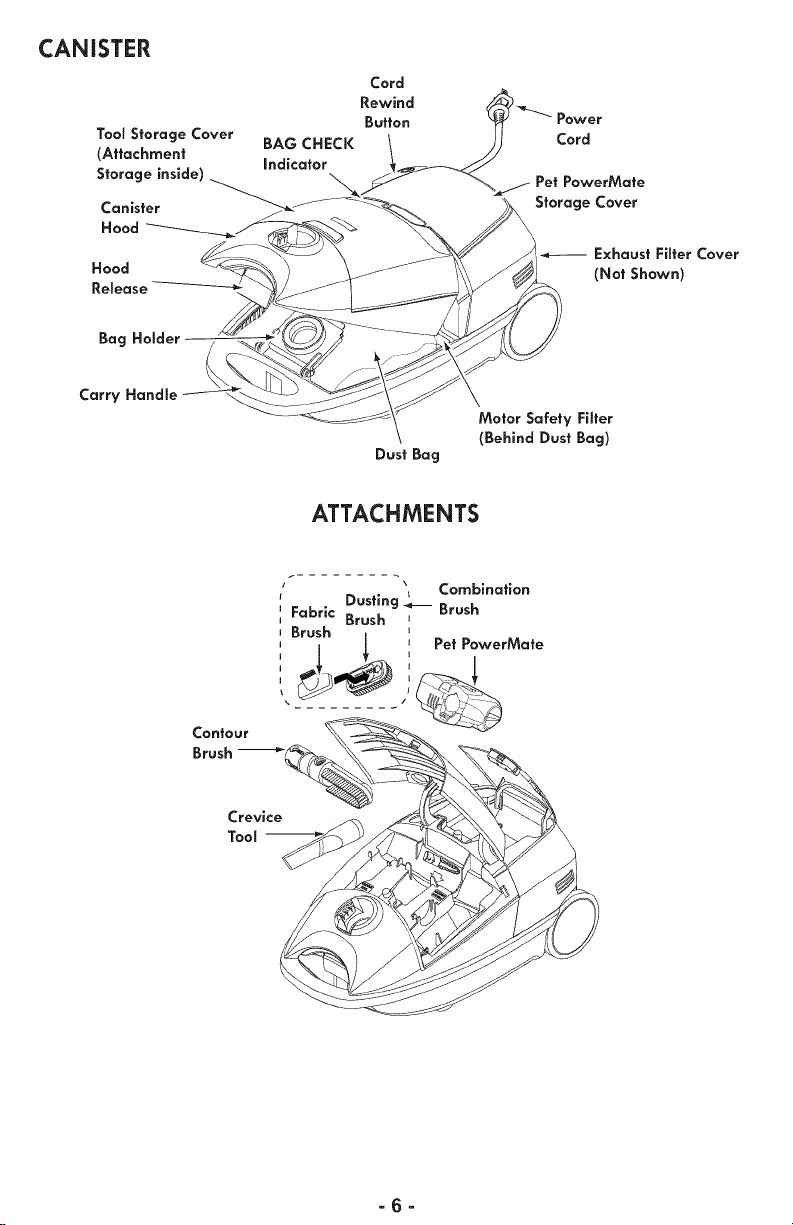
CANISTER
Tool Storage Cover
(Attachment
Storage inside)
Canister
Hood
Hood
Release
Bag Holder
Carry Handle
Cord
Rewind _
Button _ Power
BAG CHECK
Indicator
__ et PowerMate
Storage Cover
Exhaust Filter Cover
(Not Shown)
Motor Safety Filter
(Behind Dust Bag)
Dust Bag
ATTACHMENTS
Contour
Crevice
Tool --
/ . _ Combination
_ Brush | Pet PowerMate
Dusting __
Fabric Brush
Brush
-6-
Page 7
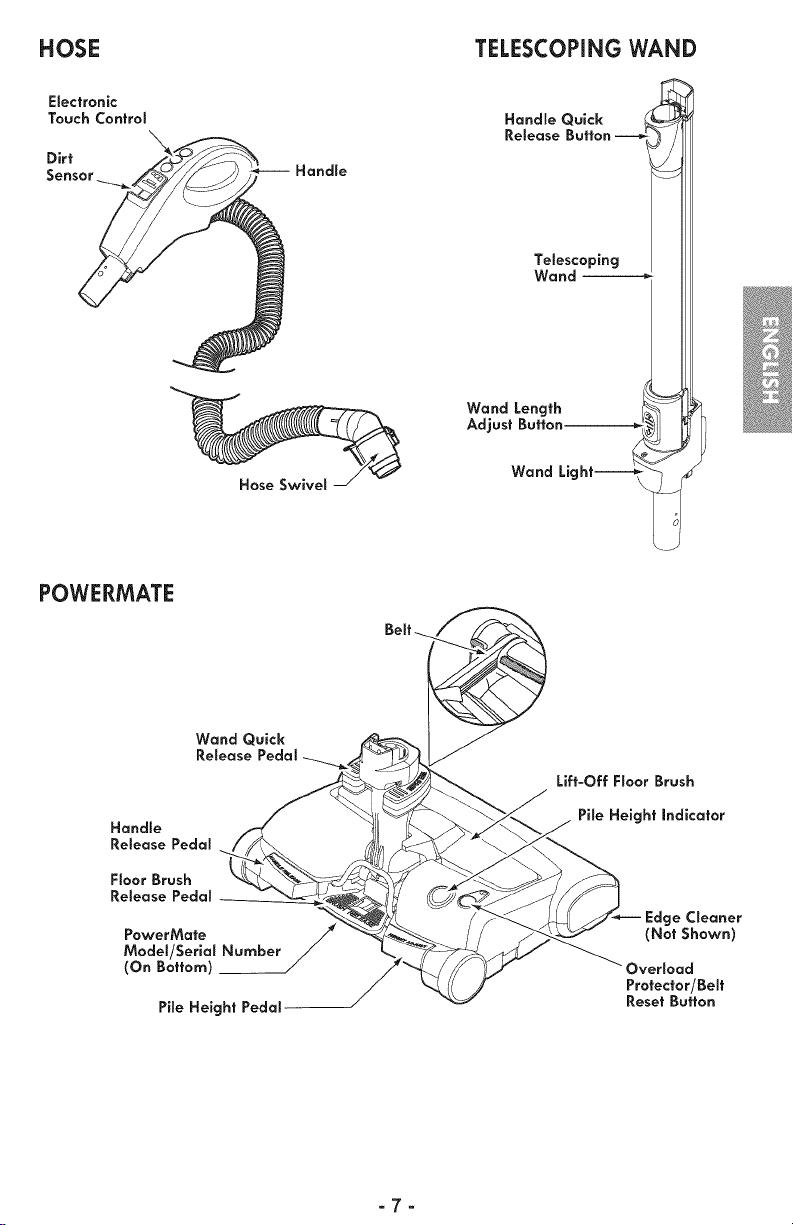
HOSE TELESCOPING WAND
Electronic
Touch Control
Dirt
Sensor
Handle
Handle Quick
Release Button
Telescoping
Wand --------_
Wand Length
Adjust Button_
POWERMATE
Handle
Release Pedal
Floor Brush
Release Peda_
Model/Serial Nurn
PowerMate ber_ €
(On Bottom)
Pile Height Pedal
Hose Swivel
Wand Quick
Release
Wand Light----_
Lift-Off Floor Brush
Pile Height Indicator
___
Edge Cleaner
(Not Shown)
Overload
Protector/Belt
Reset Button
-7-
Page 8
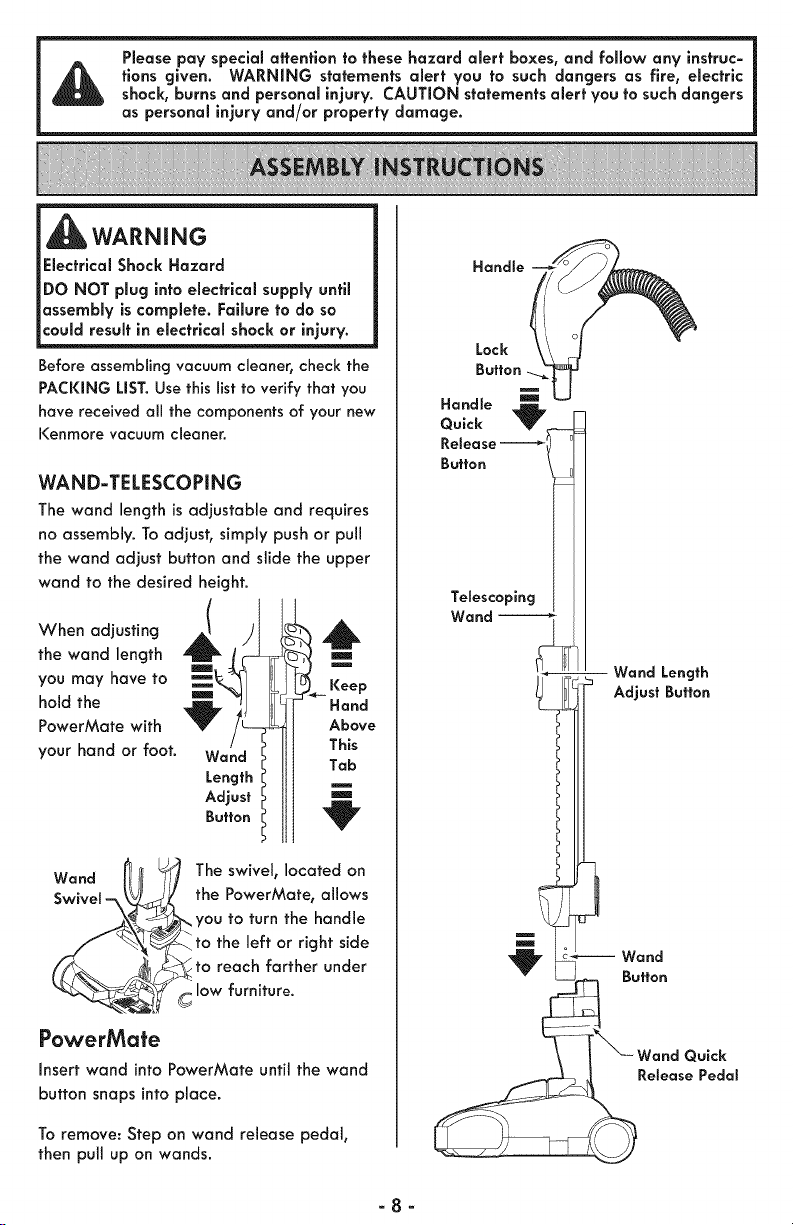
Please pay special attention tothese hazard alert boxes, and follow any instruc-
tions given. WARNING statements alert you to such dangers as fire, electric
shock, burnsand personal injury. CAUTION statements alert you to such dangers
as personal injury and/or property damage.
WARNING
Electrlcal Shock Hazard
DO NOT plug into electrical supply until
assembly is complete. Failure to do so
could result in electrical shock or injury.
Before assembling vacuum cleaner, check the
PACKING LIST. Use this list to verify that you
have received all the components of your new
I<enmore vacuum cleaner.
WAND-TELESCOPING
The wand length is adjustable and requires
no assembly. To adjust, simply pushor pull
the wand adjust button and slide the upper
wand to the desired height.
When adjusting
the wand length
you may have to
hold the
PowerMate with
your hand or foot.
Wand
Length
Adjust
Button
6
m
m
Hand
Above
This
Tab
Handle
Lock
Button
Handle m
Quick
Release
Button
Telescoping
Wand
Wand Length
Adjust Button
Wand
Swivel -
the PowerMate, allows
_you to turn the handle
to the left or right side
t b__The swivel, located on
to reach farther under
C low furniture.
PowerMate
Insert wand into PowerMate until the wand
button snaps into place.
To remove: Step on wand release pedal,
then pull up on wands.
Wand
Button
Quick
Release Pedal
-8-
Page 9

CANISTER
1. Open the canister hood.
2. Check to see that the dust bag is
properly installed. See BAG CHANGING
for instructions.
3. Check to see that the motor safety filter
is properly installed. See MOTOR SAFETY
FILTER CHANGING for instructions.
HOOD AND TOOL STORAGE
COVER
It is normal for the canister hood and tool
storage cover to come off when opened
further than needed. Line up the hinge slots,
insert the hinges into the slots, and close
the hood and tool storage cover to reinstall.
CAUTION
Never open canister hood with the tool
storage cover open. This will help to
prevent damage from occurring to the
canister hood and/or fool storage cover.
HOSE
1. Line up the
hose latch tab
and notch in
canister hood
and insert hose
into canister until
it snaps into
place.
To remove: Do not open hood before
removing hose. With hood closed, lift
hose latch tab upward and pull on hose.
Handle
Lock
Button _ To remove:
Handle quick release
Quick button and pull
Release
Y
Latch
Tab
2. Insert
handle into
wand until
lock button
snaps in
place. Be sure
hose is not
twisted.
m
Press handle
up on handle.
This canister is equipped with an on-board
storage area for a Pet PowerMate
attachment.
To install:
Open the Pet PowerMate storage cover.
insert the Pet PowerMate, press down into
place, and close the lid securely.
To Remove:
Open the storage cover. Remove Pet
PowerMate from the storage area and use
as needed (see ATTACHMENTS and
ATTACHMENT USE TABLE).
To store: Disconnect hose form wands and
canister to prevent stress on hose during
storage. Store hose in a loosely coiled
position on the hose covering is not
stressed.
Pet PowerMate
Storage Cover
=9=
Page 10
Moving parts! To reduce the risk of personal injury, DO
NOT touch the agitator when vacuum cleaner is on.
Contacting the agitator while it is rotating can cut, bruise
or cause other injuries. Always turn off and unplug from
_CAUTION __
electrical outlet before servicing.
Use caution when operating near chiidren.
HOW TO START
Torewind: Turn off
WARNING
Personal injury and Product Damage
Hazard
ALWAYS turn off the vacuum cleaner
before unplugglng.
The cord moves rapidly when
rewinding. Keep children away
and provide a clear path when
rewinding the cord fo prevent
personal injury.
DO NOT use outlets above counters.
Damage from cord to items in
surrounding area could occur.
Bot6n
del cord6n
el_ctrico"
NOTE: Toreduce the risk of electric shock,
this vacuum cleaner has a polarized plug;
one blade is wider than the other. This plug
will fit ina polarized outlet only one way. If
the plug does not fit fully in the outlet,
reverse the plug. If it still does not fit, con-
tact a qualified electrician to installthe
proper outlet. Do not change the plug in
any way.
2. Plug the polarized power cord into a 120
Volt outlet located near the floor.
1. Pull cord out
of canister to
desired length.
The cord will not
rewind until the
cord rewind
button is pushed.
and unplug the
vacuum cleaner.
Hold the plug while
rewinding to
prevent damage or
injury from the
moving cord. Push
cord rewind button.
3. Lower wand from upright position by
pressing on the HANDLE RELEASE pedal.
Handle
Release
4. Select a pile height setting by pressing
the HEIGHT ADJUST pedal on the rear of
the PowerMate. The pile height setting
shows on the indicator. See SUGGESTED
PiLE HEIGHT SETTINGS.
Attention: Refer to your carpet
manufacturers cleaning recommendations.
Some more delicate carpets may require
that they be vacuumed with the PowerMate
agitator turned off to prevent carpet
damage.
Pile Height
Indicator
-10-
Page 11
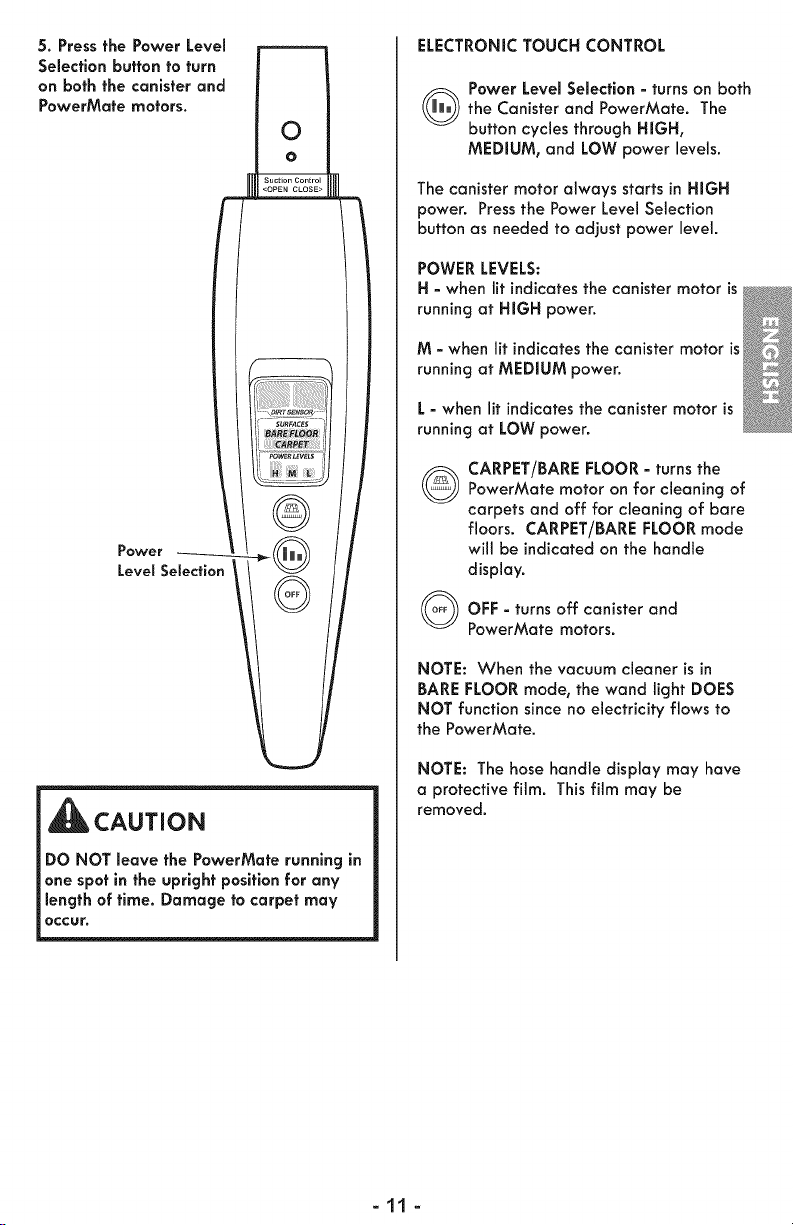
5. Press the Power Level
Selection button to turn
on both the canister and
PowerMafe motors.
Power
Level Selection
0
o i
Suction Control L_<OPEN CLOSE>
®
ELECTRONICTOUCH CONTROL
Power Level Selection - turns on both
the Canister and PowerMate. The
button cycles through HIGH,
MEDIUM, and LOW power levels.
The canister motor always starts in HIGH
power. Press the Power Level Selection
button as needed to adjust power level.
POWER LEVELS:
H - when lit indicates the canister motor is
running at HIGH power.
M - when lit indicatesthe canister motor is
running at MEDIUM power.
L - when lit indicates the canister motor is
running at LOW power.
CARPET/BAREFLOOR- turns the
®
PowerMate motor on for cleaning of
carpets and off for cleaning of bare
floors. CARPET/BARE FLOORmode
will be indicated on the handle
display.
OFF = turns off canister and
PowerMate motors.
CAUTION
DO NOT leave the PowerMate running in
one spot in the upright position for any
length of time. Damage to carpet may
occur.
NOTE: When the vacuum cleaner isin
BARE FLOOR mode, the wand light DOES
NOT function since no electricity flows to
the PowerMate.
NOTE: The hose handle display may have
a protective film. Thisfilm may be
removed.
-11 -
Page 12
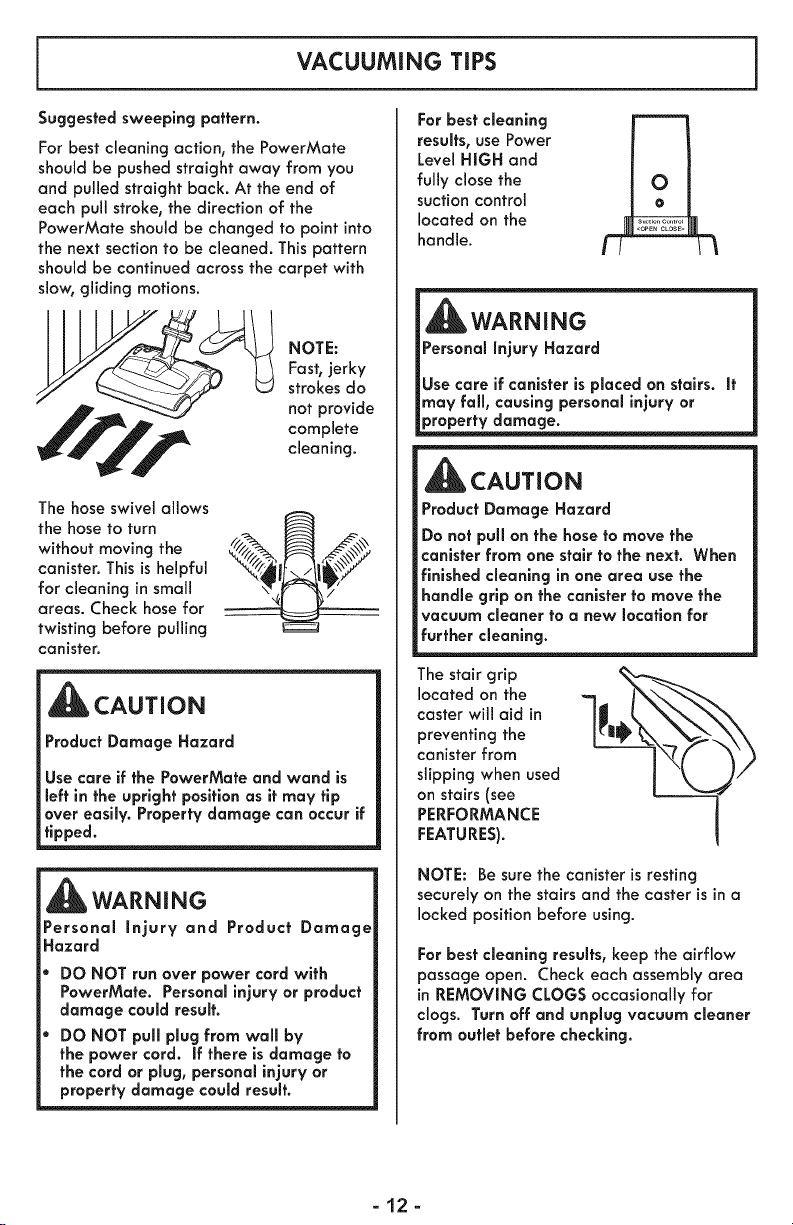
VACUUMING TiPS
Suggestedsweeping pattern.
For best cleaning action, the PowerMate
should be pushed straight away from you
and pulled straight back. At the end of
each pull stroke, the direction of the
PowerMate should be changed to point into
the next section to be cleaned. This pattern
should be continued across the carpet with
slow, gliding motions.
NOTE:
Fast, jerky
strokes do
not provide
complete
cleaning.
The hose swivel allows
the hose to turn
without moving the
canister. This is helpful
for cleaning in small
areas. Check hose for
twisting before pulling
canister.
CAUTION
Product Damage Hazard
Use care if the PowerMate and wand is
left in the upright positionas it may flp
over easily. Property damage can occur if
tipped.
For best cleaning
results, use Power
Level HIGH and
fully close the
suction control
located on the
handle.
WARNING
Personal Injury Hazard
Use care if canister isplaced on stairs, it
may fall, causing personal injury or
CAUTION
Product Damage Hazard
Do not pull on the hose to move the
canister from one stair to the next. When
finishedcleaning in one area use the
handle grip on the canister to move the
vacuum cleaner to a new location for
further cleaning.
The stair grip
located on the
caster will aid in
preventing the
canister from
slipping when used
on stairs (see
PERFORMANCE
FEATURES).
WARNING
Personal injury and Product Damage
Hazard
DO NOT run over power cord with
PowerMate. Personalinjury or product
damage could result.
DO NOT pull plug from wall by
the power cord. If there isdamage to
the cord or plug, personalinjury or
property damage could result.
NOTE: Be sure the canister is resting
securely on the stairs and the caster is in a
locked position before using.
For best cleaning results, keep the airflow
passage open. Check each assembly area
in REMOVING CLOGS occasionally for
clogs. Turn off and unplug vacuum cleaner
from outlet before checking.
_12_
Page 13
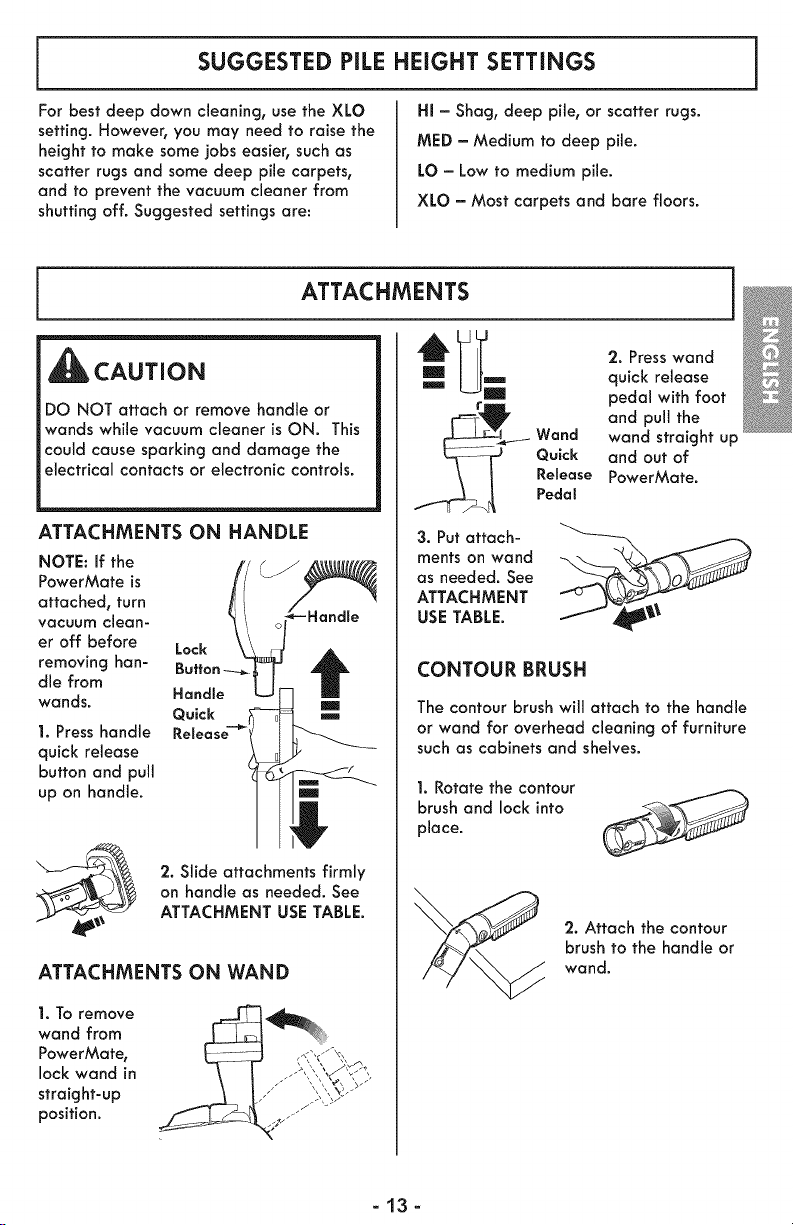
SUGGESTED PiLE HEIGHT SETTINGS
For best deep down cleaning, use the XLO
setting. However, you may need to raise the
height to make some jobs easier, such as
scatter rugs and some deep pile carpets,
and to prevent the vacuum cleaner from
shutting off. Suggested settings are:
ATTACHMENTS
CAUTION
DO NOT attach or remove handle or
wands while vacuum cleaner is ON. This
could cause sparking and damage the
electrical contacts or electronic controls.
ATTACHMENTS ON HANDLE
NOTE: if the
PowerMate is
attached, turn
vacuum clean- -Handle
er off before Lack
die from
removing han- t
wands. Handle
1. Press handle Release--_'-'
quick release
button and pull
up on handle. Ill
Quick i m_
H[ = Shag, deep pile, or scatter rugs.
MED = Medium to deep pile.
LO - Low to medium pile.
XLO = Most carpets and bare floors.
2. Press wand
quick release
pedal with foot
and pull the
wand straight up
and out of
PowerMate.
_,_.__- and
3. Put attach-
ments on wand
as needed. See
ATTACHMENT
USE TABLE.
Quick
Release
Pedal
CONTOUR BRUSH
The contour brush will attach to the handle
or wand for overhead cleaning of furniture
such as cabinets and shelves.
I. Rotate the contour
brush and lock into S_'-_
place.
2. Slide attachments firmly
on handle as needed. See
ATTACHMENT USE TABLE.
ATTACHMENTS ON WAND
1. To remove
wand from
PowerMate,
lock wand in
straight-up
position.
2. Attach the contour
brush to the handle or
wand.
-13-
Page 14
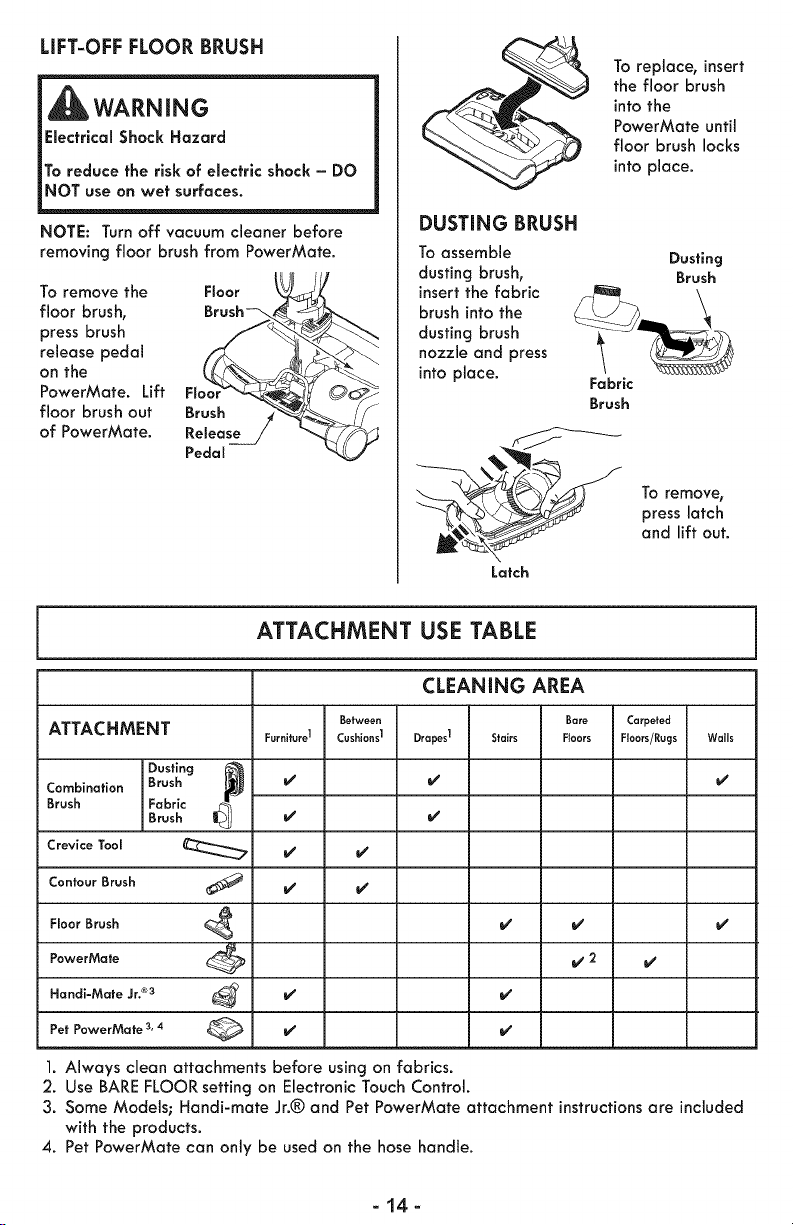
LIFT-OFF FLOOR BRUSH
i ARNING
Elecfrical Shock Hazard
_To reduce the risk of electric shock = DO
NOT use on wet surfaces.
NOTE: Turn off vacuum cleaner before
removing floor brush from PowerMate.
To remove the Floor
floor brush, Brush_
release pedal
on the
PowerMate. Lift Flaar_-_ '
floor brush out Brush /4_
of PowerMate. Release_/"
Pedal
To replace, insert
the floor brush
into the
PowerMate until
floor brush locks
into place.
DUSTING BRUSH
To assemble Dusting
dusting brush, Brush
brush into the
dusting brush
insert the fabr ic ____
nozzle and press
into place. Fabric
Brush
To remove_
press latch
and lift out.
Latch
ATTACHMENT USE TABLE
CLEANING AREA
ATTACHMENT Fur.lturJ CushlonsI Drapes1 Stairs FI.... Floors/Rugs Wails
Combination Brush i/ i/ i/
Brush Fabric
Crevice Tool _ i/
ContourBrush _;_ V' _'
FloorBrush
PowerMate _ _ 2
Handi-Mate Jr. ®3 _ _
Pet PowerMate 3, 4 _ i#s i#s
Dusting _
Brush _
1. Always clean attachments before using on fabrics.
2. UseBAREFLOOR setting on Electronic Touch Control.
3. Some Models; Handi-mate Jr.® and Pet PowerMate attachment instructions are included
with the products.
4. PetPowerMate can only be used on the hose handle.
Between Bare Carpeted
V' V' V'
-14-
Page 15

PERFORMANCE FEATURES
WARNING
Personal injury Hazard
Always turn off and unplug the vacuum
cleaner before cleaning the agitator area
as agitator may suddenly restart. Failure
to do so can result in personal injury.
OVERLOAD PROTECTOR
The PowerMate Overload Protector/
has built-in Belt Reset
protection against
motor and beff
damage should
the agitator jam.
if the agitator
slows down or
stops, the
overload protector
shuts off the
PowerMate and the red light will come on.
The canister motor will continue to run.
To correct problem: Turn off and unplug
vacuum cleaner, remove obstruction, then
press BELT RESET button.
If the problem persists, have the vacuum
cleaner serviced by a Sears or other
qualified service agent.
EDGE CLEANER
Active brush edge [ [[
cleaners are on both
sides of the
PowerMate. Guide
either side of the
PowerMate along
base-boards or next
to furniture to help
remove dirt trapped
at carpet edges.
CHECKBAG iNDiCATOR
When the vacuum
cleaner is running
with normal
airflow, the light on
the CHECK BAG
indicator is off.
The light comes on
whenever the
airflow becomes blocked, if that
occurs, check the disposable dust bag,
motor safety filter and other possible
clog locations shown in HOW YOUR
VACUUM CLEANERWORKS.
To correct problem: See the TROUBLE=
SHOOTING table.
NOTE: The light may come on when using
certain attachments, due to reduced airflow
through attachment.
THERMAL PROTECTOR
This vacuum cleaner has a thermal
protector which automatically trips to
protect the vacuum cleaner from
overheating. If a clog prevents the normal
flow of air to the motor, the thermal
protector turns the motor off
automatically. This allows the motor to
coo[ in order to prevent possible damage
to the vacuum cleaner.
To correct problem: Turn off and unplug
vacuum cleaner to allow the vacuum
cleaner to cool and the thermal protector
to reset. Check for and remove clogs, if
necessary. Also check and replace any
clogged filters. Wait approximately thirty
(30) minutes and plug the vacuum
cleaner in and turn back on to see if the
motor protector has reset.
CHECK BAG
indicator _._
-15-
Page 16
STAIRGRIP
During normal operation while the canister
is in the horizontal position, the caster wheel
rotates freely 360 °.
The Stair Grip
feature allows
the caster
wheel to lock
inposition
when the
vacuum
cleaner is
rotated 25 ° from horizontal into a vertical
position in order for the canister to rest on
stairs.
WAND LIGHT
This vacuum cleaner is
equipped with a light on the
extension wand. This light
will operate only when the
vacuum cleaner is in
CARPET mode (see HOW
TO START). The light will
operate when attached or
not attached to the
PowerMate.
The light can be used for lighting hard to
reach locations.
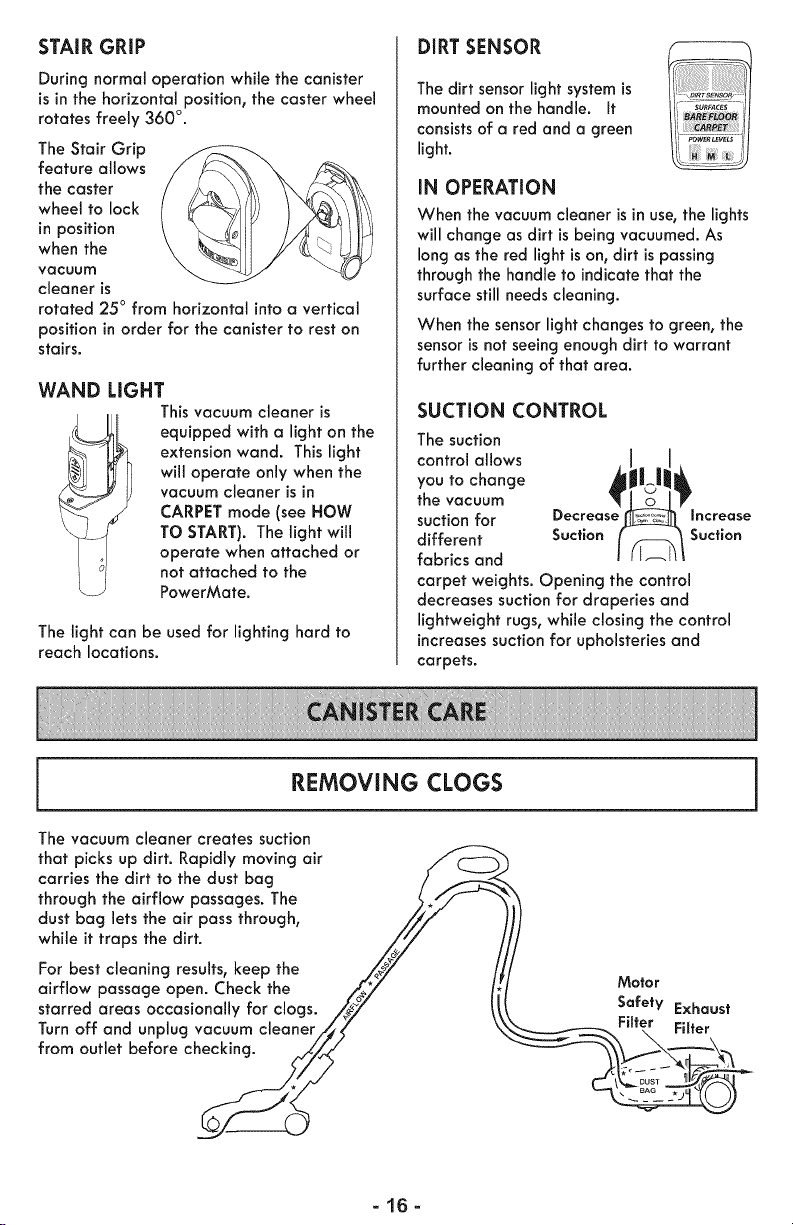
DIRT SENSOR
The dirt sensor light system is
mounted on the handle. It
consists of a red and a green
light.
IN OPERATION
When the vacuum cleaner isin use, the lights
will change as dirt isbeing vacuumed. As
long as the red light is on, dirt is passing
through the handle to indicate that the
surface still needs cleaning.
When the sensor light changes to green, the
sensor is not seeing enough dirt to warrant
further cleaning of that area.
SUCTION CONTROL
The suction
control allows
you to change
the vacuum
suction for
different Suction
fabrics and
carpet weights. Opening the control
decreases suction for draperies and
lightweight rugs, while closing the control
increases suction for upholsteries and
carpets.
Suction
REMOVING CLOGS
The vacuum cleaner creates suction
that picks up dirt. Rapidly moving air _)
carries the dirt to the dust bag /
through the airflow passages. The ,_,_-- _
dust bag lets the air pass through, //f
while it traps the dirt. // J
For best cleaning results, keep the _7 /
airflow passage open. Check the /,_" /; Motor
starred areas occasionally for clogs. _7 _! Safety Exhaust
Turn off and unplug vacuum cleaner,_" \ _Fiffer Filter
from outlet before ch_ _____
-16-
Y
Page 17

BAG CHANGING
For best cleaning results, the dust bag
should be changed often. The electronic
performance indicator will come on when
the bag needs to be changed or the airflow
is blocked.
NOTE: See PARTSAND FEATURESfor Bag
Number.
1.Turn off and
unplug vacuum
cleaner.
2. Remove hose
from canister.
3. Pull hood
release out and up,
then lift canister
hood.
4. Disengage
cardboard tab from
red bag mount by
pulling away and
lifting up.
Motor
Safety _,
5. Pullbag out of
the red bag
mount.
6. Check the
motor safety filter
and replace, if
necessary.
7.The red bag mount will flip forward after
removing bag. This will prevent the hood
from closing until a new bag is installed.
Note: DO NOT bend or crease the middle
ofthe cardboard when installingthe bag
intothe bag mount slots.
8. Rotate red bag
mount down and
install bag into slots
per illustration,
pushing down until
the cardboard tab
locks into position
and the holes align.
9. Tuck the bag securely into the bag
cavity so that none of the bag is able to be
pinched by the hood.
10. Close and latch canister hood.
1|. Insert hose into canister until it snaps in
place.
12. Plug cord into wall outlet.
CAUTION
NEVER REUSE A DUST BAG. Very fine
materials, such as carpet freshener, face
powder, fine dust, plaster, soot, new car-
pet llnt, etc. can clog the bag and cause it
to burst before it is full and may cause
damage to vacuum cleaner motor.
Change bag more often when vacuuming
these materials.
CLEANING EXTERIOR AND ATTACHMENTS
1.Turn off and unplug vacuum cleaner. DO
NOT drip water on vacuum cleaner.
2. Toclean exterior, or to reduce static
electricity and dust build-up, wipe outer
surfaceof vacuum cleaner and attach-
ments. Use a clean, soft cloth that has
been dipped in a solution of mild liquid
detergent and water, then wrung dry. Wipe
dry after cleaning.
,CAUTION
Do not use attachments if they are wet.
Attachments used in dirty areas, such as
under a refrigerator, should not be used on
other surfaces until they are washed. They
could leave marks.
=17=
Page 18

MOTOR SAFETY FILTERCHANGING
WARNING
Electrlcal Shock Hazard
Turn off and unplug vacuum cleaner from
electrical outlet. Do not operate the
vacuum cleaner without the motor safety
filter. Be sure the filter is dry and properly
installed to prevent motor failure and/or
electrical shock.
MOTOR SAFETY FILTER
ELECTROSTATIC
This filter must be replaced when dirty. It
should be replaced regularly depending on
use conditions. The filter CANNOT be
washed as it will lose itsdust trapping abil=
ity.
NOTE: See PARTSAND FEATURESfor
Motor Safety Filter number.
1. Remove the bag as outlined in the BAG
CHANGING section.
EXHAUST FILTER CHANGING
WARNING
Fire and/or Electrlcal Shock Hazard
Do not operate with a clogged exhaust
filter or without the exhaust filter installed.
Do not operate without filter cover
installed.
EXHAUST FILTER
HEPA
The exhaust filter cartridge must be
replaced when dirty. Replace the filter
when the entire surface area is covered
evenly. The filter CANNOT be washed as
it will lose its dust trapping ability.
NOTE: See PARTSAND FEATURESfor
exhaust filter number.
2. Lift the rubber
retainer and pull out
motor safety filter as
shown.
_ _ 3. Replace the filter,
the dust bag, by
sliding it back into
__ hite side out, facing
Rubber _j_ filter in so that it fits
Y_ Retainer f completely under the
_--_:_ rubber retainer.
4. Replace the bag as outlined in the BAG
CHANGING section.
1. Press latch
down to release
the exhaust filter
cover from slot in
canister.
3. Remove the
exhaust filter
using the recess as
shown.
place under the ribs in
the bag cavity. Tuck
Filter
Cover
2. Pull filter
cover outward
to remove from
canister.
./
-18-
Page 19

_ 4. Replace the
exhaust filter
cartridge. Place
the new filter
into the canister
with the foam
seal towards the
canister.
6. While
holding latch
down rotate
filter cover into
place.
5. To replace the
exhaust filter
cover place the
two tabs on the
filter cover into
the slots on the
canister.
DIRT SENSOR
Although the dirt sensorfeature in your
Kenmore canister is designed for yearsof
trouble free use,the passage of dirt through
the air passagesystem can coat the lens
causing the green light to come on and stay
on - never switching to red. When this
happens the lensesmust be cleaned.
CAUTION
when cleaning the lenses. The residue of
the water or cleaners will accelerate the
Never use water or any cleaning solution
recoating of the lenses and make cleaning
necessary sooner.
7. Release latch and verify that filter cover
is locked into place.
Approx.
5 inches
(130 turn)
-_ Sensor
Lenses
TO CLEAN THE LENSES
|. Remove the
handle by
pressing the
handle quick
release button.
2. As indicated by the illustration, the two dirt
sensor lenses are located on the inside of the
handle, approximately 5 inches/]30 mm down
(note the arrows). These lenses should be
cleaned periodically. To reach the sensor
lenses, use a small brush such as a bottle
brush. Brush each sensor lens several times to
remove dust and dirt.
-19-
Page 20

Always follow all safety precautions when performing maintenance to the PowerMate.
WARNING
Electrical Shack Or Personal injury Hazard
Always turn off and unplug vacuum
cleaner before performing maintenance to
the vacuum cleaner. Fallure to do so could
result in electrical shock or personal injury
from vacuum cleaner suddenly starting.
BELT CHANGING AND AGITATOR CLEANING
TO REMOVE BELT
Floor
Brush --_
Sru
Release
Pedal
2. Turn
PowerMate
upside down and
unscrew five (5)
PowerMate cover
screws.
1. Remove floor
brush from the
PowerMate.
Screws
5. Unscrew two (2)
agitator cover
screwsand remove
agitator cover.
assembly out
__ . Lift agitator
and remove
worn belt.
3. Turn PowerMate right side up.
4. To remove
cover, grasp
the side latches
and puff out.
7. Check and clean end cap areas. See
AGITATOR ASSEMBLY for picture of
complete agitator assembly.
=20 =
Page 21

TOCLEAN AGITATOR:
NOTE: In order to keep cleaning efficiency
high and to prevent damage to your vacu-
um cleaner, the agitator must be cleaned
every time the belt is changed.
The agitator must also be cleaned accord-
ing to the following schedule:
Vacuum Cleaner Use Clean Agitator
HEAVY - every week
(used doily)
MODERATE - every month
(used 2-3 times/week)
LIGHT - every 2 months
(used ] time/week)
2. Place agitator
assembly back
into PowerMate.
cover and
agitator
(2) screws.
replace two
4. Line up front of cover and base. Rest
cover on front edge of base as shown.
IMPORTANT
Turnoff and unplug vacuum cleaner from
electrical outlet. Check and remove hair,
stringand lint build-up frequently inthe
PowerMate agitator and end cop areas.
Remove any dirt or debris in the belt path
area or in the brush roller area.
Carefully remove any string or debris
located on the agitator or end caps.
AGITATOR ASSEMBLY
-End Cap _nn_....... n n_ Belt Path_
,°0d
TO REPLACE BELT
1. Install new
belt over
motor drive,
then over
belt path.
\ \ Path
Agitator End Cap
NOTE: See PARTS AND FEATURES for Belt
number.
5. Rotate
cover back.
Press cover
firmly until side
latches snap
into place.
Make sure there is no gap between the
cover and base.
6. Turn PowerMateupside down and
replace five (5) cover screws.
Z Insert floor
brush into
PowerMate until
floor brush locks
into place.
for
ire
-21 -
Page 22

AGITATOR SERViCiNG
WARNING
Electrical Shock Or Personal injury
Hazard
Always turn off and unplug vacuum
cleaner before performing maintenance
to the vacuum cleaner. Failure to do so
could result in electrical shock or personal
injury from vacuum cleaner suddenly
starting.
TO CHECK THE BRUSHES
New Brushes Worn Brushes
Support
Bar
TO REPLACE AGITATOR ASSEMBLY
1. Remove the floor brush from the
PowerMate.
2. Remove PowerMate cover, agitator cover,
belt and agitator assembly. See "To Remove
Belt" in BELTCHANGING AND AGITATOR
CLEANING.
3. Replace agitator assembly.
4. Reinstall belt, agitator cover and
PowerMate cover. See "To replace belt" in
BELTCHANGING AND AGITATOR
CLEANING.
5. Insertfloor brush into PowerMate until
floor brush locks into place.
When brushes are worn to the level of the
base support bars, replace the agitator
assembly.
=22 =
Page 23

Review this table to find do-it-yourself solutions for minor performance problems. Any other
service needed, should be performed by a Sears or other qualified service agent.
WARNING
Always turn off and unplug vacuum cleaner before performing maintenance to the
vacuum cleaner. Fallure to do so could result in electrlcal shock or personal injury.
Vacuum cleaner won't
start.
Poor job of dirt 1.
pick-up. 2.
Vacuum cleaner starts
but shuts off.
].
Unplugged at wall outlet.
2.
Tripped circuit breaker/blown
fuseat household service panel.
3.
Loose hose electrical
connections.
Full or clogged dust bag.
Clogged airflow passages.
3.
Dirty filters.
4.
Wrong pile height setting.
5.
Wrong power level selected.
6.
Hole in hose.
7.
Worn PowerMate agitator.
8.
Worn or broken belt.
9.
Dirty agitator or end caps.
10.
Canister hood open.
11.
Tripped overload protector in
PowerMate.
I. Hose or hood electrical
connections.
2. Tripped overload protector in
PowerMate.
3. Tripped thermal protector
in canister.
I. Plug in firmly, press ON/OFF switch.
2. Reset circuit breaker or replace fuse.
3. Reconnect hose ends.
I. Change bag.
2. Clear airflow passages.
3. Change filters.
4. Adjust setting.
5. Adjust control.
6. Replace hose.
7. Change agitator.
8 & 9. See BELTCHANGING AND
AGITATOR CLEANING.
10. Closeand latch hood.
11. Remove any items that may be
caught or jammed, then reset. If
vacuum cleaner starts and stops
again, clean agitator and end caps,
then reset.
I. Check connections, reconnect hose
ends.
2. Remove any items that may be
caught or jammed, then reset. If
vacuum cleaner starts and stops
again, clean agitator and end caps,
then reset.
3. See PERFORMANCE FEATURES-
"Thermal Protector."
PowerMate will not
runwhen attached.
1. PowerMate connections
unplugged.
2. Worn or broken belt.
3. Dirty agitator or end caps.
4. Tripped overload protector in
PowerMate.
5. Vacuum cleaner in BARE
FLOOR mode.
- 23 -
].
Plug in firmly.
2&3.
See BELTCHANGING AND
AGITATOR CLEANING.
4.
Remove any items that may be
caught or jammed, then reset. If
vacuum cleaner starts and stops
again, clean agitator and end caps,
then reset.
PressCARPET/BARE FLOOR
button to change to CARPET mode.
Page 24

Constantgreen light on
in dirt sensor.
I. Dirt passage is clogged.
2. Lenses are dirty.
I. Check for clogs in air passages.
2. Clean lenses.
No green or red dirt
sensor lights.
PerformanceIndicator
activates.
Vacuum cleaner picks
up moveable rugs -or-
I. No power to sensor board.
I. Full or dogged dust bag.
2. Dirty filters.
3. Blocked airflow passage.
4. Certain attachment tools.
I. Wrong pile height setting.
2. Suction too strong.
Take to your nearest Sears Service
Center.
I. Change bag.
2. Change filters.
3. Clear blockage from airflow passage.
4. This is normal. Light should go off
when tool is removed.
I. Adjust setting.
2. Select lower Power Level.
PowerMate pushestoo
hard.
Redlight on
PowerMate.
Cord won't rewind. I. Dirty power cord. I. Clean the power cord.
Vacuum cleaner leaves I. Wrong vacuuming pattern. I. See VACUUMING TIPS.
marks on carpet.
I. Tripped overload protector in
PowerMate.
2. Cord jammed. 2. Pull out cord and rewind.
I. Remove any items that may be
caught or jammed, then reset. If
vacuum cleaner starts and stops
again, clean agitator and end caps,
then reset.
Vacuum Cleaner Help Line:
1-877-531-7321
8:00am-5:OOpm EST,M-F
(U.S.A. and Canada)
- 24 -
Page 25

MasterProtection Agreements
Congratulations on making a smart purchase. Your new Kenmore® product is designed and
manufactured for years of dependable operation. But like all products, it may require
preventive maintenance or repair from time to time. That's when having a Master Protection
Agreement can save you money and aggravation.
The Master Protection Agreement also helps extend the life of your new product. Here's what
the Agreement* includes:
[] Parts and labor needed to help keep products operating properly under normal use
just defects. Our coverage goes well beyond the product warranty. No deductibles, no
functional failure excluded from coverage -- real protection.
[] Expert service by a force of more than ]0,000 authorized Sears service technicians,
which means someone you can trust will be working on your product.
[] Unlimited service calls and nationwide service, as often as you want us, whenever you
want US.
[] "No-lemon" guarantee - replacement of your covered product if four or more product
failures occur within twelve months.
[] Product replacement if your covered product can't be fixed,
[] Annual Preventive Maintenance Check at your request - no extra charge.
[] Fast help by phone - we call it Rapid Resolution - phone support from a Sears
representative on all products. Think of us as a "talking owner's manual."
[] Power surge protection against electrical damage due to power fluctuations.
[] $250 Food Loss Protection annually for any food spoilage that is the result of
mechanical failure of any covered refrigerator or freezer.
[] RentaJ reimbursement if repair of your covered product takes longer than promised.
[] 10% discount off the regular price of any non-covered repair service and related
installed parts.
Once you purchase the Agreement, a simple phone call is all that it takes for you to scheduJe
service. You can call anytime day or night, or schedule a service appointment online.
The Master Protection Agreement is a risk free purchase. If you cancel for any reason during
the product warranty period, we will provide a full refund. Or, a prorated refund anytime after
the product warranty period expires. Purchase your Master Protection Agreement today!
Some limitations and exclusions apply, For prices and additional information in the U.S.A. call
]-800-827-6655.
* Coverage in Canada varies on some items. For full details call Sears Canada at ]-800-361-
6665.
Sears InstaJJation Service
For Sears professional instaJJationof home appliances, garage door openers, water heaters,
and other major home items, in the U.S.A. or Canada call ]-800-4-MY-HOME®.
- 25 -
Page 26

- 26 -
Page 27

Antes de usar su aspiradara nueva ......... 1
Lista de embalaje ...................... 1
Garanlia de la aspiradora
de I(enmare ............................ 2
Instrucclanes imparfanfes de
seguridad .............................. 3
Piezas y caracferisticas ................. 4-6
Instruccianes de ensamble .............. 7-8
Almacenaje del Per PawerMate ® ........... 8
Instrucciones de aperati6n ................ 9
Para comenzar .................... 9-10
Sugerencias para aspirar .............. 11
Sugerencias sabre el ajuste de nivel de
pelo de la alfombra .................. 12
Accesorios ........................ 12-13
Cuadro de usa de los accesorios ........ 13
Caracterfsticas de rendimiento ....... 14-15
Cuidado del recepf6culo ................. 15
Quitar los residuos de basura en los
conductos .......................... 15
Cambio de la balsa .................. 16
Limpieza del exterior y de los accesorios..16
Cambio del filtro de seguridad del motor .17
Cambio del filtro de escape ......... 17-18
Detector de polvo .................... 18
Cuidado de la PowerMate ® ............... 19
Cambio de la correa y limpieza
del agitador ..................... 19-20
Cuidado del agitador ................. 21
Reconocimiento de problemas ......... 22-23
Acuerdos maestros de protecci6n ......... 24
Informaci6n de asistencia
a servicio ................ Posterior Cubierta
Parfavor lea esta gufa que le ayudara a ensamblar y operar su aspiradoranueva de Kenmore
en una manera m6s segura y efecfiva.
Para mas informaci6nacerca del cuidado y operaci6n de esta aspiradora, llame a sutienda
Sears mas cercana. Cuando pregunle par informaci6nusled necesitar6 el n6mero completo de
seriey modelo de la aspiradora que est6 Iocalizado en la placa de los n6merosde modelo y
serie.
Use el espacio de abajo para registrar el n6mero de modelo y serie para su nuevaaspiradora de
Kenmore.
NOmero de Modelo
NOmero de Serie
Fecha de Compra
Manfenga este libra y su recibo en un lugar seguro para referencias futuras.
I LISTA DE EMBALAJE
Su ASPIRADOR KENMORE se empaca con las siguientes piezas y componentes par
separado:
1 Recept6cuto 1 Cepiflo para combinaci6n _
1 PowerMate® 1 Pet PowerMate®
1 Manguera 1 Tuba telescopico
1 Cepitlo para repisas _ 1 Manual de usa y cuidado
] Herramienta para ] Lista de partes
hendiduras _
Cada uno de estos ensambles es mostrado detalladamente en la lista de piezas para
reparaci6n.
_Estos arficulos se encuentran bajo la cubierta de atmacenamiento para accesorios.
-1-
Page 28

Garantia Iimitada de un a_o
Si esta aspiradora falta por un defecto en sus materiales o fabricaci6n en e! perfodo de
un a_o desde la fecha de compra, cuando se instala, maneja y mantiene siguiendo
todas las instrucciones incluidas con el producto, devu61vala a cualquier tienda Sears,
Sears Parts & Repair Center (Centro de Reparaciones y Piezas Sears) u a otto
distribuidor Kenmore para que reparen el aparato de forma gratuita.
Esta garantfa es v6tida solamente durante 90 dfas desde la fecha de compra,
si la aspiradora se utiliza para otros fines que no sean el uso familiar privado.
Esta garantia cubre exclusivamente los defectos de materiales y fabricaci6n. Sears NO pagar6:
1. Los elementos desechables que puedan desgastarse con un uso normal, incluyendo
sin car6cter excluyente, filtros, correas, 16mparas y bolsas.
2. Un t6cnico del servicio t6cnico para que ensefie al usuario a instalar, manejar o
mantener correctamente el producto.
3. Un t_cnico del servicio t6cnico para limpiar o mantener este producto.
4. Da_os o averfa de este producto si no se ha instalado, manejado o mantenido
siguiendo todas las instrucciones incluidas con el producto.
5. Dafios o aver[a a este producto originados por accidente, abuso, uso incorrecto o
uso det producto para otros fines distintos de los indicados.
6. Da_os o averfa de este producto causados por el uso de detergentes, limpiadores,
productos qufmicos o utensilios diferentes a los recomendados en todas las
instrucciones que se incluyen con el producto.
7. Da_os o aver[a de las piezas o sistemas causados pot modificaciones no
autorizadas que se hayan hecho a este producto.
Limitaci6n de responsabilidadde las garantias implicitas;ffmitaci6n de remedios
F:I6nico y exclusivo remedio del cliente bajo esta garantfa limitada ser6 la reparaci6n
del producto segOnIo indicado en este documento. Las garantfas impffcitas, incluyendo
las garantfas de comerciabitidad o idoneidad para un prop6sito especffico, se limitan a
un a5o o et perbdo m6s corto permitido pot la ley. Sears no set6 responsable pot
da5os incidentales ni consecuenciales. Algunos estados o provincias no permiten la
exclusi6n o limitaci6n de da5os incidentales o consecuenciales, ni limitaciones en la
duraci6n de las garantfas impffcitas de comerciabilidad o idoneidad, pot Io que estas
exclusiones o limitaciones podrfan no apticar en su caso.
Esta garantfa aptica solamente cuando esta aspiradora se utiliza en Estados Unidos o
Canad6.
Esta garantfa le otorga derechos legates especfficos, y usted podr[a tenet otros
derechos que varfan en funci6n de cada estado.
Sears Brands Management Corporation, Hoffman Estates,IL 60179
-2-
Page 29

Lea [as instrucciones en este manual antes de armar o usar su aspiradar.
ADVERTENCIA
Su seguridad es muy importante para nosotros. Para reducir e[ riesgo de incendio, choque el_ctrico, [esi6n
corporal o daffos a[ uti[izar su aspiradora, act6e de acuerdo con precauciones b6sicas de segoridad, entre
elias:
Use su aspiradora 6nicamente en la forma
descrita en este manual. Use 6nicamente con
accesorios recomendados par Sears.
Desconecte e[ cord6n el_ctrico antes de
componer o limpiar e[ 6rea de[ cepiHo. De [o
contrario, e[ cepi[[o podHa arrancar de farina
imprevista o podr_a producirse un choque
el_ctrico.
No abandone [a aspiradora cuando est_
conectada. Descon_cte[a cuando no la est_
usando y antes de dar[e servicio.
Para reducir el riesgo de choque el_ctrico, no
use su aspiradora al aire libre ni sabre
superficies mojadas.
No permita que sea ufi[izada coma juguete.
Se requiere tener mayor cuidado cuando sea
ufi[izada en [a proximidad de niffos o par
niffos.
No use [a aspiradora si e[ cord6n o e[
enchufe est6n daffados. Si [a aspiradora no
est6 funcionando adecuadamente o si se ha
dejado caer, est6 da_ada, se ha dejado
expuesta a [a intemperie o se ha dejado caer
en agua, devu_lvala a un Centro de servicio
de Sears.
No ja[e ni transporte [a aspiradora par el
cord6n; no use e[ cord6n coma mango; no
cierre puertas sabre e[ cord6n; no ja[e e[
cord6n sabre rebordes agudos ni esquinas.
No pase la aspiradora sabre el cord6n.
Mantenga e[ cord6n a[ejado de superficies
ca[ienfes.
No desconecte [a aspiradora tirando de[
cord6n e[_ctrico. Para desconectarla, ja[e el
enchufe, no el cord6n.
No toque la aspiradora ni el enchufe con las
manos mojadas.
No co[oque objetos en [as aberturas.
No uti[ice [a aspiradora si a[guna abertura
est6 b[oqueada; mant_nga[a libra de po[vo,
pe[usa, cabe[Ios y cualquiera cosa que podr_a
disminuir el flujo de aire.
Mantenga e[ cabe[[o, ropa sue[ta, dedos y
todas [as partes de[ cuerpo alejados de las
aberturas y piezas mec6nicas.
Apague todos los controles antes de
desenchufar.
GUARDE ESTAS
E[ armada y usa seguro de su aspiradora son su responsabi[idad. Esta aspiradora ha sido
dise_ada exc[usivamente para usa dom_stico. La aspiradora deber6 a[macenarse en un [ugar
seco V en e[ interior. Lea este Manual de[ propietario detenidamente, pues contiene informaci6n
importante sabre seguridad V usa. Esta guia contiene informaci6n sabre seguridad debajo de
simbo[os de advertencia cuidado.
Tengo cuidado especia[ a[ utilizar la
aspiradora en esca[ones. No sabre si[[as,
mesas, etc. Mant_nga[a en e[ piso.
No use [a aspiradora para aspirar [[quidos
inflamables o combustibles (gaso[ina, [[quidos
para [impieza, perfumes, etc.) ni [a use en
lugares donde _stos podr[an estar presentes.
Los vapores de estas sustancias pueden crear
un peligro de incendio o exp[osi6n.
No [evante ninguna cosa que se est_
quernando o emitiendo humo, coma
cigarri[[os, ceri[[os o cenizas ca[ienfes.
No use [a aspiradora sin tener insta[ada la
balsa para polvo y/o los fi[tros.
Cambie siempre [a balsa para polvo despu_s
de aspirar limpiadores de alfombras o
desodorantes, ta[cos y po[vos finos. Estos
productos atascan la balsa, reducen el flujo
de aire y pueden causar que _sta se rompa.
Si no cambia la balsa podHa ocasionar da_o
permanente a [a aspiradora.
No use la aspiradora para levantar objetos
agudos, juguetes pequeffos, alfileres,
sujetapape[es, etc. PodHan da_ar [a
aspiradora o [a balsa para po[vo.
No opere sin e[ fi[tro de escape ni [a cubierta
de[ fi[tro de escape insta[ados.
La manguera contiene cables e[_ctricos. No
[a use cuando est6 daffada, cortada, o
perforada. Reemp[ace si est6 cortada o
desgastada. No [evante objetos afi[ados.
Siempre apagu_ y desconecte [a aspiradora
antes de conectar o desconectar [a
manguera, HandkMate Jr.® (si ap[icab[e), o
la boquilla.
Sujete el enchufe con [a mano a[ enro[[ar e[
cord6n e[_ctrico. Para desconectarla, ja[e e[
enchufe, no e[ cord6n.
Usted es responsab[e de asegurar que su
aspiradora no sea uti[izada par ninguna
persona que no pueda manejarla
correctamente.
INSTRUCCIONES
-3-
Page 30

Esimportante conocer las piezas y caractefisficas de suaspiradora para asegurar su uso ade-
cuado y seguro. Examfnelasantes de usar suaspiradora.
Tubo
Telesc6pico --
_,_ Recept6culo
Es_ Aspiradera es certificada asthma & allergy _riendiy'" pot _a
Asthma and AHergy Foundation of Amer_ca_
UsaJizando solamente boJsas de poJvo y fiJtros de escape con cerfificaci6n
AAFA para mantener cerfificaci6n AAFA.A
PARTESDE REEMPLAZO
Item EstiloNo. en EUA
Correa CB-6 .....
Bolsa para polvo
(Paquete de 2) Q 20-53291
Bolsa para polvo
(Paquete de 6) Q 20-53292
Filtro de escape EF-1 20-53295
Filtro de secjuridad CF-1 20-86883
del motor
Pieza NO
-4-
Pieza NO
en Canad6
20-40310
20-50410
20-40324
20-40321
Escanear para reordenar
las bolsas or visitar
kenmore.com/reorderCQ
Page 31

RECEPTACULO
Cubierta de
almacenamiento
de accesorios
(accesorios adentro)
Tapa de la
aspiradora
Pestillo
de la tapa
Sujetador
de la balsa
Manija de
transportaci6n
Bot6n de /'_
retracci6n _ Cord6n el_ctrico
Indicador de \ /JJ
BAG CHECK _.___/j
J_- _ Cubierta de
_;_ _ almacenamiento
Balsa de polvo
ACCESORIOS
Cepiffo para
combinaci6n
Pet PowerMate
para PetPowerMate
-- Cubierta del filtro
de escape
(no mostrado)
Filtro de protecci6n
del motor
(detr6s de la balsa de polvo)
Cepi,apara
Herramienta para
hendiduras
-5-
Page 32

MANGUERA TUBE TELESCOPICO
Control
Detector
electr6nico
di
Mango
giratorio de la
manguera
Bot6n de liberaci6n I
r_pida del mango--_
Tubo
telesc6pico
Bot6n de
ajuste de
extensi6n
Luz_____ _
POWERMATE
Pedal de liberaci6n
r6pida del tubo
Pedalde
liberaci6n
del mango,
Pedal de liberaci6n
del cepillo
N6meros de serie y modelo S
de PowerMate (Parte inferior)_'_
Pedal de selecci6n
de nivel de pelo de
la alfombra
Correa
Cepillo para pisos
desmontable
Indicador de nivel
de pelo de la alfombra
Limpiador
de orillas
(no mostrado)
-Bot6n de restauraci6n
"Reset" Protector de
sobrecarga
-6-
Page 33

Par favor ponga especial atenci6n a _stos recuadras can alerta de riesgo.
Advertencla: Esta informaci6n le alertar6 del pellgro de fuego, choque el_ctrico,
quemaduras y leslones. Culdado: Estainformaci6n le alertara de peligros coma
lesiones V da_os a la propiedad.
ADVERTENCIA
Peligro de choque el_ctrico
No conecte la aspiradora hasta que termine de
armarla. De Io contrario podHa causar un
choque el_ctrico o lesi6n corporal.
Antes de armar la aspiradora, revise la
LISTA DE EMBALAJE.Use esta lista para
verificar que ha recibido todos los
componentes de sunueva aspiradora
Kenmore.
TuBa TELESCOPICO
La extensi6n
del tuba es ,_
ajustable y no
requiere
ensamble. _ gase
Para ajustar, la mona
deslice hacia Control de lengLieta
arriba o extensi6n
abajo el adjustable m
bot6n del del tuba
tuba y mueva
el tuba superior a la posici6n deseoda.
arriba esta
Mango
Bot6n
de cierre
Bot6n de
liberaci6nY A
rapida _ °1
del mango
Tuba--
telesc6pico _
_-_,_-- -- gotdn de ajuste de
Cuando ajuste la Iongitud de la vara hay
que tener el PowerMatecon la mano o el pie.
La parte giratoria,
Dispositivo
giratorio
del mango
situada en el
PowerMate, le
permite mover el
mango a la
izquierdapara
pasar la aspiradora
a una extensi6n m6s
O5 larga debajo de 1as
/ muebles bajos.
Cuando ajuste la Iongitud de la vara hay
que detener el PowerMate con la mona o el
pie.
PowerMate
Introduzca la vara en la PowerMate hasta
que el bot6n del tuba quede fijo en posici6n.
Para quitar: Piseen el pedal de liberaci6n de
la vara y jale esta hacia arriba.
extensi6n del tuba
_ -- Bot6n del
-7-
Page 34

RECEPTACULO
1.Abra la fapa del recepf6culo.
2. Examine que la bolsa para polvo este instal-
ada correctamente. Consulfe las instrucciones
de insfalaci6n en: CAMBIO DE LA BOLSA.
3. Examine que el filfro de seguridad del motor
esfe instalado correcfamente. Consulfelas
instruccionesde insfalaci6n en: CAMBIO DEL
FILTRODESEGURIDADDELMOTOR.
LA TAPA Y LA CUBIERTA
Esnormal que la tapa del recepf6culo se des-
prenda al serabierta m6s de Io necesario.
Para colocar nuevamente la fapa, alinee las
ranuras de la bisagra, ins_rtelasy cierre la
fapa.
m
I ,co,oAoo
_Nuncadebeabrir lacapucha del contenedor
_estandola tapa ablerta. Asi seevitar6 da_os
a la capucha del contenedor y/o a la tapa.
MANGUERA
1.Alinee la
pestaSade
sujeci6nde la
manguera y la
ranura de la
cubierta del
recepf6culo e
introduzcala
manguera en el
recepf6culo basra
que quede fija en
posici6n.
de,a'
Para retirar:
No abra la cubierta antes de desprender la
manguera. Con la cubierta cerrada, tire hacia
arriba la lengiJetade seguridad y jale de la
manguera.
2. Introduzca el
mango en el
fubo basra que
el bot6n quede
en posici6n.
AsegOresede
Bot6n
de cierre
Bot6n de
liberaci6n
r6pida del
mango
Para retirar: Oprima el bot6n de liberaci6n
r6pida del mango para liberar el mango y fire
del mango hacia arriba.
Para Guardar: Para prevenir la presi6n de la
manguera mientras seguarda, desuna la
manguera del fubo de la aspiradora. Guarde
la magua en una posici6nenrollada y floja de
fal manera que la fapa de la manguera no se
estire.
que la man=
guera noest_
torcida.
Est6 aspiradora esta equipada con
almac_n a bordo para el accesorio Pet
PowerMate.
Para insfalar:
Abra la cubierta de almacenaje del Pet
PowerMate. Inserte el Pet PowerMate,
presi6nelo en su lugar hacia abajo, y cierre
la cubierta con seguridad.
Para quifar:
Abra la cubierta de almacenaje. Levante el
Pet PowerMate de su lugar utiffcelo como
sea necesario (v_ase ACCESORIO$ y
CUADRO DE U$O DE LOS ACCESORIO$).
AImacenamiento
para Pet PowerMafe
=8=
Page 35

iPartes en movimiento! Para reducir el riesgo de da_os
corporaies, no toque el agitador cuando la aspiradora
est6 encendida. El tocar et agitador mientras que est6
girando puede tartar, contusionar o causar otras
lesiones. Siernpre apague y desconecte del
tomacorriente antes de dar mantenlmlento. Tenga
culdado al asplrar cerca de ni_os.
PARA COMENZAR
Para enrollar:
ADVERTENCIA
Peligro de lesi6n personal y da_o al
_raducto
SIEMPRE apague ante de desconectar.
El cord6n el_ctrlco se mueve
r6pidamente durante el enrollamlento.
Mantenga alejados a los hi,as y
asegure espacia [ibre suficiente para
evitar [esianes persanales al enrollar
el card6n.
NO use los enchufes [acallzados sabre
los muebles. Los objetas cercanos
padrian resultar da_ados.
Apagu_ y
desconect_ la
aspiradora.Sujete
elenchufe mientras
enrolla el cord6n
para impedirda_o
o lesi6n corporal
parel movimiento
del cord6n. Oprima
el control para
bot6n el cord6n el_ctrico con la mano o con
el pie.
Indicador de
hive[ de peio
de [a a[fombra
Bat6n
del cord6n
el_ctrica"
I.Tirede[cor-
d6n para
sacariode[
recept6culo
hasta tenetla
Iongitud dese-
ada. E[cord6n
no se enrollar6
hasta que opri-
ma el bot6n
para enrollarlo.
NOTA: Para reducir el riesgo de choque
ei_ctrico, esfa aspiradora cuenta con una
clavija polarizada, uno de los contactos es
m6s ancho que el otro. Laclavija s61opuede
introducirsede una manera en el enchufe. Si
la clavija no cabe bien en el enchufe,
invi_rtala.Si aOnno cabe, llame a un
electricista para que instaleun enchufe
correcto. No altere la clavija de ninguna
manera,
2. Conecte el cord6n ei_ctrico polarizado en
un enchufe de 120 voitios que se encuenfre
cerca del piso.
desrni_
Pedal de
de nivel de pelade [a
alfombra
3. Baje e[ tuba desde la posici6n vertical
pisandoel pedal de liberaci6n del mango
(HANDLERELEASE).
4. Seleccioneuna alturade pelo de la alfom-
bra usando elpedal pequeSo ubicado en la
parleposteriorde laPowerMate. Elnivelde
pelola alfombra se muestra en el indicador.
Consuite SUGERENCIAS SOBRE EL AJUSTE
DE NIVEL DE PELO DE LA ALFOMBRA.
Atenci6n:Refi_rase alas recomendaciones
del fabricante para limpiar sualfombra.
Algunas alfombras m6s delicadas pueden
requerir el usade la aspiradora con el agita-
dot PowerMate desconectado para prevenir
que la alfombra sea daSada.
=9=
Page 36

5. Presione el bot6n
de selecci6n de
poder para iniciar
los motores de la
aspiradora y el
PowerMate.
O
o
Suction Control
<OPEN CLOSE>
CONTROL ELECTRONICO DE TACTO
_ elecci6n Nivel de Poder- inicia la
aspiradora y el PowerMate. Este
bot6n cambia los diferentes niveles de
poder (H) Alto, (M) Medio y (L) Bajo.
k
El motor de la aspiradora siempre inicia en
poder (H) Alto. Para seleccionar los
diferentes niveles de poder, presioneel bot6n
nivel de poder.
Niveles de Poder:
H - cuando iluminado, indica que el motor de
la aspiradora esta trabajando en nivel Alto.
M - cuando iluminado, indica que el motor
de la aspiradora esta trabajando en nivel
Medio.
Se_ecci6n
®
nivel de poder
CUIDADO
NO deje la PowerMate funcionando en
posici6n vertical en un lugar durante ningOn
espaclo de tiempo: se puede da_ar ia
alfombra.
L - cuando iluminado, indica que el
motor de la aspiradora esta
trabajando en nivel Bajo.
CARPET/BAREFLOOR - enciendeel
motor de la PowerMate para limpiar
____ alfombras y apaga el motor para
limpiar pisos.CARPET/BAREFLOOR
modalidad se indicara en la pantalla
del mango.
OFF - apaga los motores de la aspiradora y
el PowerMate.
NOTA: Cuando la aspiradora esta en BARE
FLOOR la luz del tubo NO enciende debido
a que se interrumpe el flujo de corriente.
NOTA: La pantalla en el mango de la
manguera puede tener una peffcula
protectora. Esta peffculapuede ser removida.
-10-
Page 37

SUGERENCIAS PARA ASPIRAR
Estilo de lirnpieza sugerida.
Para obtener la mejor acci6n de limpieza se
recomienda empujar la PowerMate en direc-
ci6n directamente opuesta a ustedy jalarla en
I[nea recta. AI final de cada pasada de
regreso,cambie la direcci6n de la PowerMate
hacia la siguiente secci6n a limpiar. ContinOe
as+a trav_s
de toda la
alfombra
de una
manera
lenta y
deslizante.
NOTA: las
pasadas
r6pidas y
jalonadas noIogran
una limpieza com-
pleta.
El dispositivo giratorio
de la manguera per-
mite que _sta gire sin
necesidad de mover
el recept6culo. Estoes
muy Otil para limpiar en 6reas pequefias. Ase-
gOrese de que la manguera no est_ torcida
antes de jalar el recept6culo.
Control de alfombrados
aspiraci6n _ requieren limpieza
_ _ peri6dica. Usee,
__,,_.." -__r--- \ HiGH (ALTO) y
resultados de limpieza.
Tenga cuidado s[ coloca el recept6culo sabre
escalones. Si se cae, pod6a causar lesi6n
Peligro de les[6n personal
Nivel de Poder en
cierre por comple-
to elcontrolde
asplraclonpara
Iograr los mejores
CUIDADO
Peligro de lesi6n personal y da_o al pro=
ducto
No jale de la rnanguera para mover la
aspiradora de un escal6n al siguiente.
Cuando terrn[ne de llrnpiar un 6tea use la
rnanija en [a aspiradora para rnoverla a
otto lugar para continuar la lirnpieza.
Losesca[ones
CUIDADO
Peligro de lesi6n personal y da_o al
producto
Tenga cuidado sl el PowerMate y la
rnanguera se dejan en posici6n vertical pues
)ueden caerse f6cilmente. Si se voltean
)uede haber da_a de propiedad.
ADVERTENCIA
Peligro de lesi6n personal y daffo al
_roducto
No atropelle el cord6n el_ctrico con la
PowerMate. Hay un peligro de
lesi6n corporal o daSosde
propiedad.
No tire del cord6n el_ctrico para
desenchufarlo de la pared. Si hay daSos
en el cord6n el_ctricoo el enchufe,hay un
peligro de lesi6n corporal o daSosde
propiedad.
El sost_n para la escalera esta situado en el
cuerpo y ayudar6 a evitar que la
aspiradora se deslice cuando se est6
utilizado en las escaleras (v_ase
CARACTERiSTiCAS
DE RENDiMIENTO)
%,_],,i
NOTA: AsegOrese
que la asplradora
est_ descansando
con segurldad
sobre las escaleras
y el echador est6
en la posici6n
bloqueada antes de usarla.
Mantenga et paso de aire abierto para
Iograr los rnejores resultados de
limpieza. Examine de vez en cuando
cada una de las 6reas de uni6n en
QUITAR LOSRESIDUOS DE BASURA EN
LOS CONDUCTOS para asegurarse de
que no est_n bloqueadas. Apagu_ V
desconect_ la asp[radora antes rev[sar.
=11 =
Page 38

SUGERENCIASSOBREELAJUSTEDE NIVEL DE PELODE LAALFOMBRA
Use el ajuste XLO (bajo) para obtener la
mejor limpieza a fondo. Por otra parte, quiz6s
serequiera elevar el nivel para facilitar algu-
has tareas, como por ejemplo cuando setrata
de tapetes y algunas alfombras de pelo
largo, y para impedirque la aspiradora se
apague. Se sugieren lossiguientesajustes:
ACCESORIOS
CUIDADO
NO instale ni retire el mango ni los tubos
cuando la asplradora esf_ encendlda. Esto
podria causer chispas y da_ar los confac-
los el_cfricos o control elecfronico.
ACCESORIOS DELMANGO
NOTA: Si tiene q_
insfalada la Bot6n de \\
PowerMate, cierre
apague la aspi- -_-_]"
radora antes de Bot6nde k_J
quitar el mango liberaci6n
de los fubos, r6pide --_
1.Oprima el
bof6n de
liberaci6n
r6pida del
mango pare
liberar el
mango y tire del
mango hacia arriba.
del mango
2. Deslice el accesorio
deseado con firmeza
sobre el mango. Con-
suite: CUADRO DE USO
DE LOS ACCESORIOS.
m
Mango
t
m
m
HI - Pelomuy largo y suelto,tapetes, alfom-
bras muy acojinadas.
MED- Pelo mediano a largo.
LO- Pelocorto a mediano.
XLO - Lamayorla de los alfombras y pisos
descubiertos.
2. Piseel pedal de
liberaci6n r6pida
del tubo y tire del
tubo hacia arriba
pare desprenderlo
de la PowerMate.
3. Coloqueel
ado sobre el
tubo. Consulte la
CUADRODE
accesorio dese-
USODELOS
ACCESORIOS.
CEPILLO PARA CONTORNO
El cepillo pare contorno se puede conectar
en el mango o en el tubo pare limpiar
lugares elevados o en muebles como gabi-
netes o estanterfas.
1. Gire el cepillo
pare contornos y
asegOrelo en su
Iugar.
ACCESORIOS DEL TUBO
1.Para refirar
los fubos de
la
PowerMate,
col6quelos en
la posici6n
vertical de
bloqueo.
2. Conecteel cepillo
pare contornos al
mango o al tubo.
-12-
Page 39

CEPILLOPARA PISO DESMONTABLE
CEPILLO PARA SACUDIR
ADVERTENCIA
choque
Para reduclr el rlesgo de choque el_trlco =
NO USE su asplradora sabre superficies
IPellgro de el_ctrlco
mojadas.
Para desmontar Cepillo
el cepillo para para pisos -_.
pisos presione el
pedal en el
PowerMate.
Levante el
cepillo para
pisos fuera del
PowerMate.
Pedal de
liberaci6n
del cepillo
para pisos
Para regresar el
cepillo para pisos,
col6quelo sabre el
PowerMate y
presione para
asegurarlo.
CUADRO DE usa DE LOS ACCESORIOS
Para montar el
cepillo para sacudir
inserte el cepillo
para telas dentro
de la boquilla del
cepillo para sacudir
presione en su lugar.
Pestillo
Cepillo
,_ para sacudir
Cepilla
para telas
Para quitar,
presionar el
pestillo y
levantarse.
AREA A LIMPIAR
ACCESORIO MuebI.J cojines] Cortinas| Escalones descubierfos i alfombrados/ Paredes
Entre Pisos Pisos
AIfombras
Cepillopara _acudir I/ i/ i/
combinaci6n 2epillo
Herramienta
parahendiduras _ qvs _/
_epillo para _
0aratelas _ i/
Cepillopara contorno _ I/ I/
Cepillo
parapisos _ i/ i/ i/
PowerMate
Handi-Mate Jr.®3 _ _
Pet PowerMafe 3, 4 _ _ i#s
1. Siempre limpie los accesorios antes de usar sobre telas.
2. Usar la opci6n BARE FLOOR del control electr6nico.
3. La Handi-Mate Jr.®y la Pet PowerMate incluyen sus propias instrucciones para uso de acceso-
rios.
4. La Pet PowerMafe solo pude ser utilizada en el mango de la manguera.
-13-
Page 40

CARACTERiSTICAS DE RENDIMIENTO
ADVERTENCIA
personales
Apagu_y desconecteslemprela asplradara
antesde limplar las 6reas dela agltador
pues_stospodrian arrancar de manera
IPellgro de leslones
imprevlsta. El no hacerlo, podria resultaren
lesionespersonales.
PROTECTORCONTRA
SOBRECARGAS
La PowerMate Bot6n de
cuenta con pro- BELTRESET
tecci6n
incorporada (Protector contra
contra daSo del
motor y la
correa en caso
de atascamiento
del agitador. Si
el agitador
funciona m6s
despacio o se
atasca, el
protector de sobrecarga de la PowerMate se
acfiva y la luz roja se enciende. El motor de la
aspiradora confinuar6 funcionondo. El motor
del recept6culo continuar6 funcionando.
Para corregir el problema:Apagu_ y
desconect_ la aspiradora, limpie la
obstrucci6n, y despu_s presioneel bot6n de
BELTRESET(protector de sobrecarga). Puede
necesitar un bolfgrafo.
Si el problema perslste, busque un t_cnica
calificada que haga el servicio de la
aspiradora.
LIMPIADOR DE ORILLAS
Losactivos cepillos lim-
piadores de orillas
eston en cada lado de
la PowerMate. Pasela
PowerMate junto alas
paredes o junto a los
muebles para ayudar a
eliminar la tierra acu-
mulada en los orillas
de la alfombra.
INDICADOR DE "CHECK BAG"
Cuondo la
Indicador de aspiradora est_
CHECKBAG _ funcionando con el
Si esto sucede, revisela balsa para polvo, el
filtro de la seguridad del motor y arras lugares
posiblespar residuos de bosura. V_ase
QUITAR LOSRESIDUOS DE BASURA EN
LOS CONDUCTOS.
Para correglr el problema:V_ase el diagrama
RECONOCIMIENTODE PROBLEMAS.
Nora: Esposible quela luz encienda al usar
los occesorios porque el flujo de aire es
reducido par losaccesorios.
flujo normal de aire,
"CHECK BAG" est6
el indicador de
apagado. Se
enciende la luz
j cuando el flujo de
aire est_ obstruido.
PROTECTORTERMAL
Esta aspiradora tiene un protector termal
que se ajusta autom6ticamente para
proteger a la aspiradora del
sobrecalentamiento. Si una obstrucci6n
impide el flujo normal de aire at motor, el
protector termal apaga el motor
autom6ficamente para permitir que el
motor se entree a fin de evitar posibles
dafios a la aspiradora.
Para corregir el problema: Apagu_ y
desconect_ la aspiradora para permitir que
la aspiradora se enfrfe y que et protector
termal se reajuste. Busque y saque los
obstrucclones, si es necesarlo. Examine
tambi_n y reemplace/limple cualquier
filtro obstruido. Espere aproxlmadamente
treinta (30) minutos V enchufe la
asplradora y volt_ela para vet sl el
protector del motor se ha reajustado. El
protector del motor no se reajustar6 si no
se ha apagado la aspiradora aun cuando
la asplradora se haya enfrlado.
=14=
Page 41

SOSTEN PARA LA ESCALERA
Durante la
operaci6n
normal de la
aspiradora
mientras que
est6 en la
posici6n
horizontal, las
ruedas del
cuerpo cjiren libremente 360 °.
La caracterfsfica del Sost_n para la
Escalera permite que las ruedas del cuerpo
se traben en posici6n cuando la aspiradora
cjira 25 ° de una posici6n horizontal a
vertical para que la aspiradora descanse
con secjuridad sobre las escaleras.
LUZ DEL TUBO
Esta aspiradora asta equipa
con una luz en el tubo de
extensi6n. Esta luz funcionar6
INDICADOR DE POLVO
El sistema de lucesdel
indicador de polvo seIocaliza
en el mango, consiste de una
luz roja y una verde.
EN OPERACION
Cuando se ufiliza la aspiradora las luces
cambiaran, si hay polvo presenteyes
aspirado. Mientras la luz roja permanece
encendida, esta indicando que polvo esta
pasandopor el mango y la superficie
requiere limpieza.
Cuando la luz indicadora estaen verde, el
censor no detecta suficiente polvo indicando
que el 6rea no requiere de mas limpieza.
CONTROL DEASPIRACION
t solamente cuando la
,.1; unida a la PowerMate.
La luz se puede utilizar para la iluminar
lucjares dificiles de alcanzar.
aspiradora es en modo
CARPET(ALFOMBRA) (v_ase
PARA COMENZAR) La luz
funcionar6 cuando est6 o no
aspiraci6n le
Elcontrol de j f"-_©_
permite cam-
de aspiraci6n
biar la potencia D_p_u_A;p?r:nti:r n
de la aspirado-
ra dependiendo del cjrosorde la tela o alfom-
bra. La aspiraci6n sedisminuye, para limpiar
cortinas y tapetes ligeros,abriendo el control;
para aspirar mueblesy alfombras, el control
debe cerrarse para aumentar la aspiraci6n.
QUITAR LOS RESIDUOS DE BASURA EN LOS CONDUCTOS
La aspiradora crea succi6n o aspiraci6n
levanta la tierra. La fierra es impul-
que
sada a trav_s de las vias de flujo aire H"/'__.,_
hasta la bolsa por una r6pida corriente /J _--_
de aire. La bolsa para polvopermite el ////_ _
flujo de aire, pero atrapa la tierra. ///
Para Iograr los mejores resultados de /_/
limpieza, mantencja abiertas las vfas de ,i_J
aire. Examine peri6dicamentelas 6reas ,_o_2" Fiffro de
indicadascon asteriscos para asegu- _7 seguridad
rarse de que noest_n bloqueadas. /_7" de_motor Fiffro de
Desconecte del ,/'/'/{ _ \ escape
Y
-15-
Page 42

I CAMB]O DE
La bolsa debe cambiarse seguido para Iograr
los mejores resulfados de limpieza. El indica-
dor eiectr6nico de la bolsa o de manguera
enciende cuando se necesita cambiar.
NOTA: V_ase PIEZAS Y CARACTERiSTICAS
para el n6merode la bolsa.
1.Apagu_ y desconecf_ la aspiradora.
2. Quite la
manguera de la
aspiradora.
3. Tiredel pestillo
de la fapa hacia
fuera y hacia
arriba; luego
levante la tapa del
4. Destrabe la
pesta_a de cart6n del
montaje rojo de la
bolsa empujando
hacia afuera y
firando hacia arriba.
5. Saque la bolsa del
montaje rojo.
recept6culo.
LA BOLSA
NOTA: NO doble ni pliegue el centro del
cart6n al instalar la bolsa en las ranuras del
montaje de la bolsa.
8. Gire hacia abajo
elsoportepara la
bolsa roja y para
insertarla bolsa en
las ranuras empuje
hacia abajo basra
que las lengiJetas de
cart6n encierren
seguramente en las
posiciones
apropiadas como se ve en el diagrama.
9. Empuje la bolsa asegur6ndola dentro de la
cavidad para evitar que sea trabada por la
tapa de la aspiradora.
10. Baje la cubierta del recept6culo y cierre el
pestillo.
11.Introduzco la manguera en el recept6culo
hasta que quede fija en posici6n.
12.Conecteel cord6n el_ctricoen la clavija de
la pared.
Fiffro de
seguridad_
del motor/_ --_
7. El montaje rojo de la balsa se inclinar6
hacia adelante despu_s de que retire la balsa.
Esto impedir6 que la tapa se cierre antes de
instalar una bolsa nueva.
6. Revise y cambie
el filtro de
seguridad del
motor, cuando sea
necesario.
LIMPIEZA DEL EXTERIOR Y DE LOS ACCESORIOS
1.Desconecfe elcord6n ei_ctricode Io clavija
de la pared. NO rocie agua sobrela aspba-
dora.
2. Para limpiar el exterior o reduck la
electricidad est6fica y acumulaci6n de
polvo, limpie la superficie exterior de la
aspiradora y los accesorios. Use un trapo
suavey limpio, m6jelo en una soluci6n de
agua y detergente ffquido, y exprfmalo
seco.S_quela despu_s de limpiar.
CUIDADO
NUNCA REUTILICE UNA BOLSA PARA
POLVO. Los materiales muy finos, tales
como desodorantes para alfombras,
talco facial, polvo fino, yeso, hollin,
pelusa de alfombras nuevas, etc., pue-
den atascar la bolsa y causar que se
rompa antes de que est_ Ilena y puede
da5ar el motor de ta aspiradora. Cam-
bie la bolsa m6s seguido cuando aspire
este tlpo de materlales.
CUIDADO
No use los accesorios sl est6n mojados. Los
accesorios que se utillcen en 6reas suclas,
debajo del refrlgerador, no deben usarse en
otras superficies sin antes set lavados.
Podrian de iar marcas.
-16-
Page 43

CAMBIO DEL FILTRO DE SEGURIDAD DEL MOTOR
ADVERTENCIA
Pellgro de choque el_ctrlco
Apagu_ y desconect_ la asplradora. No
opere la asplradora sinel filtro de seguridad
del motor. Aseg_urese de que el filtro est_
seco e instalado adecuadamente para
impedlr que el motor falle y/o que se pro=
duzca un choque el_ctrico.
FILTRO DESEGURIDAD DELMOTOR
ELECTROSTATICO
Este filtro se tiene que cambiar cuando est_
sucio. Debe cambiarse peri6dicamente segOn
las condiciones de uso. El filtro no se puede
_avar pues perderia su capacidad para atra=
par polvo.
NOTA: V_ase PIEZA$ y CARACTERiSTICAS
para el n6mero del filtro de seguridad del
motor.
1.Para quitar la bolsa, siga lasinstrucciones
en CAMBIO DE LA BOLSA.
CAMBIO DEL FILTRO DE ESCAPE
2. Levante el disposi-
rive de retenci6nde
goma y saque el
filtro de seguridad
como se ve en el
diagrama.
3. Reemplaceel filtro
con la superficie
blanca en su campo
de vista por correrlo
debajo de las
costillas en la
cavidad de la bolsa.
Meta el filtro para
_de retenci6n
_-_:_ de gorna
que quepa por
completo debajo de1
dispositivo de
retenci6n de goma.
4. V_ase CAMBIO DE LA BOLSA para cam-
biar la bolsa.
ADVERTENCIA
Peligro de fuego o choque el_ctrico
No opere con un filtro de escape bloqueado
o sin el fiffro de escape instalados. No
opere sin la cubierta del filtro de escape
instalada.
FILTRODE ESCAPE
HEPA
El cartucho del filtro escapetiene que
cambiarse cuando est_sucio.Cambieel filtro
cuando el 6rea superficial est_cubierta por
completo. Elfiltro nose puede lavar pues
perderiasucapacidad para atrapar polvo.
NOTA: V_ase PIEZAS y CARACTERiSTICAS
para el nOmero del filtro de escape.
1. Presioneel
pestillo hacia
abajo para
liberar la
cubierta del filtro
de escape de la
ranura en la
aspiradora.
2. Jale la
cubierta del
filtro hacia
fuera para
removerla de
la aspiradora.
3. Remover el
filtro de escape
usando la palanca
como se nuestra.
=17=
Page 44

4. Reemplace el
cartucho del
filtro del escape.
Filtro de
escape
Co[oque el filtro
nuevo en la
aspiradora con
el [ado de
esponja en
direcci6n a [a
asplradora.
5. Monte [a
cubierta de[
filtro de escape
co[ocando [as
dos [engiJetas
en la cubierta
del filtro en [as
ranuras de [a aspiradora y gire en su [ugar.
DETECTOR DE POLVO
Aunque [a funci6n de detecci6n de polvo de la
aspiradora Kenmore est6 disefiada para
brindar muchosafios de funcionamiento
interrumpido,el pasode polvo a trav_s del
sistemade [asv[as de aire puede causar una
escama en la lente,haciendo queseencienda
y contin6e encendido el indicadorverde, sin
cambiar nunca a rojo. Cuando esto suceda, se
fienen que [impiar [as [entes.
CUIDADO
No ufilke nunca agua nl soluci6n[impladora
para limplar [as lentes. Elreslduo delagua o
del limpiador causar_ que las lentes se
cubran de tierra m6s r6pldo, requiriendo
limpieza con mayor frecuencia.
%
6. Deslizar el
pestiHo hacia
abajo para
cerrar la
cubierta del
fi[tro de escape
en su lugar.
Z Suelte el pistiHo y confirme que la
cubierta esta segura en su lugar.
Approx.
5 pulgadas
(130 ram)
Detectores
de polvo
PARA
LIMPIAR LAS
LENTES
I. Retire el
mango oprim- Mango
iendoel bot6n Bot6nde
de liberaci6n cierre ,_
r6pida y jalando
fuera del tubo. Bot6n de
[iberaci6n Ill
r6pida -_'
de[ mango
T
2. Como seve en el diagrama los dos
detectores de polvo est6ncolocados dentro
de[ mango 5 pulgadas o !30ram (Observe [as
flechas). Losdetectores deben ser
[impiados peri6dicamente. Para [[egar a los
detectores, use un cepil[o peque_o, como por
ejemp[o un cepil[o para botellas. Cepille cada
detector varias veces para eliminar [a fierra y
el polvo.
-18-
Page 45

Siempre deber6n seguirse todas las precauciones de seguridad antes de efectuar el
mantenimiento a la PowerMate.
ADVERTENCIA
Peffgro de choque el_ctrico o lesi6n corporal
Apagu_ y desconect_ la asplradora antes de
efectuar el mantenimlento a su aspi=
radora. De Io contrarlo podria produclrse un
choque el_ctrico o causar lesi6n corporal sl
la aspiradora arranca de manera imprevista.
CAMBIO DE LA CORREA Y LIMPIEZA DEL AGITADOR
PARA RETIRARLA CORREA
CepiHo
para pisos _
liberacidn _
2. Gire la
PowerMate para
mostrar la parte
inferiorhacia
arriba y
desatornille cinco
(5) tornillos de la
cubierta.
1.Desprenda el
cepillo para
pisosde la
PowerMate.
O_
3. Gire la
PowerMatecon
la parte superior
hacia arriba.
Torniffos
4. Para remover la
cubierta, sujete los
pestillos de los
costados y jale
hacia fuera.
5. Desatornille
dos (2) tornillos
de la cubierta
del agitador y
levante la
cubierta del
agitador.
6. Quite el agitador y la correa gastada.
Z Examiney limpie las6reas de tapa del
extremo. En la ENSAMBLEDELAGITADOR s_
proporcionauna ilustraci6ndetodo el
ensambledel agitador.
-lg-
Page 46

LIMPIEZA DELAGITADOR
NOTA: Poro rnontener uno alto eficiencio de
lirnpieza y evitor dofios a Io ospiradoro,
que lirnpior el ogitodor coda vez que se
cornbia la correo.
Tornbi_n hay que limpiar el agitador seg0n el
siguiente colendario:
El usa de la
_iradora
Frecuente -
(usada dioriamente)
Moderado - coda rnes
(usada 2 o 3 veces
par sernana)
Ligero - coda 2 rneses
(usada 1vez par sernana)
_itador
codo sernono
IMPORTANTE
2. Coloque afro
vez la unidad del
agitador en la
PowerMate.
3. Reinstale la
cubierta del
agitador e inserte
los dos (2)
tornillos.
4. Alineelaparte frontalde lacubiertacon
labase. Coloque lacubiertasobre elborde
delanterode labase como se muestra.
Apagu_ y desconect_ la aspiradora. Exa-
mine frecuentemente el agitador y los
6teas de soporte del mismo en la
PowerMate y elimine todo cabello, hito y
peiusa acumulada.
Retire todo indicia de basura o suciedad
de la ruta de la correa y del rodillo del
agitador.
Con cuidado saque las topos y quite el
hilo o los restos ubicados en el agitador.
ENSAMBLE DEL AGITADOR
Tapa del Ruta de
extrerno la correa j_
Unidod del extrerno
cepillo
PARA
RETIRAR
LA
CORREA
1.1nstaleuna
correa nueva
sobreel eje
\_LJb_-\ _ Ruta de
\ \ la correa
Agitador Tapa del
del motory
luego sabre
la polea del agifador.
extrerno
el motor
5. Rote Io cubierta
hacia atr6s.
Apriete con poca
fuerza hasta que
los lengiJetas
lateralesy
traseras encierren
seguramente.
Cerci6rese que no hay espacio entre la
cubierta y la base.
6. Coloquela
PowerMate con la
parte inferiorhacia
arriba e inserte los
cinco (5) tornillos
en la cubierta.
7. Inserte el cepillo
paro pisos sabre la
PowerMafe basra
que este segura en
su lugar.
or
NOTA: V_ase PIEZAS Y CARACTERJSTICAS
para el n6mero de la correa.
- 20 -
Page 47

CUIDADO DEL AGITADOR
ADVERTENCIA
Pelicjro de choque el_c|rico o lesi6n
corporal
Apagu_ y desconect_ la asplradora
antes de efectuar el mantenimlento a su
asplradora. De Io contrario podHa pro-
ducirse un choque el_ctrlco o causar
lesi6n corporal si la aspiradora arranca
de manera irnprevls|a.
PARA REVISAR LOSCEPILLOS
CepiHas Naevas Cepiltas Desgastada
Barra de
saparte
de la base
PARA CAMBIAR ELAGITADOR
1. Desmonte el cepitio para pisos del
PowerMate.
'2. Quite la cubierta de la PowerMate, la
cubierta del agitador y el agitador.
V_ase CAMBIO DE LA CORREA Y
LIMPIEZA DELAGITADOR.
3. Reemplace el ensamble del agitador.
4. Reinstale la correa, la cubierta del
agitador, y la cubierta de la PowerMate.
Consulte "Para cambiar la correa" bajo
CAMBIO DE LA CORREA Y LIMPIEZA
DEL AGITADOR.
5. Inserte el cepilto para pisos sobre la
PowerMate hasta que este segura en su
lugar.
Cuando est_n gastados los cepillos al nivel de
las barras de soporteen la base, cambie la
unidad de1agitador.
-21 -
Page 48

Revise este recuadro para encontrar soluclones a problemas que puede correglr usted mismo.
Cualquier otto servicio debe set realizado par SEARS u otto agente de servicio caffficado.
ADVERTENCIA
Apagu_ y descanect_ la aspiradara antes de efectuar el mantenlmiento a su
aspiradara. De Io contrarlo podHa producirse un chaque el_ctrlco a causar lesi6n
corporal.
La aspiradora no arranca.
No aspira
satisfadoriamente.
La aspiradora arranca,
pero se apaga.
La PowerMate no funciona
cuando est6 instalada.
1. Est6 desconectada.
2. Cortaclrcultos botado o fusible
quemado en el tablero de servlcio
de ]a resldencla.
3. Conexlones el_ctdcas de la
manguera sueltas.
1. Bolsa para polvo Ilena o atascada.
2. V/as de flujo de alre atascadas.
3. Filtros suclos.
4. Ajuste incorrecto de nlvel de
pelo de la alfombra.
5. Incorrecta selecci6n de nlvel de poder.
6. Manguera rata.
7, Agltador de la PewerMate desgastados.
B. Correa desgastada o rata.
9. Agltador o tapas de los extremos
sUCiOS.
10. Tapa del recept6culo abierta.
n. Protector contra sobrecargas de la
PowerMate botado.
1. Conexlones el_ctrlcas de la manguera
o de la tapa.
2, Protector contra sobrecargas de Ja
PowerMate botado.
3. Protector termal botado
en el recept6culo.
1. Conexlones de la PowerMate
desconectadas.
2. Correa desgastada o rota.
3. Agltador o tapas de extremos de
_stesuclos_
4. Protector contra sobrecargas de Ja
PowerMate botado.
5, Aspiradora en modalidad BARE
FLOOR.
-22 -
L Conecte blen, preslone el bot6n
ON/OFF.
2. Restablezca el cortacircuitos o
cambie el fusible.
3, VueJva a conectar los extremos de
la manguera.
L Camble la bolsa.
2. Limpie las v/as de flujo de aire.
3. Camble los flltros.
4, Ajuste el nlvel.
5. Ajuste el control.
6. Camble la manguera.
7. Camble la agitador.
8 & 9. Consulte CAMBIO DE LA CORREA Y
LIMP_EZA DEL AGITADOR.
10. Cierre blen la tapa.
n. Retire cualquler objeto atorado o
atascado, luego restablezca. Si la
asplradora arranca pero se vuelve a
apagar, llmple el agltador y los tapas
del extremos de _ste, luego restablezca.
1. Examine las conexiones el_ctrlcas,
vueJvoa conector los extremos
de la manguera.
2. Retire cua]quier objeto atorado o
atascado, luego restablezca. Si la
aspiradora arranca pete se vuelve a
apagar, llmpie el agltador y lostapas del
extremos de _ste, luego restablezca.
3, Consulte CARACTER{STICAS DE
REND_MIENTO - "Protector TermaL"
L Conecte blen.
2 & 3. Consulte CAMBIO DE LA CORREA Y
UMPEEZA DEL AGffADOR.
4. Retire cuaiquler objeto atorado o
atascado, luego restab]ezca. Si la
asplradora arranca pete se vuelve a
apagar, limple el agltador y los tapas
de] extremos de _ste, luego restablezca.
5. Presione el bot6n CARPET/BARE
FLOOR para cambiar a la modalidad
CARPET
Page 49

Indicador verde
encendido confinuamente
en el detector de polvo.
No se encienden los
indicadores verde o rojo
de detecci6n de tierra.
Elindicador de
rendimiento enciende.
I.
La v_ade paso de tierra o la bolsa de I.
polvo est6n bloqueadas.
2.
Lente sucia. 2.
I.
No hay suministrode energ_a al I.
tablero detector.
I.
Bolsa para polvo Ilena o atascada. I.
2.
Filtros sucios. 2.
3.
V_as de flujo de aire atascadas. 3.
4.
Ciertos accesorios. 4.
Determine siest6n bloqueadas las
v_asde aire.
Limpie las lentes.
Acuda al Centro de Servicio de
Sears m6s cercano.
Cambie la bolsa.
Cambie los filtros.
Desbloquee las vfas de flujo de aire.
Estoes normal. Elindicador debe ser
normal cuando la herramienta est6
quitada.
Laaspiradora levanta
tapetes o es dificil
empujar la PowerMate.
Laluz roja de la
PowerMate se prende.
I. Ajuste incorrecto de nivel de
pelo de la alfombra.
2. Aspiraci6n demasiado potente.
I. Protector contra sobrecargas de la
PowerMate botado.
I.
Ajuste el niveL
2.
Seleccionar nivel de poder bajo en
el control electr6nico.
I.
Retire cualquier objeto atorado o
atascado, luego restablezca. Si la
aspiradora arranca pero se vuelve a
apagar, limpie el agitador y los tapas
del extremos de _ste, luego
restablezca.
Elcord6n no se enrolla. I. Cord6n et_ctrico sucio. Limpie el cord6n el_ctrico.
2. Cord6n atascado. Tire del cord6n y despu_s enr611elo.
La aspiradora deja I. Estilo de limpieza incorrecta. Consulte SUGERENCIAS PARA
I.
2.
I.
marcas en la alfombra. ASPIRAR.
- 23 -
Page 50

Acuerdos Maestros de Protecci6n
Enhorobuena por hocer una compra inteffgente. Sa nuevo producto Kenmore® est6 dise_ado y
fabricado poro ofrecerme a_os de funcionorniento confiabme. Pero amigaal qae todos mosprodactos
paeden precisar un mantenimiento preventivo o amgana reparoci6n de vez en caando. Por este rnotivo,
tener un Acuerdo Maestro de Protecci6n paede ohorrarme dinero e inconvenientes.
EmAcaerdo Maestro de Protecci6n tambi_n meayada a promongar movido 6timde sa nuevo prodacto. A
continuoci6n indicamos moque emAcuerdo "_induye:
[_ Portes y rnono de obra necesarios pora ayudar a que estos productos fancionen correctarnente
bajo condicionales norrnales de uso, no sirnpmernente defectos. Nuestro cobertura va rnucho rn6s
aft6 de magorontla del prodacto. Ning6n dedacibme, ningana averla funcionol qaedo excmuido de
macoberturo- protecci6n real.
[_ Servicio experto ofrecido por una ffsta de rn6s de 10.000 t_cnicos aatorizados demservicio t_cnico
de Sears, moqae significa qae amgaien en qaien usted puede confior estor6 trobojondo en su
prodacto.
[_ N6rnero iffrnitodo de ffarnadas ol servicio t_cnico y servicio en todo monoci6n, ton continuo corno
usted nos mosoffcite, sin irnportar donde est'..
[_ Gorantla seria de sastituci6n demprodacto. La sastituci6n de su prodacto cabierto si se prodacen
caatro O rn_s overlas erl doce rneses.
[_ Sastituci6n demprodacto por otro nuevo si sa prodacto cabierto no paede reparorse.
[_ Revisi6n y montenimiento anuol preventivo siempre qae modesee V sin cargo olgano.
[_ Ayada r6pida por tem_fono - Nosotros moffamamos Resomuci6n r6pida. Soporte temef6nico de un
representante de Sears en todos mosprodactos. Piense en nosotros como un "rnanuom del usaorio
parmonte".
[_ Protecci6n contra sabidas de tensi6n qae provoqaen dodos el_ctricos coasodos por mas
fluctuociones de macorriente.
[_ $250 de protecci6n contra map_rdida de alirnentos anualrnente en caso de qae se estropee alg_n
affmento como resamtodode uno overlo mec6nico de cuomqaier congemador o refrigerodor
cabierto.
[_ Reernbomso del olqaimer si mareparoci6n de su prodacto cabierto torna rn6s tiernpo demprometido.
[_ lO°/o de descaento en emprecio regamor de cuolqaier servicio de reporoci6n no cubierto y de mos
piezas instomodosrelacionados.
Uno vez qae compre e_ Acuerdo, s6_o bostor6 aria simple ffamada te_ef6nico paro qae pueda programar
un servicio. Paede Hamar a caa_qaier hora de_ d_o o de _o noche, o concertor uno cito de servicio en
ffneo.
E_Acaerdo maestro de protecci6n es una compra fibre de riesgos. Si por cualquier raz6n cance_a
darante e_perlodo de garontla de_ prodacto, _edevo_veremos todo e_ dinero. O, un reembo_so
prorrateodo despots de_ perlodo de vencimiento de _agaranffa, iCompre su Acaerdo maestro boy!
Apffcan olganas ffrnitaciones V exc_usiones. Poro precios y rn6s inforrnoci6n en EE.UU., Home o_ 1-800-
827-6655.
"_La cobertura en Canad6 varlo en o_ganos orffcu_os. Poro obtener todos _osdetoHes, Home o Sears
Conod6 1-800-361-6665.
Servicio de instalaci6n de Sears
Para Io insto_oci6n profesiona_ por porte de Sears de e_ectrodorn_sticos, obridores de paertos de
garajes, colentodores de agao y otros artica_os principa_es para e_hogor, en EE.UU. o Conad6 Home a_
-800-4-MY-HOME®.
- 24 -
Page 51

- 25 -
Page 52

Your Home
For troubleshooting, product manuals and expert advice:
managemylife
www.managemylife.com
For repair - in your home - of all major brand appliances,
lawn and garden equipment, or heating and cooling systems,
no matter who made it, no matter who sold it!
For the replacement parts, accessories and
owner's manuals that you need to do=it-yourself.
For Sears professional installation of home appliances
and items like garage door openers and water heaters.
1-800-4=IVlY=HOME ® Call anytime, day or night
(1-800-469-4663) (U.S.A. and Canada)
............................ www,sears,eom www,sears,ca
Our,ome
Forrepairofcarry-initemslikevacuums,lawnequipment,
and electronics, call anytime for the location of the nearest
Sears Parts & Repair Service Center
1-8oo-488-1222tusA/ 1-8oo-469-4663/Conada/
www.sears.corn www.sears.ca
TOpurchase a protection agreement on a product serviced by Sears:
/_! 1-800-827-66s5_u.s.A.t 1-808-a81-6685/Canada/
Para pedirservicio de reparaci6n Au Canada pour service en frangais:
a domicilio y paraordenar piezas: I=800.LE=FOYERMC
1.,88_U-,OGAR® (1-800-533-6937)
:, (1-888-784-6427) www.sears.ca ,
.... www.sears.com 0:
S@8 rS
® Registered Trademark / TM Trademark of KCD IP, LLC in the United States, or Sears Brands, LLC in other countries
® Marca Registrada / TM Marca de F_tbrica de KCD IP, LLC en Estados Unidos, o Sears Brands, LLC in otros paises
MCMarque de commerce / MO Marque d6posee de Sears Brands, LLC
 Loading...