

Sears 10827801, 606C-14 Installation Guide
Assembly Instructions Model 6XX
The following instructions are to
complete the assembly of your
Manco Fun Kart using the
component parts and hardware
that were packaged with the kart.
Carefully read these instructions
completely before starting the
assembly.
Tools required for assembly
(2) 9/16 inch wrenches
(2) 3/4 inch wrenches
(2) 7/16 inch wrenches
(1) 3/8 inch wrench
i_ Warning: Risk of death or
Bodily Injury. The Brush
Bars, and the Seat and Shoulder
Belt are critical parts of the
Operator / Passenger satbty system
on this kart. Do not attempt to
operate the kart until these
components have been properly
installed.
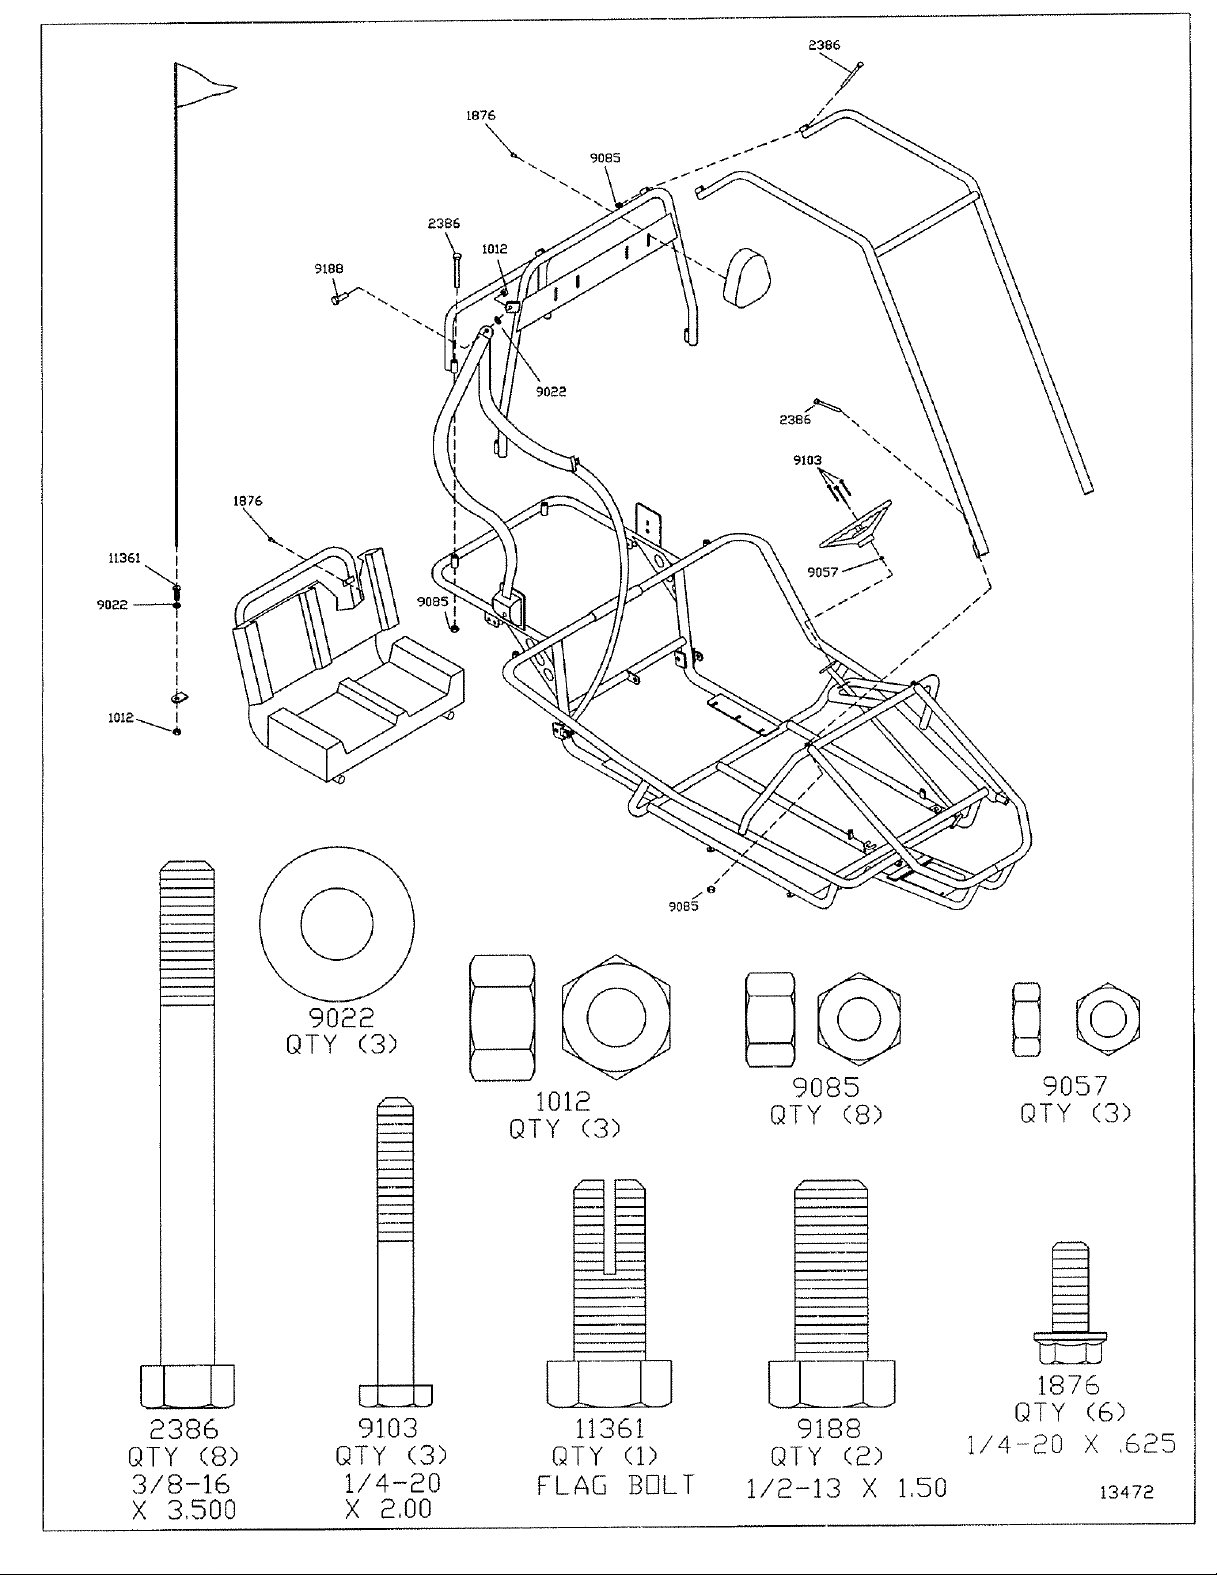
Brush Bar Assembly
Position the rear bar assembly on
the frame using four 3/8 x 16 x
3.5 inch long bolts (PN 2386) and
3/8 inch nuts (PN 9085) to hold it
in place. Do not tighten these
fasteners completely at this time.
Position the over head bar
assembly on the kart using four
3/8 x 16 x 3.5 inch long bolts (PN
2386) and 3/8 inch nuts (PN
9085).
Fully tighten all of the brush bar
and headrest mounting bolts at this
time. These fasteners use locking
nuts and require a high level of
torque to be applied to tighten
them securely.
Make sure that the nuts and
heads of the bolts are fully
engaged with the sarface of the
bushings. Then apply a final
tightening torque.
Seat and Headrest Pad
Assembly
Assemble the rear pad of the seat
to the seat frame using two 1/4 x
20 x 5/8 inch long bolts (PN
1876).
Assemble the head rests to the
support bar using four 114 x 20 x
5/8 inch long bolts (PN 1876).
Tighten these fasteners securely
at this time.
Shoulder Belt Assembly
Position the shoulder belt
mounting tab against the support
tab on the rear bar assembly with
a 1/2 washer (PN 9022) between
the tabs. Use a 1/2 x 13 x 1.5
inch long bolt (PN 9188) and 1/2
inch nut (PN 1012) to secure
these two tabs together. Tighten
the bolt and nut until the two tabs
make contact with the washer
between them but do not over
tighten. When properly
assembled, the belt tab should be
able to rotate freely on the
mounting bolt.
Follow this process for both the
Operator and Passenger belts.
Safety Fla_ Assembly
Insert the special flag mounting
bolt (PN 11361) into the motmting
tab on the rear loop of the frame
placing a 1/2 inch washer (PN
9022) under
the head of the bolt. Place a 1/2
inch nut (PN1012) on the end of
the bolt and hand tighten.
Insert the flag mounting shaft
through the mounting bolt
allowing approximately 1/2 inch
of the shaft to protrude past the
end of the bolt. Use wrenches to
securely tighten the nut and bolt to
fix the position of the flag
Engine Fluids
Read and :follow instructions in
the engine manual.
Remove oil fill plug and fill the
engine crankcase with 20 oz of
30W type SF or higher motor oil.
Replace and securely tighten the
oil fill plug.
Fill the fuel tank with regular
grade clean, unleaded gasoline. Do
not use premium grade gasoline,
gasohol or diesel fuel.
PN 13472
11361
9022--
2386
"7
/
2386
\
8188
1876
\
8386
QTY (8)
3/8-16
X 3,500
9028
QTY (3)
E 3
9103
QTY (3)
1/4-20
X 2,00
I012
QTY (3)
11361
QTY (i)
FLAG BOLT
3
8
9085
QTY (8)
9188
QTY (2)
1/8-13 X 1,50
8
9057
QTY (3)
1876
QTY (6)
i/4-20 X ,625
13472
 Loading...