

Page 1
Inflatable Boat User Manual
Manuel de l'utilisateur bateau gonflable
DURABLE, FOLDABLE, AFFORDABLE
INCLUDES SEAMAX FULL PRODUCT LINES CATALOGUE
COPYRIGHT 2009 – 2017
120-11791 MACHRINA WAY, RICHMOND, BC, CANADA V7A 4V3
www.seamaxcanada.com www.seamaxmarine.com 604-277-7766
Page 2

Seamax Inflatable Boat – English User Manual
- 1 -
Important
All of us at SEAMAX CANADA want to thank you for choosing a SEAMAX Inflatable boat. This Owners
Manual contains all the safety and operating information you will need to get the most out of your
Inflatable boat. It also contains information on how to provide care and maintenance to protect your
investment. Store this manual in a safe place for future reference and remember. You may download this
manual from our website if you happen to lose this copy.
The operator, passengers and craft are governed by local, national, and when applicable, international
rules and regulations of the waterways. If you are not familiar with these rules and regulations, your local
Department of Natural Resources can assist you. Safety courses are available from national and local
organizations and are highly recommended for anyone who is not familiar with the rules and regulations
of safe operation of water vessels.
The product you have purchased comes with a limited warranty from SEAMAX CANADA. The terms and
conditions of the warranty are in the Warranty Information Section of this manual. Keep this booklet and
your sales slip together for future reference. You may be asked to provide proof of purchase for
in-warranty service. For any questions or concerns about our products, please email us and we will
respond as quickly as possible.
Seamax DO NOT recommend using a high pressure air compressor to inflate your new boat (Except 12
volt battery powered air pumps). Inflatable boats are not design to be inflated with high pressure air
compressors. This may cause the seams to rupture or the air valves to malfunction. This in turn could
create a dangerous situation and personal injury could occur if a seam was to rupture.
This type of inflation will void your warranty.
Purchase Records
Record your Hull Identification Number (HIN) and engine mode / serial number. The HIN is located on the
back of the boat on the starboard side. The engine model / serial number is located on the swivel bracket.
You will need this information to obtain parts, warranty service or provide information to your local law
enforcement agency if your boat is lost or stolen.
Owner Information & Contact:
Boat Model & HIN:
Engine Model & Serial #:
Place of Purchase & Order #:
Page 3

Seamax Inflatable Boat – English User Manual
- 2 -
1. WARRANTY
WARRANTY TERMS
SEAMAX Inflatable Boats are warranted to be free of defects in material and workmanship during the following
prescribed warranty period. All warranty claims are handled in Canada by Seamax Canada or local Seamax dealer.
The boat’ hull, floor, all hull attachments and accessories, but not limited to, floorboards. seats, carrying bags, oar
locks, oars, rope, manual pump, lifting handles, d-rings, oar holders, valves, seat webbings, and transom integrity are
covered by this Limited Warranty for one (1) year from the date the product is first sold. All the air holding fabrics are
warranted against defects in material or workmanship that cause blistering and delaminating for three (3) years for
seams and five (5) years for (PVC) fabrics. The repair, replacement of parts, or the performance of service under this
warranty does not extend the life of this warranty beyond its original expiration date. Unexpired warranty coverage can
be transferred to a subsequent purchaser upon proper registration of the product.
This Warranty applies only to defects in material and workmanship; it does not apply to normal wear and tear, or to
damage caused by: (1). Neglect, lack of maintenance, accident, commercial, abnormal or improper use or bad
assembly; (2). Use of an accessory or part neither manufactured nor sold by us; (3). Participating in or preparing for
races or other competitive activity; (4). Alteration or removal of parts; (5). Improper Protection against UV-light, high
temperature and heat sources; (6). Has been repaired, modified or tampered with by someone other than
manufacturer without approval; (7). Damage or deterioration of the fabric due to exposure to fuel, harsh solvents or
any other chemicals; (8). Seam separation due to heat exposure; (9). Has not been assembled, used, and maintained
in accordance with the instructions or owner's manual accompanying the product; (10). Boat has been damaged as a
result of shipping, warehousing or storage.
SEAMAX limited warranty does not cover incidental or consequential costs and expenses such as haul-out, launching,
towing transport and storage charge, telephone or rental charges of any type, inconvenience, waste of time or income
losses, or other consequential damages.
The consumer must provide COMPLETE access to the product for inspection and warranty service by delivering the
product to SEAMAX CANADA or a dealer authorized to service the SEAMAX product.
Our obligation under this warranty shall be limited to repairing a defective part, or at our discretion, refunding the
purchase price or replacing such part or parts as shall be necessary to remedy ANY defect in material or workmanship
as covered by this warranty.
Page 4
Seamax Inflatable Boat – English User Manual
- 3 -
PRODUCT REGISTRATION
To be eligible for warranty coverage, the product must be registered with SEAMAX CANADA within 30 days from
purchase other than purchasing from Seamax Directly or Seamax Online.
SEAMAX limited warranty is transferable to a subsequent purchaser for the remainder of the unused portion of the
warranty. This will not apply to products used for commercial applications.
To transfer the warranty to the subsequent owner, send us a (a) Copy of the Bill of Sale or (b) Purchase Agreement
within 30 days of transfer. Warranty Claims may not be accepted without proper presentation of boat title transfer.
OUR SUPPORT
Our office is located in Richmond, BC, Canada. We are the manufacturer of Seamax inflatable boats and
accessories. Seamax Inflatable boats are designed like larger boats with excellence in mind. We have
carefully thought out every detail from the overall boat design to the smallest patch application. If you
need assistance or service, please first refer to this booklet. Additional help is available by visiting our
website, contacting us or visiting any local Seamax dealers. Your satisfaction with your inflatable boat is
very important to us.
Seamax Marine (Canada Head Office)
120-11791 Machrina Way, Richmond, BC, Canada V7A 4V3
http://www.seamaxcanada.com http://www.seamaxmarine.com
Email: [email protected] sales@ seamaxmarine.com
TEL: 1-877-907-7766 1-604-277-7766 Fax: 1-604-277-3360
Page 5
Seamax Inflatable Boat – English User Manual
- 4 -
2. ABOUT BOATING
The operator (driver) is responsible for the correct and safe operation of the boat and safety of its occupants and
general public. It is strongly recommended that each operator (driver) read and understand this entire manual before
operating the boat. Be sure at least one additional person on board is instructed in the basics of starting and operating
the outboard and boat handling in case the driver is unable to operate the boat. Remember in Canada you must have
a boating certification license for all motorized watercraft. All local rules and regulations apply to all waterways. If you
have any questions or concerns, please feel free to contact with us. Safety and operating information that is practiced,
along with using good common sense, can help prevent personal injury and product damage.
Boater’s operation license is required in Canada and USA when use the boat with an outboard engine or electric motor.
Your boat may have to be registered with Transport Canada or DMV office (Department of Motor Vehicles) before use.
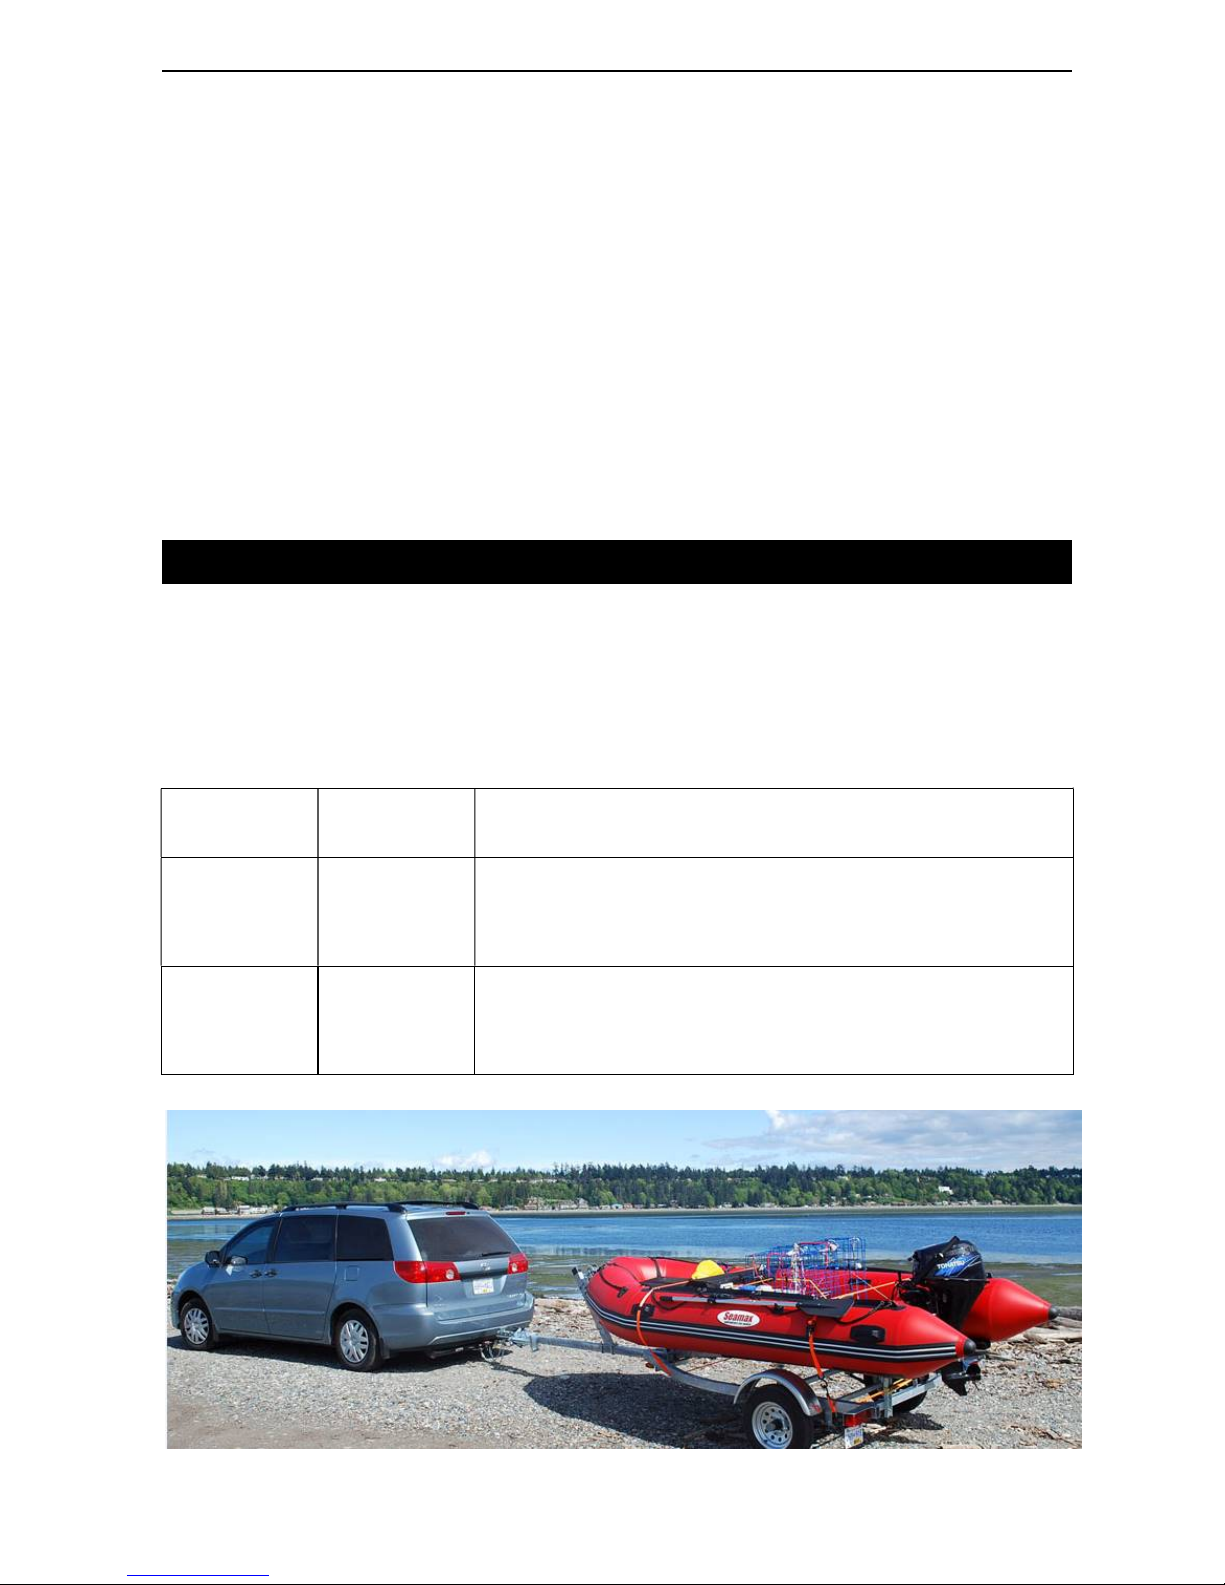
Please make sure you and your boat can meet all the government requirements when you transport the boat on the
land or use the boat in the water.
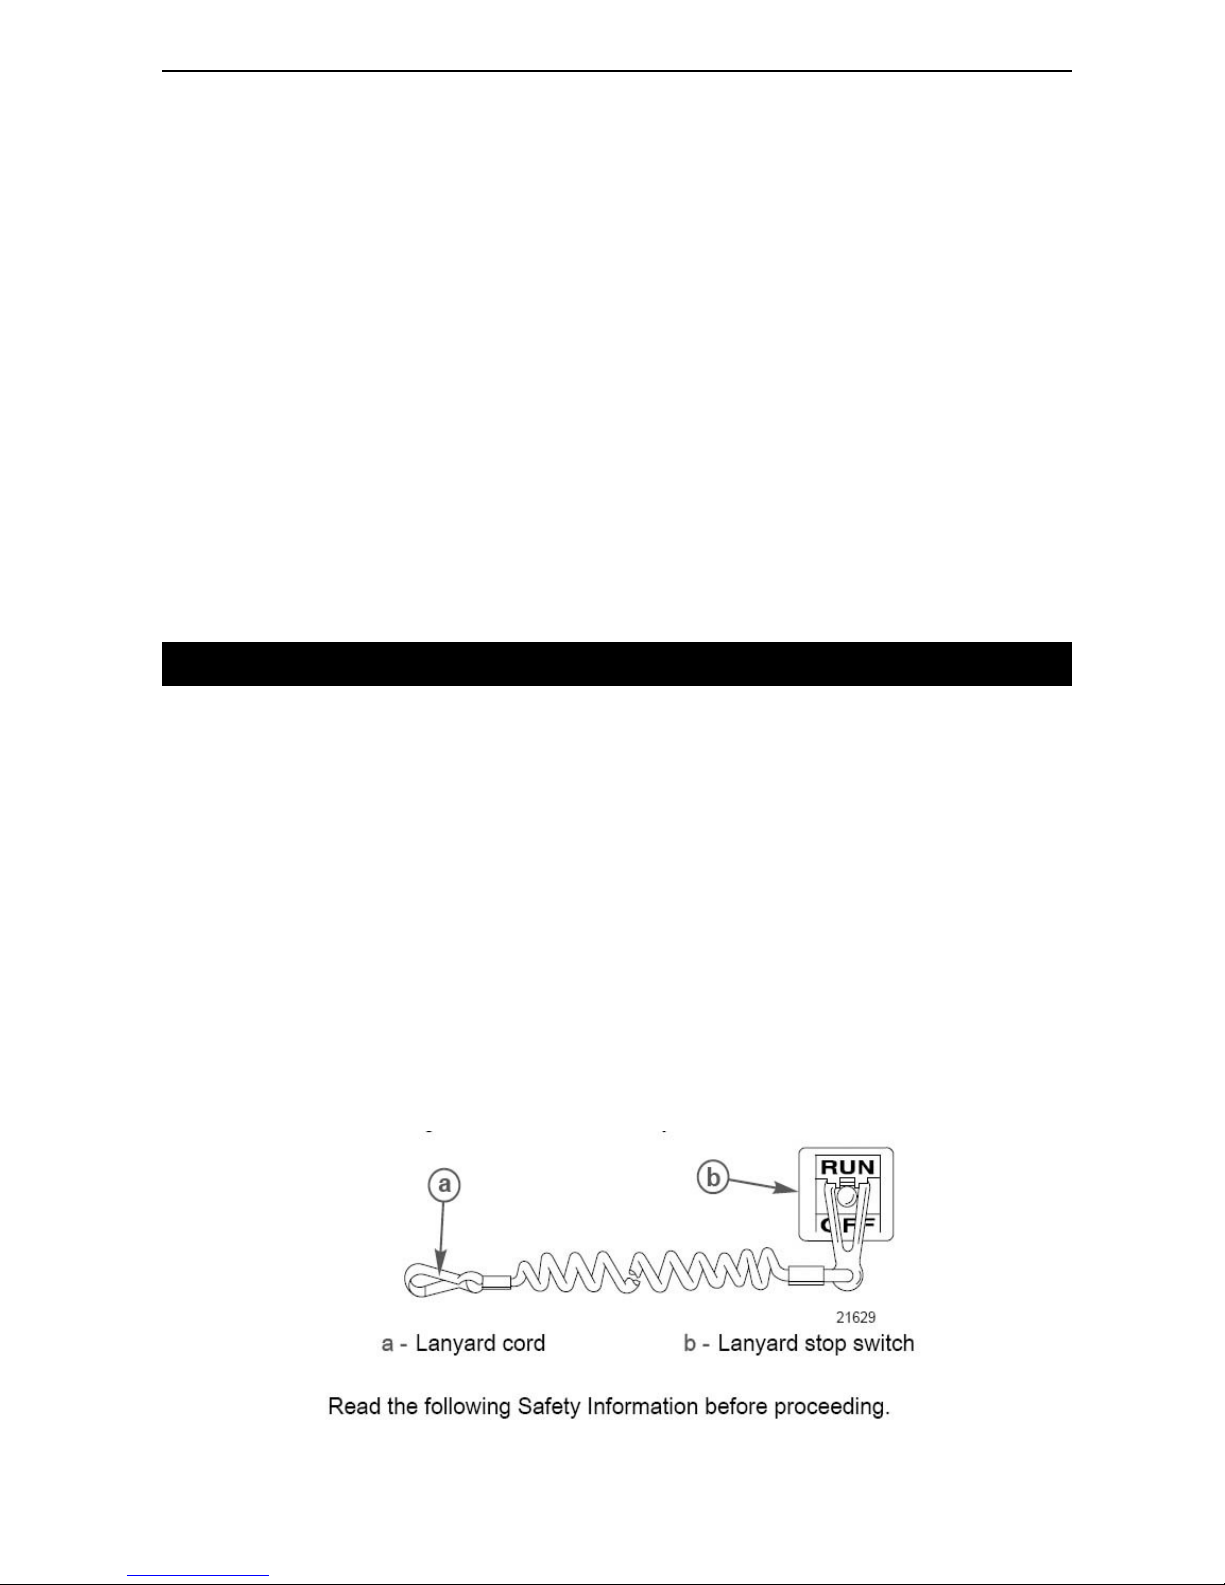
LANYARD STOP SWITCH
The purpose of a lanyard stop switch is to shut down the engine in an emergency situation when the operator moves
from a safe operating distance (as in accidental ejection from the operator's position) to activate the switch. Tiller
handle outboards and some remote control units are equipped with a lanyard stop switch. A lanyard stop switch can
be installed as an accessory, generally on the dashboard or side adjacent to the operator's position. Should the
operator fall out of the boat, the possibility of serious injury or death from being run over by the boat can be greatly
reduced by stopping the engine immediately. Always properly connect both ends of the stop switch lanyard to the stop
switch and the operator.
The lanyard is coiled to make its at-rest condition as short as possible to minimize the likelihood of lanyard
entanglement with nearby objects. Its stretched-out length is made to minimize the likelihood of accidental activation
should the operator choose to move around in an area close to the normal operator's position.
Page 6
Seamax Inflatable Boat – English User Manual
- 5 -
PROTECTING PEOPLE WHILE CRUISING
It is very difficult for a person standing or floating in the water to take quick action to avoid a boat heading in his or her
direction, even at slow speed. Always slow down and exercise extreme caution any time you are boating in an area
where there might be people in the water. Whenever a boat is moving (coasting) and the outboard gear shift is in the
neutral position, there is sufficient force by the water on the propeller to cause the propeller to rotate. This neutral
propeller rotation can cause serious injury. Shift outboard into neutral and shut off the engine before allowing people to
swim or be in the water near your boat.
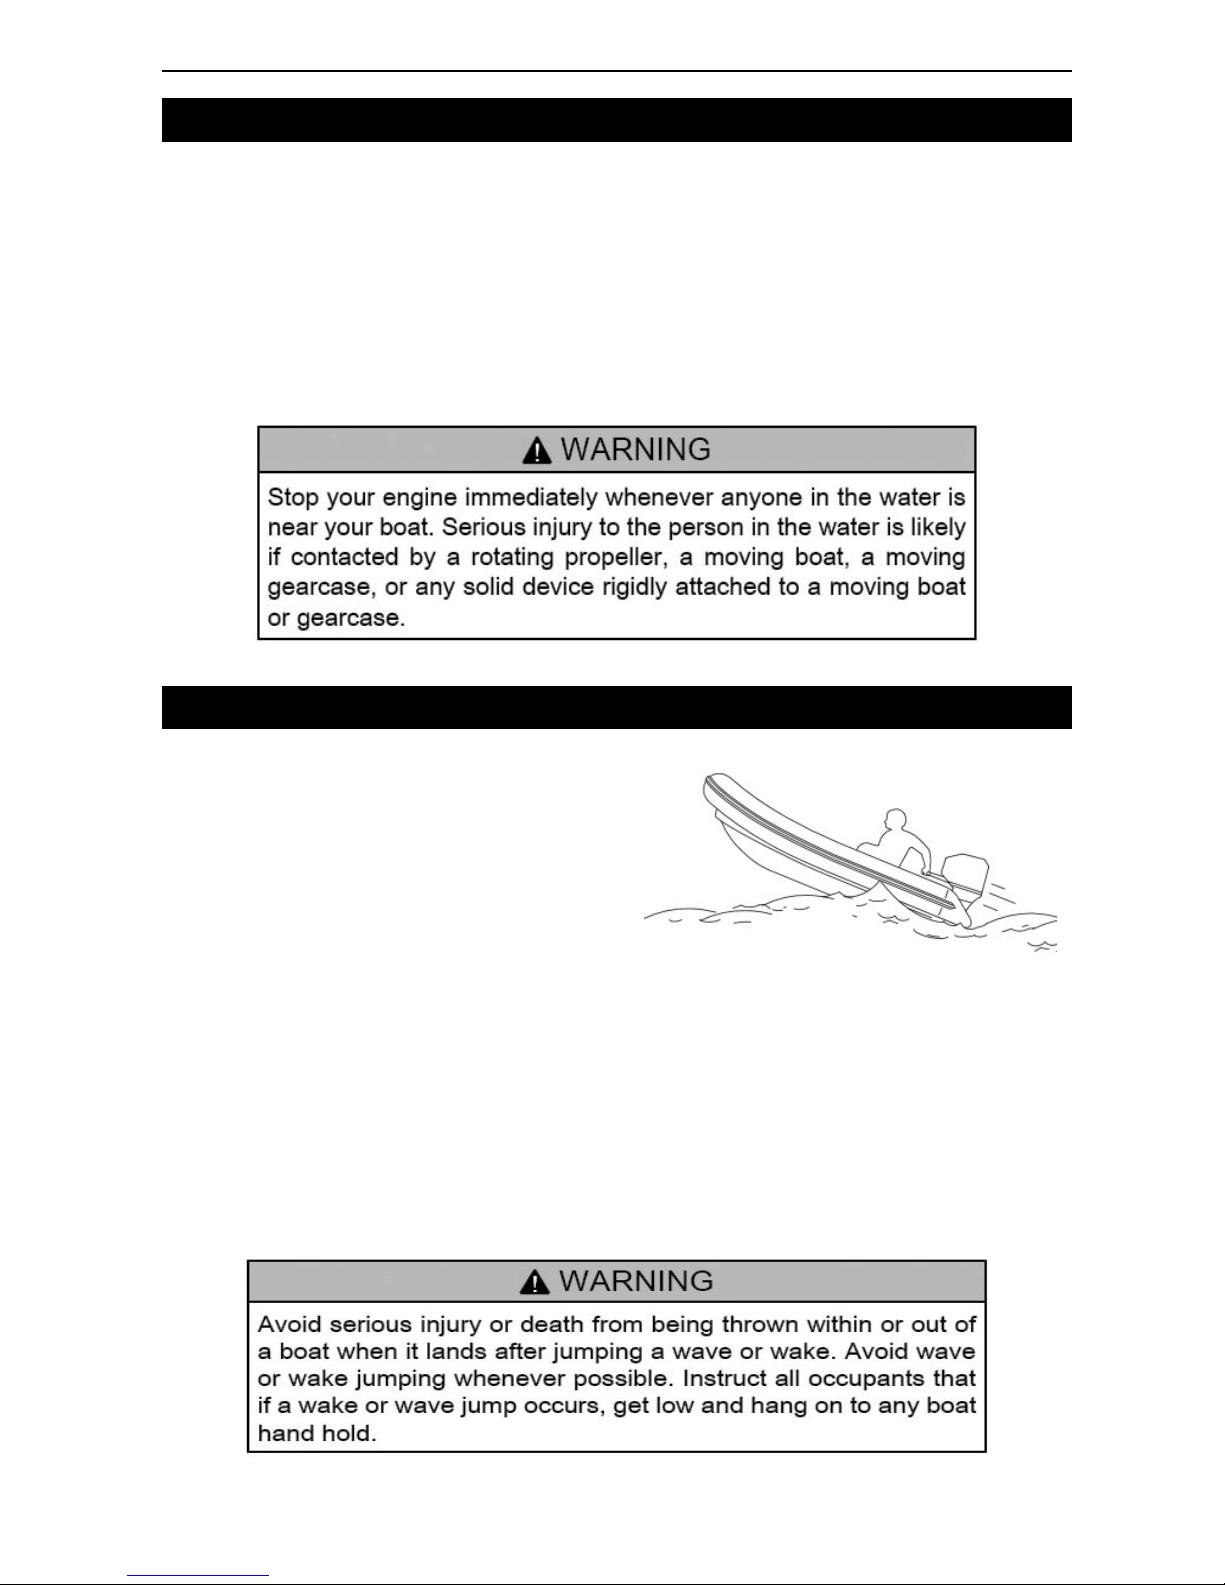
WAVE AND WAKE JUMPING
Operating recreational boats over waves and wakes is a
natural part of boating. However, when this activity is
done with sufficient speed to force the boat hull partially
or completely out of the water, certain hazards arise,
particularly when the boat re-enters the water.
The primary concern is the boat changing direction while in the midst of the jump. In such a case the landing may
cause the boat to veer violently in a new direction. A sharp change in direction can cause occupants to be thrown out
of their seats or out of the boat. Use extreme caution when near other boats. There is another hazard from allowing
your boat to launch off a wave or wake. If the bow of your boat pitches down far enough while airborne, upon water
contact it may penetrate under the water surface and submarine for an instant. This will bring the boat to an instant
stop and can send the occupants flying forward. The boat may also steer sharply to one side on impact with the water.
Please be aware of these wave and wake hazards and use extreme caution.
Page 7
Seamax Inflatable Boat – English User Manual
- 6 -
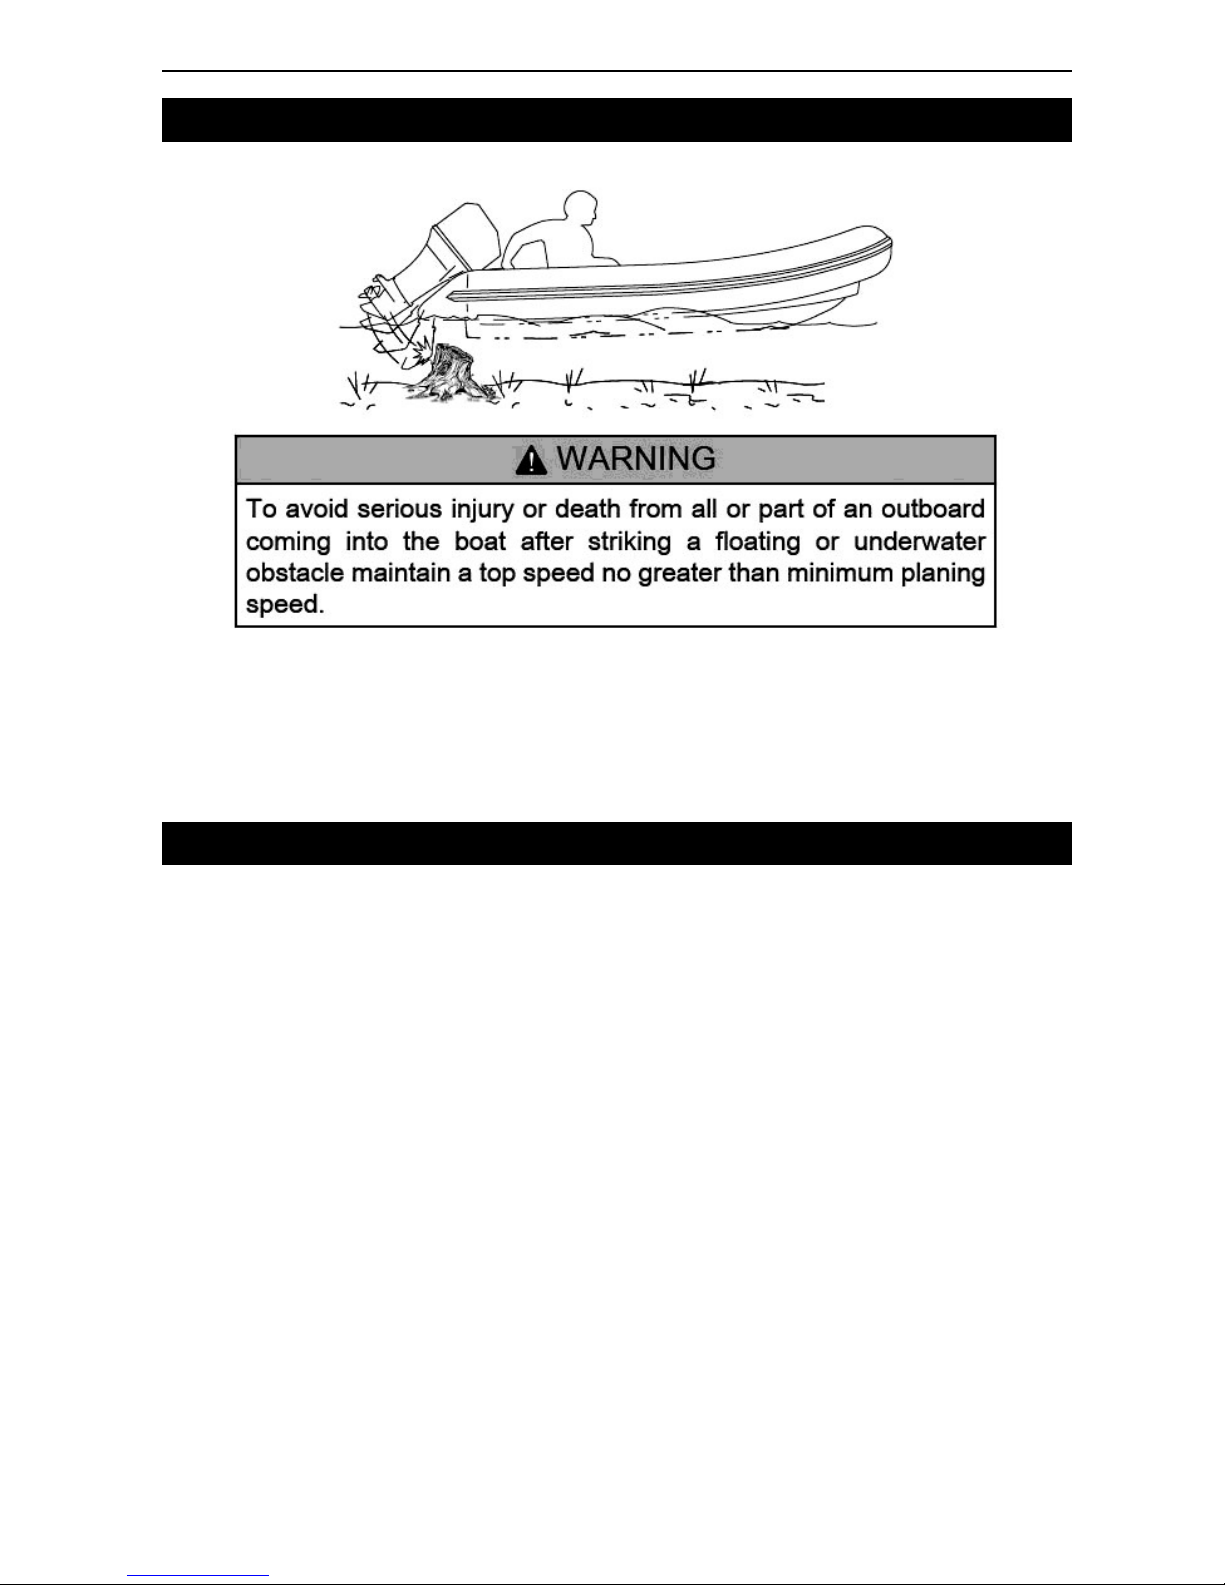
IMPACT WITH UNDERWATER HAZARDS
Reduce speed and proceed with caution whenever you drive a boat in shallow water areas, or in areas where you
suspect underwater obstacles may exist. These obstacles could be struck by the bottom leg of the outboard or the
boat bottom and cause severe damage to the boat and or motor. Travel these areas with extreme caution, to reduce
injury or impact damage from striking a floating or submerged object reduce your boat speed.
BOATING SAFETY
Boat operators should complete a boating safety course. And the boat operator may need to pass a Pleasure Craft
License to operate any motorized craft on the water (mandatory in Canada). In order to safely enjoy the waterways,
familiarize yourself with local and other governmental boating regulations and restrictions, and consider the following
suggestions:
1) On hand have enough life-Jackets (or personal floatation devices) with you for all your Passengers.
2) Check the pressure and the condition of the boat before you start sailing.
3) Pay close attention to the weather conditions for your safety.
4) Do not forget important papers (Eg. maps and boating license), oars, and flash light.
5) Make sure you take repair kits, first aid kit and a MANUAL air pump with your boat.
6) Make sure you do not exceed the maximum recommended number of persons on the capacity plate.
7) Do not exceed the recommended maximum horsepower rating.
NOTE: Use of alcohol or drugs is prohibited while operating a water craft. Alcohol or drug use impairs your
judgment and greatly reduces your ability to react quickly. This carries the same penalty as driving a car if
convicted.
Page 8
Seamax Inflatable Boat – English User Manual
- 7 -
Have an approved personal flotation device of suitable size for each person aboard the vessel (it is the law) and have
it readily accessible. Do not overload your boat. Most boats are rated and certified for maximum load (weight)
capacities (refer to your boat capacity plate). Perform safety checks and required maintenance. Follow a regular
schedule and ensure that all repairs are properly made. Know and obey all nautical rules and laws of the waterways.
Prepare other boat operators. Instruct at least one other person on board in the basics of starting and operating the
outboard, and boat handling, in case the driver becomes disabled or falls overboard. Stop the engine whenever
passengers are boarding, unloading, or are near the back (stern) of the boat. Just shifting the outboard into neutral is
not sufficient. The operator of the boat is responsible by law to maintain a proper lookout by sight and sound. The
operator must have an unobstructed view particularly to the front. Never operate your boat directly behind a water
skier in case the skier loses control and hits the water. Use extreme caution around any swimmer, diver or persons in
the water.
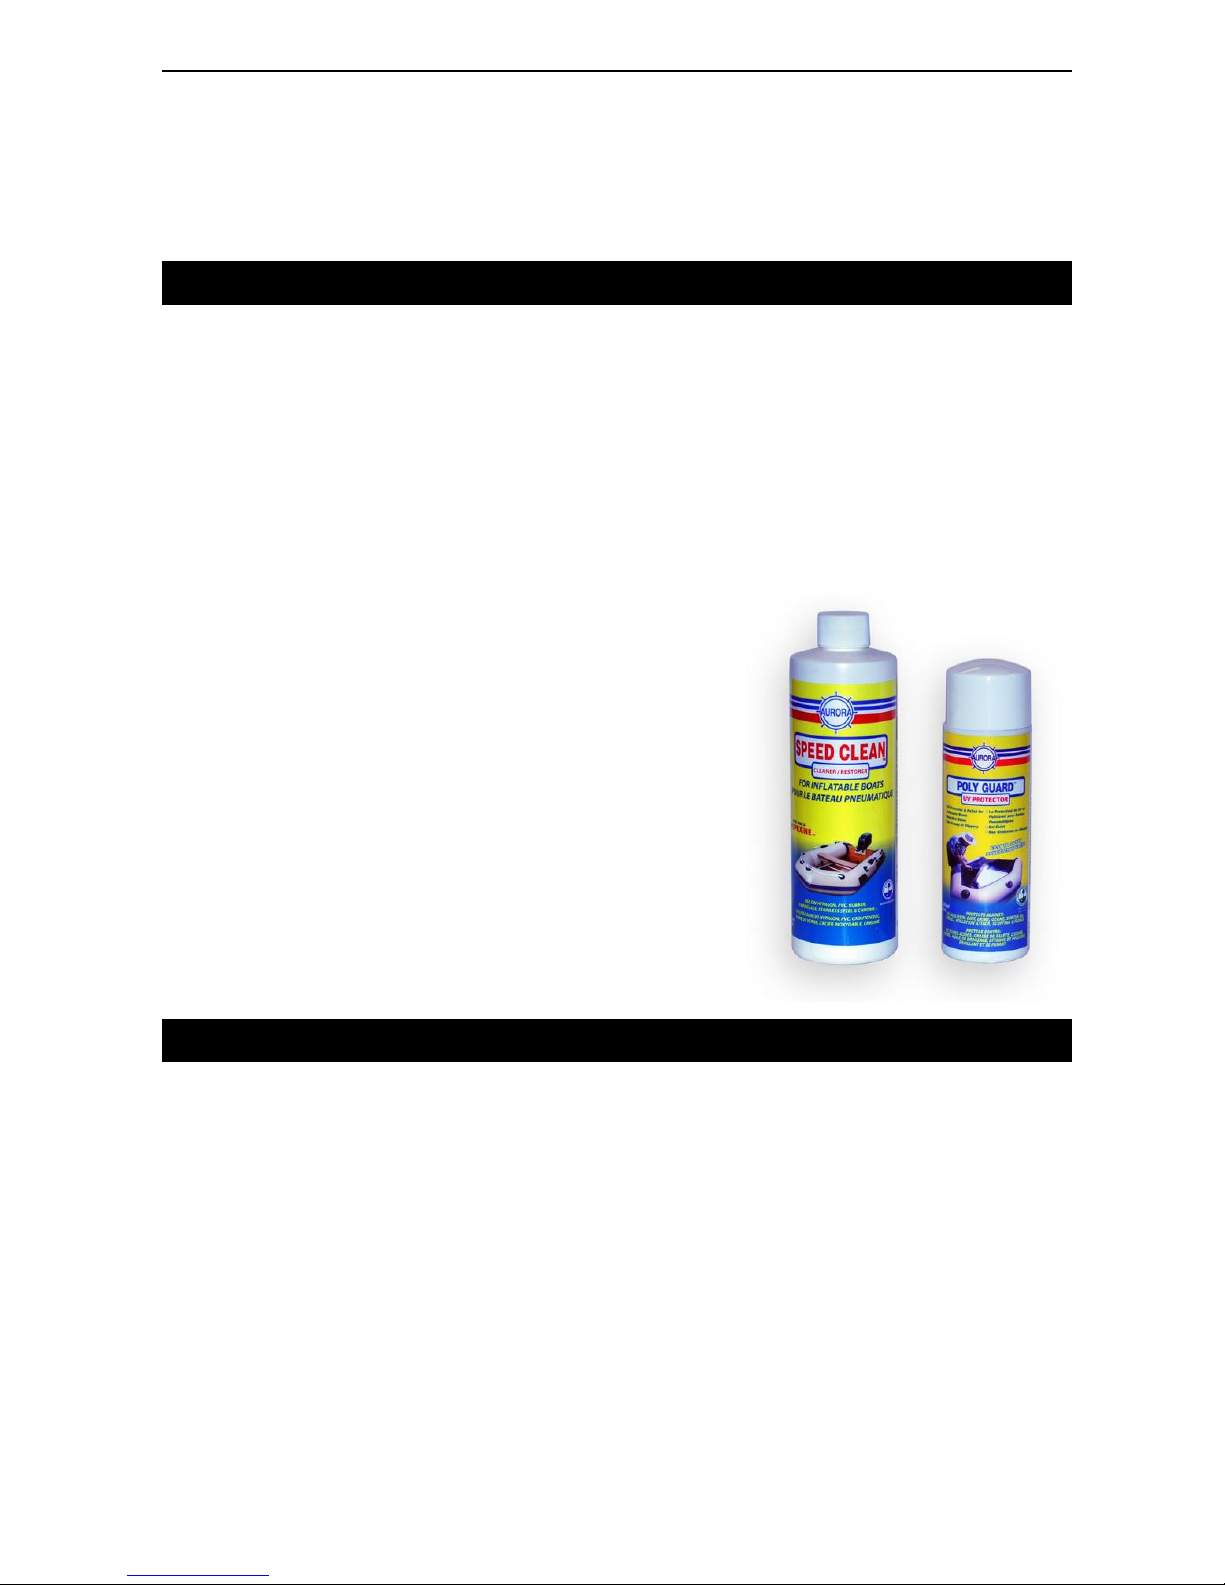
BOAT CAPACITY PLATE
Seamax inflatable boats are registered with Transport Canada and carry our own manufacture's identification code.
Each Seamax boat carries a capacity plate along required by Transport Canada .This certification along with the CE
certification allows Seamax Boats to be sold world wide.
This table shows that boat is designed and constructed for:
CATEGORIES NAVIGATION WAVE IND FORCE AND WHEIGHT
C Inshore
Designed for voyages in coastal waters, large bays, estuaries, lakes
and rivers where conditions may experience wind force 6 (Beaufort
scale) and wave heights up to 2 m (6.5 ft.)
D
Sheltered
Water
Designed for voyages on sheltered coastal waters, small bays, small
lakes, rivers, and canals where conditions may experience wind force 4
(Beaufort scale) & wave heights up to 0.5 m (1.5 ft.).
Page 9
Seamax Inflatable Boat – English User Manual
- 8 -
3. Seamax design
Seamax is a registered inflatable boat manufacturer with Transport Canada and is treated as a registered boat builder
for US Coast Guard. Inflatable boats are probably the most stable boats on the water. They are used for offshore
rescue, whitewater rafting and are the boat of choice for most military agencies. Seamax Inflatable boats come in
several different sizes and floor combinations. Seamax Marine is the developer and distributor of Seamax inflatable
boats and accessories.
TECHNOLOGY OF INFLATABLE BOAT
The Seamax new features listed below are based on commercial inflatable standards, upgraded from commercial
standards, and Seamax self-developed. All these features make our boats more rigid, more durable comparing with
many other boats. And we can guarantee the Seamax boats have the longest life time. Thank you again for choosing
Seamax.
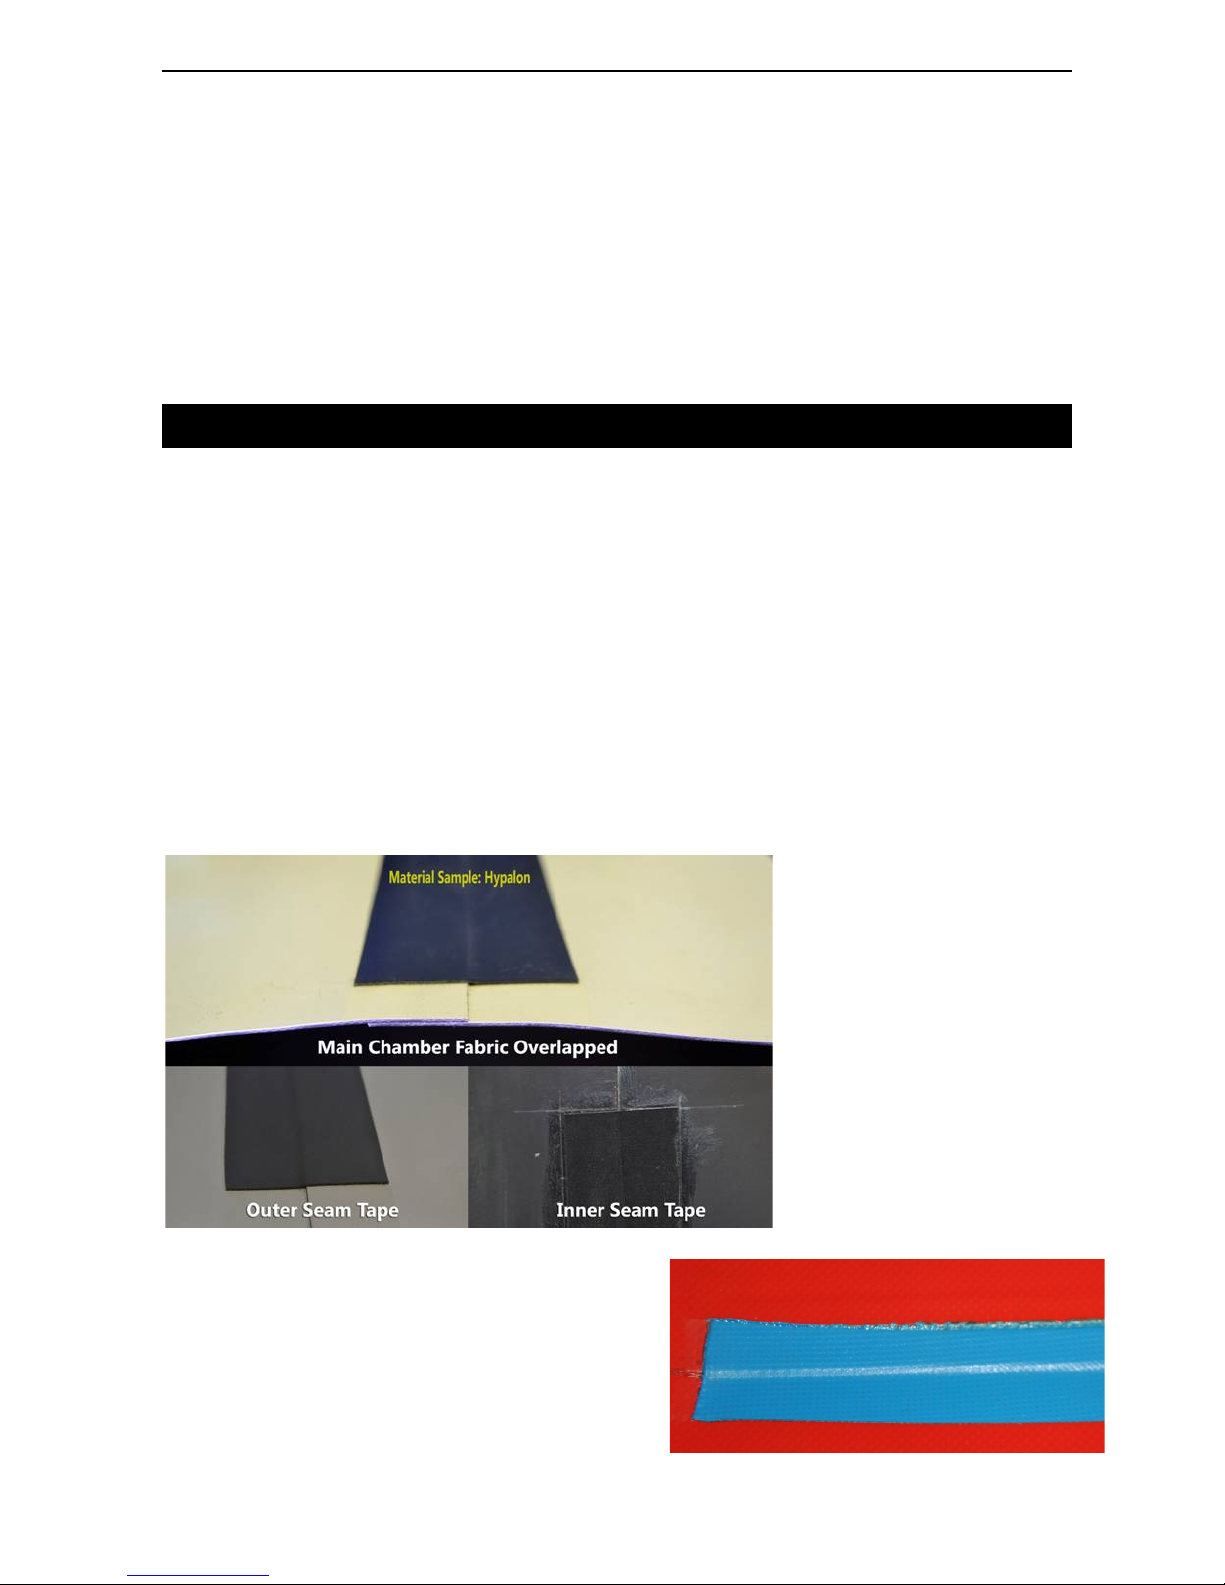
1. Four Layers Overlapped Seam (FOS)
Description – FOS
4-layer overlap seam finishing is the strongest seam construction standard in the inflatable boat industry. The 2 main
chamber fabrics are bonded together with ½” overlapped. And there are 2 extra 1” pieces of seam tape on both sides
to reinforce the main seam. Total thickness of FOS seam is about 4-5mm thick and 2.5” wide. FOS has been applied
to all Hypalon boats since 2013 and all PVC boats since 2015.
Seamax boats with FOS standard
have a strong pontoon chamber which
is air tight and will have a longer life
expectancy. FOS Seamax chamber
seams are better at resisting sun and
heat damage over the long
term. Demo photos show the FOS
seam applied on Hypalon material.
Now the FOS standard is applied to all
our new PVC and Hypalon inflatable
boats.
Double Hot Welded Standard - Seamax offers double hot
welded seam as the highest industry standard. After the main
chamber fabric welded together, we add one sky-blue seam
tape welded from chamber inside to reinforce and double the
strength. Another body color seam tape is added from
outside for the best looking and extra reinforcement.
Page 10
Seamax Inflatable Boat – English User Manual
- 9 -
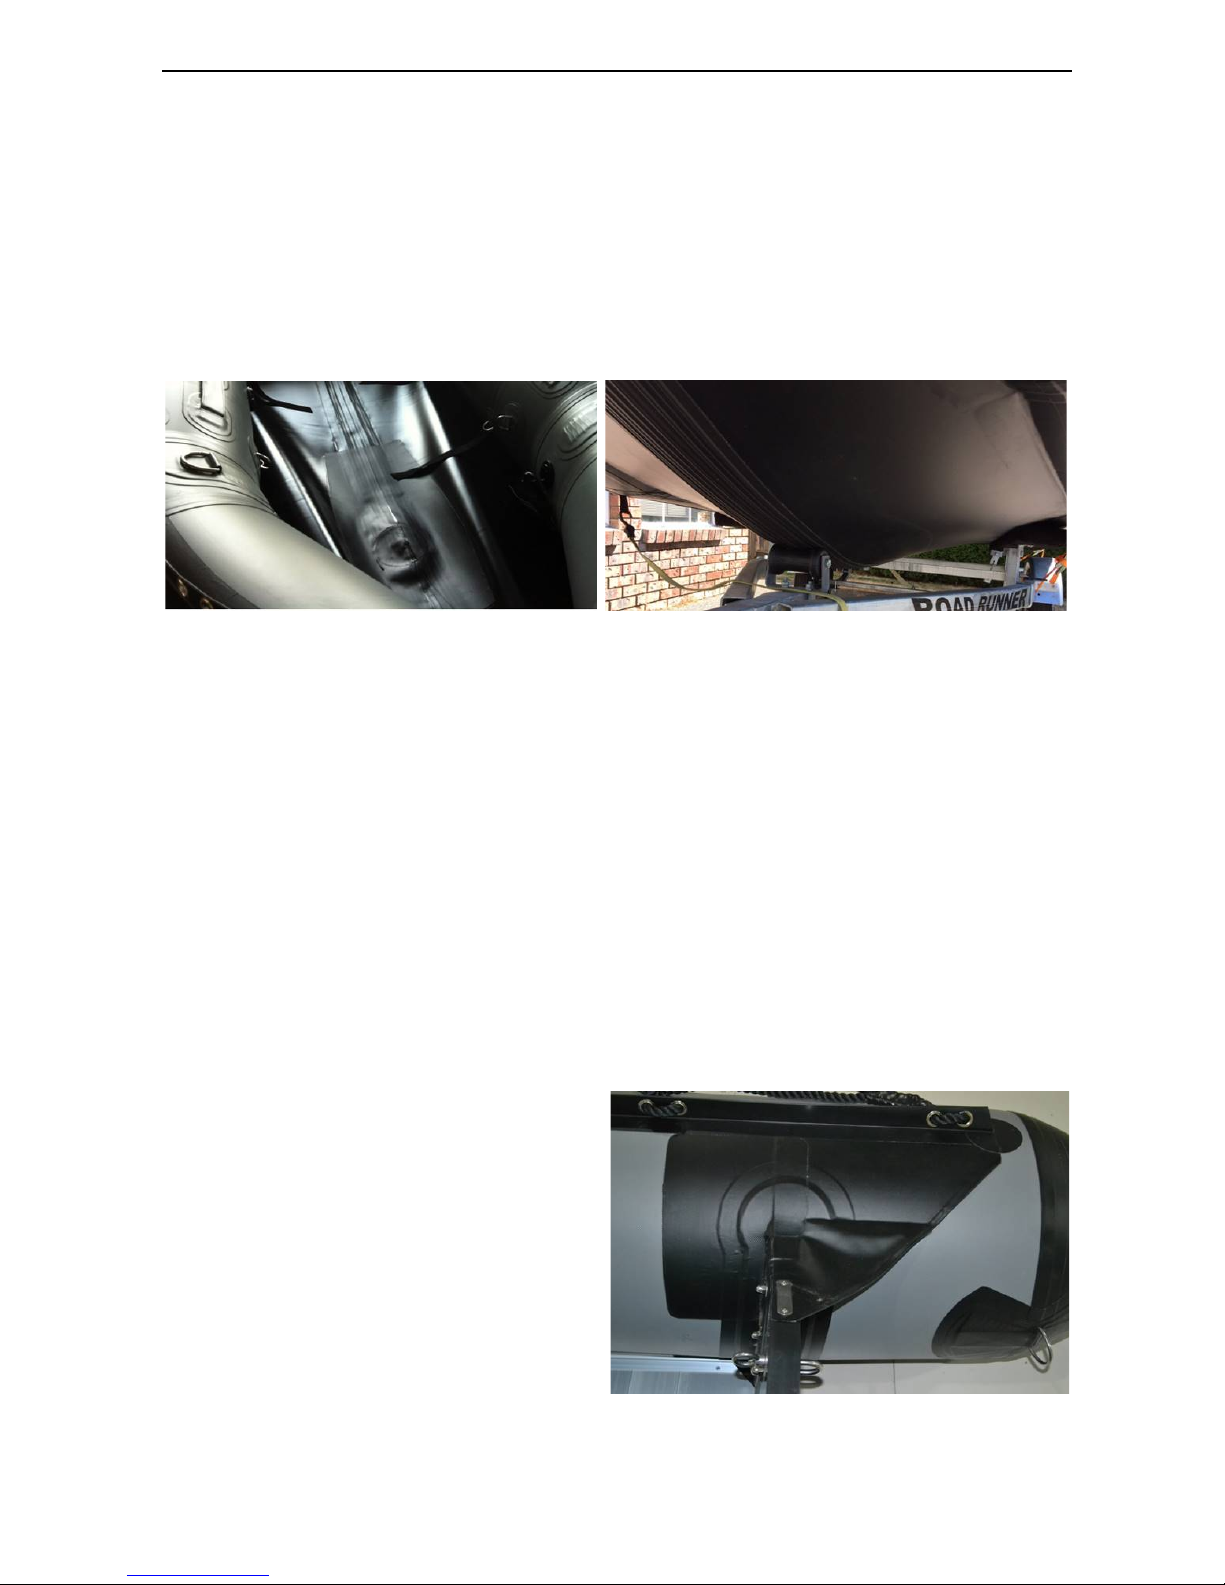
2. Inner Bottom Reinforcement (IBR)
Description – IBR
The Inner Bottom Reinforcement Layer is located on the boat bottom central keel area (inside). It is a simple idea but
gives a lot of extra protection for your boat bottom. The IBR coverage is about 3' x 1' for small boats and up to 5' x 2'
on larger boats. Seamax has been using the IBR standard to build heavy duty boats since 2010. The IBR system is
not visible from the outside of the boat and causes no extra water resistance when out on the water. IBR standard has
been applied to selected Seamax models since 2011.
Benefit – IBR
The IBR system makes the hull more rigid. It is a great feature to have on your boat as it protects your boat when you
are launching the boat from beach or a trailer. IBR also increases hull thickness in case the boat hits something
submerged in the water. Seamax has no hull bottom damage claim since the IBR standard is in effect.
3. Transom Stabilizer Reinforcement (TSR)
Description - TSR
Boat transom is glued with pontoon and bottom all together. Sun light, water and temperature can severely damage
the transom structure on roll up inflatable boats. Adding extra stability and protection to the transom is very important
to build our Seamax boats. Besides using marine grade solid birch plywood to increase the quality, we have
developed new manufacturer standards that focus every points of making. We call our standard Transom Stabilizer
Reinforcement (TSR). The TSR feature has been used on most of our Seamax PVC boats since 2015.
Benefit - TSR
TSR makes the boat and transom much stronger. The
transom adaptors are fully reinforced with 2 additional
layers from top and bottom. The fabric coverage of
transom is increased and double layered. TSR will
help the pontoons disperse the outboard motor
vibration and weight. The reinforcement technology
will dramatically extend the overall life time of our
Seamax inflatable boats.
Page 11
Seamax Inflatable Boat – English User Manual
- 10 -
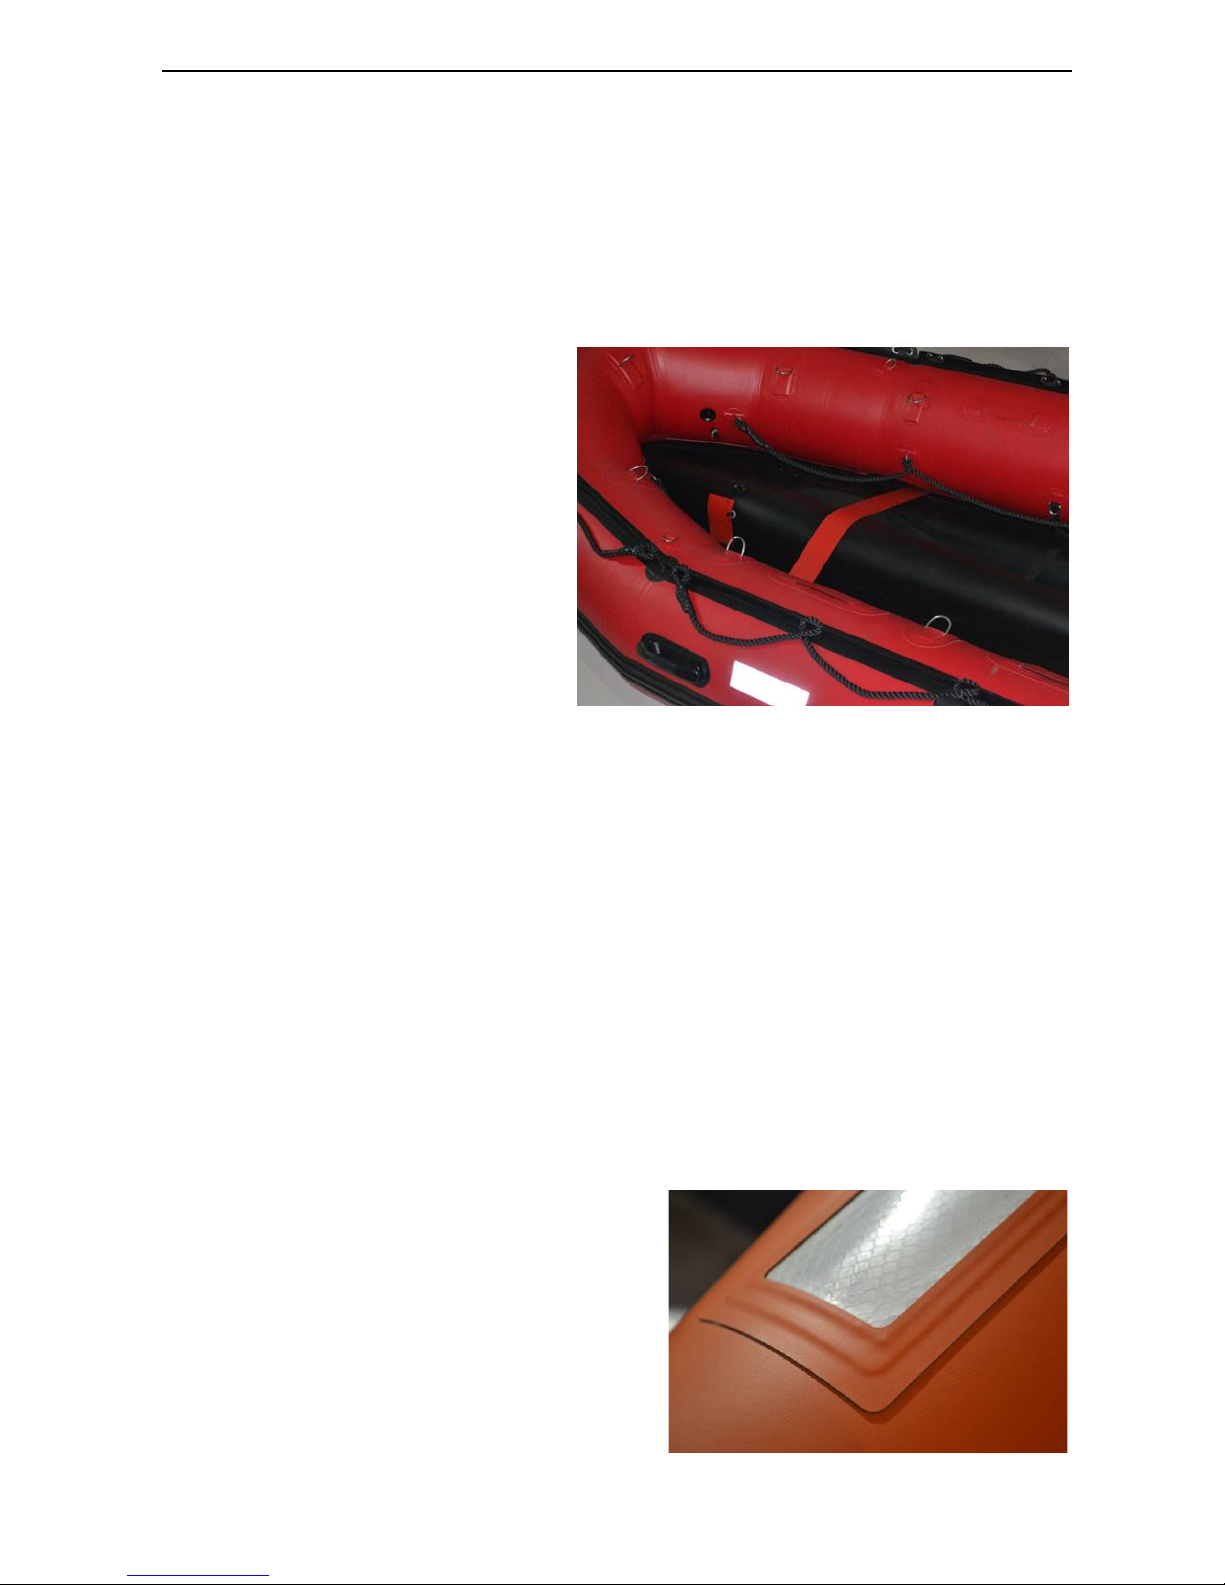
4. Hull Stabilizer Bar (HSB)
Description - HSB
The Hull Stabilizer Bar (HSB) was designed by Lawrence (Owner of Seamax) and first applied on our government
project. Now Seamax HSB (2nd version) is available on every Seamax Ocean T model boat and all Seamax boats
over 14ft. (Photo of HSB is not showing on our website). The HSB feature has been used on the Seamax Ocean T
series and all Seamax roll up models over 14' since 2015.
Benefit – HSB
Located near the front deep V-Hull, the specially
made HSB greatly helps stabilize the boat
structure. The tension along the HSB creates an
invisible force triangle to stabilize the front Hull
and keep the floor in place. Such a triangle inner
support for the hull is a great boat feature that
nobody has. Also, a boat with the HSB feature will
have better high speed boating performance. The
reinforced hull structure allows the boat to be
driven safely when chambers in low pressure.
5. Accurate Hull Quality Control (AHQC)
Description - AHQC
Seamax creates the Accurate Hull Quality Control (AHQC) as part of our manufacturing standard. This AHQC is part
of our new standard boat design which includes a new cutting pattern for both pontoon and boat bottom, a new
floorboard standard, new equipment and properly trained staff. Because of all these changes and updates, our
inflatable boats can offer a tighter and superior finished bottom as compared to other manufacturers.
Benefit - AHQC
The AHQC standard may help increase max boat speed up to 15% and reduce possibility of damage in use.
The rollup inflatable boat bottom is very hard to build tight and smooth. Seamax knows how to properly design a rollup
inflatable boat that does NOT have this problem. It costs more time, technique, and money to make perfect boats, and
that could be why many manufacturers have problems with their boat hulls.
* Reflective Tape for Navigation at Night
US Coast Guard Approved 3M Reflective Sheeting. Color
Code: White USCGFP30 (Sliver). Commercial Grade
Reflective Tape Dimensions: 3”x10”, 3”x8”. Applied quantity
is based on boat length.
* This feature is optional on the hull
Page 12
Seamax Inflatable Boat – English User Manual
- 11 -
4. BOAT specification
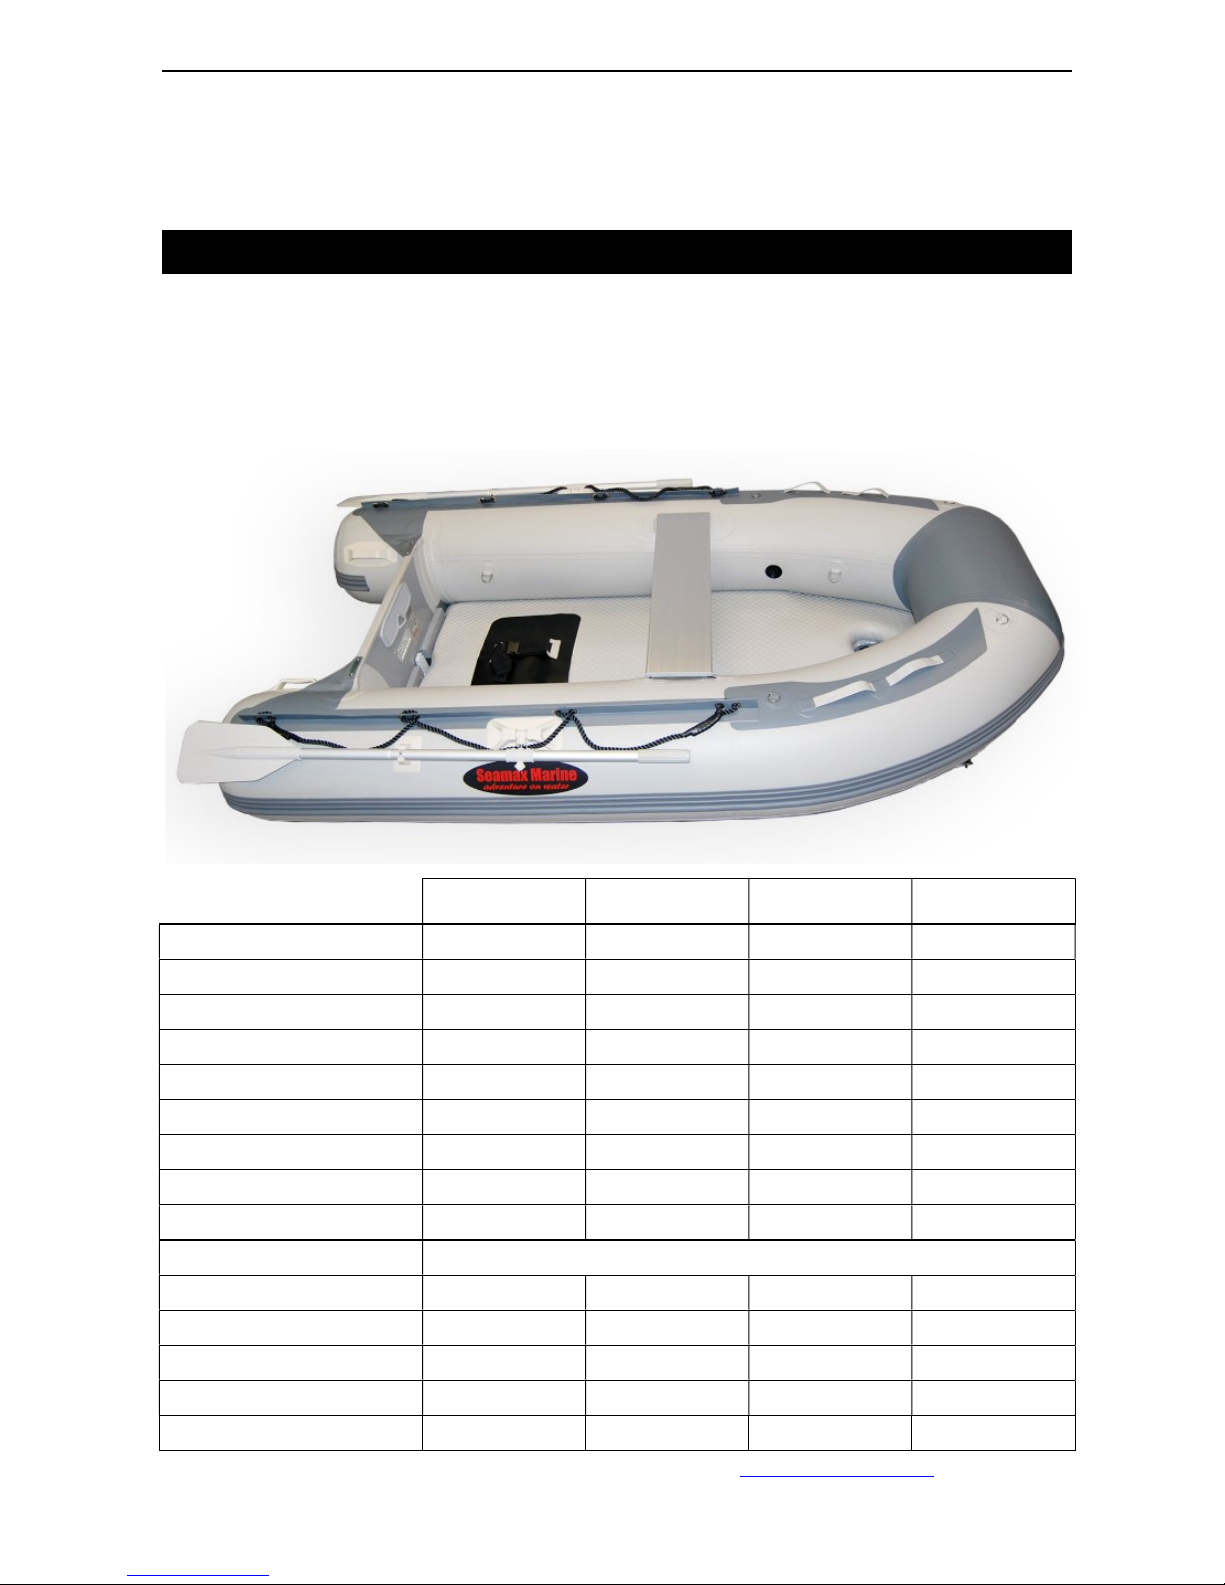
SEAMAX AIR SERIES
SEAMAX AIR SERIES with the Round Noise design helps provide maximum space in the boat. SEAMAX AIR
SERIES uses an AIRMAT floor. This floor is specifically designed with thousands of polyester threads crisscrossing
one another. Once it is inflated with high pressure, it becomes as tough and rigid as a conventional wooden floor boat.
Once deflated, the boat and floor can be rolled up together and take up very little space for storage.
Seamax Air Series AIR230 AIR270 AIR320 AIR360
Max HP
6HP/ 3Kw 10HP/ 7.5Kw 15HP/ 11.2Kw 20HP/ 15Kw
Max Occupants
2 3 4 5
Boat Net Weight
34kg/ 75Lbs 40kg/ 88Lbs 50kg/ 110Lbs 65kg/ 143Lbs
Maximum Loading
208kg/ 458lbs 373kg/ 822lbs 448kg/ 987lbs 531kg/ 1171lbs
Transom Height (motor)
Short Shaft Short Shaft Short Shaft Short Shaft
Chambers (tube+floor+keel)
3+1+1 3+1+1 3+1+1 3+1+1
Boat Length
7.5 ft / 230cm 9 ft / 270cm 10.5 ft / 320cm 11.8 ft / 360cm
Overall Width / Beam
4.3 ft / 131cm 5.0 ft / 152cm 5.0 ft / 152cm 5.5 ft / 168cm
Tube Diameter
13.8 inches/ 35cm 16.3 inches/ 41.5cm 16.3 inches/ 41.5cm 17.3 inches/ 44cm
Floor System
High Pressure AIRMAT Floor with Back Plywood Support
Boat Max Pressure
3.6 PSI 3.6 PSI 3.6 PSI 3.6 PSI
AIRMAT Floor Max Pressure
10 PSI 10 PSI 10 PSI 10 PSI
Bench Seat
1 seat 1 seat 2nd seat optional 2 seats
Oars
1 Pair / 4.3ft 1 Pair / 5.3ft 1 Pair / 5.3ft 1 Pair / 5.3ft
Boat Category
D / 1.5ft wave D / 1.5ft wave C / 6ft wave C / 6ft wave
For boat accessories, please contact our resellers or visit www.seamaxmarine.com.
Page 13
Seamax Inflatable Boat – English User Manual
- 12 -
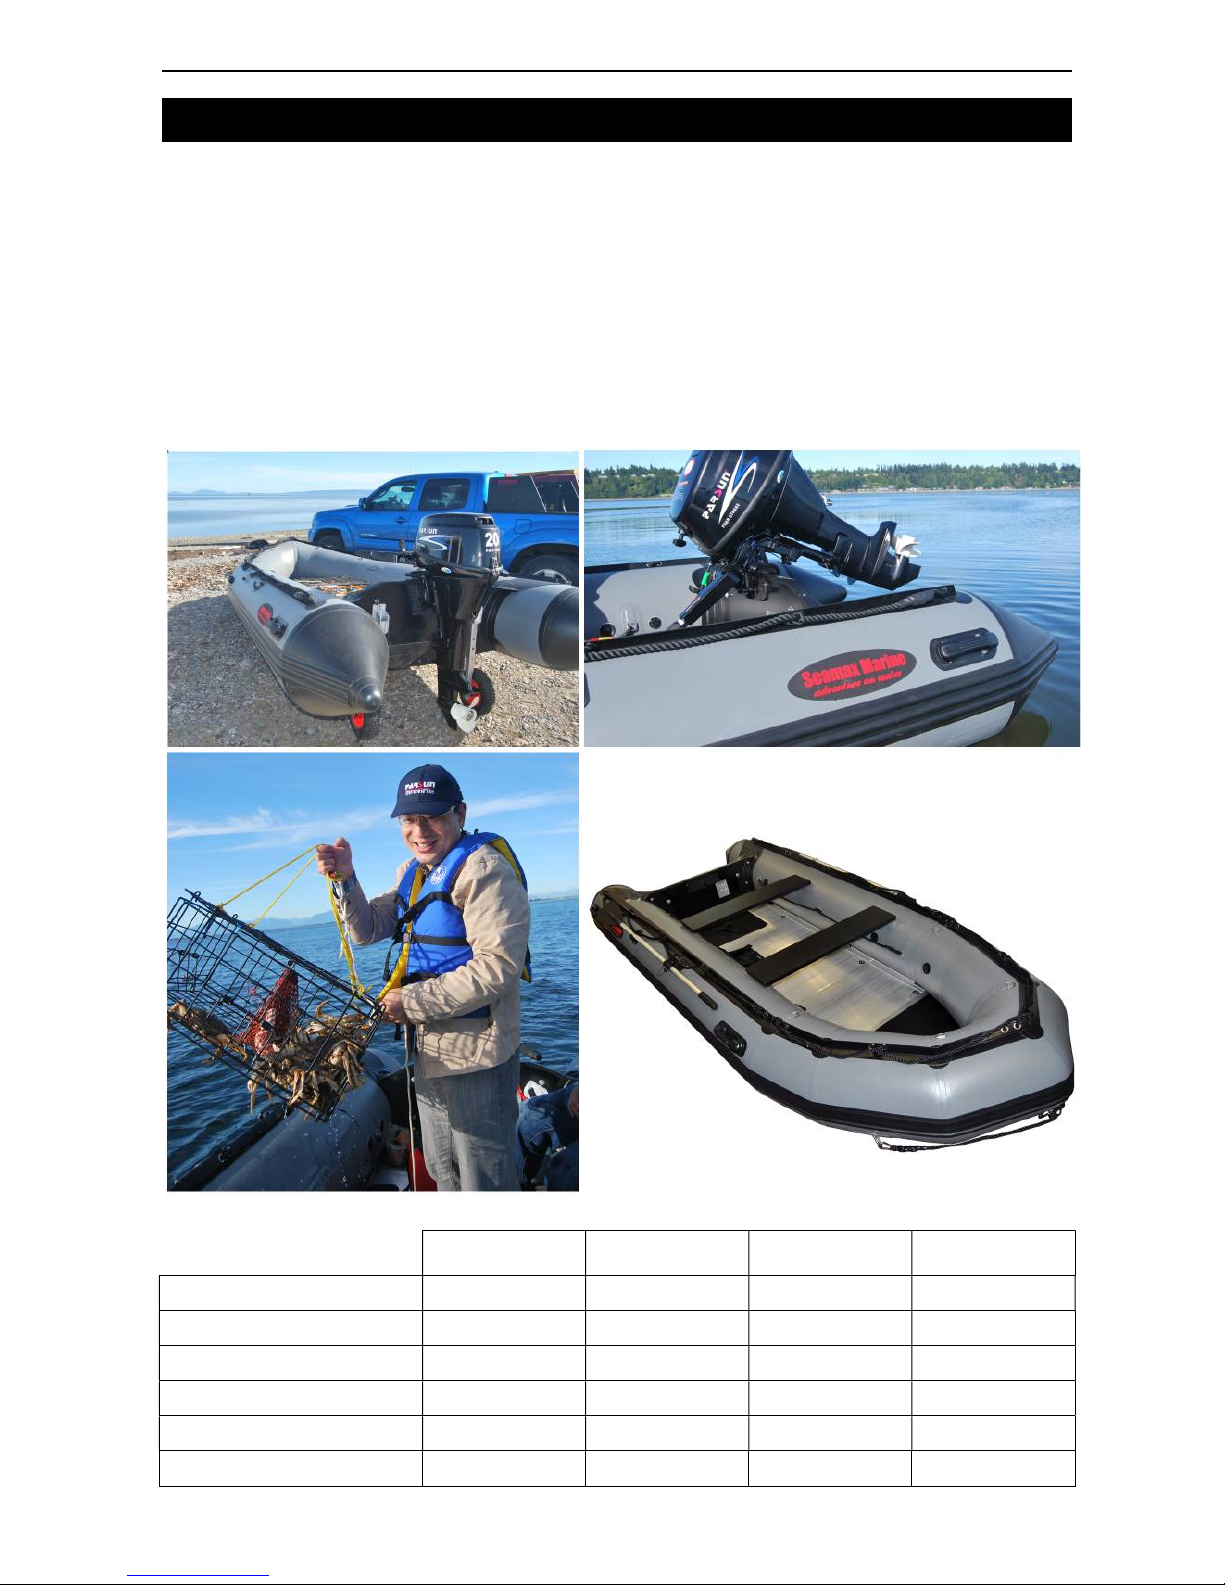
SEAMAX OCEAN SERIES
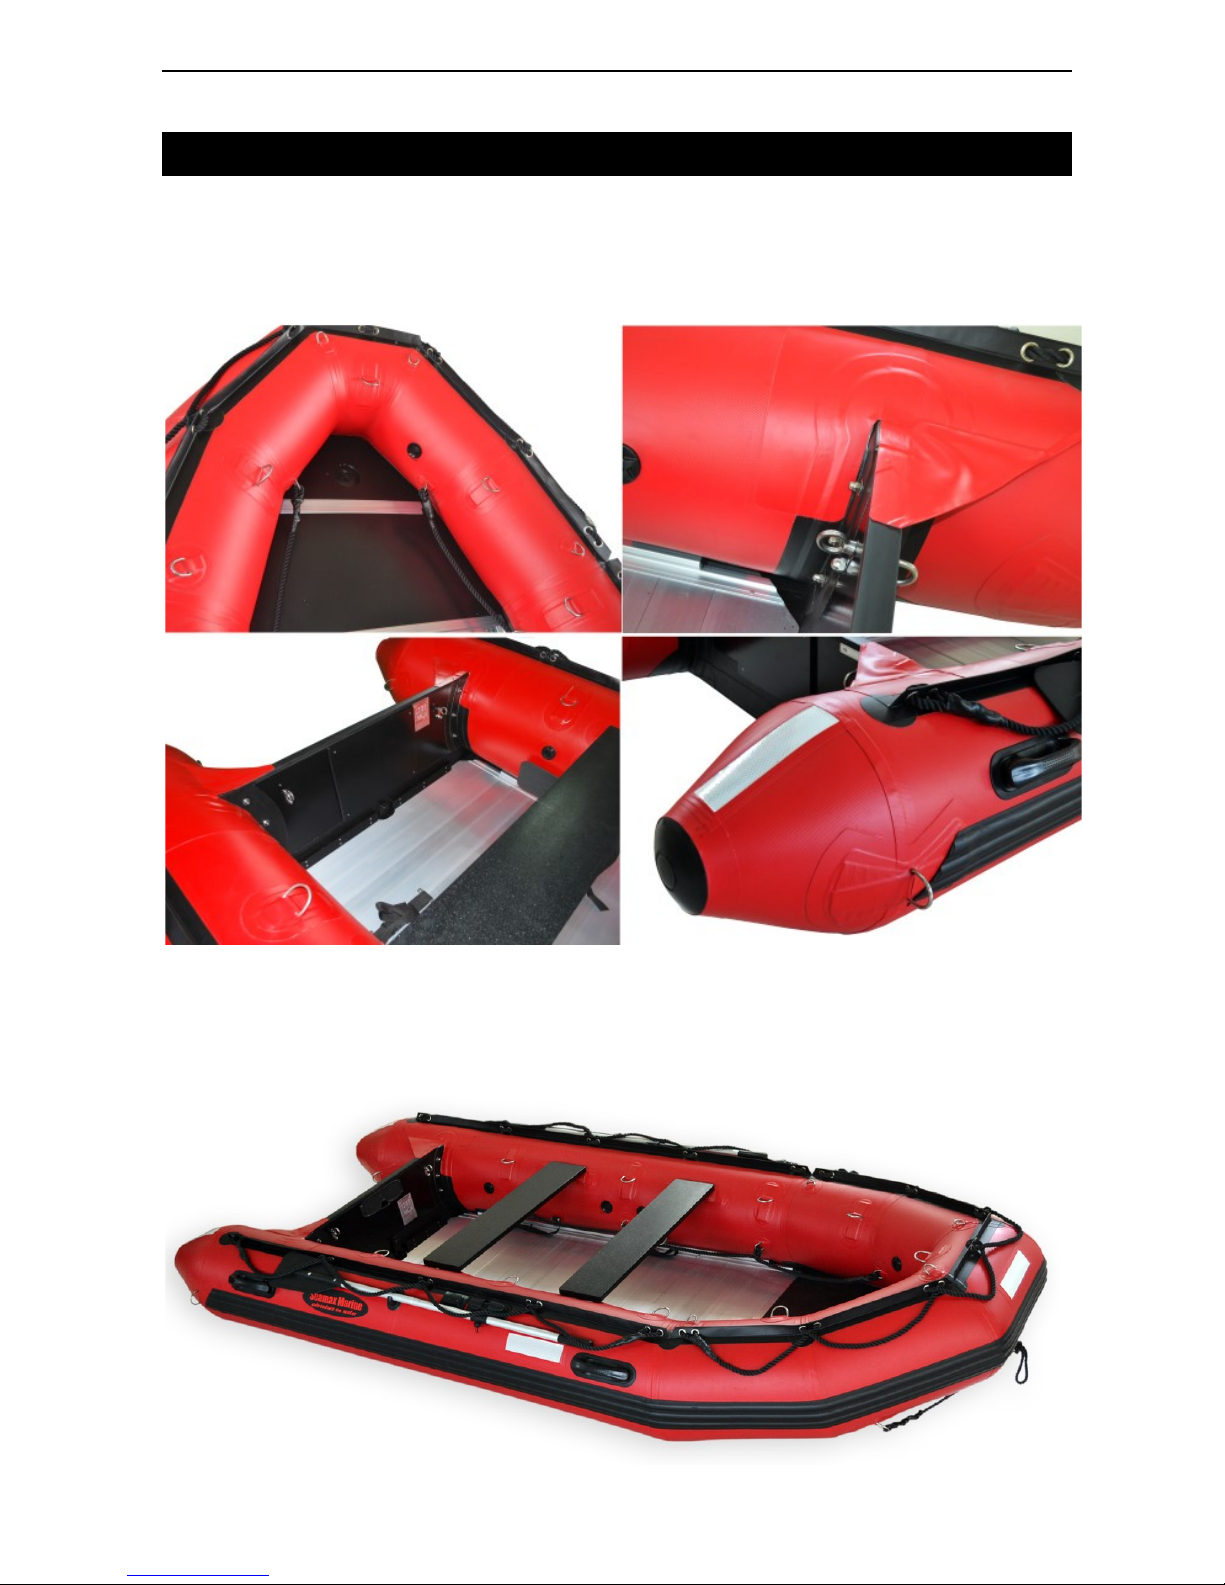
SEAMAX OCEAN SERIES comes with Aluminum floor. The boat has many heavy duty design and is built up to 14ft.
Thicker 1.2 mm material for entire boat bottom. Seamax developed reinforcement design for keel, transom
underneath, and pontoon bottom. Heavy duty life line around the entire boat. Secondary life line on the inside of the
boat. Heavy duty rubbing strake around the boat and keel bottom. Solid 1.5" thick transom made by top grade marine
birch plywood. The new Ocean series comes with a larger cockpit space by moving its transom backward. The
aluminum floor is easy to maintain because of its exceptional resistance to all types of impact. Ocean series is the
most popular boats for recreational fishing.
Seamax Ocean Series Ocean290 Ocean320 Ocean380 Ocean430
Max HP
10HP/ 7.4Kw 15HP/ 11Kw 25HP/ 18.4Kw 35HP/ 25.7Kw
Max Occupants
3 4 5 9
Boat Net Weight
50kg/ 110Lbs 54.5kg/ 120Lbs 80kg/ 176Lbs 98kg/ 215Lbs
Maximum Loading
365kg/ 805lbs 407kg/ 897lbs 555kg/ 1223lbs 1034kg/ 2277lbs
Transom Height (motor)
Short Shaft Short Shaft Short Shaft Short or Long
Chambers (tube+keel)
3+1 3+1 5+1 5+1
Page 14
Seamax Inflatable Boat – English User Manual
- 13 -
Seamax Ocean Series Ocean290 Ocean320 Ocean380 Ocean430
Boat Length
9.5 ft / 290cm 10.5 ft / 320cm 12.5 ft / 380cm 14 ft / 430cm
Overall Width / Beam
5.0 ft / 152cm 5.0 ft / 152cm 5.5 ft / 168cm 6.2 ft / 190cm
Tube Diameter
16.3 inches/ 41.5cm 16.3 inches/ 41.5cm 17.3 inches/ 44cm 19.7 inches/ 50cm
Floor System
Sectional Sold Floor System with 0.5 inch thick aluminum panel
Boat Max Pressure
3.6 PSI 3.6 PSI 3.6 PSI 3.6 PSI
Carrying Bags
Hull & Floor Hull & Floor Hull & Floor Hull & Floor
Bench Seat
1 seat 2nd seat optional 2 seats 2 seats
Oars
1 Pair / 5.3ft 1 Pair / 5.3ft 1 Pair / 5.7ft 1 Pair / 6ft
Boat Category
D / 1.5ft wave C / 6ft wave C / 6ft wave C / 6ft wave
Page 15
Seamax Inflatable Boat – English User Manual
- 14 -
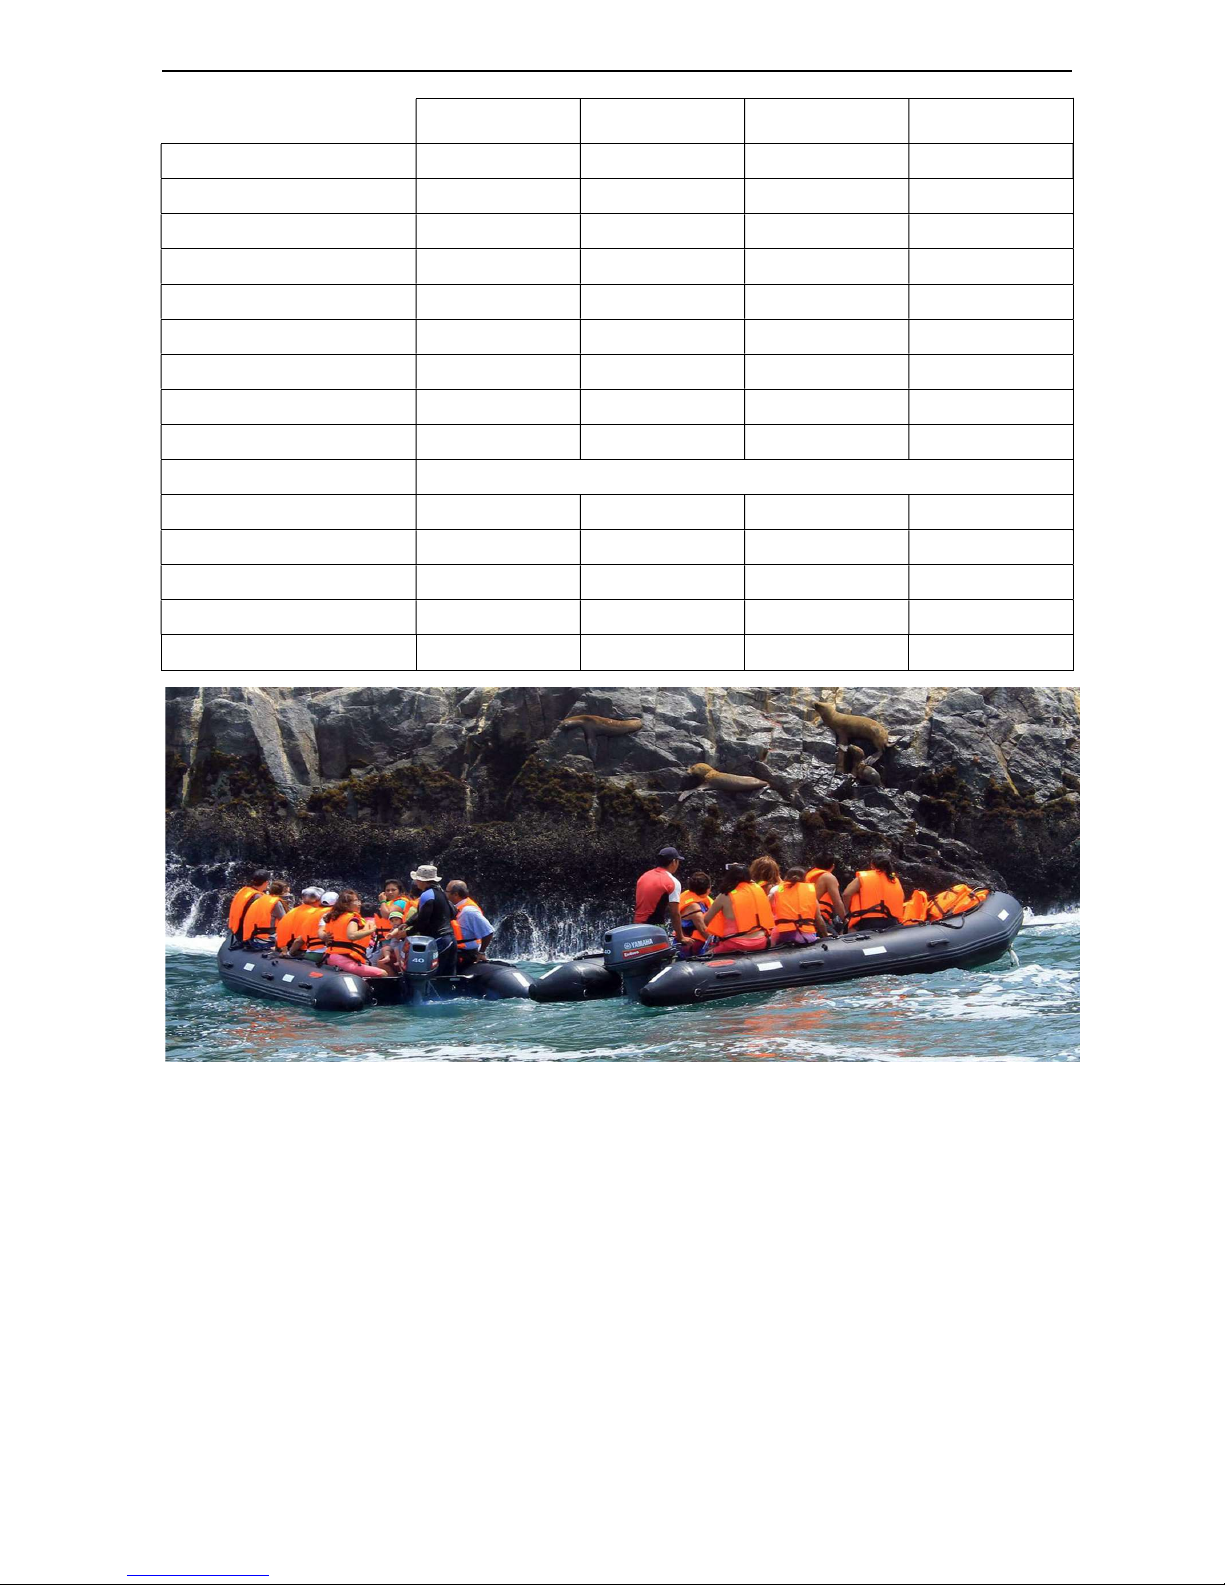
SEAMAX OCEAN-TURBO (T) SERIES
This series will deliver high quality, heavy duty and full features inflatable boats. It can meet all the requirements of an
entry level commercial inflatable boat. Ocean T series uses 1.2mm PVC for chamber and bottom, plus many special
reinforcement application applied. Ocean T series with Seamax highest standard is good for commercial use, training
purpose, rescue department, government, and military.
Commercial grade boat fabric for main construction; Four layers overlapped chamber seam structure (Feature Code:
FOS); Keel Center Inner Reinforcement (KCR); Transom Stabilizer & Reinforcement Design (TSR); Hull Stabilizer Bar
Structure (HSBS); Seamax special features also including: Dual Heavy duty life lines; Heavy duty boat bumper around
the boat and bottom; Heavy duty D-Ring & Towing Ring patches.
Page 16
Seamax Inflatable Boat – English User Manual
- 15 -
Ocean-T Series PVC Ocean380T Ocean430T Ocean470T Ocean500T
Max HP
25HP/ 18.4Kw 35HP/ 25.7Kw 40HP/ 29.4Kw 50HP/ 36.8Kw
Max Occupants
7 10 12 15
Boat Net Weight
650kg/ 1432Lbs 980kg/ 2159Lbs 1180kg/ 2599Lbs 1480kg/ 3260Lbs
Maximum Loading
525kg/ 1156lbs 750kg/ 1652lbs 900kg/ 1982lbs 1125kg/ 2478lbs
Transom Height (motor)
Short Shaft Short Shaft Short Shaft Short or Long
Chambers (tube+keel)
5+1 5+1 5+1 5+1
Boat Length
12.5 ft / 380cm 14 ft / 430cm 15.4 ft / 470cm 16.5 ft / 500cm
Overall Width / Beam
5.7 ft / 173cm 6.4 ft / 195cm 6.4 ft / 195cm 7.2 ft / 220cm
Tube Diameter
17.3 inches/ 44cm 19.7 inches/ 50cm 19.7 inches/ 50cm 22 inches/ 56cm
Floor System
Sectional Sold Floor System with 0.5 inch thick aluminum panel
Boat Max Pressure
3.6 PSI 3.6 PSI 3.6 PSI 3.6 PSI
Carrying Bags
Hull & Floor Hull & Floor Hull & Floor Hull & Floor
Bench Seat
2 seats 3rd seat optional 3rd seat optional 3rd seat optional
Oars
1 Pair / 5.7ft 1 Pair / 6ft 1 Pair / 6ft 1 Pair / 6.3ft
Boat Category
C / 6ft wave C / 6ft wave C / 6ft wave C / 6ft wave
Page 17
Seamax Inflatable Boat – English User Manual
- 16 -
SEAMAX PRO OCEAN-T HYPALON
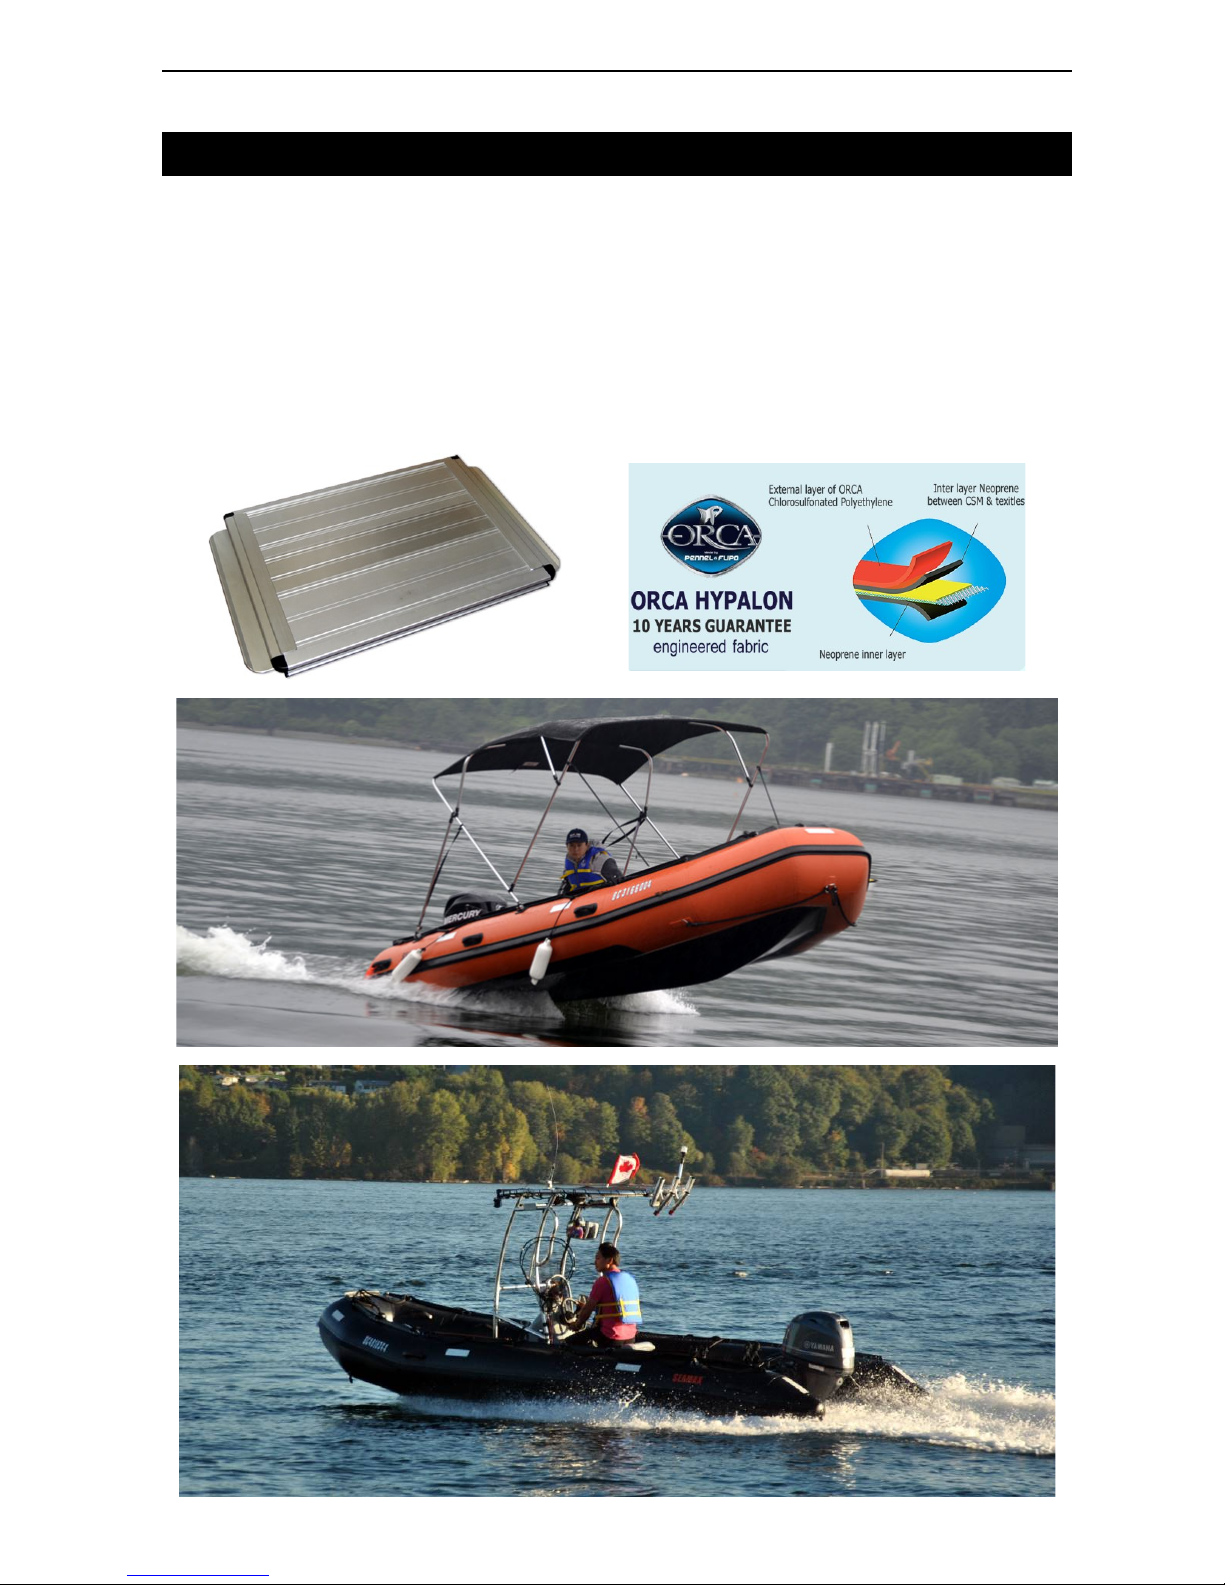
Seamax is a dedicated manufacturer of Seamax inflatable boats. The PRO Ocean-T series is our top of the line model
and is offered in Hypalon. The PRO series has a new 1 inch thick heavy duty sectional aluminum floor multi point
reflective plates on the hull for navigation at night. The Ocean Pro series is the perfect inflatable boat for military,
rescue and commercial applications. We offer this boat for up to 20ft (6 meter) model and dual motor version available.
Don’t forget this is still foldable inflatable boat, and we can ship the boat in the boxes to anywhere in the world.
Seamax can build such a great boat since we keep doing research and development in the boat industry for many
years. If you want to know more information of this line, please contact with our sales team.
Page 18
Seamax Inflatable Boat – English User Manual
- 17 -
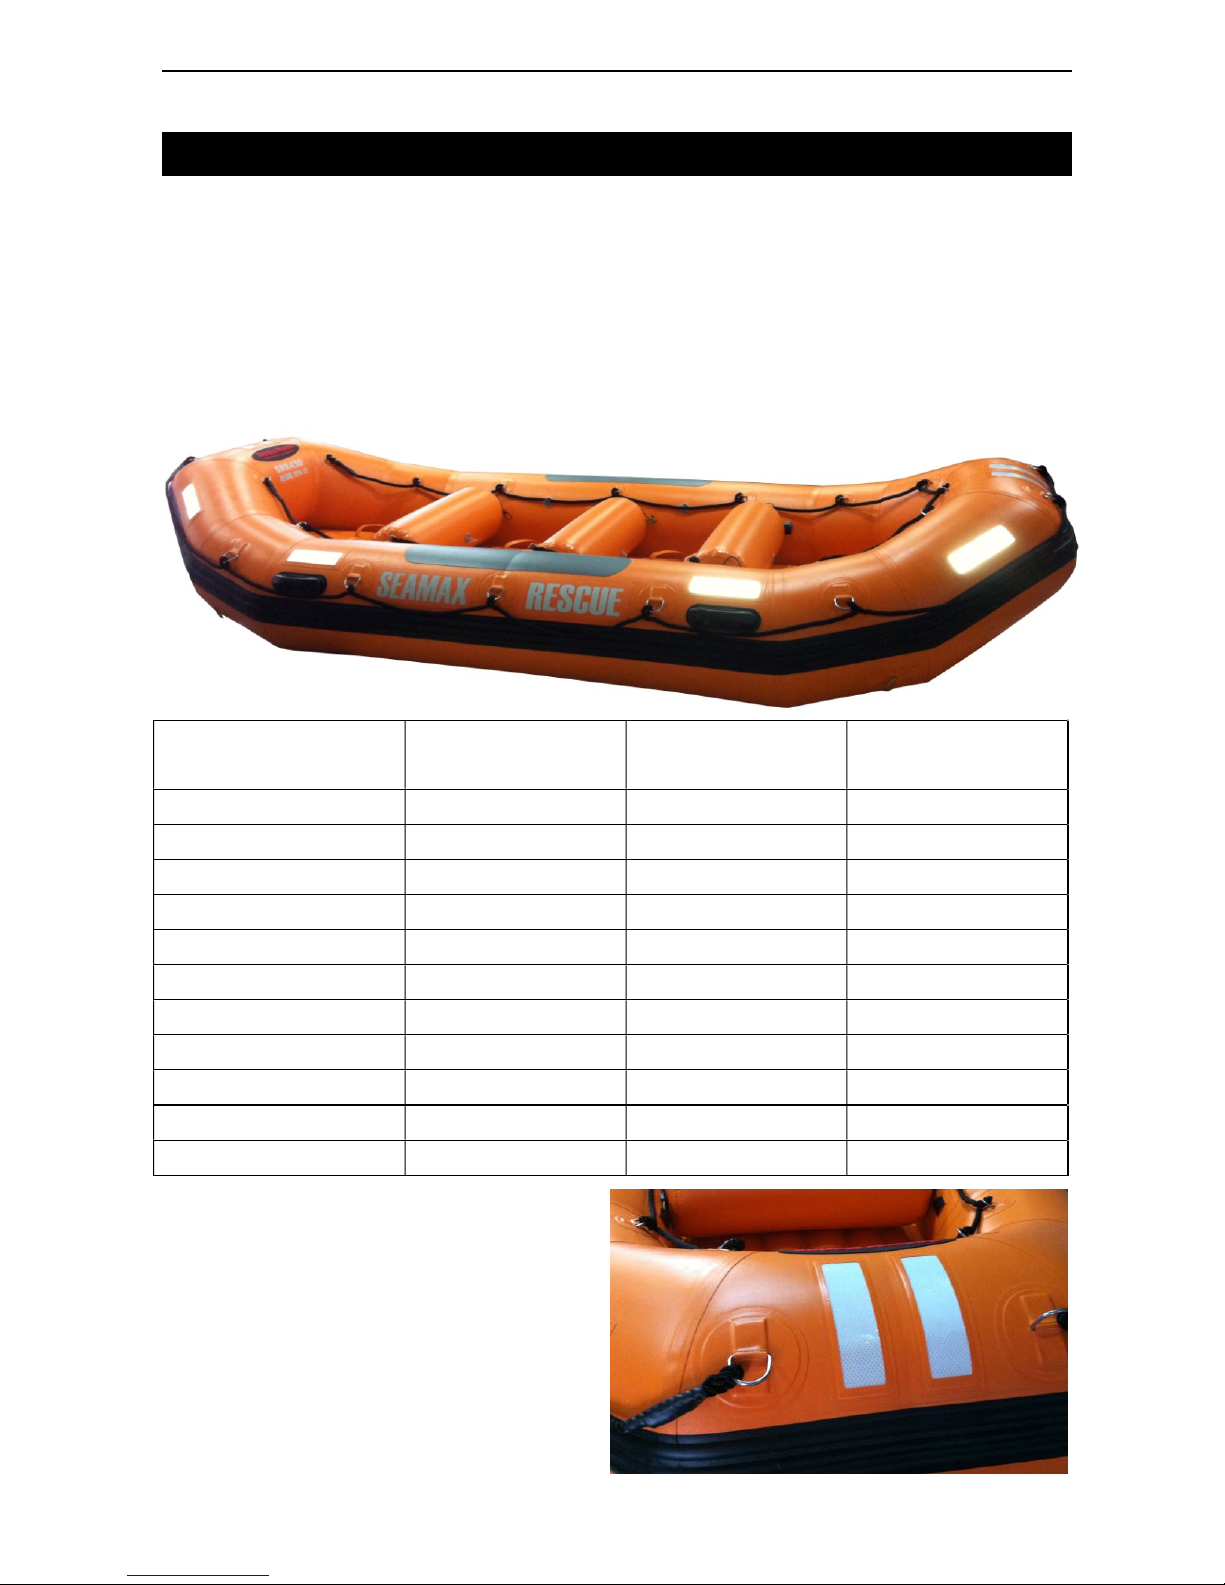
SEAMAX RIVERSTAR (SB) SERIES
River rafting is a tough sport. The rafts must be made to handle the bumps, scrapes, rocks and other challenges
unique to rafting. SEAMAX RIVERSTAR raft is fully wrapped, built tough with a heavy-duty floor, the bottom wear
patches from bow to stern, side rubbing strake, convenient, reinforced D-rings, and maintenance-free valves and
overpressure valve. The self-bailing floor, with heavily reinforced drain holes on the sides, is permanently attached so
there are no bulky ropes or time consuming lacing. The floor design consists of a heat welded, zipped-in bladder of
urethane coated nylon inside a protective pocket.
River Raft /
Rescue Raft
SB380 SB430 SRR430
(Rescue)
Net Weight
58kg/ 128Lbs 68kg/ 150Lbs 85kg/ 187bs
Maximum Load
420kg /770lbs 560kg /1232lbs 700kg /1540Lbs
Max Occupants
6 adult 8 adult 10 adult
Air Chambers
4+1+2 4+1+3 4+1+3
Chamber Pressure
Max 3.6 psi Max 3.6 psi Max 3.6 psi
Outer length
12.5ft / 380cm 14.1fg /430cm 14.1fg /430cm
Outer width
5.9ft/ 180cm 6.3ft/ 192cm 6.5ft/ 198cm
Tube diameter
17.3 inches/ 44cm 19.7 inches/ 50cm 19.7 inches/ 50cm
Inflatable thwart
2 piece 3 pieces 3 pieces
Reflective Tape
N/a N/a 8 piece
Oars
6 pieces 6 pieces 12 units
Seamax 14ft River Raft (SRR430) Rescue
Seamax Rescue raft is our special version only
available in 14ft model. It is designed to carry heavy
weight and person. The raft can be towed after the
power boat. It is built with heavy duty orange color
fabric. The raft has total 8 chambers, hot welded
seam, reflective tapes, dual life line and many more.
Page 19
Seamax Inflatable Boat – English User Manual
- 18 -
5. BOAT Assemble
UNPACKING
To protect the boat and its accessories - Never use a sharp knife to open the boxes.
Work with a helper to move the boat from the boxes. Don’t drag the packages on the
ground.
Remove all components from the boxes. Before you unfold the boat, take a good look at how the boat is folded
together. Unfold the boat on a flat surface. Take the floor boards out along with the side joiners. Inspect and check if all
the components are in new condition and not damaged in anyway such as: valves, plywood seat, foot pump, oars,
aluminum side joiners, floor boards, repair kit and carrying-bag. Inspect and familiarize yourself with all the
components and the safety features of your new inflatable boat. Knowing the functions of all the components of your
boat is very important. Not only for safety reasons but to assist in any questions or concerns you may have.
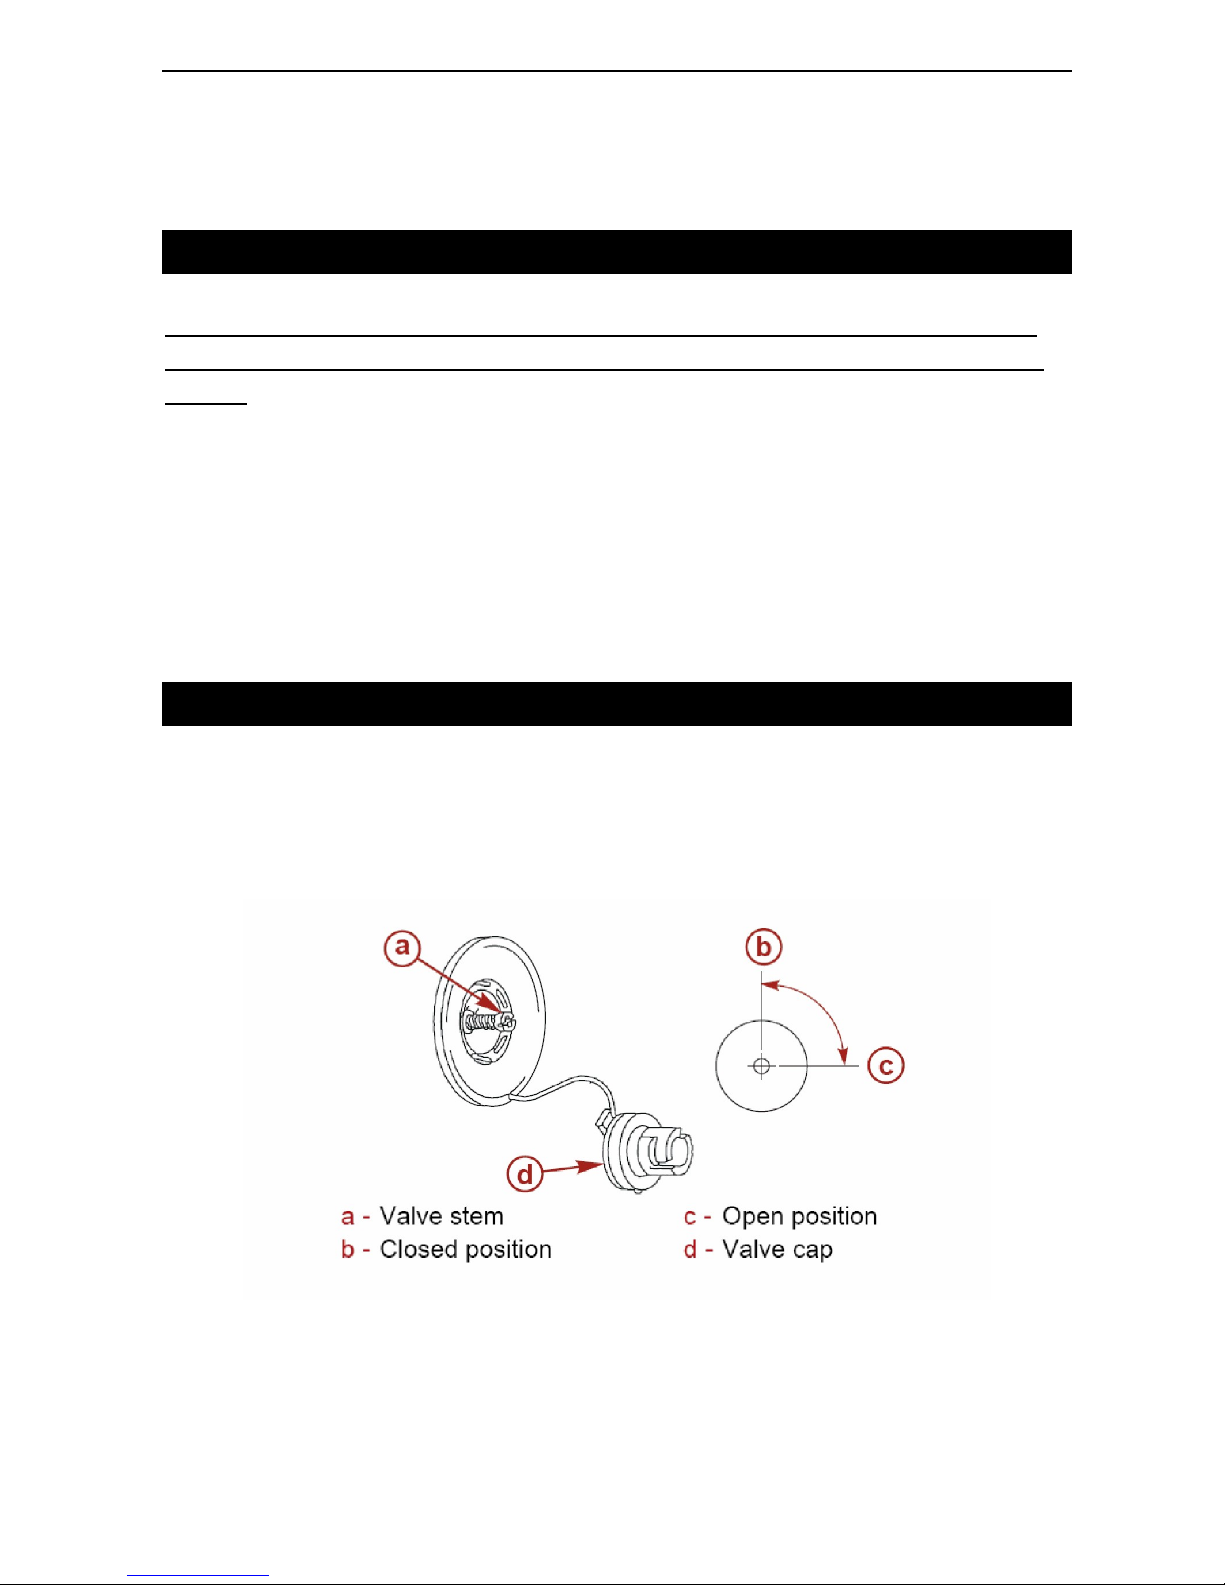
AIR VALVES
All air valves are preassembled and tested for leaks. To fill, remove the front cap and insert pump-hose twist to lock.
Ensure that the air valve is in the inflate position. You will notice that there is a 2-position valve stem. Push or Push
and twist for the inflate position. Repeat the opposite direction for the deflate position. Each SEAMAX inflatable boat
comes with a spare valve and valve wrench.
When the boat is new from the box, all the air valves are at OPEN position. Close the valve before you connect it to
the air pump. So the chamber can hold the air after the pump hose disconnected. If you forgot to turn the valve to
CLOSED position, then it may waste your time to inflate the boat again. When you inflate the boat after it assembled,
you should start with the rear pontoon chamber on each side, then the 2 middle chambers (if available), and front (bow)
chamber. Keel chamber is the latest. (Pontoon & Keel chambers between 2-3 PSI is the normal working pressure for
Page 20
Seamax Inflatable Boat – English User Manual
- 19 -
an inflatable boat. Max to give 3.6 PSI)
Double check all valves and make sure they are all in good condition. You can also use the included valve wrench to
ensure all the valves are seated tightly against the floor material. To ensure that the valves are in the correct position,
push in and twist the valve stem to the up position. To confirm it, use the foot pump to pump some air in the floor and
then remove hose. If the valve stem is in the correct position the air will not escape. If it does, push down valve stem
and twist until valve stem pops up.
Locate the foot pump and familiarize yourself with the operation and installation of the air hose into the side chamber
air valves. Inflate the side chambers to about 20% of capacity. This is done to pull the floor fabric away from the side
chambers and makes the floor installation much easier.
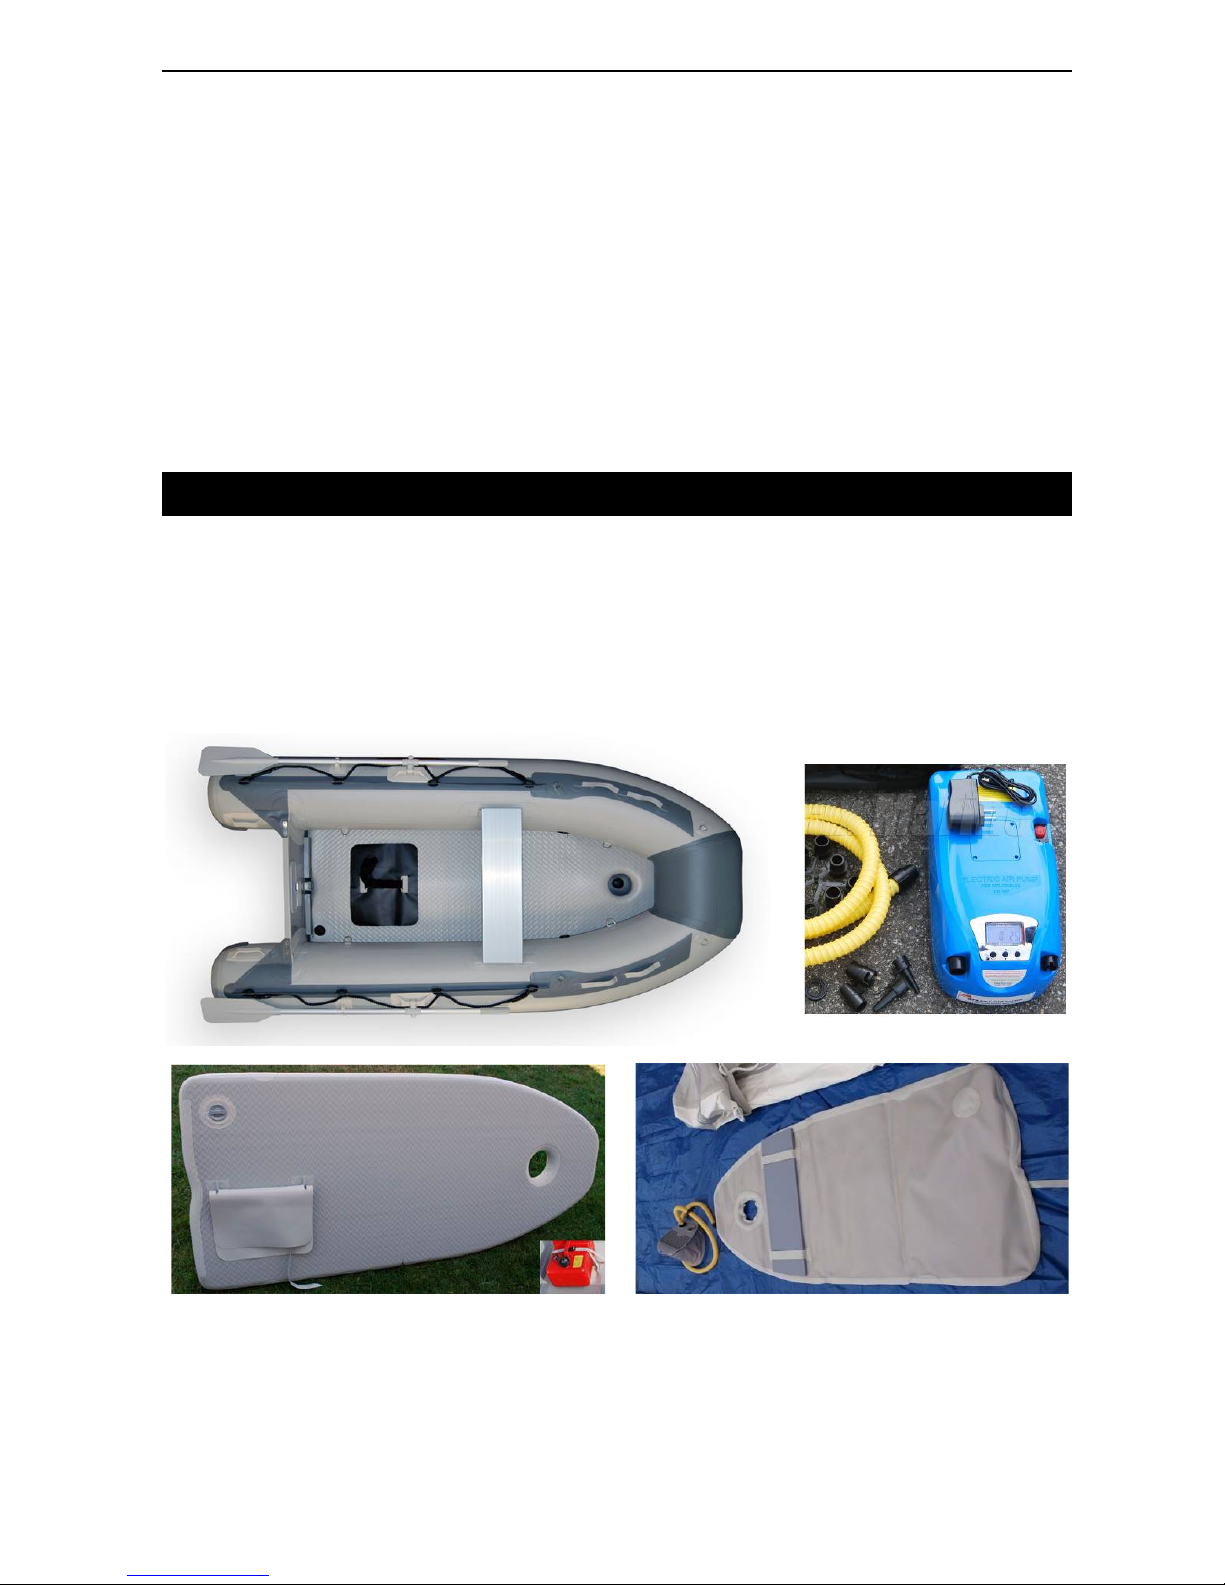
BOAT ASSEMBLE - AIRMAT FLOOR MODEL
The air floor is designed to be light weight and easy installation. Its design allows the floor to remain in the boat and be
deflated and folded up with the rest of the boat. Seamax air mat floors are specially designed using two layers of fabric
held together by thousands of polyester cross threads. Inflating this type of fabric with high pressure air provides a
very rigid yet light weight floor. This provides the versatility of a tradition hard floor with the ease of installation. We
suggest the Seamax 12V electric air pump to work with the boat (80D or 80DB Blue Version).
AIRMAT FLOOR WITH GAS TANK PAD
PLYWOOD SUPPORT AT THE BACK
Unfold the floor on a clean flat surface free of any sharp objects that could damage the air mat. Check over to make
sure there is no defect. Lay the floor flat and ensure that all valves are snug, and the air valve is in the closed position.
Install plywood slat in holder (under the 2 strap). This is to provide the support to push the inflatable keel down and
form a deep V-shape keel under the boat.
Page 21
Seamax Inflatable Boat – English User Manual
- 20 -
Inflate the floor with provided foot pump. Once inflated, inspect and become familiar with the design and how it will fit
in the boat. Once you are familiar with the floor, deflate (push the valve stem in and twist) the air mat. Take the air
series boat and lay it on a clean flat surface, pump the boat air champers to about 50% of its capacity. This will pull the
fabric away from the inner sides of the boat chambers to make installing the air mat much easier. Install the air mat
with plywood support in the boat. Make sure that the hole in the front lines up with the valve on the inflatable keel. After
installing the airmat in the boat, continue inflating the boat chambers. Once that is done, inflate the air mat floor. You
can double check its positioning as you go along by pushing down on the edges of the floor when you inflate it. When
the airmat is inflated and in the proper position, inflate the keel. The plywood support will force the keel down to
provide a deep V on the bottom of the boat. It will provide added stability in the water.
You can inflate and deflate the boat and air mat floor together and roll up as one piece. Wash and clean the sands and
dirt from the air mat floor after each use to avoid sands or dirt from getting inside and damaging the air valve. Always
inflate the keel chamber only after you have inflated all other chambers of the boat and floor. The first time when you
install the airmat floor and inflate the boat may take up to 60 minutes to complete. The given pressure of each
chamber can see the list below:
Tube air chambers – Max 3.6PSI / 25kPa, Suggested 2-3 PSI base on the temperature.
Inflatable Keel chamber – Max 5.0 PSI / 35kPa, Suggested 2-3 PSI base on the temperature.
Airmat floor chamber – Max 10 PSI / 70 kPa. Suggested 6-8 PSI base on the temperature.
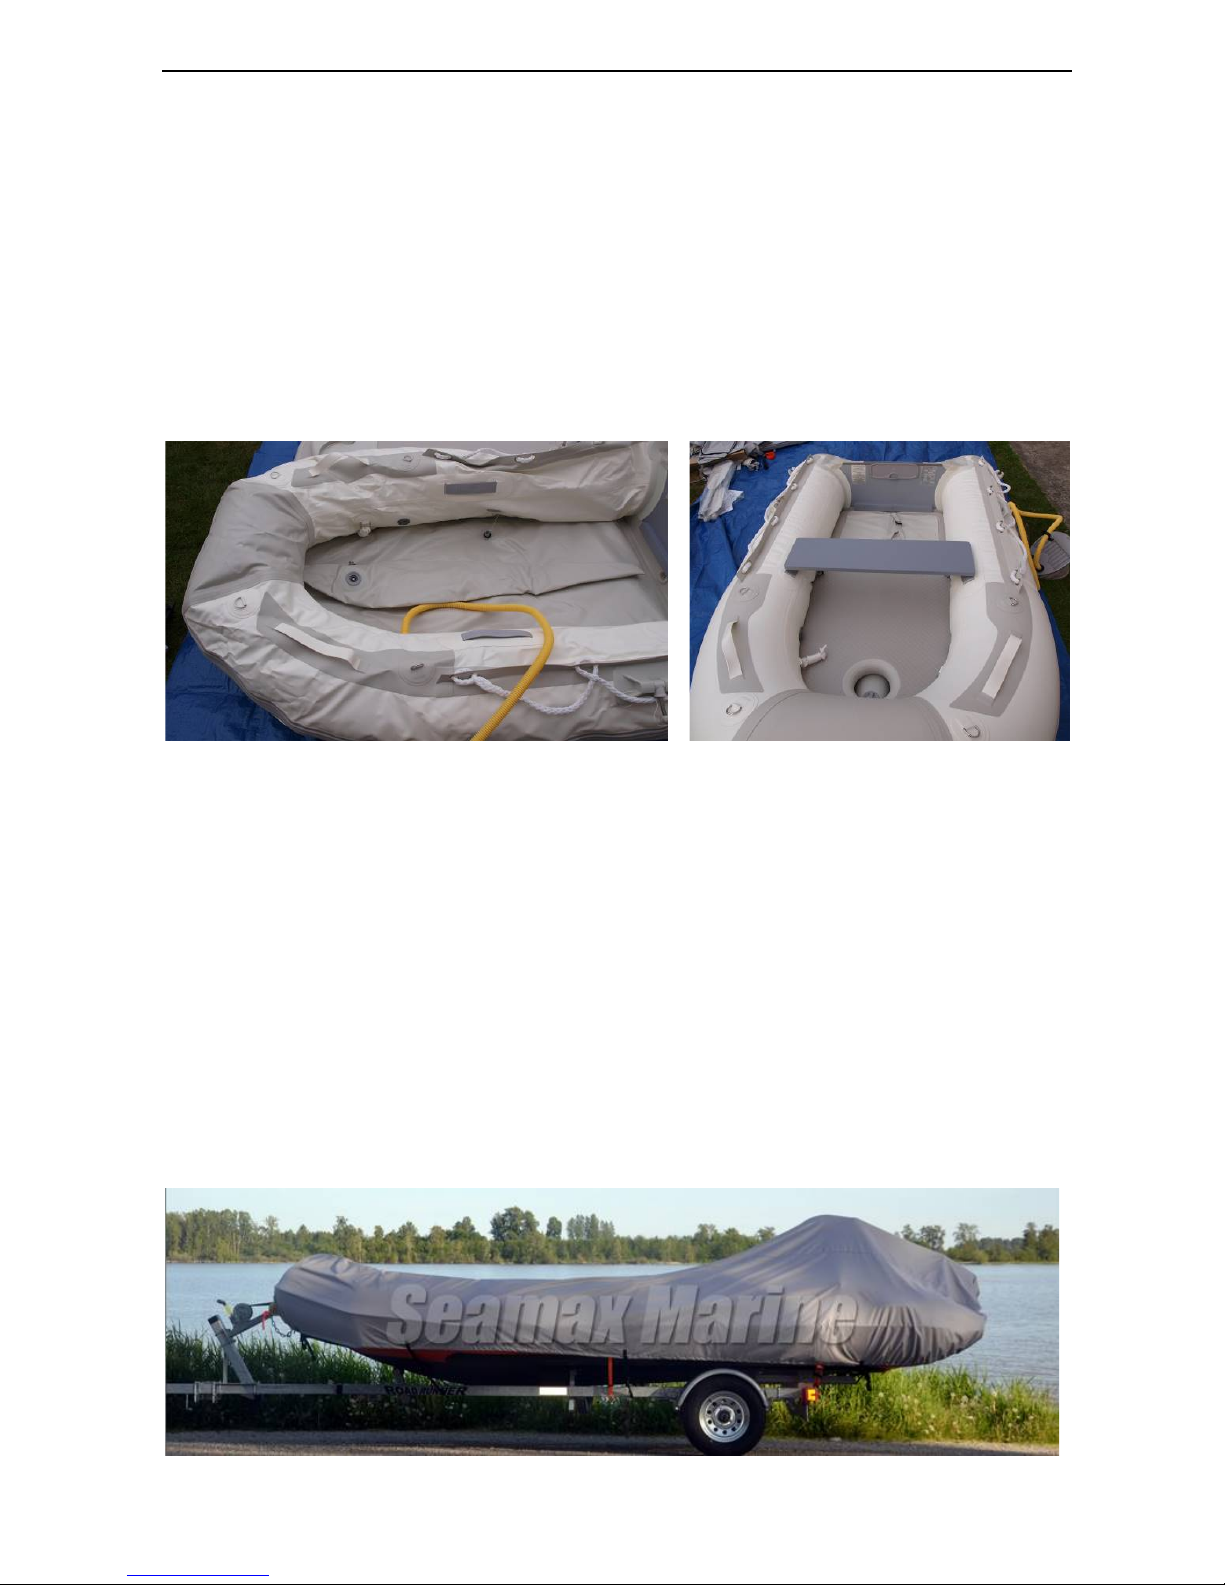
If you use the boat as the tender on your sail boat or power boat, please make sure you can follow the boat user
manual and your best knowledge to take good care the boat. We suggest using a Seamax boat cover to protect the
boat against UV and Heat. We also suggest Aurora Marine boat care products.
Page 22
Seamax Inflatable Boat – English User Manual
- 21 -
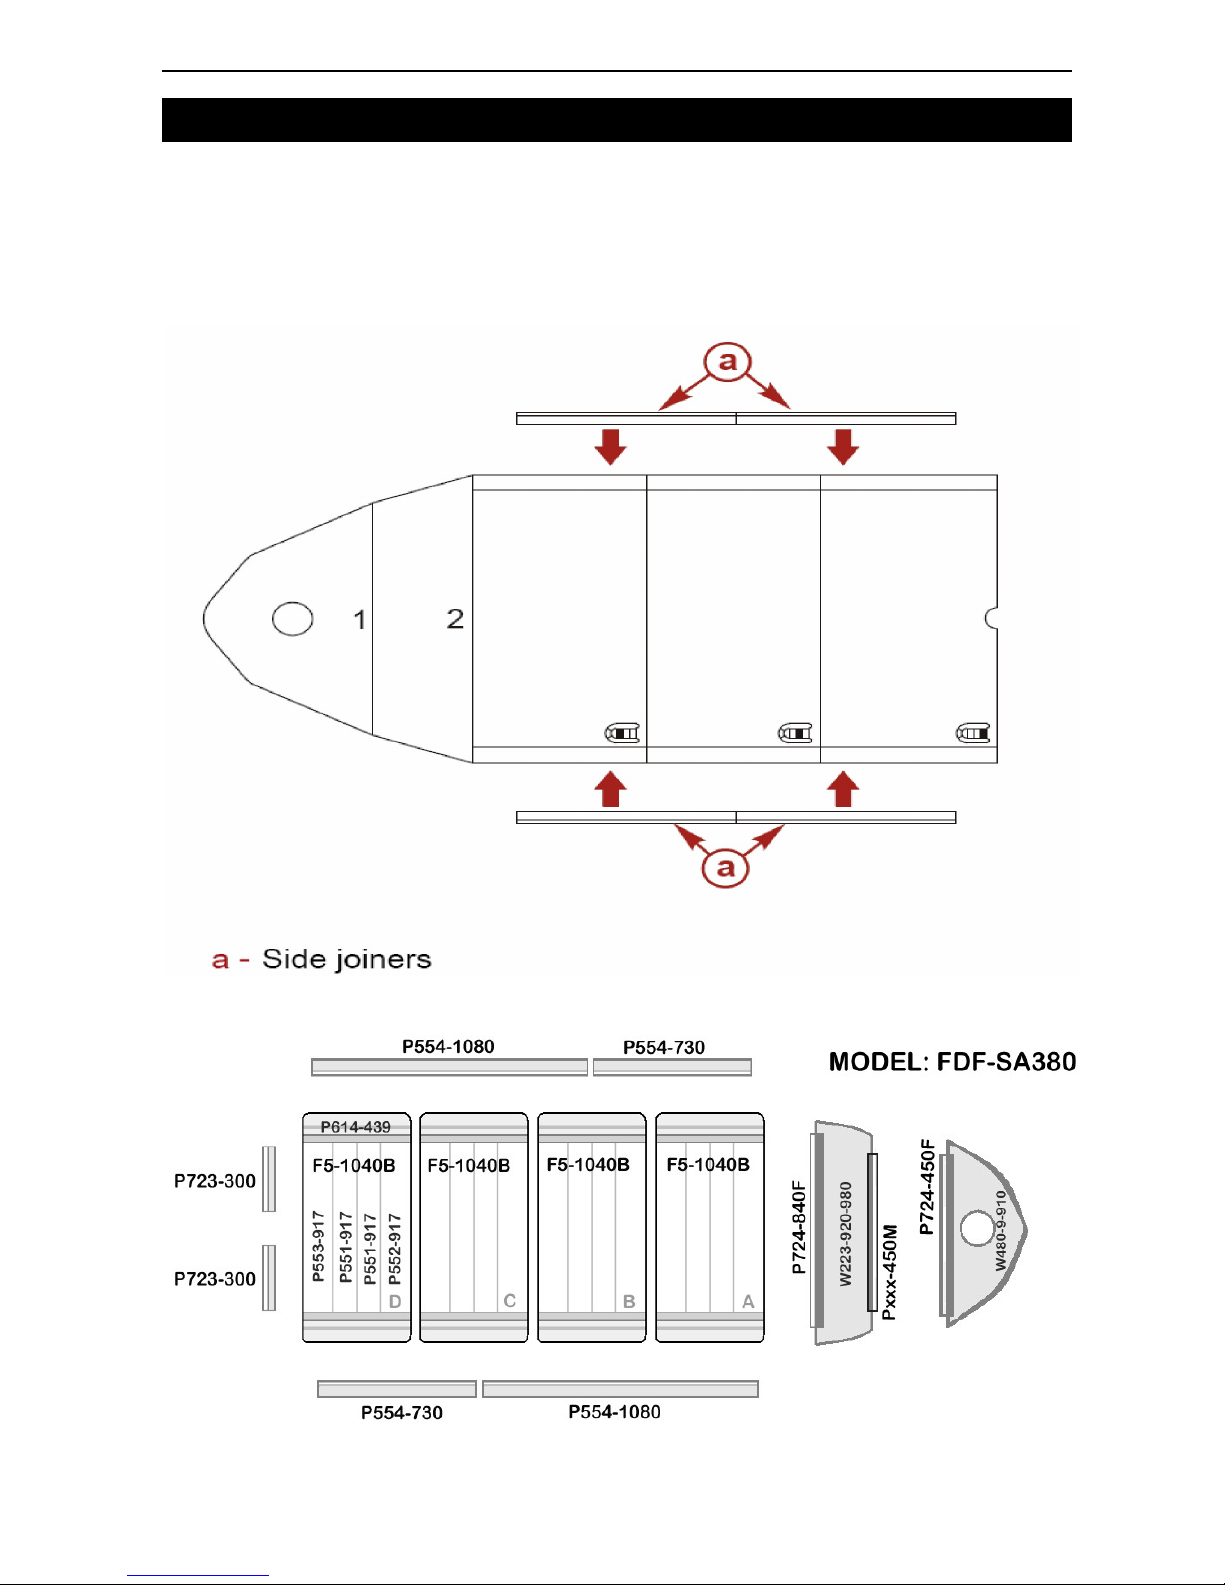
BOAT ASSEMBLE - ALUMINUM FLOOR MODEL
The floor boards included with each series will vary according to the size of the boat .The floor boards must be
installed into the boat before the boat is fully inflated. Make sure you place the floorboards in the boat in numerical
order. 1 fits into 2, 2 fits into 3, 3 fits into 4 (if required) 4 fits into 5 etc. Base on different boat models, the number of
floorboards and side joiners’ combination will be different.
Below is the assembly photo of Ocean380 floor system. (P723-300 had been installed on the transom)
Page 23

Seamax Inflatable Boat – English User Manual
- 22 -
If it is your 1st time to assemble the boat, it is very important to read through this instruction.
The floorboard system is very important for a Sport Inflatable Boat. You should not miss any parts in your boat
assembling. After your boat fully assembled and inflated, the created structure will be super solid. You can put on your
big outboard motor to reach fast speed, carry the entire passenger on the boat to have a nice time together, load all
the gears to fishing or do your boating trip.
With each boat there are 2 to 6 side-joiners which you have to install on the sides of the floorboards. These joiners
lock the floor in place to form a very stable platform for the boat.
You may notice that the first couple of times when you install the floorboards are a little difficult. This is normal. After
using the boat for a while, the fabric materials may be slightly stretched. Once the boat is inflated and deflated for a
few times, the installation of the floor board will become easier.
Knowing the following tips could help your boat assembling faster and easier:
Pump up the boat – boat had been folded in the box for a while. Pump up all the pontoon chambers to let the
boat material expanded. And then you can deflate the chambers to start the assembling.
Use a 12V electric air pump – when assembling the floorboards, the related chamber(s) air capacity may need
to be adjusted right for certain steps. You can inflate or deflate certain chamber(s) to reach the best position. A
12V electric air pump will help your job much faster and easier.
Soapy water – Boat is designed as right fit with the floorboard system. A new boat could be tighter at the
beginning. Soap water helps smooth the floorboards and side joiners getting in placed easier and faster. Spray
the soap water on the chamber fabric, floorboard edges and side joiners. So they will not be that easy to jam
together. You may save lots of time and labor when you have a spray bottle filled with 5% soapy water handy.
Bottom support – When placing the side joiners, the space along the boat inner edge is very tight since the
floorboards are already in. You can have one aluminum oars or an 8ft 2x4 wood lumber placed below the boat
and along the pontoon as a temporary support. The end part of this temporary supporting material must be over
the transom a few inches. This additional support can lift up the boat edge for few inches, so you can have more
room to insert the side joiners. Also, this additional support can form all floorboards in a fairly straight line and
helps the side joiners to be locked in.
ASSEMBLE STEPS
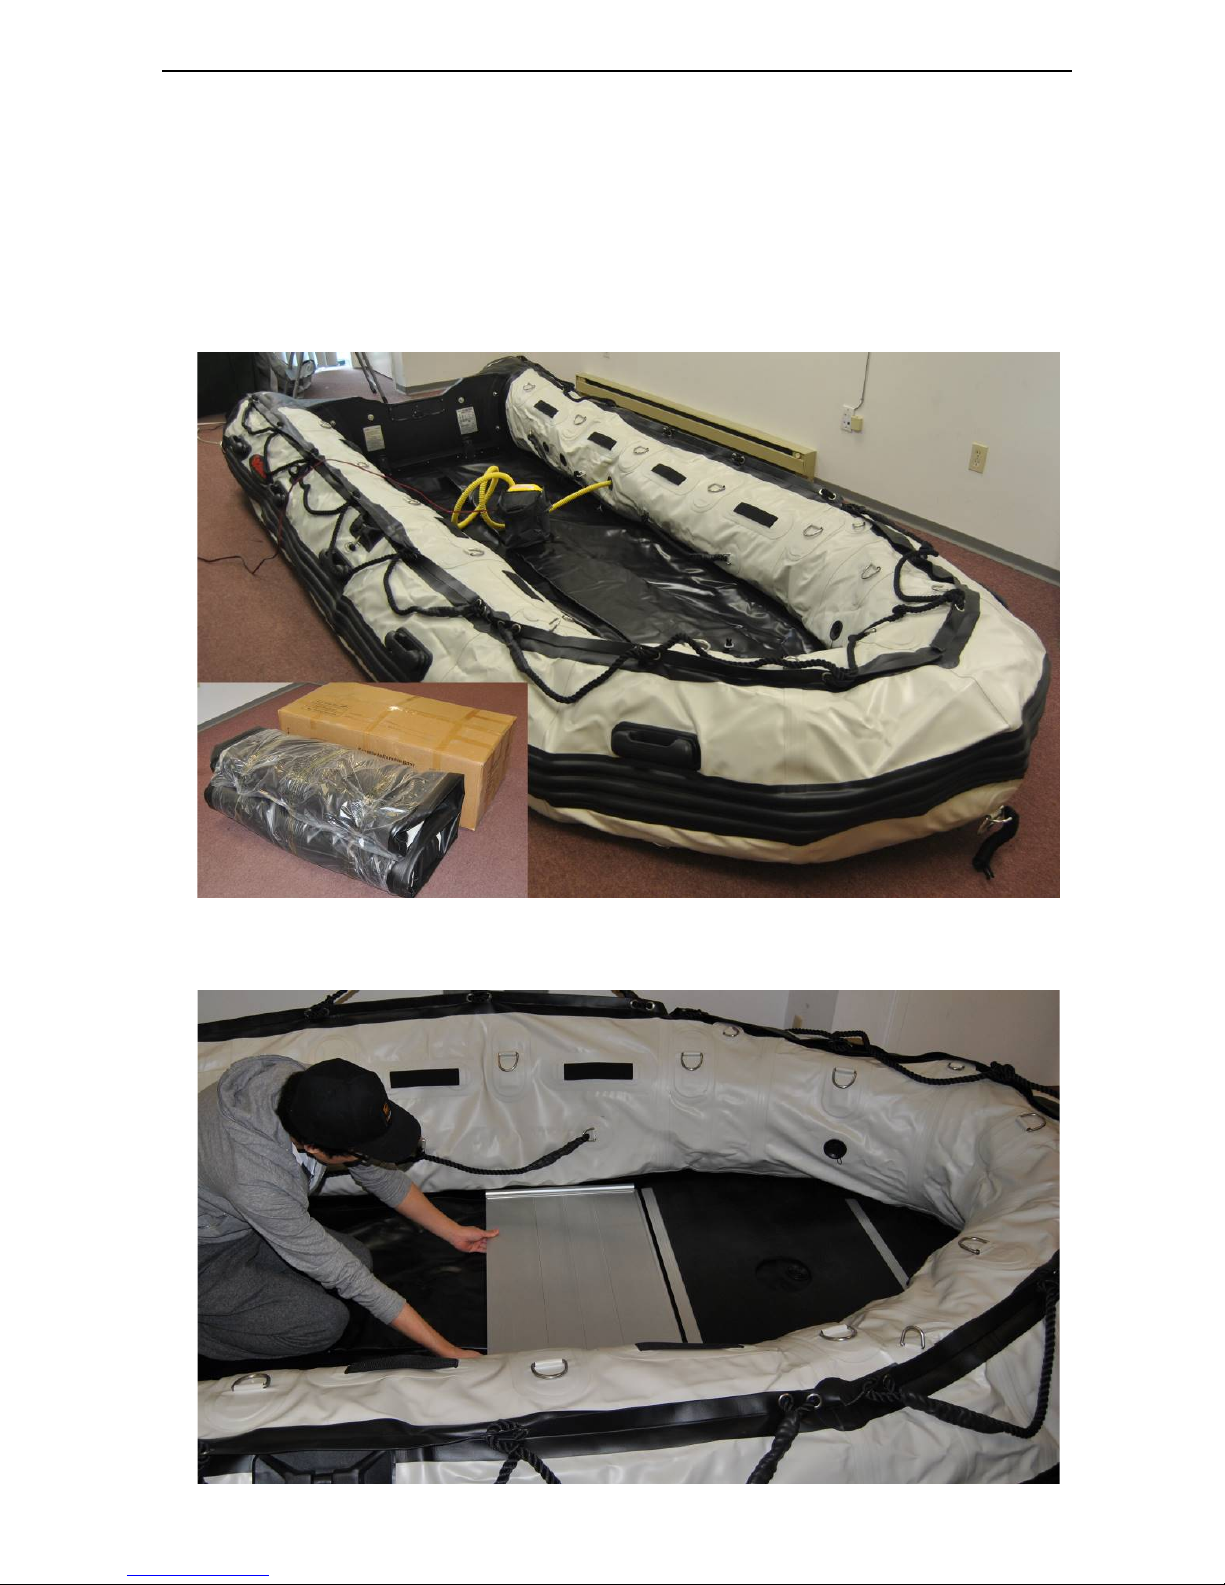
1. Clear a flat surface that is clean and free of sharp objects. Unfold the boat and spread it out flat.
2. Start with the front plywood floorboard(s); Slide it into the bow, push this as far in the nose as possible or until the
valve base of the keel is in the middle of the opening in the front floorboard. Put the next plywood floorboard after
the front floorboard
3. Place the rear floorboard (the highest number on the board); push this one as far as possible under the transom.
To bend the transom a little bit can help the floorboard going underneath of the blocker.
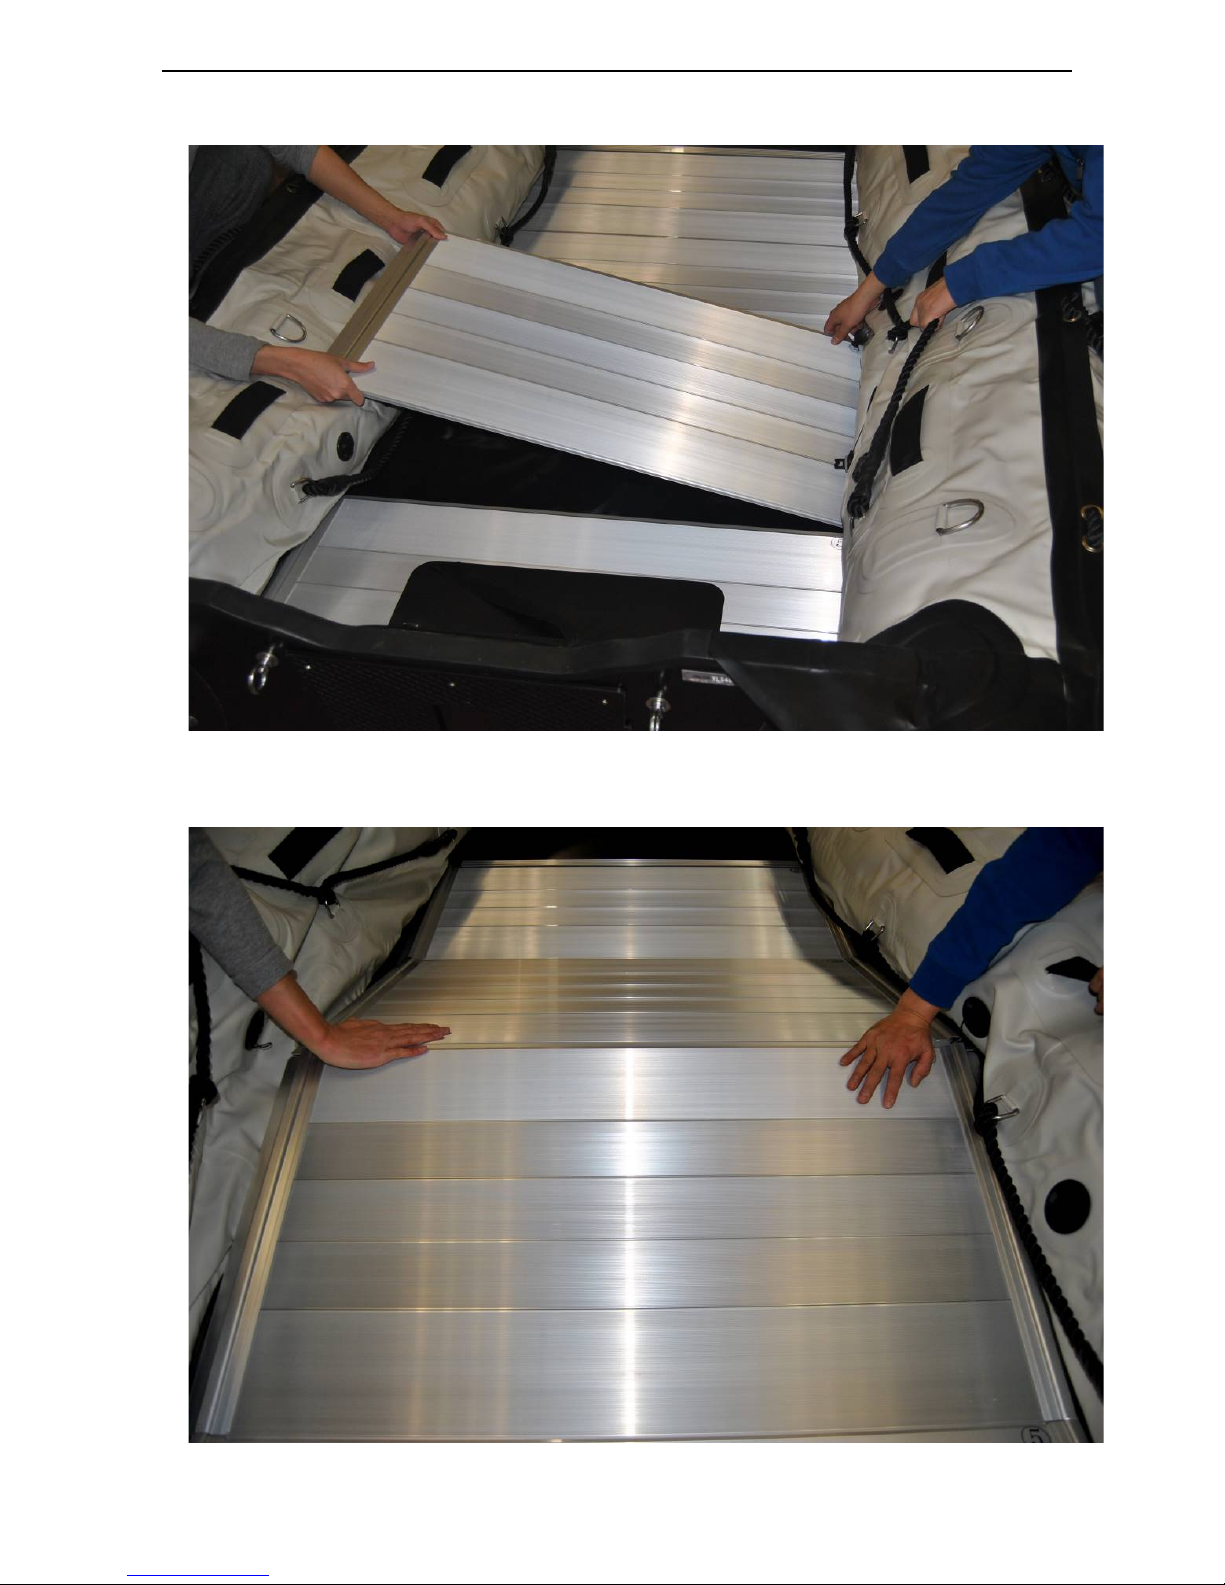
4. Fit the remaining floorboards together one by one. Finally, the 2 middle aluminum floorboards are forming an
inverted V shape. Align the side edges of the floorboards so they are straight, and then push down slowly on the
V‑joint to flatten the floorboards.
Page 24
Seamax Inflatable Boat – English User Manual
- 23 -
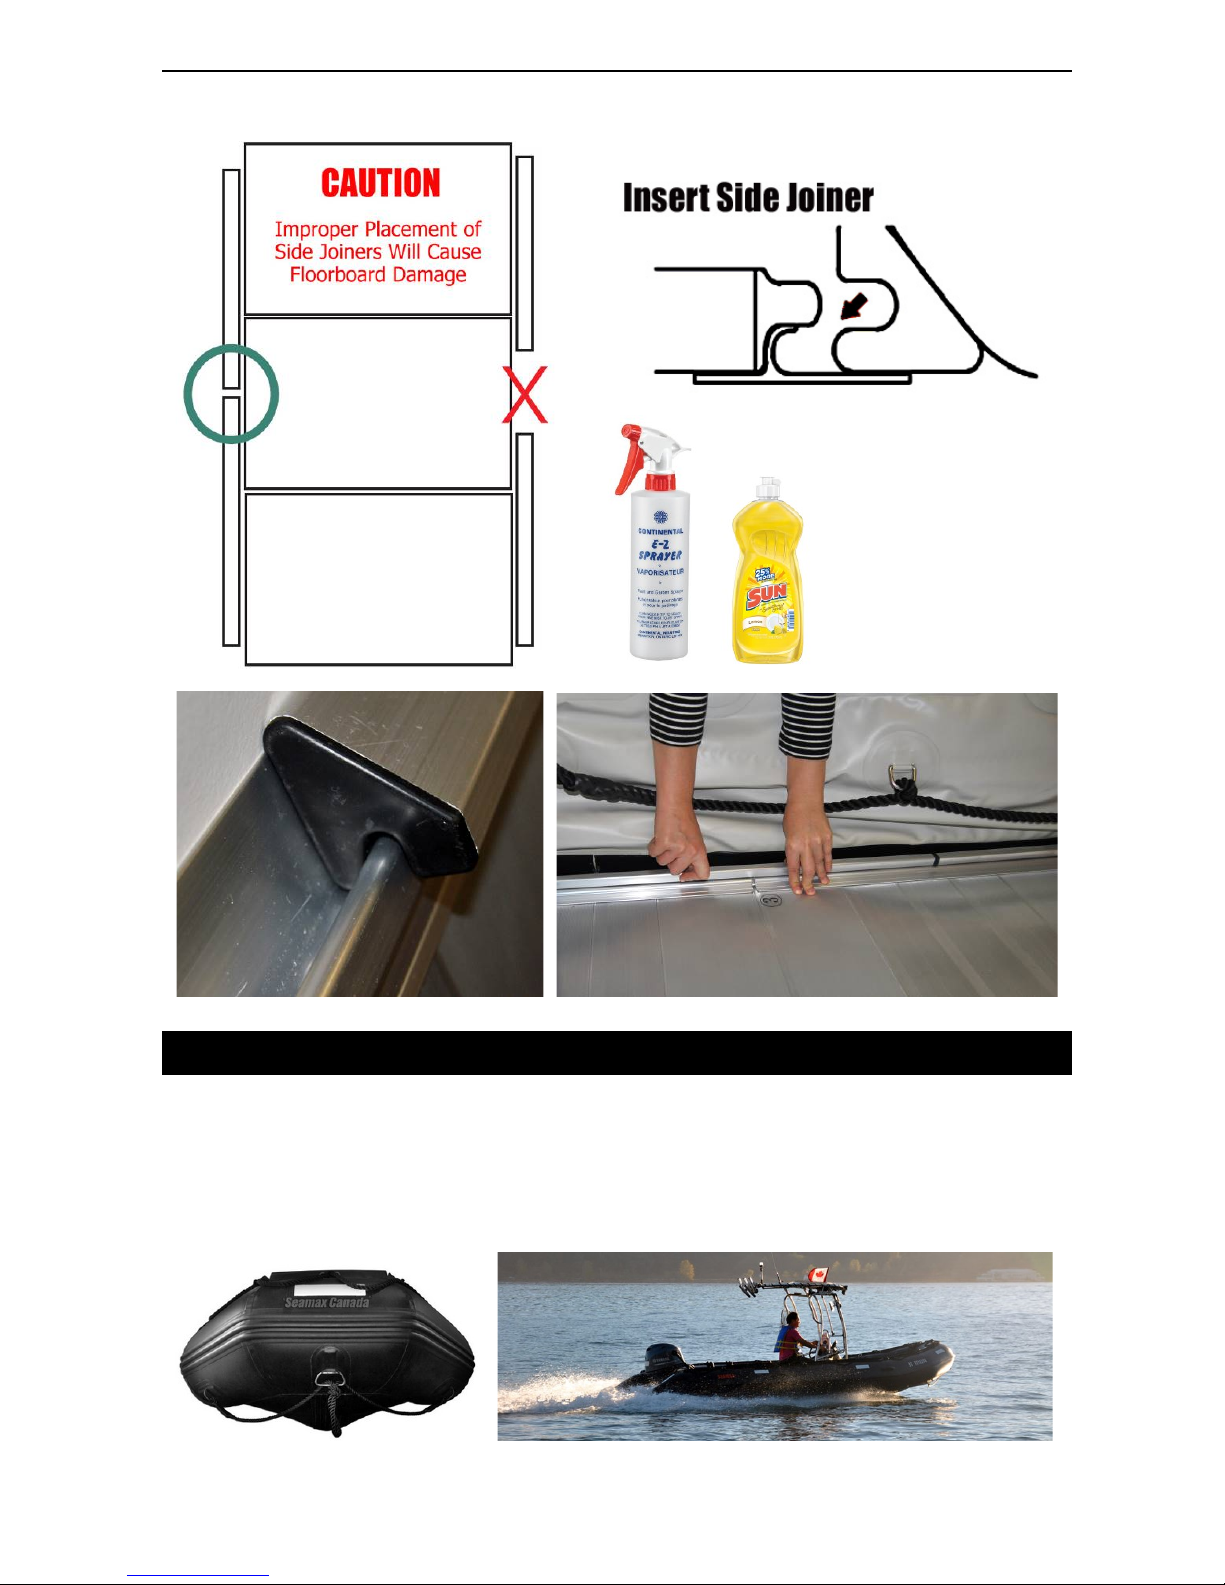
5. Attach the side joiner onto each side of floorboards within the recessed floor portion. (The floorboards are
strengthened with the side joiners installed on the floorboards. Position these side joiners: 4-6 inches from
transom, remain no gap in between each 2 side joiners).
6. Fully inflatable the pontoon chambers starting from the 2 rear chambers. The 2 rear chambers should contain the
air as their max capacity, since those 2 chambers will support the transom also. Keel chamber is the last
chamber to be inflated.
Step 1 – Open the Boat
Step 2 – Get the Floorboards in Placed
Page 25
Seamax Inflatable Boat – English User Manual
- 24 -
Step 3 – Two Middle Floorboards Forming an Inverted V Shape
Step 4 – Push Down Slowly On the V Joint to Flatten the Floorboards
NOTE: Slowly operate! Make sure the boat fabric won’t jam with floor board when pushing down.
Page 26
Seamax Inflatable Boat – English User Manual
- 25 -
Step 5 – Install the Side Joiners and Inflate the Boat
NOTE
Don’t forget to spray soapy
water and place bottom
support bar when install the
side joiners. It will make it
much easier (More
Instruction - Page 20)
ABOUT THE V HULL
Seamax Inflatable Boat are all built with V Bottom and it can called V-Hull. V-Hull consists of a separate longitudinal
inflation tube keel located beneath the floorboards. Once this keel chamber inflated, it provides a moderate V-keel at
the bow of the boats by pushing the fabric floor down and away from the floorboards. Handling and performance is
greatly improved as the keel cuts through the water cleanly. An added benefit is the extra buoyancy and flotation.
Page 27
Seamax Inflatable Boat – English User Manual
- 26 -
IMPORTANT NOTE OF BOAT INFLATION:
Best not inflate or deflate one air chamber at a time. When inflating or deflating, maintain a balanced air pressure
between air chambers to prevent stress or potential damage to the inside diaphragms that separate the air
chambers.
Do not use any type of air compressor to inflate the boat.
Install the removable seat before the boat is fully inflated. Hook the flanges that are located on the bottom of the
seat into the nylon straps on the side air chambers.
Do not inflate the keel until floorboards are installed.
Start by inflating both side chambers. Then inflate the nose. After you have inflated these 3 or 5 compartments
you can start inflating the keel.
Remember that air temperature and direct sunlight can have an effect on the air pressure for up to 2 PSI when in
a cold morning and hot afternoon.
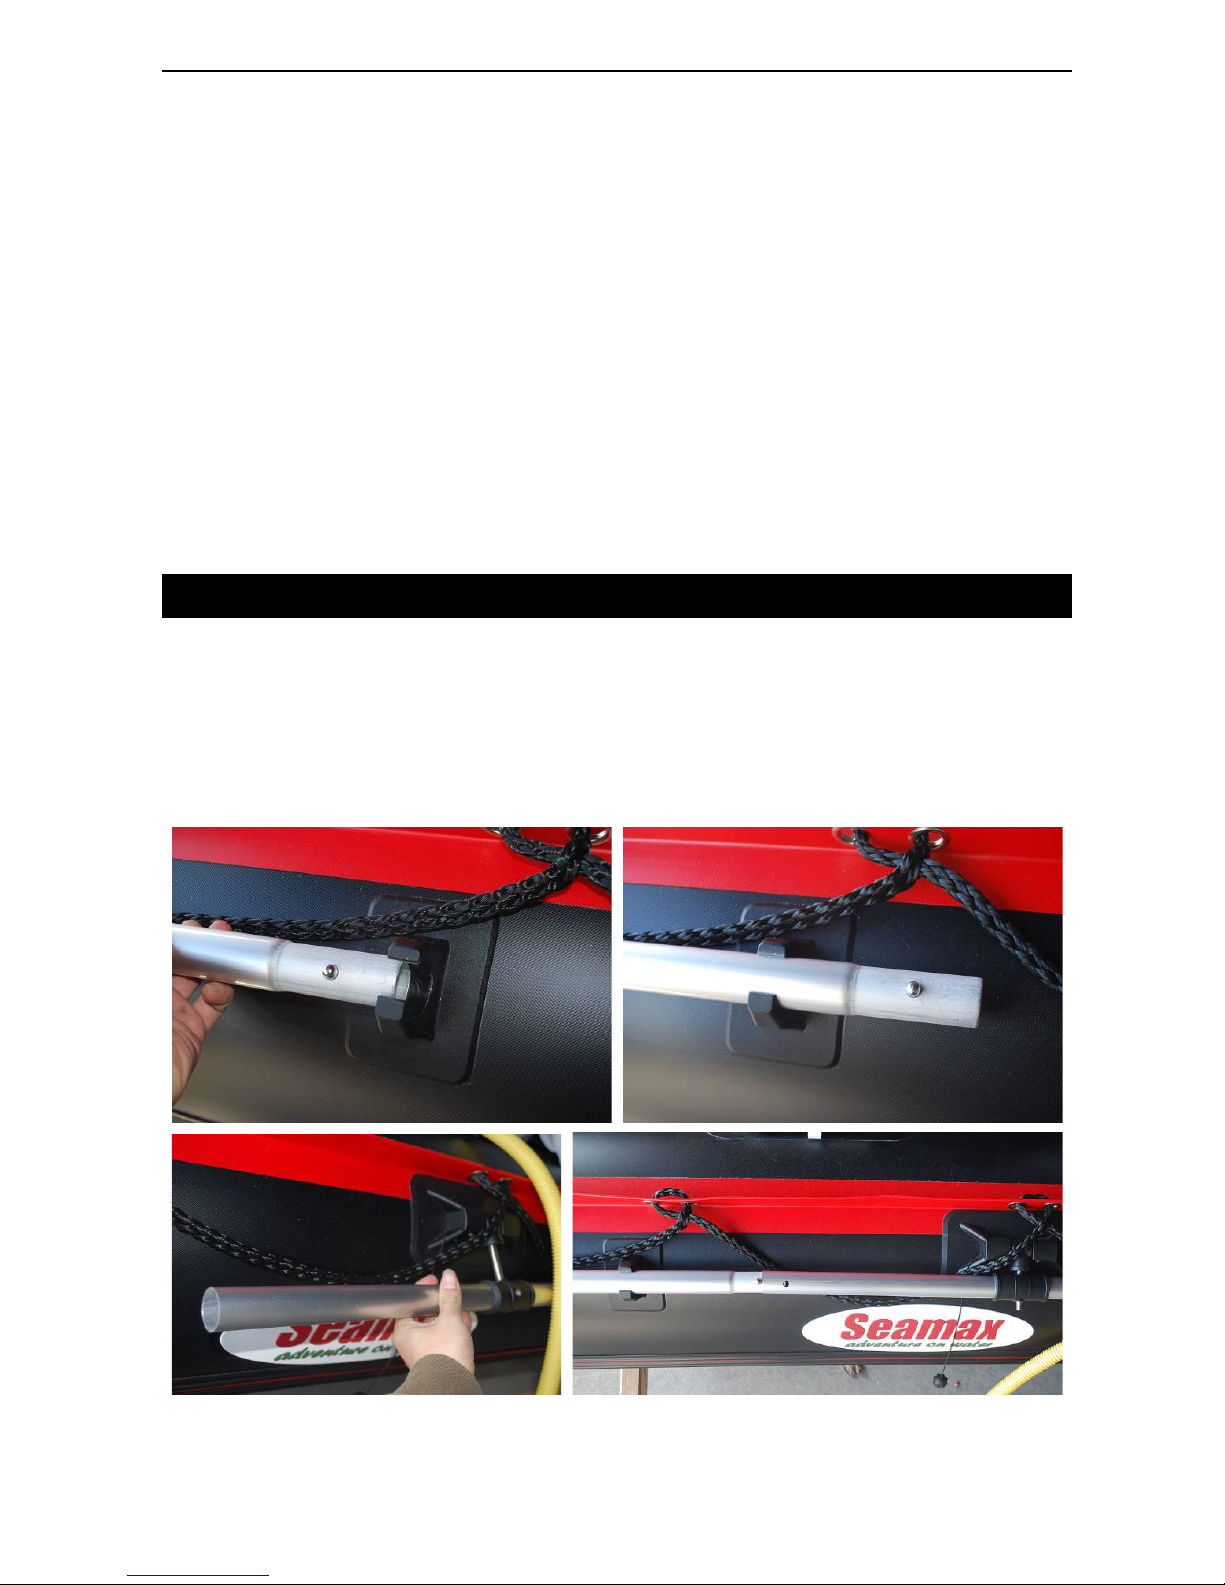
OARS SETUP
1. First Insert the oar piece in to the oar holder since new holder may be tight.
2. Put the rear piece into the oar lock stick. Join two pieces together, click the oar click in.
3. If it is not fitting well, switch over to other piece to try again.
4. Screw up the oar lock cap, finished & ready for use.
OAR SPEC - Two pieces oar, Blade piece & Handle piece; 5.3FT & 5.8FT Assembled Length; Oar handle diameter:
1 ¼ inch; Oar lock hole diameter: 3/8 inch.
Page 28
Seamax Inflatable Boat – English User Manual
- 27 -
6. BOATING
DRAIN VALVE
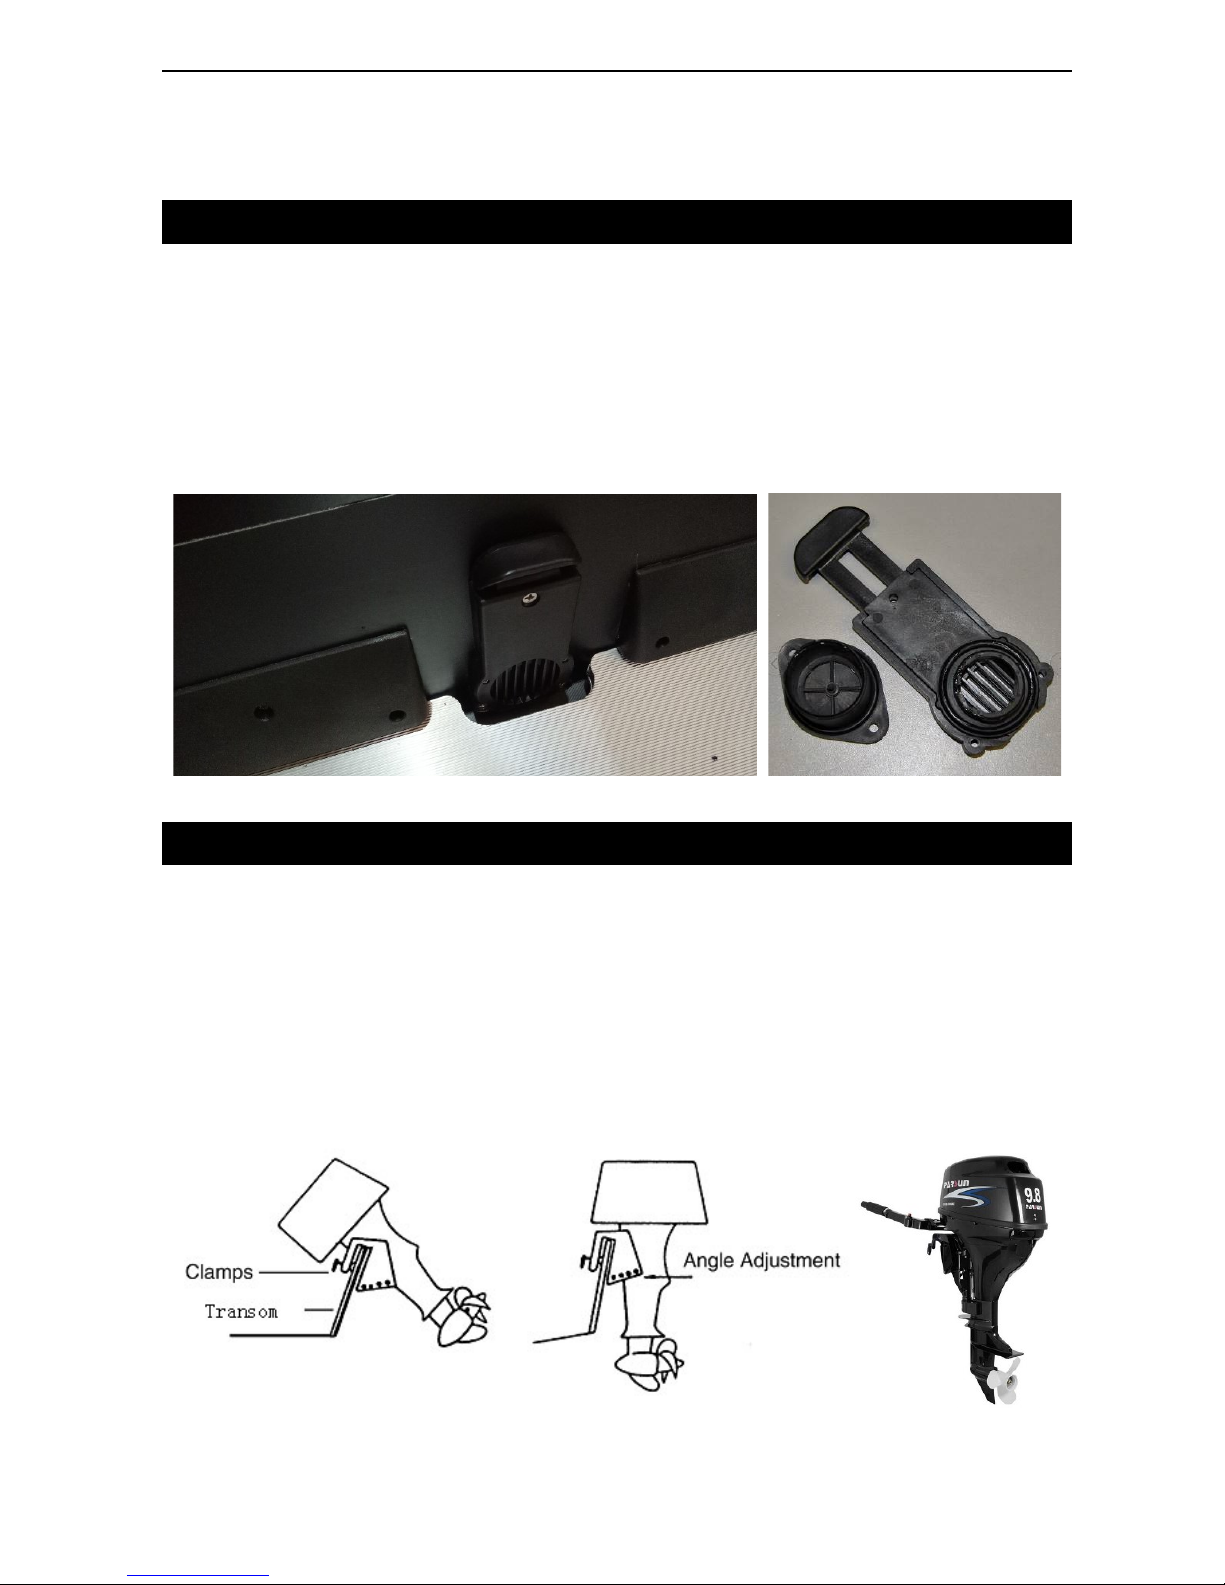
SEAMAX inflatable boats come with two styles of self draining system. To test the valve, while in a forward motion
remove the plug from the drain and the water will automatically run out. The inner diaphragm will prevent water from
returning. After the water has been drained, replace the plug. Make sure you have pulled out the black plug when you
are sailing or towing the boat. It is important to keep the self-draining system clear. When you service the drain valve,
please make sure the drain hole & drain valve can have the sealant sealed properly. We suggest Sikaflex 291 or 3M
5200 marine grade sealant to be used.
OUTBOARD MOTOR
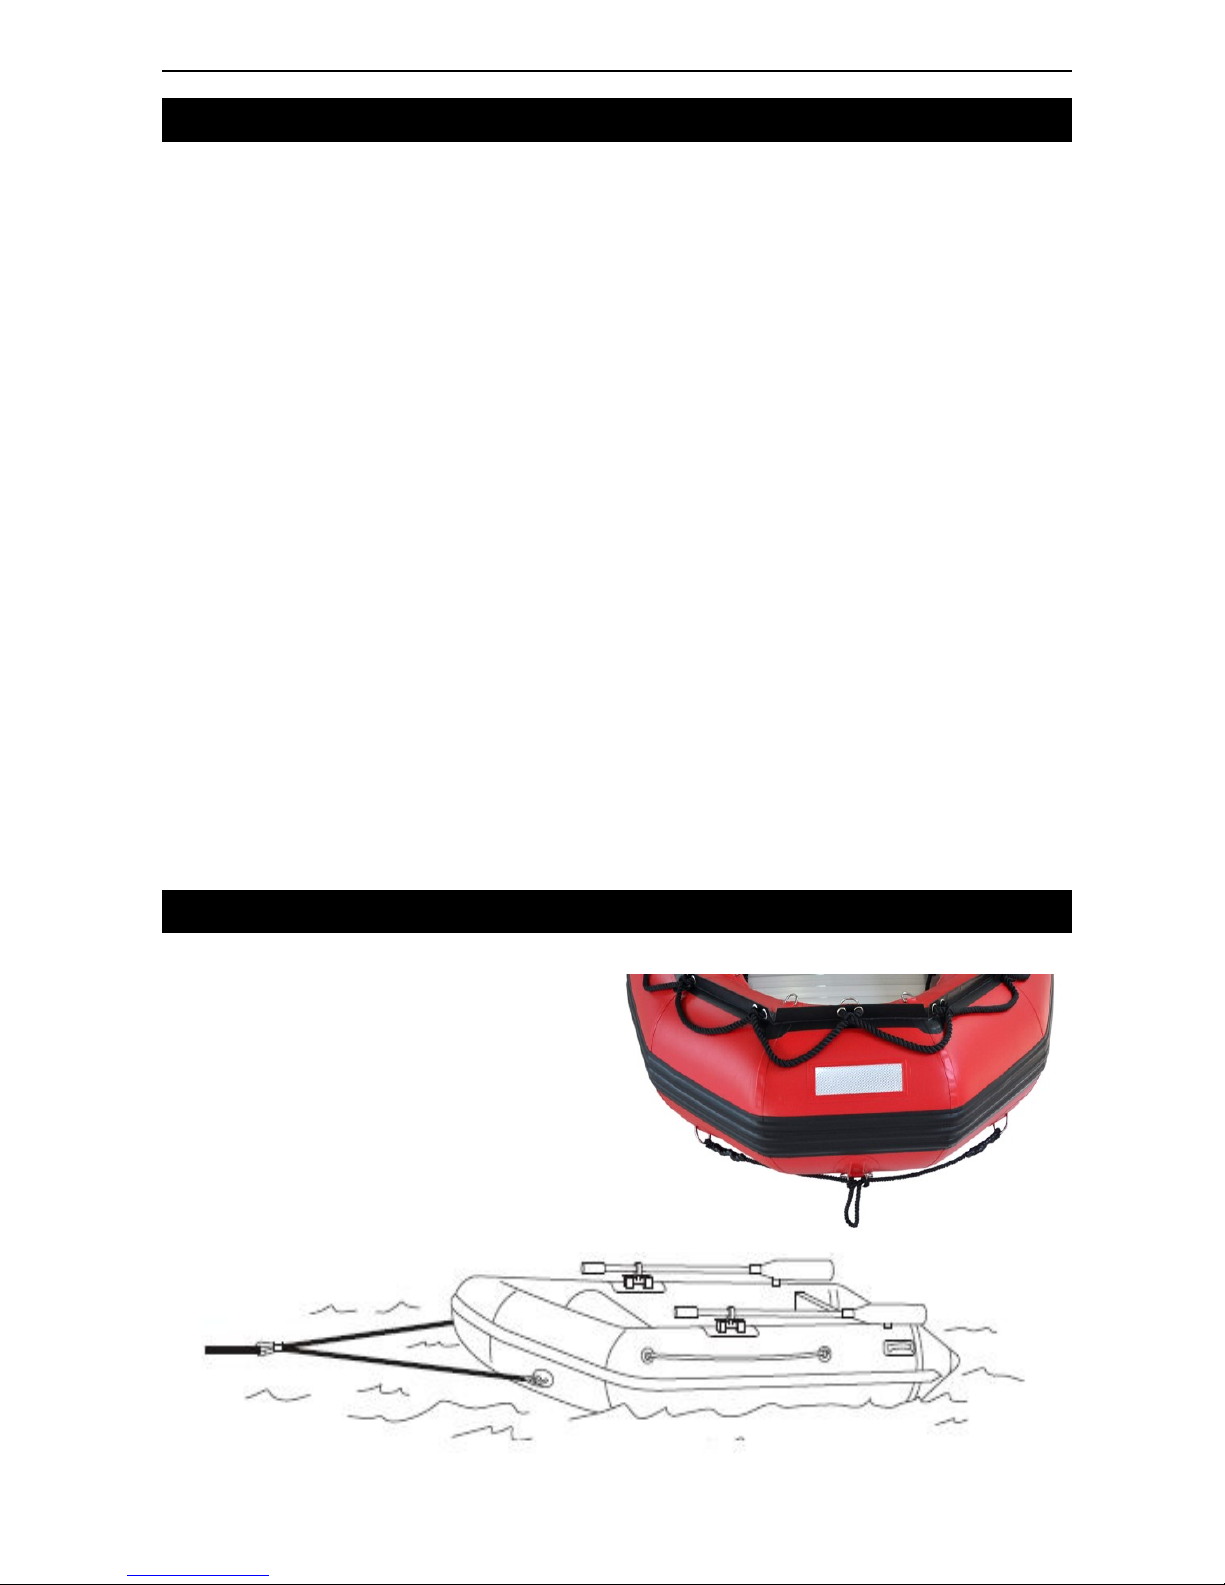
Choose an outboard for the boat that is in accordance with the horsepower range and limit. Refer to the Specification
table in this manual or the manufacturer's plate on the boat for the maximum outboard capacity. Install the outboard
along the centerline of the boat transom. Fasten the outboard to the transom following the recommended installation
instructions provided with the outboard or its manufacturer. Check outboard for tightness on transom before each use.
When you install an outboard motor, make sure you place it on the motor bracket at the transom and tighten the
butterfly bolts to the transom Check after 15 minutes of boating to ensure the butterfly bolts are still tight to the
transom.
Seamax inflatable boats have short shaft and long shaft transom models. The short shaft motor is to fit 15-16 inches
height transom. The long shaft motor is to fit 20-22 inches height transom.
Page 29
Seamax Inflatable Boat – English User Manual
- 28 -
BOAT OPERATING CHECK LIST
1. Check the inflation pressure of the air chambers. Remove any obstruction from the drain valve.
2. Check the outboard for tightness on the transom. Motor over 20HP need to install the bolts.
3. Know the fuel capacity and cruising range.
4. Check that the lanyard stop switch for the outboard works correctly.
5. Be sure the boat is not overloaded. Check the boat capacity plate for weight capacity
6. Be sure there is an approved personal flotation device of suitable size for each person aboard and readily
accessible (by law).
7. Check that the paddles are in the boat in case of engine trouble.
8. Be sure the operator knows safe navigation, boating and operating procedures.
9. Have a ring type life buoy or buoyant cushion designed to be thrown to a person in the water.
10. Arrange the passengers and load in the boat so the weight is distributed evenly and everyone is seated
properly.
11. Instruct at least one passenger in the basics of boat handling and the starting and operation of the outboard, in
case the driver becomes disabled or falls overboard.
12. Before departing, tell someone where you are going and what time you expect to return.
13. No alcohol or drugs on board, it is illegal to operate a boat while under the influence of alcohol or drugs.
14. Know the waters and area you will be boating; tides, currents, sand bars, rocks, and other hazards.
15. Check that all personal safety gear is on board (whistle or noise maker, bailing can, floating rope, water proof
flashlight)
16. Ensure the operator has a boating license
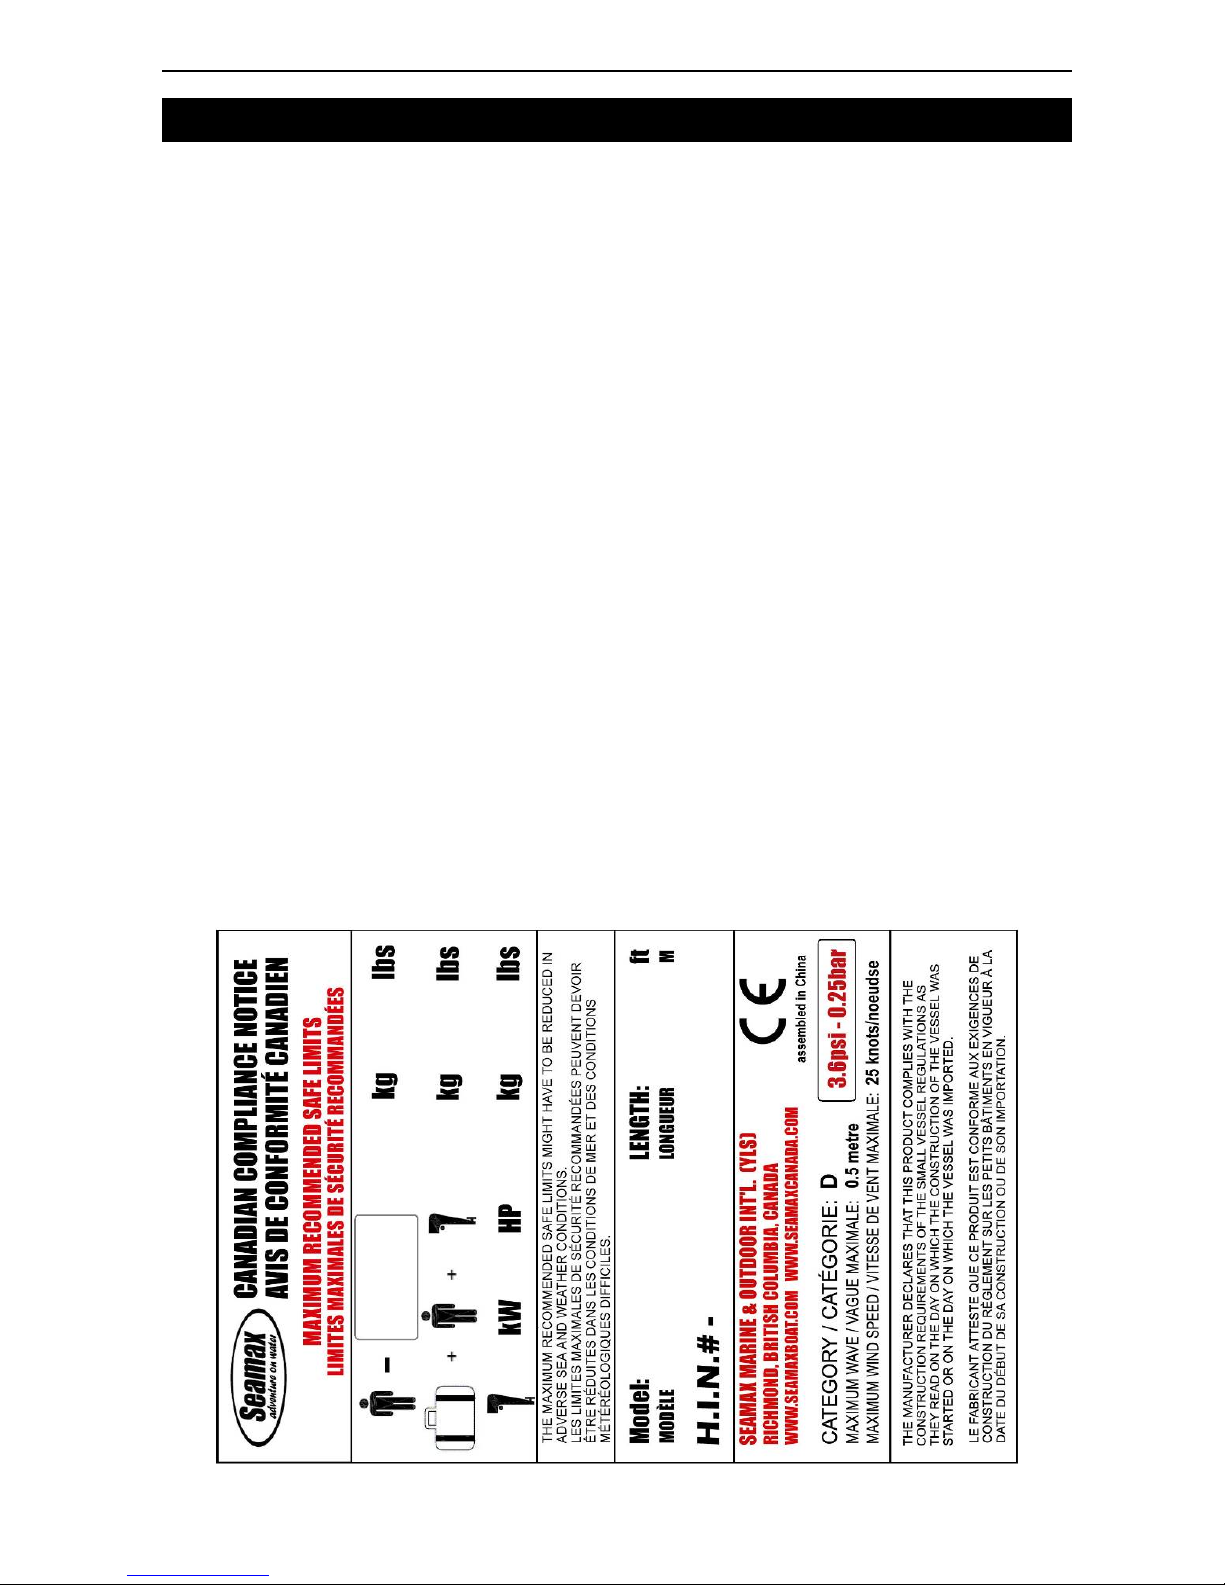
TOWING THE BOAT
If the inflatable boat is to be towed by another boat, the
inflatable boat must be empty. Remove outboard, fuel
tank, and equipment. Attach a line between the towing
rings to form a bridle. Attach a towing line to this bridle
and tow the boat at slow speed. A Front Towing Line
has been included in all Seamax boats.
Page 30
Seamax Inflatable Boat – English User Manual
- 29 -
ABOUT YOUR BOAT
AIR LEAKAGE
If one of the air chambers should accidentally deflate while you are operating the boat, shift the weight to the opposite
side of the deflated chamber and slowly head for shore. Due to temperature difference, the pressure can increase or
decrease. It may not lose more than 20% of the pressure in 24 hours according to the Inflatable Boat’s Standard
regulations. Check the following steps if this should happen.
1. Ensure all valves are securely tightened. Check if all valves are clean.
2. Inspect for any damage to the air chambers. Check the seams.
3. Use a mixture of water and 10% liquid soap to test for leaks. Check the areas with bubbling.
4. Report to seller for assistance if any air leakage found.
WATER LEAKAGE
1. Check if the self-draining valve is clean and clear.
2. Check for damage to transom or boat bottom.
3. Take out the floorboards, fill the boat with water on a dry surface, and watch for wet spots
4. Report to seller for assistance if any water leakage found.
BOAT HIN PLATE
1. HIN Plates provides the information to locate lost, stolen or boats subject to recalls.
2. Please remember to register your inflatable boat with seller & government boat license office.
3. Do not modify or make change of your boat Hull Plate.
4. Report to seller, police and your insurance company if your boat got stolen.
Page 31
Seamax Inflatable Boat – English User Manual
- 30 -
7. Service your Boat
REGULAR BOAT MAINTENANCE
You can keep your boat clean with simple soap and the water. When you find persistent stains like oil and tar, you can
remove them with some thinner. Always clean the boat with fresh water like doing your car wash at home. It is
important to check the valves every time. The transom, wooden seat and floorboards are made out of plywood and
are treated with a waterproof paint. They need to be dry out after boat wash and storage. If the damage according to
the transom or front wood floorboards found, you can scour and repair the plywood with marine sealant, primer and
outdoor paint. If the damage found is serious, you can take some pictures and contact with us. * Refer to Aurora
Marine boat cleaning products.
The boat should be cleaned and rinsed with fresh water before being
placed in long term storage. To prevent fabric discoloration from marine
growth or polluted waters, do not store the boat in water for extended
periods of time. After washing, allow the boat to dry thoroughly before
placing into storage. The boat can be stored inflated or deflated. Store
the boat in a cool, dry area that is protected from excess exposure from
the sun or heat. Cover the boat to block direct sunlight exposure if the
boat is to be stored outside for an extended period of time. The boats
fabric material is flammable! Keep away from open flame and any heat
sources. If you store the boat in your boat or RV, please make sure the
cabinet must be cool at the day time as well.
REPAIR THE FABRIC
The repair kit included with the boat is a one part glue operation and used for emergency minor repair. For a
permanent repair, a two part adhesive for PVC fabric should be used. This two part adhesive and patching materials
for PVC fabric are available in the repair kit.
Small tears and punctures in the air chambers which are 1cm (0.393 in.) or less, can be repaired in an emergency.
Larger areas, or if the patch will overlap a seam, should be patched by a professional repair person. If you are not sure
of the repair procedure, you can contact SEAMAX customer support by visiting our website.
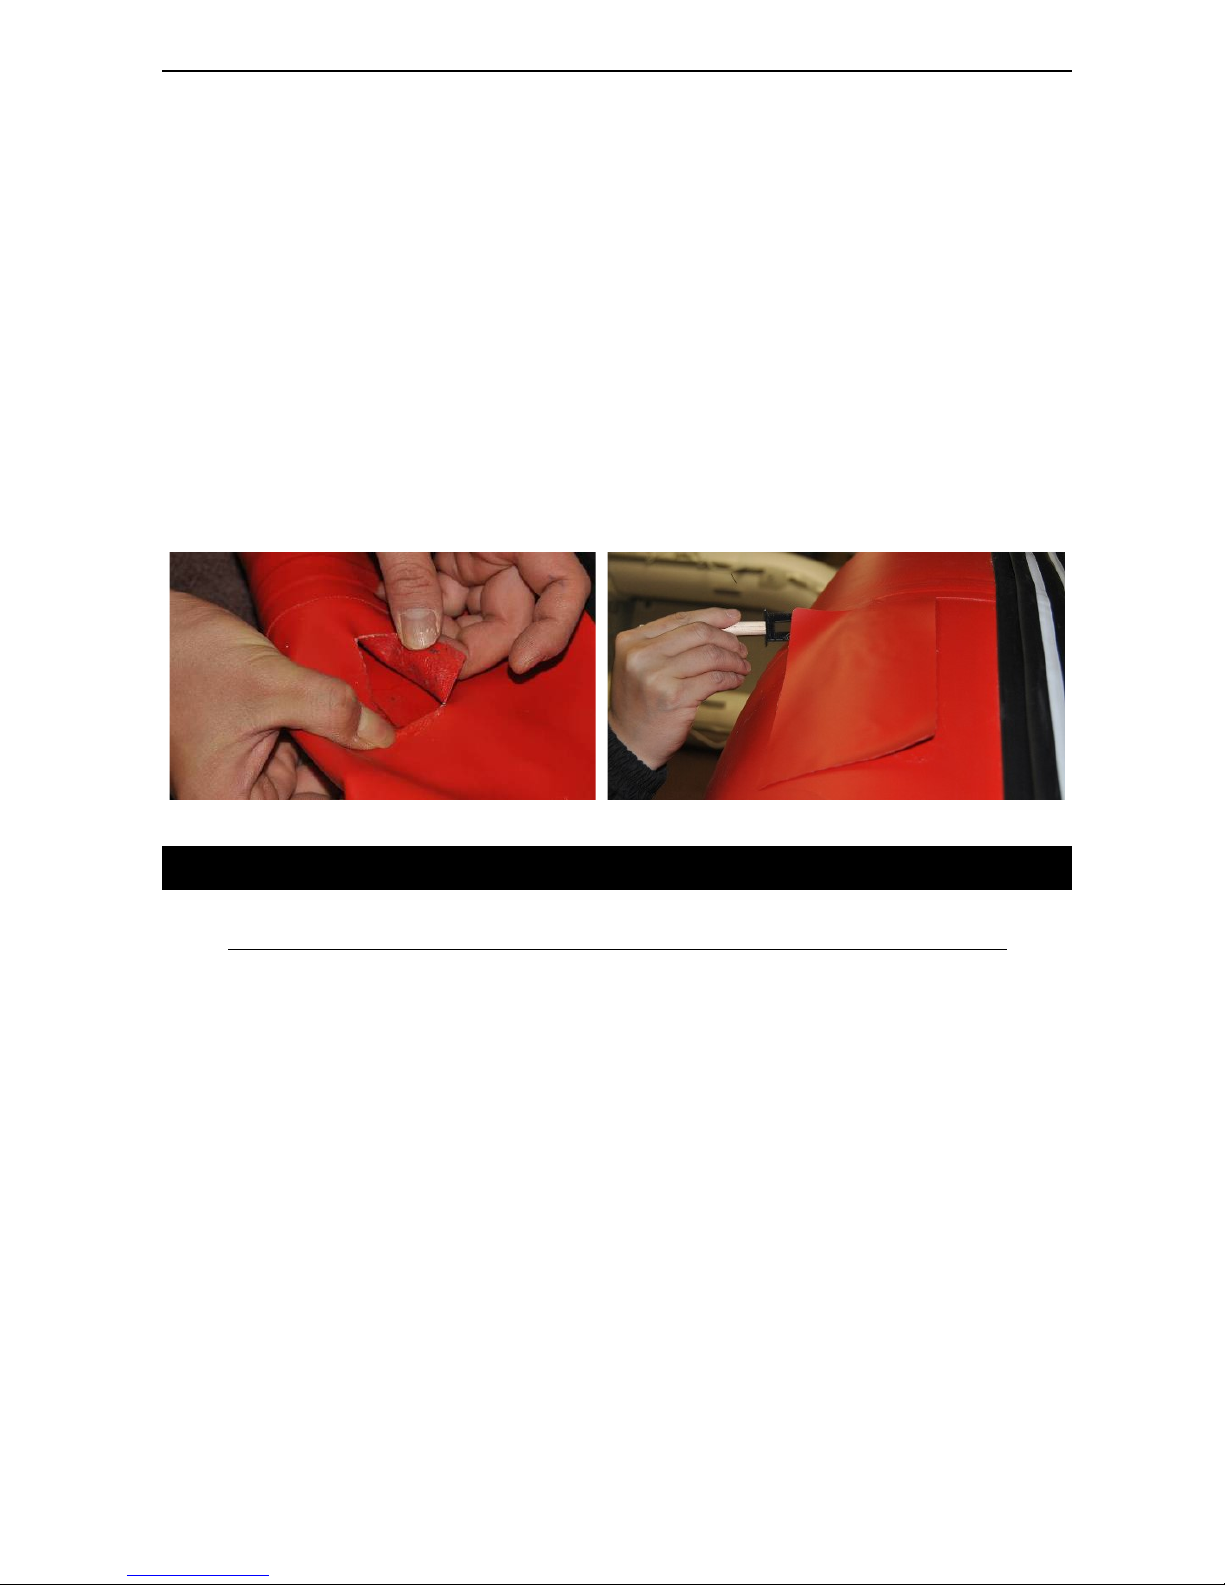
Cut out a patch large enough to overlap the damaged area by 3cm (1.2 in.) on all sides. Center the patch over the
damaged area, and with a pencil trace the outline of the patch. Apply masking tape around the perimeter of the
outlined patch area to ensure a tight and clean glue line.
Page 32
Seamax Inflatable Boat – English User Manual
- 31 -
Clean the patch area on the boat as well as the backside of the patch, its best to use M.E.K. (Methyl Ethel Ketone)
patching solvent and cleaner. Use rubber gloves when handling solvent. After applying the solvent, you will notice that
the area will become tacky. This tackiness ensures good glue adhesion.
Apply three thin layers of adhesive with a short bristle brush, in a circular pattern on both the backside of the patch and
the patch area on the boat. Allow each layer to dry for 5 minutes before applying the next layer. After applying the third
layer, wait 5 minutes and then apply the patch to the prepared area and press down firmly. Using a smooth object (a
back of a tablespoon works well), working from the center of the patch to the outside, force out any air bubbles that
may have been trapped under the patch. After the patching is complete remove the masking tape, place a 5 pound
weight onto the patch and allow 24 hours drying time before pressurizing the repaired air chamber.
Important: Repairing is only possible with a dry atmosphere and the air humidity may not be higher than
60%. More boat repair DIY instruction can be downloaded from Seamax Website.
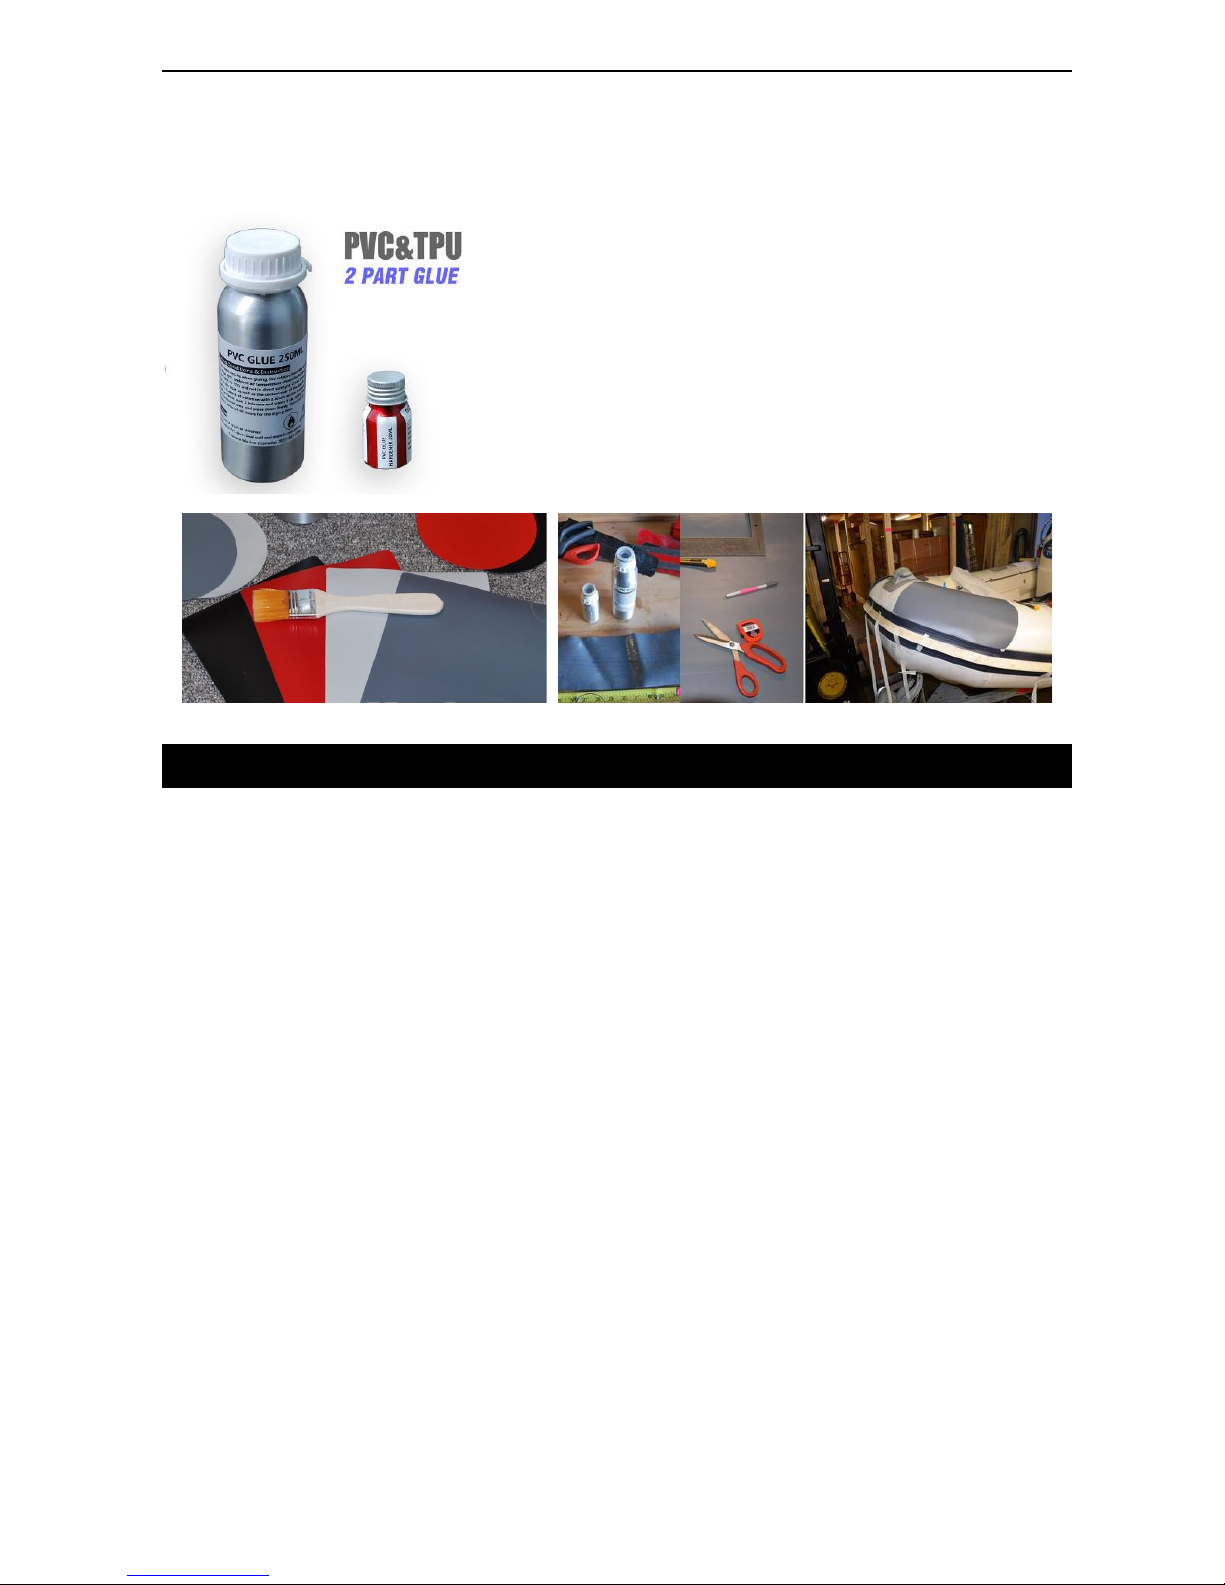
SEAMAX 2 PART PVC GLUE INSTRUCTION
THIS KIT IS NOT COMING WITH YOUR BOAT, IT IS AVAILABLE FROM SEAMAX ONLINE STORE.
Mix 5% hardener (treatment) to the glue before use. Maximum mix 8% hardener when Cold Weather 10C-15C or High
Humidity 50-75%. Do NOT exceed a mixture of 10% to the glue. M.E.K. is the thinner for PVC glue. If the glue hardens,
you can add up to 10% MEK to the glue to reactivate the glue.
Glue mixed with hardener can be kept for up to 6 hours. Glue and hardener sealed in the bottles can be kept up to 3
years. We suggest to use a small painting brush to apply 1-3 layer(s) glue on both material surfaces. Wait 5 minutes
between applications to allow glue to dry and then attach the two pieces of material together. Once you have applied
the patch, work from the center out with something like a teaspoon to force out any air bubbles and then apply
pressure to the repaired area for at least 24 hours. Wait 48 hours for the glue to cure before using.
PVC Glue can be used as one part. For a better result, please do 2 Part glue (glue and hardener) to ensure the overall
quality of the repair and extend the life time of the bonding. For any repairs related to air leaks, please use 2 Part Glue.
Note: Suggested to apply the glue 1-2 layers on new fabric surface; 2-3 layers on old fabric surface; 3-4 layers for
wood or plywood surface; 2-3 layers for parts or aluminum surface. (The surface of Hypalon boat fabric has a coating
layer, sanding the boat fabric to get rid of this coating is a must before gluing.)
Page 33
Seamax Inflatable Boat – English User Manual
- 32 -
Only mix the amount of glue you require for the repair. Seal the bottle right away and store it in a cool area so that it
may be used again. If the hardener turns to crystals or gets sticky, it is no longer usable. To clean the area that needs
to be repaired, use Methyl Hydrate, Acetone or MEK.
For the best results when gluing, the relative humidity should be less than
60% and ambient air temperature should be between 18C to 25C (65 F to
77F) and not in direct sunlight. Clean the patching area on the boat as
well as the contact side of the patch, it is best to use M.E.K. (Methyl Ethel
Ketone) patching solvent and cleaner. Keep solvent off skin. After
applying the solvent, you will notice that the area will become tacky. This
tackiness ensures good glue adhesion.
HYPALON GLUE ADDITIONAL INSTRUCTION
Mix 6% hardener (treatment) to strengthen the repair result. Maximum mixture is 10% hardener when weather is
10C-15C or when Humidity is 50-75%. DO NOT EXCEED 10% HARDENER!
This Hypalon Glue mixed with hardener can be kept for up to 8 hours. We suggest using a small paint blush to apply 2
layer(s) of glue to both surfaces Wait 5 minutes between applications to allow the glue to dry and then apply the patch
to the repair area. Use a spoon to work out any air bubbles starting from the center of the patch and then apply
pressure to the repair. Wait 48 hours in high temperature to cure.
Only mix what you need for the repair. Seal the bottle right away and store in a cool area until you need it again. If the
hardener turns crystalline or sticky, please replace with new hardener.
This glue and its hardener is a brown color.
NOTE: If the Hypalon Fabric is with finished coating, this coating must be sanded before applying the glue.
The finished surface will feel like the card tire’s rough surface. Also sand the Rubber Parts contact surface
except factory pre-sanded. (Suggest #100 - #120 sand paper)
Page 34
Seamax Inflatable Boat – English User Manual
- 33 -
Seamax Boat Warranty registration Form
Seamax Bateau garantie d'inscription– Français
Purchaser Name:
Phone:
Email:
Address:
City: Sate / Province:
Country: Zip/ Post Code:
First Time Register Yes/No: Title Transfer Yes/No:
Purchasing from:
Invoice Date: Invoice Number:
Boat Model: HIN: YLS -
Conditions or Remark: Boat Net Price of Purchase:
Purchaser Signature: Date:
All fields required. This Warranty registration form can be submitted via mail, email, fax, or Seamax website online form.
Warranty registration is not required for purchases directly from Seamax and Seamax Website.
Email: [email protected] Fax: 1-604-277-3360
Online: https://www.seamaxmarine.com/pages/product-registration
Seamax Marine * 120-11791 Machrina Way, Richmond, BC, Canada V7A 4V3
 Loading...