

SeaLife SL500 User manual


Table of Contents
I. Package Contents .............................................................................................2
II. Getting to Know Your Camera. ....................................................................3-8
a. Front view .................................................................................................................. 3
b. Rear view ................................................................................................................... 4
c. LCD Display: Capture Mode ...................................................................................... 5
d. LCD Display: Playback Mode .................................................................................... 7
III. Basic Camera Operation ...........................................................................9-18
a. Power On .................................................................................................................. 9
b. Take a Picture .........................................................................................................10
c. Take a Video ...........................................................................................................10
d. Easy Setup ............................................................................................................... 11
e. Playback Pictures and Videos .................................................................................12
f. Charge Battery ....................................................................................................13-15
g. Upload Pictures to PC ........................................................................................16-18
IV. WiFi Connection to Smartphone/Tablet (Micro HD+ only) ....................19-22
a. Download ACTION CAM HD App ....................................................................19-20
b. Changing ACTION CAM HD Username and Password .....................................21-22
V. Using the Action Cam HD App (Micro HD+ only) ..................................23-25
a. Home Screen ..........................................................................................................23
b. Playback Screen ...................................................................................................... 24
c. Share / Delete Screen .............................................................................................. 25
VI. Menu Navigation .....................................................................................26-37
a. Easy Setup ............................................................................................................... 26
b. Picture Settings ...................................................................................................27-32
c. Video Settings .....................................................................................................33-34
d. System Settings ...................................................................................................35-37
VII. Great Underwater Pictures Made Easy ..................................................38-41
VIII. Optional Accessories ............................................................................42-44
IX. Care and Maintenance .................................................................................45
X. Spare Parts and Service .................................................................................46
XI. FCC Statement .........................................................................................47-49
Visit sealife-cameras.com/manuals for Español, Deutsch, Français, Italiano and Nederlands
1
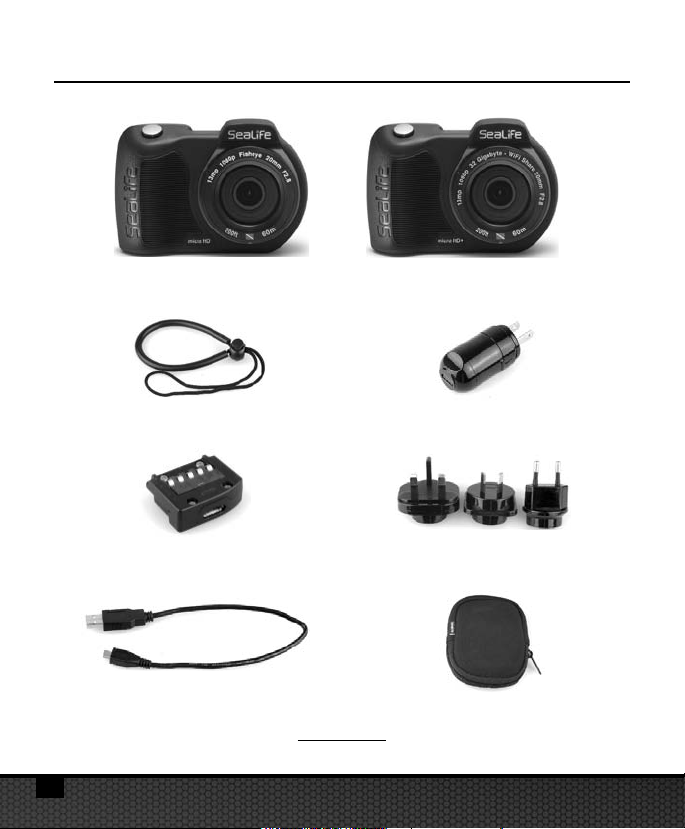
I. Package Contents
Micro HD Underwater Camera (16GB SL500 or 32GB WiFi SL501)
Wrist strap (SL50102)
USB adapter (SL50103)
USB cable (SL50104)
Instruction manual – English
2
Wall charger with US plug
(SL50105)
Int’l plug adapters for
UK, EU, AU
(SL50106)
Camera pouch (SL50107)
Not shown:
(SL50108) SeaLife Warranty statement
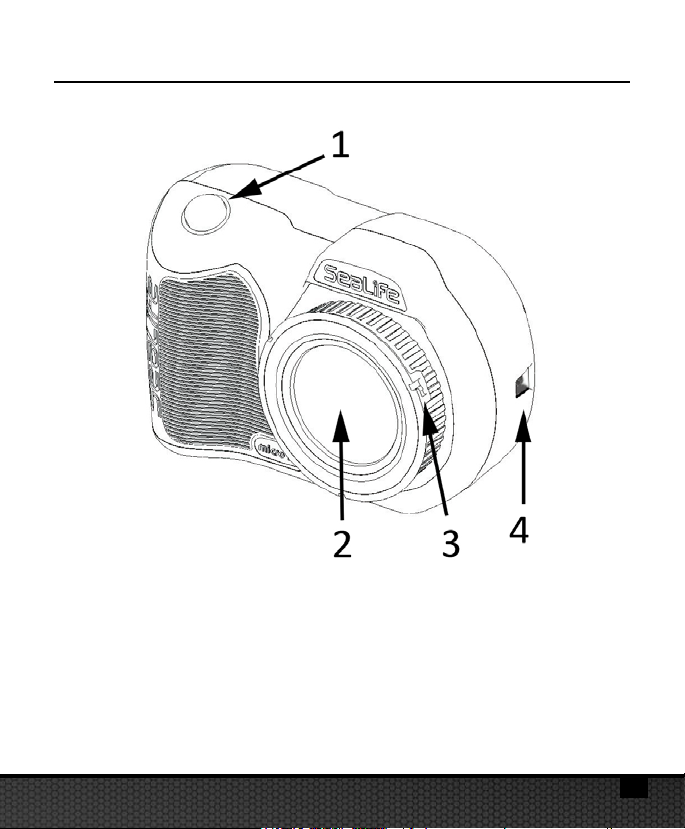
II. Getting to Know Your Camera
Front view
1. Shutter button
2. Optical glass lens port
3. Lens adapter ring (For attaching close-up lens
accessory – sold separately)
4. Wrist strap connection
3
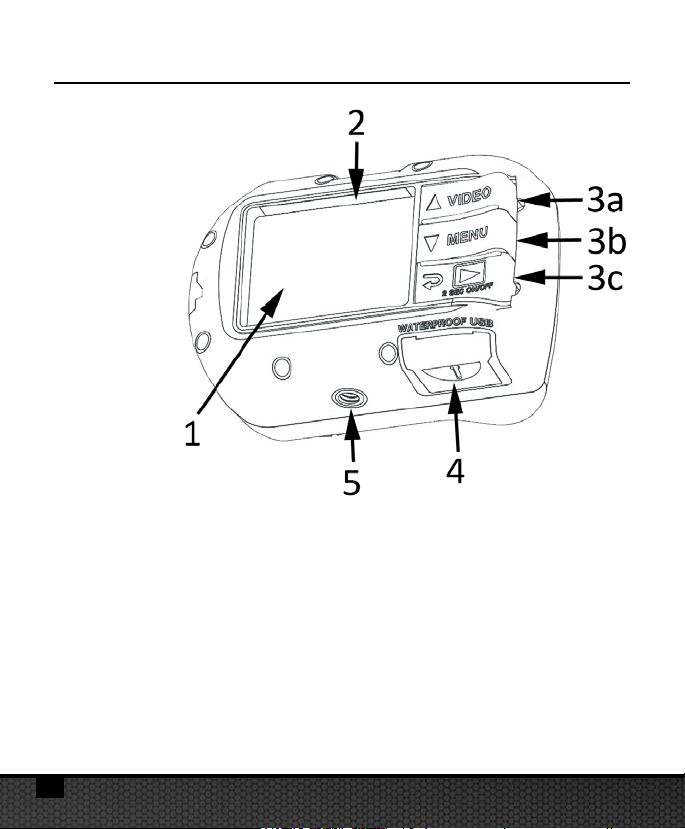
II. Getting to Know Your Camera (cont’d)
Rear view
1. 2.4” TFT color display
2. Serial #
3. “Piano Key” controls:
a. Video (up)
b. Menu (down)
c. Playback / Power (back 1 step)
4. Waterproof USB contacts (shown w/ USB cover)
5. 1/4-20 tripod accessory mount
4
II. Getting to Know Your Camera (cont’d)
LCD Display:
Capture Mode
1. Scene modes
a. Land
b. Dive
c. Snorkel
d. Ext Light
e. 2 Ext Lights
2. Capture mode
a. Single
b. Continuous
c. Time Lapse
d. AEB
3. WiFi On
4. Timers
a. Video record time (H:MM:SS)
b. Time Lapse countdown
time
(MM:SS)
5. Battery condition
a. Full power
b. High power
c. Medium power
d. Low power
e. Near empty
5

II. Getting to Know Your Camera (cont’d)
LCD Display: Capture Mode
6. Image size resolution
a. 13MP / 4128 x
3096 / 4:3 / 140°
b. 10MP / 4128 x
2322 / 16:9 / 130°
c. 9MP / 3464 x
2598 / 4:3 / 90°
d. 7MP / 3072 x
2304 / 4:3 / 140°
e. 4MP / 2440 x
1832 / 4:3 / 140°
f. 2MP / 1920 x
1080 / 16:9 / 130°
g. 2MP / 1504 x
1128 / 4:3 / 140°
7. White Balance
a. Auto
b. Underwater Deep
c. Underwater Shallow
d. Daylight
e. Cloudy
8. ISO value
a. Auto d. 400
b. 100 e. 800
c. 200
9. Exposure Value (From
-2.0 to +2.0 in 0.3 increments)
10. Self-timer or Time Lapse
time interval
a. Self-timer (3s or 10s)
b. Time Lapse interval
(2s, 5s, 10s, 30s, 1m, 5m or 30m)
11. Video resolution size
(with frames per second)
a. 1080p at 30 fps
b. 720p at 60fps
c. 720p at 30fps
d. 240p at 120fps
e. 240p at 240fps
(frames per second)
6
II. Getting to Know Your Camera (cont’d)
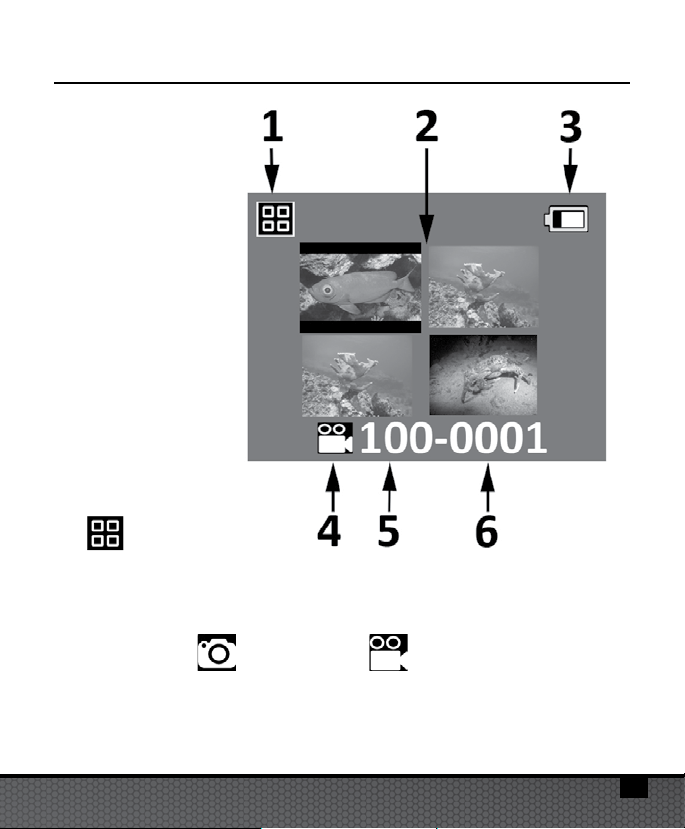
LCD Display:
Playback Mode
(Thumbnail view)
1. Playback icon -
Thumbnail view
2. Thumbnail images (Maximum 4 per page)
3. Battery condition
4. File type:
5. Folder # (100 to 999)
6. File # (0001 to 0999)
a. Still image b. Video clip
7
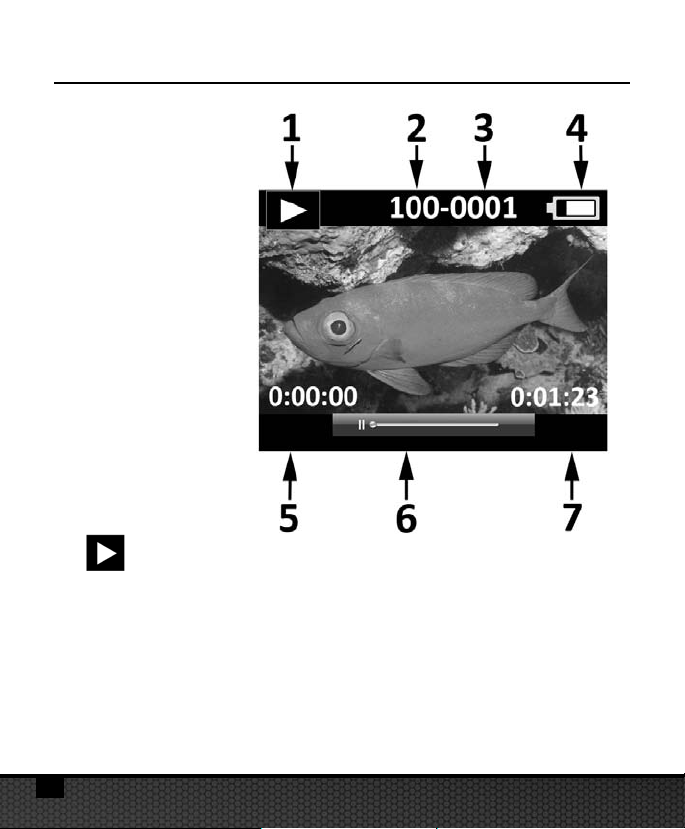
II. Getting to Know Your Camera (cont’d)
LCD Display:
Playback Mode
(Single view)
1. Playback icon - Single image view
2. Folder # (100 to 999)
3. File # (0001 to 0999)
4. Battery condition
5. Elapse time H:MM:SS (video files only)
6. Video status bar (video files only)
7. Total recorded time H:MM:SS (video files only)
8
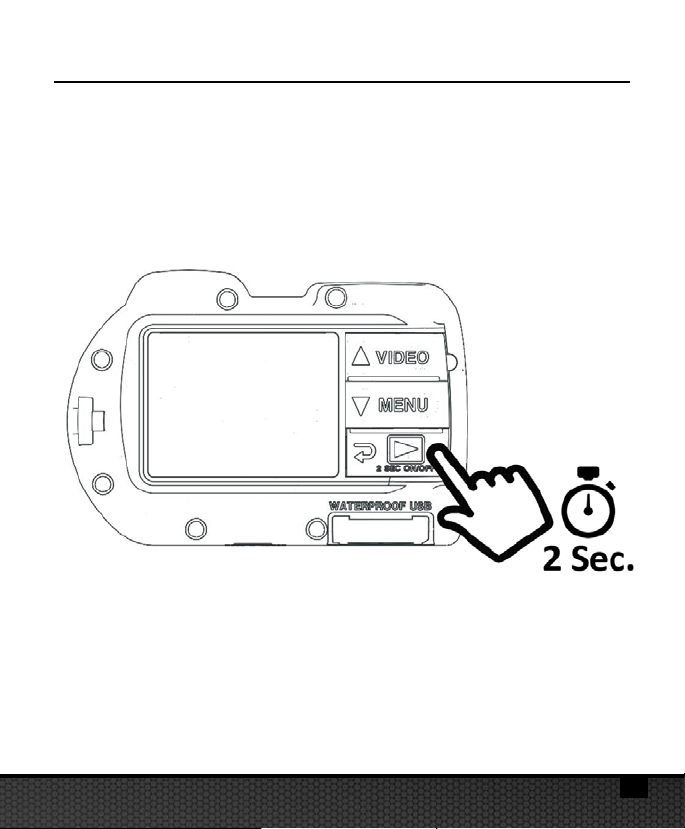
III. Basic Camera Operation
Power On:
Push and hold bottom button for 2 seconds to power camera
ON or OFF.
9
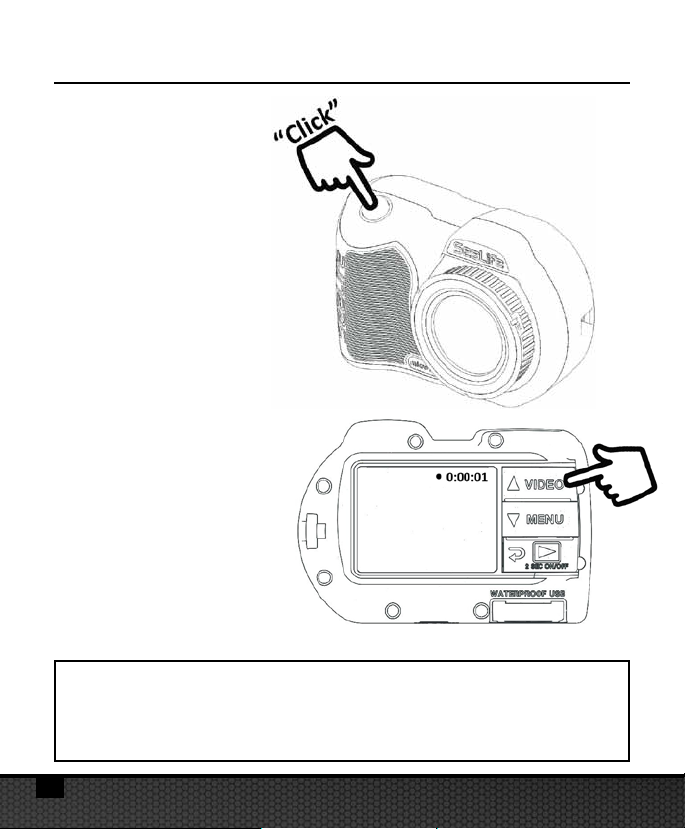
III. Basic Camera Operation (cont’d)
Take a Picture:
Aim, hold camera
steady and push
shutter button.
Take a Video:
Aim, hold camera steady
and push video button
to start or stop
video recording.
Note:
• When video recording is in progress, you will see a red dot with
elapse record timer on the top right of the LCD display.
• You can also take a 2MP picture while recording video by pushing
the shutter button.
10
III. Basic Camera Operation (cont’d)
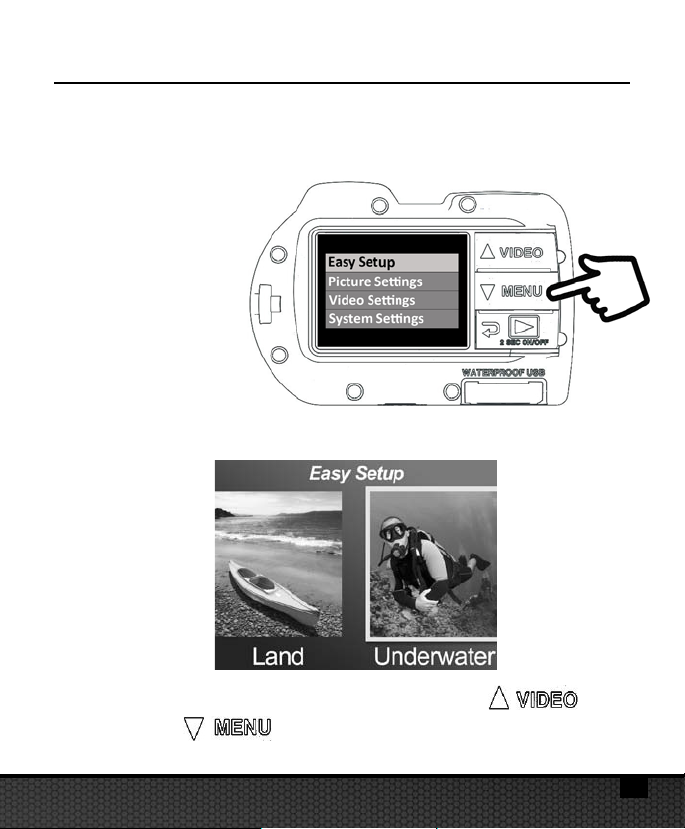
Easy Setup:
This on-screen guide will help you set the camera correctly.
1. Push MENU button
2. Push shutter button to select “Easy Setup.”
3. Follow the on-screen guide using the Up ( )
or Down ( ) buttons to select desired option
and Shutter button to confirm setting.
11
III. Basic Camera Operation (cont’d)
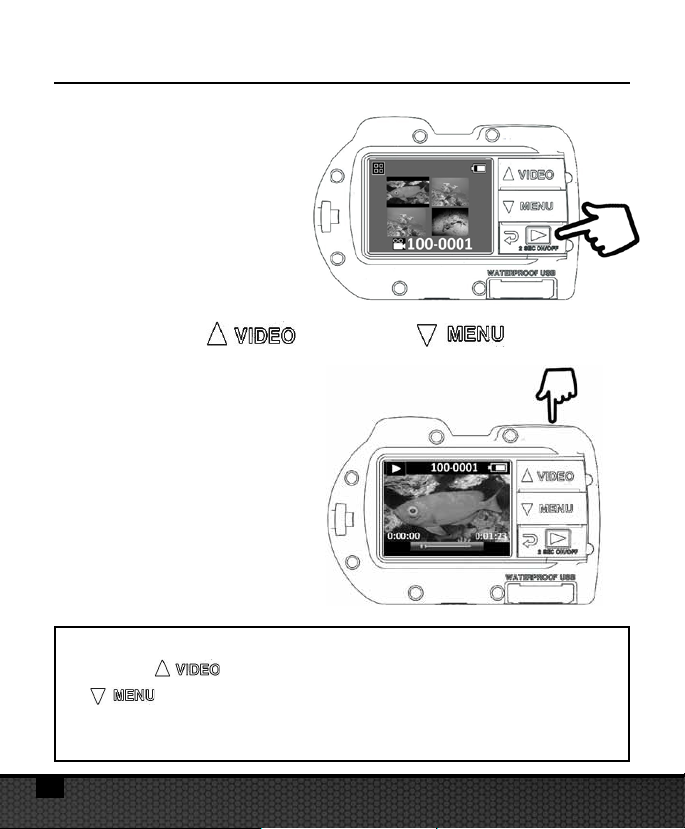
Playback Pictures and Videos:
1. Push Playback button
to display thumbnail
images.
2. Use the Up ( ) or Down ( ) buttons to
scroll through thumbnails.
3. Push Shutter button
to select and display
single images/videos.
Note:
• Push Shutter button to start or pause playback of video files.
• Use Up ( ) button to increase playback speed or Down
( ) button to decrease playback speed.
• You can delete an image file by pushing and holding shutter button
while in thumbnail view.
12
III. Basic Camera Operation (cont’d)
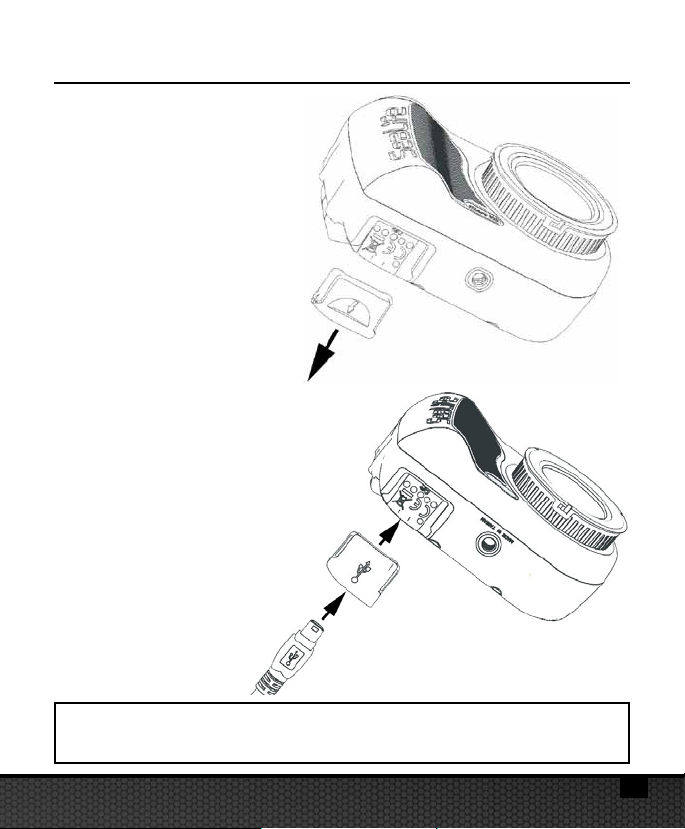
Charge Battery:
1. Remove USB cover.
2. Make sure camera is dry.
Insert USB cable into
USB adapter, and insert
into waterproof USB port
Warning: Dry camera before inserting USB adapter.
USB adapter is not waterproof.
13
III. Basic Camera Operation (cont’d)
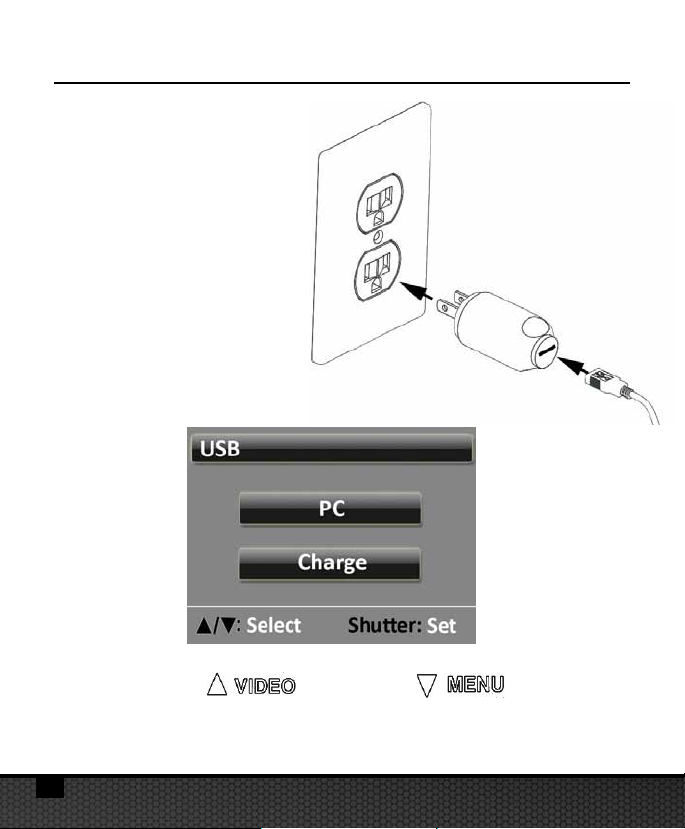
3. Connect other end of
the USB cable into the
wall charger, and
insert wall charger
into outlet.
4. The camera will display PC and Charge options.
5. Use the Up ( ) or Down ( ) buttons
to select Charge and push Shutter button to confirm
selection.
14

III. Basic Camera Operation (cont’d)
6. When the camera is charging, the large battery icon
in center of display will blink from one to three bars
repeatedly. The icon will show three solid bars when the
battery is fully charged.
7. After 1 minute of charging, the display will go to sleep
in order to save power and charge faster. Push any button
to turn on display and see battery charging status.
Note:
• After 1 minute, the camera will go into power save mode and display
will turn off while camera continues charging.
• Push any button to show battery charging status. Flashing icon means
battery is still charging. Solid icon means battery is finished charging.
• The camera may also be charged when connected to a computer USB
port; however, charging takes twice as long as charging with wall charger.
• The wall charger may be fitted with one of the 3 international plug types.
• Don’t push any buttons while connecting to PC or the camera will
not connect.
15
 Loading...