

Page 1
instructions for
MPORTANT:
PLEASE READ THESE INSTRUCTIONS CAREFULLY. NOTE THE SAFE OPERATIONAL REQUIREMENTS, WARNINGS & CAUTIONS. USE
THE PRODUCT CORRECTLY AND WITH CARE FOR THE PURPOSE FOR WHICH IT IS INTENDED. FAILURE TO DO SO MAY CAUSE DAMAGE AND/OR
PERSONAL INJURY AND WILL INVALIDATE THE WARRANTY. KEEP THESE INSTRUCTIONS SAFE FOR FUTURE USE.
hydraulic press 5.4tonne economy bench type
model no: yK6ecb.V2
thank you for purchasing a sealey product. manufactured to a high standard, this product will, if used according to these instructions,
and properly maintained, give you years of trouble free performance.
refer to
instruction
manual
Wear protective
gloves
Wear face
mask
Wear protective
clothing
Wear safety
footwear
Warning:
crushing of
hands
1. saFety
1.1. General saFety
9 familiarise yourself with this products application and limitations, as well as the specific potential hazards peculiar to the press.
9 maintain the press in good condition (use an authorised service agent).
9 replace or repair damaged parts. Use recommended parts only. Non authorised parts may be dangerous and will invalidate the
warranty.
9 Keep the press clean for best and safest performance.
9 locate the press in a suitable working area for its function, keep area clean, tidy, free from unrelated materials and ensure there is
9 adequate lighting.
9 securely attach the press to a flat, firm, level surface capable of supporting the weight of press and any workpiece taking into account
clearance for workpieces.
9 ensure the workpiece is correctly secured before operating the press.
WarninG! Always wear approved eye or face protection when operating the press.
9 remove ill fitting clothing. remove ties, watches, rings, loose jewellery and contain long hair.
9 Keep hands and body clear of the work table when operating the press.
9 maintain correct balance and footing. ensure the floor is not slippery and wear non-slip steel toe-capped shoes/boots.
9 Keep children and unauthorised persons away from the working area.
8 do not operate the press if any parts are missing as this may cause failure and/or possible personal injury.
8 do not use to compress springs or any other item that could disengage and cause a potential hazard.
8 do not stand directly in front of the loaded press and never leave a loaded press unattended.
8 do not use the press for any purpose other than that for which it is designed.
8 do not make any modifications to the press.
8 do not adjust or tamper with the safety valve.
8 do not exceed the rated capacity of the press.
8 do not apply off-centre loads.
8 do not allow the workpiece or the press plates to fall from the work table.
8 do not get the press wet or use in damp or wet locations or areas where there is condensation.
8 do not operate the press when you are tired or under the influence of alcohol, drugs or intoxicating medication.
9 When not in use, release pressure from the hydraulic unit and clean the press. stand or store the press plates in a safe location.
WarninG! Always position the press against a wall. if the press is situated in the open workshop, it is essential that a guard be
placed at the rear of the unit. this will prevent injury to bystanders in the event of the workpiece ejecting suddenly.
WarninG! the warnings, cautions and instructions in this manual cannot cover all possible conditions and situations that may occur.
it must be understood by the operator that common sense and caution are factors which cannot be built into this product, but must be
applied by the operator.
2. introduction
economy range suitable for the serious enthusiast or occasional professional use. Made from high quality steel with a powder coated paint nish
to help corrosion resistance.
3. speciFication
model no: ............................................................YK6ecB.V2
type: ........................................................................hydraulic
capacity: ..................................................................5.4tonne
ram stroke: ................................................................125mm
ram diameter: .............................................................36mm
max. height ram to table: ......................................... 145.5mm
min. height ram to table: ............................................20.5mm
table aperture: .............................................................56mm
Working table depth: .................................................. 136mm
© Jack sealey limited
Original Language Version
Working table width: ................................................... 340mm
overall height: ............................................................800mm
Weight: ........................................................................ 26.4kg
YK6ecB.V2 | issue:2 (3) 20/08/18
Page 2
4. contents
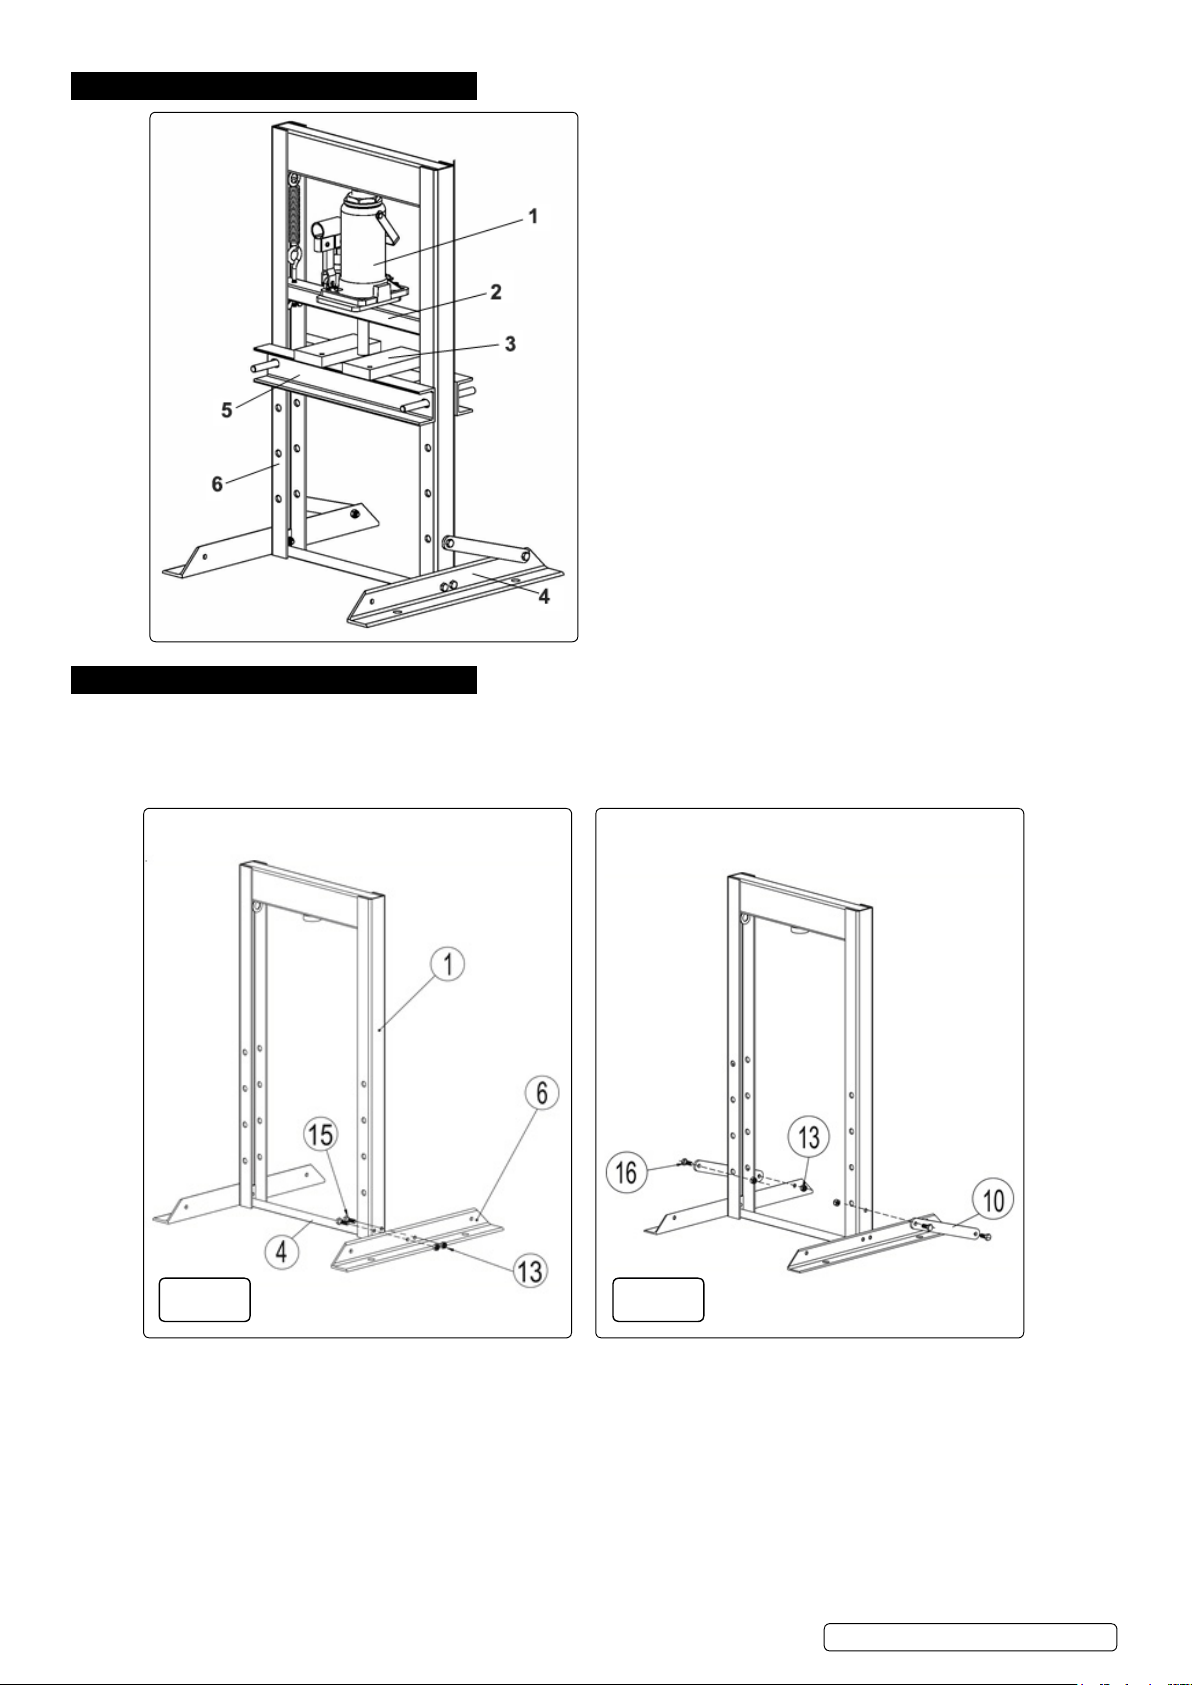
1 Bottle jack
2 Jack plate
3 Press plate
4 Angle steel foot
5 Press platform
6 Press frame
5. assembly
numbers refer to attached Parts diagram and figures below
5.1. tools required: 6mm hex key, 13mm & 14mm spanners
5.2. Attach feet assembly g.1
5.2.1. Attach the spreader (#4) and angle steel feet (#6) to the main frame (#1) using hex bolt m8x25 (#15) and nylon lock nut m8 (#13).
Fig.1 Fig.2
5.3. Attach support plate g.2
5.3.1. Attach support plate (#10) to the main frame (#1) using hex bolt m8x20 (#16) and nylon lock nut m8 (#13).
© Jack sealey limited
Original Language Version
YK6ecB.V2 | issue:2 (3) 20/08/18
Page 3
5.4. Attach the bottle jack g.3
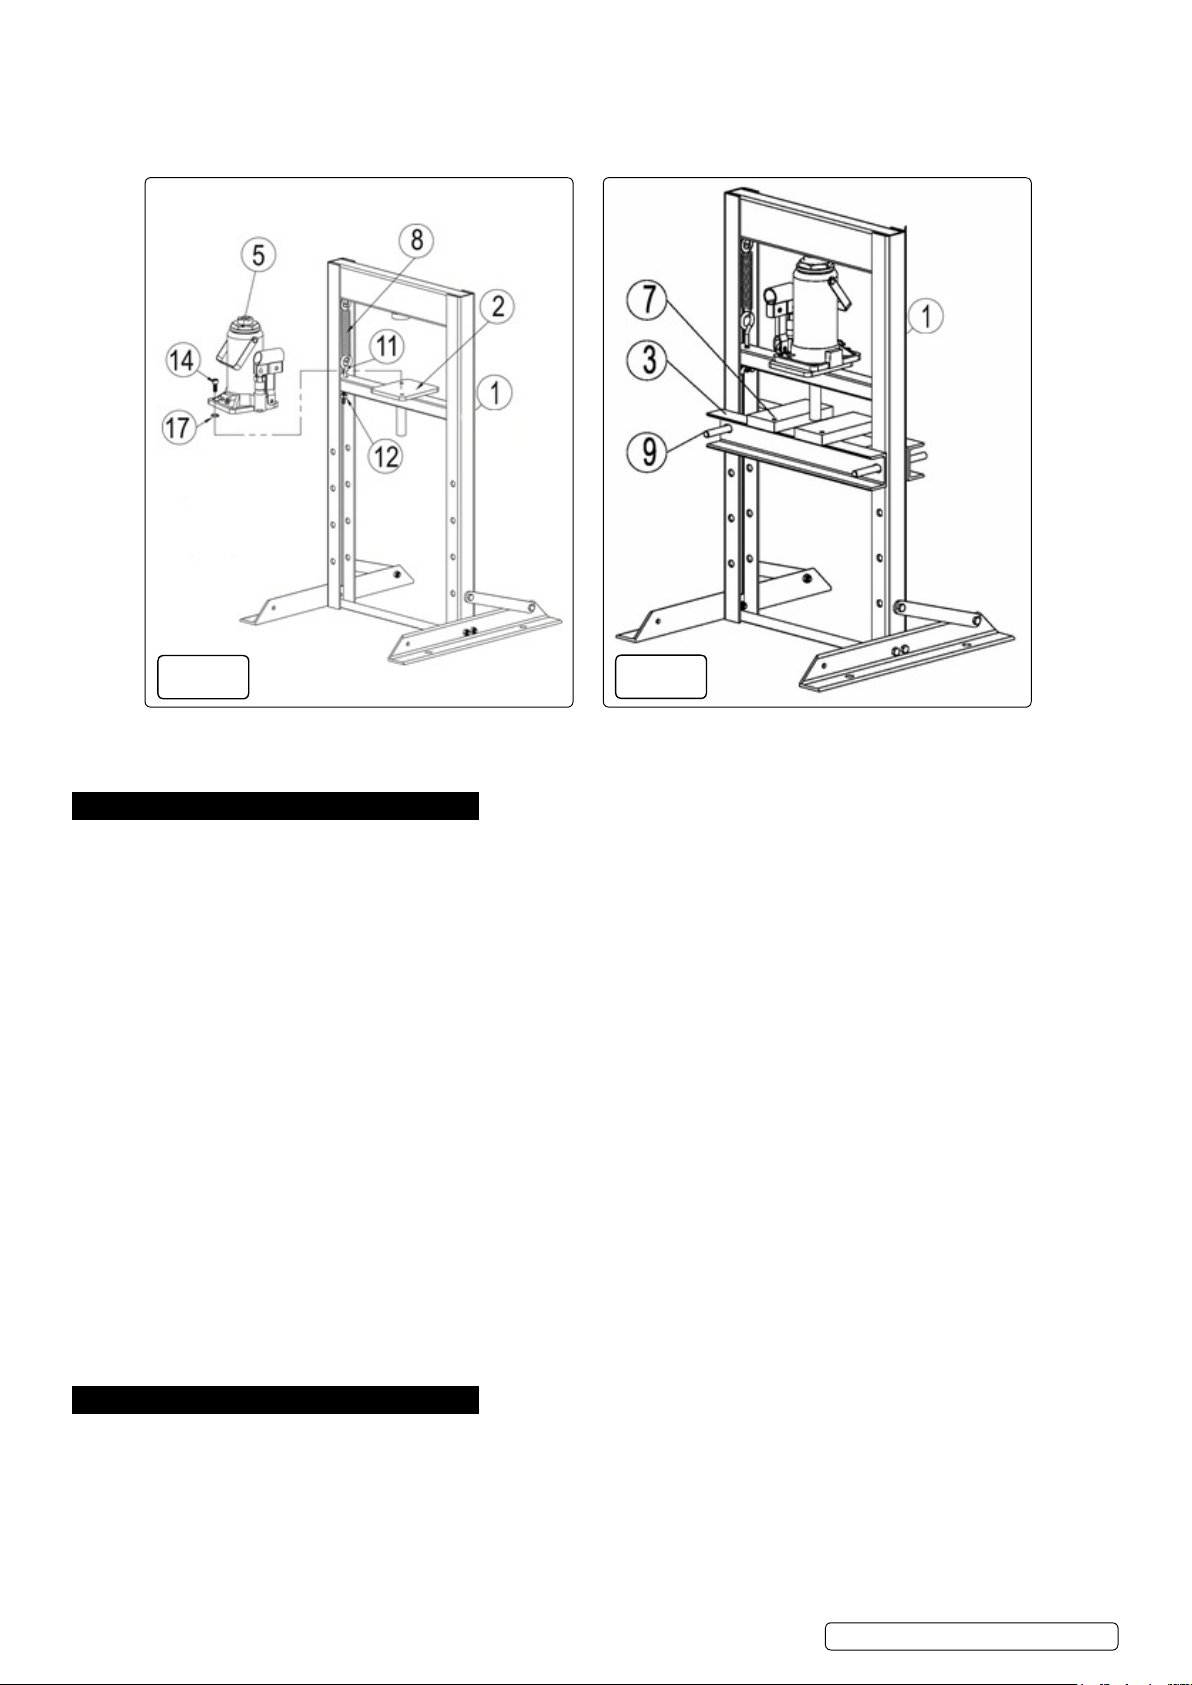
5.4.1. Hook one end of tension spring (#8) to main frame (#1). fix another end to Hook (#11), insert the hooks (#11) through the hole on jack
plate (#12), secure with wing nut m8 (#12). repeat for the other side.
5.4.2. Place the bottle jack (#5) to jack base plate (#2), x by using hex socket round head screw M8x20 (#14) and lock washer Ø8 #17).
5.4.3. Adjust the wing nut (#12), so that the tension springs is in the working state, the bottle jack can be free to return to the position.
Fig.3
5.5. Attach press platform g.4
5.5.1. Attach the press platform (#3) to main frame (#1), insert support rod (#9) to secure the press platform. Put the two press plates (#7) on
the platform.
Fig.4
6. preparation For use
6.1. Secure press to the bench/oor
WarninG! Always use another person when moving the press
6.1.1. move the press to the mounting location and drill four mounting holes in the feet of the press.
6.1.2. make a template to mark the spots where the four holes will be drilled in the bench.
6.1.3. check for any hidden wiring or cables, if needed change the location for the holes.
6.1.4. temporarily move the press to the side.
6.1.5. use a masonry drill bit to drill the four holes about 3”to 4” deep into the concrete or wood.
6.1.6. clean out the drilled holes and insert lag screw anchors (not included) into the holes.
6.1.7. Position the press and align the holes in the feet with the holes in the bench.
6.1.8. use four concrete anchor bolts or lag bolts (not included) to secure to the bench.
note: this press needs to be mounted to a bench of either concrete or wood, capable of supporting the weight of press and any
workpiece.
WarninG! to prevent serious injury do not use damaged equipment. if abnormal noise or vibration occurs have the problem
corrected before further use.
6.2. Before rst use
6.2.1. Before using the press check the hydraulic oil level in the bottle jack.
6.2.2. test the jack several times to make sure it operates correctly before actual use. if the jack does not work properly, bleed the excess air
following these steps:
a. open the release valve.
b. Remove the oil plug and ll the jack with hydraulic uid to full level.
c. Apply pressure to the saddle and pump the handle up and down several times.
d. check the oil level and if necessary top off with hydraulic oil.
e. replace the oil plug and close the release valve.
f. test the jack several more times for proper operation before using.
note: if after bleeding the excess air the jack will still not operate properly do not use the press until it has been repaired or
replaced.
7. operation
7.1. use the support rods (#9) to adjust the height of the press platform (#3).
note: the press platform needs to be in the highest position with the workpiece as close as possible to the ram of the jack plate.
7.2. Place the workpiece on the press plates (#7).
WarninG! make sure there are no obstructions under the press plates. obstructions will create an uneven surface which can cause
the press plates to break under pressure.
WarninG! When pressing two items together the items need to line up vertically. if they are not lined up one item may forcefully eject
sideways from the unit.
7.3. Put the handle (#18 Parts diagram only) in the jack sleeve and move the jack plate down until the ram of the jack plate contacts your
work piece.
© Jack sealey limited
Original Language Version
YK6ecB.V2 | issue:2 (3) 20/08/18
Page 4
7.4. continue to operate the handle to press the workpiece.
7.5. When the task is completed, carefully release the pressure by removing the handle and slowly turning the valve release screw on the
jack.
WarninG! After pressing the work piece stay clear during the release process as the jack may rise quickly.
8. maintenance
8.1. Before each use inspect the overall condition of the shop press for broken, cracked or bent parts that may affect the proper
operation.
8 do not use damaged equipment.
8.2. Before each use test the bottle jack for proper operation.
8.3. changing the hydraulic oil
8.3.1. change the hydraulic oil every two years as follows:
1. With the bottle jack in the lowered position remove the oil plug.
2. turn the jack so the old hydraulic oil will drain out completely.
3. fill with hydraulic jack oil until the oil begins to run out and reinstall the oil plug.
note: Always dispose of the old oil properly according to local regulations.
8.4. Periodically clean the tool with a clean cloth and detergent or a mild solvent and wipe dry.
9. troubleshootinG
WarninG! Always use caution when troubleshooting a press. resolve any and all issues before using this piece of equipment. never
use a damaged or malfunctioning press.
9.1. if there are problems with the press not operating correctly review the troubleshooting section for possible solutions. Always test the
press several times to make sure it is operating correctly before use.
note: if the solutions listed do not solve the problem do not use. repair or replace the press.
Jack
will
not
operate
ram
will
not lift
all the
way
X X make sure the release valve is closed. check release.
X X X Valves may be blocked or may not be fully closed.
X X X Jack may be low on oil. check and refill if needed.
X X X Jack may require bleeding.
ram
lowers
under
load
pump
stroke feels
spongy
handle
moves
when jack
is under
load
oil leaks
from oil
plug
possible solutions
to flush valves:
1. lower the saddle and close the release valve.
2. manually lift the saddle several inches.
3. open the release valve and force the saddle down as quickly
as possible.
X unit may have too much hydraulic oil in. check oil level.
enVironment protection
recycle unwanted materials instead of disposing of them as waste. All tools, accessories and packaging should be sorted, taken to
a recycling centre and disposed of in a manner which is compatible with the environment. When the product becomes completely
unserviceable and requires disposal, drain any fluids (if applicable) into approved containers and dispose of the product and fluids
according to local regulations.
note: it is our policy to continually improve products and as such we reserve the right to alter data, specifications and component parts without prior
notice.
important: no liability is accepted for incorrect use of this product.
Warranty: Guarantee is 12 months from purchase date, proof of which is required for any claim.
sealey Group, Kempson Way, suffolk business park, bury st edmunds, suffolk. ip32 7ar
© Jack sealey limited
Original Language Version
YK6ecB.V2 | issue:2 (3) 20/08/18
 Loading...