

Page 1
INSTRUCTIONS FOR
IMPORTANT: PLEASE READ THESE INSTRUCTIONS CAREFULLY. NOTE THE SAFE OPERATIONAL REQUIREMENTS, WARNINGS & CAUTIONS. USE
THE PRODUCT CORRECTLY AND WITH CARE FOR THE PURPOSE FOR WHICH IT IS INTENDED. FAILURE TO DO SO MAY CAUSE DAMAGE AND/OR
PERSONAL INJURY AND WILL INVALIDATE THE WARRANTY. KEEP THESE INSTRUCTIONS SAFE FOR FUTURE USE.
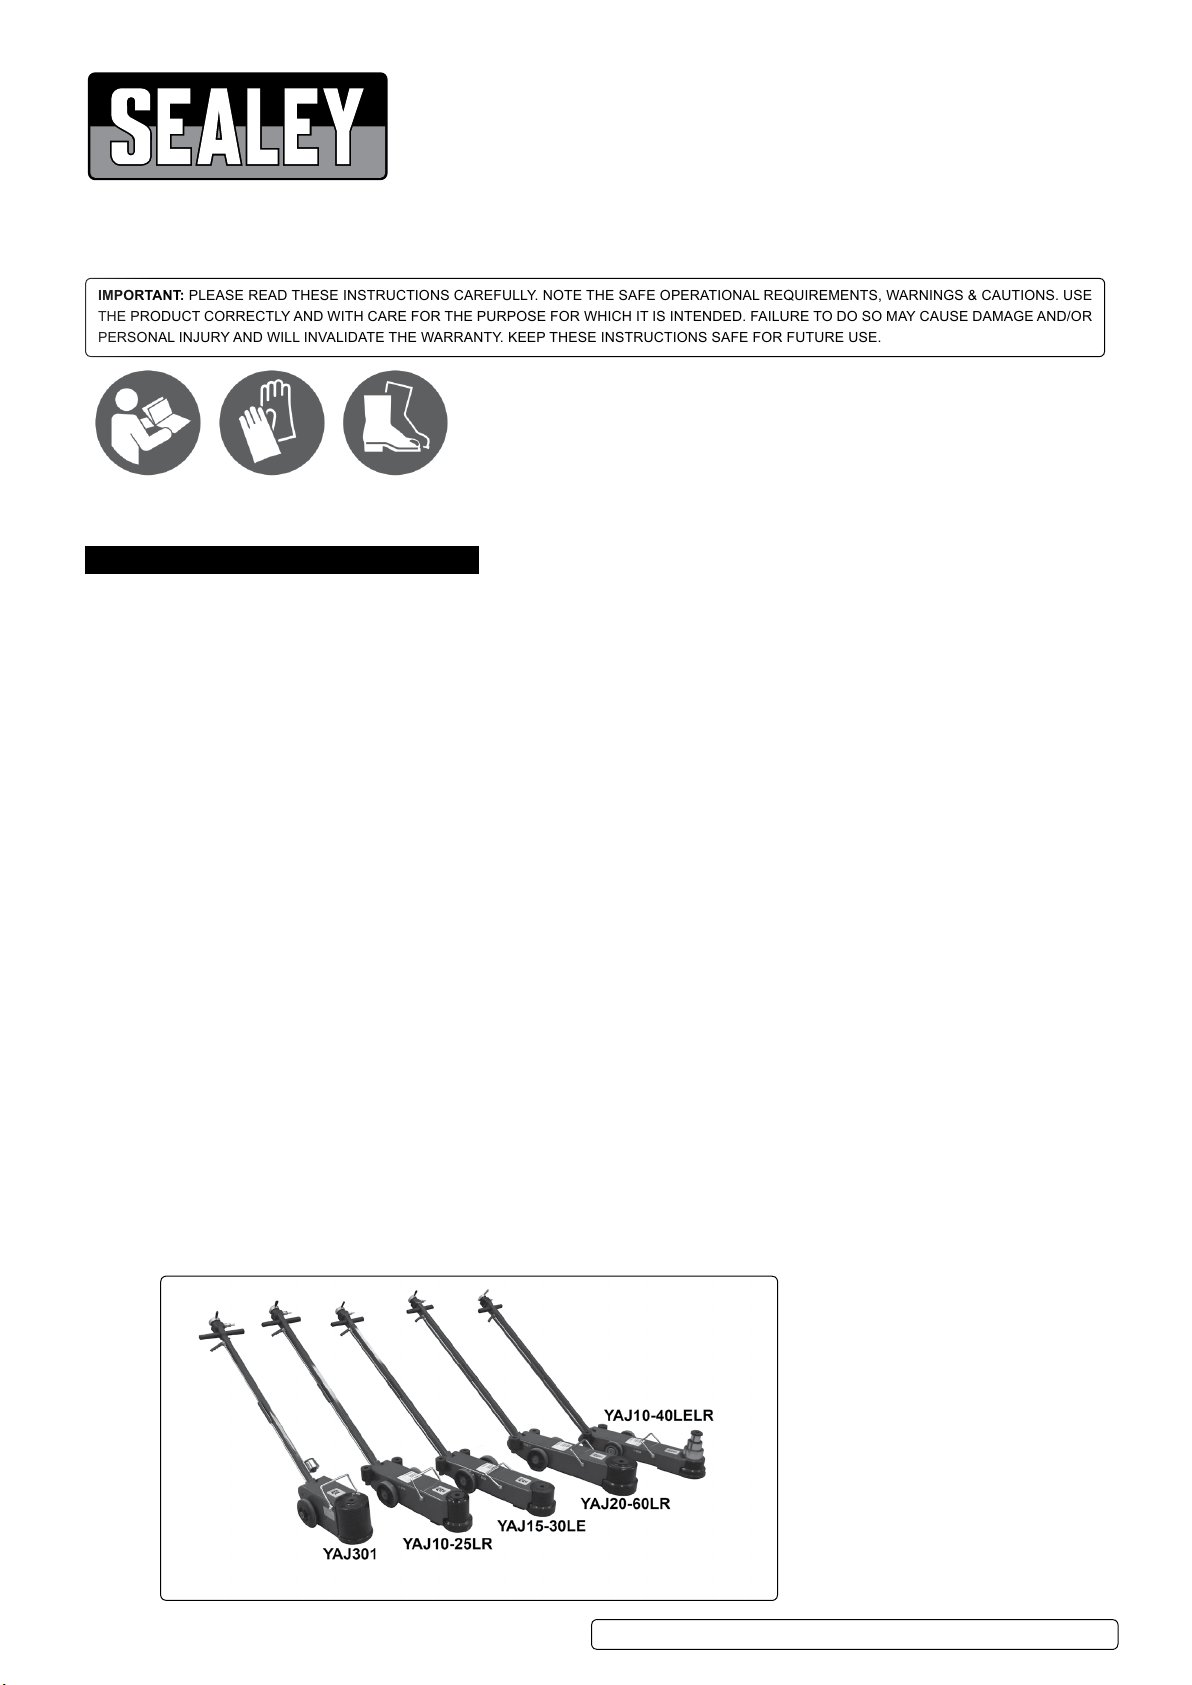
AIR OPERATED JACKS TELESCOPIC
MODEL NO’S:
YAJ301.V2, YAJ10-25LR, YAJ15-30LE,YAJ20-60LR, YAJ10-40LELR.V2
Thank you for purchasing a Sealey product. Manufactured to a high standard, this product will, if used according to these
instructions, and properly maintained, give you years of trouble free performance.
Refer to
instructions
Wear protective
gloves
Wear safety
footwear
1. SAFETY
9 Disconnect jack from air supply before changing parts, servicing or performing any maintenance.
WARNING! Ensure correct air pressure is maintained and not exceeded.
9 Keep air hose away from heat, oil and sharp edges. Check air hose for wear before each use, and ensure that all connections are
secure.
9 Ensure jack is kept clean and in good working order. Repair or replace damaged parts immediately.
9 Use recommended parts only. Incorrect parts may be dangerous and will invalidate the warranty.
9 Use a qualified person to lubricate and maintain the jack.
8 DO NOT use brake fluid to top up system. Use Sealey hydraulic oil only.
9 Locate jack in a suitable, well lit work area. Keep area clean and tidy and free from unrelated materials.
9 Use jack on level & solid ground, preferably concrete. Avoid tarmacadam since jack may sink in.
9 Place chocks under wheels of vehicle.
9 Ensure the vehicle handbrake is engaged (or in “PARK” mode), and switch the engine off.
9 Ensure minimum distance of 0.5m between vehicle as it tilts & static objects such as doors, walls, etc.
9 Ensure all non essential persons keep a safe distance and that there are no passengers in the vehicle to be jacked up.
9 Place jack under vehicle manufacturer’s recommended jacking points (see vehicle handbook).
9 Check that the jacking point is stable and centred on the jack saddle and is free from grease or oil.
▲ DANGER: Use jack for lifting only, NOT for supporting the raised load. Use correctly rated axle stands under vehicle before proceeding
with task.
8 DO NOT apply your body weight to the handle during jacking.
9 The handle is only for moving the jack to and from the lifting location.
8 DO NOT operate the jack if parts are missing or damaged.
8 DO NOT exceed the rated capacity of the jack.
8 DO NOT allow the vehicle to move during lifting.
8 DO NOT jack a vehicle which may result in the spillage of fuel, battery acid, or dangerous substances.
8 DO NOT work under the vehicle until axle stands have been positioned correctly.
8 DO NOT use the jack for purposes other than those for which it is designed.
8 DO NOT adjust the safety overload valve.
8 DO NOT snatch the hose from the air supply, and DO NOT direct air from the air hose at yourself or others.
9 Ensure there are no persons or obstructions beneath the vehicle before lowering.
9 When not in use disconnect jack from the air supply, and store in the lowered position in a safe, dry, childproof area.
WARNING! Turn off air supply and de-pressurise the control nozzle before removing the pump unit from any installation or mobile
system.
9 Failure to comply with this instruction may damage the unit and will invalidate your warranty.
© Jack Sealey Limited
Original Language Version
YAJ301.V2, YAJ10-25LR, YAJ15-30LE, YAJ20-60LR, YAJ10-40LELR.V2| Issue 1 01/09/17
Page 2
2. INTRODUCTION
Ideal for workshop or roadside use, these jacks take the effort out of lifting heavy plant, tractors and commercial vehicles. For extra safety, all
models feature dead man’s handle which also aids controlled lowering speed. All models supplied with extensions that close the gap between the
saddle of the jack and the jacking point.
3. SPECIFICATION
Model No YAJ301 YAJ10-25LR YAJ15-30LE YAJ20-60LR YAJ10-40LELR
Max. Capacity 30tonne 25tonnes 30tonne 60tonnes 40tonne
Min. Height 210mm 185mm 150mm 175mm 125mm
Maximum Height (inc. Extensions)/Capacity:
Stage 1 (mm/tonne) 463/30 402/25 343/30 377/60 302/40
Stage 2 (mm/tonne) - 497/10 409/15 458/40 351/20
Stage 3 (mm/tonne) - - - 542/20 404/10
Piston Stroke 133mm 192mm 139mm 247mm 151mm
Extensions 45/75mm 45/75mm 45/75mm 45/75mm 45/75mm
Chassis Length 490mm 770mm 810mm 875mm 830mm
Max. Length incl. handle 1700mm 2150mm 2190mm 2225mm 2210mm
Width with out wheels 176mm 161mm 215mm 215mm 179mm
Overall Width 290mm 282mm 295mm 295mm 282mm
Air Consumption 10.5cfm 11.5cfm 11.5cfm 11.5cfm 11.5cfm
Working Pressure 116-174psi 116-174psi 116-174psi 116-174psi 116-174psi
Weight 39Kg 53Kg 46Kg 73Kg 44Kg
4. ASSEMBLY
4.1. Attaching the Handle
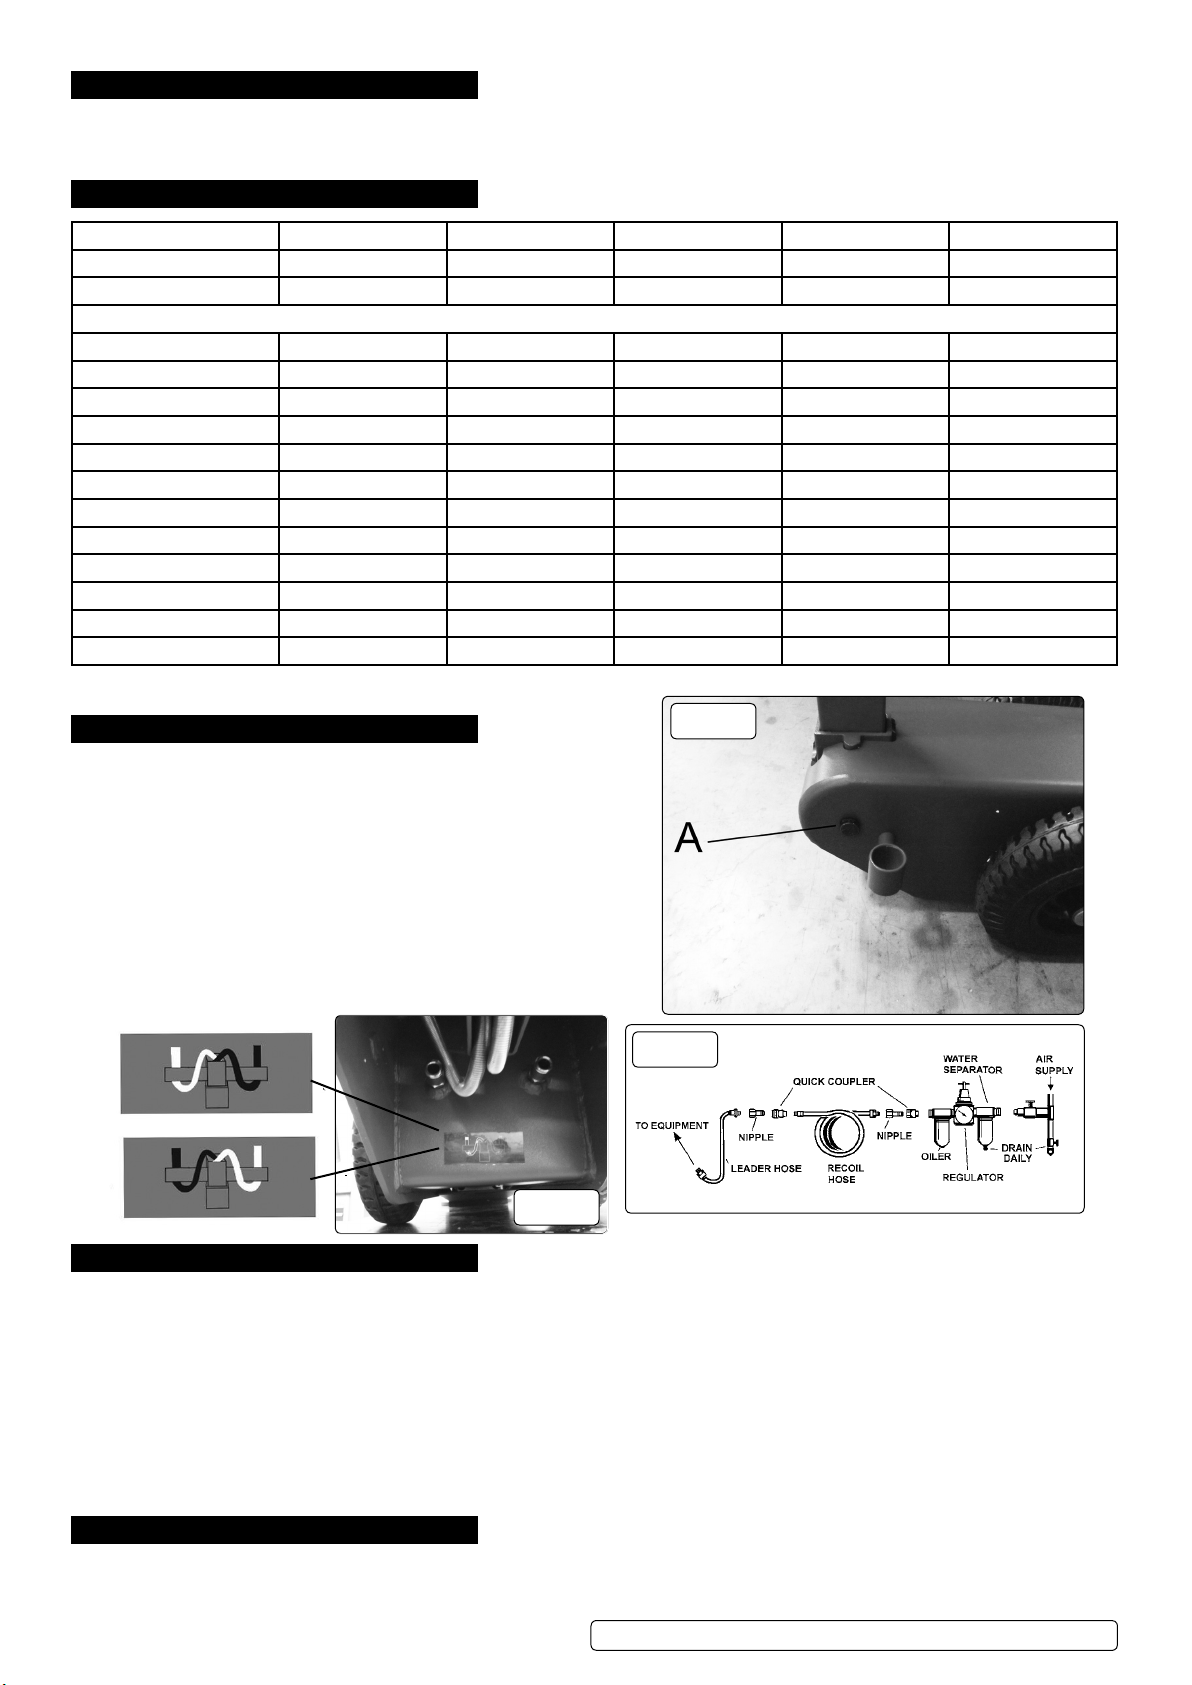
4.1.1. Removeacirclipfromeithersideofthelargepin(g.1A).
4.1.2. Slide out the pin and place the handle into the opening.
Slide the pin back through the jack, lining up the handle
and through the other side. Secure with circlips.
4.2. Air Hoses
4.2.1. Screw in the black and clear hoses from the handle into the jack
ensuring the black and clear hoses are wrapped around the
handle, inserting as shown by the label positioned beneath the
connectionpointsonthejack(g.2).Positionsoasnottoobstruct
the movement of the handle.
g.1
g.3
OR
g.2
5. AIR SUPPLY
5.1. Ensurethatthejackpneumaticswitchisinthe“off”positionbeforeconnectingtotheairsupply.g.4.
5.2. You will require an air pressure of between 116psi and 174psi and an air flow of 11.5cfm (10.5cfm for YAJ301) to get the best
performance from this jack.
WARNING! Ensure the air supply does not exceed the stated maximum pressure while operating the jack. Too high an air pressure and
unclean air will shorten the products life due to excessive wear, and may be dangerous causing possible damage and personal injury.
5.3. Drain the air tank daily. Water in the air line will damage the jack.
5.4. Clean the air inlet filter screen weekly.
5.5. Keep the air hose between the compressor and the air jack as short as possible, and install an air filter and oiler (fig.3).
5.6. Line pressure should be increased to compensate for unusually long air hoses (over 8 metres). The minimum hose diameter should be
3/8” I.D. and fittings must have the same inside dimensions.
5.7. Keep hose away from heat, oil and sharp edges. Check hoses for wear, and make certain that all connections are secure.
6. OPERATION
6.1. Preparation
6.1.1. Check that the air supply meets the requirements set out in section 5.
© Jack Sealey Limited
Original Language Version
YAJ301.V2, YAJ10-25LR, YAJ15-30LE, YAJ20-60LR, YAJ10-40LELR.V2| Issue 1 01/09/17
Page 3
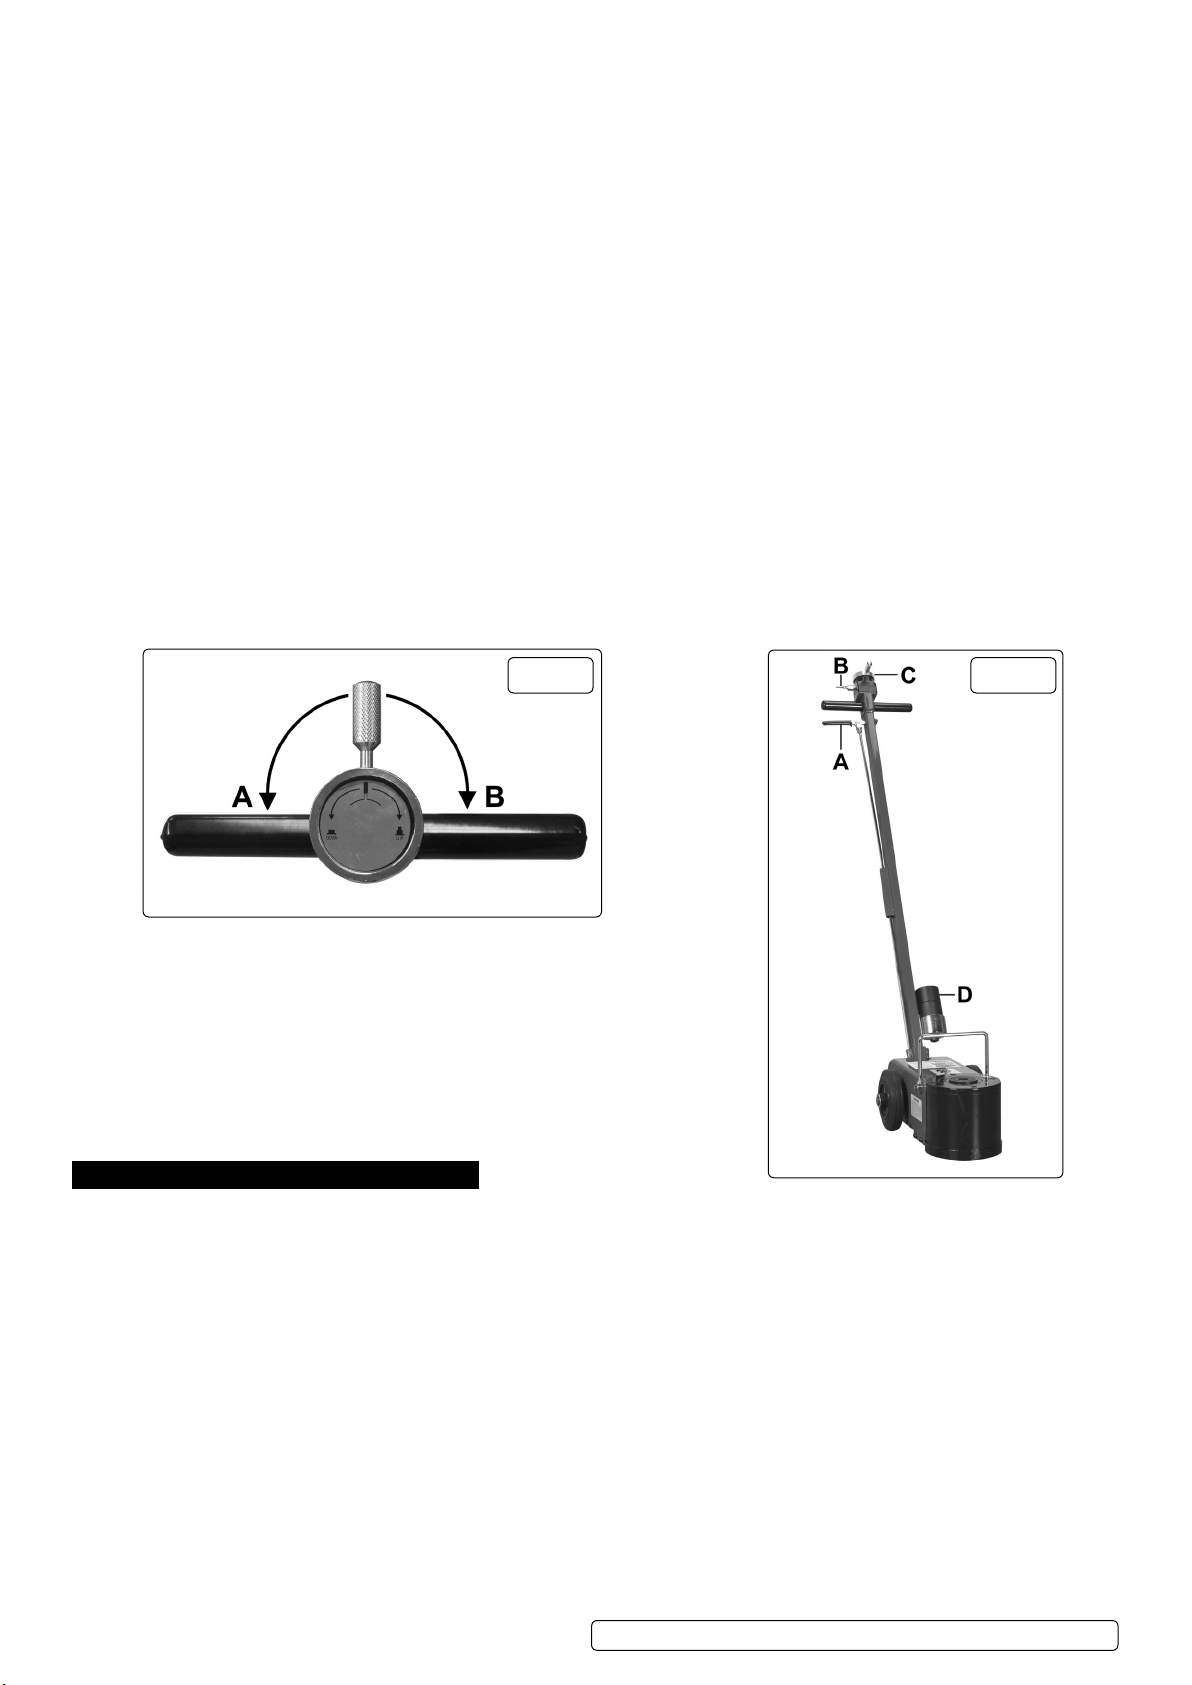
6.1.2. Connecttheairsupplytotheconnector(g.5.B).
6.1.3. Set the handle to the required angle using the handle release lever shown in (fig.5.A). Pull the lever upwards towards the main handle.
Move the handle to the required position and release the lever to lock it into position.
6.2. Purging the System
Beforeusingthejack,purgethehydrauliccircuitinordertoeliminateanypossibleairthatmayhaveenteredthesystemduring
transit.
6.2.1. Push the control lever (fig.4) to the ‘down’ (fig.4.A) position and hold it there for several seconds. Release the lever to the centre ‘hold’
position.
6.2.2. Now push the lever to the ‘up’ position(fig.4.B)
position and watch the jack as it retracts. The lowering movement should be smooth and without irregular stops.
and hold it there until the jack is fully extended. Push the lever to the ‘down’ (fig.4.A)
6.2.3. Repeat the raising and lowering cycle until the movement is smooth. Once this has been achieved this indicates that all air has been
expelled.
6.3. Using the Jack
WARNING! ensure you have read and understood the safety instructions in section 1 before commencing work.
Position the jack under the vehicle manufacturer’s recommended jacking point (see vehicle handbook).
Note:Usetheextensionpins(g.5.D)togetthejackclosertothejackingpointbeforeengagingthejack.Seespecicationfor
capacity when using the extension pins.
6.3.1. Whilst holding the main jack handle, lifting is achieved by pushing the controllevertothe‘up’position(g.4.B).
6.3.2. When the vehicle has reached the desired height release the control lever which will automatically return to the middle hold position
stoppinganyfurtherairow,holdingthejackattheheighttowhichithasbeenraised.
6.3.3. Place axle stands correctly in position and ensure section 1 safety instructions are strictly applied before performing any task.
6.4. Lowering the Jack
6.4.1. Ensure there are no persons or obstruction beneath the vehicle before lowering, and remove any axle stands.
6.4.2. Whilst holding the main jack handle lowering is achieved by pushing the control lever to down position (fig.4.A), the jack will
lower in a controlled manner.
6.4.3. Once completely lowered releasing the control lever will return to the middle hold position. Remove the jack from under the vehicle.
If you have finished using the jack, turn the air pressure supply off and disconnect from the air line and store the jack and air line
accordingly.
g.4 g.5
7. MAINTENANCE
IMPORTANT: Only fully qualified personnel should attempt maintenance or repair.
WARNING! Disconnect jack from air supply before changing parts, servicing or performing any maintenance.
7.1. When the jack is not in use, the piston must be in the lowest position to minimise corrosion.
7.2. Keep the jack clean and lubricate all moving parts with air tool oil on a regular basis.
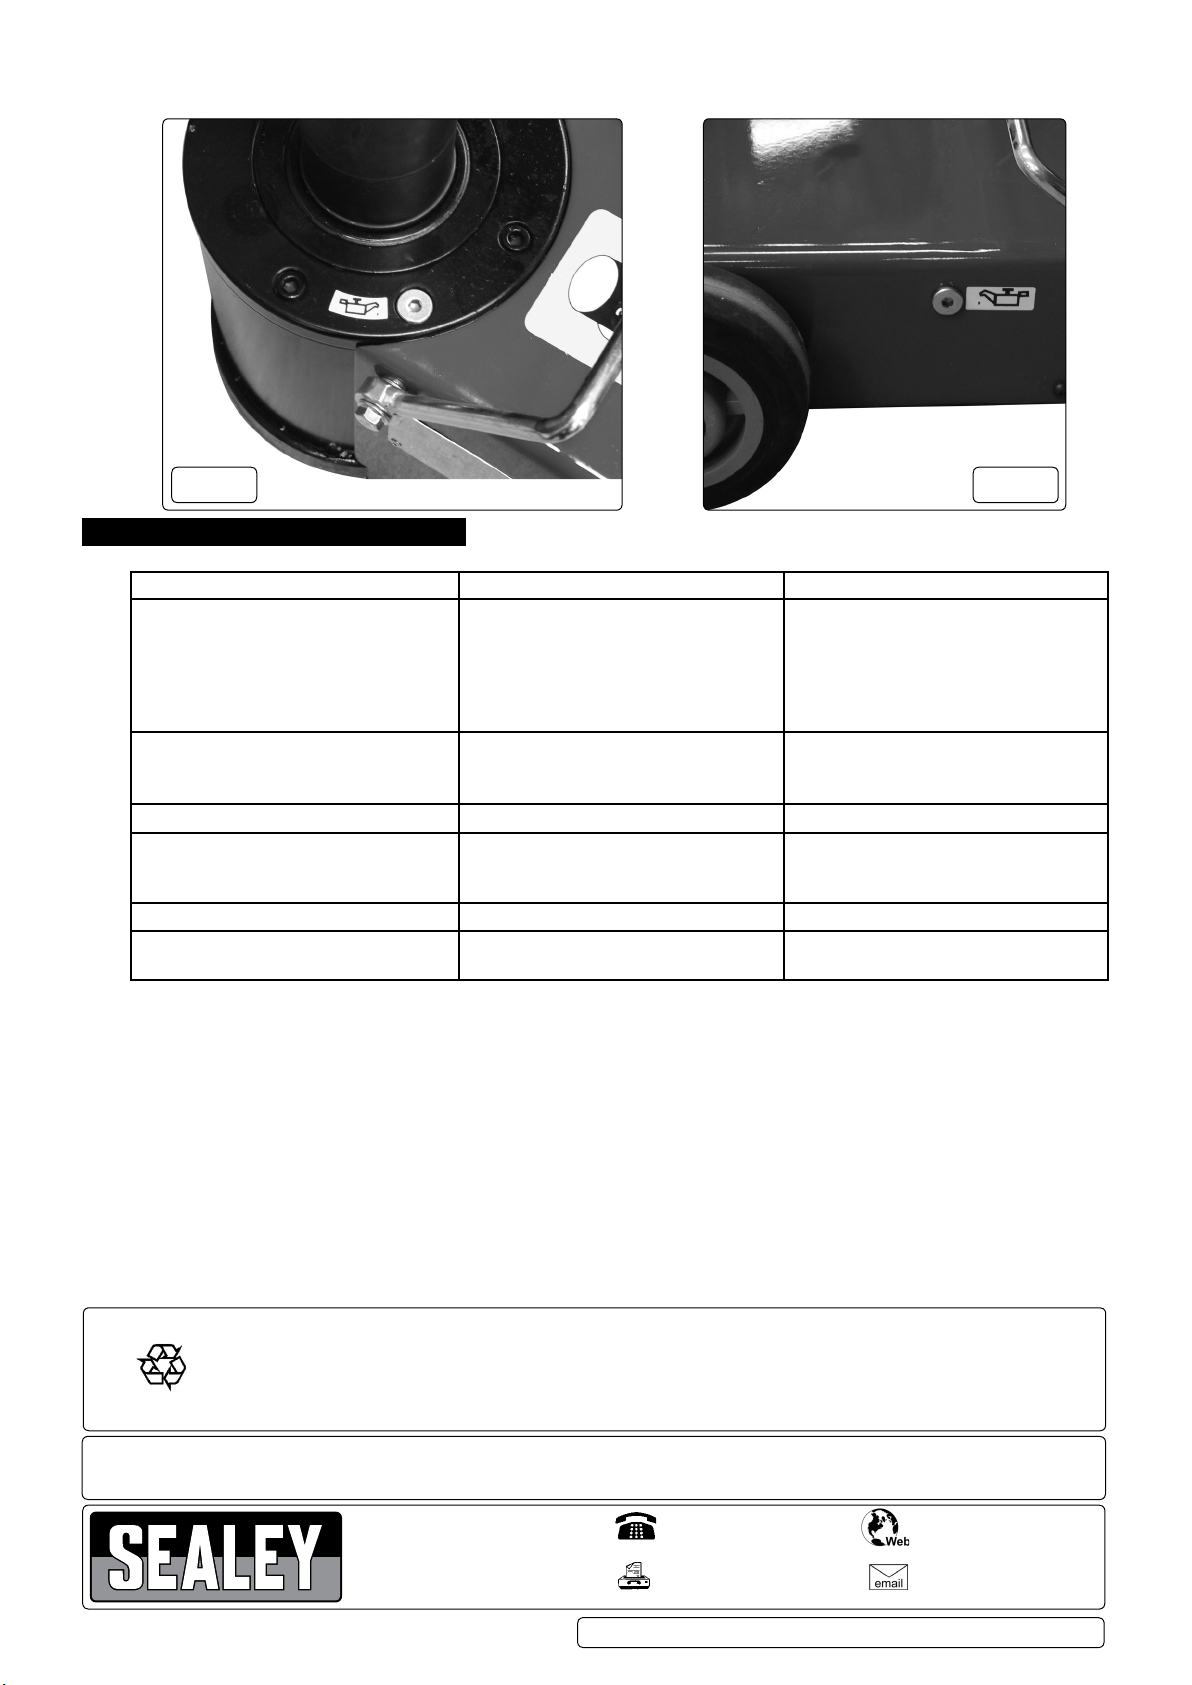
7.3. Tocheckoillevel,lowerjackfully.Removethellerplug(seeg.6forYAJ301org.7forothermodels).Theoilsurfaceshouldbe
levelwiththeindicatorinsidethellerhole,forYAJ301itshouldbelevelwiththebottomofthellerhole.Topuptheoillevelif
necessarybutdonotoverllasthejackwillbecomeinoperative.Ifinadvertentlyoverlledtheexcessoilshouldbepouredoff.After
topping up or pouring off excess oil it may become necessary to purge air from the unit. See section 6.2.
WARNING! DO NOTusebrakeuid,oranyuidotherthanhydraulicjackuidasthismaycauseseriousdamagetothejackandwill
invalidate the warranty!
7.4. Ensuretheairlterlocatedintheairvalveisclean.
7.5. Should the piston not rise and the oil level is correct, this may indicate a problem with air seeping into the hydraulic valve passage.
Purge any air from the system. See 6.2
7.6. Conrmthatthepistoncanrisetothehighestposition.
7.7. Beforeeachusecheckforbroken,cracked,bent,orlooseparts;anyvisibledamagetowelds,piston,pump,saddle,airconnector,
levers, frame and all parts including nuts, bolts, pins and other fasteners. If any suspect item is found, remove jack from service and
takenecessaryactiontoxtheproblem.DO NOT use the jack if believed to have been subjected to abnormal load or shock. Inspect
and take appropriate action.
7.8. After a year of extensive use, the oil should be replaced in order to extend the life of the jack. To drain the oil, remove
© Jack Sealey Limited
Original Language Version
YAJ301.V2, YAJ10-25LR, YAJ15-30LE, YAJ20-60LR, YAJ10-40LELR.V2| Issue 1 01/09/17
Page 4
thellerplugandvalve.Makesurethatnodirtisallowedtoenterthehydraulicsystem.See7.3.forrellinginstructions.
7.9. Periodically check the pump piston and piston rod for signs of corrosion. Clean exposed areas with a clean oiled cloth.
g.6 g.7
8. TROUBLESHOOTING
Problem
Jack does not lift but pump is working. 1. Oil exhausted.
Air pump does not operate. 1.Insufcientcompressorpower.
Jack stops before end of travel. 1.Hydraulicoilisinsufcient. 1. Replenish oil.
Jack lowers or does not hold in the raised
position.
Lifting is slow. 1. Air leakage due to worn servo-valve. 1. Replace servo-valve.
Pump continues to operate when the air
valves are closed.
IMPORTANT:NORESPONSIBILITYISACCEPTEDFORINCORRECTUSEOFTHEMACHINE.
Air / Hydraulic products are only repaired by local service agents. We have service/repair agents in all parts of the UK. DO NOT
RETURN JACKS TO US.
Please telephone us on 01284 757500 to obtain the address and phone number of your local agent. If jack is under guarantee
please contact your dealer.
De-commissioning the Jack
Should the jack become completely unserviceable and require disposal, draw off the oil into an approved container and dispose of
the jack and the oil according to local regulations.
Possible Cause
2. Air in hydraulic system.
3. Defective suction or delivery valves.
4. Defective packaging or O-ring.
5. Poor quality oil.
2. Pump oil used up.
1. Defective suction delivery, release or
safety valve.
2. Defective piston packing.
1. Air valve will not close. 1. Replace valve.
Remedy
1. Supply oil.
2. Drain air by opening cap plug or suction
and delivery valves.
3. Clean clogged valve.
4. Replace.
5. Replace oil.
1. Use a larger compressor.
2.Findleakandrectify,rellwithoil.
Rebuild and lubricate air valve.
1. Clean and adjust valve.
2. Replace packing.
Environmental Protection
Recycle unwanted materials instead of disposing of them as waste. All tools, accessories and packaging should be
sorted, taken to a recycling centre and disposed of in a manner which is compatible with the environment.
When the product becomes completely unserviceable and requires disposal, drain off any fluids (if applicable)
into approved containers and dispose of the product and the fluids according to local regulations.
NOTE: It is our policy to continually improve products and as such we reserve the right to alter data, specications and component parts without prior notice.
IMPORTANT: No liability is accepted for incorrect use of this product.
WARRANTY: Guarantee is 12 months from purchase date, proof of which will be required for any claim.
© Jack Sealey Limited
Sole UK Distributor, Sealey Group.
KempsonWay,SuffolkBusinessPark,
Bury St. Edmunds, Suffolk.
IP32 7AR
Original Language Version
YAJ301.V2, YAJ10-25LR, YAJ15-30LE, YAJ20-60LR, YAJ10-40LELR.V2| Issue 1 01/09/17
01284 757500
01284 703534
www.sealey.co.uk
 Loading...