

instructions for
I
MPORTANT:
PLEASE READ THESE INSTRUCTIONS CAREFULLY. NOTE THE SAFE OPERATIONAL REQUIREMENTS, WARNINGS & CAUTIONS. USE
THE PRODUCT CORRECTLY AND WITH CARE FOR THE PURPOSE FOR WHICH IT IS INTENDED. FAILURE TO DO SO MAY CAUSE DAMAGE AND/OR
PERSONAL INJURY AND WILL INVALIDATE THE WARRANTY. KEEP THESE INSTRUCTIONS SAFE FOR FUTURE USE.
and properly maintained, give you years of trouble free performance.
SubmerSible dirty water pump
automatic 133ltr/min 230v
model no: wpd133a
thank you for purchasing a Sealey product. manufactured to a high standard, this product will, if used according to these instructions,
and properly maintained, give you years of trouble free performance.
refer to
instruction
manual
1. SaFety
1.1. electrical SaFety
warninG! it is the user’s responsibility to check the following:
check all electrical equipment and appliances to ensure that they are safe before using. inspect power supply leads, plugs and all
electrical connections for wear and damage. sealey recommend that an rcd (residual current device) is used with all electrical
products. You may obtain an rcd by contacting your local sealey dealer.
if the product is used in the course of business duties, it must be maintained in a safe condition and routinely PAt (Portable Appliance
test) tested.
electrical safety information: it is important that the following information is read and understood.
1.1.1. ensure that the insulation on all cables and on the appliance is safe before connecting it to the power supply.
1.1.2. regularly inspect power supply cables and plugs for wear or damage and check all connections to ensure that they are secure.
1.1.3. important: Ensure that the voltage rating on the appliance suits the power supply to be used and that the plug is tted with the correct
fuse - see fuse rating in these instructions.
8 do not pull or carry the appliance by the power cable.
8 do not pull the plug from the socket by the cable.
8 do not use worn or damaged cables, plugs or connectors. ensure that any faulty item is repaired or
replaced immediately by a qualied electrician.
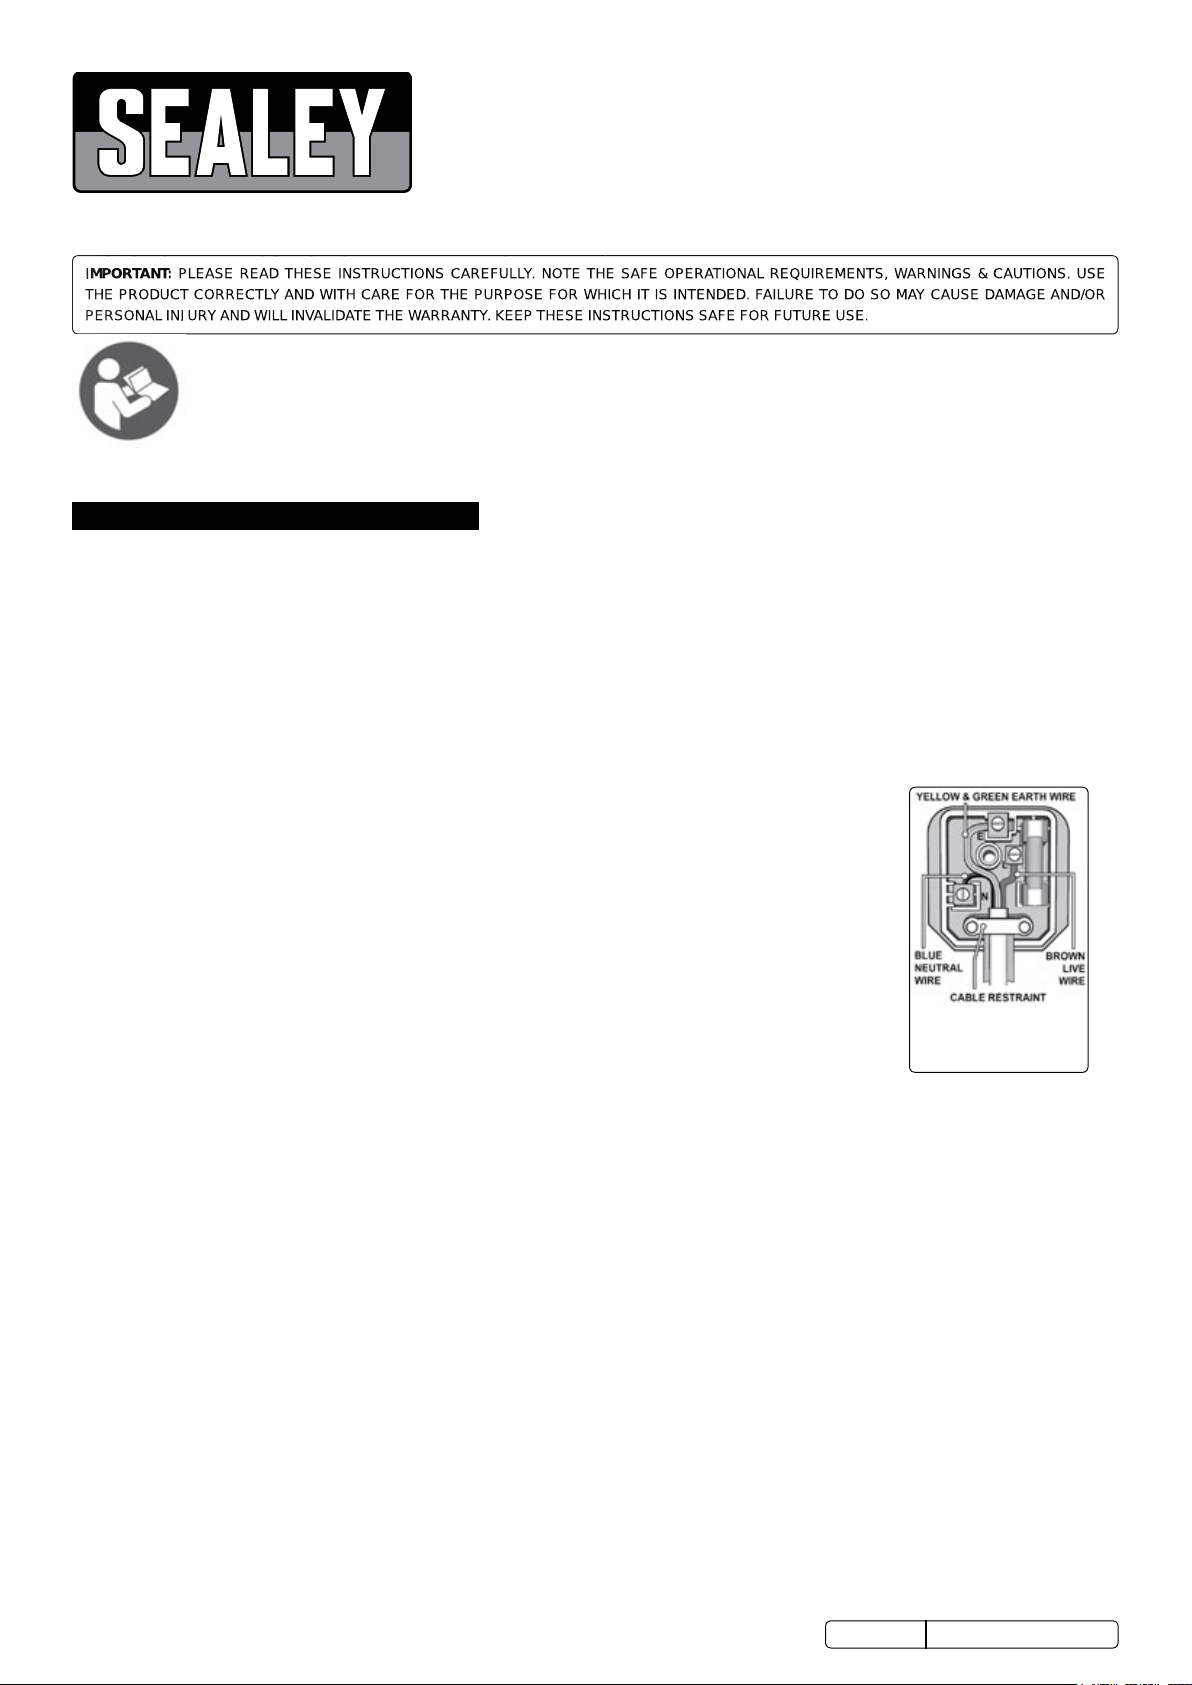
1.1.4. This product is tted with a BS1363/A 13 Amp 3 pin plug.
if the cable or plug is damaged during use, switch the electricity supply and remove from use.
Ensure that repairs are carried out by a qualied electrician.
Replace a damaged plug with a BS1363/A 13 Amp 3 pin plug. If in doubt contact a qualied electrician.
A) Connect the GREEN/YELLOW earth wire to the earth terminal ‘E’.
B) Connect the BROWN live wire to the live terminal ‘L’.
C) Connect the BLUE neutral wire to the neutral terminal ‘N’.
ensure that the cable outer sheath extends inside the cable restraint and that the restraint is tight.
Sealey recommend that repairs are carried out by a qualied electrician.
1.1.5. only allow the minimal amount of pump cable to enter water or wet areas. the electrical cable is designed
for use in water and must not be substituted. if damaged contact a qualified electrician.
1.1.6. extension cable use. only use a cable designed for use with water equipment. contact your dealer or a qualified electrician
for advice. ensure water is kept clear of electrical mains power supply. do not touch switch or plug with wet hands.
1.1.7. only allow the minimal amount of pump cable to enter water or wet areas. the electrical cable is designed for use in water and must
not be substituted. if damaged contact a qualified electrician.
1.1.8. extension cable use. only use a cable designed for use with water equipment. contact your dealer or a qualified electrician
for advice. ensure water is kept clear of electrical mains power supply. do not touch switch or plug with wet hands.
1.2. General SaFety
warninG! Pump must be used in accordance with Health & safety, government, local authority, and water authority rules and
regulations.
9 familiarise yourself with application and limitations, as well as the specific potential hazards peculiar to the pump.
warninG! disconnect the pump from the mains power before changing accessories, servicing or performing any maintenance.
9 maintain the pump in good condition (use an authorised service agent). Keep the pump clean.
9 replace or repair damaged parts. Use genuine parts only. Unauthorised parts may be dangerous and will invalidate the warranty.
9 if pump is used to pump water from a well, drain or deep receptacle, take adequate precautions to stop persons or animals from
falling in.
9 use the moulded handle to lower or raise the pump. it may be necessary to attach a suitable rope or pulley to the handle.
9 if the bottom of the water container is covered with sludge, sand, gravel or mud etc, suspend the pump or place it on a raised base to
operate above the solid matter. this is not essential but will increase the efficiency and longevity of the pump.
9 in flood situations, the user is responsible for ensuring that appropriate back-up procedures, alarms etc are correctly installed in case of
pump failure.
9 in swimming pools, fish ponds, etc, ensure location is clear of people and animals, including removal of fish from pond.
note: this pump is not designed for continuous use in a fish pond or similar water feature or display, see section 4 “operating
instructions”.
8 do not operate the pump if any parts are damaged or missing as this may cause failure and/or possible personal injury.
replacement fuse
rating:
5 amp
Original Language Version© Jack sealey limited
WPD133A Issue 2 (H, F) 02/01/18

8 do not use the pump for any purpose other than for that which it is designed.
8 do not use to pump chemicals, fuels, salt water, sea water, inflammable, corrosive, explosive or dangerous liquids.
8 do not use to pump septic tanks or settling pits.
8 do not operate the pump out of water. the pump pick up area must be completely submerged during operation.
8 do not exceed the maximum submersible depth of 7 metres.
8 do not operate the pump during freezing temperatures.
8 do not leave the pump in water that may freeze.
8 do not carry the pump by its electrical cable, or outlet pipe. use the moulded handle only (fig.1).
9 When not in use, switch off the pump and remove plug from the power supply. Rinse pump, drain out any
water and store in a frost free, safe location.
warninG! do not allow uncontrolled discharge of contaminated water which would pollute the environment.
2. i introduction
manufactured from corrosion resistant materials with stainless steel motor case and noryl base cover. fitted with automatic cut-out. minimum water
depth of 40mm. designed for operation in dense and dirty water. suitable for the effective drainage of cellars, sinks, cisterns, baths and the general
transfer of water and dense liquids.
3. SpeciFication
model no:................................ ..............................WPD133A
cutout:..................................... ..............................Automatic
outlet:...................................... ................”x”, “y” or “z” (g.2)
maximum output:.................... .................... 133ltr(30gal)/min
minimum Water Depth:.................................................40mm
maximum Water Depth:........... .......................................7mtr.
maximum Particle size:........... .....................................30mm
maximum Head:..................... ........................................5mtr.
motor Power:.................................................................400W
supply: ...........................................................................230V
4. operation
warninG! ensure you read, understand and apply safety instructions.
important as a guide limit the maximum continuous running time for the pump to six hours, followed by three hours
downtime.
4.1. fit an appropriate discharge pipe to pump outlet and secure with clip; inside diameter “x” “y” or “z” (fig.2). ensure the diameter of the
discharge pipe is the same as, or greater than, the outlet diameter. A smaller pipe will adversely effect the pump flow rate.
4.2. Position pump in the water, and place the outlet pipe securely in the discharge receptacle or area. We recommend the pump is
submerged with its discharge outlet facing up to release any trapped air.
4.3. Plug the pump into the electrical mains supply and switch on. the pump will automatically turn on as the level of water rises (fig.1a).
As water level lowers, the float will automatically switch the pump off as it reaches the minimum height (fig.1b). the float may be
adjusted by shortening or lengthening the cable using the notch in the handle. The pump will switch on if the water level is up to or
above the maximum length of the float cable. to function correctly the float must move freely. ensure the float can do so and that the
cable is not restricted. check that the pump and discharge are working correctly.
4.4. the water into which the pump is placed will act as the motor cooling agent. for this reason the pump must remain submerged at all
times. should the pump have to be used in shallow water (float switch overridden) do not operate “dry” for more than 10 minutes.
failure to follow this rule will damage the unit and will invalidate your warranty.
note: see fig.3 to determine minimum clearance required when using the pump in a restricted area, such as a well or a trough for
example.
fig.1
fig.2
fig.3
600
500 500
5. maintenance
warninG! With the exceptions listed below in “TROUBLESHOOTING”, all pump, float, electrical cable service maintenance and repair
must only be undertaken by an authorised service agent. failure to observe this rule may be dangerous and will invalidate your warranty.
warninG! ensure the pump is disconnected from the mains power supply before attempting any service or maintenance.
5.1. Keep all parts of the pump clean. rinse, drain and allow to dry before storing pump.
5.2. regularly check the water inlet on the base of the pump to ensure there are no blockages. to access the impeller, carefully undo the
base screws and remove base. clean impeller and replace base ensuring that the o-ring is correctly located.
© Jack sealey limited
Original Language Version
WPD133A Issue 2 (H, F) 02/01/18

8 do not dismantle any other part of the unit.
6. troubleShootinG
symptom Possible cause remedial Action
motor operates but there is no suction. 1. Water level below minimum suction
depth.
2. Air bubbles in pump accumulated during
submersion or float is incorrectly positioned so that pump does not cut out at
minimum level and sucks in air.
3. clogged intake filter or discharge pipe.
reduced water volume for level of water. 1. discharge pipe bent or pinched.
2. discharge pipe too narrow.
3. Pump partially blocked.
the pump will not start or suddenly stops
during operation.
1. no electrical power.
2. float not working.
3. Impeller jammed.
1. switch off the pump
2. release air by inclining the pump and
re-immersing it in water.
3. remove dirt and clean the unit.
1. straighten pipe.
2. use larger diameter pipe.
3. clean pump.
1. check cable, fuse and plug.
2. contact authorised service agent.
3. clean the pump.
weee reGulationS
Dispose of this product at the end of its working life in compliance with the EU Directive on Waste Electrical and Electronic Equipment
(WEEE). When the product is no longer required, it must be disposed of in an environmentally protective way. Contact your local solid
waste authority for recycling information.
environment protection
recycle unwanted materials instead of disposing of them as waste. All tools, accessories and packaging should be sorted, taken to
a recycling centre and disposed of in a manner which is compatible with the environment. When the product becomes completely
unserviceable and requires disposal, drain any fluids (if applicable) into approved containers and dispose of the product and fluids
according to local regulations.
note: it is our policy to continually improve products and as such we reserve the right to alter data, specifications and component parts without prior
notice.
important: no liability is accepted for incorrect use of this product.
warranty: Guarantee is 12 months from purchase date, proof of which is required for any claim.
Sealey Group, Kempson way, Suffolk business park, bury St edmunds, Suffolk. ip32 7ar
01284 757500 01284 703534 sales@sealey.co.uk www.sealey.co.uk
© Jack sealey limited
Original Language Version
WPD133A Issue 2 (H, F) 02/01/18
 Loading...