

Sealey WPB050,WPB062S Instructions Manual

INSTRUCTIONS FOR:
SURFACE MOUNTING BOOSTER PUMPS 230V
MODEL No's: WPB050 & WPB062S
Thank you for purchasing a Sealey product. Manufactured to a high standard this product will, if used according to these instructions and
properly maintained, give you years of trouble free performance.
IMPORTANT: PLEASE READ THESE INSTRUCTIONS CAREFULLY. NOTE THE SAFE OPERATIONAL REQUIREMENTS, WARNINGS AND
CAUTIONS. USE THE PRODUCT CORRECTLY AND WITH CARE FOR THE PURPOSE FOR WHICH IT IS INTENDED. FAILURE TO DO SO MAY
CAUSE DAMAGE AND/OR PERSONAL INJURY AND WILL INVALIDATE THE WARRANTY. PLEASE KEEP INSTRUCTIONS SAFE FOR FUTURE USE.
1. SAFETY INSTRUCTIONS
1.1. ELECTRICAL SAFETY
WARNING! It is the responsibility of the owner and the operator to read, understand and comply with the following:
You must check all electrical products, before use, to ensure that they are safe. You must inspect power cables, plugs, sockets and any other connectors
for wear or damage. You must ensure that the risk of electric shock is minimised by the installation of appropriate safety devices. A Residual Current
Circuit Breaker (RCCB) should be incorporated in the main distribution board. We also recommend that a Residual Current Device (RCD) is used.
It is particularly important to use an RCD with portable products that are plugged into a supply which is not protected by an RCCB. If in any doubt consult
a qualified electrician. You may obtain a Residual Current Device by contacting your Sealey dealer.
You must also read and understand the following instructions concerning electrical safety.
1.1.1. The Electricity at Work Act 1989 requires that all portable electrical appliances, if used on business premises, are tested by a qualified electrician, using a
Portable Appliance Tester (PAT), at least once a year.
1.1.2. The Health & Safety at Work Act 1974 makes owners of electrical appliances responsible for the safe condition of those appliances and the safety of the
appliance operators. If in any doubt about electrical safety, contact a qualified electrician.
1.1.3. Ensure that the insulation on all cables and on the appliance is safe before connecting it to the power supply. See 1.1.1. and 1.1.2. and use a Portable
Appliance Tester.
1.1.4. Ensure that cables are always protected against short circuit and overload.
1.1.5. Regularly inspect power supply cables and plugs for wear or damage and check all connections to ensure that none is loose.
1.1.6. Important: Ensure that the voltage marked on the appliance matches the power supply to be used and that the plug is fitted with the correct fuse - see
fuse rating at right.
1.1.7. DO NOT pull or carry the appliance by the power cable.
1.1.8. DO NOT pull the plug from the socket by the cable.
1.1.9. DO NOT use worn or damaged cables, plugs or connectors. Immediately have any faulty item repaired or
replaced by a qualified electrician. When a BS 1363/A UK 3 pin plug is damaged, cut the cable just
above the plug and dispose of the plug safely.
Fit a new plug according to the following instructions (UK only).
a) Connect the GREEN/YELLOW earth wire to the earth terminal ‘E’.
b) Connect the BROWN live wire to the live terminal ‘L’.
c) Connect the BLUE neutral wire to the neutral terminal ‘N’.
d) After wiring, check that there are no bare wires, that all wires have been correctly
connected, that the cable outer insulation extends beyond the cable restraint and that the restraint is
tight. Double insulated products, which are always marked with this symbol , are fitted with live
(brown) and neutral (blue) wires only. To rewire, connect the wires as indicated above DO NOT connect either wire to the earth terminal.
1.1.10. Products which require more than 13 amps are supplied without a plug. In this case you
must contact a qualified electrician to ensure that a suitably rated supply is available.
We recommend that you discuss the installation of an industrial round pin plug and socket with your electrician.
1.1.11. If an extension reel is used it should be fully unwound before connection. A reel with an RCD fitted is preferred since any appliance plugged into it will be
protected. The cable core section is important and should be at least 1.5mm², but to be absolutely sure that the capacity of the reel is suitable for this
product and for others which may be used in the other output sockets, we recommend the use of 2.5mm² section cable.
1.2. GENERAL SAFETY
WARNING! Pump must be used in accordance with Health & Safety, government, local authority and water authority rules and regulations.
Familiarise yourself with the application, limitations and potential hazards peculiar to the pump.
WARNING!Disconnect the pump from the mains power before servicing or performing any maintenance.
Maintain the pump in good condition (use an authorised service agent). Keep the pump clean.
Replace or repair damaged parts. Use genuine parts only. Unauthorised parts may be dangerous and will invalidate the warranty.
Only use for pumping cold or warm water (NOT exceeding 35°C).
If used in situations of possible flooding, user is responsible for installing appropriate back up procedures, alarms etc. in case of pump failure.
If used with swimming pools, fish ponds, etc., ensure areas are clear of people and animals (including removal of fish from ponds). Note that this pump is not
designed for continuous use in a fish pond or similar water feature or display.
DO NOT operate the pump if any parts are damaged or missing as this may cause failure and/or possible personal injury.
DO NOT use the pump for any purpose other than for which it is designed and DO NOT modify it in any way.
DO NOT use to pump chemicals, fuels, fatty liquids or salt water.
DO NOT pump sludge, sand, gravel, mud, or fibrous materials. Ensure the inlet hose will NOT pick up any solid materials. Sand and such substances will
reduce working life of pump, and invalidate your warranty.
DO NOT use to pump septic tanks or settling pits.
DO NOT submerge the pump or the electrical cable in water. Protect the pump from external wet conditions.
DO NOT operate pump during freezing temperatures. DO NOT allow any part of the pump or pipes to freeze.
DO NOT carry pump by the cable, or piping. Only use the handle.
Make sure the work area is tidy and well lit.
Keep children and bystanders away from the work area.
DO NOT operate pump whilst tired or under the influence of alcohol, drugs or medication.
Maintain correct balance and footing, wear non slip shoes whilst positioning the pump.
DO NOT point the water discharge towards another person, electrical wiring or equipment.
Make sure that the pump is correctly positioned to prevent movement during use. Ensure that the area around the pump is kept clear.
When not in use switch off pump and remove plug from power supply. Rinse pump, drain out any water and store
in a frost free, safe location.
WARNING! DO NOT allow uncontrolled discharge of contaminated water, thus polluting the environment.
NOTE: This appliance is not intended for use by persons (including children) with reduced physical, sensory or mental capabilities or lack of experience and
knowledge, unless they have been given supervision or instruction concerning the use of the appliance by a person responsible for their safety. Children should be
supervised to ensure that they do not play with the appliance.
RECOMMENDED
FUSE RATING: 13AMP
© Jack Sealey Limited
Original Language Version
WPB050 & WPB062S Issue: 2(I)- 22/12/15
2. INTRODUCTION & SPECIFICATION
WPB050: Manufactured from high impact thermoplastic material for added durability. Ideal for boosting or maintaining water pressure within the home or garden
water supplies. Fitted with automatic pressure cut-off and non-return valve. Suitable for lifting water up to 8 metres.
WPB062S: Manufactured from high impact stainless steel for added durability and rust proofing. Ideal for boosting or maintaining water pressure within the home
or garden water supplies. Fitted with automatic pressure cut-off and non-return valve. Suitable for lifting water up to 8 metres.
Model No. Cut-Out Outlet OD Maximum Maximum Motor Input Maximum Maximum
Output Head Particle Size Suction Height
WPB050 Manual 1"BSP 50ltr(11gal)/min 35mtr 600W 230V 1mm 8mtr
WPB062S Manual 1"BSP 62ltr(13gal)/min 46mtr 1200W 230V 1mm 8mtr
3. INSTALLATION
3.1. GENERAL CARE INSTRUCTIONS
3.1.1. Keep the pump clean and well maintained.
3.1.2. DO NOT use the pump if any part of it is damaged. Have it inspected by your local Sealey dealer.
3.1.3. DO NOT run the pump dry. Make sure that the pump is already lled or ready to be lled with water, before use.
3.1.4. DO NOT overtighten the ller plugs as this will damage its threads.
3.1.5 Make sure the pump securely anchored, through the holes in its feet, in a horizontal position.
3.1.6. The pump is designed to pump water only, DO NOT use it to pump ammable or corrosive liquids.
3.1.7. Make sure that a strainer is always connected to the inlet hose to prevent debris from being drawn up and into the pump causing damage.
3.2. PREPARATION FOR USE
WARNING! DO NOT connect the pump to the mains electrical supply until all hose installation is completed.
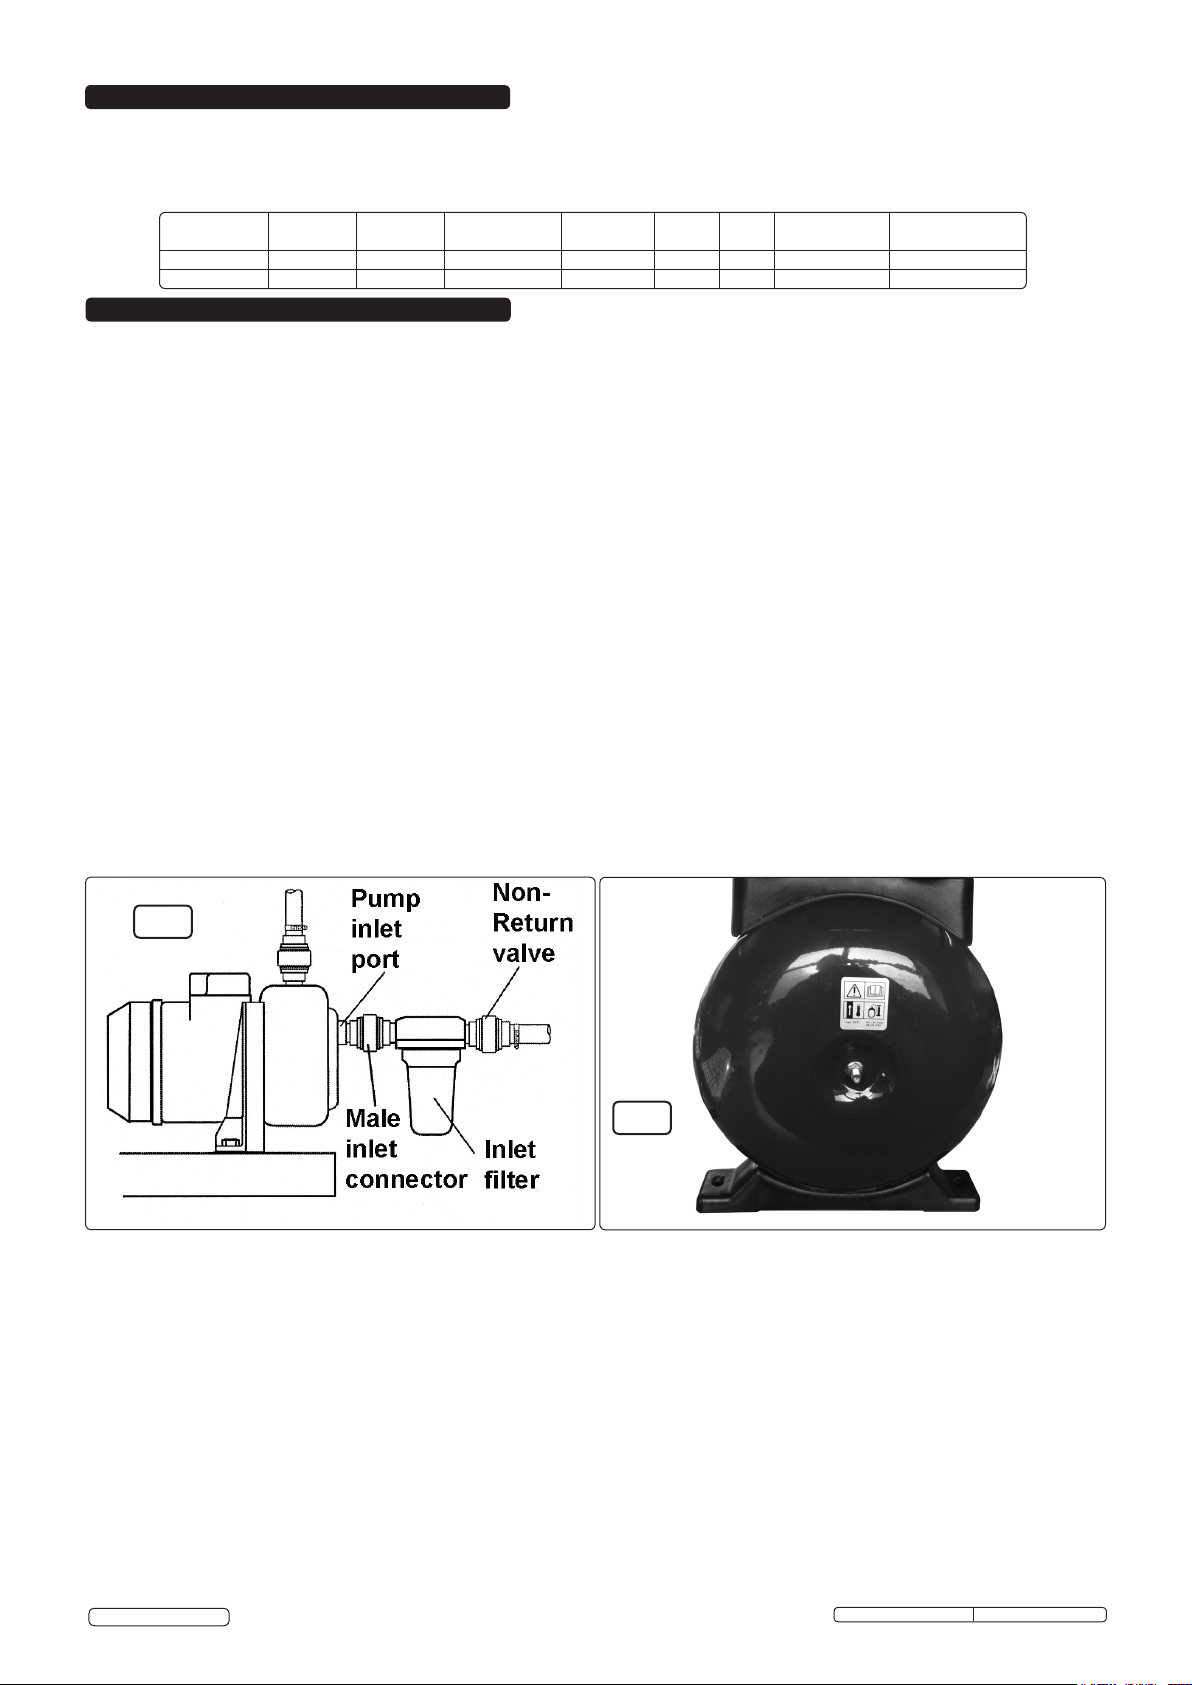
3.2.1. Connect a male inlet connector into the pump and hand tighten (g.1). Ensure that the direction of ow arrow is pointing to the pump.
3.2.2. Screw a non return valve (not supplied) to an inlet lter (not supplied), make sure it is correctly orientated, with the spring loaded valve able to pass water
into the lter. (Sealey recommend Water Pump Filters part no. WPF1 or part no. WPF2 for use with these pumps). Make sure the bowl of the lter is
hanging down.
DO NOT over tighten any of the connections.
3.2.3. Positioning the pump (Refer to g.1)
• check hoses for damage, they must be protected and supported as they are considerably heavier when lled with water.
• the pump must always be operated in a horizontal position with the outlet port pointing vertically upwards.
• use the xing holes in the feet to anchor the pump in its operating position.
• make sure there is good air circulation around the pump motor.
• the pump must not become soaked with water, neither the motor or the terminal box are waterproof.
• place the pump as close to the water source as possible.
• Make sure there is adequate drainage for the water that is discharged.
3.2.4. Pipe connections:
• use as large a diameter inlet pipe as practical, otherwise the performance of the pump will be affected.
• a gate valve may be positioned on the outlet side of the pump. This can be used to regulate the ow of water, and be useful in priming the pump.
WARNING! DO NOT place any restriction on the inlet side of the pump, unless it is an isolator valve in a gravity fed system. The pump should not be used
with the delivery valve closed.
• if the pump is to be permanently fixed the fittings to the pump must be flexible. Short pieces of hose should be fitted to form the join to any rigid pipes.
• ensure there are no air leaks as this will prevent effective priming and affect the pump's capacity.
• make sure all pipes are kept as short and straight as possible.
• hoses laid across roadways need to be protected by planks to reduce "hydraulic shock" caused by vehicles running over them.
fig.1
fig.2
3.2.5. Foot Valve/Filter
If the pump is used to draw raw water from a well or excavation a foot valve/coarse lter should be tted to the lower end of the suction hose, (see g.2).
This will retain water in the suction system and prevent large objects entering the pump body. It may be necessary to keep the foot valve clean by:
• constructing a bed of stones to rest the foot valve on.
• position the valve to clear of the bottom of the pit, pond etc.
• securing the foot valve inside a basket or bucket.
3.2.6. Preparing the Booster Pressure Tank
An air pressure tank and regulator provide a constant water pressure at the outlet. The pump automatically cuts in when the water pressure reaches a
preset value. The regulator is pre-set at the factory and must not be altered.The following proceedure must be completed before connecting to the water
supply.
• For the system to work correctly the tank must be pressurised to its rated operating pressure of between1.8 bar (26psi) and 2.0 bar (29psi).
• Unscrew the cap on the end of the tank to reveal the air valve (see g.2).
• Use an air line or foot pump to pressurise the tank.
• check the pressure using a standard pressure gauge, replace the cap when nished.
3.2.7. Priming the Pump
It is essential that all connections and hoses are completely tight for the system to work.
This is a self priming pump but the inlet side of the pump still needs to be completely lled with water before initial starting or if the system has been drained
for any other reason.
• remove ller plug (g.3) and slowly ll with water until all the air is expelled.
Note: Relling is necessary if the pump has been drained or if the water has been lost. DO NOT allow the pump to run dry.
• open all valves on the outlet side of the pump to achieve as great a ow as possible.
© Jack Sealey Limited
Original Language Version
WPB050 & WPB062S Issue: 2(I)- 22/12/15
 Loading...