

Page 1
COMPRESSION, LEAKAGE & TDC KIT
IMPORTANT: PLEASE READ THESE INSTRUCTIONS CAREFULLY. NOTE THE SAFE OPERATIONAL REQUIREMENTS, WARNINGS & CAUTIONS. USE
THE PRODUCT CORRECTLY AND WITH CARE FOR THE PURPOSE FOR WHICH IT IS INTENDED. FAILURE TO DO SO MAY CAUSE DAMAGE AND/OR
PERSONAL INJURY AND WILL INVALIDATE THE WARRANTY. KEEP THESE INSTRUCTIONS SAFE FOR FUTURE USE.
MODEL NO: VSE3156.V3
Thank you for purchasing a Sealey product. Manufactured to a high standard, this product will, if used according to these
instructions, and properly maintained, give you years of trouble free performance.
Refer to
instructions
Wear eye
protection
Wear protective
gloves
Wear safety
footwear
Wear protective
clothing
1. SAFETY
WARNING! Ensure all Health and Safety, local authority and general workshop practice regulations are adhered to when using these
tools.
8 DO NOT use tools if seals or threads are damaged. Any defective seal MUST be changed before use to avoid incorrect readings.
9 Maintain the tools in a good, clean condition for best and safest performance.
9 Ensure that a vehicle that has been jacked up is adequately supported with axle stands.
9 Wear approved eye protection. A full range of personal safety equipment is available from your Sealey Stockist.
9 Wear suitable clothing to avoid snagging, tie back long hair and DO NOT wear jewellery.
9 Ensure any disconnected fuel pipes are plugged to avoid spillage.
9 Ensure that the correct connector is used for the engine/vehicle being tested.
9 Always release the pressure from the gauge before disconnecting the quick release coupling.
9 Account for all tools, and parts being used and DO NOT leave them in or near the engine.
WARNING! Select neutral (or ‘park’ if automatic transmission) and keep hands clear of the engine as engine rotation may occur
when using these tools. The ignition MUST BE turned o, and only switched on when instructed to do so.
WARNING! (Leakage Tester) Turn regulator knob fully anti-clockwise before connecting to compressed air. Excess pressure will
damage the gauge and will invalidate the warranty.
IMPORTANT: Always refer to the vehicle manufacturer’s service instructions, or a proprietary manual, to establish the current
procedure and data. These instructions are provided as a guide only.
9 When not in use, return all parts to the protective case and store this in a safe, dry, childproof location.
WARNING! The warnings, cautions and instructions referred to in this manual cannot cover all possible conditions and situations
that may occur. It must be understood that common sense and caution are factors which cannot be built into this product, but must be
applied by the operator.
2. INTRODUCTION
A comprehensive kit for testing the compression and leakage on both diesel and petrol vehicles. Features 600psi gauge with large rubber
bumper, straight and right angled quick connect ttings and an extensive range of spark/glow plug and injector adaptors. Includes TDC nder,
ideal for use when the engine has no crankshaft timing marks. Supplied in carry-case. See instructions on Sealey website for complete vehicle
applications.
© Jack Sealey Limited
Original Language Version
VSE3156.V3 Issue 2 (HF) 13/03/19
Page 2
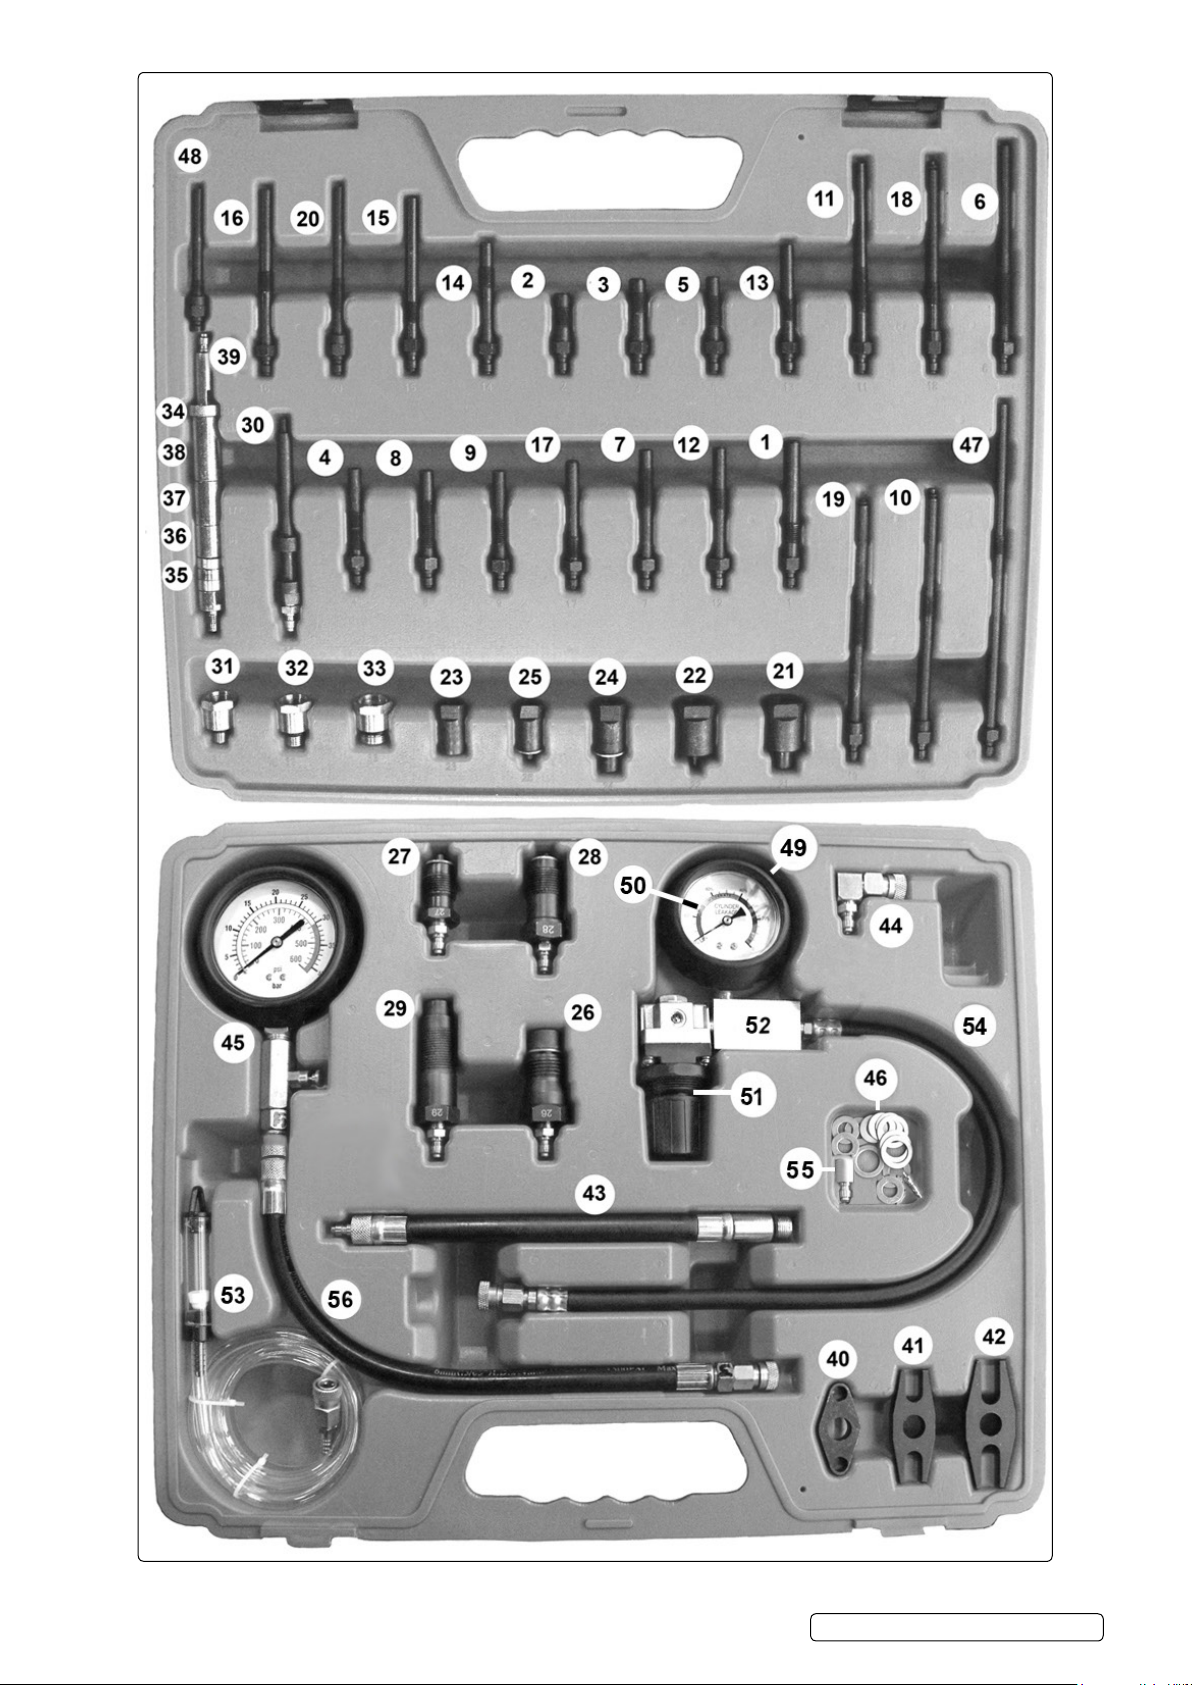
3. CONTENTS
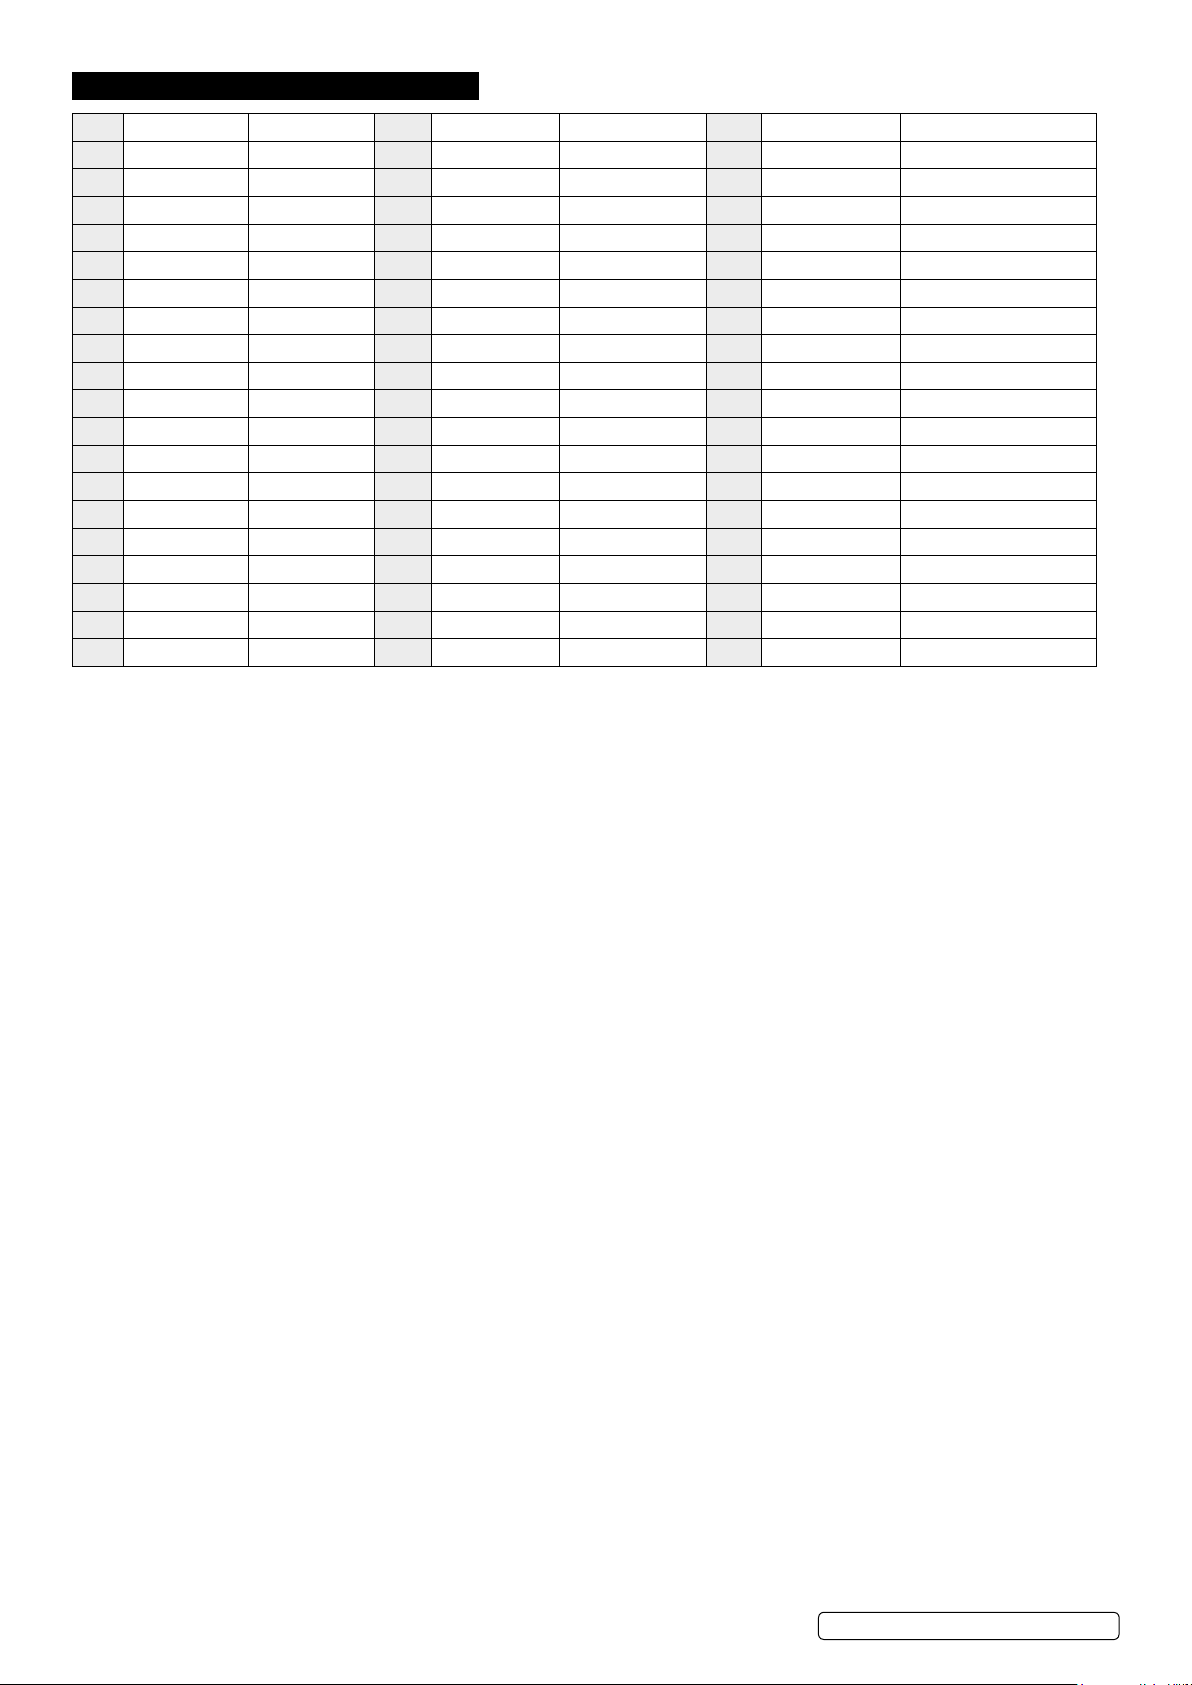
Item Part No. Description Item Part No. Description Item Part No. Description
1 VSE3155.01 1-Connector 20 VSE3155.20 20-Connector 39 VSE3155.39 Pillar Assembly
2 VSE3155.02 2-Connector 21 VSE3155.21 21-Connector 40 VSE3155.40 Bridge Piece (Small)
3 VSE3155.03 3-Connector 22 VSE3155.22 22-Connector 41 VSE3155.41 Bridge Piece (Medium)
4 VSE3155.04 4-Connector 23 VSE3155.23 23-Connector 42 VSE3155.42 Bridge Piece (Large)
5 VSE3155.05 5-Connector 24 VSE3155.24 24-Connector 43 VSE3155.43 Hose & Connector 14mm
6 VSE3155.06 6-Connector 25 VSE3155.25 25-Connector 44 VSE3155.44 Elbow Connector
7 VSE3155.07 7-Connector 26 VSE3155.26 26-Connector 45 VSE3155.45-G Gauge
8 VSE3155.08 8-Connector 27 VSE3155.27 27-Connector 46 VSE3155.46 Valve & Washer Set
9 VSE3155.09 9-Connector 28 VSE3155.28 28-Connector 47 VSE3155.47 47-Connector
10 VSE3155.10 10-Connector 29 VSE3155.29 29-Connector 48 VSE3155.48 48-Connector
11 VSE3155.11 11-Connector 30 VSE3155.30 30-Connector 49 VSE3156.V3-01 Gauge Cover
12 VSE3155.12 12-Connector 31 VSE3155.31 Connector 10mm 50 VSE2020.V2-06 Pressure Gauge
13 VSE3155.13 13-Connector 32 VSE3155.32 Connector 12mm 51 VSE2020.V2-02 Valve Assembly
14 VSE3155.14 14-Connector 33 VSE3155.33 Connector 18mm 52 VSE3156.V3-05 Aluminium Block
15 VSE3155.15 15-Connector 34 VSE3155.34 Spacer 6.4mm 53 VSE3156.TDC TDC Finder
16 VSE3155.16 16-Connector 35 VSE3155.35 Spacer 6.5mm 54 VSE3156.202-6 Cylinder Leakage Hose
17 VSE3155.17 17-Connector 36 VSE3155.36 Spacer 19mm 55 VSE3156.01 Blanking Connector
18 VSE3155.18 18-Connector 37 VSE3155.37 Spacer 26mm 56 VSE3155V4.45A Gauge Hose
19 VSE3155.19 19-Connector 38 VSE3155.38 Spacer 38mm - - -
© Jack Sealey Limited
Original Language Version
VSE3156.V3 Issue 2 (HF) 13/03/19
Page 3
© Jack Sealey Limited
Original Language Version
VSE3156.V3 Issue 2 (HF) 13/03/19
Page 4
4. SPECIFICATION
Model No:.......................................................................................................................................... VSE3156.V3
Spark Plugs; ...............................................................................................................................10, 12, 14, 18mm
Injector Adaptors; ....................................................................... M20, M22, M24 & Ford Stanadyne Injectors plus
Clamp-On Injectors .....................................................................................................................10, 12, 14, 18mm
Nett Weight: ................................................................................................................................................ 5.43Kg
Reading: .................................................................................................................................Cylinder Leakage %
Glow Plug Adaptors; ..............................................................................................................................................
Alfa Romeo, BMW, Chrysler, Citroen, Daewoo, Fiat, Ford, Honda, Hyundai, Isuzu, Jeep, Kia, Lada, Lancia, Land Rover, LDV, Mazda,
Mercedes, MG, Mitsubishi, Nissan, Peugeot, Renault, Rover, Saab, Ssangyong, Suzuki, Toyota, VAG, Vauxhall/Opel, Volvo
5. OPERATION
5.1. OVERVIEW OF COMPRESSION TESTING.
When an engine’s performance is down, or if misring occurs which cannot be attributed to the ignition or fuel systems, a
compression test can provide diagnostic clues as to the engine’s condition. Compression should build up quickly in a
healthy engine. A very low compression reading on the rst stroke, followed by gradually increasing pressure on successive
strokes, indicates worn piston rings. A low compression reading on the rst stroke, which does not build up during successive
strokes, indicates leaking valves or a faulty head gasket (a cracked head could also be the cause). Deposits on the undersides
of the valve heads can also cause low compression. If the pressure in any cylinder is considerably lower than the others, introduce
a small quantity of clean oil into that cylinder through the access hole, and repeat the test. If the addition of oil temporarily improves
the compression pressure, this indicates that bore or piston wear is responsible for the pressure loss. If there is no improvement,
it suggests that the leakage is around the valves, or a faulty head gasket. A low reading from two adjacent cylinders suggests
a faulty head gasket between the two cylinders. The presence of coolant in the engine oil will conrm this. If the compression is
unusually high, the combustion chambers are probably coated with carbon deposits. If this is the case, the cylinderhead
should be removed and de-carbonised. As a rough guide, engines having a compression pressure in excess of 100psi
(6.9 bar), should not exceed a compression loss of more than 10psi (0.69 bar). On older engines with lower compression pressure,
loss should not exceed 0.35 bar (5psi).
5.2. COMPRESSION TESTING.
5.2.1. Check the engine oil is at the correct level.
5.2.2. Remove all of the glow plugs/spark plugs from the engine.
5.2.3. Select the applicable adaptor from the kit and screw it into the rst glow/spark plug port, ensuring there is a good seal with the
O-ring (if tted). Connect the coupling on the pressure gauge hose to the adaptor, ensuring it locks into place.
5.2.4. Turn over the engine using the starter motor and observe the gauge, looking for a steady increase in the reading (see 5.1) and note
the maximum reading obtained. Refer to the vehicle/engine manufacturer’s workshop manual for compression data.
5.2.5. Depress the Re-set Valve (situated under the gauge) to release the pressure. The Re-set Valve allows the test to be repeated if
required without disconnecting the tester from the glow/spark plug port.
WARNING! Always release pressure via the Re-set Valve BEFORE disconnecting the Tester.
5.2.6. Disconnect the compression tester from the adaptor and remove the adaptor from the glow/spark plug port. Install them into the
next cylinder’s glow/spark plug port and repeat the tests. Continue the tests for all of the remaining cylinders in turn.
NOTE: A variation in compression readings between cylinders is often a better indication of engine problems than the individual values of
compression.
COMPRESSION CONDITION ACTION/DIAGNOSIS
Low compression reading on some cylinders.
High relative compression readings and relatively equal cylinder
readings.
Lower relative compression readings. One or more cylinders lower than
others.
(a) Use oil in cylinder to see if rings are worn.
(b) If compression increases, rings and/or cylinder wall are worn.
(c) If compression does not rise, do a cylinder leakage test to
determine source of problem.
If excessive exhaust emissions, lack of power, poor performance, or
poor fuel consumption do a cylinder leakage test to determine source
of problem.
Do a cylinder leakage test to determine source of problem.
5.3. TDC INDICATOR TOOL.
5.3.1. Remove the glow/spark plug from cylinder number 1. It may also be necessary to remove all glow/spark plugs to facilitate manual
turning over of the engine.
5.3.2. Select the applicable adaptor from the kit and screw it into the glow/spark plug port of cylinder number 1. Ensure that there is a
good seal with the O-ring (if tted). Connect the coupling on the TDC nder to the adaptor, ensuring it locks into place.
5.3.3. Position the indicator in a vertical position, in a suitable viewable location, using the magnetic hook if needed.
5.3.4. Turn the engine over manually, using a spanner or socket on the crankshaft pulley, in the direction of engine rotation and watch for
the oat to rise in the tube. As the piston rises on the compression stroke, the oat will rise to the top of the tube and stay there,
when the piston goes past TDC and compression is lost, the oat will suddenly sink. Note the position and temporarily
make suitable marks to indicate TDC, or compare with existing timing marks.
5.3.5. Turn the engine over a further 1¾ turns and the oat should start to rise again as the piston rises on the compression stroke.
Continue to slowly turn the crankshaft towards TDC (watching the timing marks) - note the exact point when the oat drops. Alter
the timing mark if required.
5.3.6. Repeat the procedure, turning the engine over a further 2 turns to re-check for accuracy.
5.3.7. Disconnect the TDC tool from the adaptor and remove the adaptor from the glow/spark plug port.
© Jack Sealey Limited
Original Language Version
VSE3156.V3 Issue 2 (HF) 13/03/19
Page 5
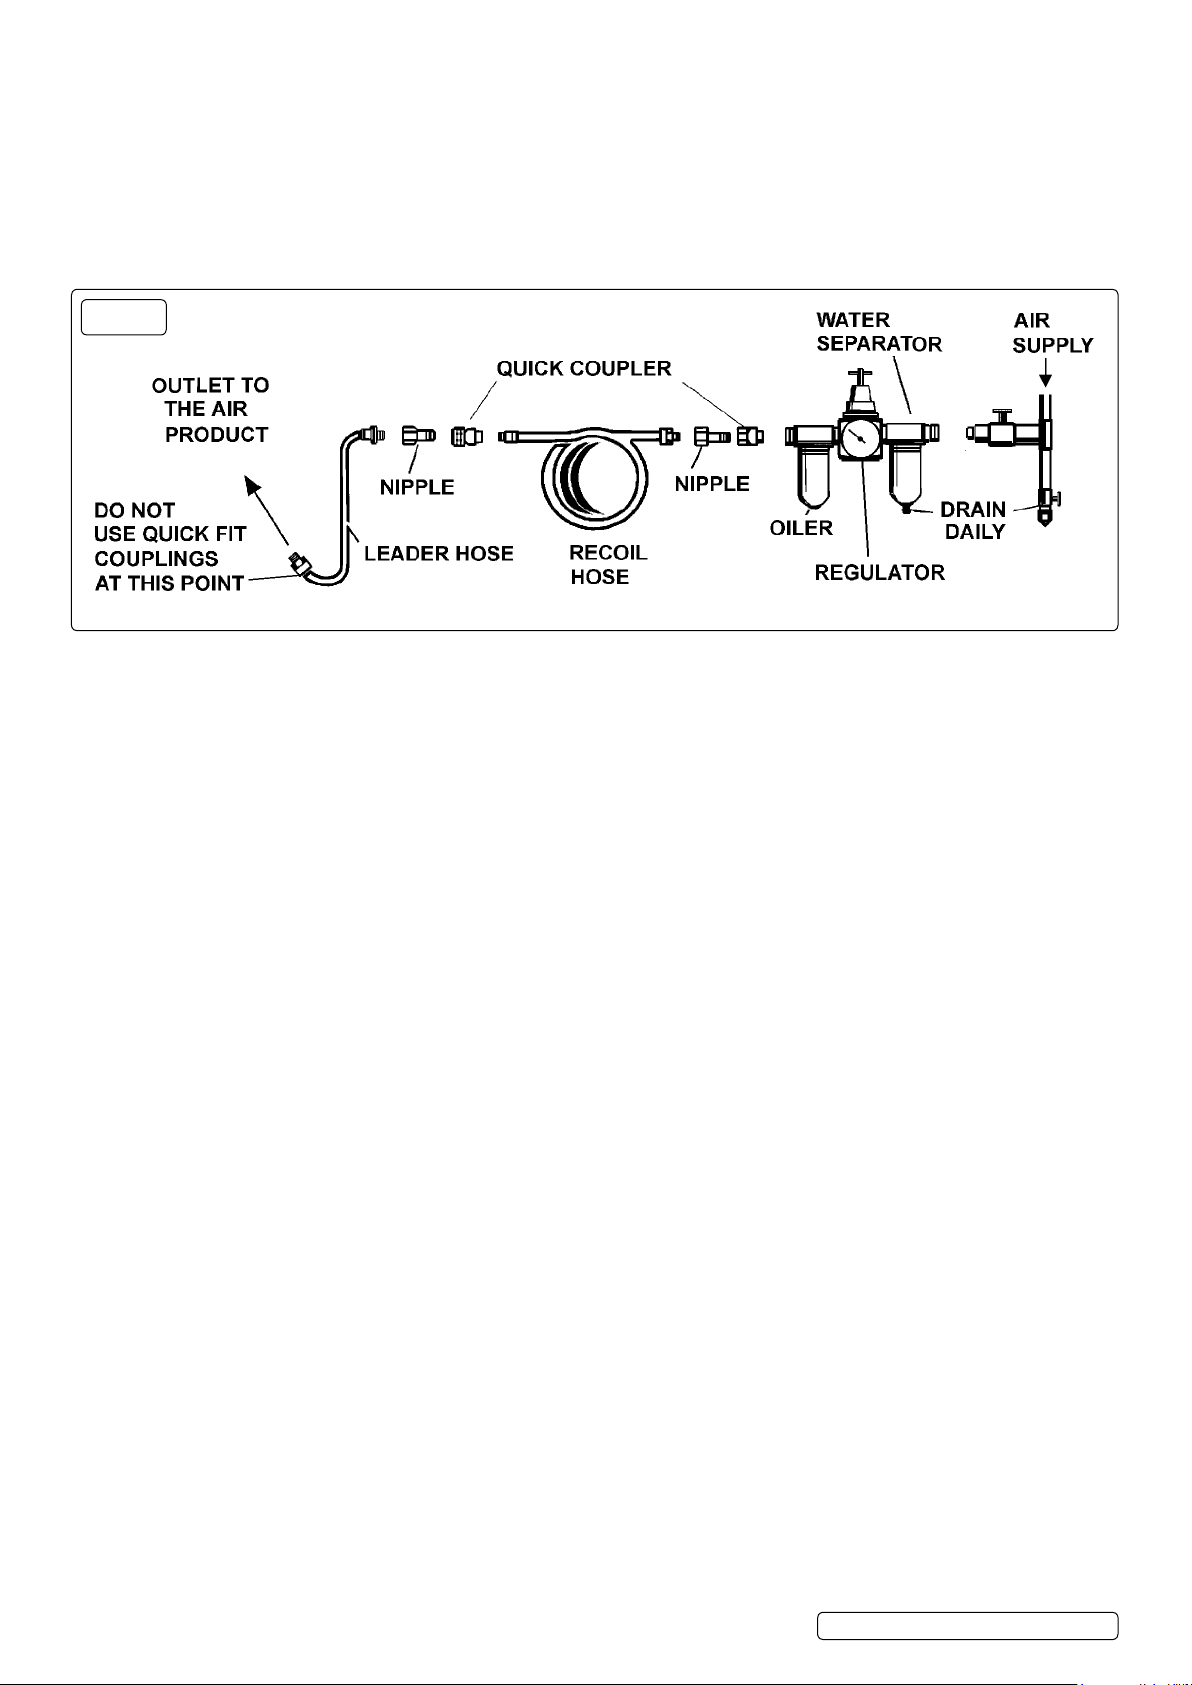
5.4. LEAKAGE TESTING - CONNECTING TO AN AIR LINE.
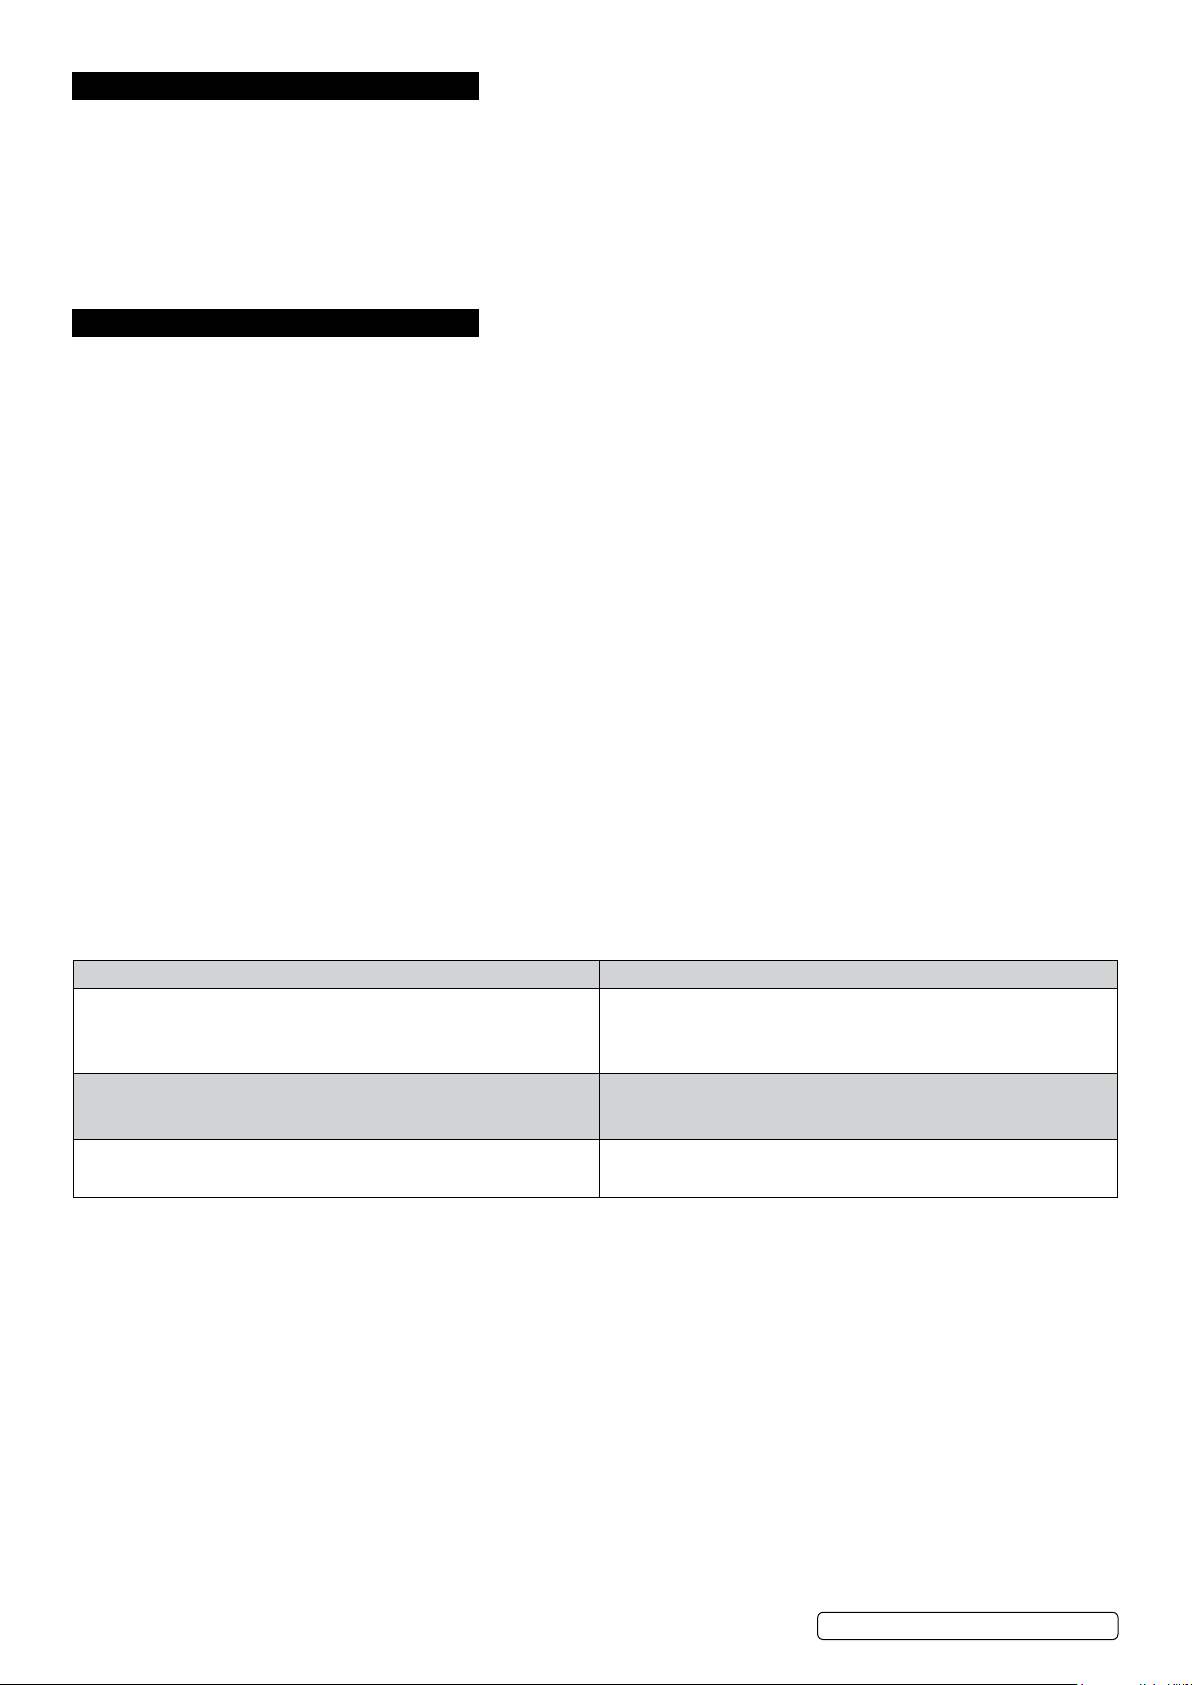
5.4.1. The recommended hook-up is shown in Fig.1. An air pressure of 45 to 100psi is required.
5.4.2. Ensure that the air valve regulator is in the “o” position before connecting to the air supply.
WARNING! Ensure that the air supply is clean and does not exceed the pressure quoted. Too high an air pressure and/or unclean
air will shorten the life of the tester due to excessive wear and may be dangerous, causing damage and/or personal injury.
5.4.3. Drain the compressor air tank daily. Water in the air line will damage the tester.
5.4.4. Clean compressor air inlet lter weekly.
5.4.5. Line pressure should be increased to compensate for unusually long air hoses (over 8 metres). The minimum bore for hose and
ttings is 1/4”.
5.4.6. Keep hoses away from heat, oil and sharp edges. Check hoses for wear and make certain that all connections are secure.
g.1
5.5. OVERVIEW OF LEAKAGE TESTING.
Once the leakage tester has been connected to one of the cylinders, compressed air is fed into that particular cylinder through the built
in pressure regulator. Diagnosis is made by observing the amount of leakage that is indicated on the cylinder leakage gauge and by
listening for leakage at various points of the vehicle’s system.
Location of listening points:
Oil Dipstick Tube - for leakage from damaged or worn rings and/or cylinder wall.
Radiator Filler - for cylinder wall cracks or head gasket leakage.
Adjacent Cylinder - for head gasket leakage.
Exhaust Tail Pipe - for exhaust valve leakage.
Carburettor Air Inlet - for intake valve leakage.
Fuel Injection Throttle Body - for intake valve leakage.
5.6. USING THE LEAKAGE TESTER.
5.6.1. Run the engine until it reaches normal operating temperature.
5.6.2. Remove glow/spark plugs, oil dipstick, radiator cap, air lter from carburettor, or if fuel injected, remove air lter or hose from the
throttle body.
5.6.3. Position No.1 piston at TDC on the compression stroke so that both inlet and exhaust valves are closed.
NOTE: Always rotate the engine in the normal operating direction. To position the piston correctly, use a piston position gauge and remove
the cam/rocker cover so that closed valves can be conrmed.
5.6.4. Diesel engines: Fit a suitable connector into the glow plug aperture, then connect the hose (54) onto this.
5.6.5. Petrol engines: Fit a connector (31, 32 or 33) into the spark plug aperture, then screw the hose (43) onto this, or directly screw the
hose (43) into the spark plug aperture.
5.6.6. DO NOT connect the Leakage Tester to the hose’s connector until the leakage gauge has been calibrated. To do this, screw a
1/4” BSPT male air line connector tting into the threaded hole on the side of the regulator of the Leakage Tester. Pull out
and turn the regulator knob on the tester fully in to close the regulator, then t the blanking connector (55) to the end of the leakage
hose (54), before connecting the regulator/tester to the compressed air line (supply must be between 45 and 100psi).
5.6.7. Calibrate the leakage gauge by turning the regulator knob out until the needle on the gauge reaches zero at the end of the yellow
‘SET’ band (0%), typically this will happen between 15 to 20psi, then lock the regulator by pushing the knob in. Once set, remove
the air line from the regulator and then remove the blanking connector (55) and instead, connect the leakage hose (54) to
the previously tted connector/hose (see 5.6.4). Reconnect the air line.
5.6.8. Any leakage present in the currently connected cylinder will show on the cylinder leakage gauge as a percentage loss. A cylinder
that is not leaking will read approximately 20% in the green band.
5.6.9. Test the other cylinders (always at TDC), and compare the leakage gures to determine which of the cylinders are faulty.
5.6.10. If necessary, retest the cylinder(s) showing high leakage. Check at the listening points (see 5.5.) to determine the cause of the
leakage.
5.7. PROBLEM SOLVING.
5.7.1. If excessive leakage shows on gauge, the cylinder may not be at TDC on the compression stroke. Check to ensure that the valves
are closed. Always position piston at TDC for uniform results.
5.7.2. If rings are broken or cylinder walls are scored, excessive leakage will be identied.
5.7.3. It is important that all cylinders have reasonably uniform readings (as in compression testing). Dierences in excess of 15% indicate
excessive leakage.
5.7.4. Large engines tend to leak more than small engines.
5.7.5. If leak is excessive on a vehicle with low mileage, the piston rings may be stuck. Treat the engine with quality tune-up oil for a period of
time and then re-test before disassembling.
5.7.6. The lower the pitch of the leakage sound, the greater the leak.
5.7.7. To assist with listening, use a length of clean hose, or a mechanic’s stethoscope with the probe removed.
© Jack Sealey Limited
Original Language Version
VSE3156.V3 Issue 2 (HF) 13/03/19
Page 6
5.7.8. When making repeat tests on the same cylinder, variations in the piston position and engine temperature can cause gauge readings to
dier by up to 10%.
5.7.9. If an engine has multiple faults (such as worn rings and burned valves), the tester may indicate only the most serious fault.
NOTE: There is always some leakage past the piston rings. As a result, some leakage will always be heard when listening to the dipstick tube.
ENVIRONMENT PROTECTION
Recycle unwanted materials instead of disposing of them as waste. All tools, accessories and packaging should be sorted, taken to
a recycling centre and disposed of in a manner which is compatible with the environment. When the product becomes completely
unserviceable and requires disposal, drain any fluids (if applicable) into approved containers and dispose of the product and fluids
according to local regulations.
Note: It is our policy to continually improve products and as such we reserve the right to alter data, specifications and component parts without prior
notice.
Important: No Liability is accepted for incorrect use of this product.
Warranty: Guarantee is 12 months from purchase date, proof of which is required for any claim.
Sealey Group, Kempson Way, Suffolk Business Park, Bury St Edmunds, Suffolk. IP32 7AR
© Jack Sealey Limited
Original Language Version
VSE3156.V3 Issue 2 (HF) 13/03/19
Page 7
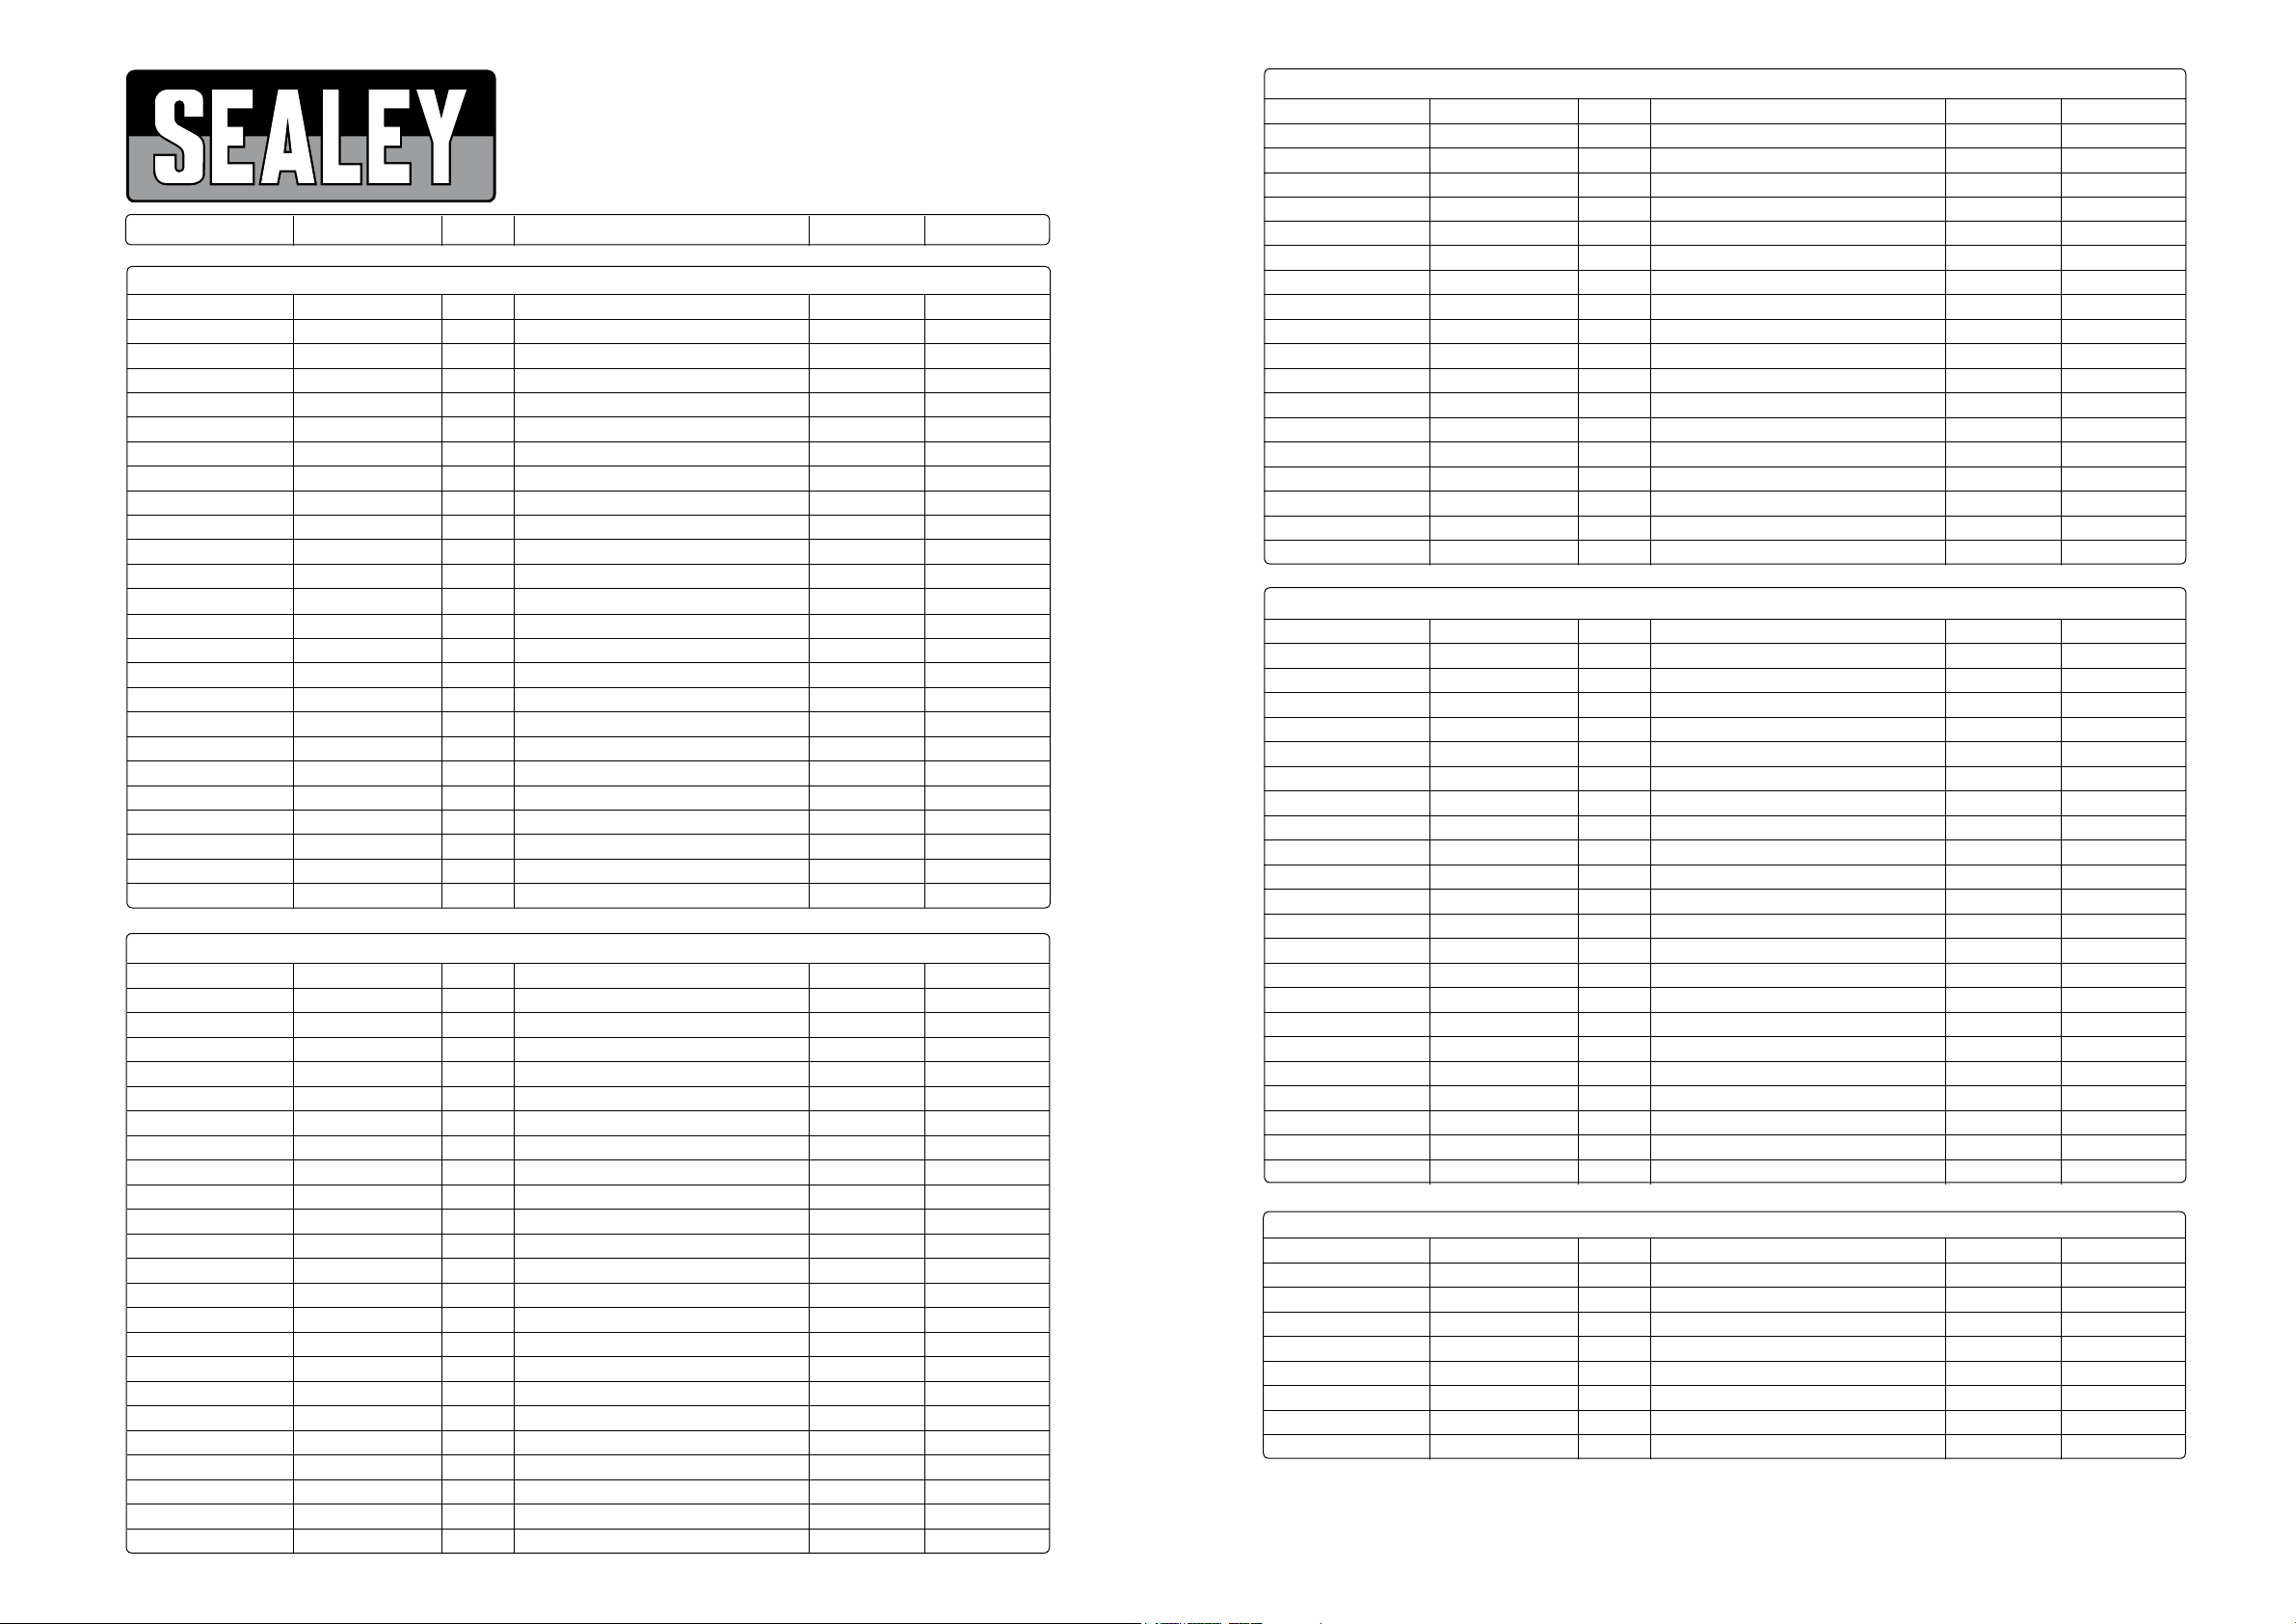
VSE3156.V3
DIESEL VEHICLE
APPLICATION LIST
Make / Model Engine Type Information Year Adaptor No
Alfa Romeo
145 1.9 TD AR67501 (AR67502NO) 04/94 -> 09/96 2
145 1.9 TD AR33601 10/96 -> 09/97 2
145 1.9 JTD AR32302 01/98 -> 01/01 14
146 1.9 TD AR67501 (AR67502NO) 02/95 -> 09/96 2
146 1.9 TD AR33601 10/96 -> 09/97 2
146 1.9 JTD AR32302 01/98 -> 01/01 14
147 1.9 JTD 937A2.000 03/01 -> 14
147 1.9 JTD 182B9.000 06/03 -> 14
147 1.9 JTD AR37101 07/05 -> 14
155 1.9 TD AR67502 04/93 -> 04/96 2
155 2.5 TD VM07, VM31B, VM425CLIEA 05/95 -> 01/98 12
156 1.9 JTD AR32302 01/98 -> 14
156 1.9 JTD AR37101 10/00 -> 05/01 14
156 1.9 JTD 937A2.000 05/01 -> 14
156 2.4 JTD AR32501 01/98 -> 09/00 14
156 2.4 JTD AR32501 02/98 -> 11/99 14
156 2.4 JTD 839A6.000 10/00 -> 14
156 2.4 JTD 841C.000 03/02 -> 14
156 2.4 JTD 841G.000 11/03 -> 14
159 1.9 JTD 939A1.000 09/05 -> 14
164 2.5 TD VM08B, VM32B,VM425-SLIRA 05/95 -> 09/98 12
166 2.4 JTD AR34202 10/98 -> 09/00 14
166 2.4 JTD AR36202 10/00 -> 14
166 2.4 JTD 841C.000 04/02 -> 14
Brera 1.9 JTD 939A1.000 06/06 -> 14
Audi
A2 1.2 TDi ANY 02/00 -> 12
A2 1.4 TDi AMF 02/00 -> 08/03 12
A3 1.9 TDi AGR, AHF, AJM, ALH 09/96 -> 05/03 12
A3 1.9 TDi ASV 01/97 -> 07/98 12
A3 1.9 TDi ANU 08/98 -> 12
A3 1.9 TDi ASZ 10/00 -> 05/03 12
A3 1.9 TDi ATD 10/00 -> 12
A3 1.9 TDi AXR 10/00 -> 09/01 12
A3 1.9 TDi AZV, BKD 03/03 -> 12
A4 1.9 D AFF, AHH 03/96 -> 07/97 12
A4 1.9 TDi 1Z 01/95 -> 07/96 12
A4 1.9 TDi AFN 02/96 -> 06/00 12
A4 1.9 TDi AFF 03/96 -> 06/00 12
A4 1.9 TDi AHU 08/96 -> 06/00 12
A4 1.9 TDi AJM 01/98 -> 12/98 12
A4 1.9 TDi AVG 08/99 -> 06/00 12
A4 1.9 TDi ATJ 03/00 -> 09/01 12
A4 1.9 TDi ATD 09/01 -> 12
A4 1.9 TDi AVB 09/01 -> 04/04 12
A4 1.9 TDi AVF, AWX 01/01 -> 12
A4 2.5 TDi AFB, AKN 09/97 -> 09/01 16
A4 2.5 TDi AKE, AVL 11/00 -> 16
A4 2.5 TDi AYM 08/01 -> 07/02 16
A4 2.5 TDi BFC, BDG, BCZ 07/02 -> 16
Audi (Continued)
A6 1.9 TDi 1Z, AHU 07/94 -> 10/97 12
A6 1.9 TDi AFN 04/97 -> 04/01 12
A6 1.9 TDi AJM 01/98 -> 04/01 12
A6 1.9 TDi AVF, AWX 07/01 -> 12
A6 2.5 TDi AAT, AEL 06/94 -> 10/97 12
A6 2.5 TDi AFB 04/97 -> 07/98 16
A6 2.5 TDi AKN 07/98 -> 05/01 16
A6 2.5 TDi AKE 02/00 -> 16
A6 2.5 TDi AYM 08/01 -> 06/02 16
A6 2.5 TDi BFC, BDG, BCZ 07/02 -> 16
A6 2.5 TDI BAU, BDH 02/00 -> 01/05 16
A8 2.5 TDi AFB 06/97 -> 09/98 16
A8 2.5 TDi AKN 07/98 -> 09/98 16
A8 3.0 TDI ASB 08/03 -> 16
A8 4.0 TDI ASE 03/03 -> 16
A8 3.3 TDi AKF 09/99 -> 09/02 16
Allroad 2.5 TDi AKE 05/01 -> 16
Cabrio 1.9 TDi 1Z 07/95 -> 06/96 12
Cabrio 1.9 TDi AHU 07/96 -> 11/00 12
BMW
3-Series 318 (E36) TDS M41 09/94 -> 01/98 2
3-Series 318 Compact (E36) TDS M41 D18U 03/94 -> 07/01 2
3-Series 320 (E46) D M47 D20 04/98 -> 09/01 12
3-Series 320 Compact (E46) TD M47 N204 D4 09/01 -> 12
3-Series 325 (E36) TD M51 09/91 -> 01/98 2
3-Series 325 (E36) TDS M51 08/93 -> 03/98 2
3-Series 330 (E46) Di DDE306, M57 D30 08/99 -> 02/05 12
3-Series 330 (E46) D M57306D1 08/00 -> 02/05 12
3-Series 330 (E46) Di M57 D30 06/00 -> 02/05 12
5-Series 520 (E39) Di M47 D20 06/02 -> 12
5-Series 520 (E39) D M47 D20 02/00 -> 05/02 12
5-Series 524 (E34) TD M21 03/88 -> 09/91 2
5-Series 525 (E39) D M57 D25 02/00 -> 06/03 12
5-Series 525 (E34) TD M51 D25 09/91 -> 12/96 2
5-Series 525 (E34) TDS M51 D25 08/93 -> 01/96 2
5-Series 525 (E39) TDS M51 D25 01/96 -> 06/03 2
5-Series 525 (E39) TDS M51 D25 01/97 -> 06/98 2
5-Series 525 (E39) TDS M57 D25 02/00 -> 05/04 12
5-Series 530 (E39) D M57 D30 05/98 -> 09/00 12
7-Series 725 (E38) TDS M51 D25 02/96 -> 09/98 2
7-Series 730 (E38) D M52 D30H 05/98 -> 12
7-Series 740 (E38) TD M67 D40 01/99 -> 15
X5 2.9 (E53) Di M57 D30 05/01 -> 06/03 12
Chrysler
Grand Voyager 2.5 TD VM HR425 CLIEE 05/95 -> 04/01 12
Jeep Cherokee 2.5 TD VM HR425 CLIRX 10/94 -> 2
Jeep Grand Cherokee 2.5 TD VM HR492/VM 425CLIRE 01/93 -> 2
Jeep Grand Cherokee 2.5 TD ENC 04/99 -> 12
Jeep Grand Cherokee 3.1 TD EXA 04/99 -> 12
PT Cruiser 2.2 CRD EDJ 03/02 -> 15
Voyager 2.2 TD VM HR 492 /VM 425 CLIRE 06/92 -> 01/96 2
Voyager 2.5 TD VM HR 425 CLIEE 04/92 -> 04/95 2
Voyager 2.5 TD VM 05/95 -> 04/01 12
Page 8
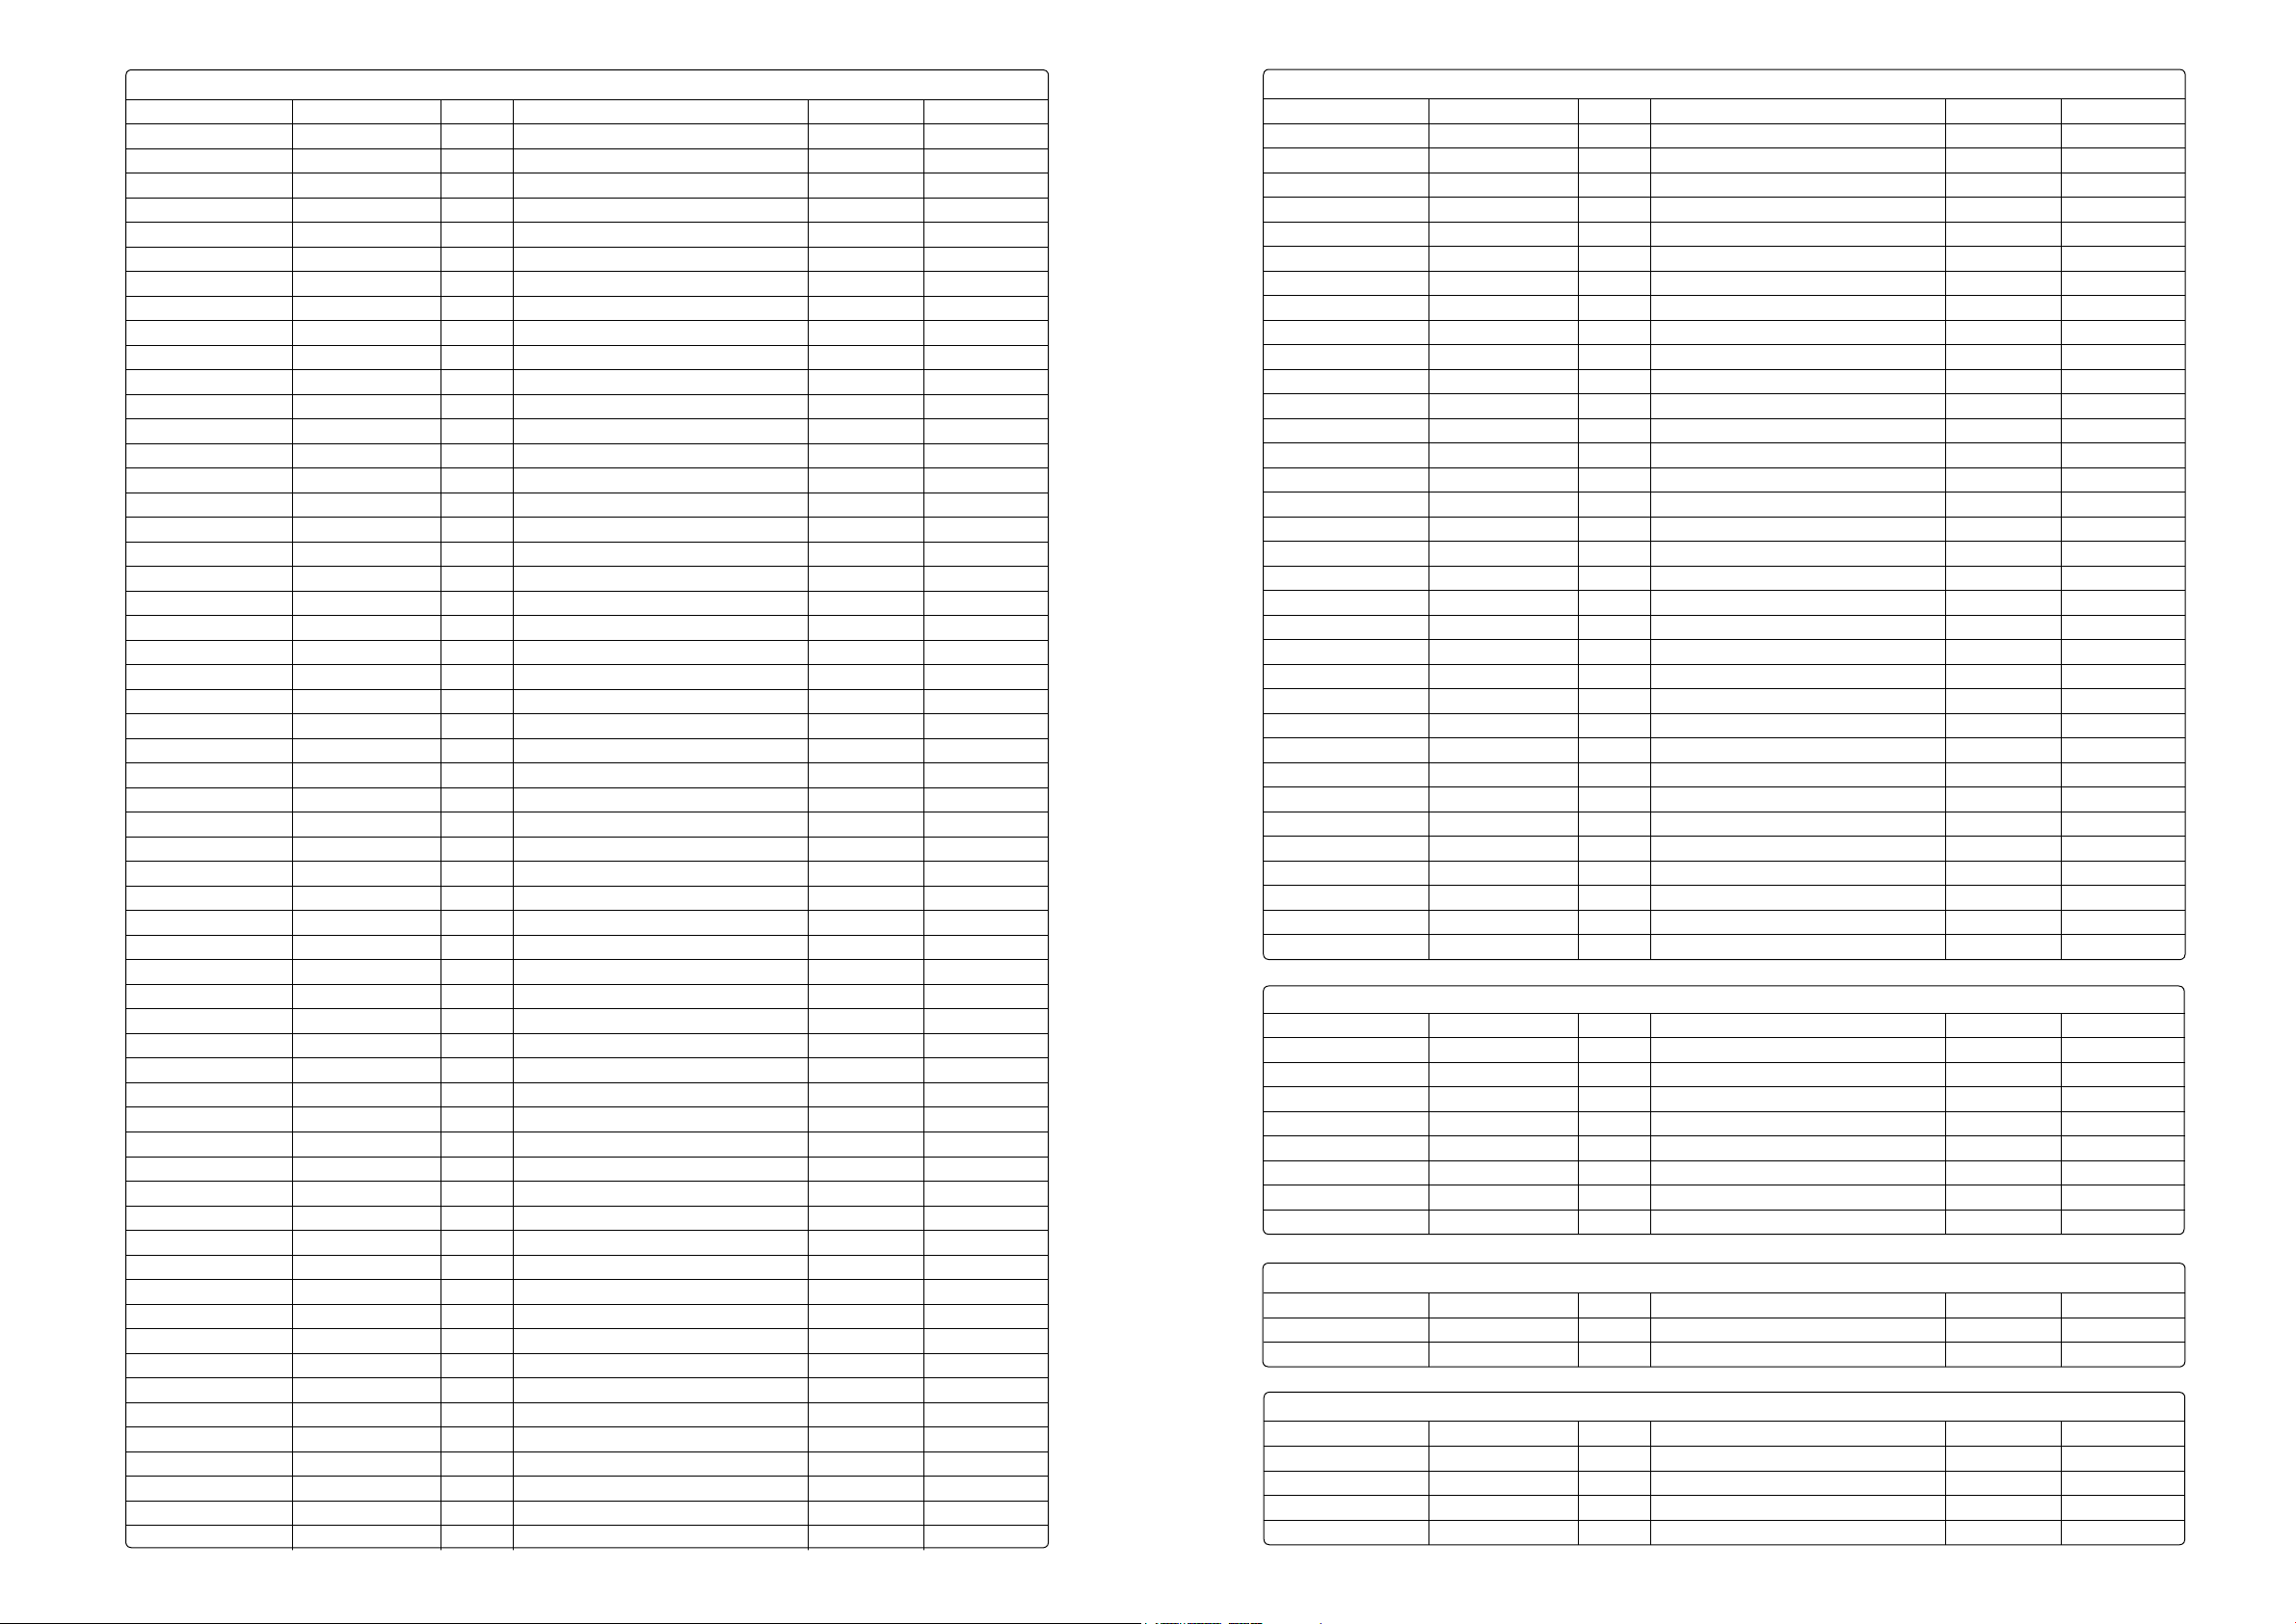
Citroen
AX 1.5 D TUD5 10/94 -> 04/97 12
Berlingo 1.8 D XUD7 08/96 -> 08/98 2
Berlingo 1.8 TD DW8TD 09/98 -> 12
Berlingo 1.9 D XUD9A 07/96 -> 08/98 2
Berlingo 1.9 D DW8B 07/98 -> 12
Berlingo 1.9 Di XUD9A 09/98 -> 2
Berlingo 2.0 HDi DW10 10/99 -> 17
C1 1.4 HDi DV4D 06/05 -> 20
C2 1.4 HDi DV4TD (8HX) 2003 -> 20
C3 1.4 HDi DV4 02/02 -> 20
C3 1.4 HDi DV4TED4 02/02 -> 20
C4 1.6 HDi DV6ATED4 (9HX) 11/04 -> 20
C4 1.6 HDi DV6TED4 (9HY/9HZ) 11/04 -> 20
C4 (Grande) Picasso 1.6 HDi DV6ATED4 (9HY) 10/06 -> 20
C5 1.6 HDi DV6TED4 09/04 -> 20
C5 2.0 HDi DW10TD, DW10TED 01/01 -> 17
C5 2.2 HDi DW12TED4 01/01 -> 17
C8 2.0 HDi DW10TD, DW10TED 07/02 -> 17
C8 2.2 HDi DW12TED4 2002-> 17
C15 1.8 D XUD7 06/95 -> 2
C15 1.9 D DW8B 07/98 -> 12
C25 1.9 D XU9DA 07/87 -> 01/94 2
C25 2.5 TD CRD 93 LS 04/87 -> 01/94 2
C35 2.5 D CRD 93 B 01/80 -> 01/94 2
CX 2.5 TD M25-669,671 01/87 -> 12/92 2
Dispatch 1.9 D XUD9AU 03/94 -> 08/98 2
Dispatch 1.9 D XUD9AU 09/98 -> 12
Dispatch 1.9 TD XUD9TF 03/94 -> 08/98 2
Dispatch 1.9 TD XUD9TF 09/98 -> 12
Dispatch 2.0 HDi DW10 09/98 -> 17
Dispatch 2.4 D DJ5 03/94 -> 2
Dispatch 2.4 TD DJ5T 03/94 -> 08/96 2
Dispatch 2.5 TDi DJ5TED 09/96 -> 15
Evasion 1.9 TD XUD9TF, XUD9BTF 07/94 -> 10/02 2
Evasion 2.0 HDi DW10ATED 07/99 -> 10/02 17
Evasion 2.0 TD DHX 05/97 -> 10/02 2
Evasion 2.1 TD XUD11BTE 05/96 -> 10/02 2
Jumper 1.9 D XUD9AU 03/94 -> 05/95 2
Jumper 1.9 D XUD9, XUD9AU 06/95 -> 2
Jumper 1.9 TD XUD9TF 03/94 -> 2
Jumper 2.0 HDi DW10, DW10TD 09/98 -> 17
Jumper 2.2 HDi DW12TED 04/02 -> 17
Jumper 2.2 HDi 100 4HV 04/06 -> 18
Jumper 2.2 HDi 120 4HU 04/06 -> 18
Jumper 2.5 D DJ5 03/94 -> 2
Jumper 2.5 D DJ5TE 03/94 -> 08/96 2
Jumper 2.5 D DJ5 03/94 -> 2
Jumper 2.5 TD DJ5TE 03/94 -> 12/96 2
Jumper 2.5 TDi DJ5TED 09/96 -> 15
Jumpy 1.9 D XUD9A 09/95 -> 2
Jumpy 1.9 D DW8 07/98 -> 12
Jumpy 1.9 TD XUD9TF 09/95 -> 2
Jumpy 2.0 HDi RHX 10/99 -> 17
Jumpy 2.0 HDi DW10ATED, BTED, TED4 2000 -> 17
Nemo 1.4 HDi DV4TED 02/08 -> 20
Relay 1.8 D DW8 09/98 -> 12
Relay 1.8 TD DW8TD 09/98 -> 12
Relay 1.9 D XUD9A 09/95 -> 2
Relay 1.9 TD XUD9TF 09/95 -> 2
Citroen (Continued)
Relay 2.0 HDi DW10 2000 -> 17
Saxo 1.5 D TUD5,5B 02/96 -> 10/03 12
Synergie 1.9 TD XUD9TF, XUD9BTF 01/94 -> 08/98 2
Synergie 1.9 TD DW8 09/98 -> 12
Synergie 1.9 TD XUD9TF, XUD9BTF 09/98 -> 2
Synergie 2.0 HDi DW10ATED 07/99 -> 17
Synergie 2.1 TD XUD11BTE 05/96 -> 2002 2
Visa 1.8 D XUD7 01/87 -> 03/91 2
Xantia 1.9 D XUD9 AL 03/93 -> 01/96 2
Xantia 1.9 D XUD9SD 06/94 -> 2
Xantia 1.9 D XUD9A 02/96 -> 08/98 2
Xantia 1.9 TD XUD9BTF 03/93 -> 2
Xantia 2.0 HDi DW10TD, DW10ATED 07/98 -> 17
Xantia 2.1 TD XUD11BTE 05/95 -> 2
XM 2.1 D XUD 11A,L 05/89 -> 06/95 2
XM 2.1 TD XUD 11ATE,L,BTE 05/89 -> 05/01 2
XM 2.1 TD XUD11ATE,BTE 07/94 -> 12/00 2
XM 2.5 TD DK5ATE 07/94 -> 05/01 2
Xsara 1.4 HDi DV4 2003 -> 20
Xsara 1.5 D TUD5 09/97 -> 12
Xsara 1.8 D XUD7 09/97 -> 2
Xsara 1.8 TD 09/97 -> 2
Xsara 1.9 D XUD9A 09/97 -> 2
Xsara 1.9 D DW8,8B 04/98 -> 12
Xsara 1.9 D XUD9BSD 09/98 -> 2
Xsara 1.9 TD XUD9TE, XUD9TE/Y 09/97 -> 08/98 2
Xsara 1.9 TD XUD9TE, XUD9BSD 09/98 -> 2
Xsara 2.0 HDi DW10TD 04/99 -> 17
Xsara 2.0 HDi RHZ DW10ATED 05/01 -> 17
Xsara Picasso 1.6 HDi DV6TED4 05/04 -> 20
Xsara Picasso 2.0 HDi DW10TD, DW10ATED 12/99 -> 17
ZX 1.5 D TUD5 10/94 -> 06/98 12
ZX 1.8 D XUD7 05/94 -> 06/98 2
ZX 1.9 D XUD 9A,L 03/91 -> 06/98 2
ZX 1.9 TD XUD9T,L 09/92 -> 06/98 2
Daewoo
Daewoo 1.9 D F8Q-290 02/99 -> 01/05 13
Daewoo 1.9 D F8Q-292 06/99 -> 01/05 13
Korando 2.9 D MB-OM662 01/99 -> 01/05 3
Korando 2.9 TD MB-OM601 01/99 -> 01/05 3
Musso 2.2 TD MB OM 601 09/99 -> 3
Musso 2.3 TDi OM661LA 01/99 -> 01/05 3
Musso 2.9 D OM622LA 01/99 -> 01/05 3
Musso 2.9 TD MB-OM60129TD 01/99 -> 09/99 3
Rexton 2.9 TD 04/02 -> 3
Daihatsu
Delta 3.4 D 3B 05/95 -> 4
Delta Wide 2.0 D 2C 08/95 -> 11/96 4
Hijet (S85) 1.2 D LDW 05/95 -> 02/98 2
FIAT
Brava 1.9 D 160A7.000 09/95 -> 03/96 2
Brava 1.9 JTD 182B4000 10/98 -> 2002 14
Brava 1.9 JTD 182B9000 09/00 -> 2002 14
Bravo 1.9 D 160A7.000 09/95 -> 03/96 2
Bravo 1.9 JTD 182B4000 10/98 -> 2002 14
Page 9
FIAT (Continued)
Bravo 1.9 JTD 182B9000 09/00 -> 2002 14
Croma 1.9 D 939A1.000 06/05 -> 14
Croma 2.5 D 8144.67 1990-> 1997 2
Croma 2.5 TD 8144.91.200,8144.97 01/93 -> 12/93 2
Doblo 1.9 JTD 182B9.000 01/01 -> 14
Doblo 1.3 JTD 188A9.000 02/04 -> 48
Ducato 1.9 D 230.A2.000 03/94 -> 04/02 2
Ducato 1.9 D DJY 04/98 -> 12
Ducato 1.9 TD 280A1.000 01/90 -> 02/94 2
Ducato 1.9 TD 230A4.000 03/94 -> 04/02 2
Ducato 1.9 TD 230A3.001 03/94 -> 04/02 2
Ducato 1.9 TD 230A3.000 03/94 -> 2
Ducato 1.9 TD DHX 04/98 -> 2
Ducato 2.0 JTD RHV (DW10) 10/01 -> 17
Ducato 2.5 TD 03/94 -> 2
Elba 1.7 D 04/89 -> 12/96 2
Fiorino 1.7 D 1992 -> 2
Fiorino 1.7 TD 146D7.000 1997 -> 2
Grande Punto 1.9 D 10/05 -> 14
Idea 1.9 JTD 188B2.000 01/04 -> 14
Idea 1.3 JTD 188 A9.000 02/04 -> 48
Linea 1.3 D 06/07 -> 48
Marea 1.9 JTD 182B4.000 10/98 -> 08/00 14
Marea 1.9 JTD 186A6.000 09/00 -> 14
Marea 2.4 JTD 185A6.000 10/98 -> 04/99 14
Marea 2.4 JTD 839A5.000 04/99 -> 14
Marea 2.4 JTD 185A6.000 04/99 -> 14
Marengo 1.9 D 160A7.000 01/92 -> 2
Marengo 1.9 TD 160.A6.000 01/92 -> 12/96 2
Multipla 1.9 JTD 182B4.000 03/99 -> 14
Multipla 1.9 JTD 186A6.000 09/00 -> 07/02 14
Multipla 1.9 JTD 186A8.000 07/02 -> 14
Palio 1.7 D 176A3.000 04/96 -> 2
Palio 1.7 TD 176A3.000 04/96 -> 2
Palio 1.9 JTD 188A2.000 01/01 -> 14
Palio Weekend 1.7 TD 176A3.000 07/97 -> 2
Panda 1.3 JTD 188 A9.000 01/04 -> 48
Punto 1.7 D 176A3.000 06/93 -> 1999 2
Punto 1.7 D 176A3000, 176B3000 04/94 -> 11/96 2
Punto 1.7 TD 176TD 1697 TT 06/93 -> 09/96 2
Punto 1.7 TD 176B7.000 09/96 -> 09/99 2
Punto 1.7 TD 176A5.000 10/96 -> 09/99 2
Punto 1.7 JTD 188A7.000 02/00 -> 14
Punto 1.7 TDS 176A5000 04/96 -> 02/00 2
Punto 1.9 JTD 188A2.000 08/99 -> 14
Punto 1.9 JTD 188A7.000 07/01 -> 14
Punto 1.3 JTD 189A9.000 06/03 -> 48
Punto Grande 1.3 TD 188A9.000 01/06 -> 48
Scudo 1.8 D DW8,B 09/98 -> 12
Scudo 1.8 TD DW8TD 09/98 -> 12
Scudo 1.9 D D9B 1995-> 07/98 2
Scudo 1.9 TD D8B 1995-> 07/98 2
Scudo 2.0 JTD DW10ATED4, DWBTED, RHW 2000-> 17
Sedici 1.9 JTD 06/06 -> 14
Stilo 1.9 D 09/05 -> 14
Stilo 1.9 JTD 192A3.000 10/01 -> 14
Stilo 1.9 JTD 10/01 -> 14
Stilo 1.9 JTD 192A1.000 10/01 -> 12/02 14
Stilo 2.4 JTD 839A6.000 10/01 -> 14
FIAT (Continued)
Strada 1.9 JTD 188A2.000 04/03 -> 14
Strada 1.3 D 223A9.000 05/06 -> 48
Tempra 1.9 D 160 A.000 02/91 -> 09/96 2
Tempra 1.9 D 160A6.000 02/91 -> 09/96 2
Tempra 1.9 TD 160B6.046 07/91 -> 12/96 2
Tempra 1.9 TD 160D.1000 04/93 -> 09/96 2
Tipo 1.9 TD 160D.1000 04/93 -> 09/95 2
Tipo 1.9 TD 160A7.000 06/93 -> 10/95 2
Ulysse 1.9 JTD XUD9TU 09/94 -> 03/99 2
Ulysse 2.0 TD XUD11 ATE 05/96 -> 2
Ulysse 2.0 TD RHZ 10/99 -> 17
Ulysse 2.0 JTD DW10ATED, RHW 12/99 -> 17
Ulysse 2.1 TD P8C 08/96 -> 10/99 2
Ulysse 2.2 JTD DW12ATED,4HW 04/03 -> 17
500 1.3 D 169A1.000 10/07 -> 48
Ford
Courier 1.8 D RTJ,RTK 02/96 -> 07/98 2
Courier 1.8 Di RTP 01/00 -> 12/01 2
Escort 1.8 TD RVA 08/90 -> 07/98 2
Escort 1.8 TD RFS 01/95 -> 02/99 2
Escort Van 1.8 TD RVA 12/95-06/01 2
Fiesta 1.4 TDCi DV4 2001 -> 20
Fiesta 1.6 TDCi HHJA / HHJB 11/04 -> 20
Fiesta 1.8 D D18NA,RTK,RTJ 11/95 -> 04/00 2
Fiesta 1.8 Di RTQ Endura 01/00 -> 12/01 2
Fiesta 1.8 Di RTN, RTP, RTQ Endura 04/00 -> 2
Fiesta 1.8 TD 11/95 -> 2
Fiesta Van 1.8 D RTK 02/96 -> 2
Fiesta Van 1.8 D RTJ,RTK 05/98 -> 2
Focus 1.6 TDCi HHDA, HHDB 01/05 -> 20
Focus 1.6 TDCi G8BA / G8DA 11/04 -> 20
Focus C-Max 1.6 TDCi 02/05 -> 20
Focus C-Max 1.6 TDCi G8BA / G8DA 10/03 -> 20
Fusion 1.4 TDCi 2001-> 20
Fusion 1.4 TDCi 06/03 -> 20
Fusion 1.6 TDCi HHJA / HHJB 11/04 -> 20
Galaxy 1.9 TD 1Z,AHU,ANU 10/95 -> 10/01 12
Galaxy 1.9 TDi AFN 02/95 -> 04/00 12
Galaxy 1.9 TDi AVG 06/99 -> 12
Galaxy 1.9 TDi AUY 04/00 -> 09/01 12
Galaxy 1.9 TDi AHU, 1Z, ANU 10/01 -> 12
Galaxy 1.9 TDi AUY 10/01 -> 12
Maverick 2.7 TD TD27T 02/93 -> 07/96 8
Maverick 2.7 TD TD27E 08/96 -> 05/01 8
Mondeo 1.8 TDi D18TDi 09/96 -> 09/00 2
Mondeo 1.8 TD Di R5BA 10/00 -> 18
Mondeo 2.0 TDi D5BA,D6BA 10/00 -> 18
Mondeo 2.0 TDCi 2002-> 18
Mondeo 2.2 TDCi QJBA, QJBB 09/04 -> 18
Ranger 2.5 D WL (MD25NA) 10/99 -> 04/02 8
Ranger 2.5 TD WL-T (MD25TI) 10/99 -> 8
Scorpio 2.5 TD SCB,SCC (E2D36) 11/94 -> 06/96 12
Scorpio 2.5 TD SCD 09/96 -> 08/98 12
Tourneo 2.0 Di 06/01 -> 18
Transit 2.0 Di 08/00 -> 18
Transit 2.0 TDi D3FA,ABFA 03/99 -> 18
Transit 2.2 TDCi P8FA 06/07 -> 18
Page 10
FORD (Cont’d)
Transit 2.2 TDCi QVFA 06/07 -> 18
Transit 2.2 TDCi QWFA 06/07 -> 18
Transit 2.4 Di D2FE,D2FA 01/00 -> 18
Transit 2.4 Di D4FA 01/00 -> 18
Transit 2.4 TDi F4FA 01/00 -> 18
Transit 2.4 TDCi PHFA 06/07 -> 18
Transit 2.4 TDCi JXFA 06/07 -> 18
Transit 2.4 TDCi H9FB 06/07 -> 18
FSO
Polonez 1.9 D XUD9A 1991 -> 2
Honda
Accord 2.0 TDi L Series 20TN2 05/95 -> 10/98 12
Accord 2.0 TDi 02/99 -> 12
Civic 1.7 CTDi 4EE-2 2002-> 11
Civic 2.0 D L Series 03/96 -> 2001 12
Civic 2.0 TDi 20TN2-20T2R 10/97 -> 12
Civic Aerodeck 2.0 TDi 20T2N 05/98 -> 2001 12
Civic Fastback 2.0 TDi 20T2N 10/97 -> 02/01 12
Concerto 1.8 TD XUD7T 08/94 -> 10/96 2
Hyundai
Galloper 2.5 TD 08/91 -> 07/98 8
Galloper 2.5 TD D4BH 08/98 -> 8
H-1 2.5 TD D4BH 03/00 -> 8
Starex 2.5 TD 06/97 -> 8
Isuzu
Rodeo 2.2 TD C223 (T) 1981->08/07 9
Lancia
Kappa 2.4 JTD 838A8.000 05/98 -> 10/01 14
Lybra 1.9 JTD AR32302 07/99 -> 14
Lybra 1.9 JTD AR3701 09/00 -> 05/01 14
Lybra 1.9 JTD AR32302 05/01 -> 14
Lybra 2.0 JTD 839A5000 09/00 -> 14
Lybra 2.2 JTD 839A5000 05/02 -> 14
Lybra 2.4 JTD 839A5000 07/99 -> 14
Musa 1.9 188B2.000 10/04 -> 14
Musa 1.3 189 A9.000 10/04 -> 48
Phedra 2.0 JTD RHM 07/03 -> 17
Phedra 2.0 JTD DW10TD,DW10TED 09/02 -> 17
Phedra 2.2 JTD DW12TED4 09/02 -> 17
Thesis 1.9 JTD 10/01 -> 14
Thesis 1.9 JTD 10/01 -> 14
Thesis 2.4 JTD 841C.000 04/02 -> 14
Ypsilon 1.3 JTD 189 A9.000 10/04 -> 48
Zeta 1.9 TD XUD 9T 04/95 -> 09/02 2
Zeta 2.0 D 2000-> 09/02 17
Zeta 2.1 TD P8C 07/96 -> 1999 2
Land Rover
Defender 2.5 (90) TDi 23L 09/90 -> 12/98 15
Defender 2.5 (110) TDi 23L 09/90 -> 12/98 15
Defender 2.5 Td5 06/98 -> 15
Discovery 2.5 TDi 12L 21L 08/96 -> 15
Discovery 2.5 TDi 19L 10/95 -> 15
Freelander 2.0 Di 20TCIE 07/97 -> 11/00 12
Freelander 2.0 Td4 M47 D20 (BMW) 11/00 -> 12
Range Rover 2.5 TDi 14L 08/94 -> 03/02 15
Range Rover 2.5 TDS M51 D25 (BMW) 11/94 -> 03/02 2
Range Rover 3.0 Td6 M57 D30 (BMW) 03/02 -> 12
Jeep
Cherokee 2.5 TD VM 10/94 -> 2
Cherokee 3.1 TD 09/01 -> 12
Commander 3.0 CRD Mercedes 2006 -> 15
Grand Cherokee 2.5 TD VM 01/93 -> 02/99 12
Grand Cherokee 2.5 TD 03/99 -> 12
Grand Cherokee 2.7 CRD 11/01 -> 12
Grand Cherokee 3.1 TD 03/99 -> 12
Kia
Besta 2.2 D R2 02/96-> 8
Magentis 2.0 CRDi D4 EA 04/06 -> 15
Pregio 2.7 D J2 10/97 -> 8
Pregio 3.0 D JT-MotorW3,NB9 01/98 -> 8
Prontier 3.0 D JT-MotorW3,NB9 01/98 -> 8
Retona 2.0 TD 06/99-> 8
Sportage 2.0 TD RF 10/97 -> 09/98 8
Sportage 2.0 TD 4WD 1997 -> 8
Lada
Cossack 1.9 D Peugeot XUD 9L 01/94 -> 2
Hussar 1.9 D Peugeot XUD 9L 01/94 -> 2
Niva 1.9 D Peugeot XUD 9L 01/94 -> 2
Sagona 1.5 D TUD5L 11/96 -> 12
Samara 1.5 D TUD5L 11/96 -> 12
LDV
200 1.9 D XUD9 10/94 -> 03/96 2
200 2.0 D 1989-> 03/96 2
400 2.5 D 1989-> 03/96 2
400 2.5 TD 1989 -> 10/98 2
Cub 2.3 D LD23 07/98 -> 8
Pilot 1.9 D XUD9A 04/96 -> 2
Mazda
121 1.8 D RTJ 03/96 -> 2
2 1.4 CD F6JA 04/03 -> 20
3 1.6 DI Turbo Y601 06/04-> 20
626 2.0 (GE) D RF 10/92 -> 04/97 8
626 2.0 D RF-CX 05/93 -> 11/96 8
626 2.0 D 11/94 -> 02/98 8
B2500 2.5 TD MD25 TI 06/99 -> 8
E2200 2.2 D R2 02/97 -> 8
MPV 2.5 TD 05/96->09/99 8
Mercedes
200 290 - 2.9 TD OM602.942 04/92 -> 3
200 290 - 2.9 TDi OM602.983 07/97 -> 3
300 350 - 3.5 D OM603.972 09/91 -> 09/96 3
300 350 - 3.5 TD 603.972 09/93 -> 08/96 3
400 408 - 2.3 D OM601 09/88 -> 10/94 3
500 508 - 2.3 D 03/89 -> 07/96 3
Page 11
Mercedes Cont’d
600 612 - 2.9 TD 602980 08/96 -> 2
C-Class C180 - 1.8 D (202) OM604 10/98 -> 05/00 3
C-Class C200 - 2.0 D (202) OM601.913 06/93 -> 05/00 3
C-Class C200 - 2.0 D (202) OM604.915 10/96 -> 05/00 1
C-Class C200 - 2.1 CDi (203) OM611.962 09/00 -> 15
C-Class C200 - 2.1 CDi (203) OM 04/03 -> 15
C-Class C200 - 2.2 CDi (202) OM611.960 03/98 -> 05/00 15
C.Class C200 - 2.2 CDi OM 03/98 -> 05/00 15
C-Class C220 - 2.2 D (202) OM604.910, 021.056-> 07/93 -> 05/98 3
C-Class C220 - 2.2 D (202) OM611.913/915 07/96 -> 05/00 1
C-Class C220 - 2.2 CDi (202) OM611.960 09/97 -> 05/00 15
C-Class C220 - 2.2 CDi (203) OM611.962 05/00 -> 02/04 15
C-Class C220 - 2.2 CDi (203) OM646.963 02/04 -> 15
C-Class C250 - 2.5 TD (202) OM605.960 05/96 -> 05/00 1
C-Class C270 - 2.7 CDi (203) OM612.962 06/00 -> 15
CLK-Class CLK270 - 2.7 CDi (209) OM612.962/967 10/02 -> 15
E-Class E200 - 2.0 D (210) OM604.917 06/95 -> 07/99 1
E-Class E200 - 2.1 CDi (210) OM611.960 06/98 -> 07/99 15
E-Class E200 - 2.1 CDi (210) OM611.962 07/99 -> 03/02 15
E-Class E200 - 2.1 TD (211) OM 06/02 -> 15
E-Class E220 - 2.2 D (210) OM604.912 03/95 -> 06/98 1
E-Class E220 - 2.2 D (210) OM604.913 05/96 -> 07/99 1
E-Class E220 - 2.2 CDi (210) OM611.961 07/98 -> 06/00 15
E-Class E220 - 2.2 CDi (210) OM611.962 07/99 -> 03/02 15
E-Class E220 - 2.2 CDi (210) OM611.961 03/02 -> 15
E-Class E250 - 2.5 D (124) OM605.911 07/93 -> 05/96 1
E-Class E250 - 2.5 TD (124) OM602.962 07/93 -> 06/95 3
E-Class E250 - 2.5 TD (210) OM605.912 03/95 -> 05/95 1
E-Class E250 - 2.5 TD (210) OM605.962 07/97 -> 07/99 1
E-Class E270 - 2.7 CDi (210) OM612.961 07/99 -> 03/02 15
E-Class E270 - 2.7 CDi (211) OM647,961 04/02 -> 15
E-Class E300 - 3.0 TD (124) OM603.960 / 963 07/93 -> 05/95 3
E-Class E300 - 3.0 TD (124)OM606.910 06/95 -> 06/96 1
E-Class E300 - 3.0 TD (210) OM606.962 06/96 -> 08/99 1
E-Class E320 - 3.2 DCi (210) OM613.961 07/99 -> 03/02 15
E-Class E320 - 3.2 DCi 9211) OM648,961 11/02 -> 15
G-Class G240 - 2.5 D (460) OM602.930 02/89 -> 12/92 3
G-Class G270 - 2.7 CDi (463) OM612.966 10/01 -> 15
G-Class G300 - 3.0 TD (463) OM606.964 09/96 -> 09/00 1
G-Class G350 - 3.5 TD (463) OM603.972 08/93 -> 09/96 3
G-Class G400 - 4.0 CDi (463) OM628.962 09/00 -> 15
ML-Class ML270 - 2.7 CDi (163) OM612.963 02/98 -> 15
ML-Class ML400 - 4.0 CDi (163) OM628.963 09/01 -> 15
S-Class S300 - 3.0 TD (140) OM606.961 06/96 -> 10/98 1
S-Class S320 - 3.2 CDi (220) M613.960 01/00 -> 15
S-Class S350 - 3.5 TD (140) OM603.971 10/95 -> 08/96 1
S-Class S400 - 4.0 CDi (220) M628.960 01/00 -> 15
Sprinter 2.2 CDi OM611.960 04/00 -> 15
Sprinter 2.2 CDi 04/00 -> 15
Sprinter 2.2 CDi OM611A 04/00 -> 15
Sprinter 2.3 D OM601.943 12/94 -> 03/00 3
Sprinter 2.7 CDi OM612 04/00 -> 15
Sprinter 2.9 D OM602.980.10 (Dela ->9849) 02/95 -> 2
Sprinter 2.9 D OM602.980.12 (Dela->136) 02/95 -> 2
V-Class V200 - 2.0 CDi OM611.960 03/99 -> 09/03 15
V-Class V220 - 2.2 CDi OM611.980 03/99 -> 09/03 15
V-Class V230 - 2.3 TD OM601.970 09/96 -> 02/99 3
Viano 2.2 Cdi OM646.982 09/03 -> 15
Vito 2.2 CDi OM611A 03/99 -> 09/03 15
Mercedes Cont’d
Vito 2.2 Cdi OM646.983 09/03 -> 15
Vito 2.2 CDi OM611.960 03/98 -> 09/03 15
Vito 2.2 Cdi OM646.982 09/03 -> 15
Vito 2.2 CDi OM611.980 03/99 -> 09/03 15
Vito 2.3 D OM601.942 02/96 -> 09/03 3
Vito 2.3 TD OM601.970 03/96 -> 02/98 3
MG
ZR 2.0 TD 06/01-> 12
ZS 2.0 TD 01/04-> 12
ZT 2.0 CDTi 204D2 06/02->09/03 12
Mitsubishi
Carisma 1.9 TD F8QT 10/96 -> 2
Challenger 2.5 D 4D56T 11/98 -> 8
Pajero 3.2 Di-D 4M41 04/00 -> 10/01 10
Shogun 3.2 Di-D 4M41 04/00 -> 10
Nissan
Almera 1.5 dCi 01/03 -> 12
Almera 2.0 D CD20 11/95 -> 03/00 7
Almera 2.2 Di YD22DDT 03/00 -> 10
Almera Tino 2.2 Di YD22DDTi 08/00 -> 10
Brougham 2.3 D TD23 01/93 -> 8
Brougham 2.3 TD TD23 01/93 -> 8
Cabstar 2.3 D LD23 02/99 -> 12/01 8
Cabstar 2.5 TD 01/82 -> 07/97 8
Cargo 2.3 D LD23 09/94 -> 8
D21 2.5 D TD25 01/93 -> 8
D21 2.7 D TD27 01/93 -> 8
D21 2.7 D TD27T 01/93 -> 8
Interstar 1.9 dCi 80 F9Q, 772 07/02 -> 12
Interstar 2.2 dCi 90 G9T 722 07/02 -> 19
Interstar 2.5 dCi 100 G9U 632, 650 11/03 -> 19
Interstar 2.5 dCi 120 G9U 07/02 -> 19
Interstar 2.5 dCi 150 09/06 -> 19
King Cab 2.5 D TD25 1993-> 8
King Cab 2.5 TD TD25 02/98 -> 8
King Cab 2.5 TDi TD25TI 05/98 -> 8
March 1.5 D TUD5 10/96 -> 12
Micra 1.5 D TUD5,TUD15 05/98 -> 12/02 12
Micra 1.5 TD K9K 2002-> 12
Navara 2.5 dCi YD25 05/05 -> 10
Navara 2.5 dCi YD25 05/05 -> 10
Note 1.5 dCi lp K9K 03/06 -> 12
Note 1.5 dCi hp K9K 03/06 -> 12
Pathnder 2.5 dCi YD25DDTi 03/05 -> 10
Pathnder 2.7 D TD25,TD27 02/93 -> 8
Pathnder 2.7 D TD27T 02/93 -> 8
Pathnder 2.7 TD TD27ET 1993-> 8
Patrol 2.7 TD TD27 02/93 -> 8
Pick-Up 2.5 D TD25 02/98 -> 8
Pick-Up 2.5 TD TD25 10/87 -> 01/98 8
Pick-Up 2.7 TD TD27 8
Primastar 1.9 dCi 03/01-> 12
Primera 2.0 D CD20 12/90 -> 09/96 7
Primera 2.2 Di 03/02 -> 10
Serena 2.3 D LD23 10/94 -> 8
Page 12
Nissan (Cont’d)
Terrano 2.7 D TD27, TD27T 02/93 -> 06/96 8
Terrano 2.7 TD TD27T 1993 -> 09/97 8
Trade 2.3 D LD23 05/97 -> 8
Urvan 2.5 D TD25 1993->10/96 8
Vanette 2.3 D LD23 09/94 -> 02/98 8
X-Trail 2.2 Di YD22ETI 06/01 -> 10
X-Trail 2.2 dCi YD22ETI 12/03 -> 10
Peugeot
106 1.5 D TUD5,TUD5B 03/94 -> 12
107 1.4 HDi DV4D 06/05 -> 20
1007 1.4 HDi DV4TD (8HX, 8HZ) 04/05 -> 20
205 1.8 D XUD7 10/83 -> 05/97 2
205 1.8 TD XU7.DT,XUD7 07/85 -> 05/97 2
206 1.4 HDi 2001-> 20
206 1.6 HDi 9HY (DV6 TED4) 05/04 -> 20
206 1.9 D DW8,DW8B 07/98 -> 12
206 2.0 HDi DW10,DW10TD 10/99 -> 17
306 1.8 D XUD7(CEE95L3) 1994->08/98 2
306 1.8 D XUD7 06/95 -> 03/01 2
306 1.8 D XUD7(CEE95L3) 09/98 -> 03/01 2
306 1.9 D XUD9 04/92 -> 03/01 2
306 1.9 D XUD9A,L 03/93 -> 03/01 2
306 1.9 D DW8,DW8B 04/98 -> 03/01 12
306 1.9 TD XUD9TE 03/93 -> 03/01 2
306 2.0 HDi DW10,DW10TD 08/98 -> 03/01 17
307 1.4 HDi DV4TD 04/01 -> 20
307 1.6 HDi 9HY (DV6 TED4) 02/04 -> 20
307 2.0 HDi DW10TD 04/01 -> 17
307 2.0 HDi DW10ATED 04/01 -> 17
307 2.0 HDi RHR (DW10 BTED4) 10/03 -> 17
405 1.9 D XUD9 03/88 -> 01/97 2
405 1.9 D XUD9A 02/97 -> 2
405 1.9 TD XUD9TE,XUD9TF 09/92 -> 01/97 2
406 1.9 TD XUD9BTF,SD,TE 10/95 -> 08/98 2
406 1.9 TD XUD9BTF,SD,TE 09/98 -> 03/99 2
406 2.0 HDi DW10TD 04/99 -> 17
406 2.0 HDi DW10ATED4 (RHS) 08/01 -> 17
406 2.1 TD XUD11BTE 10/95 -> 08/98 2
406 2.1 TD XUD11BTE 09/98 -> 03/99 2
406 2.2 HDi DW12TED4 02/00 -> 17
406 2.2 HDi DW12TED 09/00 -> 17
407 1.6 HDi 9HY (DV6 TED4) 05/04 -> 20
407 2.0 HDi RHR (DW10 BTED4) 05/04 -> 17
605 2.1 TD XUD11BTE(CEE95L3) 06/89 -> 08/98 2
605 2.1 TD XUD11BTE(CEE19.5) 06/89 -> 02/00 2
605 2.1 TD XUD11BTE(CEE95L3) 09/98 -> 02/00 2
605 2.5 TD DK5ATE 07/94 -> 08/98 2
607 2.0 HDi DW10ATED 02/00 -> 17
607 2.2 HDi DW12TED4 02/00 -> 17
806 1.9 TD XUD9TE 07/94 -> 2002 2
806 2.0 HDi DW10TED,4 09/98 -> 2002 17
806 2.1 TD XUD11ATE,BTE 05/95 -> 09/99 2
807 2.0 HDi DW10TD,DW10TED 2002-> 17
807 2.2 HDi DW12TED4 2002-> 17
Bipper 1.4 HDi DV4TED 02/08 -> 20
Boxer 1.8 D XUD7 09/98 -> 2
Boxer 1.9 D XUD9 07/95 -> 08/98 2
Boxer 1.9 D XUD9,XUD9AU 09/98 -> 2
Peugeot (Cont’d)
Boxer 1.9 TD XUD9TE 03/94 -> 08/98 2
Boxer 1.9 TD XUD9TE,XUD9UTF 09/98 -> 2
Boxer 2.0 HDi DW10TD 09/98 -> 17
Boxer 2.0 HDi DW10UTD (RHV) 04/02 -> 17
Boxer 2.2 HDi DW12UTED (4HY) 04/02 -> 17
Boxer 2.2 HDi 100 PUMA 22 DT 04/06 -> 18
Boxer 2.2 HDi 120 PUMA 22 DT 04/06 -> 18
Boxer 2.5 D DJ5 03/94 -> 2
Boxer 2.5 DTi DJ5T 03/94 -> 2
Boxer 2.5 DTi DJ5TED 09/96 -> 15
Boxer 2.8 JTD 10/97 -> 2
Expert 1.9 D XUD9A,L 09/95 -> 2
Expert 1.9 D DW8 07/98 -> 12
Expert 1.9 D XUD9A,L 09/98 -> 2
Expert 1.9 TD XUD9TE 09/95 -> 2
Expert 2.0 HDi DW10TD 12/99 -> 17
Expert 2.0 HDi DW10ATED 07/00 -> 17
J5 2.5 D DJ5 02/94 -> 2
J5 2.5 TD DJ5T 02/94 -> 2
Partner 1.8 D XUD7 08/96 -> 2
Partner 1.9 D XUD9A 08/96 -> 08/98 2
Partner 1.9 D DW8 07/98 -> 12
Partner 1.9 D XUD9A 09/98 -> 2
Partner 2.0 HDi DW10TD 12/99 -> 17
Ranch 1.9 D XUD9A 05/96 -> 2
Renault
19 1.9 TD F8Q-740,744 09/90 -> 03/96 2
Avantime 2.2 dCi F9Q 09/01 -> 12
Avantime 2.2 dCi G9T-720 09/01 -> 19
Clio 1.5 DCi K9K65,K9K80,K9K700 06/01 -> 12
Clio 1.5 dCi K9K 768 06/05 -> 12
Clio 1.5 dCi K9K 766 06/05 -> 12
Clio 1.5 dCi K9K 764 06/05 -> 12
Clio 1.9 D F8Q-676,678,692,696 03/91 -> 08/98 2
Clio 1.9 D F8Q.630,662 03/98 -> 13
Clio 1.9 D F8Q-632 01/99 -> 13
Clio 1.9 D F9Q.780 03/99 -> 12
Clio 1.9 DTi F9Q.716 02/99 -> 12
Espace 1.9 DTi F9Q-722 02/99 -> 12
Espace 1.9 DCi F9Q-820 11/02 -> 12
Espace 2.1 TD J8S-610,772,776,778 04/91 -> 09/96 2
Espace 2.2 DCi G9T-710 09/00 -> 19
Espace 2.2 TD G8T- 714,716 10/96 -> 08/00 12
Espace 2.2 DCi G9T-742, 743 11/02 -> 19
Express 1.9 D F8Q 640,644,646,648,682 09/94 -> 2
Extra 1.9 D F8Q 640 01/96 -> 2
Kangoo 1.5 DCi K9K-710 09/02 -> 12
Kangoo 1.5 DCi K9K-700, 704 12/01 -> 12
Kangoo 1.5 DCi K9K-702 07/02 -> 12
Kangoo 1.9 D F8Q-630 03/98 -> 13
Kangoo 1.9 D F8Q-662 03/98 -> 13
Kangoo 1.9 D F8Q-632 03/99 -> 13
Kangoo 1.9 DTi F9Q-780 02/00 -> 12
Kangoo 1.9 DTi F9Q-790 10/01 -> 12
Laguna 1.5 dCi 10/07 -> 12
Laguna 1.9 DTi F9Q.716 05/98 -> 01/99 12
Laguna 1.9 DTi F9Q710,717,718 01/99 -> 12/00 12
Laguna 1.9 DCi F9QT-750,751,752 01/01 -> 12
Page 13
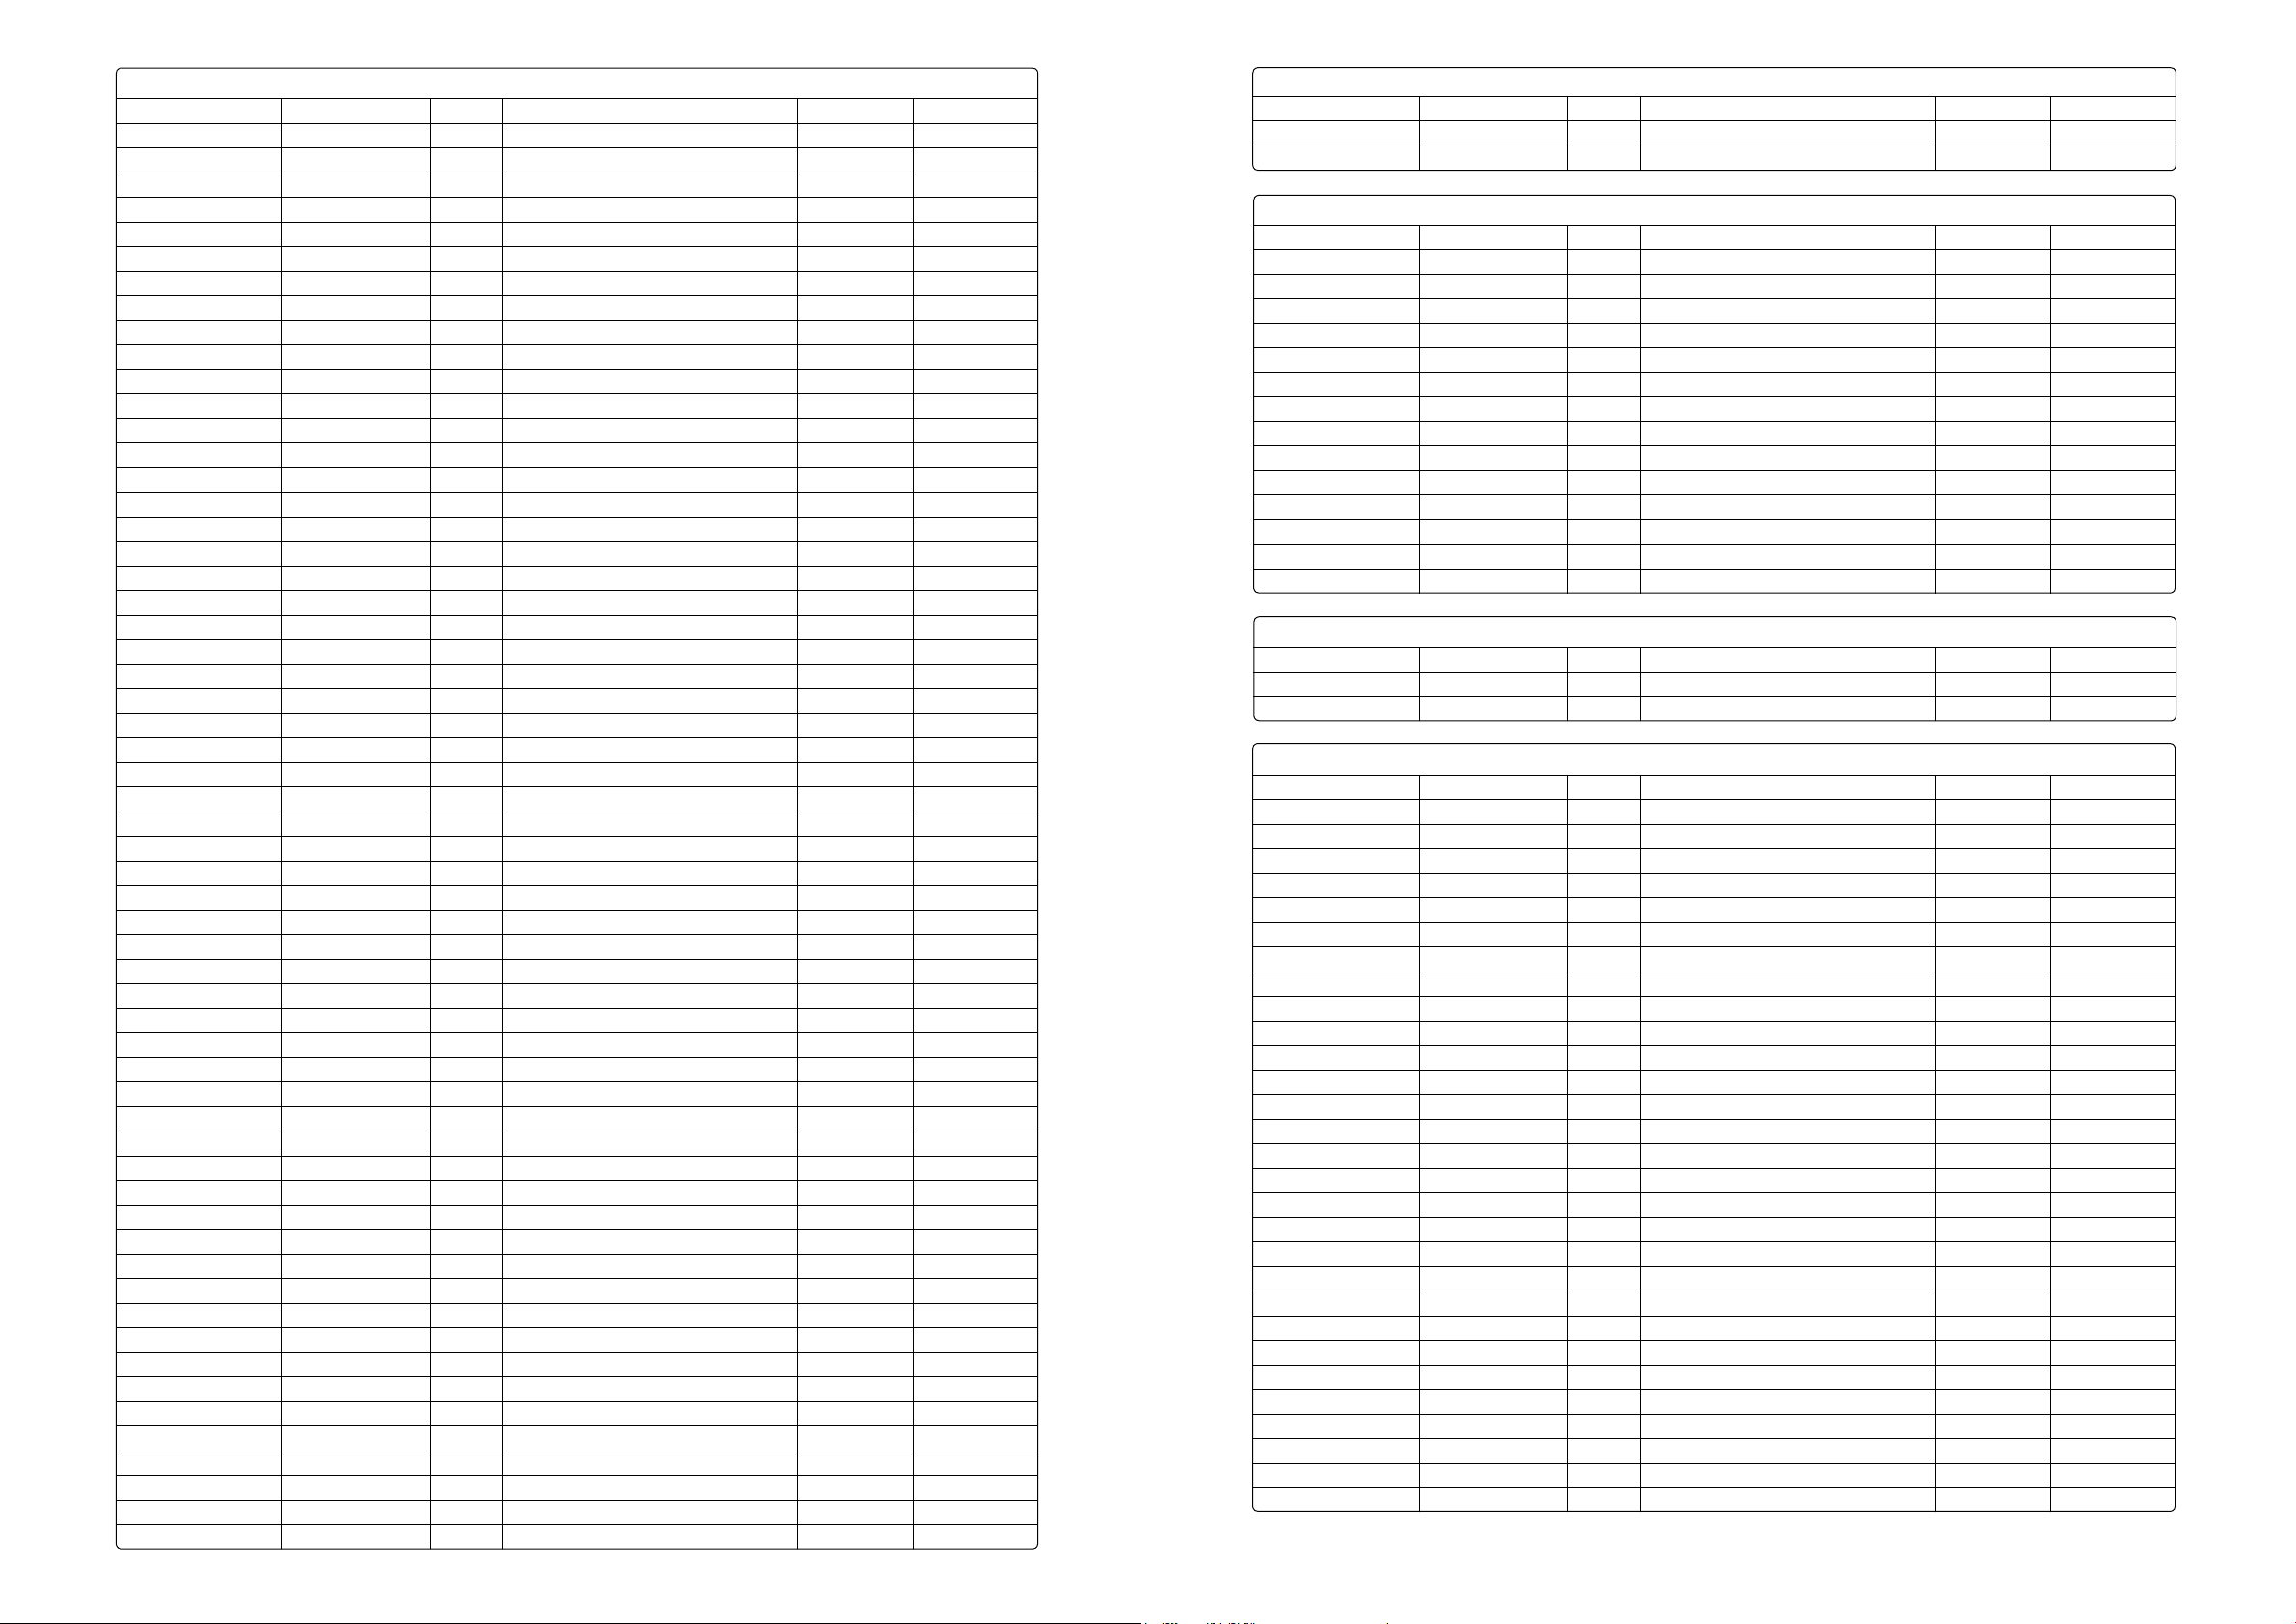
Renault (Cont’d)
Laguna 2.0 dCi M9R 920 10/07 -> 12
Laguna 2.2 D G8T-706,752,790,792,794 02/96 -> 06/98 12
Laguna 2.2 TD G8T 01/94 -> 03/01 12
Laguna 2.2 TD G8T-760 02/96 -> 06/98 12
Laguna 2.2 DCi F9Q 03/01 -> 12
Laguna 2.2 DCi G9T-702 01/02 -> 19
Master 1.9 DTi F9Q-770 09/99 -> 12
Master 2.2 D G9T-720 (722 INTD) 10/00 -> 19
Master 2.2 DCi F9Q 06/00 -> 12
Master 2.5 D S8U-730,731,742 06/82 -> 07/98 2
Master 2.5 TD So m 8140.27.2580 08/89 -> 07/98 2
Master 2.5 dCi G9T 722 10/03 -> 19
Master 2.5 dCi G9T-720 10/01 -> 19
Megane 1.5 DCi 09/02 -> 12
Megane 1.9 DCi F9Q 11/03 -> 12
Megane 1.9 D F8Q-620,624 11/95 -> 2
Megane 1.9 D F8Q-620 01/96 -> 2
Megane 1.9 D F8Q-788 03/98 -> 13
Megane 1.9 D F8Q-622,790 03/99 -> 13
Megane 1.9 TD F8Q-784 01/96 -> 2
Megane 1.9 DCi F9Q-731,736 01/99 -> 08/02 12
Megane 1.9 DCi F9Q-732,733 03/99 -> 08/02 12
Megane 1.9 DTi F9Q-730,734 04/97 -> 02/99 12
Megane 1.9 DTi F9Q-731,732,736,740 01/99 -> 08/02 12
Megane 1.9 DTi F9Q-731,736 01/99 -> 08/02 12
Megane 1.9 DTi F9Q-744 02/01 -> 08/02 12
Megane Scenic 1.9 D F8Q-620,624 11/95 -> 02/99 2
Megane Scenic 1.9 D F8Q-788 03/98 -> 09/99 13
Megane Scenic 1.9 D F8Q-622,790 01/99 -> 09/99 13
Megane Scenic 1.9 Di F9QT-770 06/00 -> 12
Megane Scenic 1.9 TD F8Q-784 01/96 -> 09/99 2
Megane Scenic 1.9 TD F9Q-730, 734 01/96 -> 09/99 12
Megane Scenic 1.9 dCi F9Q-730,734 01/96 -> 09/99 12
Megane Scenic 1.9 dCi F9Q-732,733 03/99 -> 12
Megane Scenic 1.9 dCi F9Q-731,736 03/99 -> 09/99 12
Megane Scenic 1.9 dCi F9Q-716, 718 06/00 -> 12
Megane Scenic 1.9 DTi F9Q-731,732,736,740 01/99 -> 12
Megane Scenic 1.9 DTi F9Q-716, 718 03/99 -> 12
Megane Scenic 1.9 DTi F9Q-744 02/01 -> 12
Modus 1.5 dCi 12/04-> 12
Rapid 1.9 D F8Q-640 09/94 -> 03/98 2
Safrane 2.1 TD J8S-760 04/92 -> 10/96 2
Safrane 2.2 TD G8T-740 10/96 -> 11/01 12
Safrane 2.5 TD S8U-762,763 05/93 -> 10/96 2
Scenic 1.5 dCi K9K-722 06/03 -> 12
Scenic 1.5 dCi K9K-728 12/03 -> 12
Scenic 1.9 dCi F9Q-730, 734 01/96 -> 09/99 12
Scenic 1.9 dCi F9Q-731, 736 03/99 -> 09/99 12
Scenic 1.9 dCi F9Q-716, 733 11/00 -> 12
Scenic 1.9 dCi 06/03 -> 12
Scenic 1.9 dCi F9Q-812 06/03 -> 12
Scenic 1.9 dCi 05/05 -> 12
Thalia 1.5 dCi K9K-700 04/02 -> 12
Thalia 1.5 dCi K9K-702 06/01 -> 12
Trac 1.9 D F8Q-600,606 05/98 -> 03/01 13
Trac 1.9 dCi F9Q-760, 762 03/01 -> 12
Trac 2.1 D J8S-620,622,758 09/80 -> 10/97 2
Trac 2.1 D 852-750 09/80 -> 10/97 2
Trac 2.5 D So m S8U 10/82 -> 10/97 2
Renault (Cont’d)
Trac 2.5 D 8140.67.2500 03/90 -> 10/97 2
Trac 2.5 dCi G9U-730 05/03 -> 19
Vel Satis 2.2 dCi G9T 600, 702, 703 04/02 -> 19
Rover
25 2.0 TD 20T 10/99 -> 12
45 2.0 TD 20T 02/00 -> 12
75 2.0 CDT M47R (BMW) 04/99 -> 12
75 2.0 CDTi 204 D2 02/03 -> 12
100 115 - 1.5 D TUD5 03/95 -> 12
200 218 - 1.9 D XUD 9A 03/91 -> 03/00 2
200 218 - 1.9 D XUD9 09/91 -> 03/00 2
200 220 - 2.0 D 20T2N, 20T2R 01/96 -> 03/00 12
400 418 - 1.8 TD XUD 7TE 03/91 -> 03/00 2
400 418 - 1.9 D XUD 9A 03/91 -> 03/00 2
400 420 - 2.0 SD 20T2R 03/96 -> 12
400 420 - 2.0 SDi 20T2N 03/96 -> 12
600 620 - 2.0 TD 20T2N 02/95 -> 06/99 12
800 825 - 2.5 TD VM HR-492/VM 425 SLIRR 01/93 -> 04/95 2
800 825 - 2.5 TD VM425 Slira 05/95 -> 02/99 12
Saab
9-3 2.2 TiD D223L/X22DTH 09/98 -> 11/00 15
9-3 2.2 TiD 11/00 -> 15
9-3 1.9 CDTi Z19DTH 09/04 -> 47
Seat
Alhambra 1.9 TDi 1Z,AFN 01/96 -> 12
Alhambra 1.9 TDi AHU 07/96 -> 12
Alhambra 1.9 TDi ANU 03/99 -> 09/01 12
Alhambra 1.9 TDi AVG 06/99 -> 12
Alhambra 1.9 TDi AJM 04/00 -> 12
Alhambra 1.9 TDi AUY 06/00 -> 12
Alhambra 1.9 TDi ASZ 11/02 -> 12
Arosa 1.4 TDi AMF 08/99 -> 12
Arosa 1.7 SDi AKU 10/97 -> 12
Cordoba 1.7 SDi 07/97 -> 06/99 12
Cordoba 1.9 D 1Y 05/93 -> 08/99 2
Cordoba 1.9 SDi AEF 03/93 -> 08/99 2
Cordoba 1.9 SDi AEY 01/96 -> 09/02 12
Cordoba 1.9 SDi AQM,AGP 06/99 -> 12
Cordoba 1.9 SDi ASY 10/02 -> 12
Cordoba 1.9 TD AAZ 05/94 -> 08/99 2
Cordoba 1.9 TDi 1Z,AHU,ALH,AGR 08/96 -> 12
Cordoba 1.9 TDi AFN,ASK,ASV 06/97 -> 12
Cordoba 1.9 TDi ASZ 10/02 -> 12
Cordoba 1.9 TDi ATD 10/02 -> 12
Ibiza 1.7 SDi 07/97 -> 08/99 12
Ibiza 1.9 D EAF 03/93 -> 2
Ibiza 1.9 D 1Y 05/93 -> 08/96 2
Ibiza 1.9 SDi AEF 03/93 -> 08/99 2
Ibiza 1.9 SDi AEY 03/93 -> 08/99 12
Ibiza 1.9 SDi AQM,AGP 08/99 -> 12
Ibiza 1.9 TD AAZ 05/93 -> 2
Ibiza 1.9 TDi 1Z,AHU,AFN 08/96 -> 08/99 12
Ibiza 1.9 TDi ALK,ALH,AGR,ASK,ASV 08/99 -> 12
Inca 1.9 D 1Y,1EY 11/95 -> 2
Page 14
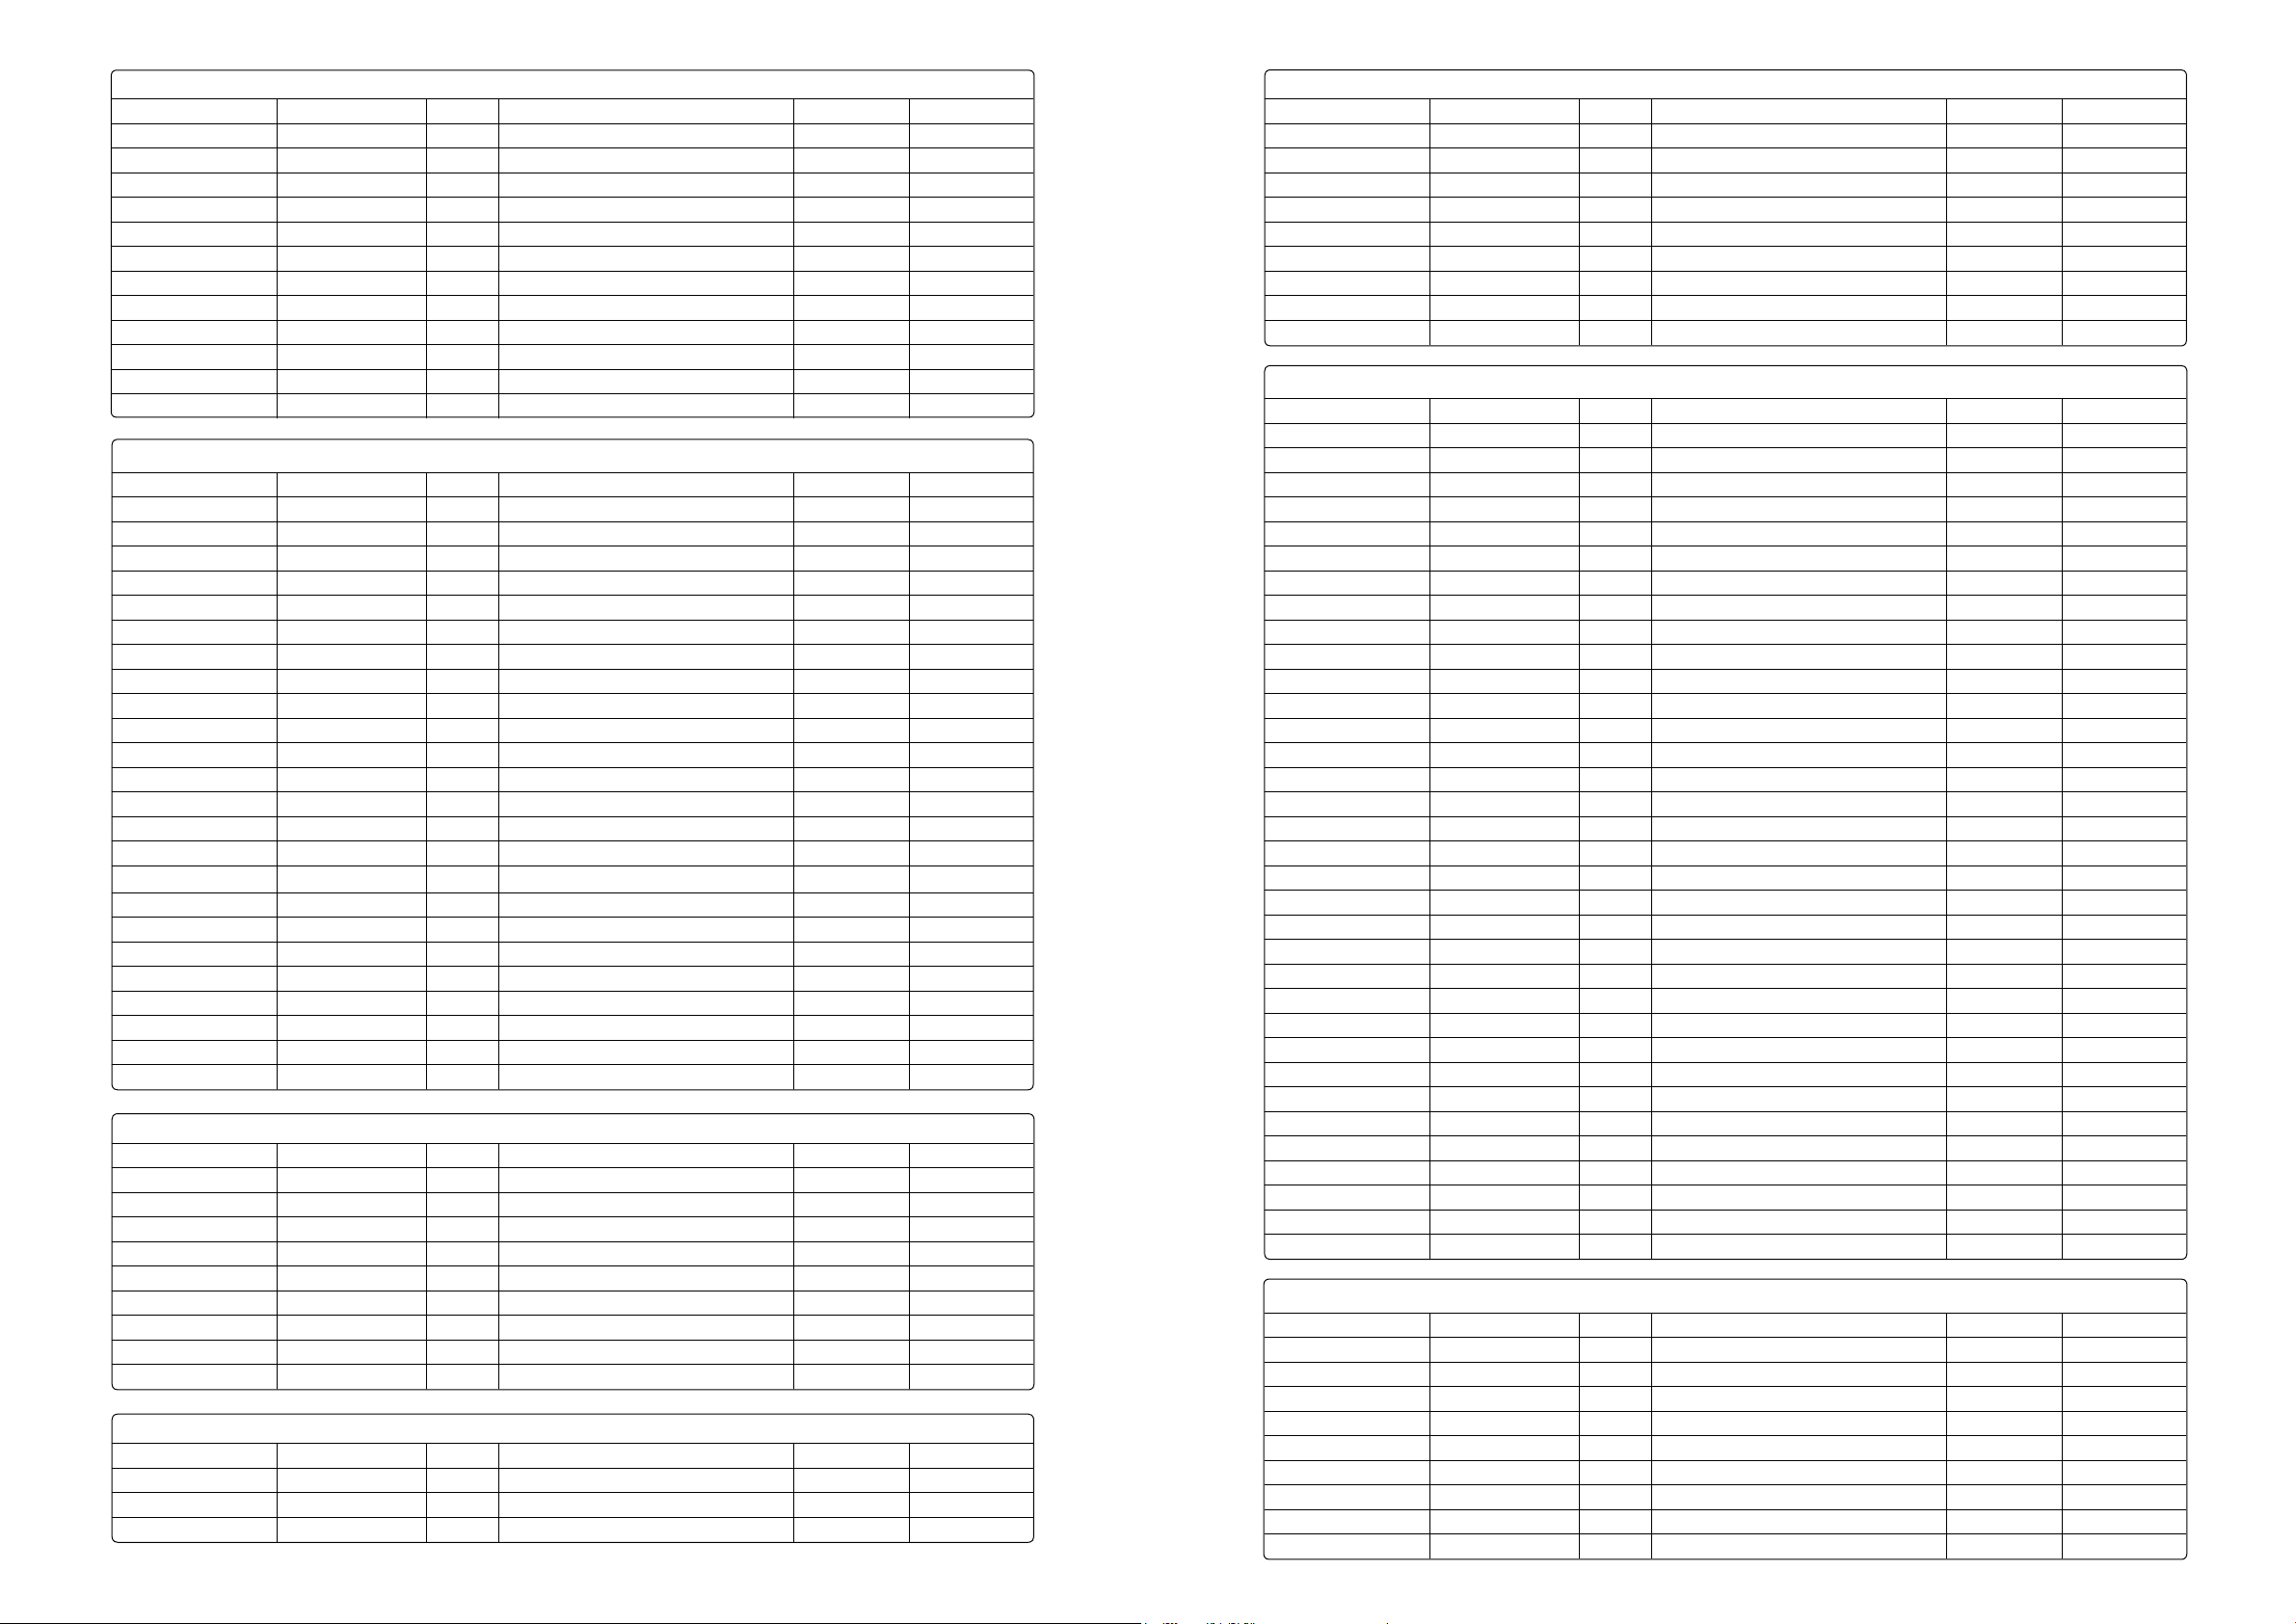
Seat (cont’d)
Inca 1.9 SDi AEY,AYQ 11/95 -> 12
Leon 1.9 SDi AQM 11/99 -> 12
Leon 1.9 TDi ALG,AGR 09/99 -> 12
Leon 1.9 TDi ASV,AHF 09/99 -> 12
Leon 1.9 TDi ARL 01/01 -> 12
Toledo 1.9 D 1Y 03/91 -> 10/98 2
Toledo 1.9 SDi AEY 12/95 -> 03/99 12
Toledo 1.9 TD AAZ 03/91 -> 04/97 2
Toledo 1.9 TDi 1Z,AFN 08/96 -> 10/98 12
Toledo 1.9 TDi AGR,AHU,ALH 01/97 -> 12
Toledo 1.9 TDi AHF,ASV 11/98 -> 12
Toledo 1.9 TDI ASZ 05/03-> 12
Toledo 1.9 TDi ARL 01/01 -> 12
Skoda
Fabia 1.4 TDi AMF 04/03 -> 12
Fabia 1.9 SDi ASY 1999-> 12
Fabia 1.9 SDi AGP 12/99 -> 12
Fabia 1.9 TDi ATD 1999-> 12
Fabia 1.9 TDi AJM 12/99 -> 12
Fabia 1.9 TDi AHF 10/00 -> 12
Felicia 1.9 D 1Y 09/96 -> 2
Felicia 1.9 D AEF 1996->06/01 2
Octavia 1.9 D AGP 07/96 -> 12
Octavia 1.9 SDi AEY 09/96 -> 12
Octavia 1.9 SDi AGP,AQM 05/97 -> 12
Octavia 1.9 TDi 1Z 1996->07/00 12
Octavia 1.9 TDi AGR 01/96 -> 12
Octavia 1.9 TDi ALH 07/96 -> 12
Octavia 1.9 TDi AHF 01/97 -> 12
Octavia 1.9 TDi AGR,AHF,ALH,ASV,ATD 08/00 -> 12
Octavia 1.9 TDi AJM, AUY 10/00 -> 12
Octavia 1.9 TDi ATD 10/00 -> 12
Octavia 1.9 TDi ASZ 02/03 -> 12
Pick Up 1.9 D AEF 01/96 -> 2
Roomster 1.4 TDI BNM, BMS 09/06 -> 12
Superb 1.9 TDi AVB 08/02 -> 12
Superb 1.9 TDi AVF, AWX 02/02 -> 12
Superb 2.5 TDi AYM 02/02 -> 16
Superb 2.5 TDi BDG 06/03 -> 16
Ssangyong
Istana 2.3 D 661, 911 07/95 -> 3
Istana 2.9 D 662, 911 07/95 -> 3
Korando 2.3 D OM601 01/97 -> 3
Korando 2.5 D XD3P 06/93 -> 07/97 2
Korando 2.9 D OM602 09/96 -> 3
Korando 2.9 D OM662 02/99 -> 3
Korando 2.9 TD 04/98 -> 3
Musso 2.3 D MB OM 601 07/93 -> 3
Musso 2.9 D MB OM 602 07/93 -> 01/99 3
Rexton 2.9 TD 04/02 -> 3
Suzuki
Baleno 1.9 TD XUD9 02/99 -> 2
Grand Vitara 1.9 DDiS F9Q 10/05 -> 12
Grand Vitara 2.0 TDi RF 03/98 -> 8
Grand Vitara 2.0 TDi DW10, RHW 2000-> 17
Suzuki (cont’d)
Ignis 1.3 DDiS Z13DT 09/03 -> 48
Jimny 1.5 DDiS K9K 700 12/03 -> 12
Liana 1.4 TD 8HY (DV4TED4) 03/05 -> 20
Samurai 1.9 TD RFP 09/98 -> 2
SX4 1.9 DDiS 06/06-> 14
Vitara 1.9 TD RF 12/94 -> 03/98 8
Vitara 1.9 TD XUD9 11/95 -> 2
Vitara 1.9 TD RF 12/95 -> 03/98 8
Vitara 2.0 TD RF 08/95 -> 8
Wagon R 1.3 DDiS Z13DT 09/03 -> 48
Toyota
Avensis 2.0 TD 2C-TE 10/97 -> 07/00 4
Avensis 2.0 D-4D 1CD-FTV 08/99 -> 6
Avensis Verso 2.0 D-4D 1CD-FTV 05/01 -> 6
Aygo 1.4 D 2WZ-TV 05/05 -> 20
Blizzard 2.4 TD 2L-TE 04/90 -> 5
Caldina 2.0 TD 2C-T 01/96 -> 09/97 4
Caldina 2.2 D 3C-E 05/98 -> 4
Carina E 2.0 TD 2C-T 01/96 -> 10/97 4
Coaster 3.4 D 3B 08/88 -> 07/99 4
Coaster 4.0 D 2H 08/88 -> 01/90 4
Coaster 4.2 D 1HZ 01/90 -> 07/99 4
Coaster 4.2 TD 1H-DT 01/90 -> 01/93 4
Corolla 2.0 D 2C 05/96 -> 04/97 4
Corolla 2.0 D 2C-E 04/97 -> 10/99 4
Corolla 2.0 D-4D 1CD-FTV 09/00 -> 6
Corolla Verso 2.0 D-4D 1CD-FTV 10/01 -> 6
Corolla Wagon 2.2 D 3C-E 04/98 -> 4
Dyna 2.4 D 2L 08/88 -> 01/99 5
Dyna 2.8 D 3L 08/88 -> 01/99 5
Dyna 3.4 D 3B 05/95 -> 4
Hiace 2.4 D 2L 08/89 -> 01/99 5
Hiace 2.8 D 3L 08/89 -> 01/99 5
Hilux 2.4 D 2 L 08/88 -> 07/98 5
Hilux 2.4 TD 2L-II T/2L-TE 08/90 -> 09/97 5
Hilux 2.8 D 3 L 08/95 -> 07/98 5
Land Cruiser 2.4 TD 2L-T 01/90 -> 01/95 5
Land Cruiser 4.2 D 1H-Z 01/90 -> 05/98 4
Land Cruiser 4.2 TD 1HD-T 01/90 -> 01/98 4
Liteace 2.0 D 2C-III / 2C 10/96 -> 4
Picnic 2.0 D-4D 1CD-FTV 05/01 -> 6
Premio 2.0 TD 2C-T 01/96 -> 01/98 4
Previa 2.0 D-4D 1CD-FTV 02/01 -> 6
Rav 4 2.0 D-4D 1CD-FTV 05/01 -> 6
Starlet 1.5 D 1N 12/89 -> 01/96 5
Townace 2.0 D 2C 10/96 -> 4
Vauxhall / Opel
Arena 1.9 D F8Q 07/98 -> 11/99 2
Arena 2.5 TD S8U 09/98 -> 11/99 2
Astra 1.7 D 17YD 08/91 -> 03/04 2
Astra Mk III 1.7 TD 17DT,TC4EE1, 817253-> 02/90 -> 02/98 9
Astra Mk IV 1.7 TD X17DTL 02/98 -> 08/00 2
Astra Mk IV 1.7 DTi 16V Y17DT 02/00 -> 11
Astra Mk IV 2.0 DTi X20DTL, Y20DTL 03/98 -> 03/04 15
Astra Mk IV 2.0 DTi X20DTH,Y20DTH 08/99 -> 03/04 15
Astra Mk V 1.7 CDTi Z17DTL 03/04 -> 11
Astra Mk V 1.7 CDTi Z17DTH 03/04 -> 11
Page 15
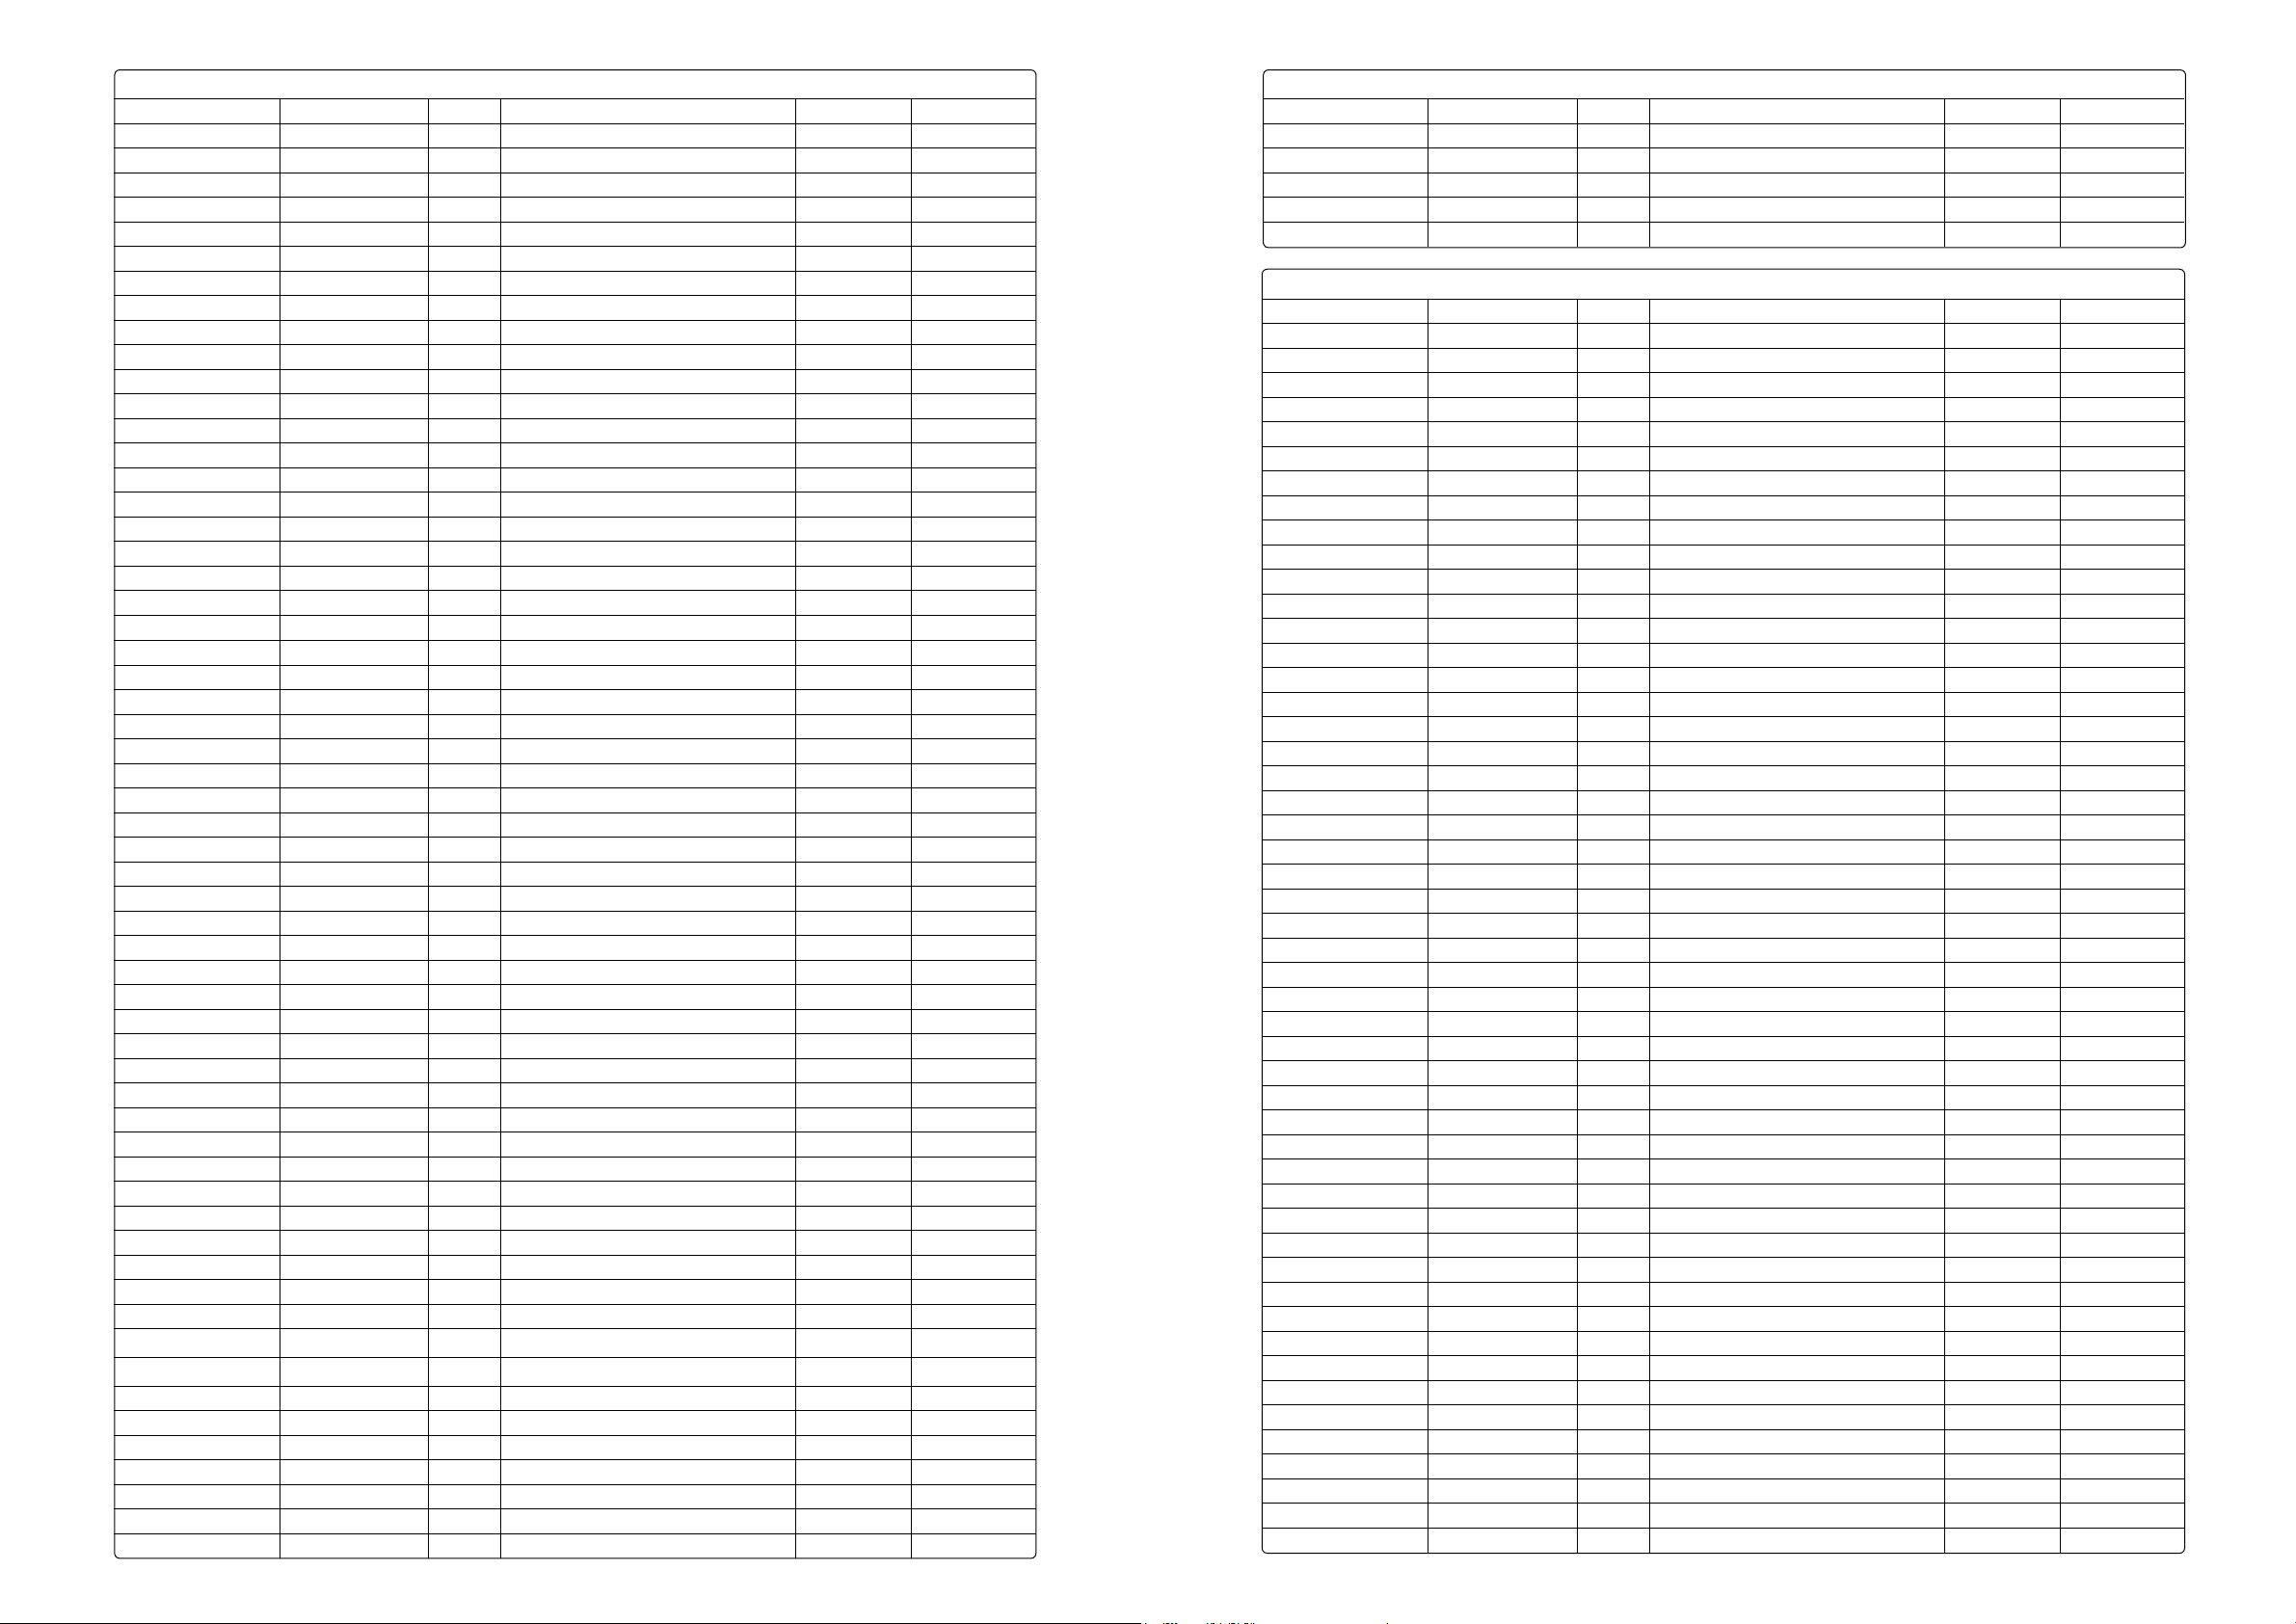
Vauxhall /Opel (Continued)
Astra Mk V 1.9 CDTi Z19DT 09/05 -> 14
Astra Mk V 1.9 CDTi Z19DTH 09/04 -> 47
Astra Mk V 1.3 CDTi Z13DT 04/05 -> 48
Astra Van 1.7 D 08/83 -> 03/04 2
Astra Van 1.7 D 17D 09/88 -> 08/94 2
Astra Van 1.7 D 17DR 09/93 -> 08/94 2
Astra Van 1.7 TD X17DTL 09/94 -> 03/04 2
Astra Van 2.0 Di X20DTL 09/98 -> 03/04 15
Brava 2.2 D 1990 -> 09/96 9
Brava 2.3 D 1988 -> 09/96 9
Brava 2.5 D 03/92 -> 2
Combo 1.7 D X17D 09/94 -> 10/01 9
Combo 1.7 DTi 17D 4EE;1 X17 D 4EE1 09/94 -> 10/01 11
Combo 1.7 DTi Y17DT 08/01 -> 11
Combo 1.7 Di Y17DTL 10/01 -> 2
Combo 1.7 CDTi Z17DTH 06/04 -> 11
Combo 1.3 CDTi Z13DT 10/04 -> 48
Corsa 1.5 D 15D (4EC1) 03/93 -> 09/00 9
Corsa 1.5 TD 15TD / X15DT (4EC1) 03/93 -> 09/00 9
Corsa 1.7 Di Y17DTL 09/01 -> 11
Corsa 1.7 DTi Y17DTL 09/01 -> 11
Corsa 1.7 TD 17D / X17D (4EE1) 03/93 -> 09/00 9
Corsa 1.3 CDTi Z13DT 08/03 -> 48
Corsa Van 1.7 D 17D, X17D 09/93 -> 2
Corsa Van 1.7 DI Y17 DTL 09/00 -> 11
Corsa Van 1.7 DTI Y17 DT 09/00 -> 11
Corsa Van 1.3 CDTi Z13DT 01/04 -> 48
Frontera 2.2 DTi X22DTH 09/98 -> 15
Frontera 2.2 DTi Y22DTH 08/00 -> 15
Frontera 2.5 TD 25TD 09/96 -> 08/98 12
Meriva 1.7 DTi Y17DT 09/02 -> 11
Meriva 1.3 CDTi Z13DT 11/05 -> 48
Monterey 3.1 TD 4JG2TC 05/94 -> 9
Movano 1.9 DTi F9Q-770 12/99 -> 12
Movano 2.2 DTi G9T-720 09/00 -> 19
Movano 2.5 DTi S8U 12/99 -> 2
Movano 2.5 DTi 10/01 -> 19
Movano 2.8 DTi S9W 11/98 -> 2
Omega 2.0 TDi X20DTH 02/98 -> 15
Omega 2.2 DTi Y22DTH 08/00 -> 15
Omega 2.5 TD BMW - X25DT OHC-R6 04/94 -> 2
Signum 1.9 CDTi Z19DT 04/04 -> 14
Signum 1.9 CDTi Z19DTH 04/04 -> 14
Signum 2.0 DTi Y20DTH 05/03 -> 15
Signum 2.2 DTi Y20DTR 05/03 -> 15
Sintra 2.2 DTi X22DTH 09/98 -> 04/99 15
Tigra 1.3 CDTi Z13DT 12/04 -> 48
Vectra 1.7 TD X17TD,TC4EC1 09/95 -> 12/96 9
Vectra 1.7 TD X17DT 09/95 -> 12/96 15
Vectra 1.9 CDTi Z19DTL 04/04 -> 14
Vectra 1.9 CDTi Z19DT 04/04 -> 14
Vectra 1.9 CDTi Z19DTH 04/04 -> 47
Vectra 2.0 Di X20DTL 08/99 -> 03/02 15
Vectra 2.0 DTi X20DTH 06/96 -> 15
Vectra 2.0 DTi Y20DTH 08/99 -> 15
Vectra 2.0 DTI 03/03-> 17
Vectra 2.2 DTi Y22DTR 07/00 -> 15
Vectra 2.2 DTi Y20DTR 04/02 -> 15
Vivaro 1.9 Di F9Q-770 12/99 -> 12
Vauxhall (Continued)
Vivaro 1.9 DTi F9Q.760 08/01 -> 12
Vivaro 2.5 DTi G9U 730 04/04 -> 19
Zara 1.9 CDTi Z19DT 07/05-> 14
Zara 1.9 CDTi Z19DTH 07/05-> 47
Zara 2.0 DTi X20DTL 05/99 -> 15
Zara 2.2 DTi X22DTL 09/99 -> 15
VW
Beetle 1.9 TDi ALH, AGR 11/98 -> 09/00 12
Beetle 1.9 TDi ATD 10/00 -> 12
Beetle 1.9 TDi AXR 03/03 -> 12
Bora 1.9 SDi AGP, AQM 09/98 -> 12
Bora 1.9 TDi AHF, ALH, AGR, ASV, AJM, AUY, ANU 10/98 -> 06/01 12
Bora 1.9 TDi ARL 05/00 -> 12
Bora 1.9 TDi ASZ (Ch No ->172.600000) 11/01 -> 12
Bora 1.9 TDi ASZ (Ch No 172.600001->) 11/01 -> 12
Bora 1.9 TDi ATD 11/01 -> 12
Bora 1.9 TDi AXR 11/01 -> 12
Caddy 1.7 SDi AHB 10/96 -> 12
Caddy 1.9 D 1Y, AEF 01/96 -> 02/04 2
Caddy 1.9 SDi AEY 11/95 -> 02/04 12
Caddy 1.9 TDi AHU, ALE 08/96 -> 02/04 12
California 1.9 TD ABL 08/92 -> 03/98 2
California 2.4 D AAB 09/90 -> 04/98 2
California 2.4 D AJA 05/97 -> 03/98 2
California 2.5 TDi ACV 08/95 -> 12
California 2.5 TDi AJT 05/98 -> 12
Caravelle 1.9 D 09/90 -> 04/96 2
Caravelle 2.5 TDi 08/95 -> 12
Eurovan 2.4 SDi 10/92 -> 2
Eurovan 2.5 SDi 01/95 -> 12
Fox 1.4 TDi BNM 04/05 -> 12
Golf 3 1.9 D 1Y 09/91 -> 08/98 2
Golf 3 1.9 TD AAZ 09/91 -> 08/98 2
Golf 3 1.9 SDi AEY 09/93 -> 02/99 12
Golf 3 1.9 TDi 1Z,AHU,ALE 09/91 -> 07/96 12
Golf 3 1.9 TDi AFN 09/93 -> 02/99 12
Golf 4 1.9 D 1Y 10/97 -> 02/99 2
Golf 4 1.9 Di ANU 01/99 -> 03/04 12
Golf 4 1.9 TD AAZ 10/97 -> 02/99 2
Golf 4 1.9 SDi AEY 10/97 -> 02/99 12
Golf 4 1.9 SDi AGP,AQM 07/97 -> 03/04 12
Golf 4 1.9 TDi AFN,AHF,ASV 10/97 -> 06/01 12
Golf 4 1.9 TDi AGR,ALH,AHU 09/97 -> 06/01 12
Golf 4 1.9 TDi ASZ 01/98 -> 10/01 12
Golf 4 1.9 TDi AJM,AUY 04/98 -> 06/01 12
Golf 4 1.9 TDi ARL 05/00 -> 10/01 12
Golf 4 1.9 TDi ATD 10/00 -> 03/03 12
Golf 4 1.9 TDi AVF 07/01 -> 03/03 12
Golf 4 1.9 TDi ARL 11/01 -> 03/03 12
Golf 4 1.9 TDi ASZ 11/01 -> 03/03 12
Golf 4 1.9 TDi ATD 11/01 -> 03/03 12
Golf 4 1.9 TDi AXR 11/01 -> 03/03 12
Golf Van 1.9 D 08/92 -> 2
LT28 2.4 TD ACL 09/92 -> 08/96 2
LT28 2.5 SDi AGX 05/96 -> 12
LT28 2.5 TDi AHD, ACV 05/96 -> 08/99 12
LT28 2.5 TDi ANJ, AVR 01/99 -> 12
LT28 2.5 TDi A PA 05/99 -> 12
Page 16
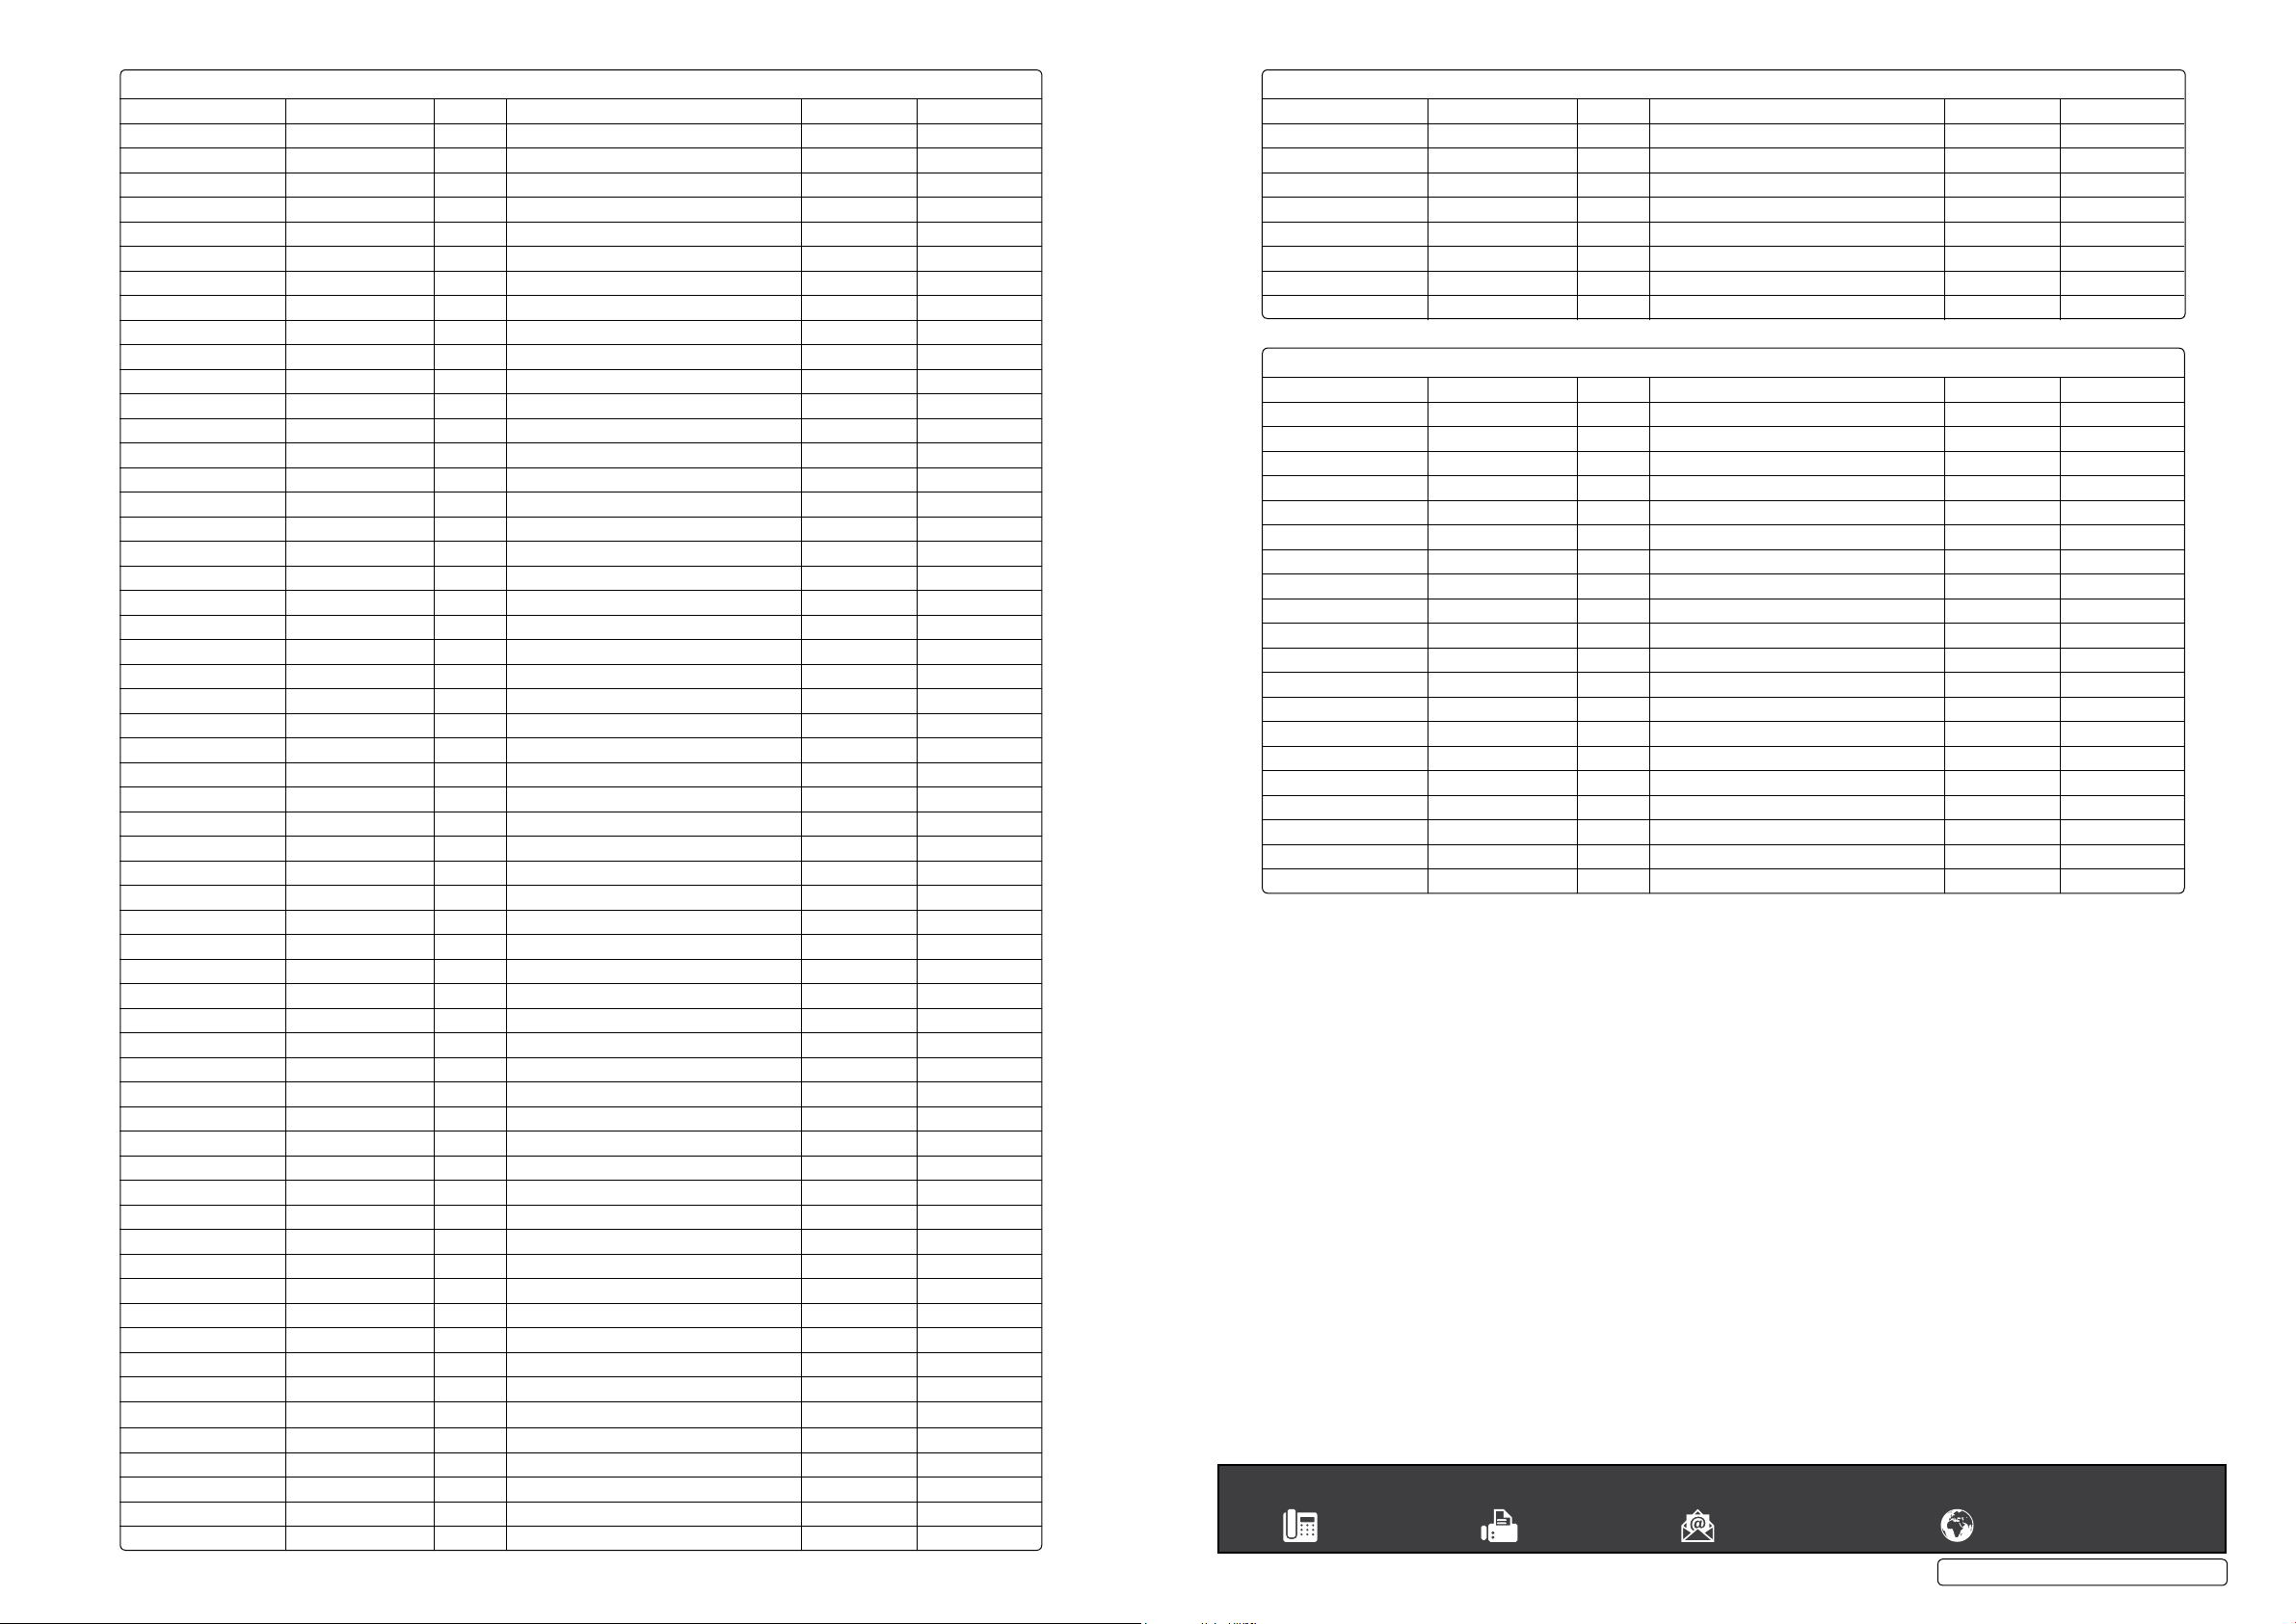
VW (Continued)
LT35 2.4 TD ACL 09/92 -> 08/96 2
LT35 2.5 SDi AGX 05/96 -> 04/01 12
LT35 2.5 TDi AHD 05/96 -> 08/99 12
LT35 2.5 TDi ANJ, AVR 01/99 -> 12
LT35 2.5 TDi A PA 05/99 -> 12
LT40 2.4 D 1S, ACT 08/89 -> 04/96 2
LT40 2.4 TD 1G 02/83 -> 04/96 2
LT45 2.4 TD ACL 09/92 -> 08/96 2
LT46 2.5 TDi ANJ 01/99 -> 12
LT46 2.5 TDi A PA 05/99 -> 12
Lupo 1.2 TDi ANY 06/99 -> 11/00 12
Lupo 1.2 TDi AYZ 11/00 -> 10/01 12
Lupo 1.2 TDi ANY, AYZ 11/01 -> 12
Lupo 1.4 TDi AMF 01/99 -> 12
Lupo 1.7 SDi AKU 10/98 -> 12
Multivan 1.9 TD ABL 09/92 -> 04/98 2
Multivan 1.9 TDi AXB 04/03 -> 12
Multivan 2.4 D AAB 09/90 -> 04/98 2
Multivan 2.4 D AJA 05/98 -> 2
Multivan 2.5 TDi ACV 08/95 -> 12
Multivan 2.5 TDi AJT 05/98 -> 12
Multivan 2.5 TDi AXE 04/03 -> 12
Multivan 2.5 TDi AXD 04/03 -> 12
Passat 1.9 TD AAZ 03/90 -> 10/96 2
Passat 1.9 TDi 1Z, AHU, AHH 10/93 -> 12/00 12
Passat 1.9 TDi AFN, AVG 10/96 -> 12/00 12
Passat 1.9 TDi AJM, AWX, ATJ 10/98 -> 12
Passat 1.9 TDi AVB, ATD 11/00 -> 10/01 12
Passat 1.9 TDi AVF 01/01 -> 10/01 12
Passat 1.9 TDi AVF,AWX 11/01 -> 12
Passat 1.9 TDi AVB 11/01 -> 12
Passat 2.5 TDi AFB, AKN 08/98 -> 16
Phaeton 5.0 TDi AJS 11/02 -> 12
Polo 1.4 TDi AMF 04/99 -> 09/01 12
Polo 1.4 TDi AMF, BAY 10/01 -> 12
Polo 1.4 TDi ATD, AXR 10/01 -> 12
Polo 1.7 SDi AHB 01/96 -> 12/99 12
Polo 1.7 SDi AHG, AKU, AKW 05/97 -> 09/01 12
Polo 1.7 SDi AKW 11/97 -> 12
Polo 1.7 SDi AKU 10/99 -> 04/00 12
Polo 1.9 D 1Y, AEF 12/95 -> 09/01 2
Polo 1.9 SDi AEY, AGD 07/96 -> 09/01 12
Polo 1.9 SDi AQM 09/99 -> 09/01 12
Polo 1.9 TDi AHU, ALE 08/96 -> 08/99 12
Polo 1.9 TDi AFN, ATD 06/98 -> 08/01 12
Polo 1.9 TDi ALH, AGR 09/99 -> 08/01 12
Sharan 1.9 TDi 1Z,AHU, ANU 09/95 -> 10/01 12
Sharan 1.9 TDi AFN,AVG 09/95 -> 04/00 12
Sharan 1.9 TDi AUY 03/00 -> 12
Sharan 1.9 TDi AHU, ANU 11/01 -> 12
Sharan 1.9 TDi ASZ 11/02 -> 12
Taro 2.4 D 2L 02/89 -> 03/97 5
Touareg 2.5 R5 TDI BAC 01/03-> 12
Touareg 5.0 TDi 10/02 -> 12
Transporter 1.9 TD ABL 09/92 -> 04/98 2
Transporter 2.4 D ACT 02/92 -> 2
Transporter 2.4 D AJA 04/97 -> 04/98 2
Transporter 2.4 TD 1G 08/88 -> 04/96 2
Transporter 2.5 TDi ACV 08/95 -> 04/98 12
VW (Continued)
Transporter 2.5 TDi AHY, AJT 05/98 -> 12
Transporter 2.5 TDi AUF 11/99 -> 12
Transporter 2.5 TDi AYC 09/00 -> 12
Transporter 2.5 TDi AYY 10/01 -> 12
Vento 1.9 D 1Y 09/91 -> 10/98 2
Vento 1.9 TD AAZ 09/91 -> 10/98 2
Vento 1.9 SDi AEY 01/95 -> 07/97 12
Vento 1.9 TDi 1Z 10/93 -> 07/96 12
Vento 1.9 TDi AHU, AFN, ALE 08/96 -> 10/98 12
Volvo
360 1.8 D XUD7 09/98 -> 2
440 1.9 TD F8Q, D19T 01/93 -> 12/96 2
460 1.9 TD F8Q, D19T 01/93 -> 08/97 2
850 2.5 TDi D5252T 08/95 -> 12/98 12
940 2.4 TDi D24TIC 01/94 -> 05/97 2
C30 2.0 D D4204 T 10/06 -> 17
S40 1.6 D 01-05 -> 20
S40 1.9 DI D4192T3 03/99->07/00 12
S40 1.9 DI D4192T3/T4 07/00->12/03 14
S40 1.9 TD F8Q 05/96 -> 08/99 2
S40 1.9 TDi D4192T (F8QT) 09/96 -> 08/99 2
S60 2.5 TDi D5252T 10/01 -> 12
S70 2.5 TDi D5252T 12/96->11/00 12
S80 2.5 TDi D5252T 07/98 -> 12
V40 1.9 DI D4192 T2 03/99->07/00 12
V40 1.9 DI D4192 T3/T4 07/00 14
V40 1.9 TD F8Q Kombi 01/96 -> 08/99 2
V40 1.9 TD D4192T (F8QT) 09/96 -> 08/99 2
V40 1.9 TD D4192T2 03/99 -> 08/99 2
V50 1.6 D 01/05 -> 20
V70 2.5 TDi D5252T 12/96 -> 11/00 12
Sealey Group, Kempson Way, Suffolk Business Park, Bury St Edmunds, Suffolk. IP32 7AR
© Jack Sealey Limited
Original Language Version
VSE3156.V3 Issue 2 (HF) 13/03/19
 Loading...