

Page 1
1
Refer to instructions
To prevent personal injury or damage to vehicles and/or the
diagnostic tool, read this instruction manual first and observe the
following safety precautions at a minimum whenever working on a
vehicle:
Always perform automotive testing in a safe environment.
Wear safety eye protection that meets ANSI standards.
Keep clothing, hair, hands, tools, test equipment, etc. away from all
moving or hot engine parts.
Operate the vehicle in a well-ventilated work area: Exhaust gases
are poisonous.
Put blocks in front of the drive wheels and never leave the vehicle
unattended while running tests.
Use extreme caution when working around the ignition coils,
ignition wires and spark plugs. These components create
hazardous voltages when the engine is running.
Put the transmission in PARK (for automatic transmission) or
NEUTRAL (for manual transmission) and ensure that the
handbrake is applied.
Page 2

2
Keep a fire extinguisher suitable for petrol/chemical/electrical fires
nearby.
DO NOT connect or disconnect any test equipment while the
ignition is on or the engine is running.
Keep the scan tool dry, clean and free from oil/water or grease. Use
a mild detergent, DO NOT use solvent or abrasive cleaners.
Jack Sealey Limited Original Language Version VSCANP Issue:1 03/01/18
Page 3

3
Chapter I Product Introduction........................................................................ 5
1.2 Care and Maintenance.................................................................................... 5
1.2.1 Storage................................................................................................... 5
1.2.2 Tablet and VCI protection.................................................................... 6
Chapter II V-Scan Pro Tablet.............................................................................7
2.1 V-Scan Pro Tablet Overview.......................................................................9
2.2 V-Scan Pro Tablet Specifications............................................................. 9
Chapter III V-Scan Pro VCI.............................................................................. 10
3.1 V-Scan Pro VCI Overview..........................................................................10
3.2 V-Scan Pro VCI Specifications................................................................ 11
Chapter IV V-Scan Pro Tablet Display Screens....................................... 11
4.1 Vehicle Diagnosis Screen......................................................................... 12
4.2 VCI Connection Screen............................................................................. 13
4.3 Data Management Screen......................................................................... 14
4.4 Reference Guide Screen........................................................................... 14
4.5 Update Screen..............................................................................................15
4.6 Settings Screens......................................................................................... 16
4.6.1. Language Settings.............................................................................16
4.6.2. Unit....................................................................................................... 16
4.6.3. User Info..............................................................................................17
Page 4

4
4.6.4. Self Test.............................................................................................. 17
4.6.5. Activation.............................................................................................18
4.6.6. About Us............................................................................................. 19
4.6.7. System Settings................................................................................. 19
Chapter V Vehicle Diagnosis.......................................................................... 20
5.1 Connection method of tablet and VCI................................................... 20
5.2 Vehicle Diagnosis....................................................................................... 23
Chapter VI Update & Activation..................................................................... 27
6.1 Update............................................................................................................ 27
6.2 How to Renew Update Subscription...................................................... 29
6.3 Activation...................................................................................................... 29
Chapter VII Compliance Information............................................................ 33
Chapter VIII Parts Information........................................................................ 34
Page 5

5
Chapter I Product Introduction
The V-Scan Pro diagnostic tool is a fast wireless multitasking operating
system. Includes the most extensive coverage of OE-level diagnostics,
allowing independent garages to provide a complete diagnostic service
for cars, SUV’s and vans.
Software features:
• Read/clear codes
• Live data
• Actuation tests
• ECU and key coding (some vehicles)
• Special functions; Battery Configuration, DPF, Electronic Parking
Brake , Oil Service Reset, Throttle Reset, TPMS and more
• Maintenance functions; Technical information and data management
1.2 Care and Maintenance
1.2.1 Storage
1) Store the product on a flat and dry place.
2) Never put the product in direct sunlight or near to a source of heat.
3) Never put the product in a magnetic field.
4) Avoid shock, dust, moisture and extremely high temperature.
5) If main unit is dirty, power off the machine, then clean the housing case
Page 6

6
with soft cloth.
1.2.2 Tablet and VCI protection
1) Be careful to plug and unplug the main cable and diagnostic connector.
Tighten the screws before operation to avoid unexpected disconnecting
and/or damage to the diagnostic port.
Page 7
7
Chapter II V-Scan Pro Tablet
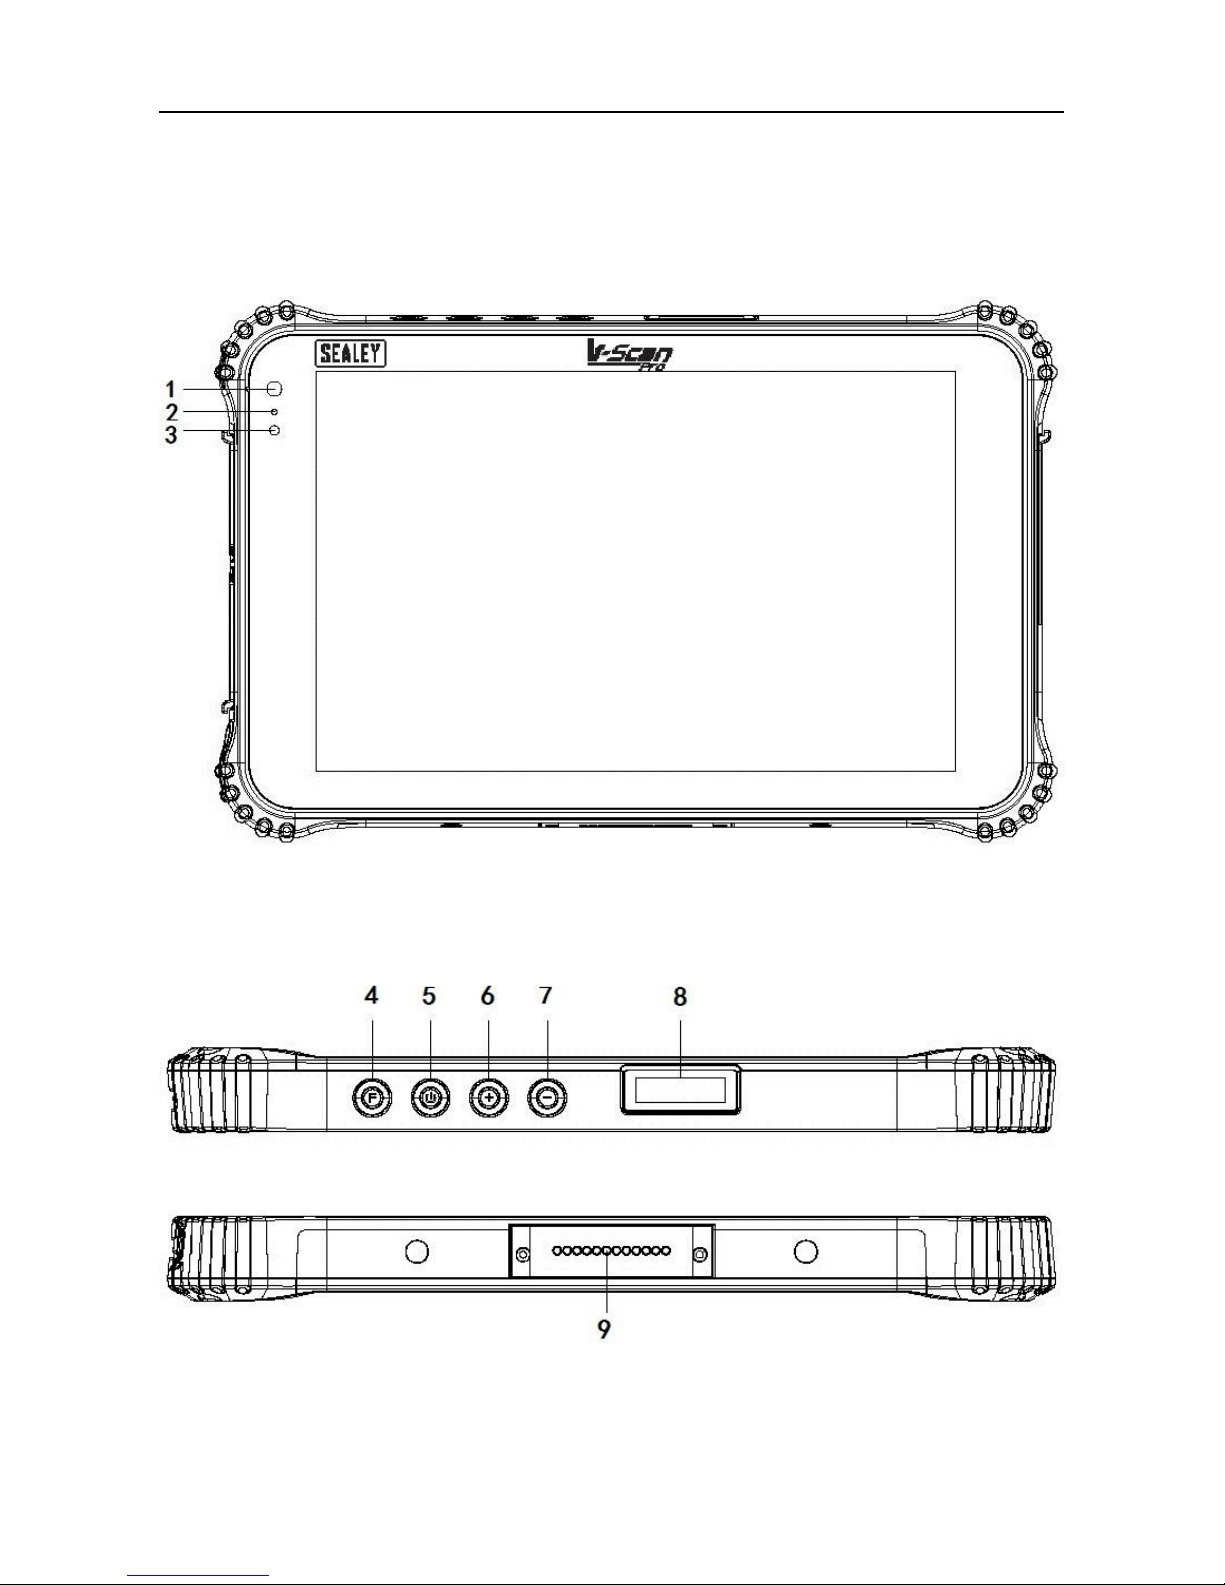
2.1 V-Scan Pro Tablet Overview
Front View
Top & Bottom
Page 8
8
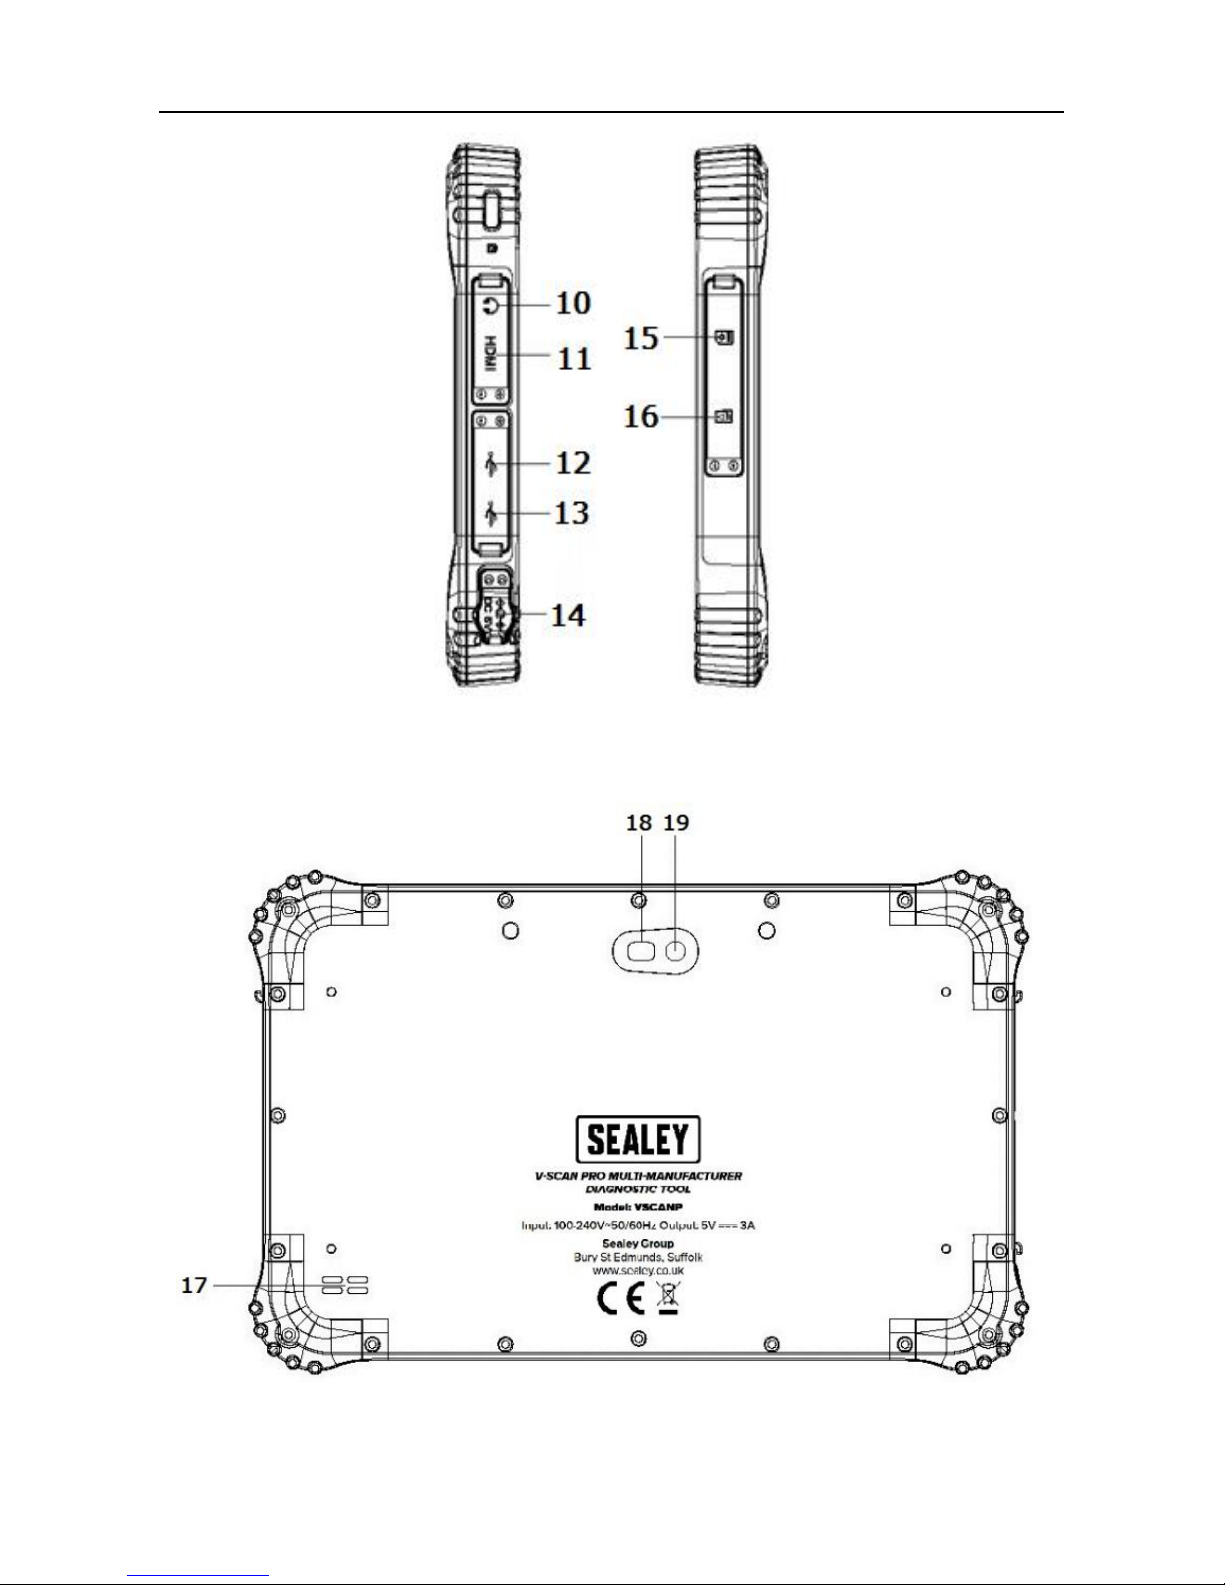
Side View
Back View
Page 9

9
2.1 V-Scan Pro Tablet Overview
1
Front camera
11
HDMI interface
2
Charging indicator
12
USB Micro-B port
3
Light-sensitive sensor
13
USB A port
4
(Not in use)
14
Charging socket
5
Power switch
15
SIM card slot (Not In Use)
6
Volume +
16
TF card slot (Not In Use)
7
Volume -
17
Speaker
8
(Not in use)
18
Rear camera
9
Docking port (Dock not available)
19
(Not in use)
10
Headphone jack
2.2 V-Scan Pro Tablet Specifications
Ingress
Protection
IP67
Dimension
228 x 147 x 16.5mm
Display
Screen
8-inch, 16:10, 800 x 1280 IPS screen
Touch
Screen
5-dot capacitive screen, G+G, hardness 7H+,
scratch-resistant, TP thickness: 1.1mm, COF, support
handwriting
Camera
Front 2.0MP with work indicator, rear 5.0MP
CPU
Intel Bay trail-T (Quad-core), Z3735F, 1.86GHz
GPU
Intel HD Graphic (Gen7)
RAM
RAM 2GB, ROM 32GB
Page 10
10
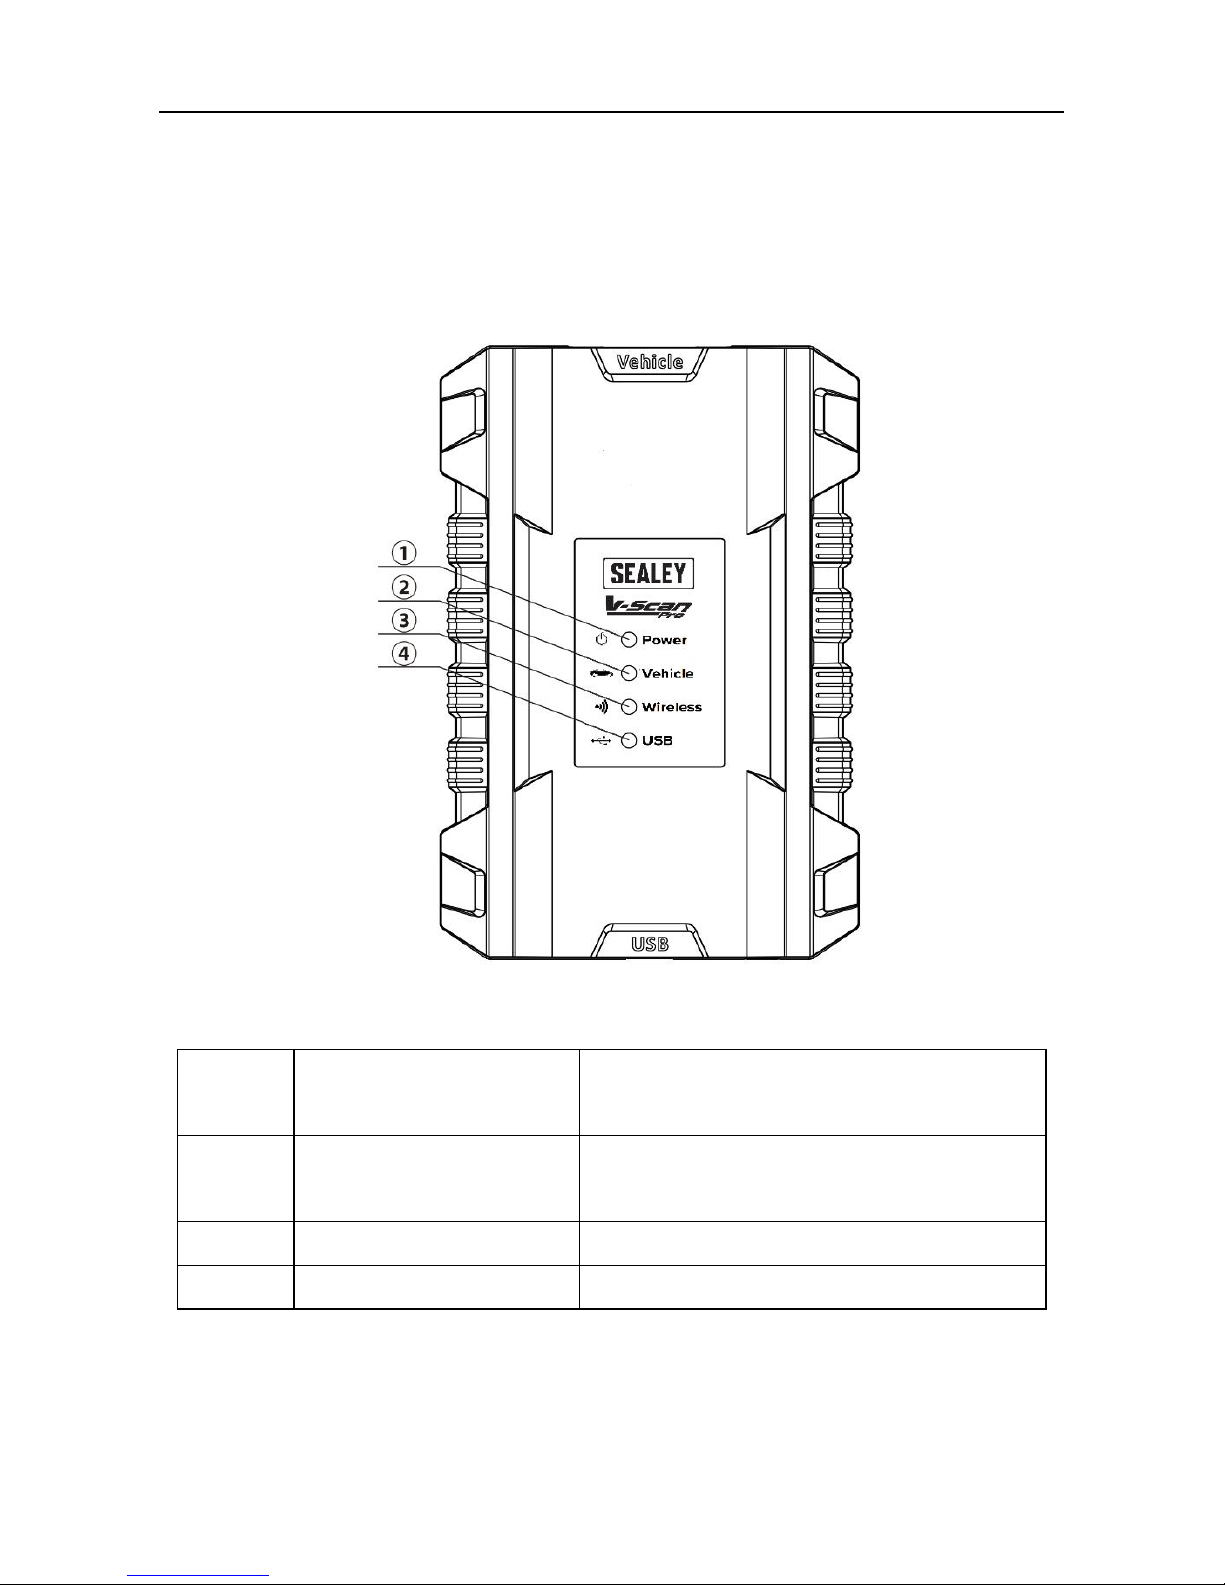
Chapter III V-Scan Pro VCI
3.1 V-Scan Pro VCI Overview
①
Power indicator
On when powered on (connected to
vehicle)
②
Diagnostic indicator
Flashes when communicating with
vehicle
③
Wireless indicator
On when connected to a tablet
④
USB indicator
On when connected to a tablet
Page 11

11
⑤
DB15 interface
Connect to main test cable; Connect the
other end of cable to vehicle
⑥
USB interface (B
shape)
Connect with tablet or upgrade VCI box
3.2 V-Scan Pro VCI Specifications
Processor
Cortex-M3 Micro-controller
Frequency
100MHz
Processor model
LPC1768
Flash memory
512KB
RAM
64KB
Wireless
Support for Bluetooth 2.0, Bluetooth 4.0
Page 12

12
Chapter IV V-Scan Pro Tablet Display Screens
Start up the tablet (press and hold power switch for 5 seconds).
Open the V-Scan Pro app:
4.1 Vehicle Diagnosis Screen
Open the diagnosis menu to begin vehicle diagnostics. Here, you can select
from a wide range of different manufacturers from different continents.
Page 13

13
4.2 VCI Connection Screen
1. Wireless.
2. USB. (USB connection lead is not supplied. Will require a USB-A male to
USB-B male lead). This is an alternative method of connecting the VCI to
tablet. Would only be used if the Bluetooth function isn’t working or operator
would rather not use
.
Page 14

14
4.3 Data Management Screen
Storage location for screen shots, test logs, vehicle software version, etc.; for
user’s reference.
4.4 Reference Guide Screen
Maintenance Help:
Includes diagnostic/repair information for some vehicles as a reference
guide.
Fault Code:
Built-in fault code library, allowing the user to search a code, giving useful
information.
Dictionary:
Allows user to search abbreviations used in vehicle diagnostics.
Page 15

15
4.5 Update Screen
When connected to the internet via Wi-Fi or cable interface, update to the
latest diagnostic software.
Page 16

16
4.6 Settings Screens
Set Language, Units, User Info, Self-Test, Activation, Push Notifications,
About Us and other functions.
4.6.1. Language Settings
The V-Scan Pro supports multiple languages
.
4.6.2. Unit
Set the live data units in the diagnostic software. You can select Metric or
English as needed. (For example Metric would be km and English would be
miles.)
Page 17

17
4.6.3. User Info
Set your personal information: name, phone, email, address, company name.
Page 18

18
4.6.4. Self Test
You can check the V-Scan Pro for open or short circuits.
4.6.5. Activation
The V-Scan Pro will need to be activated when received. This will start your 2
year standard subscription for updates to the software.
Page 19

19
4.6.6. About Us
Provides information on the operating system and software versions. Also
provides activation state and product S/N. (Serial Number)
4.6.7. System Settings
Opens up the tablets settings menu.
Page 20

20
Chapter V Vehicle Diagnosis
5.1 Connection method of tablet and VCI
Connect the VCI box to the vehicle to be diagnosed via the main test cable
and diagnostic connector.
Turn on the tablet, enter VCI connection. It can be connected via Bluetooth
and USB cable.
First: Connect the tablet with VCI box via Wireless.
1. It is default paired and will automatically connect when used.
If the VCI is not paired, refresh the device list.
Page 21

21
2. The ID for the VCI can then be found on the device list. Click to Connect.
Page 22

22
3. Click Pair.
4. After the pairing is successful, the VCI wireless (Bluetooth) indicator on the
tablet and on the VCI will illuminate. This indicates a successful connection.
When connected. The V-Scan Pro will display (please see image
below). It will automatically pair next time you use it, and you do not need to
set-up again.
Page 23

23
5.2 Vehicle Diagnosis
The following is an introduction to the V-Scan Pro Diagnosis.
1.
Enter the Diagnosis menu
.
2. Select continent and manufacturer.
Page 24

24
2.1 You can also use the search function to find the manufacturer.
3. You can select automatic scanning or Manual selection.
Automatic Scanning: This will load the ECU’s the diagnostic tool has
identified and can communicate with.
Manual Selection System: This will show a list of ECU’s for you to choose
from.
Page 25

25
4. Choose ECU for testing.
5. When you enter into the ECU that you want to test you will have a number
of options. These include fault code reading, clearing, live data, actuation
tests and special functions.
Page 26

26
6. Fault code
7. Live Data
Page 27

27
Chapter VI Update & Activation
After purchasing the Sealey V-Scan Pro you are advised to activate the
machine immediately, regularly update it and complete the personal
information.
6.1 Update
1. Click Update.
2. Click the refresh icon on the top right to check for latest updates.
Page 28

28
3. Make sure software is on the latest version. The vehicle database will
keep the tool up to date with the latest vehicles.
Page 29

29
6.2 How to Renew Update Subscription
After the initial subscription has expired, it can be renewed by purchasing
directly from Sealey on 01284757500. Sealey will just need the serial number
of the V-Scan Pro. Activation of the new subscription will take 24 hours.
6.3 Activation
Sealey V-Scan Pro is not permanently activated when leaving the factory.
After you power on the machine and select models, you will be prompted:
"You are using the trial version, ** times left ", Click ‘Activate’ in the settings
menu to enter the activation interface. The tablet will then display a QR code.
1. On a separate device. Open up a QR code scan app.
2. Scan the QR code on the tablet.
Page 30

30
3. Once scanned, the activation code will be displayed.
4. Fill in the activation code to the tablet. Click ‘Complete’ to back to the
activation interface.
Page 31

31
5. Click ‘Activation.’
6. Activation is successful. If you are prompted ‘Activation Failed’, start again.
Page 32

32
7. After the activation is successful, you can see the status bar is displayed
as ‘Activated.’
Page 33

33
Page 34

34
Chapter VIII Parts Information
Page 35

35
1
VSCANP.01
Tablet
2
VSCANP.02
VCI (Black Box)
3
VSCANP.03
Self-Diagnosis Plug
4
VSCANP.04
OBD 16 Pin
5
VSCANP.05
Battery Clip
6
VSCANP.06
Aux Vehicle Socket
7
VSCANP.07
VCI Main Cable
8
VSCANP.08
BMC (not shown)
9
VSCANP.09
Mains Charger
10
VSCANP.10
Data Cable (USB to micro USB 1mtr & 12.5cm)
VSCANP-UPDATE
12 Months of Updates (not shown)
N/A
Fuse 10A (not shown)
N/A
Picking list (not shown)
N/A
Software list (not shown)
N/A
Outer Colour Box (not shown)
N/A
Drying Agent (not shown)
N/A
Lens Cloth (not shown)
 Loading...