

Page 1

IMPORTANT: PLEASE READ THESE INSTRUCTIONS CAREFULLY. NOTE THE SAFE OPERATIONAL REQUIREMENTS, WARNINGS & CAUTIONS. USE
THE PRODUCT CORRECTLY AND WITH CARE FOR THE PURPOSE FOR WHICH IT IS INTENDED. FAILURE TO DO SO MAY CAUSE DAMAGE AND/OR
PERSONAL INJURY AND WILL INVALIDATE THE WARRANTY. KEEP THESE INSTRUCTIONS SAFE FOR FUTURE USE.
INSTRUCTIONS FOR:
VIDEO BORESCOPE Ø9MM,5.5MM,3.9MM CAMERA
MODEL NOs: VS8230, VS8231, VS8232
Thank you for purchasing a Sealey product. Manufactured to a high standard, this product will, if used according to these instructions,
and properly maintained, give you years of trouble free performance.
Refer to
instruction
manual
1. SAFETY
1.1. General safety
9 Always perform automotive testing in a safe environment.
9 Keep your work area clean and well lit.
9 Keep clothing, hair, hands, tools, test equipment, etc. away from all moving or hot engine parts.
9 Operate the tool in a well-ventilated work area.
8 DO NOT operate the tool in explosive atmospheres, such as in the presence of ammable liquids, gases, or heavy dust.
8 DO NOT use the tool around corrosive chemicals which can damage the tool.
8 DO NOT abuse the exible cable. Never use the exible cable to carry the tool.
8 DO NOT drop the borescope, it is not shock proof.
9 Keep bystanders and children away while operating the tool.
9 Keep the tool dry, clean, free from oil, water and grease.
WARNING: The handheld display unit is NOT waterproof.
9 Handle the borescope with care. If it is dropped, check for breakage and any other conditions which may affect its operation.
8 DO NOT immerse the imager head and cable into corrosive substances, petroleum or oil.
8 DO NOT use near moving machinery.
8 DO NOT use excessive force to insert or withdraw the imager head or cable.
8 DO NOT use the tool while tired or under the inuence of drugs, alcohol, or intoxicating medication.
8 DO NOT over-reach. Maintain proper footing and balance at all times.
8 DO NOT use the tool for personal or medical use in any way.
1.2. Charging safety
9 Use only the supplied charger.
9 Allow clearance all around the charger to allow cooling.
9 Disconnect the charger from the electrical supply when not in use.
8 DO NOT charge in an explosive atmosphere or in the presence of ammable material.
8 DO NOT leave camera unattended whilst recharging.
8 DO NOT exceed the maximum charging time.
1.3. The warnings, precautions and instructions discussed in this instruction manual cannot cover all possible conditions and situations
that may occur. It must be understood by the operator that common sense and caution are factors which cannot be built into this
product, but must be supplied by the operator.
2. INTRODUCTION
A range of three high performance pistol grip borescopes with 85mm colour TFT screen, waterproof probe pod with IP67 rating. Each having the
same main unit, but with a choice of camera probe diameters (3.9mm, 5.5mm or 9mm).
Ø3.9mm Camera is small enough to t into a diesel combustion chamber through the glow plug hole.
Ø5.5mm Camera gives extremely crisp image quality.
Ø9mm Camera is ideal if restricted access isn’t an issue, is competitively priced, with crisp image quality.
All units feature video record/playback, still images and stream live video via the AV out connection. Videos and images are stored on a 4GB
micro SD card (supplied) allowing up to 4.5 hours of video and 10,000 images, which can be transferred to a PC via the USB connection. Also
features digital zoom control and rotate/ip control of image. Powered by lithium-ion battery pack giving up to 4 hours continuous use. AV and
USB cables not supplied.
© Jack Sealey Limited
Original Language Version
VS8230,VS8231,VS8232 Issue: 1 - 27/11/17
Page 2
3. SPECIFICATIONS
Model No: ..................... VS8230 ....................VS8231 ..................VS8232
Camera: . ...................... Ø9mm .....................5.5mm ...................3.9mm
Optional Probes: ................. Yes .......................Ye s ......................Yes
Viewing Angle: .................. 53°........................60° . . . . . . . . . . . . . . . . . . . . . . 80°
Pod Length: .................... 50mm .....................30mm....................20mm
Camera Probe Length: ............ 1000mm ...................1000mm ..................1000mm
Adjustable Light Control:........... Yes .......................Yes ......................Ye s
Screen Size: .................... 85mm .....................85mm ....................85mm
Screen Resolution: ............... 320 x 240 ..................320 x 240 ................320 x 240
Mirror Flip/Rotate Function: . ....... Ye s .......................Yes ......................Yes
Record Function (Video + Still): ..... Ye s .......................Yes .....................Yes
AV Out: . . ...................... Yes .......................Ye s ......................Yes
USB Connection: ................ Ye s .......................Yes ......................Yes
SD Memory Slot:................. Yes .......................Yes ......................Yes
Accessories: . ................... No ........................No ......................No
Power Source: .................. 3.7V Li-ion Rechargeable ......3.7V Li-ion Rechargeable.....3.7V Li-ion Rechargeable
Probe part no (available separately): . VS8290 ....................VS8255 ..................VS8239
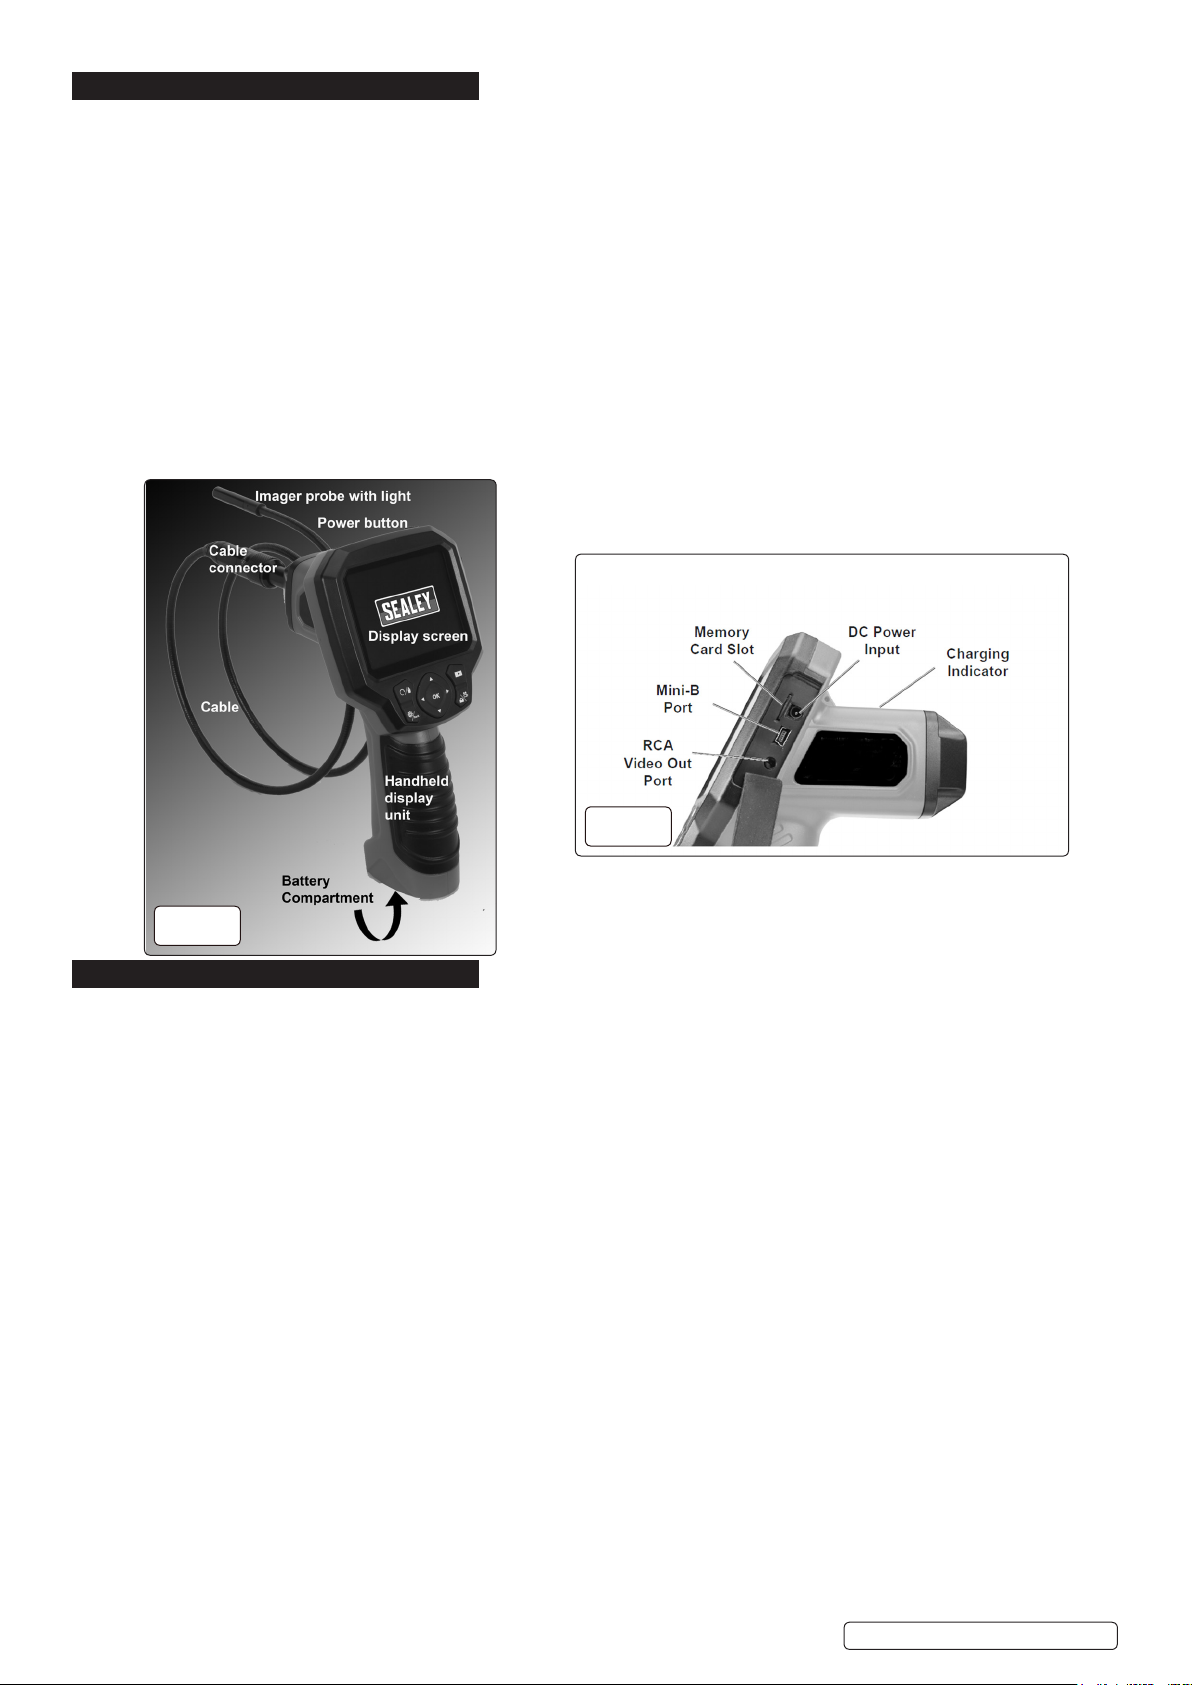
g.2
g.1
4. OPERATION
4.1. Battery Charging
4.1.1. Plug the pin jack plug into the DC power input (g.2), then plug the charger into a 230V socket.
4.1.2. When charging commences, the red charging indicator (g.2) will light.
4.1.3. When the charge is complete, the charging indicator will turn green.
4.1.4. The maximum charge time is 6 hours.
4.1.5. When charging is complete, disconnect the charging lead from the power supply and from the charging port.
WARNING: Ensure that the borescope is switched off and isolated from the mains electric supply before performing any of the
following:
4.2. Connecting and disconnecting the cable
4.2.1. To use the tool, the imager probe and cable must be connected to the display unit. To connect the cable to the display unit, make sure
that the key and slot (g.3) are properly aligned. Once they are aligned, tighten the knurled knob to hold the connection rmly in place.
4.2.2. Disconnection is the reverse of 4.2.1.
4.3. Micro SD Card
4.3.1. Insert the micro SD card into the memory card slot (g.2), then push down on the card until it clicks into place.
NOTE: When the card is installed, the SD icon will appear on the display screen (g.1).
4.3.2. To remove the card: push down until the card releases, then remove.
4.4. Connecting to computer with USB to mini-B cable (not supplied).
4.4.1. Plug the mini-B end into the Mini-B port (g.2) then plug the USB into a computer.
4.5. Connecting to external monitor with RCA cable (not supplied).
4.5.1. Plug one end into the RCA video out port (g.2) then plug other end into the RCA video in port.
© Jack Sealey Limited
Original Language Version
VS8230,VS8231,VS8232 Issue: 1 - 27/11/17
Page 3

4.6. General operating instructions
Press the Power button (g.1) to turn the borescope on.
4.6.1. Press the Settings/Back button to enter setup.
4.6.2. Select Advanced Settings, then press OK.
4.6.3. Select Date and Time, then press OK. Use Left/Right and Up/Down buttons to set date and time, then press OK.
4.6.4. Select Language, then press OK. Use left/right buttons to chose language. Conrm with OK.
4.6.5. Select Colour or Black/white., then press OK. Use left/right buttons to select colour or black/white, then press OK.
4.6.6. Select Format Media, then press OK. Choose No or Yes, then press OK.
NOTE: Pressing OK whilst yes is selected will erase all les from the micro SD card.
4.7. To view rmwear version, select Help, then press OK.
4.8. Live viewing
View on Display Screen or use RCA cable to view on external monitor.
4.8.1. Adjusting Light: Press left button to dim and turn off light. Press right button to turn on light and increase brightness.
4.8.2. Zooming: Press up button to zoom in, down button to zoom out.
4.8.3. Flip Image: Press Flip image/trash can button to ip image horizontally and vertically.
4.9. Capturing images
4.9.1. Press the camera/video button to toggle between camera and video modes.
4.9.2. Camera mode: Press OK to capture image.
4.9.3. Video mode: Press OK to start video.
4.10. Playback and delete
Playback on display screen, external monitor, or another device.
4.11. Display screen
4.11.1. Press the Playback button to use JPG and AVI les. Use left/right and up/down buttons to navigate through les.
4.11.2. Press OK to view image or video. For video, press OK to start and stop.
4.11.3. To delete le, press ip image/trash can button, select File/delete, then press OK.
4.12. External monitor
Connect borescope to monitor using an RCA cable, then follow ‘display screen’ instructions (section 4.11).
4.13. Another device
Remove SD card to view les on another device.
When nished, press the power button to switch off and store in a cool, dry childproof location.
5. MAINTENANCE
5.1. Battery removal/replacement
5.1.1. To remove batteries, slide the battery compartment cover (g.2) free and remove the battery carrier.
5.1.2. Remove the dead batteries and replace with fresh.
WARNING: only use rechargeable cells with this borescope: the use of non-rechargeable cells could lead to re or explosion.
5.1.3. Replace the battery carrier and slide the battery compartment lid back on.
5.2. Cleaning
5.2.1. DO NOT use abrasive or solvent cleaners. Use a mild detergent on a soft cloth, taking care not to put excessive pressure on the
display screen.
6. TROUBLESHOOTING
Problem Possible Causes Likely Solutions
Display is on, but does not show image. 1) Cable connection loose.
2) Imager probe is dirty.
1) Light is dim at maximum brightness.
2) Display turns itself off.
3) Borescope will not turn on.
1) Low battery.
2) Low battery.
3) Low or dead battery.
1) Check cable connection.
2) Clean imager probe.
1) Charge battery.
2) Charge battery.
3) Charge battery; if it won’t take a
charge, replace battery.
© Jack Sealey Limited
Original Language Version
VS8230,VS8231,VS8232 Issue: 1 - 27/11/17
Page 4

ENVIRONMENT PROTECTION
Recycle unwanted materials instead of disposing of them as waste. All tools, accessories and packaging should be sorted, taken to
a recycling centre and disposed of in a manner which is compatible with the environment. When the product becomes completely
unserviceable and requires disposal, drain any fluids (if applicable) into approved containers and dispose of the product and fluids
according to local regulations.
WEEE REGULATIONS
Dispose of this product at the end of its working life in compliance with the EU Directive on Waste Electrical and Electronic Equipment
(WEEE). When the product is no longer required, it must be disposed of in an environmentally protective way. Contact your local solid
waste authority for recycling information.
BATTERY REMOVAL (See section 5.1 for removal details).
Under the Waste Batteries and Accumulators Regulations 2009, Jack Sealey Ltd are required to inform potential purchasers of products
containing batteries (as defined within these regulations), that they are registered with Valpak’s registered compliance scheme.
Jack Sealey Ltd Batteries Producer Registration Number (BPRN) is BPRN00705.
Note: It is our policy to continually improve products and as such we reserve the right to alter data, specifications and component parts without prior
notice.
Important: No Liability is accepted for incorrect use of this product.
Warranty: Guarantee is 12 months from purchase date, proof of which is required for any claim.
Sealey Group, Kempson Way, Suffolk Business Park, Bury St Edmunds, Suffolk. IP32 7AR
01284 757500 01284 703534 sales@sealey.co.uk www.sealey.co.uk
© Jack Sealey Limited
Original Language Version
VS8230,VS8231,VS8232 Issue: 1 - 27/11/17
 Loading...