

Page 1
INSTRUCTIONS FOR:
VIDEO BORESCOPE Ø9mm PROBE
MODEL No. VS8196.V3
Thank you for purchasing a Sealey product. Manufactured to a high standard, this product will, if used according to these
instructions and maintained properly, give you years of trouble free performance.
IMPORTANT: PLEASE READ THESE INSTRUCTIONS CAREFULLY. NOTE THE SAFE OPERATIONAL REQUIREMENTS, WARNINGS & CAUTIONS. USE THE PRODUCT
CORRECTLY AND WITH CARE FOR THE PURPOSE FOR WHICH IT IS INTENDED. FAILURE TO DO SO MAY CAUSE DAMAGE AND/OR PERSONAL INJURY AND WILL
INVALIDATE THE WARRANTY. KEEP THESE INSTRUCTIONS SAFE FOR FUTURE USE.
Refer to Instruction
Manual
Wear Eye
Protection
1. SAFETY
IMPORTANT: Failure to understand and follow the instructions listed below may result in electric shock, re and/or
serious personal injury.
1.1. Work Area Safety
1.1.1. Always perform automotive testing in a safe environment.
1.1.2. Ensure that work area is clean and well lit.
1.1.3. Keep clothing, hair, hands, tools, test equipment, etc. away from all moving or hot engine parts.
1.1.4. Operate the tool in a well-ventilated work area.
1.1.5. DO NOT operate the tool in explosive atmospheres.
1.1.6. Ensurethatasuitablereextinguisherisavailable.
1.1.7. DO NOT use the tool around corrosive chemicals which can damage the tool.
1.1.8. Keep unauthorised personnel and children clear of the work area whilst operating the tool.
1.1.9. Keep the tool dry, clean, free from oil, water and grease. Use a mild detergent on a clean cloth to clean the outside of the tool when
necessary.
1.2. Battery
1.2.1. Remove the battery while cleaning the tool.
1.2.2. Remove the battery before storing the tool for a long period of time to prevent battery leakage damaging the battery compartment.
1.2.3. When necessary, replace all four batteries with new ones.
1.2.4. Useonlythesizeandtypeofbatteriesspecied.
1.2.5. Be sure to install the batteries with the correct polarity as indicated in the battery compartment.
1.2.6. Dispose of batteries according to local authority guidelines. DO NOTdisposeofbatteriesinre.
1.3. Operating Safety
1.3.1. Use the tool only as directed. DO NOT operate the tool unless the instruction manual has been read thoroughly.
1.3.2. Thedisplayunitisnotwaterproof.Theprobeheadandcablearewaterproof,butnotacidprooforreproof.Avoidsubmersingtheprobe
head and cable into corrosive, oily places and be sure to keep the probe head and cable away from high temperature objects.
1.3.3. DO NOT immerse the display unit in water.
1.3.4. DO NOT use excessive force to insert or withdraw the probe head and cable. This may result in damage to the tool or inspection area.
1.3.5. DO NOT use the probe head and cable as a clearing tool.
1.3.6. DO NOT place the probe head and cable into anything or anywhere that may contain a live electric charge or moving parts.
1.3.7. DO NOT use the tool for personal inspection or medical use in any way. This is NOT a medical tool.
1.3.8. DO NOT eat or smoke while operating the tool. Use hot, soapy water to wash hands and other body parts exposed to drain contents after
using the tool to inspect drains and other areas that may contain chemicals or bacteria.
1.3.9. When the inspection is completed, carefully withdraw the probe head and cable from inspection area.
1.3.10. Maintain the tool with care. Properly maintained tools are less likely to cause injury.
1.3.11. DO NOT drop the tool. If the tool is accidently dropped, check for damage.
1.3.12. Always wear appropriate personal protective equipment whilst handling and using the tool. A full range of PPE is available from your
Sealey stockist.
1.3.13. Protect against excessive heat. The tool should be kept away from heat sources. DO NOT use the tool near moving machinery or in areas
where the temperature will exceed 113°F (45°C).
1.3.14 DO NOT over-reach. Maintain proper footing and balance at all times.
1.3.15 DO NOTusethetoolwhiletiredorundertheinuenceofdrugs,alcohol,orintoxicatingmedication.
1.3.16. After use, store the tool in a safe, dry, childproof area.
© Jack Sealey Limited
Original Language Version
VS8196.V3 Issue: 1 - 30/03/17
Page 2
2. INTRODUCTION
Fitted with a 60mm high resolution screen and includes controls for light intensity, mirror flip function (to reverse image when using a 45° mirror)
and image rotation. Features waterproof probe pod with IP67 rating. Powered by four AA batteries (supplied).
3. SPECIFICATION
Model No: .........................................................VS8196.V3
Camera Diameter: .......................................................Ø9mm
Field of Vision: .............................................................53°
Pod Length: ............................................................ 49mm
Probe Length:......................................................... 1000mm
Adjustable Light Control: .................................................... Yes
Screen Size: ............................................................ 60mm
Screen Resolution: ................................................... 960 x 240
Mirror Flip/Rotate Function: .................................................. Yes
AV Out:..................................................Yes (cable not supplied)
Accessories: ....................................45° Mirror, Magnetic Pick-Up, Hook
Power Source: ..................................................4 x AA (supplied)
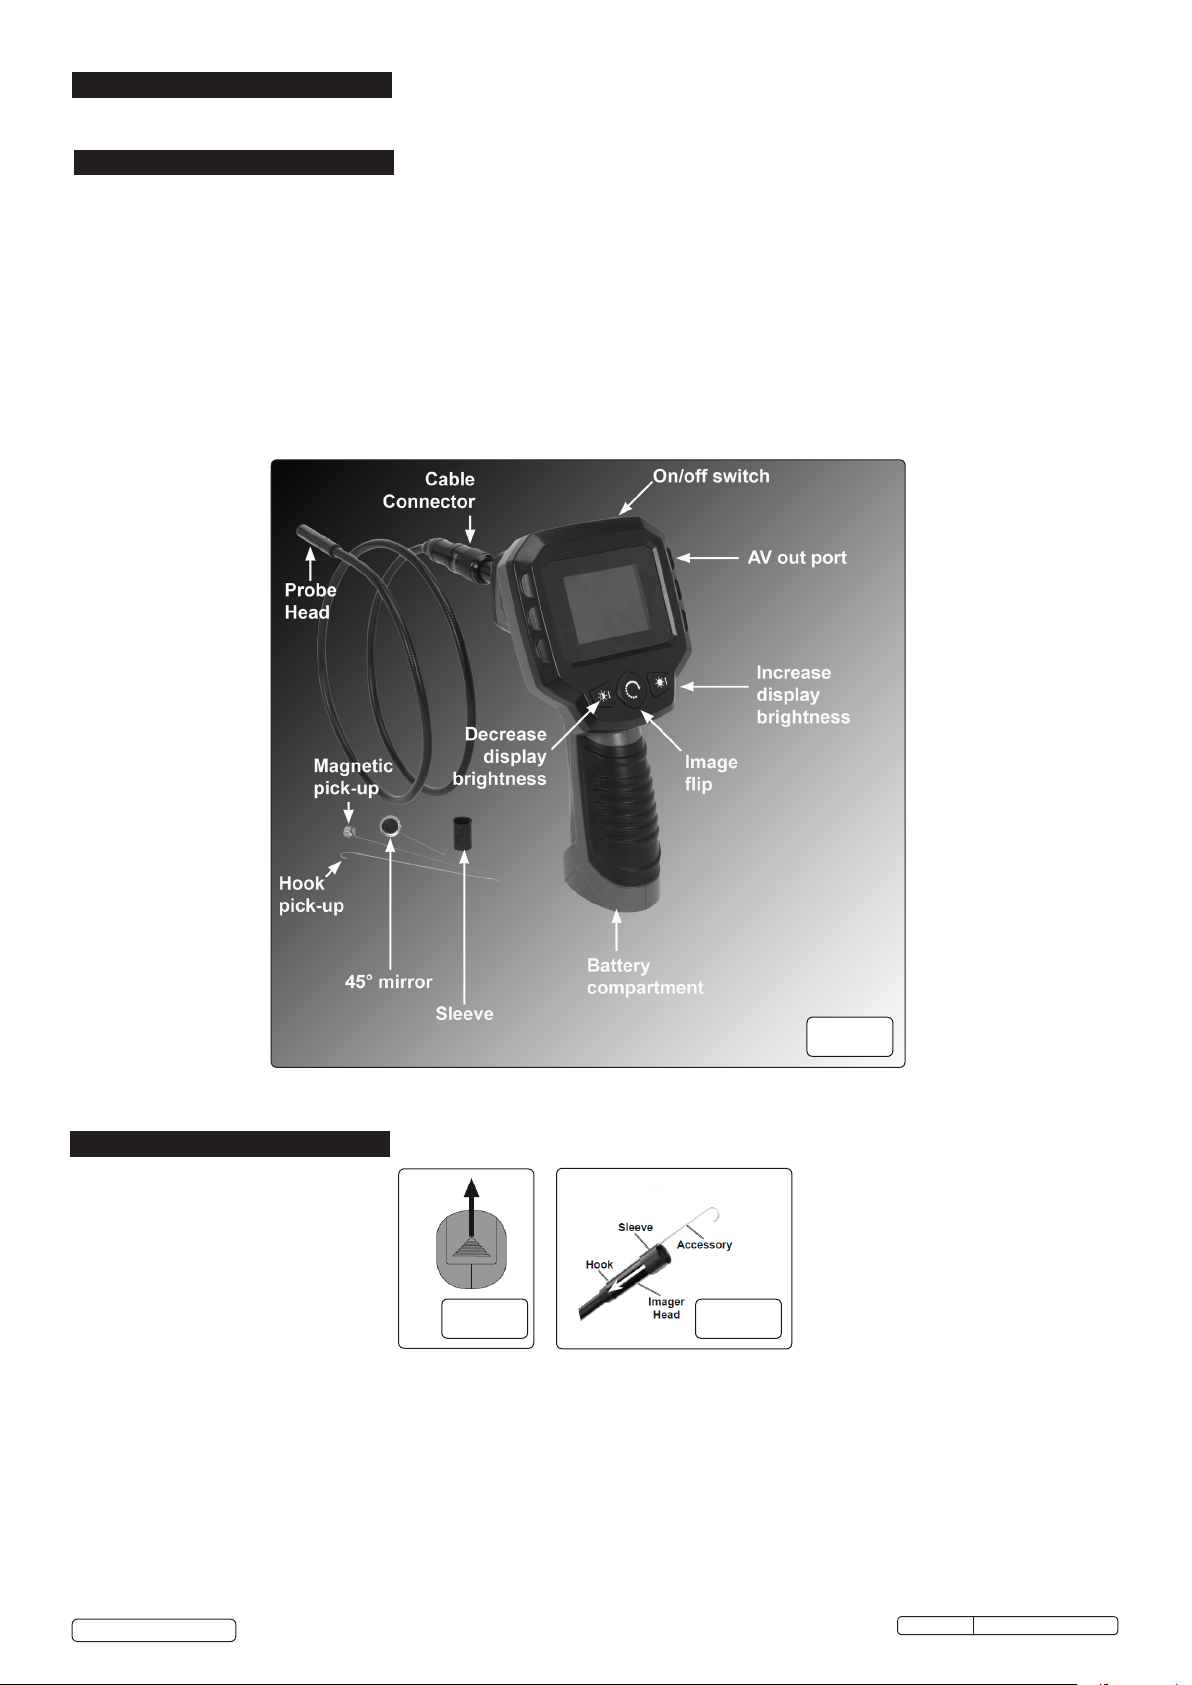
g.1
4. ASSEMBLY
g.2
4.1. Batteries
4.1.1. To insert batteries; slide open the battery compartment cover in the base of the display unit handle (fig.2).
4.1.2. Remove the battery carrier, insert 4 x AA batteries (observing correct polarity).
4.1.3. Replace the battery carrier and close the cover.
4.2. Connecting probes. NOTE: Ensure that the borescope is switched off before changing probes or accessories.
4.2.1. Insert the cable connector into the rear of the display unit (do not use excessive force).
4.2.1. When inserted, turn the cable connector collar anticlockwise until connected securely.
4.3.2. To disconnect, turn clockwise to release.
4.3. Attaching accessories
4.3.1. Hold the accessory against the image head (fig.4), placing the hook in the hole.
4.3.2. Match the slot in the sleeve, then slide the sleeve down over the image head until it covers the hook.
4.4. Connecting to external monitor
Connect the AV out port to the monitor using a suitable cable (not supplied).
© Jack Sealey Limited
Original Language Version
g.3
VS8196.V3 Issue: 1 - 30/03/17
Page 3

5. OPERATION
5.1. Press the on/off switch (fig.1) to switch on.
5.2. To adjust the display brightness: use either the display increase increase or decrease buttons (fig.1).
5.3. To turn the image back through 180° when using the mirror accessory, press the image flip button (fig.1).
5.4. When not in use, switch the unit off using the on/off switch.
6. MAINTENANCE
6.1. Before each use inspect the borescope to ensure that no damage is present, paying particular attention to the screen and probe.
6.2. Clean the borescope regularly using a soft cloth and mild detergent, taking care not to exert excessive pressure on the screen.
DO NOT use solvent or abrasive cleaners.
6.3. If the borescope is not to be used for a considerable time, the batteries should be removed to remove the risk of corrosion.
6.4. When not in use, store in a dry, secure location out of reach of children.
7. TROUBLESHOOTING
Problem Possible Causes Likely Solutions
Display is on, but does not
show image.
1) Display is dim, even at
maximum brightness.
2) Display turns itself off.
3) Camera does not turn on
1) Loose cable connection.
2) Probe head is dirty.
Low battery voltage Replace batteries
1) Check cable connection.
2) Clean probe head.
Environmental Protection
Recycle unwanted materials instead of disposing of them as waste. All tools, accessories and packaging should be sorted,
taken to a recycling centre and disposed of in a manner which is compatible with the environment.
When the product becomes completely unserviceable and requires disposal, drain off any fluids (if applicable) into
approved containers and dispose of the product and the fluids according to local regulations.
Dispose of this product at the end of its working life in compliance with the EU Directive on Waste Electrical and
Electronic Equipment (WEEE). When the product is no longer required, it must be disposed of in an environmentally
protective way. Contact your local solid waste authority for recycling information.
Battery Removal
For battery removal see section 4.1.
Under the Waste Batteries and Accumulators Regulations 2009, Jack Sealey Ltd are required to inform potential purchasers of
products containing batteries (as defined within these regulations), that they are registered with Valpak’s registered compliance
scheme. Jack Sealey Ltd’s Batteries Producer Registration Number (BPRN) is BPRN00705
NOTE: It is our policy to improve products continually and as such we reserve the right to alter data, specifications and component parts without
prior notice.
IMPORTANT: No liability is accepted for incorrect use of this product.
WARRANTY: Guarantee is 12 months from purchase date, proof of which will be required for any claim.
Sole UK Distributor, Sealey Group,
Kempson Way, Suffolk Business Park,
Bury St. Edmunds, Suffolk,
IP32 7AR
© Jack Sealey Limited
Original Language Version
WEEE Regulations
01284 757500
01284 703534
www.sealey.co.uk
sales@sealey.co.uk
VS8196.V3 Issue: 1 - 30/03/17
 Loading...