

Page 1

IMPORTANT: PLEASE READ THESE INSTRUCTIONS CAREFULLY. NOTE THE SAFE OPERATIONAL REQUIREMENTS, WARNINGS AND CAUTIONS. USE THIS
PRODUCT CORRECTLY AND WITH CARE FOR THE PURPOSE FOR WHICH IT IS INTENDED. FAILURE TO DO SO MAY CAUSE DAMAGE AND/OR PERSONAL
INJURY AND WILL INVALIDATE THE WARRANTY. PLEASE RETAIN THESE INSTRUCTIONS FOR FUTURE USE.
Thank you for purchasing a Sealey product. Manufactured to a high standard this product will give you years of trouble free performance if these instructions are
carefully followed and the product is correctly maintained.
1. SAFETY INSTRUCTIONS
1.1. ELECTRICAL SAFETY. WARNING! It is the user’s responsibility to check the following:
You must check all electrical equipment and appliances to ensure they are safe before using. You must inspect power supply leads,
plugs and all electrical connections for wear and damage. You must ensure the risk of electric shock is minimised by the installation of
appropriate safety devices. An RCCB (Residual Current Circuit Breaker) should be incorporated in the main distribution board.
We recommend that an RCD (Residual Current Device) is used with all electrical products. It is particularly important to use an RCD
with portable products that are plugged into an electrical supply not protected by an RCCB. If in doubt consult a qualified
electrician. You may obtain a Residual Current Device by contacting your Sealey dealer. You must also read and understand
the following instructions concerning electrical safety.
1.1.1 The Electricity At Work Act 1989 requires all portable electrical appliances, if used on business premises, to be tested by a qualified
person, using a Portable Appliance Tester (PAT), at least once a year.
1.1.2 The Health & Safety at Work Act 1974 makes owners of electrical appliances responsible for the safe condition of the appliance and
the safety of the appliance operator. If in any doubt about electrical safety, contact a qualified electrician.
1.1.3 DO ensure the insulation on all cables and the product itself is safe before connecting to the mains power supply. See 1.1.1.
above and use a Portable Appliance Tester (PAT).
1.1.4 DO ensure that cables are always protected against short circuit and overload.
1.1.5 DO regularly inspect power supply, leads, plugs for wear and damage and all electrical connections to ensure that none is loose.
1.1.6 DO check that the voltage marked on the product is the same as the electrical power supply to be used and check that all fused plugs
are fitted with the correct capacity fuse.
1.1.7 DO NOT pull or carry the powered appliance by its power supply lead and do not pull plug by the cable. Products must not be pulled
or carried by their output cables.
1.1.8 DO NOT use worn or damaged leads, plugs or connections. Immediately replace or repair by qualified persons.
1.1.9 The following information is for fitting a 13 amp plug which is only suitable when using the unit as a charger. If the unit is
to be used for starting it must be fitted with a 16 or 32amp plug or be hard wired into a 32A protected outlet. IN ALL CASES
CONSULT A QUALIFIED ELECTRICIAN TO ASCERTAIN THE CORRECT PLUG/FUSE COMBINATION FOR YOUR APPLICATION.
a) Connect the green/yellow earth wire to the earth terminal ‘E’.
b) Connect the brown live wire to live terminal ‘L’.
c) Connect the blue neutral wire to the neutral terminal ‘N’.
d) After wiring, check that there are no bare wires, that all wires have been correctly connected, that the external insulation
extends beyond the cable restraint and that the restraint is tight.
DANGER! BE AWARE, LEAD-ACID BATTERIES GENERATE EXPLOSIVE GASES DURING NORMAL BATTERY OPERATION. FOR THIS REASON, IT IS
VERY IMPORTANT TO READ AND FOLLOW THESE INSTRUCTIONS CAREFULLY, EACH TIME YOU USE THE CHARGING EQUIPMENT.
Follow these instructions and those published by the battery and vehicle manufacturers and the manufacturer of any equipment you
intend to use in the vicinity of the battery. Remember to review warning marks on all products and on engines.
DANGER! BE AWARE, LEAD-ACID BATTERIES CONTAIN CORROSIVE SUBSTANCES. FOR THIS REASON, IT IS VERY IMPORTANT TO READ AND
FOLLOW THESE INSTRUCTIONS CAREFULLY, EACH TIME YOU USE THE CHARGING EQUIPMENT. Follow these instructions and those
published by the battery and vehicle manufacturers and the manufacturer of any equipment you intend to use in the vicinity of the
battery. Remember to review warning marks on all products and on engines.
1.2. GENERAL SAFETY INSTRUCTIONS
Familiarise yourself with the application, limitations and potential hazards relating to starter/chargers. Also refer to the vehicle
manufacturer’s handbook. IF IN ANY DOUBT CONSULT AN ELECTRICIAN.
Ensure that the starter/charger is in good order and condition before use. If in any doubt do not use the unit and contact an electrician.
Only use recommended attachments and parts. To use non-recommended items may be dangerous and will invalidate your warranty.
Use the starter/charger in the vertical position only and ensure it is placed on a stable surface which will adequately support the weight.
Ensure the starter/charger is ‘OFF’ before handling the power clamps.
Ensure the starter/charger is ‘OFF’ before attaching/detaching the power clamps to/from the battery.
Keep tools and other items away from the engine and ensure that you can see the battery and moving parts of the engine clearly.
Ensure the voltage on the starter/charger is set to the same voltage as the battery.
If the battery has caps to access the battery fluid, remove the caps and check the fluid level before connecting the power clamps. If
necessary top-up the battery with distilled water by referring to the battery manufacturer’s instructions.
The cables may become hot with excessive use. If so, allow a few minutes for them to cool down before attempting to re-use.
If the starter/charger receives a sharp knock or blow the unit must be checked by a qualified service agent before using.
If the battery terminals are corroded or dirty clean them before attaching the power clamps.
Keep children and unauthorised persons away from the work area.
DO NOT dis-assemble the starter/charger for any reason. The starter/charger must only be checked by qualified service personnel.
DO NOT try to charge a non-rechargeable battery.
DO NOT try to start engine, or to charge the battery, if the battery is frozen.
WARNING! To prevent the risk of sparking, short circuit and possible explosion DO NOT drop metal tools in the battery area,
or allow them to touch the battery terminals.
DO NOT allow power clamps to touch each other or to make contact with any metallic parts of the vehicle.
DO NOT cross connect power leads from starter/charger to battery. Ensure positive (+ or RED) is to positive and negative (- or BLACK) is to negative.
If symbols cannot be distinguished, remember that the negative terminal is the one directly connected to the vehicle bodywork.
INSTRUCTION MANUAL FOR:
ELECTRONIC STARTER/
CHARGER 180AMPS 12V/24V
MODEL No: TECSTART420.V2
Original Language Version
TECSTART420.V2 Issue: 3(L) -
08/05/14
© Jack Sealey Limited
Page 2
3. ASSEMBLY
2. INTRODUCTION & SPECIFICATION
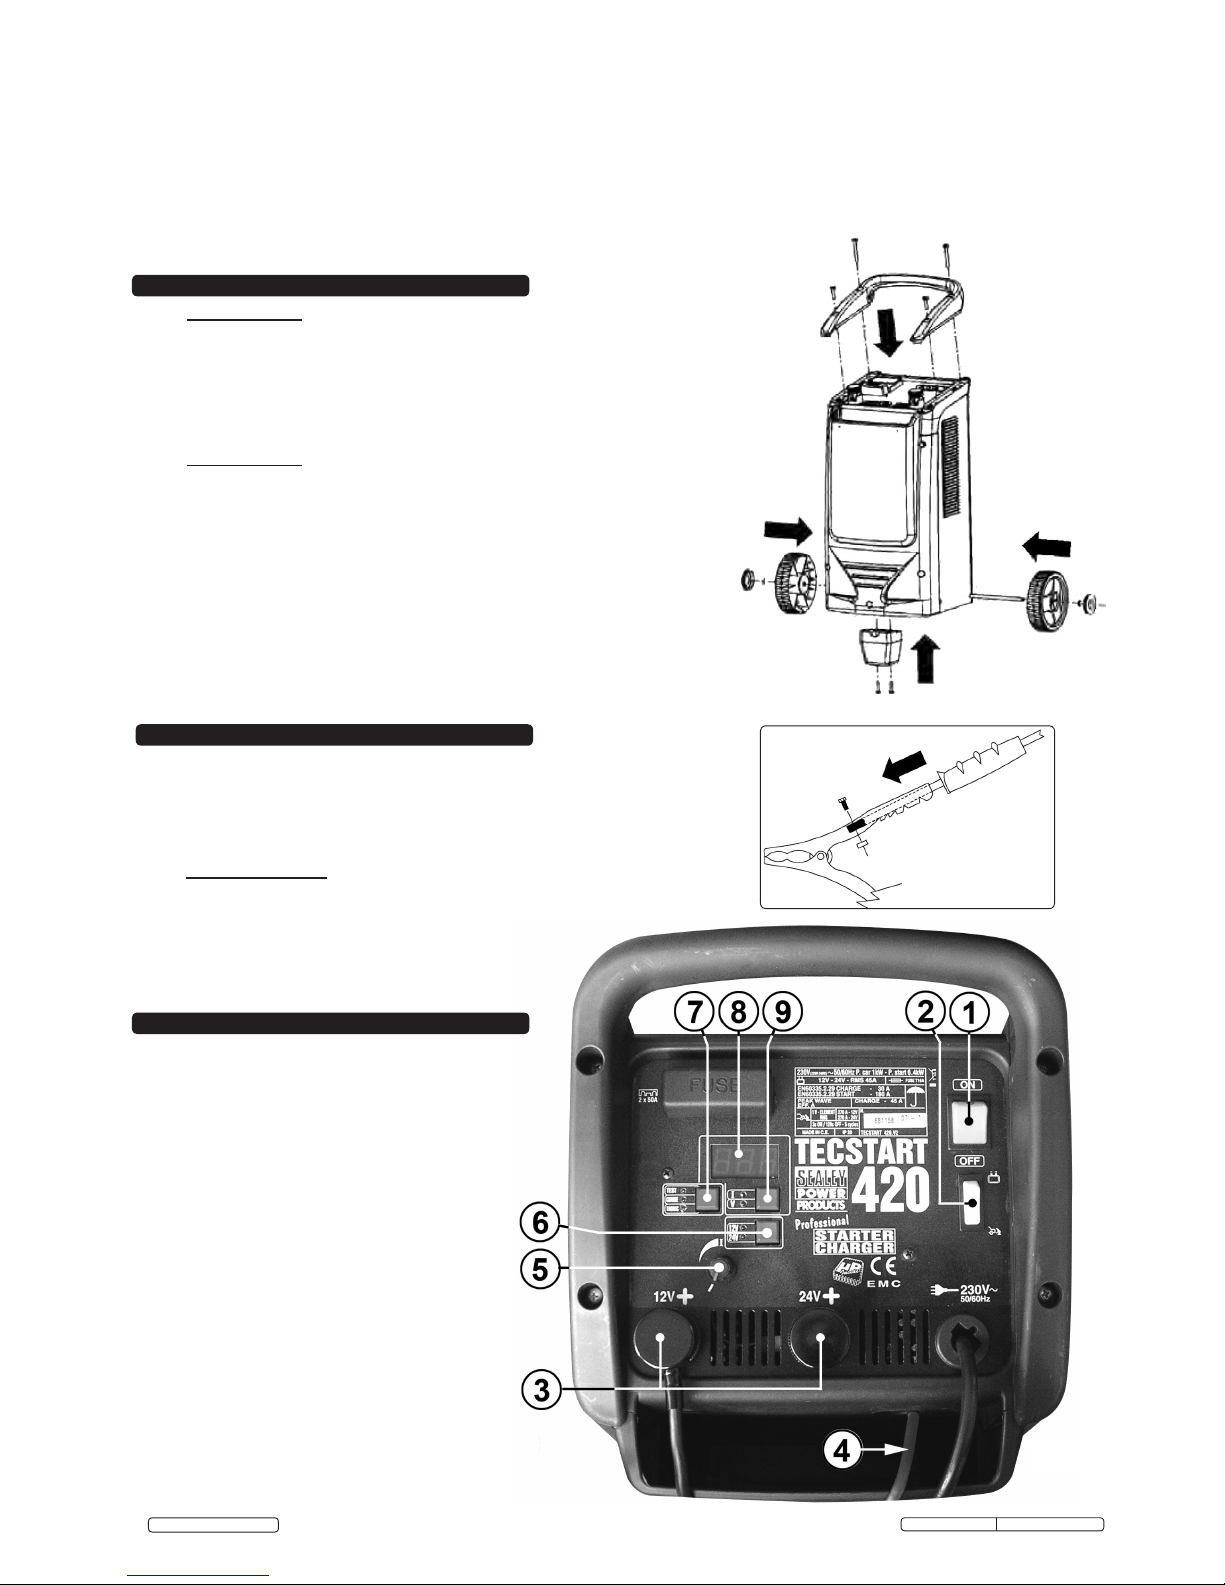
4.1 The Tecstart 420 is electronically controlled
by a microprocessor. The adjustments and
indicators are as shown in Fig.3.
1: ON/OFF Switch.
2: Selector switch BATTERY CHARGER/
STARTER.
3: Positive sockets 12V/24V.
4: Negative output.
5: Charge current adjustment potentiometer.
During charging the current setting is
shown for a few seconds on the display
whenever the knob is turned.
6: 12V/24V battery voltage selection key.
7: Operating mode selection key TEST,
CHARGE and TRONIC.
8: Display for showing the selected
parameter. The display also shows several
abbreviations indicating the present status
or mode of the battery charger.
9: Amps/Volts parameters selection key for
the display. V = voltage in volts. I = current
in amps.
4. BATTERY CHARGER CONTROLS
Fig.3
DO NOT pull the cables or clamps from the battery terminals and DO NOT remove power clamps while the starter/charger is ‘On’.
DO NOT use the starter/charger outdoors, or in damp or wet locations and DO NOT operate within the vicinity of flammable liquids or gases.
DO NOT use starter/charger inside vehicle or inside engine compartment. Ensure there is sufficient ventilation and do not cover or
obstruct starter/charger ventilation louvres.
DO NOT use this product to perform a task for which it is not designed.
WARNING! Simultaneous charging of batteries is possible but must be done with great caution by a qualified person. Contact
your Sealey dealer for information and accessories. DO NOT charge in series two batteries of differing type, capacity, or levels of
discharge.
WARNING! If a fuse blows, ensure it is replaced with an identical fuse type and rating.
When not in use, store the starter/charger carefully in a safe, dry, childproof location. ,
3.1 Assemble the handle and foot to the main casing using
the fittings provided as indicated in Fig.1.
3.1.1 Slide the axle through the casing at the bottom back
corner. Slide a wheel onto each protruding end of the axle
and retain them with the circlips provided. Push a plastic
covering cap into the centre of each wheel, see Fig.1.
3.2 BATTERY CLAMPS. (See Fig.2)
Assemble the clamp with the red handle to the movable
cable (See Fig.3-3). Assemble the clamp with the black
handle to the fixed cable which comes directly out of the
battery charger. See Fig.3-4.
Fig.1
2.1 INTRODUCTION
A hybrid starter/charger utilising traditional transformer power supply with advanced
electronic control. The unit features digital read-out of the battery condition or battery
charging current and current control setting to allow batteries to be fast-charged. Advanced
electronics provide battery conditioning cycle for badly discharged batteries. Once a battery
has been brought up to fully charged status, the Tronic function maintains the battery in
this condition by reading the charged status of the cells. The unit also has the power to start
vehicles fitted with batteries up to 700Ah.
2.2 SPECIFICATION
Model No: .....................................................................Tecstart420
Output 12V Charge Peak (EN) ........................................ 45A(30A)
Output 24V Charge Peak (EN) ........................................ 45A(30A)
Output 12V Start peak (EN)......................................... 300A(180A)
Output 24V Start Peak (EN) ........................................ 300A(180A)
Input - Charge .......................................................................... 4.5A
Input - Start ............................................................................... 28A
Power Input ............................................................................230V
Power Output .....................................................................12V/24V
Polarity Protection ................................................................... Fuse
Fuse Reference ......................................................120.122350 (2)
Fig.2
Original Language Version
TECSTART420.V2 Issue: 3(L) -
08/05/14
© Jack Sealey Limited
Page 3

5. OPERATION
5.1 BEFORE CHARGING
NOTE: Check the capacity (Ah) of the battery to be charged, ensuring that it is not less than the figure
given in the data sheet.
NOTE: DO NOT allow the two clamps to come into contact when the battery charger is plugged into the
mains, as blown fuses will result.
5.1.1 When the battery charger is used with a battery which is always connected to a vehicle, check the
vehicle instruction manual under the heading Electric System or Maintenance. Before charging, it
is advisable to disconnect the positive cable, which is part of the vehicle electrical system.
5.1.2 Check the battery voltage before connecting it to the battery charger. Remember the 3 caps
correspond to a 6-volt battery, while 6 caps correspond to a 12-volt battery.
5.1.3 Occasionally, there may be two 12-volt batteries in series, in which case a voltage of 24-volts is
required to charge both batteries. Ensure that they have the same specification, thus preventing
uneven charging.
5.1.4 Remove the battery charger caps to release the gas produced.
5.1.5 Ensure the electrolyte covers the battery plates. If it does not, add distilled water to cover the
plates to between 5 - 10mm.
WARNING! Battery electrolyte is a highly corrosive acid.
5.1.6 Using a hydrometer, check the electrolyte specific gravity. The approximate density, at 20 °C is:
Charged battery; 1.28.
Half-charged Battery: 1.21.
Flat battery: 1.14.
5.1.7 Connect the RED charge clamp to the battery positive terminal (+ symbol).
5.1.8 Connect the BLACK charge clamp to the vehicle chassis, at a safe distance from the battery and
the fuel pipe.
5.1.9 Insert the power cable into the socket and set the mains switch to ON.
5.1.10 Ensure the settings on the battery charger panel are compatible with the battery specifications.
This check is carried out with the operating mode selection key in the TEST mode. See 7 in Fig.4.
5.1.11 If there is an error in the connection or the setting, the display will show the flashing message
“Err” until the problem has been solved. See Fig.9.
5.2 CHARGING
5.2.1 On the battery charger front panel, set the operating mode selection key to CHARGE. See 7 in Fig.4.
5.2.2 Set an appropriate charging current with the variable potentiometer (see 5 in Fig.4).
5.2.3 Monitor the battery voltage and charge current on the display using the V/I key (9 in Fig.4).
5.3 AUTOMATIC CHARGING
5.3.1 On the battery charger front panel, set the operating mode selection key to TRONIC. See 7 in Fig.4.
If the battery voltage is particularly low, the charger supplies a fixed current of about 2A until it
reaches the safety voltage of 1.5 volts per element. Under these operating conditions the display
shows the fixed current value alternating with “LCC”. See Fig.10.
NOTE: The battery charger will constantly monitor the voltage across the battery terminals, automatically
supplying, or cutting off, the charge current as necessary.
5.3.2 Monitor the battery voltage and charge current on the display using the V/I key (9 in Fig.4).
5.3.3 When the supply current is cut off, the display will show the message 'End', see Fig.11.
5.4 SEALED BATTERIES
5.4.1 Charge the battery slowly, carefully monitoring the voltage across the battery terminals.
5.4.2 When the battery terminal voltage reaches 14.4V for 12V batteries or 28.8V for 24V batteries,
stop charging.
Fig.10
Fig.9
Fig.8
Fig.5
Fig.6
Fig.7
Fig.4
Fig.11
4.2 BATTERY CHARGE STATUS INDICATORS
4.2.1 A very flat, or sulphated, battery is indicated by the display at Fig.5.
4.2.2 A flat battery is indicated by the display at Fig.6.
4.2.3 A half-charged battery is indicated by the display at Fig.7.
4.2.4 A charged battery is indicated by the display at Fig.8.
Original Language Version
TECSTART420.V2 Issue: 3(L) -
08/05/14
© Jack Sealey Limited
Page 4

7.1 CLEANING
7.1.1 Regularly clean the positive and negative terminals of oxidation, ensuring a good contact with clamps.
7.2 USE
7.2.1 Prior to each use, inspect the Tecstart420 for worn or damaged leads, broken plugs or connections.
7.2.2 Inspect the insulation of all cables prior to connection to the mains supply.
7.2.3 Ensure the cables are protected against short circuit and overload.
7.2.4 The above checks should also be carried out on the regular, annual Portable Appliance Test (PAT) test.
6. ALARMS AND SAFEGUARDS
Fig.14
Fig.15
Fig.16
Fig.17
6.1 The overheating safeguard is displayed as shown in Fig.14. It shows that the battery charger is
overheated. It will stay displayed, without supplying current, until it returns to normal temperature.
Reset is automatic.
6.2 The battery charger has three protection levels, shown in Figs.15, 16 and 17. L1 gives maximum
protection with connection and/or setting error detection and charge current limitation. L2 gives
intermediate protection with connection and/or setting error detection. L3 has ALL safeguards
disabled.
NOTE: The user has the option of totally or partially removing the safeguards (3 PROTECTION LEVELS)
by the following procedure:
A) In test mode press the I/V key for about 5 seconds until the current is no longer displayed and
either L1, L2 or L3 is displayed.
B) Turn the potentiometer to select the desired protection level
NOTE: The protection level shown initially depends on the actual position of the potentiometer.
Save the choice by pressing the I/V key.
NOTE: To enable the charging of very flat, or sulphated, batteries it may be necessary to disable all
safeguards. Each time the battery charger is switched on, it automatically returns to the maximum
protection level (L1)
5.5 MULTIPLE CHARGING
WARNING! DO NOT simultaneously charge different types of battery or batteries with different
capacities or levels of discharge.
5.5.1 Simultaneous multiple charging should be carried out in series, since this enables monitoring of
the current circulating in each battery. Refer to Fig.12.
NOTE: If two batteries with rated voltages of 12V are connected in series, set the battery voltage
selection key on the front panel to 24V and move the positive cable to the 24V terminal, see Fg.3-3.
5.6 COMPLETION OF CHARGING
5.6.1 On the battery charger front panel, set the operating mode selection key to TEST. See 7 in Fig.4.
5.6.2 Set the battery charger mains switch to OFF.
5.6.3 Disconnect the BLACK clamp from the chassis, or from the battery negative terminal (- symbol).
5.6.4 Disconnect the RED clamp from the battery positive terminal (+ symbol).
5.6.5 Store the battery charger in a dry location.
5.7 STARTING
NOTE: Never attempt to start a vehicle with the battery disconnected. The presence of the battery is
essential for the elimination of possible overvoltage that may be generated due to energy
accumulating in the connection cables at the starting stage.
5.7.1 On the battery charger front panel, set the CHARGER/STARTER selection switch to STARTER.
See 2 in Fig.3. The display will show the message 'Str', see Fig.13.
WARNING! Ensure that the power supply line is fused or has an automatic switch
corresponding to that shown in the data plate in the top of the control panel.
5.7.2 Set the mode switch to CHARGE (see 2 in Fig.3) and rapidly charge the battery for between 5
to 10 minutes, to ease starting. Switch back to START mode after rapid charging.
NOTE: The starting operation must strictly follow the WORK/PAUSE cycle (i.e. START, 3
seconds ON,120 seconds OFF, to a maximum of 5 cycles).
5.7.3 If the engine does not start, discontinue the operation, or the battery and/or the vehicle electrical
system will be damaged.
Fig.12
Fig.13
7. MAINTENANCE
NOTE: It is our policy to continually improve products and as such we reserve the right to alter data, specifications and component parts without prior notice.
IMPORTANT: No liability is accepted for incorrect use of this product.
WARRANTY: Guarantee is 12 months from purchase date, proof of which will be required for any claim.
INFORMATION: For a copy of our latest catalogue and promotions call us on 01284 757525 and leave your full name and address, including postcode.
01284 757500
01284 703534
sales@sealey.co.uk
Sole UK Distributor, Sealey Group,
Kempson Way, Suffolk Business Park,
Bury St. Edmunds, Suffolk,
IP32 7AR
www.sealey.co.uk
Web
email
Original Language Version
TECSTART420.V2 Issue: 3(L) -
08/05/14
© Jack Sealey Limited
Page 5

Page 6

ELECTRONIC STARTER/
CHARGER 180AMPS
12V/24V
MODEL NO:
TECSTART420.V2
NOTE: It is our policy to continually improve products and as such we reserve the right to alter data, specifications and component parts without prior notice.
IMPORTANT: No liability is accepted for incorrect use of this product.
WARRANTY: Guarantee is 12 months from purchase date, proof of which will be required for any claim.
INFORMATION: For a copy of our latest catalogue and promotions call us on 01284 757525 and leave your full name and address, including postcode.
01284 757500
01284 703534
sales@sealey.co.uk
Sole UK Distributor, Sealey Group,
Kempson Way, Suffolk Business Park,
Bury St. Edmunds, Suffolk,
IP32 7AR
www.sealey.co.uk
Web
email
Environmental Protection.
Recycle unwanted materials instead of disposing of them as waste.
All tools, accessories and packaging should be sorted, taken to a recycle centre and
disposed of in a manner which is compatible with the environment.
When the product is no longer required, it must be disposed of in an environmentally
protective way. Contact your local solid waste authority for recycling information.
Under the Waste Batteries and Accumulators Regulations 2009, Jack Sealey Ltd are
required to inform potential purchasers of products containing batteries (as defined within
these regulations), that they are registered with Valpak’s registered compliance scheme.
Jack Sealey Ltd’s Batteries Producer Registration Number (BPRN) is BPRN00705
Original Language Version
TECSTART420.V2 Issue: 3(L) -
08/05/14
© Jack Sealey Limited
 Loading...