

Sealey SWF16WR.V3 Instructions Manual
Created 23/12/14
SWF16WR.V3 | Issue 1 Original Language Version Page 1
Instructions For:
MODEL NO. SWF16WR. V3
16" WALL FAN 3-SPEED WITH REMOTE CONTROL 230V
Thank you for purchasing a Sealey product. Manufactured to a high standard, this product will, if used according to these instructions,
and properly maintained, give you years of trouble free performance.
IMPORTANT: PLEASE READ THESE INSTRUCTIONS CAREFULLY. NOTE THE SAFE OPERATIONAL REQUIREMENTS, W ARNINGS & CAUTIONS.
USE THE PRODUCT CORRECTLY AND WITH CARE FOR THE PURPOSE FOR WHICH IT IS INTENDED. FAILURE TO DO SO MAY CAUSE
DAMAGE AND/OR PERSONAL INJURY AND WILL INVALIDATE THE WARRANTY. KEEP THESE INSTRUCTIONS SAFE FOR FUTURE USE.
1. SAFETY INSTRUCTIONS
1.1. ELECTRICAL SAFETY
WARNING! It is the responsibility of the owner and the operator to read, understand and comply with the following:
You must check all electrical products, before use, to ensure that they are safe. You must inspect power cables, plugs, sockets and any
other connectors for wear or damage. You must ensure that the risk of electric shock is minimised by the installation of appropriate safety
devices. A Residual Current Circuit Breaker (RCCB) should be incorporated in the main distribution board. We also recommend that a
Residual Current Device (RCD) is used. It is particularly important to use an RCD with portable products that are plugged into a supply
which is not protected by an RCCB. If in any doubt consult a qualifi ed electrician. You may obtain a Residual Current Device by contacting
your Sealey dealer. You must also read and understand the following instructions concerning electrical safety.
1.1.1. The Electricity at Work Act 1989 requires that all portable electrical appliances, if used on business premises, are tested by a
qualifi ed electrician, using a Portable Appliance Tester (PAT), at least once a year.
1.1.2. The Health & Safety at Work Act 1974 makes owners of electrical appliances responsible for the safe condition of those appliances
and the safety of the appliance operators. If in any doubt about electrical safety, contact a qualifi ed electrician.
1.1.3. Ensure that the insulation on all cables and on the appliance is safe before connecting it to the power supply. See 1.1.1 and 1.1.2
and use a Portable Appliance Tester.
1.1.4. Ensure that cables are always protected against short circuit and overload.
1.1.5. Regularly inspect power supply cables and plugs for wear or damage and check all
connections to ensure that none is loose.
1.1.6. Important: Ensure that the voltage marked on the appliance matches the power supply to be
used and that the plug is fi tted with the correct fuse - see fuse rating at right.
1.1.7. DO NOT pull or carry the appliance by the power cable.
1.1.8. DO NOT pull the plug from the socket by the cable.
1.1.9. DO NOT use worn or damaged cables, plugs or connectors. Immediately have any faulty
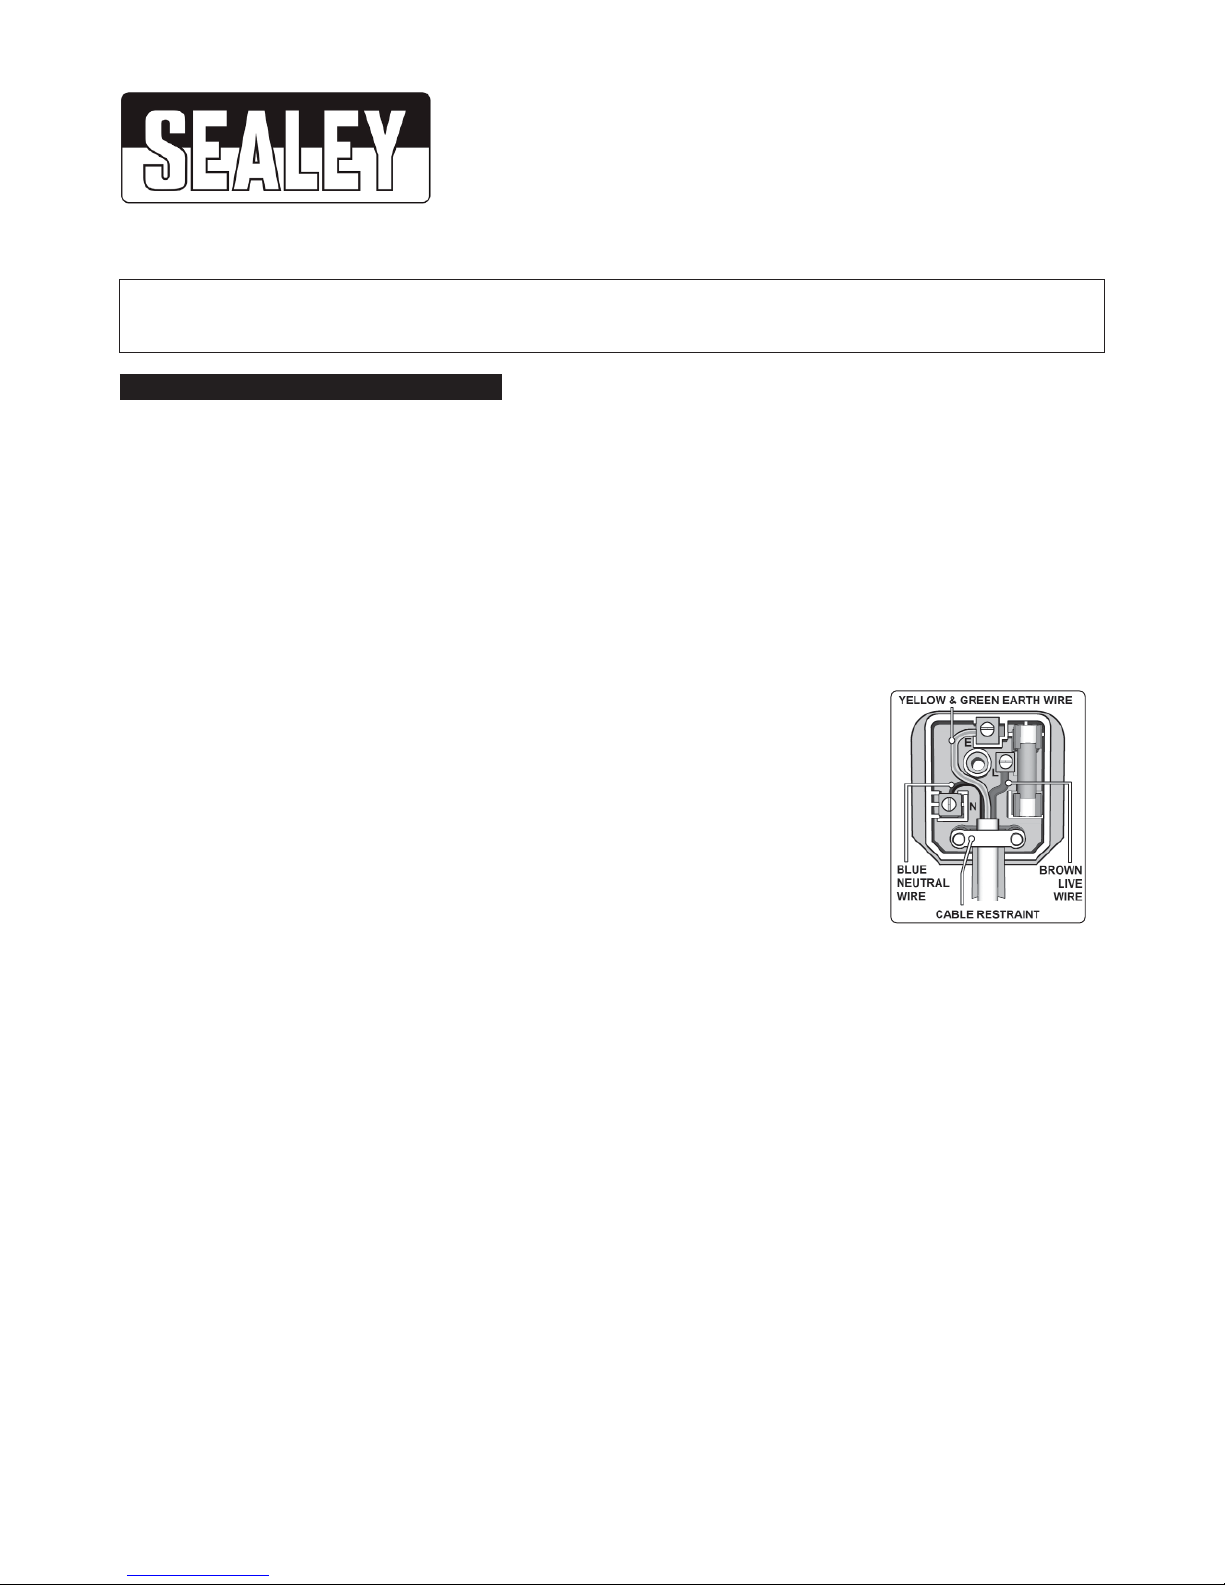
item repaired or replaced by a qualifi ed electrician. When a BS 1363/A UK 3 pin plug is
damaged, cut the cable just above the plug and dispose of the plug safely. Fit a new plug
according to the following instructions (UK only).
a. Connect the GREEN/YELLOW earth wire to the earth terminal ‘E’.
b. Connect the BROWN live wire to the live terminal ‘L’.
c. Connect the BLUE neutral wire to the neutral terminal ‘N’.
d. After wiring, check that there are no bare wires, that all wires have been correctly connected,
that the cable outer insulation extends beyond the cable restraint and that the restraint is tight. Double insulated products, which
are always marked with this symbol, are fi tted with live (brown) and neutral (blue) wires only. To rewire, connect the wires as
indicated above - DO NOT connect either wire to the earth terminal.
1.1.10. Products which require more than 13 amps are supplied without a plug. In this case you must contact a qualifi ed electrician to
ensure that a suitably rated supply is available. We recommend that you discuss the installation of an industrial round pin plug and
socket with your electrician.
1.1.11. If an extension reel is used it should be fully unwound before connection. A reel with an RCD fi tted is preferred since any appliance
plugged into it will be protected. The cable core section is important and should be at least 1.5mm², but to be absolutely sure that
the capacity of the reel is suitable for this product and for others which may be used in the other output sockets, we recommend the
use of 2.5mm² section cable.
1.2. GENERAL SAFETY
Disconnect the fan from the mains power when not in use, and before servicing or performing any maintenance.
Use the fan in dry areas only. Do not use in wet or high condensation locations such as bathrooms, showers, or pools.
WARNING! If fan falls into water, immediately switch off and disconnect from the mains power supply. Do not touch the fan until the mains
power supply has been disconnected.
Always disconnect the fan from the power supply when moving it from one location to another.
Keep the fan clean and maintained in good condition (use an authorised service agent).
Use recommended parts only (unauthorised parts may be dangerous, and will invalidate your warranty).
DO NOT insert any objects through the fan guard.
DO NOT cover the fan.
DO NOT immerse the fan in water or any other liquid.
DO NOT allow children to operate the fan.
DO NOT place the fan where it may be knocked over easily, or where the lead may cause a person to trip.
DO NOT use the fan outdoors.
DO NOT use an extension cord unless it has been approved by an electrical authority.
When not in use store in a safe, dry, childproof location.
Recommended
Fuse Rating: 3 Amp
Created 23/12/14
Page 2 Original Language Version SWF16WR.V3 | Issue 1
NOTE: This appliance is not intended for use by persons (including children) with reduced physical, sensory or mental capabilities or lack of
experience and knowledge, unless they have been given supervision or instruction concerning the use of the appliance by a person responsible
for their safety. Children should be supervised to ensure that they do not play with the appliance.
2. INTRODUCTION
Features tilt and swivel head for optimum air circulation. Remote control operation and fully guarded fan blades for ease-of-use and extra safety.
Smooth running motor powers both fan blades and head oscillation. Timer function allows user to preset running time between 30 minutes - 7.5
hours. Features three modes - Normal, Nature and Sleep. Nature mode for alternating high and low airfl ows. Sleep mode for gradual reduction
of fan speed. Supplied with wall bracket for quick and easy installation.
3. SPECIFICATION
Fan Diameter: ............................................................................................400mm (16”)
Speeds: ....................................................................................................................... 3
Modes: ........................................................................................Normal, Nature, Sleep
Maximum Airfl ow: .......................................................................................... 53mtr³/min
Power:.....................................................................................................................50W
Supply: ...................................................................................................................230V
Weight: ................................................................................................................2.37kg
Height ................................................................................................................ 500mm
4. ASSEMBLY
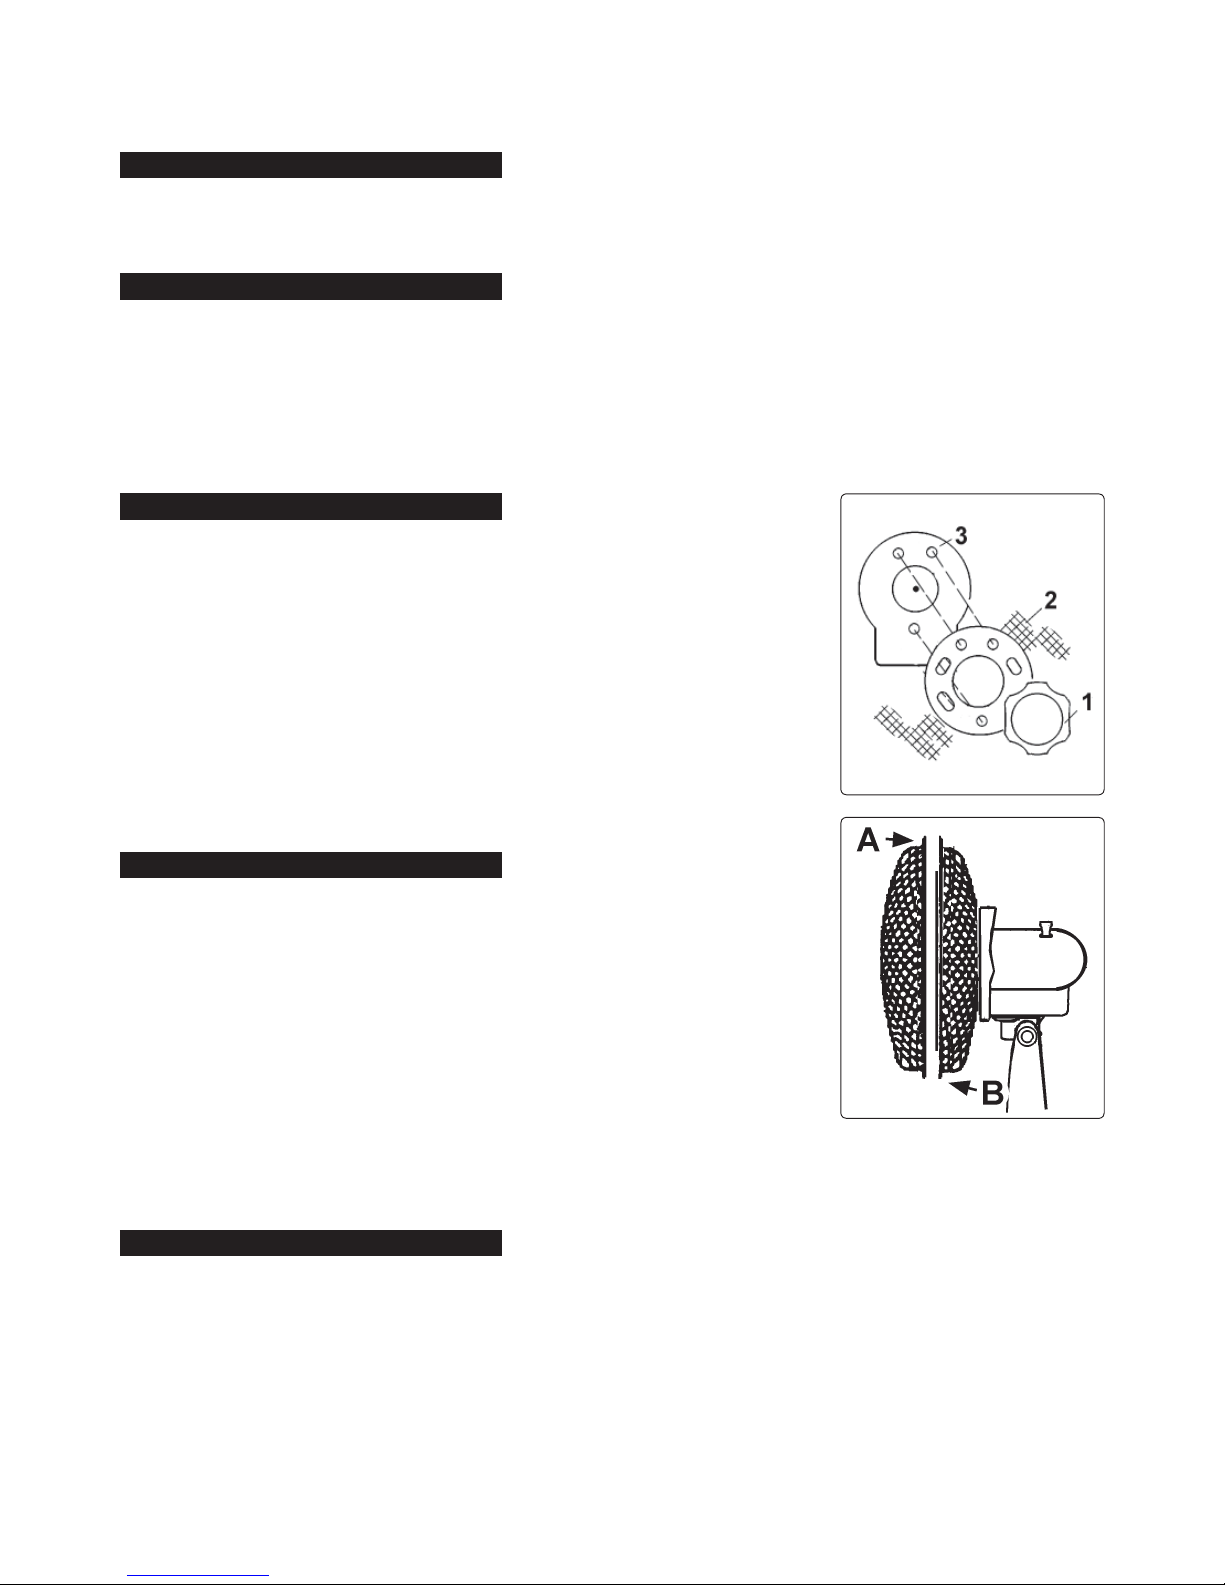
4.1. Assemble the fan as follows:
Unscrew and remove the large plastic locking cap from the motor spindle of the fan (Note:
left hand thread). Then unscrew and remove the plastic locking ring (Fig.1.1) from the motor
housing.
4.2. Fitting the rear fan guard: Identify the rear fan guard by the location holes in the centre plate
(Fig.1.2) and place the guard over the fan spindle and fi t onto the three location pins (Fig.1.3).
4.3. Secure the rear guard with the plastic locking ring (Fig.1.1).
4.4. Fitting the fan blade. Slide the fan blade onto the motor spindle until it comes to rest against
the pin, ensure the pin engages with the cutouts on the blade. Thread the large plastic locking
cap onto the end of the motor spindle by turning it anticlockwise. Hold one of the fan blades and
tighten the cap down onto the fan.
4.5. Fitting the front fan guard to the rear fan guard. Hook the clip on the top of the front guard
(Fig.2.A) over the rear guard and fi t and tighten the screw and nut at the bottom of the guards
(Fig.2.B). Slide the four other clips on the front guard down to secure the guards together.
4.6. Check that the guard has been assembled correctly and that the fan will turn freely before
plugging into the mains. The fan is now ready to use.
5. OPERATION
WARNING! Ensure you read, understand and apply the safety instructions
in Section 1 before using the fan.
5.1. Mount on a suitable wall location using the bracket and three fi xings. Secure the fan to the
bracket using the thumbscrew. Plug into the mains power supply.
5.2. Adjust tilt of fan as required.
5.3. On the Fan Bracket. To start the fan, press the ON/SPEED button. To adjust the Speed press
the ON/SPEED button to sequence through LOW MED HI. To stop the fan, Press the OFF
button. To start/stop oscillation, press the OSCIL button.
5.4. On the Remote. To start the fan, press the ON/SPEED button. To adjust the Speed press the
ON/SPEED button to sequence through LOW MED HI. To stop the fan, Press the OFF button.
To start/stop oscillation, press the SWING button.
5.5. To set the MODE. On the Remote, press the MODE button. Modes are NOR - constant speed.
NAT - fast / slow alternating speed. SLP - fast / slow alternating speed, set stop time by using TIMER.
5.6. To set the TIMER. On the Remote, press the TIMER button. The timer can be set from 30 minutes to 7 hours and 30 minutes. Press the
TIMER button to sequence through 30 minute timer intervals to select desired timer duration.
5.7. When the fan is no longer required, press the OFF button and remove plug from mains socket.
Store in a safe, dry, childproof location.
6. CARE OF FAN
IMPORTANT: Turn the fan OFF and disconnect from power supply before cleaning.
6.1. Use only a soft, damp cloth to clean the fan.
6.2. DO NOT submerse the fan in water and NEVER allow water to drip into the motor housing.
6.3. DO NOT use solvents or other chemicals to clean the fan.
6.4. To clean the fan blades, remove front guard - reverse of assembly sequence 4.5. above.
6.5. Wipe the blades and guards clean.
6.6. Reassemble front guard - see assembly sequence 4.5. and 4.6. above.
6.7. Store the fan in its original box or otherwise cover the fan to protect it from dust.
Fig. 1
Fig. 2
 Loading...