

Page 1
INSTRUCTIONS FOR:
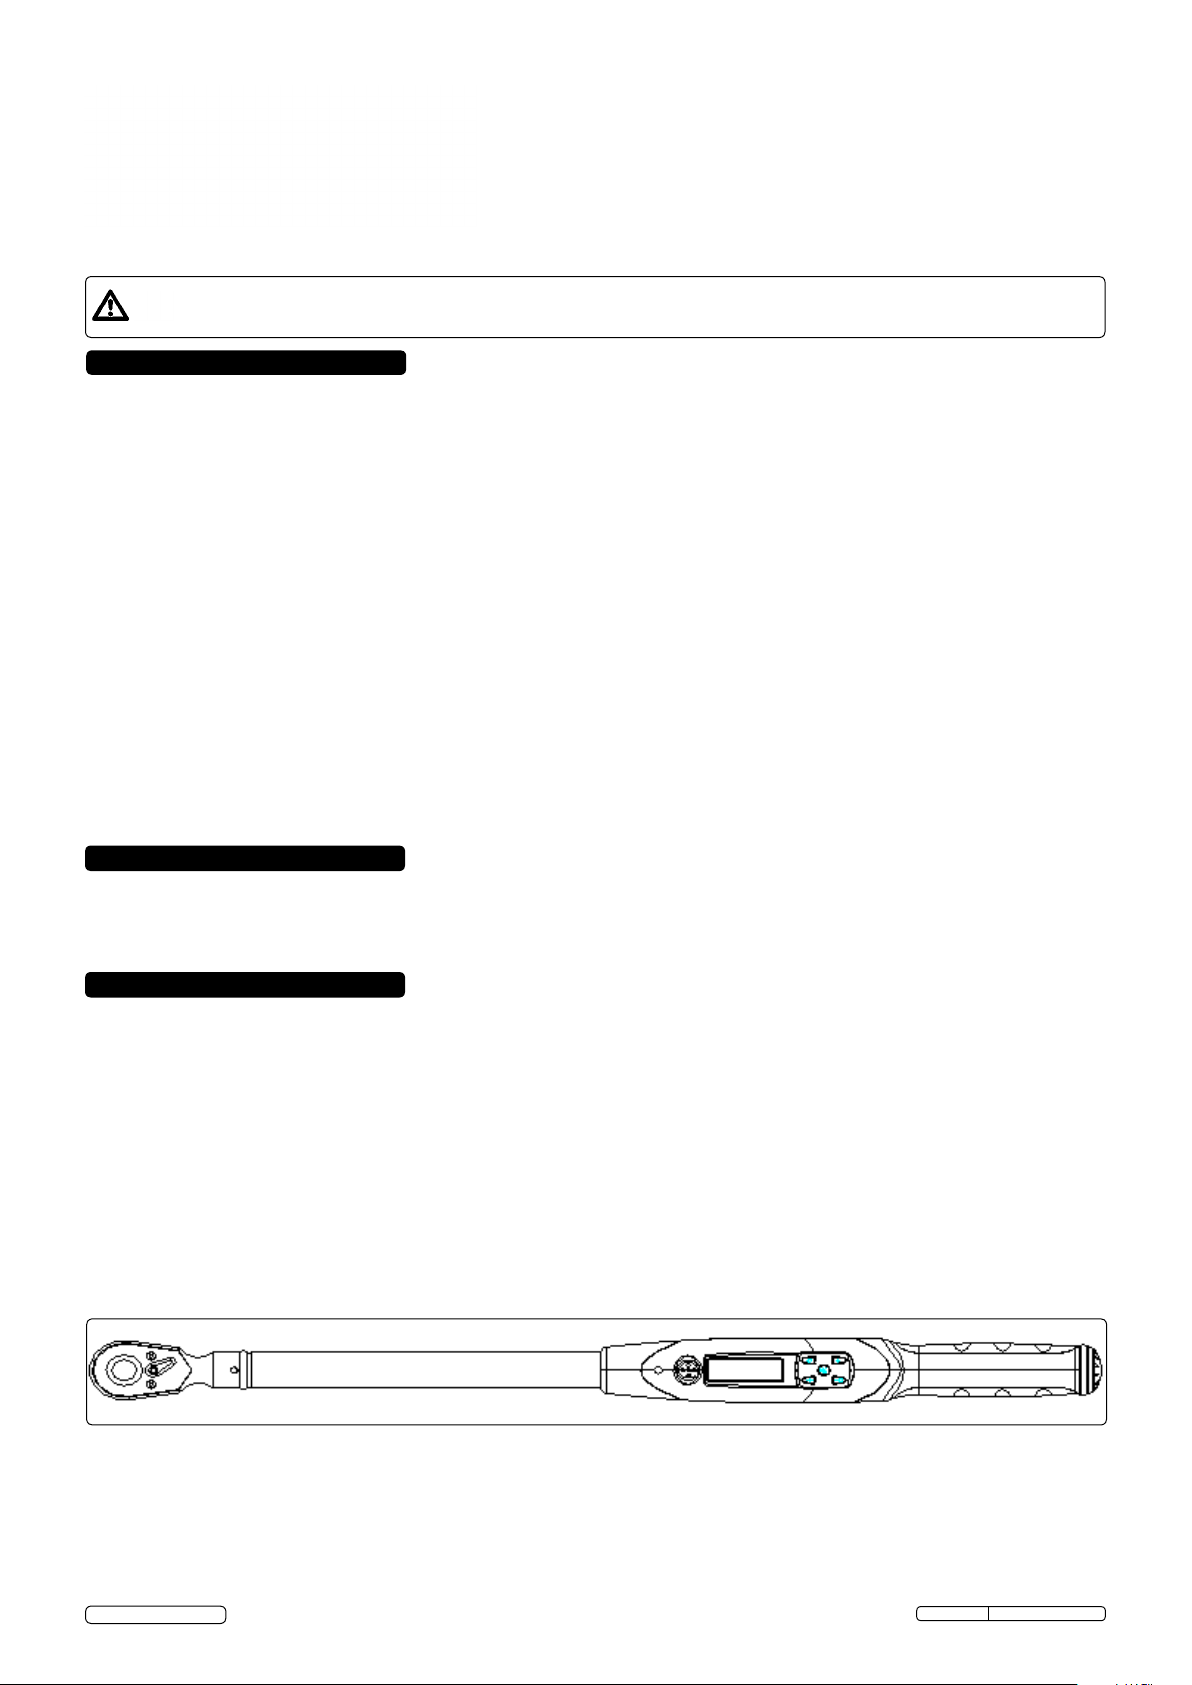
3/8” square drive digital torque
wrench 8-85nm
MODEL NO: stw308
Thank you for purchasing a Sealey product. Manufactured to a high standard, this product will, if used according to these
instructions, and properly maintained, give you years of trouble free performance.
IMPORTANT: please read these instructions carefully. note the safe operational requireMents, warnings & cautions. use the
product correctly and with care for the purpose for which it is intended. failure to do so May cause daMage and/or
personal inJury and will invalidate the warranty. Keep these instructions safe for future use.
1. safety
warning! do not use the torque wrench if damaged or thought to be faulty.
Ensure all workshop safety rules, regulations and conditions are complied with when using the torque wrench.
Maintain correct balance and footing. Ensure the floor is not slippery and wear non-slip shoes.
Keep children and unauthorised persons away from the working area.
Avoid over-torquing the wrench (110% of maximum torque range) as this will cause loss of accuracy.
Keep the wrench away from magnets.
In operation when you hear the continuous tone, stop pulling immediately especially in case the target torque/ angle is low.
Ensure all sockets, extensions and drivers are rated correctly and are of flawless construction. Avoid using adaptors and extensions for
best accuracy.
do not use the torque wrench if the batteries are low, torque accuracy will be affected.
do not use the wrench as a hammer or similar.
do not use on live electrical circuits the plastic handle is not insulated.
do not subject the wrench to excessive force or shocks.
do not drop, throw, or violently shake the wrench.
do not operate the wrench in damp conditions.
do not operate the wrench in dusty conditions.
do not push on the LCD panel.
do not use wrench until first instructed in its use by a qualified person.
do not leave the wrench in a place exposed to excessive heat, humidity or direct sunlight.
do not use organic solvents such as alcohol or thinners to clean the wrench.
After use, turn the wrench off, clean with a soft dry cloth, place torque wrench in its storage case, and store in a safe, dry, childproof
location.
Remove the batteries if the torque wrench is not to be used for a long time, to prevent damage from leaking.
2. introduction
Rugged and resilient digital torque wrench suitable for workshop and factory use. LCD read-out with LED, audible alarm and vibration indicating
achieved and target torque levels. Preset track, peak or desired torque levels using simple push button menu. Selectable read-out in Nm, lb.in,
lb.ft, or kgf.m. Reversible Chrome Vanadium 72-tooth ratchet allows torque reading in either direction. Accurate to ±2% between 10% and 100%
of wrench’s stated capacity. Supplied with test certicate and storage case.
3. specification
3.1. Specication
Model No: ...................... stw308
Drive: .......................... 3/8”Sq
Length: . . . . . . . . . . . . . . . . . . . . . . . . . 335mm
Range: ......................... 8-85Nm
Operating Voltage: ................ 3V
Cell Qty x Type: .................. 2 x AAA (supplied)
Torque Accuracy: ................. ±2%(C.W. / C.C.W. of reading,
. . . . . . . . . . . . . . . . . . . . . . . . . . . . . . . 10% to 100% of full scale)
Torque Resolution: . . . . . . . . . . . . . . . . 0.1N.m / 1lbf-in / 0.1lbf-ft / 0.1Kgf.m
Gear Teeth:...................... 72
Units: .......................... N.m / lbf-in / lbf-ft / Kgf.m
Operating Temperature: ............ 0 ~ 40°C / 32~104°F
Storage Temperature:.............. -20 ~ 45°C / -4 ~113°F
Humidity:........................ Humidity up to 60% Non-condensing
3.2. Calibration check
We recommend to ensure continued accuracy the
calibration of each wrench should be checked annually,
beginning one year after rst use. Calibration should
also be checked after any impact, over-torquing or other
misuse. Contact your Sealey Dealer to arrange
recalibration.
© Jack Sealey Limited
Original Language Version
STW308 Issue: 1 - 14/05/14
Page 2
4. operation
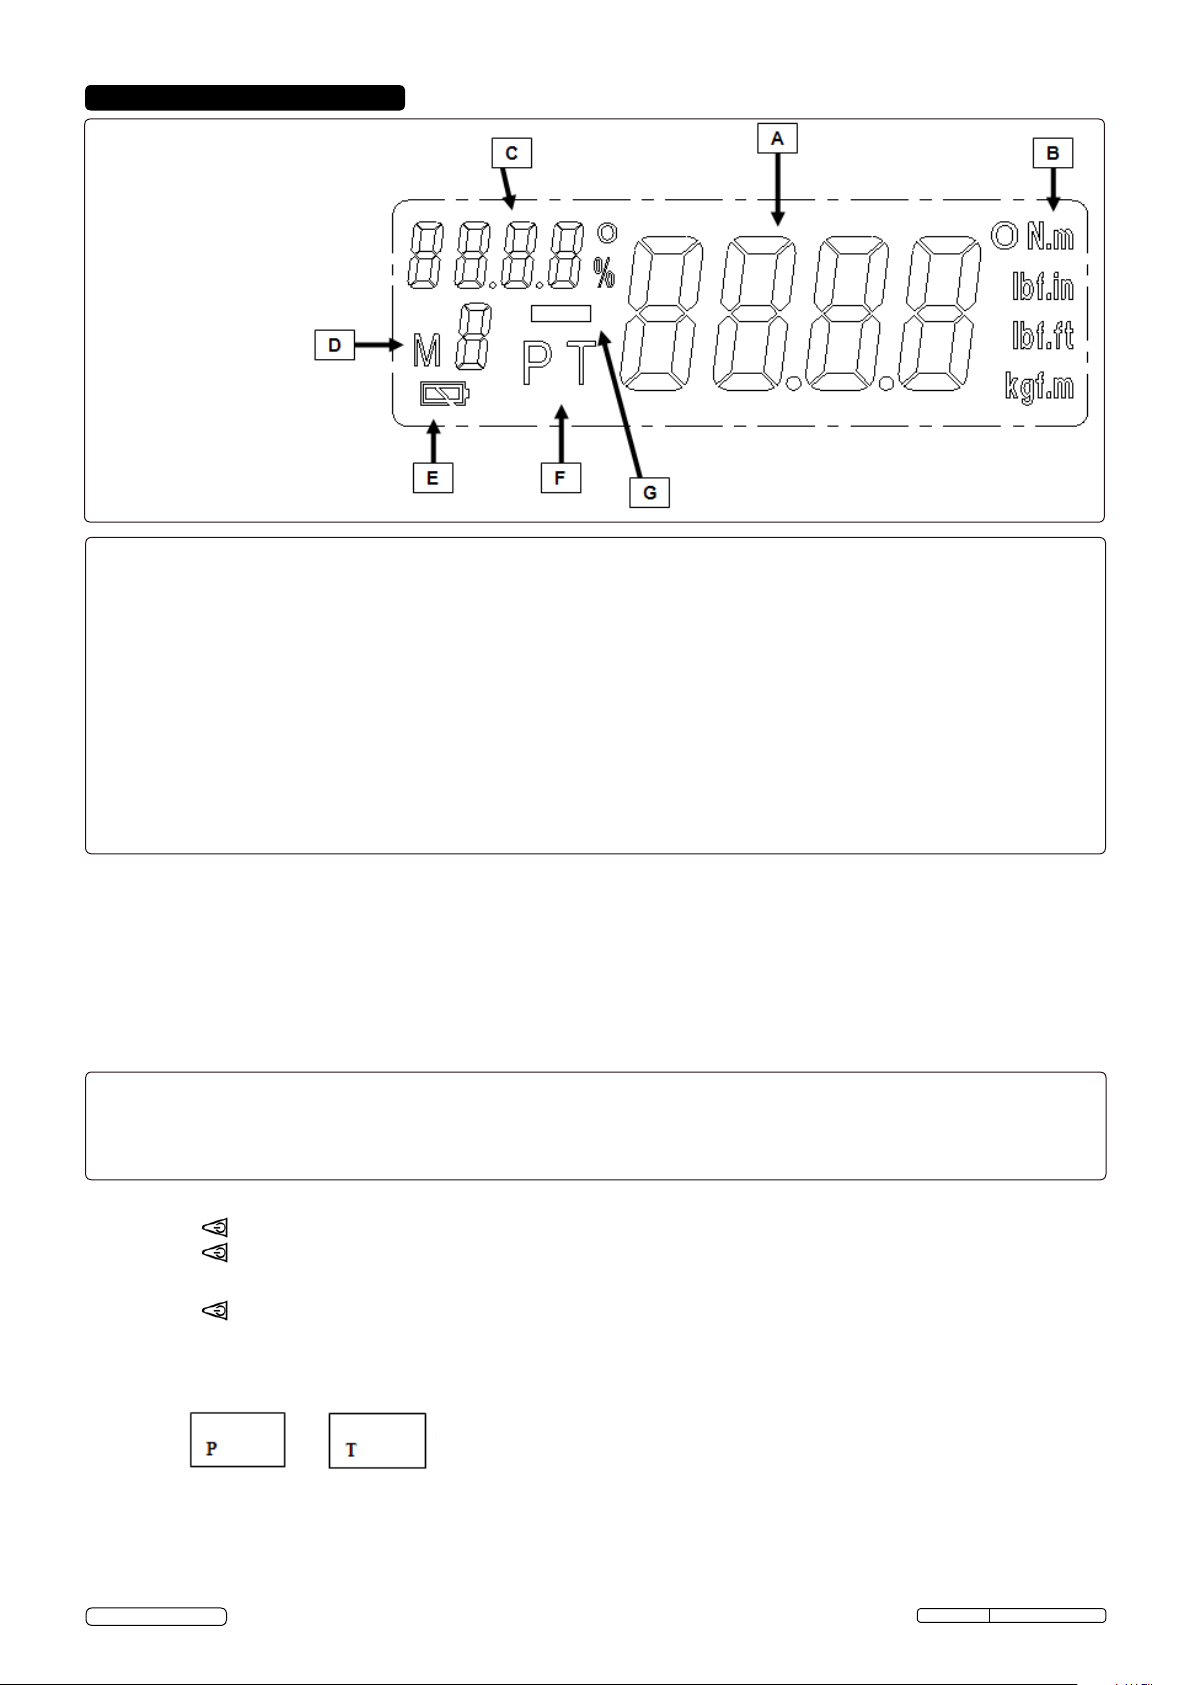
4.1. Display
A: Real-time torque value
B: Torque units
C: Target torque indicator
D: Memory storage numbers
E: Battery indicator
F: Peak / Track mode
G: MINUS symbol for counter- clockwise
rotation
4.2. Control Panel
1. Power ON / OFF button.
2. Memory storage numbers selection / setting button.
3. Memorise the torque setting value.
4. Button to zero the torque values.
5. Button for display illumination (hold for 3 seconds) / for selecting the next digit.
4.3. Preparation for use
4.3.1. Open the cover of the battery compartment by turning it counter-clockwise.
4.3.2. Insert two AAA batteries positive end rst, push the battery cap on against the spring and screw clockwise to lock.
Note: DO NOT mix the type of battery or use new/used ones together. Keep the battery terminals clean. If the battery voltage is low, the
battery symbol will be displayed on the screen and soon afterwards the wrench will turn off. Replace batteries.
4.4. Turning the tool on / off
4.4.1. Press button to turn on. The buzzer sounds and on the display all readouts will be displayed at the same time for a moment
4.4.2. Press button again to turn off the electronic system.
4.5. Peak and Track Mode Setting
4.5.1. Press to turn the wrench on. After turning on the display, the default is in “ Track “ mode, i.e. the real-time torque reached
during operation will be displayed.
4.5.2. Press button to select:
(Peak) mode or back to (Track) mode.
4.5.3. During the “Peak” mode, the maximum value reached will be saved additionally and the value is shown on the display for approx. 2
seconds. After that, this value is ashing then you can keep going for the next application or press button to zero then keep going
for the next application.
© Jack Sealey Limited
Original Language Version
STW308 Issue: 1 - 14/05/14
Page 3
4.6. Unit Selection
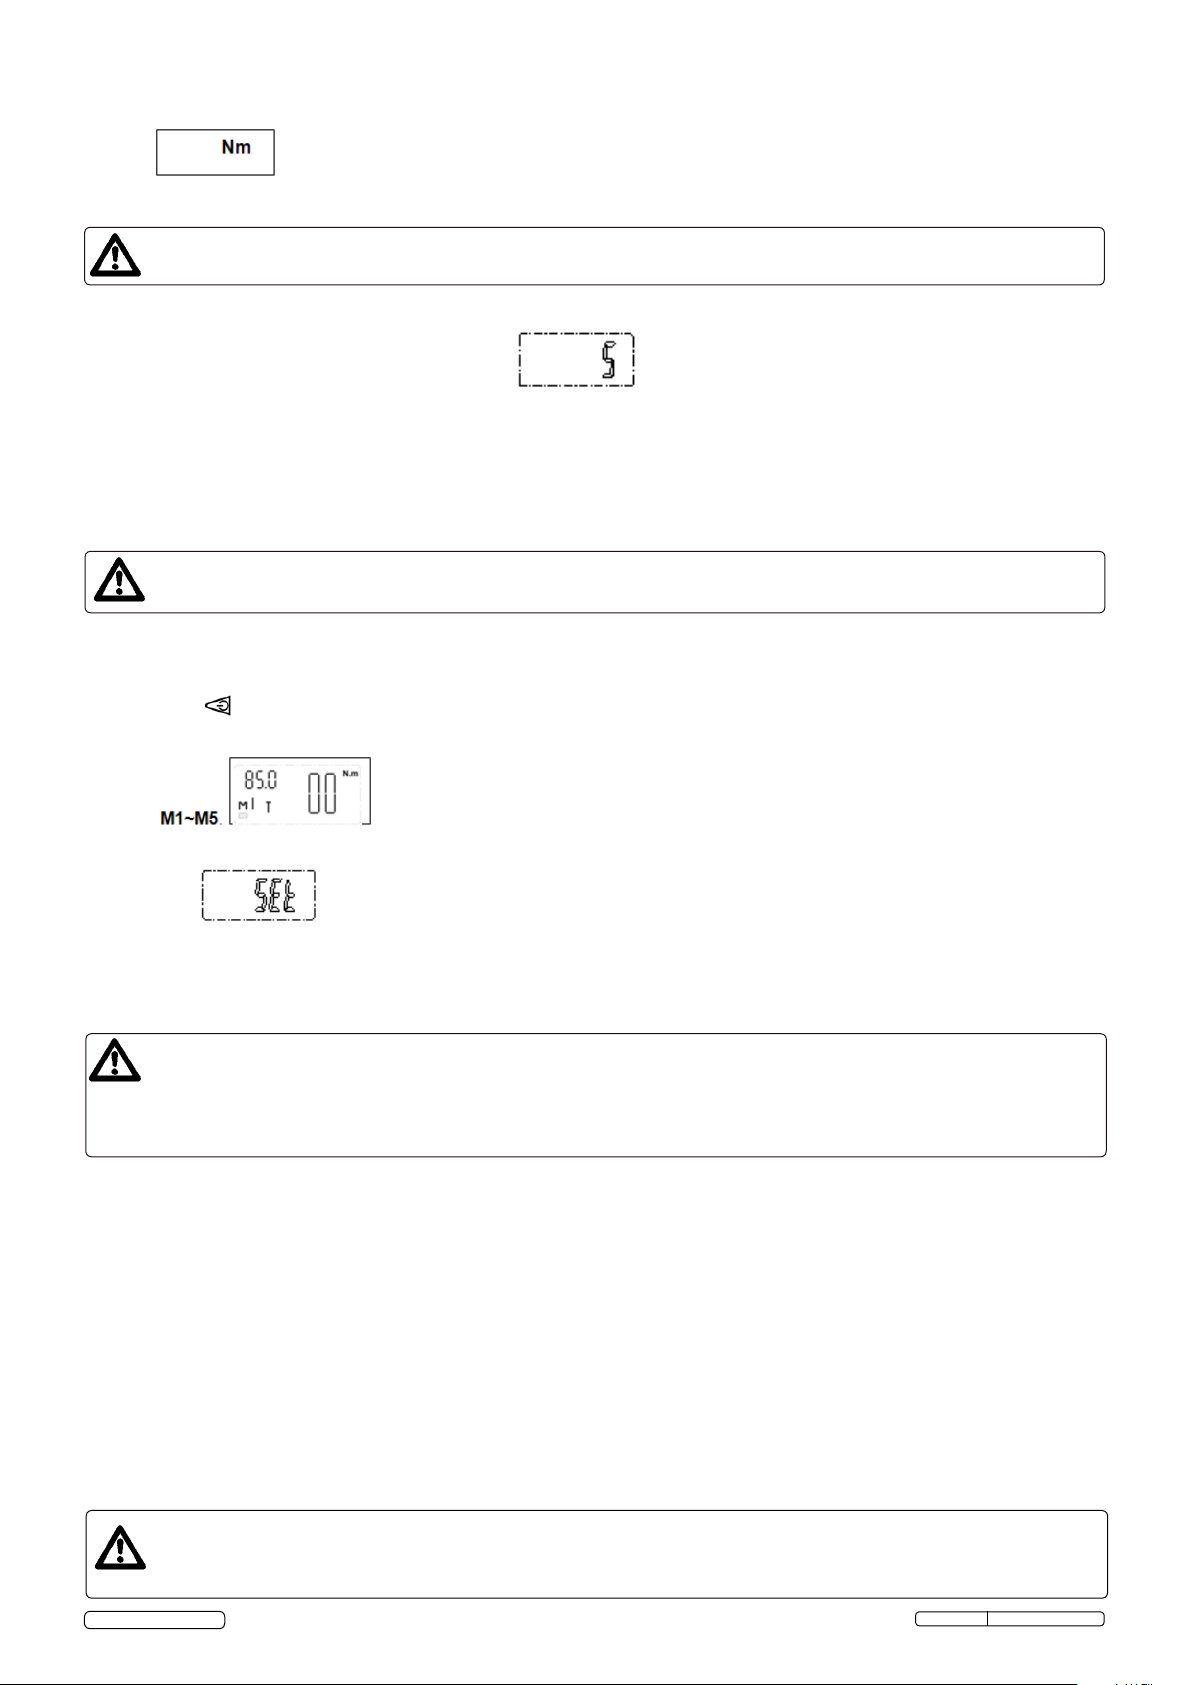
4.6.1. Enter the selecting mode by pressing and holding the button for 5 seconds.
4.6.2. is shown on the screen, select the units between N.m/ lbf.ft/ lbf.in/ kgf.m by pressing button.
4.6.3. Press button to conrm the unit selection. The wrench will switch to the setting of Auto Power Off.
Caution:
If no button is touched within 3 seconds, the wrench will remain at the last selection of unit, and return to measuring mode.
4.7. Auto power off setting
The torque wrench will be turned off automatically without any buttons being touched over a period. Change the auto –off
setting as follows:
4.7.1. Once the unit is selected, the default Auto-Off time (5 mins) will be shown on the screen.
4.7.2. Wait for 2 seconds without touching any buttons, or press button to remain on the default setting.
4.7.3. Change the wrench’s Auto-off time by pressing button. Select the shut-off time between 5 minutes, 15 minutes or “off”
to turn off the Auto-off function.
4.7.4. Press button to conrm the selection. The wrench returns to measuring mode.
Caution:
If no button is touched within 3 seconds, the wrench will remain at the last selection of unit, and return to measuring mode.
4.8. Programming the Torque value
4.8.1. The wrench has ve presets for setting the target Torque value.
4.9. Target Torque Setting
4.9.1. Press button to turn the wrench on.
4.9.2. Press and hold the button for 5 seconds (more than if required) to select the memory storage number between
4.9.3. Once the memory number is chosen, access the target Torque programming by pressing the button.
4.9.4. When is shown on screen, the “0000” or last saved torque value is displayed. The rst digit of this value (“0000”)
is ashing. Press button to zero the last saved value OR by repeatedly pressing button, the value of the ashing digit is
gradually increased. When the desired value is achieved, press button to skip to the next digit. Repeat this process for all the
digits, (ones, tens, hundreds etc.)
4.9.5. When the required torque is set, press to save the pre-set value.
Caution:
“Erro” will be shown on the screen, when the pre-set torque does not exceed the minimal torque of 10% FS or over the 100%
of torque value. After 1 second, the wrench returns to target torque value setting.
After pressing the “ “ button access the torque setting mode, if no buttons are touched for 3 seconds, the torque
wrench will quit automatically and return to measuring mode.
4.10. Turning the display illumination on/off
4.10.1. The display illumination can be turned on prior to or after programming the torque.
4.10.2. In order to do this, press and hold the button for 5 seconds.
4.11. Operating the torque wrench
4.11.1. Select the socket required for your work.
4.11.2. Place the tool on the bolt or nut. Grip the torque wrench handle and pull on the wrench with quick movements. Avoid jerky
movements.
4.11.3. With the target torque pre-set, the target value is indicated on the screen.
4.11.4. The LED light will be ashing GREEN when you are in the upper 50%-98% of the programmed torque value.
4.11.5. When you approach the programmed torque value in (+/- 5Nm) the buzzer will sound.
4.11.6. When you are within 2% of the programmed value, the RED light will be seen and you will feel a vibration in the handle. Once +/-
2 Nm of the desired torque value is achieved, the buzzer will emit a quicker sound sequence.
4.11.7 When you are over 2% of the programmed torque, the buzzer will emit a continuous tone, the LED will turn GREEN and a vibration
will be felt in the handle.
4.11.8. During the peaK mode, the maximum value reached will be saved additionally and the value is shown on the display. After releasing
the wrench for approx. 2 seconds, this value is ashing, then you can keep going for the next application.
ATTENTION: When you hear the continuous tone, stop pulling immediately in case the target torque is low.
Caution:
Never use the torque wrench when it has a low battery. The wrench’s accuracy will be affected.
“----” will be shown on the screen, when applying torque is exceeded at 100% of the maximum torque value.
© Jack Sealey Limited
Original Language Version
STW308 Issue: 1 - 14/05/14
Page 4
Environmental Protection
Recycle unwanted materials instead of disposing of them as waste. All tools, accessories and packaging should be
sorted, taken to a recycling centre and disposed of in a manner which is compatible with the environment.
Dispose of this product at the end of its working life in compliance with the EU Directive on
WEEE Regulations
Waste Electrical and Electronic Equipment (WEEE). When the product is no longer required, it must be disposed
of in an environmentally protective way. Contact your local solid waste authority for recycling information.
Battery Removal
Refer to 4.3. for battery removal. Dispose of batteries according to local authority guidelines.
Under the Waste Batteries and Accumulators Regulations 2009, Jack Sealey Ltd are required to inform potential
purchasers of products containing batteries (as dened within these regulations), that they are registered with Valpak’s
registered compliance scheme. Jack Sealey Ltd’s Batteries Producer Registration Number (BPRN) is BPRN00705.
Parts support is available for this product. To obtain a parts listing and/or diagram,
please log on to www.sealey.co.uk, email [email protected] or telephone 01284 757500.
NOTE: It is our policy to continually improve products and as such we reserve the right to alter data, specifications and component parts without prior notice.
IMPORTANT: No liability is accepted for incorrect use of this product.
WARRANTY: This product has a lifetime guarentee. Proof of purchase will be required for any claim.
INFORMATION: For a copy of our latest catalogue and promotions call us on 01284 757525 and leave your full name and address, including postcode.
© Jack Sealey Limited
Sole UK Distributor, Sealey Group,
Kempson Way, Suffolk Business Park,
Bury St. Edmunds, Suffolk,
IP32 7AR
Original Language Version
01284 757500
01284 703534
www.sealey.co.uk
STW308 Issue: 1 - 14/05/14
 Loading...