

Sealey STW291 Instructions For
INSTRUCTIONS FOR:
DIGITAL TORQUE ADAPTOR
WITH ANGLE FUNCTION 1/2”Sq.Dr. 20 - 200Nm
MODEL No: STW291
Thank you for purchasing a Sealey product. Manufactured to a high standard this product will, if used according to these
instructions and properly maintained, give you years of trouble free performance.
IMPORTANT: PLEASE READ THESE INSTRUCTIONS CAREFULLY. NOTE THE SAFE OPERATIONAL REQUIREMENTS, WARNINGS
AND CAUTIONS. USE THE PRODUCT CORRECTLY AND WITH CARE FOR THE PURPOSE FOR WHICH IT IS INTENDED. FAILURE
TO DO SO MAY CAUSE DAMAGE AND/OR PERSONAL INJURY AND WILL INVALIDATE THE WARRANTY. PLEASE KEEP
INSTRUCTIONS SAFE FOR FUTURE USE.
1. SAFETY INSTRUCTIONS
WARNING! DO NOT use the digital torque adaptor if
damaged or thought to be faulty.
DO NOT apply force to the adaptor when the power is
off. Always turn the adaptor on before using it otherwise
the adaptor will be damaged.
DO NOT turn off the torque adaptor while torque force is
being applied.
DO NOT exceed the permitted maximum torque value
for this torque adaptor. To do so will cause it to break.
DO NOT subject the 1/2” connectors on the top and
bottom of the adaptor to any force other than a rotational
one.
Ensure that all components including all adaptors,
extensions, drivers and sockets are rated to match or
exceed the torque being applied.
Observe all equipment, system and manufacturer ’s
warnings, cautions and procedures when using this
torque adaptor.
Use the correct size socket for the fastener.
DO NOT use sockets showing wear or cracks.
Check that the torque adaptor capacity matches or
exceeds each application before proceeding.
Ensure all workshop safety rules, regulations, and
conditions are complied with when using this digital
torque adaptor.
Maintain correct balance and footing. Ensure the floor is
not slippery and wear non-slip shoes.
Keep children and unauthorised persons away from the
working area.
DO NOT press, pressure, or damage the LCD display.
DO NOT use the torque adaptor near strong magnetic
elds .
DO NOT subject the digital torque adaptor to excessive
force or shocks.
DO NOT drop or throw the digital torque adaptor.
DO NOT leave the digital torque adaptor in any place
exposed to excessive heat, humidity or direct sunlight.
DO NOT use organic solvents such as alcohol or
thinners to clean the digital torque adaptor.
DO NOT submerge the digital torque adapter in water or
any other liquid.
DO NOT disassemble the digital torque adaptor.
To ensure accurate measurement periodic re-calibration
is necessary.
After use clean with a soft dry cloth and store in a safe,
dry, childproof location.
2. INTRODUCTION
Designed for use with a standard ratchet or breaker bar. Ideal
for work around the engine bay and the tightening of wheel
nuts to factory specications. Large LCD display with LED/
audible alarm indicating achieved and target torque levels.
Selectable readings in Nm, lb.ft, lb.in or kg.m. Accurate to
±2% of stated capacity and operates in either direction.
Features angle mode, eliminating the need for
angle gauges and protractors providing the most accurate
and fastest way to measure torque plus angle tightening
sequences. Will also accumulate angle measurement when
multiple turns are required, ideal for use where access is
restricted. Includes auto shut off. Supplied with test certicate
and storage case.
3. SPECIFICATION
Model No: STW291
Drive: “1/2””Sq”
Length: 100mm
Range: 20-200Nm(15-147.5lb.ft, 354-1770lb.in)
Battery: 2 x CR2032 (Supplied)
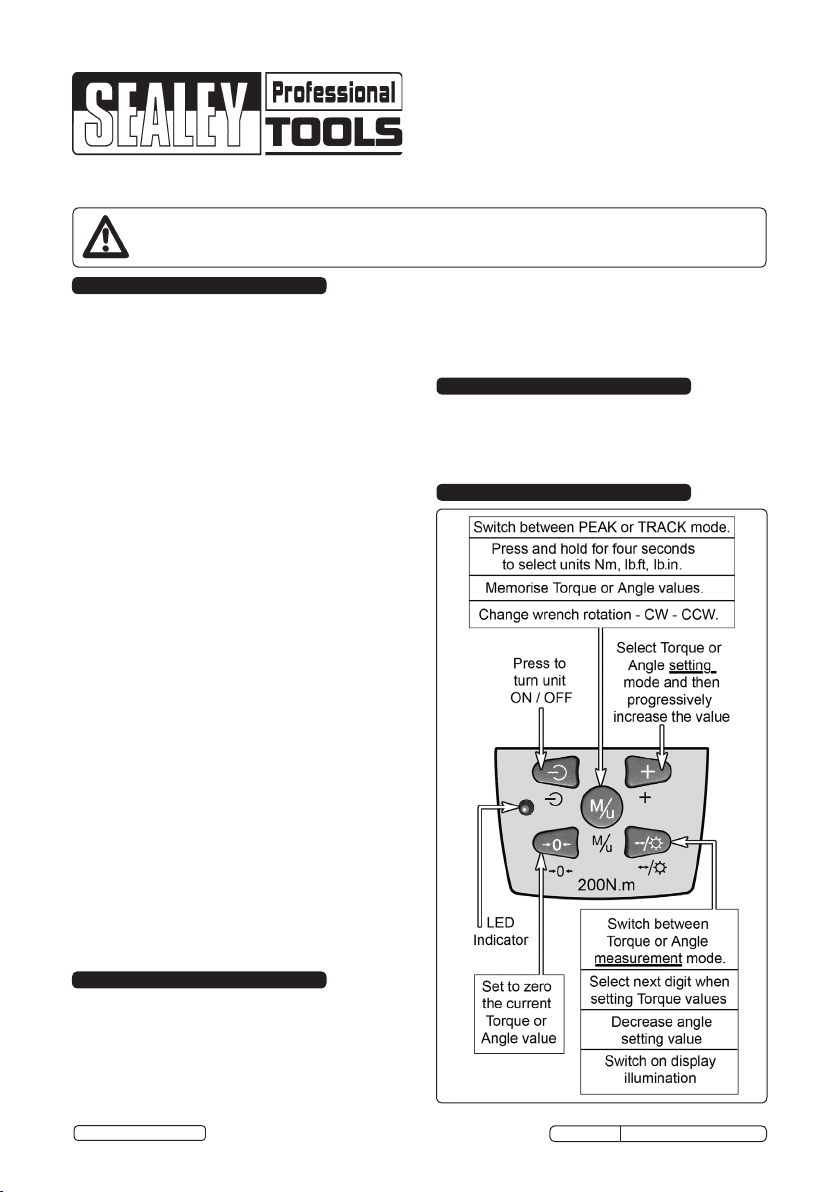
4. KEYPAD CONTROL FUNCTIONS
© Jack Sealey Limited
Original Language Version
STW291 Issue No.1 28/06/12
5. OPERATION
NOTE: ENERGY SAVINGS FUNCTION:
If left on and unused, the torque adaptor will turn off
automatically after a period of 4 minutes.
5.1 PREPARATION:
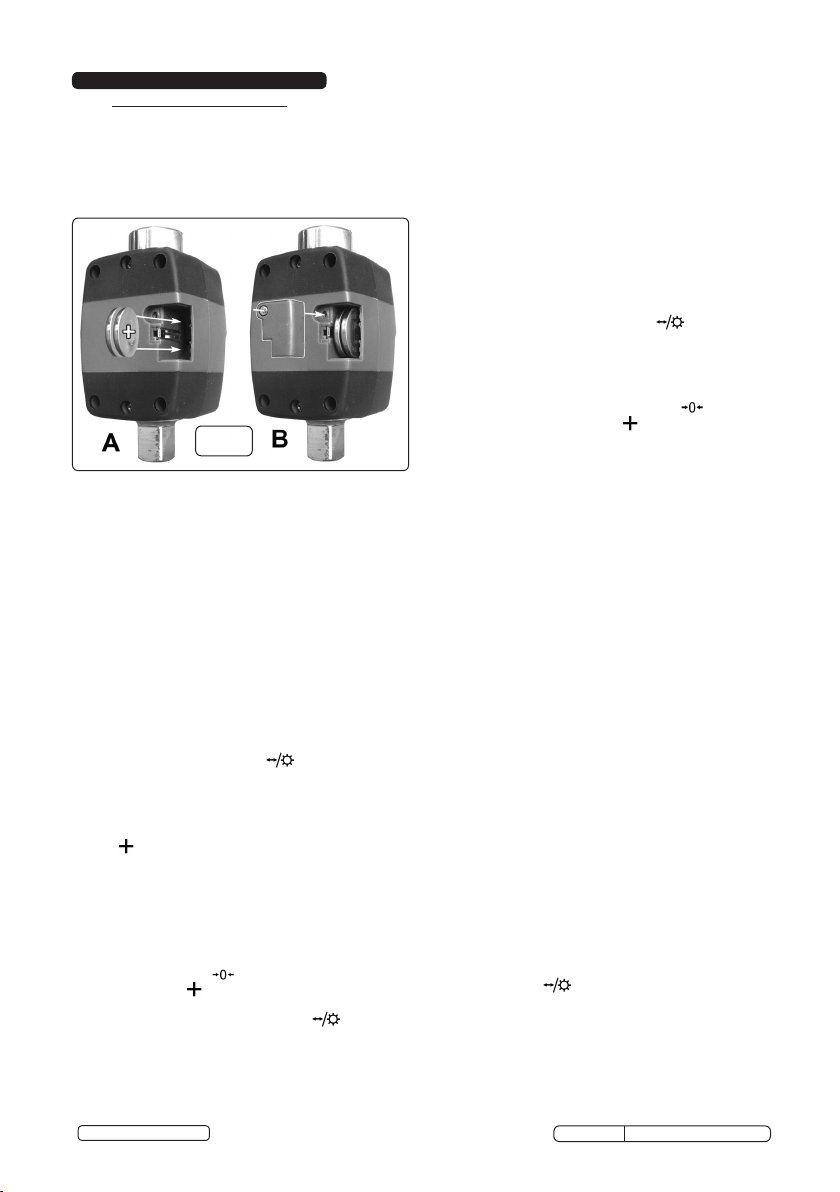
5.1.1 Unscrew the battery cover and install the two batteries
supplied as shown below, ensuring the correct polarity
as indicated in g.1A. Rex the battery cover as shown
in g.1B.
g.1
5.1.2 Press the ON/OFF button once to turn the meter on.
The display will initially show four zeros (“0000”) before
reverting to a “0.0” torque reading.
5.1.3 To select the required unit of measurement, press and
hold the “M/u” button for 4 seconds. As soon as the
display jumps to the next unit of measurement let go of
the button. Repeat this process until the display shows
the unit you require. ( Nm / lb.ft / lb.in ).
5.1.4 Ascertain the correct size and type of socket for the
xing to be tightened and attach it to the square drive
connection (1/2” ) at the base of the adaptor.
5.1.5 Insert the required ratchet wrench/drive bar into the
socket at the top of the adaptor. Do not use a tool that
will allow you to apply excessive force through the
adaptor.
5.2 SELECTING THE TORQUE OR ANGLE
MEASUREMENT MODE:
5.2.1 By default, the adaptor switches on in Torque
Measurement Mode. Press “ “ button to switch
to Angle Measurement Mode or back into Torque
Measurement Mode when required.
5.3 SETTING THE TORQUE OR ANGLE VALUE:
5.3.1 In order to set the torque or angle value, press the
“ “ button for 2 seconds. NOTE: If no buttons are
then pressed, the display will revert to zero after 6
seconds.
5.4 (a) TORQUE setting mode: The display will initially
show “ SET “ for 1 second and then revert to the last
saved torque or “ 000.0 “. The rst digit of this value
( “000.0“ ) will be ashing, indicating that the value can
now be set/altered. ( To zero the last saved torque
setting press the “ “ button ). By repeatedly
pressing the “ “ button, the value of the ashing
digit will be progressively increased. When the
required value is reached, press the “ “ button to
move to the next digit. Repeat this process for all digits
(ones, tens, hundreds etc) until the desired value has
been set.
© Jack Sealey Limited
Original Language Version
5.4.1 This value can then be stored by pressing the “ M/u “
button. Once the value is stored, taking 2 to 3 secs, the
display will revert to “ 000.0 “.
5.4.2 If you attempt to store a torque value that is below the
minimum value or above the maximum value dened in
the specication, the abbreviation “Erro” will be shown
on the display. After 1 second, the torque adaptor will
revert to torque measuring mode. The preset value will
not have been stored, and the warning indicators will
not work until a valid value has been stored.
5.5 (b) ANGLE setting mode:
NOTE: Before setting the angle, the adaptor (with
wrench and socket attached) should be positioned onto
the tting to be tightened so that the adaptor has a
datum starting point against which to set the angle.
5.5.1 To set the angle value, press the “ “ button for 2
seconds. (NOTE: If no buttons are then pressed, the
display will revert to zero after 6 seconds).
5.5.2 The display will initially show “ SET “ for 1 second and
then revert to the last saved angle or “ 0° “. ( To zero
the last saved angle setting press the “ “ button).
By repeatedly pressing the “ “ button, the angle
value will be progressively increased until the required
angle value is reached.
5.5.3 This value can then be stored by pressing the “ M/u “
button. Once the value is stored, taking 2 to 3 secs, the
display will revert to “ 0° “.
5.5.4 When in ANGLE measuring mode the direction of
rotation of the adaptor can be changed from clockwise
(CW) to counterclockwise (CCW) and back again by
pressing the “ M/u “ button
5.6 Mode Select:
5.6.1 The “TRACK” mode is the default when the torque
adaptor is switched on. In “TRACK” mode the display
shows the reading in real time during the torque
process both when the pressure is increased or
released. When the programmed value is reached the
unit signals both audibly and visually whilst the adaptor
is under pressure. As soon as the pressure is released
the display reverts to zero
5.6.2 Press the “M/u” button to shift into “PEAK” mode. The
display shows “peak” in the top left of the display.
5.6.3 In “PEAK” mode the display will always hold the current
value reached, even if the pressure is slightly released.
When the programmed value is achieved, the unit
signals both audibly and visually and the value shown
on the display will begin to ash after approx. one
second. If further pressure is applied after the
programmed value has been reached the unit assumes
that further torque is to be applied up to the current
programmed value and the display again shows torque
ascending from zero. Alternatively, you can zero the
display and apply the programmed torque to another
xing.
5.7 Turning the display illumination on/off.
The display illumination can be turned on prior to or
after programming the torque. In order to do this, press
and hold the “ “ button for 2 Secs.
5.8 OPERATION:
5.8.1 When you approach within +/- 5 Nm of the programmed
torque value the unit will beep intermittently.
5.8.2 When you approach within +/- 2 Nm of the programmed
value the unit will emit a quicker sound sequence.
STW291 Issue No.1 28/06/12
 Loading...