


instructions for
MPORTANT:
PLEASE READ THESE INSTRUCTIONS CAREFULLY. NOTE THE SAFE OPERATIONAL REQUIREMENTS, WARNINGS & CAUTIONS. USE
THE PRODUCT CORRECTLY AND WITH CARE FOR THE PURPOSE FOR WHICH IT IS INTENDED. FAILURE TO DO SO MAY CAUSE DAMAGE AND/OR
PERSONAL INJURY AND WILL INVALIDATE THE WARRANTY. KEEP THESE INSTRUCTIONS SAFE FOR FUTURE USE.
screwdriver torque digital 0-20nm
1/4”hex drive
model no: sts104
thank you for purchasing a sealey product. manufactured to a high standard, this product will, if used according to these
instructions, and properly maintained, give you years of trouble free performance.
refer to
instructions
1. safety
warning! ensure that Health & safety, local Authority regulations and general workshop practice regulations are adhered to
when using tools.
8 do not use tools if damaged.
9 maintain tools to ensure that they are in an adequate condition for safe use and optimum performance.
9 Wear suitable clothing to avoid snagging. do not wear jewellery. tie back long hair.
9 When not in use, store in a safe, dry childproof place.
9 Keep children and unauthorised persons away from the work area.
warning! the warnings, conditions and instructions in this manual cannot cover all possible conditions and situations. the
operator/ user must apply caution and common sense (good practical sense).
1.1. for battery use and care
warning! Keep batteries dry at all times.
8 do not combine used batteries with new ones or mix battery types or mix different brands.
9 insert the batteries carefully as indicated on the product.
8 do not use a battery if it is cracked or broken.
8 do not heat or incinerate batteries.
8 do not throw battery into a fire.
1.2. use and care
8 do not exceed the permitted maximum torque value for this meter.
9 Periodic re-calibration is necessary to maintain accuracy.
9 to avoid damaging the torque screwdriver, neVer apply force to the meter when the power is off. Always turn it on before using.
8 do not turn off the torque screwdriver while torque force is applied.
8 do not press, pressure, or damage the lcd display.
8 do not drop or throw this meter. Avoid bumps or shocks to the torque screwdriver.
8 do not leave this meter in any place exposed to excessive heat, humidity, or direct sunlight.
8 do not expose this meter to dust or sand as this could cause serious damage.
warning! do not use on live electrical circuits.
2. introduction
suitable for automotive, workshop and factory use. lcd read-out with led, audible alarm and vibration indicating achieved and target torque
levels. Preset track, peak or desired torque levels using simple push-button menu. clockwise and anti-clockwise operation. selectable read-out
in Nm or lb.ft. Accurate to ±1% of stated capacity. Textured, T-handle for added grip and comfort. Supplied with test certicate.
3. specification
model no. .................................................................. sts104
drive ..........................................................................1/4”Hex
range. ......................................................................0-20nm
length ........................................................................170mm
Battery ......................................................2 x AAA (supplied)
operation
© Jack sealey limited
Original Language Version
sts104 | issue 1 15/05/17
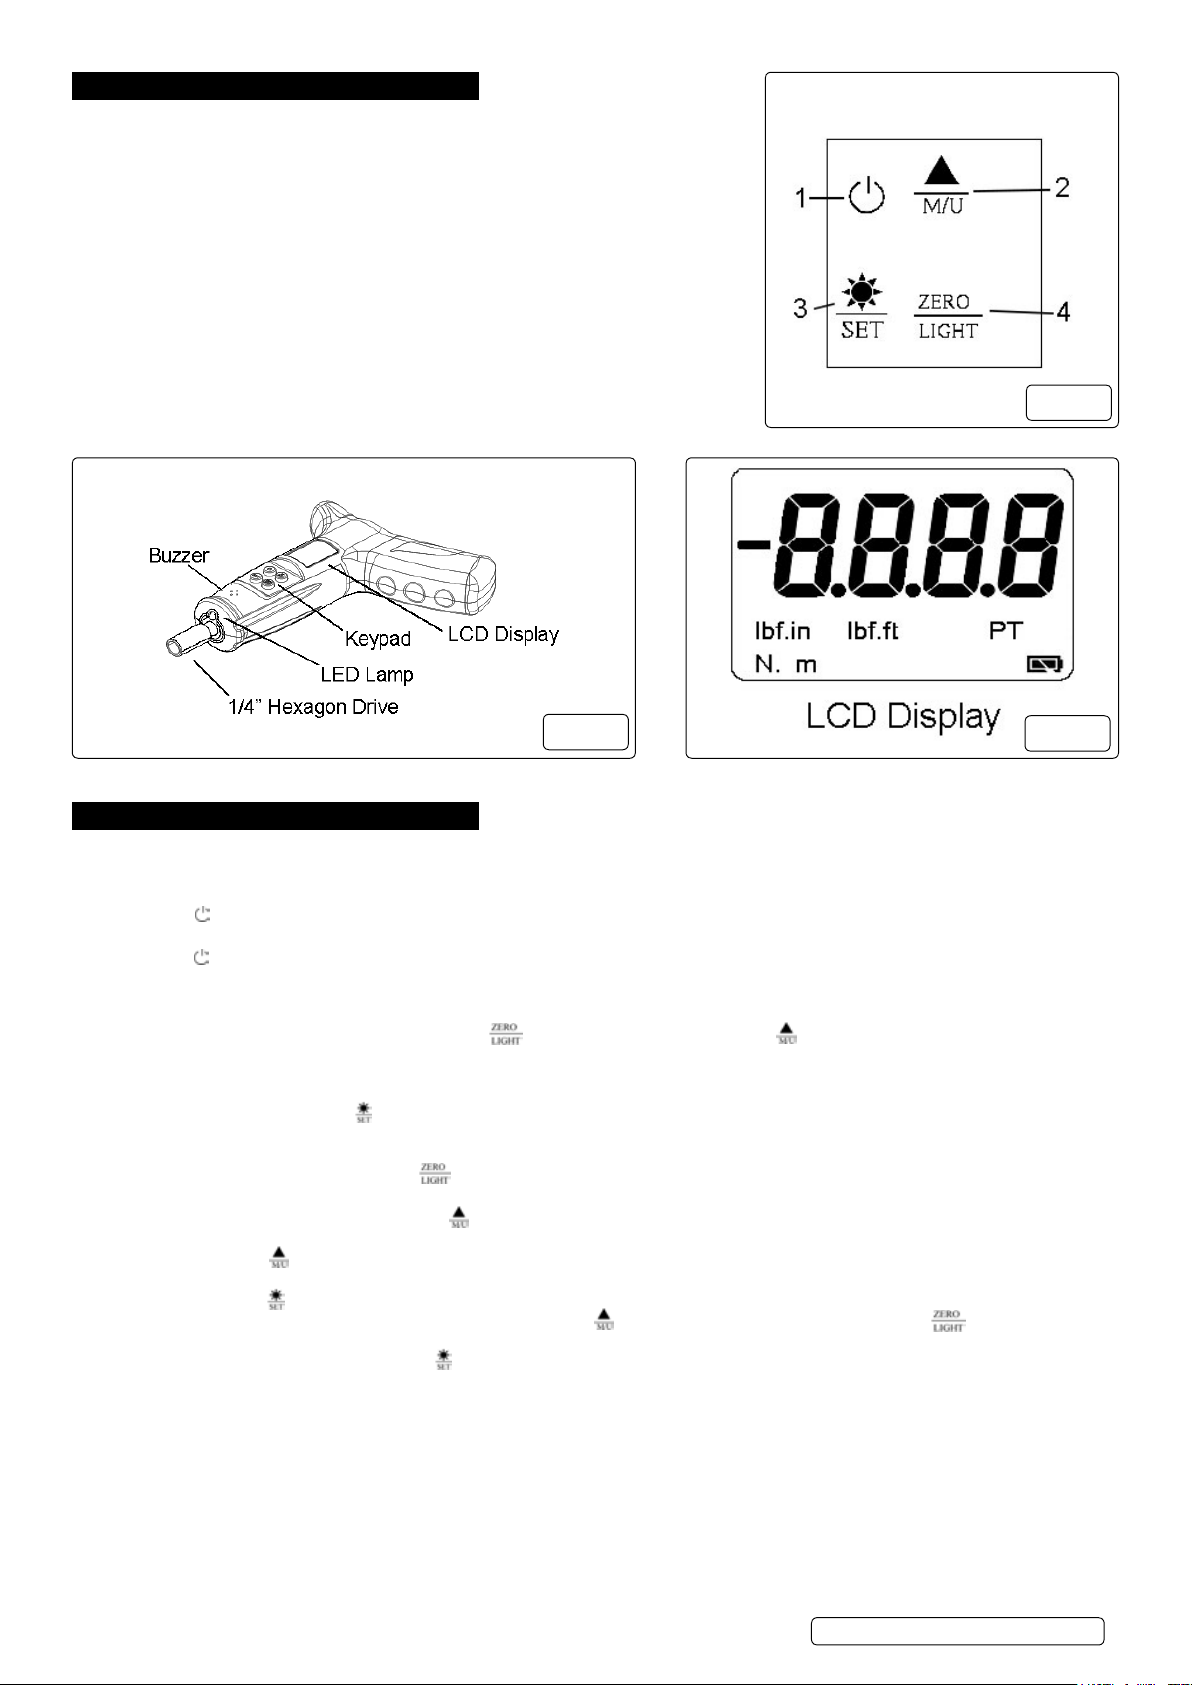
4. function Keys (fig.1.)
1. Press to turn the unit on and off.
2. Press to select the measurement mode between “track” and “peak”. / Press
and hold the button for 2 seconds to select the units. / under setting mode, press
to increase the value to program pre-set torque.
3. under measure status, press to switch on and off the back light. / under
measure status, press and hold the button for 2 seconds to enter the setting
mode. / under setting status, press to memorize the setting value and quit setting
mode.
4. under measure status, press to Zero tare. / under measure status, press
and hold the button for 2 seconds to switch on and off the led lamp which is
at the front of the tool. / under setting mode, press to decrease the value to
program pre-set torque.
g.1
g.2
g.3
5. preparation.
5.1. install the new batteries.
5.1.1. remove battery cover on the side of the screwdriver. Place batteries in battery compartment and replace cover.
5.2. turning the tool on / off.
5.2.1. Press “ ” button to turn on. the buzzer sounds and on the display you can see all readouts at the same time for just a moment. then
wait the display will show “ 0000 ” on the screen.
5.2.2. Press “ “ button again to turn off the electronic system.
5.3. activating the “peak mode”
5.3.1. After turning on the display, the default is in “ tracK “ mode, i.e. the real-time torque reached during operation will be displayed.
5.3.2. during the “ PeAK “ mode, the torque screwdriver will record and display the present maximum value. When the force released, the
maximum value is shown on the display. Press “ “ button to zero the value or press “ “ button switch between trAcK mode
and PeAK mode.
5.4. turning the lcd Back light on/off.
5.4.1. the lcd Back light can be turned on prior to or after programming the torque.
5.4.2. in order to do this, press the “ “ button to turn on or turn off.
5.5. turning the led lamp on/off.
5.5.1. the led lamp, at the front of the tool can be turned on prior to or after programming the torque.
5.5.2. in order to do this, press and hold the “ “ button for 2 seconds to turn on or turn off.
5.6. peak & track mode and units selection
5.6.1. turn the torque screwdriver on and press “ “ button switch between “trAcK“ mode and “PeAK” mode. in “PeAK” mode, the display
shows “peak” on the left side of the screen.
5.6.2. Press and hold “ ” button for 2 seconds to select units between n.m / lbf-ft / lbf-in.
5.7. programming the pre-set torque value
5.7.1. Press and hold “ ” button for 2 seconds to enter the setting mode, the display shows “ set ” on the screen. After 2 seconds, “0.00” or
the last programmed value will be shown on display, press the “ ” button to increase the value, or press the “ ” button to decrease
the value.
5.7.2. once the target torque is select, press “ ” button to memorize and quit setting mode.
warning! if the pre-set torque exceed the 125% maximum torque value (20nm), the value will jump back to Zero. the pre-set has
failed. if the warning indication did not work, reset mode again. the last pre-set torque value will be shown on the screen. if no value
shows, it means the pre-set has failed. Please read the instruction manual again and follow the procedure of “Pre-set torque Value”.
© Jack sealey limited
Original Language Version
sts104 | issue 1 15/05/17

6. operation
6.1. When target torque is reached, the user will hear the buzzer and also feel the vibration at the handle. (note: in PeAK mode,
when you reach the programmed torque, the buzzer will emit a continuous tone. Press “ “ button switch to trAcK mode
or press “ “ button to zero the value and turn off the warning indicator.
6.2. When the force is applied in an anti-clockwise direction, the display will show a minus (-) sign on the left side of screen, the reading
will be positive when the wrench is applied in a clockwise direction. To change ratchet direction see g.4
6.3. the torque screwdriver will automatically switch off if there is inactivity for over 5 mins.
g.4
7. maintenance
8 do not store this product in dusty, sandy, humid areas
8 or near any heat sources.
8 do not leave it in places where it may be subject to high temperatures.
9 Always keep the torque screwdriver dry. Water or other liquid will damage the electronic components inside.
9 if the tool is not used for a long period of time, remove the batteries in order to prevent damage from leakage.
9 Always turn off this product before cleaning. use only a damp cloth for cleaning. never use any type of liquid or aerosol cleaner, or
any type of organic solvent to clean this product.
7.1. recalibration
7.1.1. if the user does not utilize a control procedure, a period of 12 months, or 5000 cycles, whichever occurs first, may be taken as default
values for the interval between calibrations. the interval starts with the first use of the torque tool. shorter intervals between
calibrations may be used if required by the user, their customer or by legislation.
7.1.2. recalibration must take place after any repair, overload, impact or other misuse.
contact a uKAs accredited laboratory for recalibration.
environmental protection
recycle unwanted materials instead of disposing of them as waste. All tools, accessories and packaging should be
sorted, taken to a recycling centre and disposed of in a manner which is compatible with the environment.
When the product becomes completely unserviceable and requires disposal, drain off any fluids (if applicable)
into approved containers and dispose of the product and the fluids according to local regulations.
weee regulations
dispose of this product at the end of its working life in compliance with the eu directive on
Waste electrical and electronic equipment (Weee). When the product is no longer required, it must be disposed
of in an environmentally protective way. contact your local solid waste authority for recycling information.
Battery removal
remove battery cover on side of screwdriver and remove batteries, replace cover.
under the Waste Batteries and Accumulators regulations 2009, Jack sealey ltd are required to inform potential
purchasers of products containing batteries (as dened within these regulations), that they are registered wih Valpak’s
registered compliance scheme. Jack Sealey Ltd’s Batteries Producer Registration Number (BPRN) is BPRN00705.
NOTE: It is our policy to continually improve products and as such we reserve the right to alter data, specications and component parts without prior notice.
important: no liability is accepted for incorrect use of this product.
warranty: Guarantee is 12 months from purchase date, proof of which will be required for any claim.
© Jack sealey limited
sole uK distributor, sealey Group.
Kempson Way, suffolk Business Park,
Bury st. edmunds, suffolk.
iP32 7Ar
Original Language Version
01284 757500
01284 703534
www.sealey.co.uk
sales@sealey.co.uk
sts104 | issue 1 15/05/17
 Loading...