

Page 1
INSTRUCTION MANUAL FOR:
WALL OR FLOOR MOUNTED TYRE RACK
MODEL No: STR001
Thank you for purchasing a Sealey product. Manufactured to a high standard this product will, if used according to these instructions and
properly maintained, give you years of trouble free performance.
IMPORTANT: PLEASE READ THESE INSTRUCTIONS CAREFULLY. NOTE THE SAFE OPERATIONAL REQUIREMENTS, WARNINGS & CAUTIONS. USE
THE PRODUCT CORRECTLY AND WITH CARE FOR THE PURPOSE FOR WHICH IT IS INTENDED. FAILURE TO DO SO MAY CAUSE DAMAGE OR
PERSONAL INJURY, AND WILL INVALIDATE THE WARRANTY. PLEASE KEEP INSTRUCTIONS SAFE FOR FUTURE USE.
1. SAFETY INSTRUCTIONS
1.1 GENERAL SAFETY
WARNING! Ensure Health & Safety, and local authority regulations
are adhered to when assembling and using this tyre rack.
Locate tyre rack in a suitable area where it will not be an obstruction.
Keep the general area clean, uncluttered and ensure there is
adequate lighting.
WARNING! Erect tyre rack on a level and solid surface such as
concrete or on a flat and solid wall such as breeze block.
The tyre rack should be secured to the wall in a suitable location
with adequate fixings
DO NOT attempt to wall mount the tyre rack on your own. Obtain
assistance or use manual handling equipment.
Wall mount the tyre rack at such a height that minimises the risk
of injury when loading and unloading.
Keep children and unauthorised persons away from the storage
area.
DO NOT use the tyre rack for any purpose other than that for
which it is designed.
DO NOT site the tyre rack out of doors.
DO NOT get the tyre rack wet or use in damp or wet locations or
areas where there is condensation.
DO NOT clean the tyre rack with any solvents which may damage
the coated surface.
DO NOT overload the tyre rack when wall mounted.
Ensure that the tyre rack is properly assembled before loading it
with heavy tyres.
Maximum load for tyre rack is 90kg when wall mounted.
Where possible heavier items should be evenly distributed across
the tyre rack.
2. INTRODUCTION
Wall or floor mounted tyre rack helps keep work area tidy and
securely houses up to thirteen tyres. Steel construction with a powder
coated finish giving anti-corrosion resistance. Holds up to 90kg when
wall mounted.
Model: ...........................................STR001
Overall Size (W x D x H) ...................1680 x 740 x 710mm
Useable Minimum Width .............................1215mm
Useable Maximum Width. . . . . . . . . . . . . . . . . . . . . . . . . . . . .1570mm
3. CONTENTS
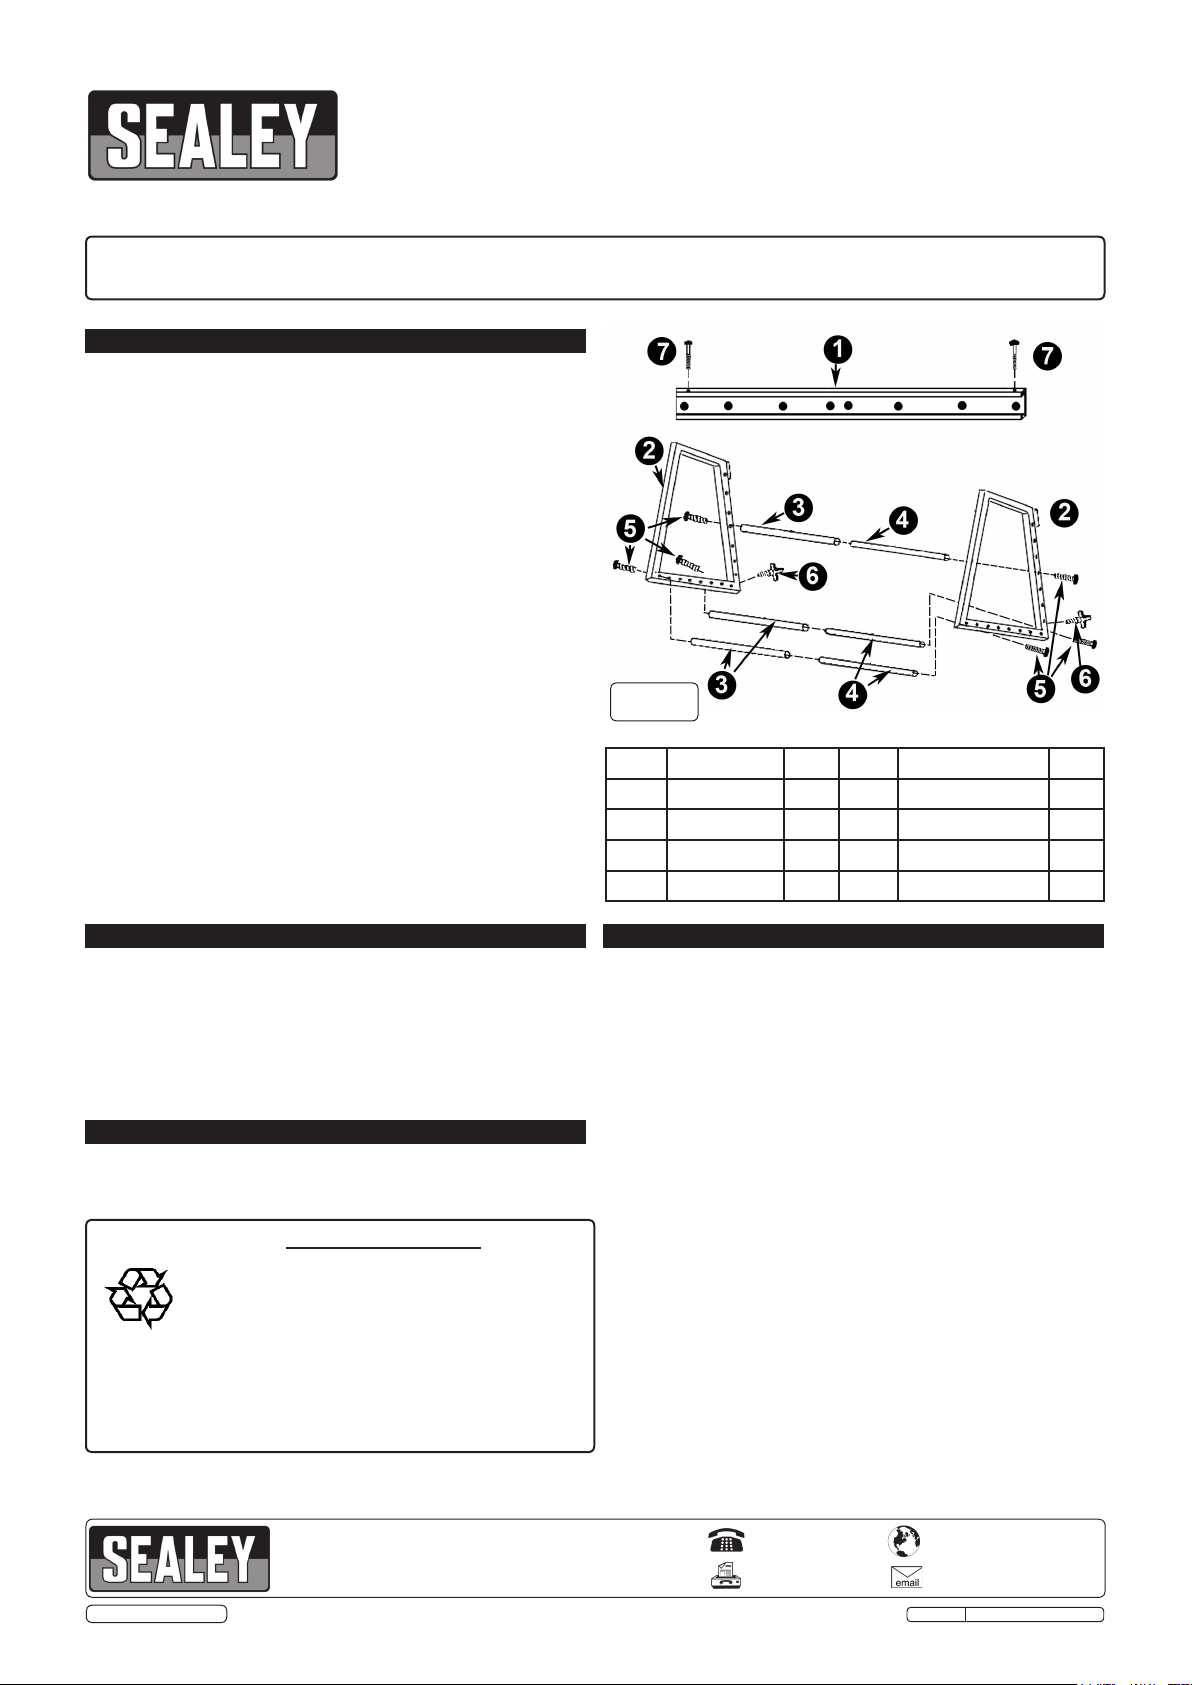
Carefully unpack the product and check the contents as detailed in
Fig.1. Should any items be missing or damaged contact your Sealey
stockist.
NOTE: It is our policy to continually improve products and as such we reserve the right to alter data, specifications and component parts without prior notice.
IMPORTANT: No liability is accepted for incorrect use of this product.
WARRANTY: Guarantee is 12 months from purchase date, proof of which will be required for any claim.
© Jack Sealey Limited
Recycle unwanted materials instead of disposing of
them as waste. All tools, accessories and packaging
should be sorted, taken to a recycling centre and
disposed of in a manner which is compatible with
unserviceable and requires disposal, drain off any
into approved containers and dispose of the product
and the fluids according to local regulations.
Environmental Protection
the environment.
When the product becomes completely
fluids (if applicable)
Sole UK Distributor, Sealey Group,
Kempson Way, Suffolk Business Park,
Bury St. Edmunds, Suffolk,
IP32 7AR
Original Language Version
Fig.1
Item Description Qty Item Description Qty
1. Beam 1 5. Screw M10x50 6
2. Upright 2 6. Handwheel 2
3. Bar 3 7. Screw M6x65 2
4. Extension 3
4. ASSEMBLY
WARNING! Before assembly and use ensure you have
read, understood and apply Section 1 safety instructions.
4.1 Assembling the frame (refer to fig.1).
4.1.1 Slide the extension bars (4) into the bars (3) ensuring that the
threaded holes are facing outwards.
4.1.2 Align two of the assembled bars (3&4) to opposing holes on
the lower sections of the uprights (2). Ensure that the
assembled bars (3&4) are spaced correctly for the size of tyres
to be stored. Secure the assembled bars (3&4) in place using
the M10x50 screws (5).
4.1.3 Align the remaining assembled bar (3&4) to opposite holes in
the rear sections of the uprights (2) and secure in place using
M10x50 screws (5).
4.2 Wall mounting.
4.2.1 Secure the beam (1) with adequate fixings to a wall capable of
holding the weight of the rack and the load required. Position at
a height that will minimise the risk of injury when loading and
unloading.
4.2.2 Screw the handwheels (6) to the rear of the uprights (2).
4.2.3 Slide the assembled frame on the beam (1). Fit the securing
screws (7) to the beam (1). Adjust the handwheels (6) until the
frame sits square to the wall.
4.2.4 Slide the frame to the required width before loading.
01284 757500
01284 703534
www.sealey.co.uk
Web
STR001 Issue: 2(SP) - 28/07/16
 Loading...