

Page 1
INSTRUCTIONS FOR
IMPORTANT: PLEASE READ THESE INSTRUCTIONS CAREFULLY. NOTE THE SAFE OPERATIONAL REQUIREMENTS, WARNINGS & CAUTIONS. USE
THE PRODUCT CORRECTLY AND WITH CARE FOR THE PURPOSE FOR WHICH IT IS INTENDED. FAILURE TO DO SO MAY CAUSE DAMAGE AND/OR
PERSONAL INJURY AND WILL INVALIDATE THE WARRANTY. KEEP THESE INSTRUCTIONS SAFE FOR FUTURE USE.
WELDING CURTAIN AND FRAME
MODEL NO: SSP99.V2, SSP992, SSP993
Thank you for purchasing a Sealey product. Manufactured to a high standard, this product will, if used according to these instructions,
and properly maintained, give you years of trouble free performance.
Refer to
instruction
manual
1. SAFETY
1.1. GENERAL SAFETY
WARNING! Ensure Health & Safety, local authority and general workshop practice regulations are adhered to when using this equipment.
9 Familiarise yourself with the application and limitations of the curtain, as well as the specific potential hazards.
9 Maintain the curtain in good condition (use an authorised service agent).
9 Replace or repair damaged parts. Use genuine parts only. Non-authorised parts may be dangerous and will invalidate the warranty.
9 Keep the work area clean and uncluttered and ensure there is adequate lighting.
9 Keep the curtain clean for best and safest performance.
9 Keep children and unauthorised persons away from the work area.
DO NOT use the curtain for any purpose other than that for which it is designed.
DO NOT use the curtain if any parts are damaged or missing as this may cause failure and/or
personal injury.
2. i INTRODUCTION
Supplied with amber welding screen to BS EN 1598. Suitable for use in workshops where the
glare from welding and cutting may be a hazard to others. Supplied with two feet. Curtain and
frame supplied flat packed. Assembles with ease.
1
3. SPECIFICATION
Width: 1300mm 1800mm 2400mm
Height: 1750mm 1750mm 1750mm
Model: SSP99.V2 SSP992 SSP993
fig.
4. ASSEMBLY
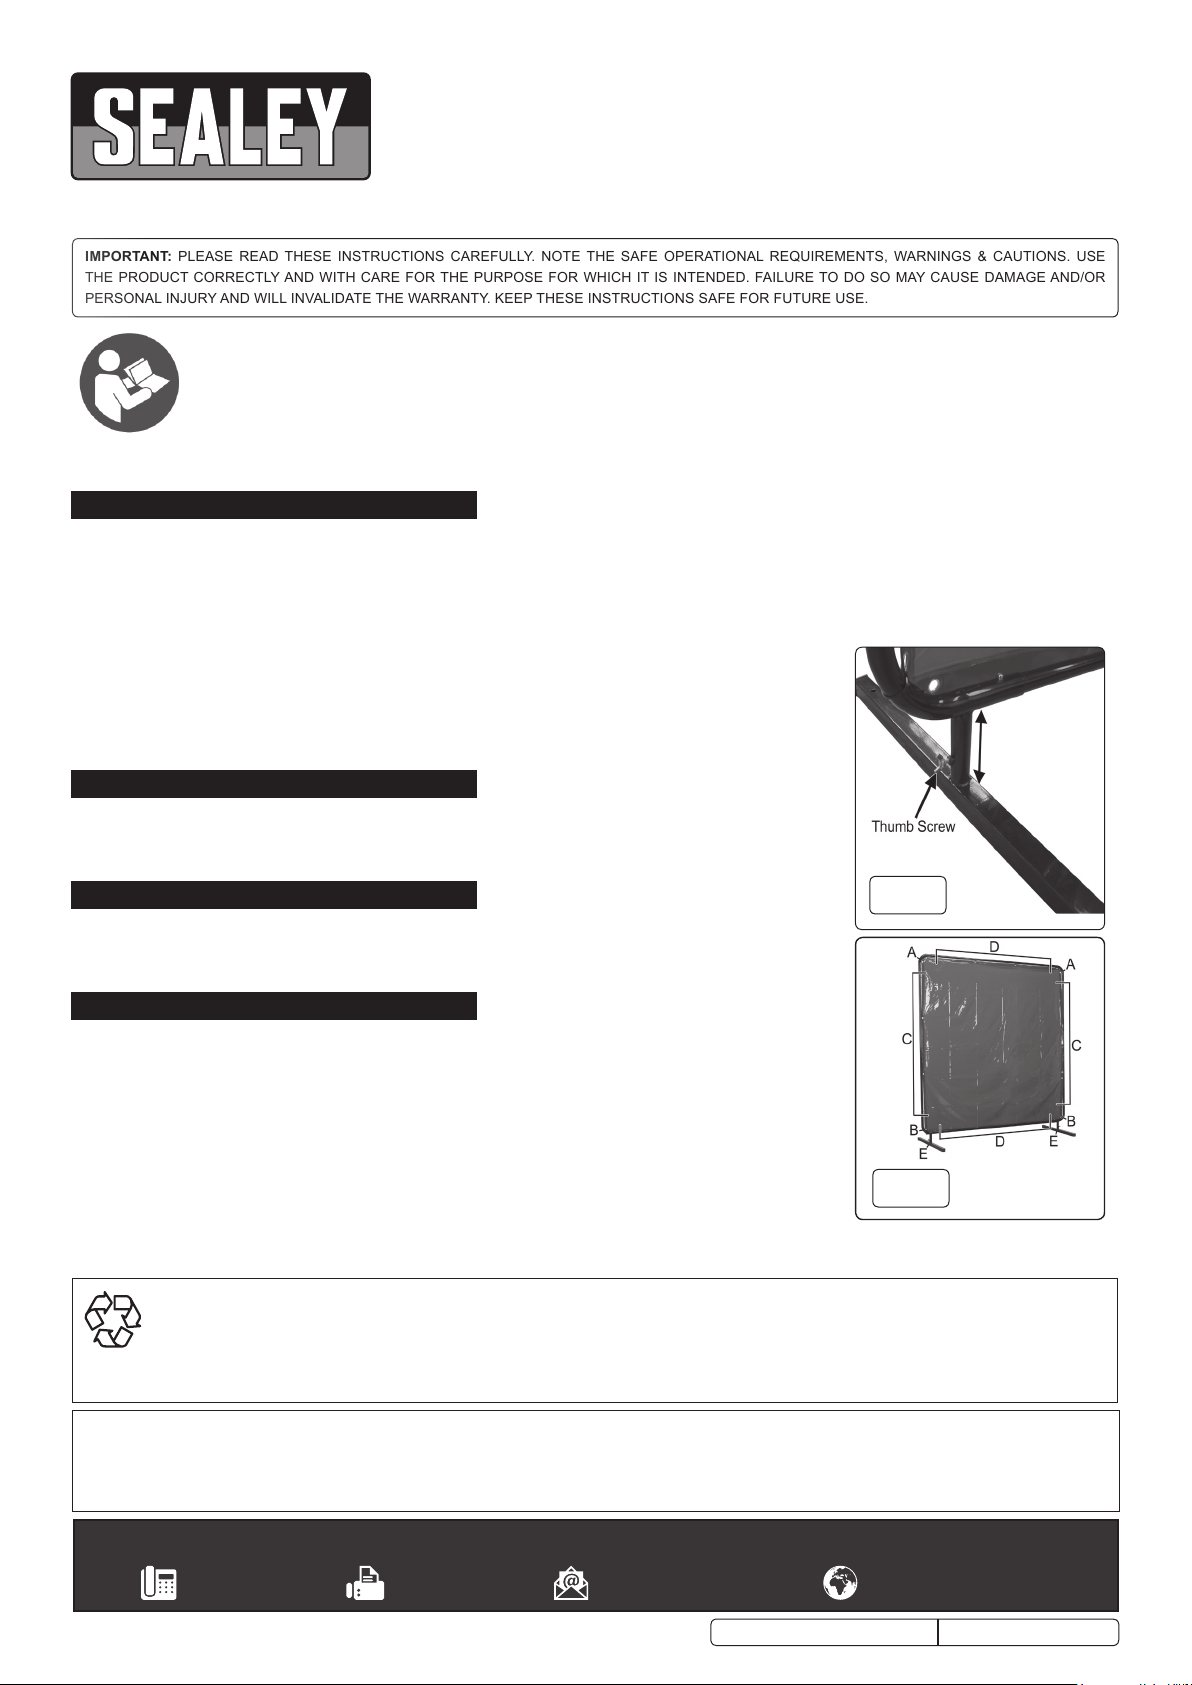
4.1. Take the two lower corner frame fittings (fig.2B) and insert them into the two feet. (fig.2E)
4.2. Insert the bottom horizontal bar (fig.2D) between the two feet (fig.2E), ensure that the sprung
catches are seated correctly.
4.3. Insert the long vertical bars (fig.2C) in to the top of the corner fittings, ensure that the sprung
catches are seated correctly.
4.4. Connect the two upper corner fittings (fig.2A) to the two vertical bars and then the remaining top
bar (fig.2D) to them. Ensure that the sprung catches are seated correctly.
4.5. Stand the frame up and make sure the feet are square.
4.6. Take the welding curtain and with it the correct way around secure it to the frame with the ties
included.
4.7. The frame can be raised or lowered by loosening the thumb screw (fig.1) on the feet, when at the required height, tighten the thumb
screw.
ENVIRONMENT PROTECTION
Recycle unwanted materials instead of disposing of them as waste. All tools, accessories and packaging should be sorted, taken to
a recycling centre and disposed of in a manner which is compatible with the environment. When the product becomes completely
unserviceable and requires disposal, drain any fluids (if applicable) into approved containers and dispose of the product and fluids
according to local regulations.
fig.
2
Note: It is our policy to continually improve products and as such we reserve the right to alter data, specifications and component parts without prior
notice.
Important: No Liability is accepted for incorrect use of this product.
Warranty: Guarantee is 12 months from purchase date, proof of which is required for any claim.
Sealey Group, Kempson Way, Suffolk Business Park, Bury St Edmunds, Suffolk. IP32 7AR
Original Language Version© Jack Sealey Limited
SSP992, SSP993, SSP99.V2 Issue 2(H, F) 14/03/18
 Loading...