

Page 1
INSTRUCTIONS FOR:
STUD WELDER WITH SLIDE HAMMER
MODEL No: SR20.V3
Thank you for purchasing a Sealey product. Manufactured to a high standard, this product will, if used according to these instructions
and maintained properly, give you years of trouble free performance.
IMPORTANT: PLEASE READ THESE INSTRUCTIONS CAREFULLY. NOTE THE SAFE OPERATIONAL REQUIREMENTS, WARNINGS & CAUTIONS. USE THE PRODUCT
CORRECTLY AND WITH CARE FOR THE PURPOSE FOR WHICH IT IS INTENDED. FAILURE TO DO SO MAY CAUSE DAMAGE AND/OR PERSONAL INJURY AND WILL
INVALIDATE THE WARRANTY. KEEP THESE INSTRUCTIONS SAFE FOR FUTURE USE.
Refer to Instruction
Manual
Wear
Eye Protection
Wear
Protective Gloves
Wear
Safety Footwear
Wear
Protective Clothing
1. SAFETY
1.1. ELECTRICAL SAFETY
WARNING: It is the owner’s responsibility to read, understand and comply with the following:
You must check all electrical equipment and appliances to ensure that they are safe before use. You must inspect power supply leads, plugs and
all electrical connections for wear and damage. You must ensure the risk of electric shock is minimised by the installation of appropriate safety
devices. An RCCB (Residual Current Circuit Breaker) should be incorporated in the main distribution board. We also recommend that an RCD
(Residual Current Device) is used with all electrical products. It is particularly important to use an RCD with portable products that are plugged into
an electrical supply not protected by an RCCB. If in doubt consult a qualified electrician. You may obtain a Residual Current Device by contacting
your Sealey dealer. You must also read and understand the following instructions concerning electrical safety.
1.1.1. The Electricity At Work Act 1989 requires all portable electrical appliances, if used on business premises, to be tested by a qualified
electrician, using a Portable Appliance Tester (PAT) after a suitable period.
1.1.2. The Health & Safety at Work Act 1974 makes owners of electrical appliances responsible for the safe condition of the appliance
and the safety of the appliance operator. If in any doubt about electrical safety, contact a qualified electrician.
1.1.3. Ensure the insulation on all cables and the product itself is safe before connecting to the mains power supply. See 1.1.1. & 1.1.2. above
and use a Portable Appliance Tester (PAT).
1.1.4. Ensure that cables are always protected against short circuit and overload.
1.1.5. Regularly inspect power supply, leads, plugs for wear and damage and all electrical connections
to ensure that none is loose.
1.1.6. Important: Ensure the voltage marked on the product is the same as the electrical power supply
to be used and check that supply is correctly fused, see fuse rating at right.
1.1.7. DO NOT pull or carry the powered appliance by its power supply lead.
1.1.8. DO NOT pull power plugs from sockets by the power cable.
1.1.9. DO NOT use worn or damaged leads, plugs or connections. Immediately replace or have repaired
by a qualified electrician.
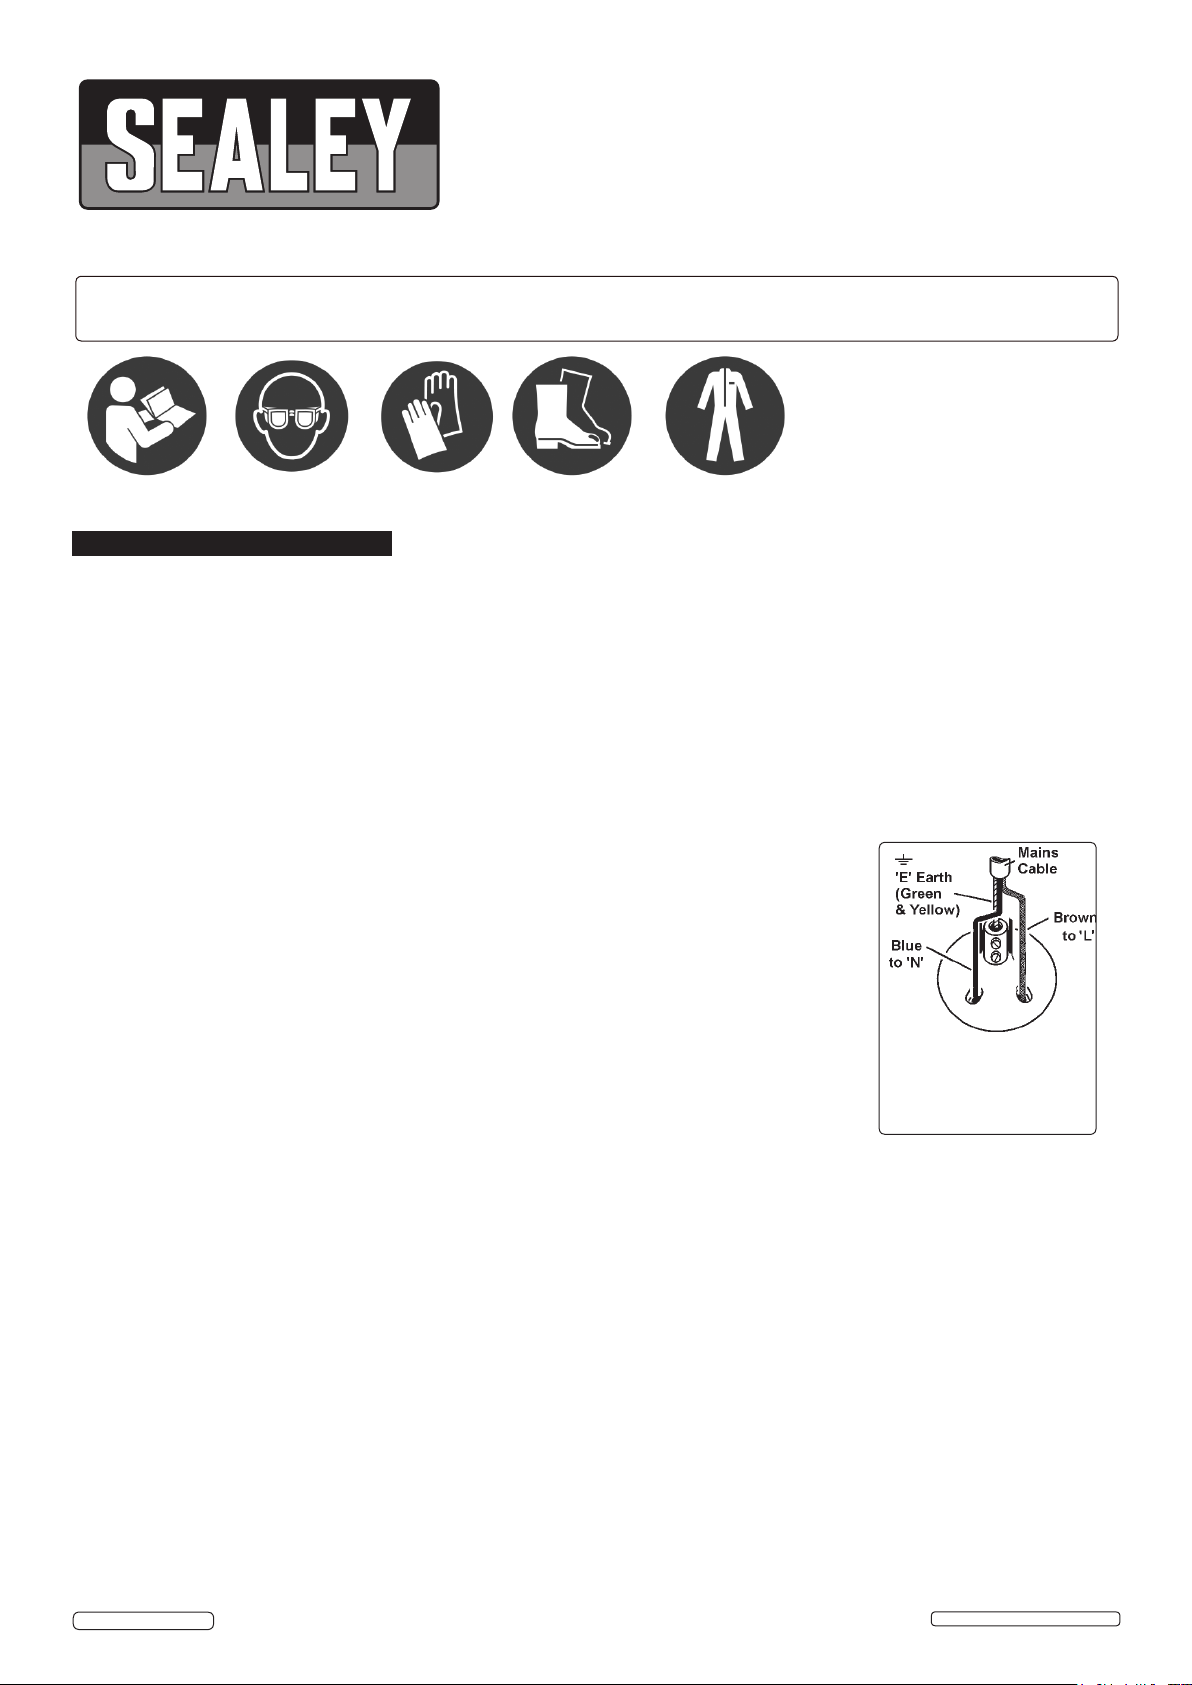
1.1.10. This product comes complete with a round pin 16A plug. You must contact a qualified electrician to
ensure a 30 amp supply is available.
If fitting such a plug -
Ensure that the unit is correctly wired and earthed, as follows:
a) Connect the GREEN/YELLOW earth wire to the earth terminal ‘E’.
b) Connect the BROWN live wire to live terminal ‘L’.
c) Connect the BLUE neutral wire to the neutral terminal ‘N’.
d) After wiring, check there are no bare wires, that all wires have been correctly connected, that the cable outer insulation
is clamped by the cable grip and that the grip is tight.
1.1.11. Cable extension reels. When a cable extension reel is used it should be fully unwound before connection. We recommend that a cable
of at least 2.5mm² section is used for this product.
1.2. GENERAL SAFETY
WARNING: Unplug from the mains power supply before performing maintenance or service.
Ensure the welder and all cables are in sound condition and good working order, and keep the copper carrier tight.
Replace or repair damaged parts. Use recommended parts only, unauthorised parts may be dangerous and will invalidate the warranty.
Keep the welder clean for best and safest performance.
Use the welder in a suitable work area. Keep the area clean and tidy and free from unrelated materials. Ensure that there is adequate
lighting.
WARNING! Wear safety goggles, protective clothing, protective footwear and welding gauntlets.
Check you have good ventilation and that air can flow freely around the welder.
Ensure that there are no flammable materials near the work area.
Keep children and unauthorised persons away from the work area.
Remove ill fitting clothing, remove ties, watches, rings, and other loose jewellery and contain long hair.
DANGER! The welder creates magnetic fields that can interfere with watches and such devices. If you have a pacemaker, consult a doctor
before welding or approaching a stud welding area.
DO NOT wear any clothing with metal accessories. Ensure that there are no metallic articles in your pockets.
DO NOT use the welder for any purpose other than that for which it is designed.
DO NOT get the welder wet or use the welder in damp or wet locations.
DANGER! DO NOT weld near flammable materials - solids, liquids or gases.
DO NOT operate the welder while under the influence of drugs, alcohol or intoxicating medication, or if tired.
DO NOT operate the welder if it, or the cable, is damaged.
© Jack Sealey Limited
Original Language Version
Recommended fuse
rating:
16A
SR20.V3 Issue: 2(L) - 19/07/17
Page 2
DO NOT allow untrained persons to operate the welder.
DO NOT use outside, welder is for inside use only.
When not in use, switch off welder, remove plug from power supply and store in a dry, childproof location.
2. INTRODUCTION
A welder of exceptional quality for fast, efficient body repairs. Removes dents quickly, without holes or the need to remove interior trim. Amazing
pulling power - even on heavier gauge panels. Welds on nails and washers.
3. CONTENTS
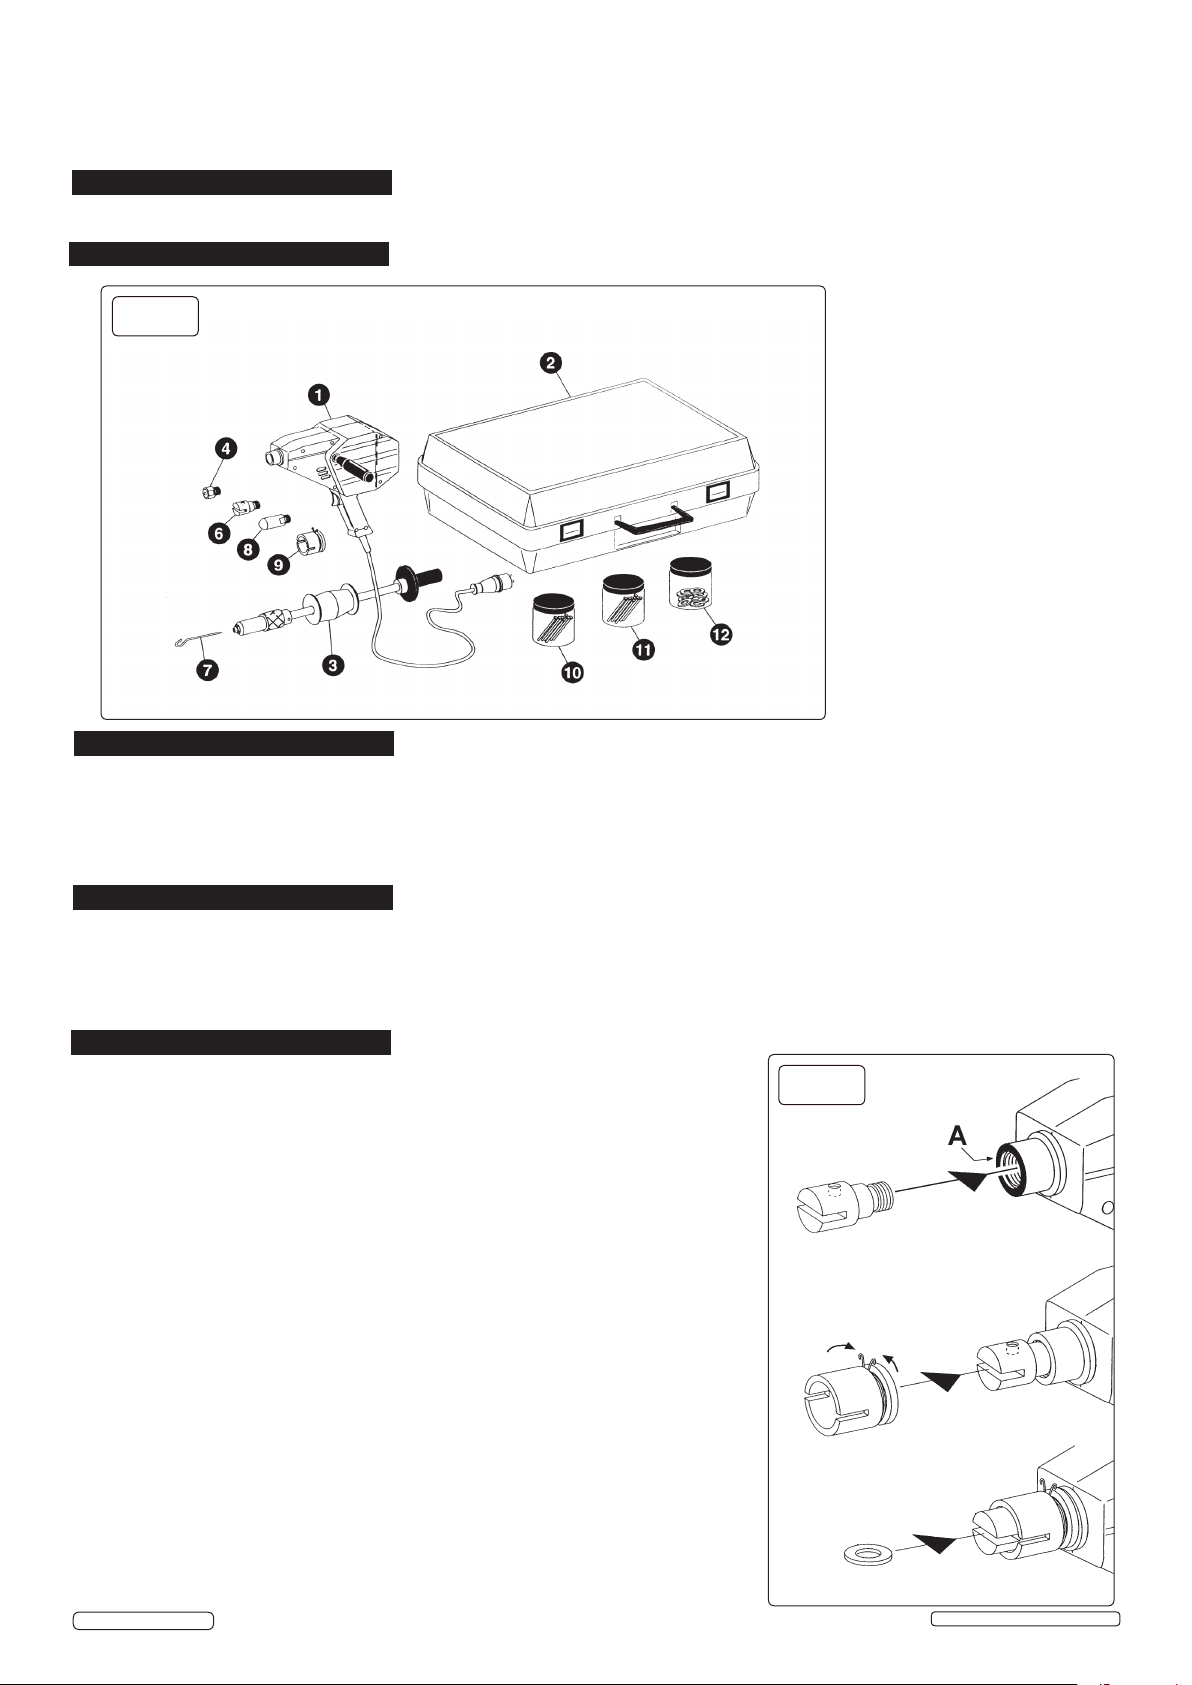
Key:
g.1
1: Welding Gun.
2: Case.
3: Slide Hammer.
4: Electrode for 2mm & 2.5mm nails.
6: Washer Electrode.
7: Washer Hook.
8: Heating Electrode.
9: Extension electrode for use with
items 6 & 8.
10:Nails Ø2mm (200).
11:Nails Ø2.5mm (200).
12:Washers Ø16mm (50)
4. SPECIFICATION
Model No: ................................................SR20.V3
Supply Required: ...............................................16A
Power @ 50%: ...............................................0.8kW
Maximum Welding Power: .......................................6kW
Maximum Short Circuit Current:..................................2500A
Weight: ..................................................... 5.6kg
5. APPLICATIONS
5.1. A nail or washer, depending on accessibility, is welded to damaged panel to enable the panel to be pulled back into shape with the
slide hammer (figs 3 & 4). The washer electrode (fig.1.6) has a magnet to hold the washer in place prior to welding and should be used in
conjunction with extension electrode (fig.1.9 & fig.2). When reshaping is completed, cut and grind off nail or washer to give a smooth
finish.
5.2. The heating electrode (fig. 1.8) is used to locally heat and shrink out minor panel defects.
This electrode should be used in conjunction with extension electrode (fig.1.9).
6. OPERATION
WARNING: Ensure that you read and understand the safety instructions in Section 1.
Introduction
If you are not familiar with the SR20 or with stud welding, we recommend that you practice the
following procedure before attempting any actual task. When welding, you will find that the trigger
operation time is very short. Leave approximately 1 minute between each use to allow gun to
cool. Practice on a scrap panel before attempting the actual work. Proceed as follows:
6.1. Welding
6.1.1. Disconnect from power supply. Screw side handle to left or right side of gun, as
required.
6.1.2. Attach the appropriate electrode (see Section 5). If using either of electrodes
(figs 1.6 & 1.10) also fit extension electrode (fig.1.9); see fig.2.
Note: Electrodes are copper, DO NOT over tighten or threads will be damaged.
6.1.3. Ensure you check the following before you start:
a). Electrodes and extension electrode must be clean and without defect.
Carefully remove any defect with a fine file or abrasive paper.
b). If the electrode is too worn and cannot be repaired, replace with a new one.
c). The panel to be welded must be clean and free from paint, grease or rust.
6.1.4. Connect the welder to the power supply. Select the item for welding (i.e. nail,
washer etc.) and insert into the electrode.
Note that washer and rivet electrodes are magnetic to hold washer/rivet in place.
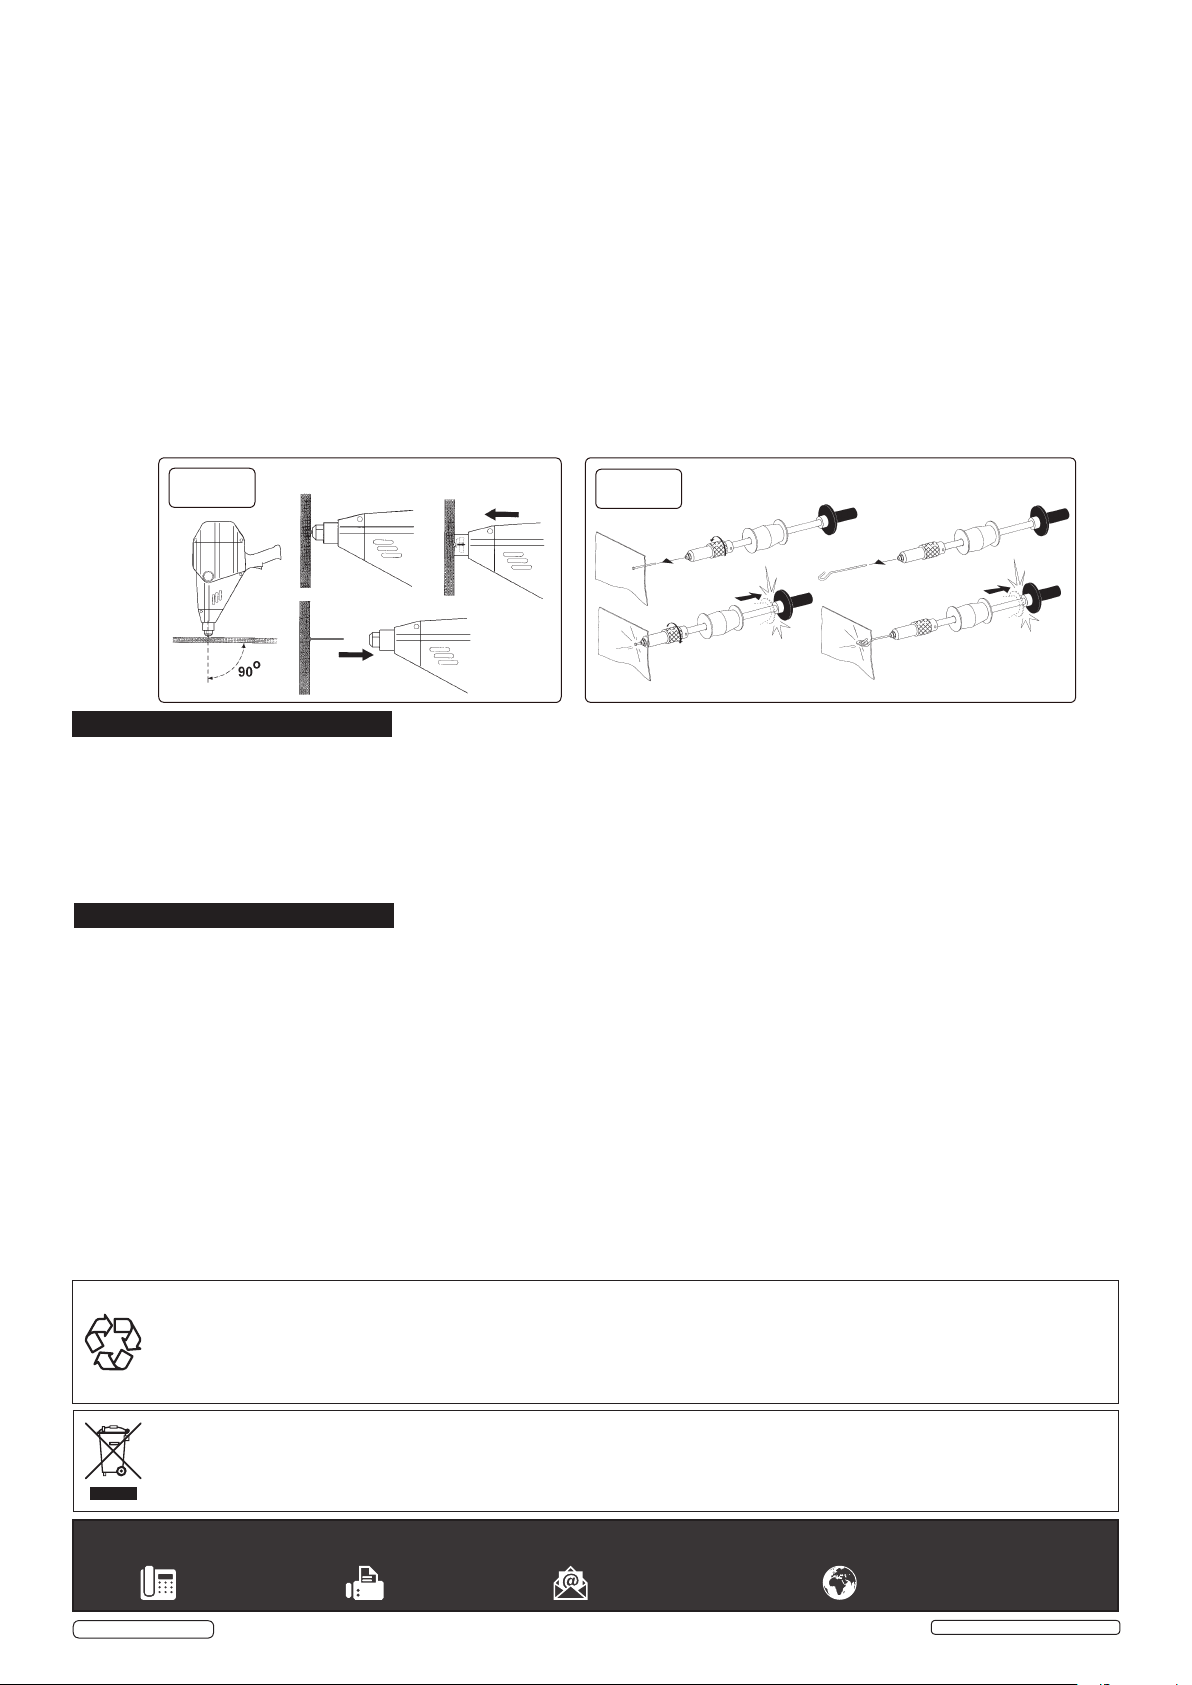
6.1.5. With moderate force, press gun onto damaged panel surface. The electrode will
retract and the outer rim of the carrier (or extension electrode if fitted) will make
contact with workpiece thereby completing the electrical circuit. Keep the gun head
at right angles to the panel surface to ensure good contact (fig.3).
g.2
© Jack Sealey Limited
Original Language Version
SR20.V3 Issue: 2(L) - 19/07/17
Page 3
6.1.6. Squeeze the trigger for no more than half a second, so as not to overheat the fitting to be welded. This could ‘cook’ it and make it less
resistant against being ripped out.
DO NOT keep the gun in place for too long as it may overheat or burn a hole in the panel.
6.1.7 DO NOT release the pressure on the welding surface until you have released the trigger or the circuit may be prematurely broken.
6.1.8. Allow 1 minute between applications to allow the welder to cool down.
6.1.9. When the task is complete, disconnect the tool from the power supply and store in a safe area.
Note: DO NOT use the welding gun continuously for long periods, as the gun may overheat.
6.2. Slide Hammer
6.2.1. Grip the nail in the slide hammer spindle and then operate the striking hammer until the dent is pulled out. To pull a washer, grip the
washer hook (fig.1.7) in the spindle and hook the washer. See fig.4.
6.3. Sheet Heating
Use the heating electrode (fig.1.8) and extension (fig.1.9), for localised sheet heating in order to shrink and remove small dents
and pimples. Proceed as 6.1. above, omitting 6.1.5. Carefully heat the localised area accordingly.
IMPORTANT; If the electrode, electrode holder, carrier contact face (fig. 4.A) and panel are not clean, dry and free from paint,
grease, rust etc. the weld will be poor and the welder may overheat, causing irreparable damage to the casings.
g.3
g.4
7. MAINTENANCE
WARNING: Unplug from the mains power supply before performing maintenance or service.
7.1. Check all electrical components as stated in Section 1.
7.2. Using a cloth or a brush, regularly clean the transformer cooling slots.
7.3. Replace or repair damaged parts. Use recommended parts only, unauthorised parts may be dangerous and will invalidate the warranty.
7.4. Keep the handgrips of the welder dry, clean and grease free.
7.5. Always keep the surfaces of the electrodes and of the electrode holding barrels free from any oil, grease, dust, paint, etc., in order to
allow proper flow of current.
7.6. After you have finished using the gun, allow it to cool and then return it, and the accessories, to the case for safe storage.
8. CONSUMABLES
The following items are available through your local Sealey dealer. All are supplied in packs of 100.
Part No. Description
PS/0002 Nails, 2.5 x 50mm
PS/0003 Nails, 2.0 x 50mm
PS/0004 Washer, 8 x 16 x 1.5mm
Part No. Description
PS/0006 Rivet, 3 x 3.2mm
PS/0007 Rivet, 3 x 4.5mm
PS/0009 Threaded Rivet, 4 x 15mm
ENVIRONMENT PROTECTION
Recycle unwanted materials instead of disposing of them as waste. All tools, accessories and packaging should be sorted, taken to
a recycling centre and disposed of in a manner which is compatible with the environment. When the product becomes completely
unserviceable and requires disposal, drain any fluids (if applicable) into approved containers and dispose of the product and fluids
according to local regulations.
WEEE REGULATIONS
Dispose of this product at the end of its working life in compliance with the EU Directive on Waste Electrical and Electronic Equipment
(WEEE). When the product is no longer required, it must be disposed of in an environmentally protective way. Contact your local solid
waste authority for recycling information.
Sealey Group, Kempson Way, Suffolk Business Park, Bury St Edmunds, Suffolk. IP32 7AR
© Jack Sealey Limited
Original Language Version
SR20.V3 Issue: 2(L) - 19/07/17
 Loading...