

Page 1
INSTRUCTIONS FOR:
BROADCAST SPREADER 80kg TOW
BEHIND
MODEL No: SPB80T
Thank you for purchasing a Sealey product. Manufactured to a high standard, this product will, if used according to these
instructions, and properly maintained, give you years of trouble free performance.
IMPORTANT: PLEASE READ THESE INSTRUCTIONS CAREFULLY. NOTE THE SAFE OPERATIONAL REQUIREMENTS, WARNINGS & CAUTIONS. USE THE PRODUCT
CORRECTLY AND WITH CARE FOR THE PURPOSE FOR WHICH IT IS INTENDED. FAILURE TO DO SO MAY CAUSE DAMAGE AND/OR PERSONAL INJURY AND WILL
INVALIDATE THE WARRANTY. KEEP THESE INSTRUCTIONS SAFE FOR FUTURE USE.
Refer to
instruction
manual
1. SAFETY
Ensure that the spreader is in sound condition and good working
order before use.
Ensure that the operator is fully trained and competent to operate
the prime mover before attaching and using the spreader.
Ensure that all chemical safety instructions are adhered to when
handling products for use in the spreader. A full range of personal
safety equipment is available from your Sealey dealer.
Always distribute the load evenly.
Ensure all non essential personnel keep a safe distance when the
spreader is in use.
Replace or repair damaged parts. Use only recommended parts.
Unauthorised parts may be dangerous and will invalidate the
warranty.
Keep hands and feet away from moving parts.
DO NOT overload the spreader - see Specification.
DO NOT leave unattended, especially when loaded, unless the
wheels are chocked or the spreader is otherwise secured.
DO NOT allow others to ride on the spreader.
DO NOT allow untrained personnel to use the spreader.
DO NOT use the spreader for purposes other than for which it is
designed.
DO NOT operate the spreader when you are tired or under the
influence of alcohol, drugs or intoxicating medicines.
When loaded,DO NOT operate the spreader over edges, rough
surfaces etc. where the spreader is at risk of overturning.
WARNING! Failure to comply with these instructions may result
in damage to spreader or other property and/or personal injury.
2 . INTRODUCTION
Manufactured with a strong tubular steel frame and polypropylene
dispensing hopper. Pin hitch design attaches to ride-on lawnmowers,
can be converted to ball hitch using Model No. TB36. Fitted with
aluminium gear, rain cover, pneumatic tyres and adjustable feed
system. Includes hopper screen to ease spreader flow and filter out
unwanted contaminants. Sprays in 360° motion to cover a large area.
Suitable for a variety of horticultural agents, including grit, seed, salt,
fertiliser and weed killer.
3 . SPECIFICATION
Model No. ......................................SPB80T
Capacity (Weight)....................................80kg
Capacity (Volume) ...................................88ltr
Spread .........................................3-3.6mtr
Weight ............................................24kg
Dimensions (W x D x H)..................880 x 1350 x 965mm
1
fig.
4 . ASSEMBLY
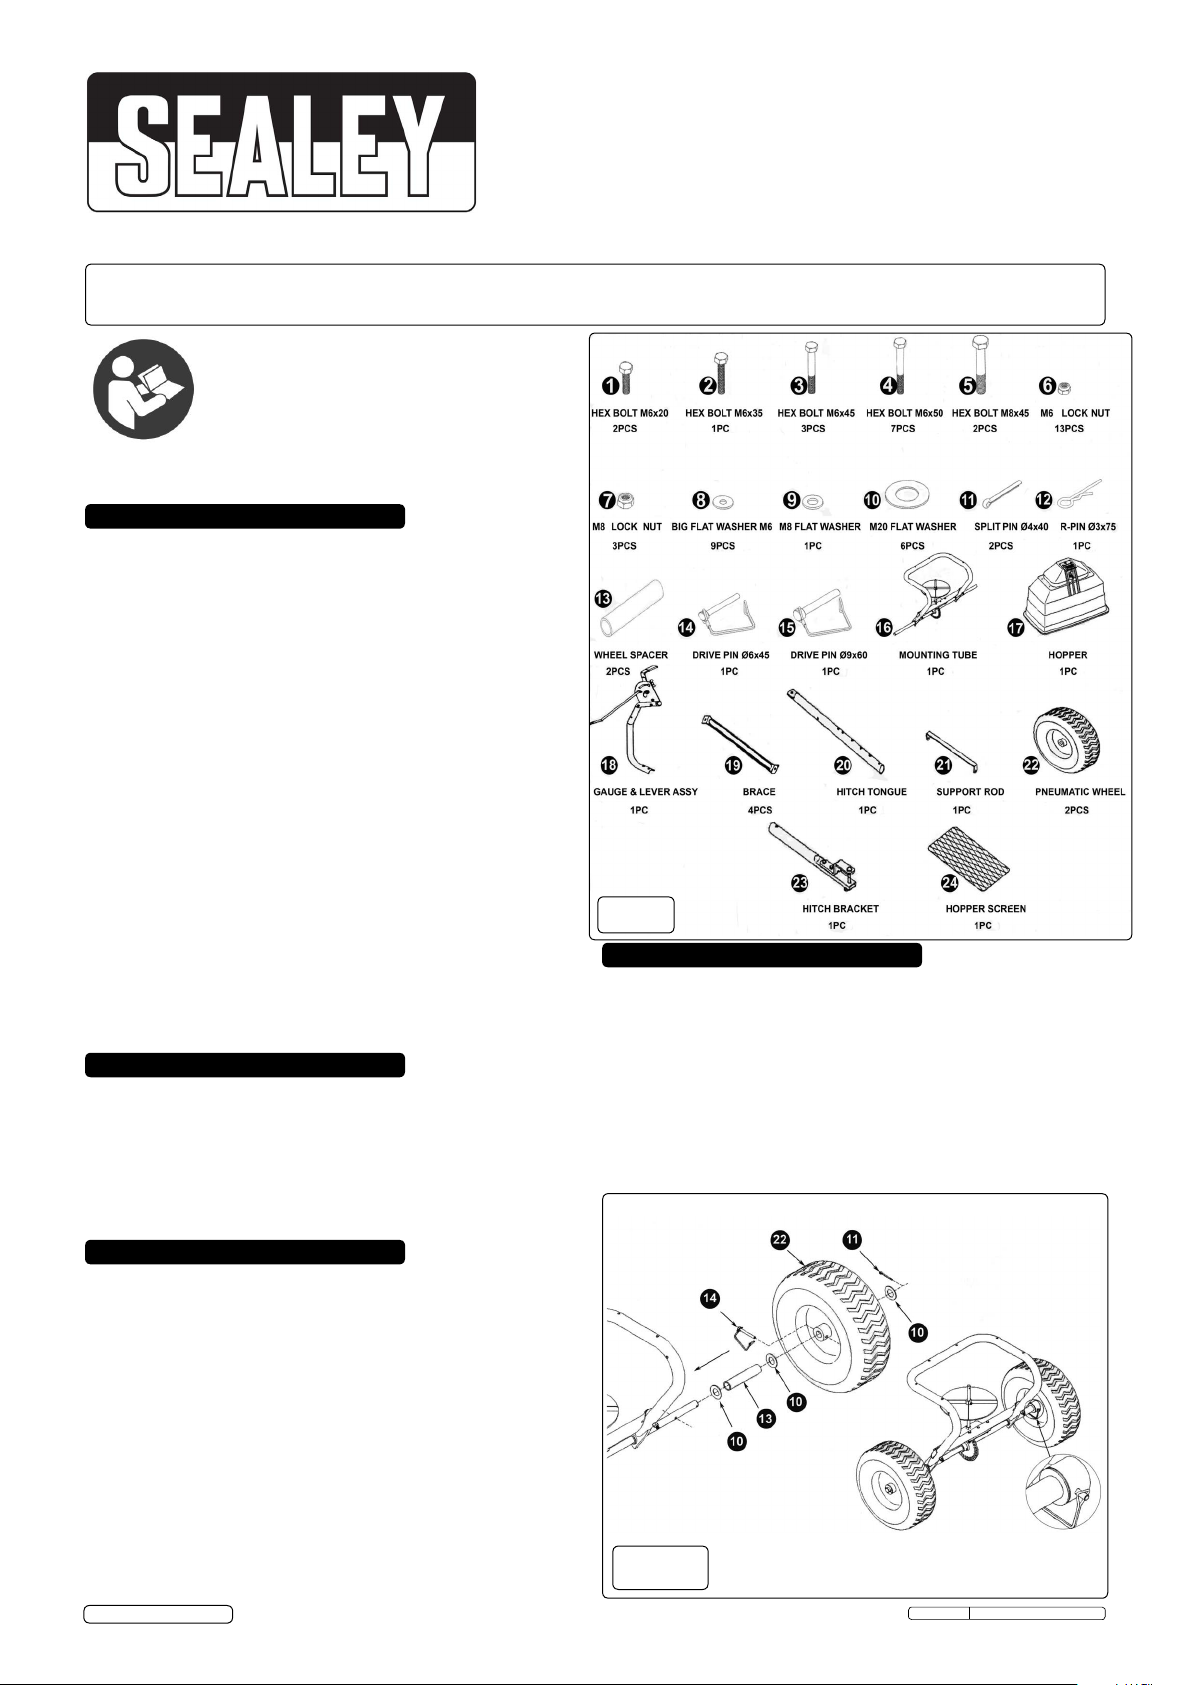
4.1. Check contents against fig.1 above, if anything is missing or
damaged contact your local Sealey dealer.
4.2. Refering to fig.2, place a M20 flat washer (10) onto the
axle of the mounting tube (16) followed by wheel spacer (13)
and then another M20 flat washer (10).
4.3. Attach the pneumatic wheel (22) then a M20 flat washer (10)
to the mounting tube axle. Secure with split pin (11) and repeat
procedure for the other side.
4.4. Rotate one pneumatic wheel so that the hole on the inside of
the wheel boss aligns with the corresponding hole in the axle
tube. Insert drive pin Ø6x14 (14) and lock in place.
© Jack Sealey Ltd
fig.
Original Language Version
2
SPB80T Issue: 2(SP) -
11/09/15
Page 2
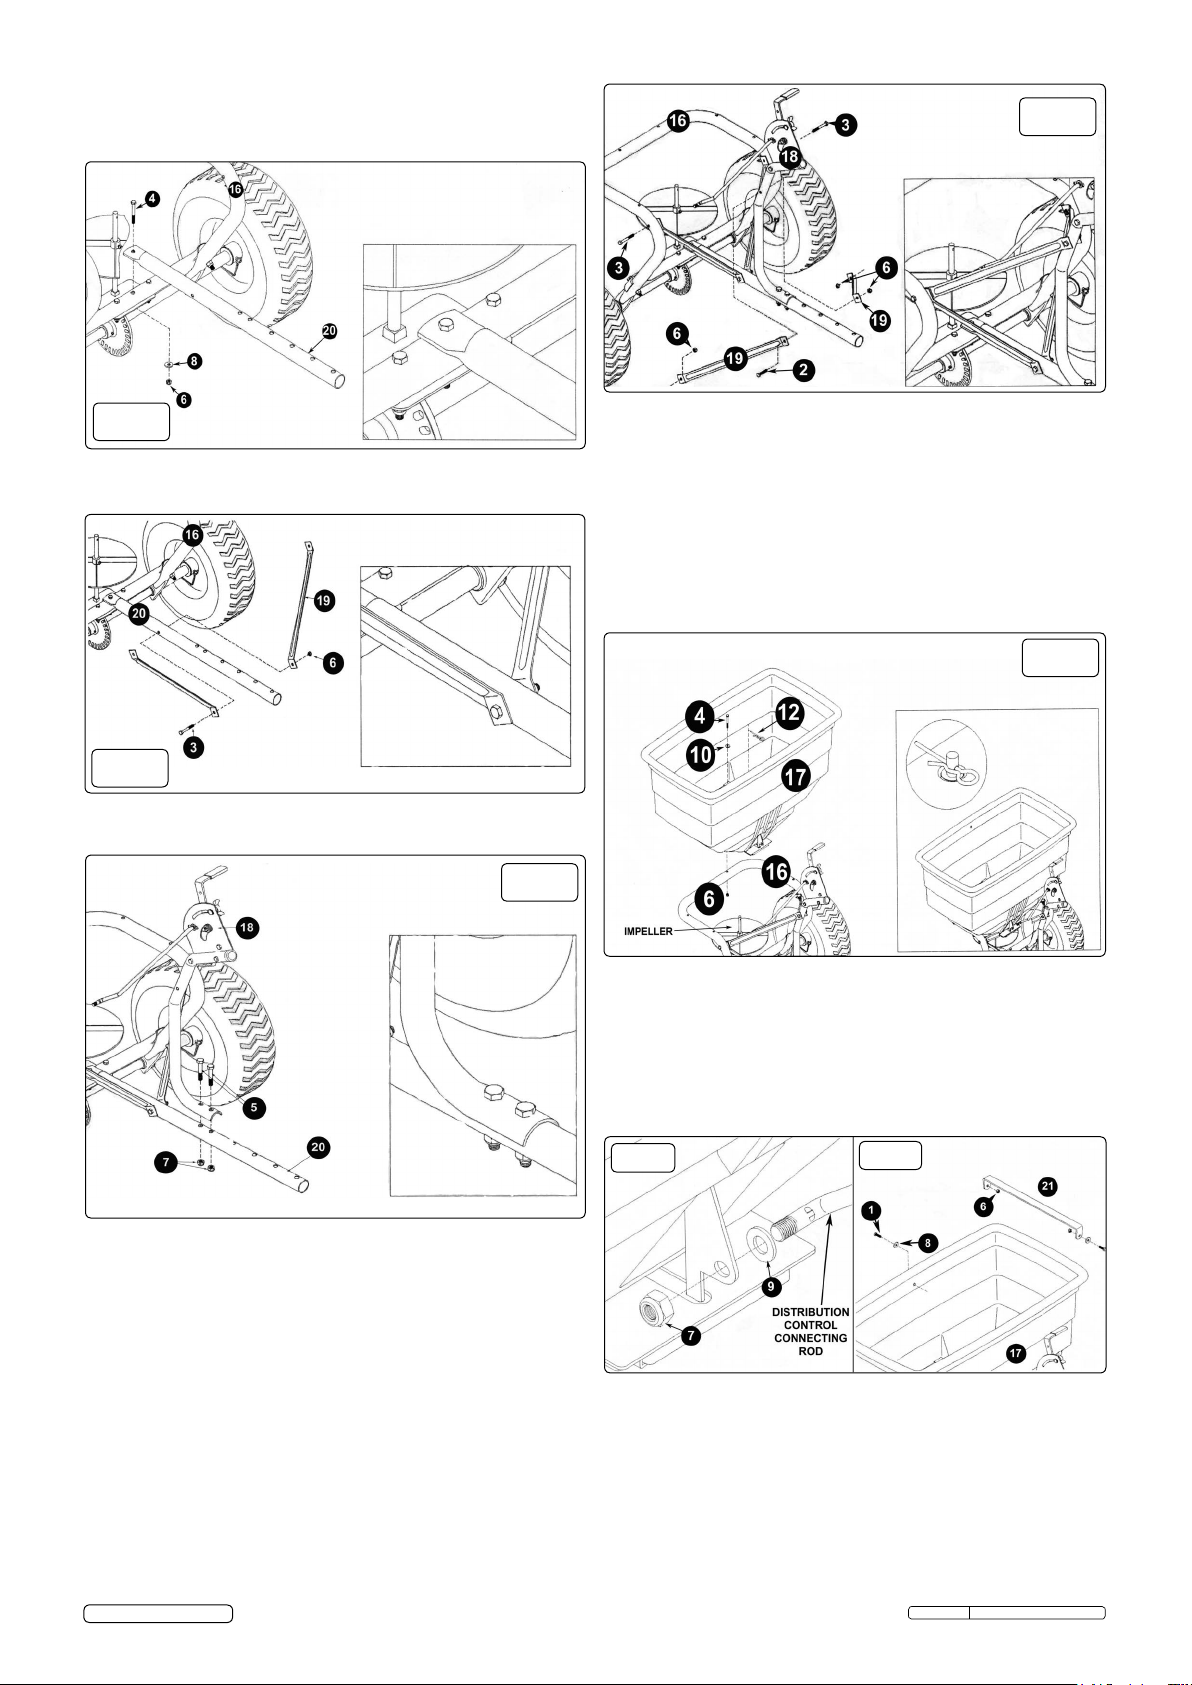
4.5. Attach the hitch tongue (20) to the mounting tube (16) using
hex bolt M6x50 (4), big flat washer M6 (8) and M6 lock nut
(6) as shown in figure 3. At this stage do not fully tighten the
nut and bolt.
3
fig.
4.6. Attach one brace (19) to either side of the hitch tongue (20)
using hex bolt M6x45 (3) and M6 lock nut (6) as shown in
figure 4. Do not fully tighten the nut at this stage.
6
fig.
4.11. Place the hopper (17) over the mounting tube (16) so that
the shaft protruding from the impeller on the mounting tube
locates into the swivel bush on the base of the hopper.
4.12. Align the six bolt holes in the hopper with the six bolt holes
on the mounting tube and fit the Hex Bolts M6x50 (4) with
the big flat washers M6 (8) at the bolt heads. Loosely attach
the M6 lock nuts (6) as shown in figure 7. Adjust the
hopper over the mounting tube until the impeller is free to
rotate without any resistance. Fully tighten the nuts and bolts
securing the hopper to the mounting tube.
4.13. Attach the R-pin Ø3x75 (12) to the shaft protruding above
the impeller as shown in figure 7.
7
fig.
4
fig.
4.7. Attach the gauge & lever assembly (18) to the hitch tongue
(20) using hex bolt M8x45 (5) and M8 lock nuts (7) as shown in
gure5.
5
fig.
4.8. Attach the remaining two braces (19) to the gauge & lever
assembly (18) using hex bolt M6x45 (3) and M6 lock nut (6) as
showningure6.Donotfullytightenthenutandboltatthis
stage.
4.9. Connect the loose ends of the two braces (19) to the mounting
points on either side of the mounting tube (16) and attach using
hexboltsM6x45(3)andM6locknuts(6)asshowningure6.
4.10. All nuts and bolts used for the braces (19) and the hitch tongue
(20) can now be fully tightened
4.14. Attach a M8 flat washer (9) over the loose end of the
adjustable connection rod and insert the rod through the
hole in the fixing plate at the base of the hopper and secure
with a M8 lock nut (7) as shown in figure 8.
4.15. Secure the support rod (21) to the inside of the hopper (17)
using hex bolts M6x20 (1), big flat washers M6 (8) and M6
lock nuts (6) as shown in figure 9.
4.16. Place the hopper screen (24) into the hopper (17) so that it
sits squarely on the base.
9
fig.
8
fig.
© Jack Sealey Ltd
Original Language Version
SPB80T Issue: 2(SP) -
11/09/15
Page 3

4.17. Connect the hitch bracket (23) to the hitch tongue (20),
aligning the hole in the hitch bracket with the holes in the
hitch tongue until the desired length required is attained.
Lock the hitch bracket to the hitch tongue using drive pin
Ø9X60 (15) as shown in figure10.
4.18. The spreader is now fully assembled and ready for use.
10
fig.
5 . OPERATION
5.1. Read the Safety Instructions in Section 1 before operating the
spreader.
5.2. Secure the spreader onto the prime mover using the towing
pin on the hitch bracket (23). Secure the towing pin with the
R-pin provided. The spreader can be converted to use a ball
hitch by fitting a Sealey Ø50mm Towing Hitch, Model No.
TB36, available from your Sealey dealer.
5.3. Load the product into the hopper, ensuring that it is evenly
distributed and the maximum capacity of the spreader is not
exceeded. When handling hazardous products it is important
to first read the safety data sheet and take necessary safety
precautions. A full range of personal safety equipment is
available from your Sealey dealer.
5.4. The towing speed will affect the rate of flow from the
spreader. It is advisable to operate the spreader at lower
speeds for a more effective flow of the product.
5.5. The adjustable feed system is controlled by movement of the
handle on the gauge and lever assembly (18). Operate the
spreader at the desired speed and adjust the handle either
forwards or backwards until a satisfactory rate of flow is
achieved. A locking device is provided on the gauge to allow
the optimum flow required to be maintained.
5.6. Clean the spreader thoroughly after use, paying particular
attention to the area around the adjustable feed system and
the impeller.
6 . MAINTENANCE
6.1 After each use clean material out of hopper.
6.1.1 Rinse/dry inside and outside of spreader after each use.
6.1.2 Before operating make sure that the tyres are inflated to the
correct pressure.
6.1.3 Periodically check all fastenings are tight.
6.1.4 Annually clean and lightly lubricate parts.
6.1.5 Touch up all scratched or worn painted metal surfaces.
6.1.6 To avoid damaging the spreader never exceed the rated load
capacity of 80kg.
6.2 STORAGE.
6.2.1 Before storing ensure that the spreader is clean and dry.
6.2.2 Store indoors or in a protected area during severe weather and
in the winter months.
6.2.3 Never allow material to stay in the hopper for extended periods
of time.
© Jack Sealey Ltd
Original Language Version
SPB80T Issue: 2(SP) -
11/09/15
Page 4

(CHART 'A') SQUARE FOOT COVERAGE PER BAG (LBS/1000 SQ.FT)
WEIGHT OF BAG (LBS) 5000 SQ.FT COVERAGE 10000 SQ.FT COVERAGE 15000 SQ.FT COVERAGE
5 1.0lb 0.5lb 0.3lb
10 2.0lb 1.0lb 0.7lb
15 3.0lb 1.5lb 1.0lb
20 4.0lb 2.0lb 1.3lb
25 5.0lb 2.5lb 1.7lb
30 6.0lb 3.0lb 2.0lb
35 7.0lb 3.5lb 2.3lb
40 8.0lb 4.0lb 2.3lb
45 9.0lb 4.5lb 3.0lb
50 10.0lb 5.0lb 3.3lb
55 11.0lb 5.5lb 3.7lb
(CHART 'B') SPREADER SETTINGS/SPREADER WIDTHS
MATERIALS TO BE
USED
LBS/1000
SQ.FT
G/M² SPREADER
SETTING
SMALL PARTICLE
SPREAD
MEDIUM PARTICLE
SPREAD
LARGE PARTICLE
1 5 5 5-6 ft 6-9 ft 9-12 ft
2 10 8 5-6 ft 6-9 ft 9-12 ft
GRIT
SEED
FERTILISER
WEED
KILLER
E.T.C.
3 15 10 5-6 ft 6-9 ft 9-12 ft
4 20 13 5-6 ft 6-9 ft 9-12 ft
5 25 15 5-6 ft 6-9 ft 9-12 ft
6 30 18 5-6 ft 6-9 ft 9-12 ft
7 35 20 5-6 ft 6-9 ft 9-12 ft
8 40 23 5-6 ft 6-9 ft 9-12 ft
9 45 25 5-6 ft 6-9 ft 9-12 ft
10 50 28 5-6 ft 6-9 ft 9-12 ft
11 55 30 5-6 ft 6-9 ft 9-12 ft
SPREAD
NOTE: It is our policy to continually improve products and as such we reserve the right to alter data, specifications and component parts without prior notice.
IMPORTANT: No liability is accepted for incorrect use of this product.
WARRANTY: Guarantee is 12 months from purchase date, proof of which will be required for any claim.
© Jack Sealey Ltd
Recycle unwanted materials instead of disposing of them as waste. All tools, accessories and packaging should be
sorted, taken to a recycling centre and disposed of in a manner which is compatible with the environment.
When the product becomes completely unserviceable and requires disposal, drain off any fluids (if applicable)
into approved containers and dispose of the product and the fluids according to local regulations.
Sole UK Distributor, Sealey Group,
Kempson Way, Suffolk Business Park,
Bury St. Edmunds, Suffolk,
IP32 7AR
Environmental Protection
Original Language Version
01284 757500
01284 703534
www.sealey.co.uk
SPB80T Issue: 2(SP) -
11/09/15
 Loading...