

Page 1
INSTRUCTIONS FOR
IMPORTANT: PLEASE READ THESE INSTRUCTIONS CAREFULLY. NOTE THE SAFE OPERATIONAL REQUIREMENTS, WARNINGS & CAUTIONS. USE
THE PRODUCT CORRECTLY AND WITH CARE FOR THE PURPOSE FOR WHICH IT IS INTENDED. FAILURE TO DO SO MAY CAUSE DAMAGE AND/OR
PERSONAL INJURY AND WILL INVALIDATE THE WARRANTY. KEEP THESE INSTRUCTIONS SAFE FOR FUTURE USE.
BELT/DISC SANDER 915 X 100MM/Ø150 370W/230V
MODEL NO: SM914
Thank you for purchasing a Sealey product. Manufactured to a high standard, this product will, if used according to these instructions,
and properly maintained, give you years of trouble free performance.
Refer to
instruction
manual
Wear eye
protection
Wear ear
protection
Wear a mask
Wear
protective
gloves
1. SAFETY
1.1. ELECTRICAL SAFETY
WARNING! It is the user’s responsibility to check the following:
Check all electrical equipment and appliances to ensure that they are safe before using. Inspect power supply leads, plugs and
all electrical connections for wear and damage. Sealey recommend that an RCD (Residual Current Device) is used with all electrical
products. You may obtain an RCD by contacting your local Sealey dealer.
If the product is used in the course of business duties, it must be maintained in a safe condition and routinely PAT (Portable
Appliance Test) tested.
Electrical safety information, it is important that the following information is read and understood.
1.1.1. Ensure that the insulation on all cables and on the appliance is safe before connecting it to the power supply.
1.1.2. Regularly inspect power supply cables and plugs for wear or damage and check all connections to ensure that they are secure.
1.1.3. Important: Ensure that the voltage rating on the appliance suits the power supply to be used and that the plug is tted with the
correct fuse - see fuse rating in these instructions.
8 DO NOT pull or carry the appliance by the power cable.
8 DO NOT pull the plug from the socket by the cable.
8 DO NOT use worn or damaged cables, plugs or connectors. Ensure that any faulty item is repaired or is
replaced immediately by a qualied electrician.
1.1.4. This product is tted with a BS1363/A 13 Amp 3 pin plug.
If the cable or plug is damaged during use, switch the electricity supply and remove from use.
Ensure that repairs are carried out by a qualied electrician.
Replace a damaged plug with a BS1363/A 13 Amp 3 pin plug. If in doubt contact a qualied electrician.
a) Connect the GREEN/YELLOW earth wire to the earth terminal ‘E’.
b) Connect the BROWN live wire to the live terminal ‘L’.
c) Connect the BLUE neutral wire to the neutral terminal ‘N’.
Ensure that the cable outer sheath extends inside the cable restraint and that the restraint is tight.
Sealey recommend that repairs are carried out by a qualied electrician.
1.2. GENERAL SAFETY
WARNING! Ensure all Health and Safety, local authority, and general workshop practice regulations are strictly adhered to.
WARNING! Disconnect from the mains power supply before changing accessories, servicing or performing any maintenance.
WARNING! DO NOT sand any materials containing asbestos.
9
Ensure the operating voltage stated on the ratings plate corresponds to your mains power supply.
9
Check the belt and disc sander and the electrical connections for any damage and DO NOT use the tool if the sander or the cable is
damaged.
9
Ensure that the belt and disc sander is switched off before plugging in to the mains power supply.
9
Persons with limited physical, sensory or mental abilities are not allowed to use the unit, unless they are fully supervised and briefed on
safety issues by a qualified person.
9
Use the belt and disc sander according to this manual and only for the purpose for which it is designed.
9
Before starting up, make sure that no spanners or adjusting keys are attached to the machine.
9
Avoid contact with grounded surfaces such as radiators, pipes etc.
9 Maintain correct balance and footing, ensure that the floor is not slippery and wear non-slip rubber soled footwear.
NOTE: Remember that the disc and belt will still be moving for several seconds whilst slowing down, after switching off.
9
Familiarise yourself with your working area and be alert for possible hazards, which you might not hear due to machine noise.
9
Inspect the work piece and remove all nails and screws before sanding.
9
Be aware that sparks may ignite the dust or fumes.
9
Switch off the belt and disc sander before making any adjustments and when the unit is not in use.
9
After finishing work and before carrying out maintenance, disconnect the power lead from the mains supply.
9
In the event of an electrical or mechanical malfunction, immediately switch off the sander and DO NOT use it further.
9
Always keep your work area clean.
9
Never use the power cable to carry the belt and disc sander. Keep the cable away from hot, sharp edges and moving parts.
WARNING! Always wear gloves and safety goggles and a dust mask as some coatings and wood dust may be harmful and toxic.
Recommended fuse rating
13 Amp
© Jack Sealey Limited
Original Language Version
SM914 | Issue:2 (H,F) 04/01/18
Page 2
Always work in a well ventilated area. Whenever possible use
the dust collection outlets provided on the machine.
Take care that the belt and disc sander cannot tip over or move
while sanding long or heavy objects. If necessary, fasten the
belt and disc sander to a supporting surface.
Ensure that the sanding belt is running in the correct direction
and ensure that the sanding disc or sanding belt is not
damaged.
DO NOT allow children or untrained persons to operate the
sander. Keep them away from the work area.
Ensure the sanding belt is correctly positioned and adjusted so
that it cannot run off the pulleys.
DO NOT remove the safety guard whilst sander is in use.
Remove ill fitting clothing, ties and loose jewellery and tie back
long hair. Keep hands and body clear of the worktable when
operating the sander.
DO NOT use the belt and disc sander near flammable liquids,
gases or dust.
DO NOT disassemble the machine and DO NOT try to repair it
yourself. Have the unit repaired by a professional or contact
your local Sealey stockist. Always use original replacement
parts.
DO NOT touch the sanding belt immediately after operation; it
may be extremely hot and cause burns. The sanding belt is
sharp-edged.
DO NOT use excessive force against the sanding belt or disc.
DO NOT operate the sander when you are tired, under the
influence of alcohol, drugs or intoxicating medication.
DO NOT get the sander wet or use in damp or wet locations or
areas where there is condensation.
DO NOT switch the sander on while the workpiece is in
contact with the abrasive and DO NOT leave the sander
running unattended.
3. TECHNICAL SPECIFICATION
Model No: ................................................................................. SM914
Belt Size: .........................................................................915 x 100mm
Belt Speed: ..........................................................................440mtr/min
Disc Size: ...............................................................................Ø150mm
Disc Speed: ............................................................................ 2850rpm
Table Size: .......................................................................230 x 160mm
Table Tilt: ......................................................................................0-45°
Motor Power: ............................................................................... 370W
Supply:.......................................................................................... 230V
Dust Extraction: .....................................................................Ø63.5mm
Weight: .......................................................................................18.5kg
Replacement Sanding Belts: ..............................................................
Model No: ................................................................................. Grade:
SM14/B060G ...............................................................................60Grit
SM14/B080G ...............................................................................80Grit
SM14/B100G .............................................................................100Grit
Replacement Sanding Discs: .............................................................
Model No: ................................................................................. Grade:
SM14/D80G .................................................................................80Grit
4. ASSEMBLY & ADJUSTMENT
4.1 Mounting the sander.
4.1.1 Mount the sander to a suitable workbench adjacent to dust
extraction facilities if available. Bolt the sander down utilising
the three mounting holes, two in the left hand flange and one
on the right hand flange. Insert bolts from above and fasten
below with nuts and lock washers.
fig.2
2. INTRODUCTION
Bench mounting semi-portable belt and disc sander suitable for
general woodworking applications. Powerful induction motor with
smooth, bearing-mounted drive pulleys gives quiet operation. The
sanding belt can be used in a vertical or horizontal position and at any
other angle in between. The sanding disc table can be tilted to any
angle up to 45°, and is supplied with a mitre gauge for accurate angle
sanding.
fig.1
WARNING! Ensure that the sander is disconnected from the
mains power supply before beginning assembly.
4.2 Attaching the sanding disc abrasive pad and lower cover.
4.2.1 Before attaching cover (C) in place, remove the backing from
the self adhesive abrasive pad and stick it to the metal disc
ensuring that it is centralised. Fix the lower cover (C) in place
as shown above using two self tapping screws (A&B).
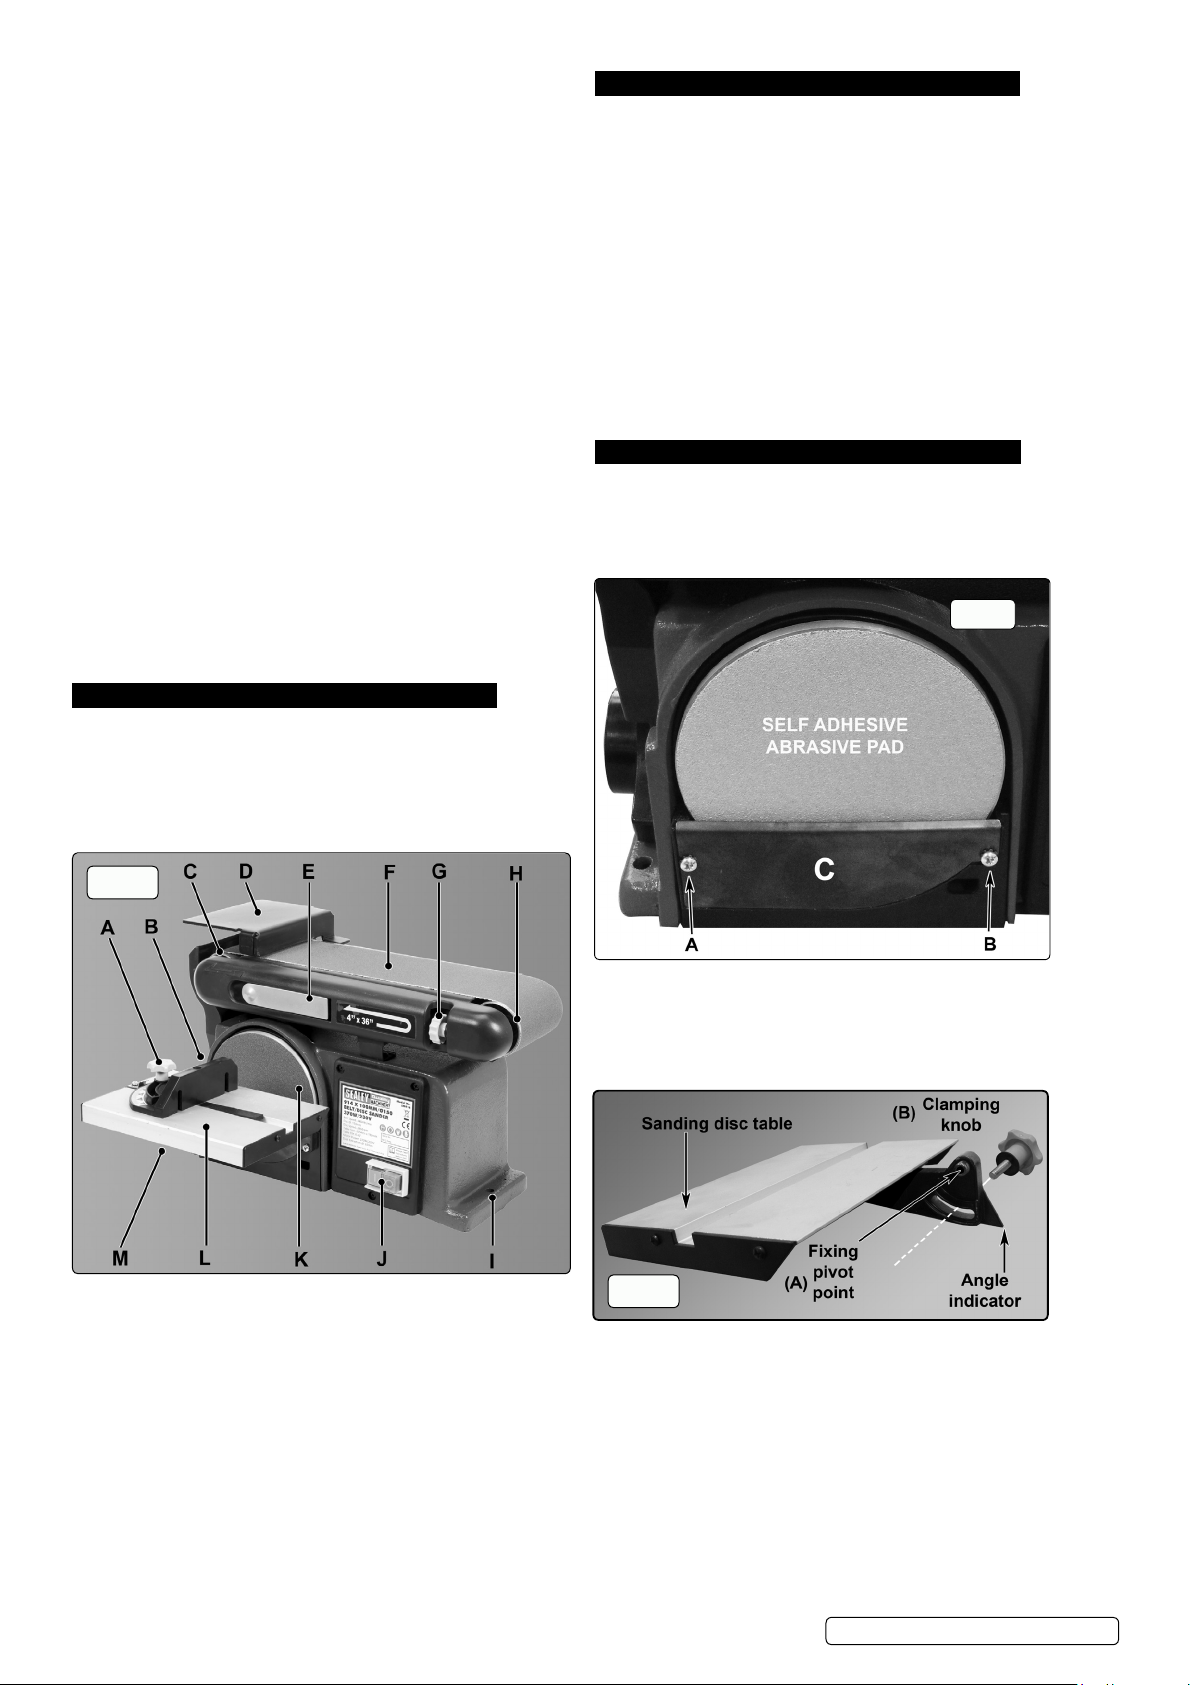
A MITRE GAUGE
B KNOB FOR TABLE ANGLE
ADJUSTMENT (Not visible)
C DRIVE DRUM
D BELT SANDING GUARD
E BELT TENSIONING LEVER
F SANDING BELT
G BELT TRACKING CONTROL
H IDLER DRUM
© Jack Sealey Limited
I MOUNTING POINT x 3
J ON/OFF SWITCH
K SANDING DISC
L DISC SANDING TABLE
M DUST EXTRACTION PORT
(Not visible)
Original Language Version
fig.3
4.3 Attaching the sanding disc table.
4.3.1 The sanding disc table has one pivot/fixing point as indicated
above which plugs directly into the main body of the sander
and is held in place by a single clamping knob as shown in
fig.4.
SM914 | Issue:2 (H,F) 04/01/18
Page 3
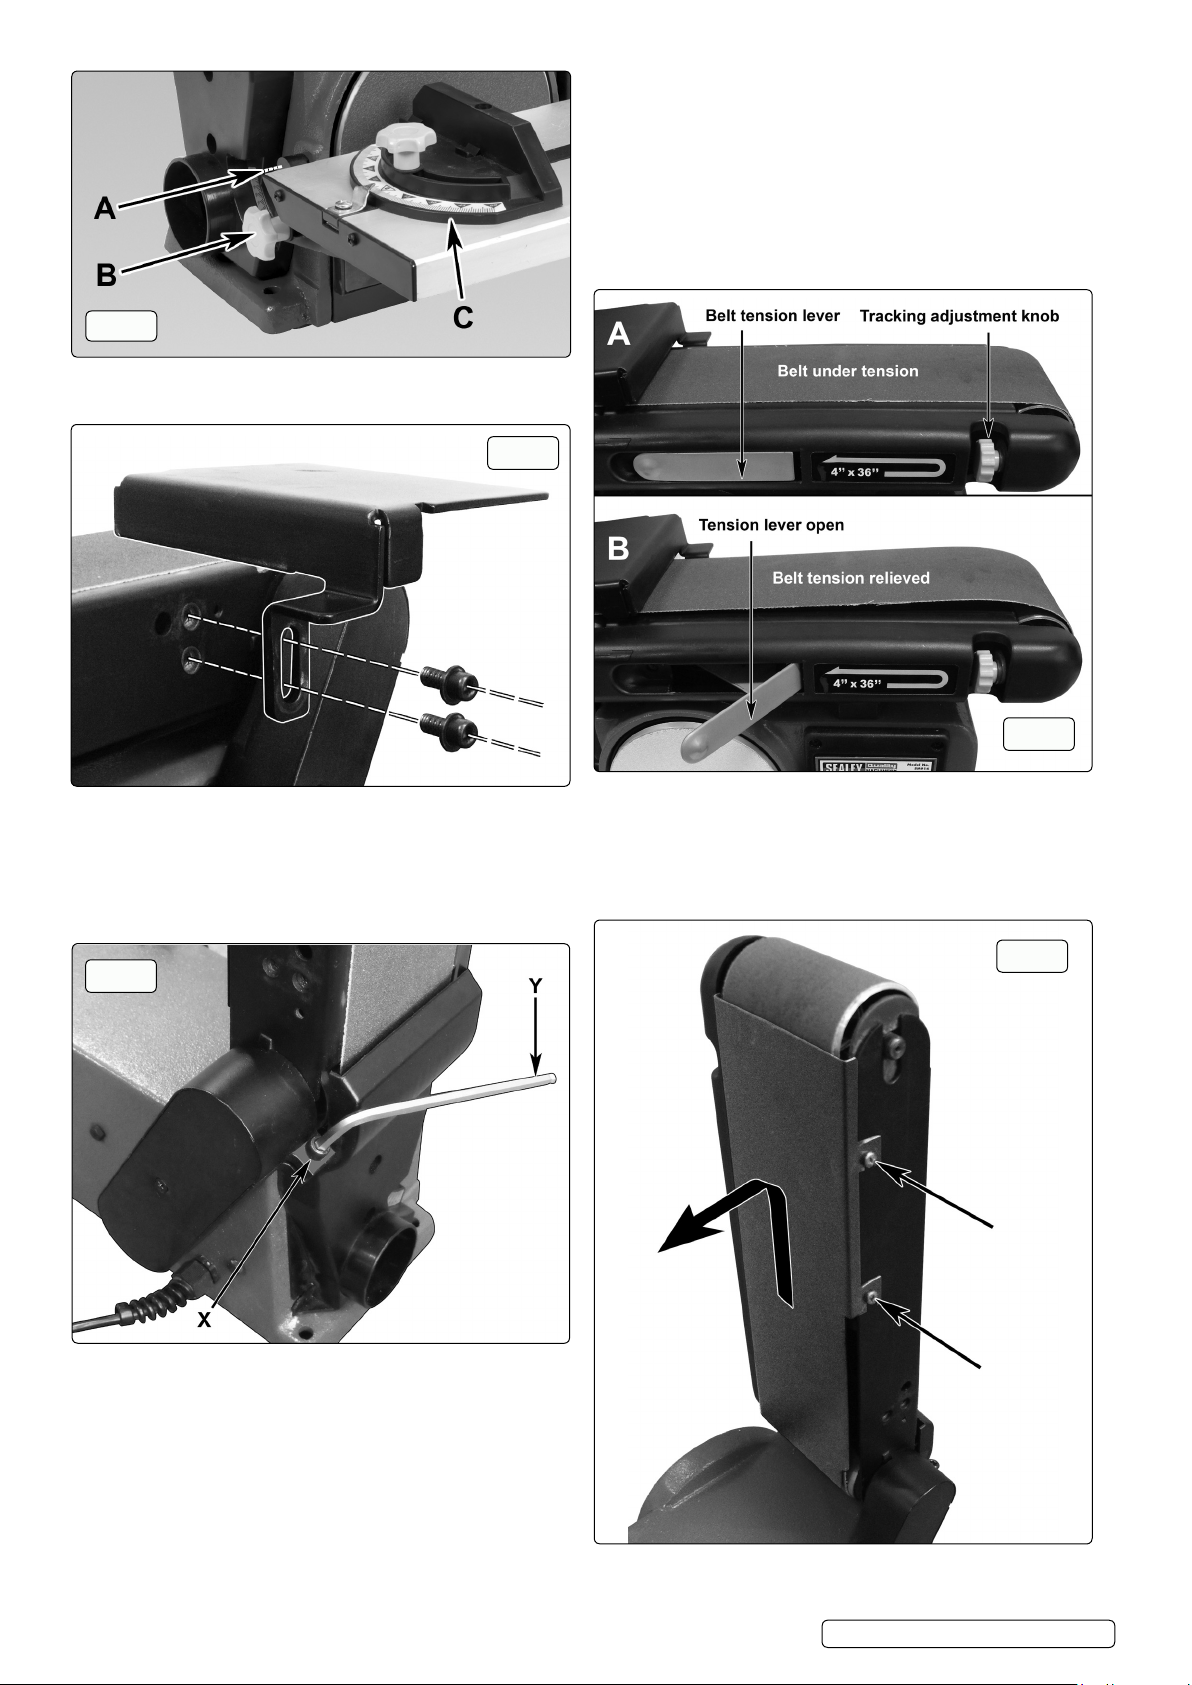
fig.4
4.3.2 Fig.4 shows the sanding table in place, pivoting around point
(A) and held in place by clamping knob (B). Place the mitre
guide (C) into the slot in the table when required.
fig.5
4.5.3 Firstly, loosen the clamping nut with a 6mm hex key (Y).
4.5.4 Lift the belt assembly into the vertical position (or any angle
in between) and fully re-tighten the clamping nut.
4.5.5 Re-attach the work support table/guard and fully tighten the two
fixing screws ensuring that there is at least 1.5mm clearance
between the guard and the surface of the belt.
4.5.6 To return to the horizontal position, reverse the process
just described.
WARNING! Never use the sanding belt without the work
support/guard attached.
4.4 Attaching the sanding belt work support/guard.
4.4.1 Referring to fig.5 above, position the slotted mounting leg of
the work support/guard over the two threaded holes in the side
of the belt housing and fix in place using the two socket
cap screws and washers provided. Screw them down, finger
tight only at this stage. Supporting the underside of the work
support/guard, lift it slightly so that there is at least 1.5mm of
clearance between the support and the surface of the belt and
then fully tighten the bolts using a 6mm hex key.
fig.6
fig.7
4.6 Belt tracking control (minor adjustment). (See fig.7A)
4.6.1 The sanding belt tracking is factory set so that the belt will run
true on the rollers. If however the belt should begin to deviate
from true it can be corrected using the tracking adjustment
control knob seen in fig.7A. Turning the knob clockwise will
cause the belt to move towards the front of the machine (i.e.
the disc side). Turning the knob counter clockwise will cause
the belt to move towards the back of the machine.
fig.8
4.5 Changing the sanding belt orientation. (See fig.6)
4.5.1 The sanding belt can be used either horizontally, vertically or at
any angle in between, but must be locked in the chosen position
using the clamping nut (X) situated to one side of the drive drum.
4.5.2 To change from the horizontal to the vertical position it is
advisable to remove the work support to give easier access
to the clamping nut.
© Jack Sealey Limited
Original Language Version
SM914 | Issue:2 (H,F) 04/01/18
Page 4

4.7 Changing the sanding belt.
4.7.1 Before the sanding belt can be changed, the protective cover
on the back/underside of the belt assembly must be removed.
4.7.2 Move the belt assembly into the vertical position as described
in Section 4 and loosen the two screws indicated in fig.8.
4.7.3 Unhook the cover from the sanding belt assembly by lifting it
up and away from the sander. Put to one side.
4.7.4 Release the tension from the belt by pulling open the
tensioning lever as indicated in fig.7B.
4.7.5 Slide the old belt off the rollers. Slide the new belt into position
on the rollers and re-tension it as described below.
4.7.6 Take hold of the belt tensioning lever and ease it back into
position taking care not to trap you fingers behind the lever.
WARNING! In the open position the lever is spring loaded and
will snap shut if pushed.
4.8 Tracking adjustment of new belt. (See fig.7A)
4.8.1 When a new belt is fitted the full tracking procedure should be
followed.
4.8.2 To check if the belt is tracking correctly, turn the sander on and
off again immediately and note how the belt is running. If the
belt runs true on its rollers with no deviation, no tracking
adjustment is required.
4.8.3 If however the belt should begin to deviate from true it can be
corrected using the tracking adjustment control knob seen in
fig.7A. Turning the knob clockwise by a ¼ turn will cause the
belt to move towards the front of the machine (i.e. the disc
side). Turning the knob counter clockwise by a ¼ turn will
cause the belt to move towards the back of the machine.
4.9 Dust extraction port. (See fig.1M)
4.9.1 Where available the sander should always be connected to a
dust extraction system via the Ø62mm port provided on the left
hand side of the machine. It is also recommended that the
operator should still wear respiratory protection as a dust
extraction system cannot eliminate all dust produced during the
sanding process.
5. OPERATING INSTRUCTIONS
WARNING! DO NOT allow two people to use the sander at the
same time. Remember that even though you are using only
one of the sanding facilities, the other is still turning and
could represent a hazard to you or other people nearby.
5.1 Using the sanding disc.
5.1.1 Ensure that the work support table is correctly fixed to the
sander. Adjust the angle of the table and/or mitre guide
as required by the job in hand.
5.1.2 Plug the sander into the mains power supply.
5.1.3 Switch on the sander using the green ON button. See fig.1(J).
5.1.4 Allow the disc to reach full speed before bringing the
workpiece into contact with it. Hold the workpiece firmly down
on the table. Always work left of centre on the disc so that the
movement of the disc tends to force the workpiece down onto
the table. Do not use excessive force to remove material but
allow the abrasive disc to do its job.
5.1.5 Switch off the sander using the red OFF button. See fig.1(J).
5.1.6 Allow the disc and belt to come to a standstill before leaving
the sander.
5.1.7 DO NOT leave the sander running unattended.
5.1.8 Unplug the sander from the mains power supply when no
longer required.
5.2 Using the sanding belt.
5.2.1 Ensure that the sanding belt support/guard is correctly fixed to
the sander. See section 4.4.
5.2.2 Move the belt assembly to the vertical or horizontal position (or
any angle in between) as described in Section 4.5 and ensure
that it is locked in position.
5.2.3 Plug the sander into the mains power supply.
5.2.4 Switch on the sander using the green ON button. See fig.1(J).
5.2.5 Allow the belt to reach full speed before bringing the
workpiece into contact with it, close to the support/guard. (The
belt moves left to right and will force the workpiece up against
the support).
5.3 Broad surface sanding.
5.3.1 When sanding broad flat surfaces hold the workpiece with a
firm grip and bring it lightly down onto the moving belt. Apply
only enough pressure to allow the sanding belt to remove
material.
5.3.2 Keep fingers away from the sanding belt, especially when
sanding thin workpieces. Consider using a specially
made pushing or holding down stick.
5.3.3 Switch off the sander using the red OFF button. See fig.1(J).
5.3.4 Allow the disc and belt to come to a standstill before leaving
the sander.
5.4. Sanding inside-curves.
5.4.1 When sanding inside-curves, always use the right hand end of
the sanding belt, holding the workpiece firmly and keeping
fingers away from the belt.
5.4.2 Keep the curve pressed firmly against the idler drum and move
the workpiece evenly back and forth across the drum. Only
apply enough pressure to allow the belt to remove material
gradually.
5.4.3 Switch off the sander using the red OFF button. See fig.1(J).
5.4.4 Allow the disc and belt to come to a standstill before leaving
the sander.
5.4.5 DO NOT leave the sander running unattended.
5.4.6 Unplug the sander from the mains power supply when no
longer required.
6. MAINTENANCE
WARNING! Disconnect from the mains power supply before
changing accessories, servicing or performing any
maintenance.
6.1 General Maintenance.
6.1.1 Before each use check the condition of the power cable for
wear or damage.
6.1.2 Before each use check the sanding disc and belt for wear or
damage.
6.1.3 Before each use check moving parts for alignment or binding
issues.
6.1.4 Clean and vacuum dust from the motor housing and other
sander parts on a regular basis.
6.1.5 Changing the sanding disc. Refer to Section 4.2.
6.1.6 Changing the sanding belt. Refer to Section 4.7.
6.1.7 For all other maintenance issues refer to your local Sealey
stockist.
© Jack Sealey Limited
Original Language Version
SM914 | Issue:2 (H,F) 04/01/18
Page 5
7. MAINTENANCE
PROBLEM CAUSE SOLUTION
Sanding Grains easily rub
off belt or discs.
Deep sanding grooves or
scars in workpiece.
Sanding surface clogs
quickly.
Burns on workpiece. 1. Using a sanding grit that is too ne. 1. Use a coarser-grit sanding accessory.
Motor will not start. 1. Low voltage. 1. Check power source for proper voltage.
Motor will not start – fuses
or circuit breakers tripping
or blowing.
Motor overheats. 1. Motor overloaded. 1. Reduce load on motor (pressure on object being
Motor stalls (resulting in
blown fuses or tripped
circuit).
Machine slows when
operating.
Machine vibrates
excessively.
Workpiece frequently gets
pulled out of operator’s
hands.
Workpiece lifts up from the
sanding disc/table.
1. Sanding belt/disc has been stored in an
incorrect environment.
2. Sanding belt/disc has been damaged or folded. 2. Store sanding accessories at – not bent or folded.
1. Sanding belt/disc grit is too coarse for the desired
nish.
2. Workpiece sanded across the grain. 2. Sand with the grain of the wood.
3. Too much sanding force on the workpiece. 3. Reduce pressure on workpiece while sanding.
4. Workpiece held still against the belt-disc for too
long.
1. Too much pressure against belt/disc. 1. Reduce pressure on workpiece while sanding.
2. Sanding softwood. 2. Use different stock, different sanding accessories,
2. Using too much pressure. 2. Reduce pressure on workpiece while sanding.
3. Work held still for too long. 3. Do not keep workpiece in one place for too long.
2. Open circuit in motor or loose connections. 2. Inspect all lead connections on motor for loose or
3. Blown fuse or breaker. 2. Short circuit. (Contact service agent)
1. Short circuit in line, cord or plug. 1. Inspect cord or plug for damaged insulation and
2. Short circuit in motor or loose connections. 2. Inspect all connections on motor for loose or shorted
3. Incorrect fuses or circuit breakers in power line. 3. Install correct fuses or circuit breakers or switch tool
2. Extension cord too long and of insufcient gauge
(weight).
1. Short circuit in motor or loose connections. 1. Inspect connections on motor for loose or shorted
2. Low voltage. 2. Correct low voltage conditions (for example:
3. Incorrect fuses or circuit breakers in power line. 3. Install correct fuses or circuit breakers or plug tool
4. Excessive sanding pressure overloads motor. 4. Reduce the load on the motor.
1. Feed rate too great. 1. Reduce the rate at which the workpiece is fed onto
2. Undersized circuit or use of undersized extension
cord.
1. Incorrect motor mounting. 1. Tighten/strengthen motor mountings
2. Incorrect sanding-belt tension. 2. Adjust tension adjustment knob. Follow
3. Weak or broken tension spring. 3. Have tension spring replaced by service technician.
4. Idler roller is too loose. 4. Have service technician adjust idler roller.
5. Broken/defective sanding accessories. 5. Replace sanding belt/disc.
1. Not supporting the workpiece against the stop. 1. Use the platen (backstop) or mitre gauge to support
2. Attempting to sand (unaided) a workpiece that is
too small.
1. Sanding on the “up” side of the wheel. 1. Sand on left hand side of sanding disc (as operator
1. Ensure sanding accessories are stored away from
extremely hot or dry temperatures.
1. Use a ner-grit sanding accessory.
4. Keep workpiece moving while sanding on the
sanding accessory.
or accept that this will happen and plan on cleaning or
replacing belts/discs frequently.
open connections. (Contact service agent)
4. Improper match between tool and circuit, fuse or
breaker.
shorted wires.
terminals and/or worn insulation.
to an appropriately sized circuit.
sanded).
2. Utilize an extension cord of appropriate gauge and
length or plug tool directly into outlet.
terminals or worn insulations. (Contact service agent)
improper extension cord length and/or gauge).
into an appropriate circuit, matched to an
appropriate fuse or breaker.
belt or disc.
2. Ensure circuit wires or extension cords are proper
gauge, or eliminate use of extension cords.
belt-tensioning/tracking instructions in this manual.
the workpiece.
2. Use another hand tool or jig to grasp or hold the
workpiece.
faces the disc).
© Jack Sealey Limited
Original Language Version
SM914 | Issue:2 (H,F) 04/01/18
Page 6
EC DECLARATION
OF CONFORMITY
Description and Function: ������������������������������������������������������������������������������������������������������������������������������������������������������������������������
Model/Type: ���������������������������������������������������������������������������������������������������������������������������������������������������������������������������������������������
Manufacturing Date/Serial Number where applicable: ����������������������������������������������������������������������������������������������������������������������������
2006/42/EC Machinery Directive
2014/30/EU EMC Directive
2011/65/EU RoHS Directive
This declaration of conformity is issued under the sole responsibility of the manufacturer:
Jack Sealey Ltd, Kempson Way, Suolk Business Park, Bury St Edmunds, Suolk. IP32 7AR
Declaration of Conformity in accordance with the above Directive(s)�
References to harmonised standard(s)
EN 61029-1:2009+A11:2010 ��������������������������������������������������������
EN 55014-1:2006+A1:2009+A2:2011 �������������������������������������������
EN 55014-2:1997+A1:2001+A2:2008 ������������������������������������������
EN 61000-3-2:2014 ����������������������������������������������������������������������
EN 61000-3-3:2013 ����������������������������������������������������������������������
������������������������������������������������������������������������������������������������������
Belt/Disc Sander 100 x 915mm/Ø150 370W/230V
SM914 v1
������������������������������������������������������������������������������������������������������
������������������������������������������������������������������������������������������������������
������������������������������������������������������������������������������������������������������
������������������������������������������������������������������������������������������������������
������������������������������������������������������������������������������������������������������
������������������������������������������������������������������������������������������������������
Technical le compiled by: Jack Sealey Ltd
Being the responsible person appointed by the manufacturer.
Signed �������������������������������������������������������������������������������������������
04 January 2018
Date �����������������������������������������������������������������������������������������������
Steve Buckle�
Name ���������������������������������������������������������������������������������������������
Marketing Director�
Position �����������������������������������������������������������������������������������������
Place: Bury St Edmunds
Sealey Group, Kempson Way, Suffolk Business Park, Bury St Edmunds, Suffolk. IP32 7AR
XVII2813
ENVIRONMENT PROTECTION
Recycle unwanted materials instead of disposing of them as waste. All tools, accessories and packaging should be sorted, taken to
a recycling centre and disposed of in a manner which is compatible with the environment. When the product becomes completely
unserviceable and requires disposal, drain any fluids (if applicable) into approved containers and dispose of the product and fluids
according to local regulations.
WEEE REGULATIONS
Dispose of this product at the end of its working life in compliance with the EU Directive on Waste Electrical and Electronic Equipment
(WEEE). When the product is no longer required, it must be disposed of in an environmentally protective way. Contact your local solid
waste authority for recycling information.
Note: It is our policy to continually improve products and as such we reserve the right to alter data, specifications and component parts without prior
notice.
Important: No Liability is accepted for incorrect use of this product.
Warranty: Guarantee is 12 months from purchase date, proof of which is required for any claim.
Sealey Group, Kempson Way, Suffolk Business Park, Bury St Edmunds, Suffolk. IP32 7AR
© Jack Sealey Limited
Original Language Version
SM914 | Issue:2 (H,F) 04/01/18
 Loading...