

INSTRUCTIONS FOR
IMPORTANT: PLEASE READ THESE INSTRUCTIONS CAREFULLY. NOTE THE SAFE OPERATIONAL REQUIREMENTS, WARNINGS & CAUTIONS. USE
THE PRODUCT CORRECTLY AND WITH CARE FOR THE PURPOSE FOR WHICH IT IS INTENDED. FAILURE TO DO SO MAY CAUSE DAMAGE AND/OR
PERSONAL INJURY AND WILL INVALIDATE THE WARRANTY. KEEP THESE INSTRUCTIONS SAFE FOR FUTURE USE.
SPRAY GUN CLEANER
MODEL NO: SM23/2.V3
Thank you for purchasing a Sealey product. Manufactured to a high standard, this product will, if used according to these
instructions, and properly maintained, give you years of trouble free performance.
Refer to
instruction
manual
Wear eye
protection
Wear
protective
gloves
Wear
respiratory
protection
1. SAFETY
R WARNING! Ensure Health & Safety, local authority, general workshop practice regulations are adhered to when using equipment.
R WARNING! Disconnect the air supply from the tank before changing accessories, servicing or performing any maintenance.
Maintain the tank in good condition (use an authorised service agent).
Replace or repair damaged parts. Use genuine parts only. Non-authorised parts may be dangerous and will invalidate the warranty.
Locate the tank in an adequate working area. Ensure the tank stands on a rm level surface. Keep area clean and tidy and free from
unrelated materials. Ensure the area is well ventilated and has adequate lighting.
R WARNING! Ensure correct air pressure is maintained and not exceeded. Recommended pressure: 30 - 50psi.
Keep air hose away from heat, oil and sharp edges. Check air hose for wear before each use, and ensure that all connections are
secure.
Use only water and detergent as a cleaning agent, do not pour any other type of cleaning uid into the tank.
Keep the tank clean. Remove and clean the suction lter regularly for best performance.
R WARNING! Wear approved safety eye protection, mask and gloves.
Remove ill tting clothing, ties, watches, rings and other loose jewellery, contain long hair, and wear appropriate protective clothing.
Maintain correct balance and footing. Ensure the oor is not slippery and wear non-slip shoes.
Keep non-essential persons away from the working area.
DO NOT use the tank with the lid open and do not use it for spray gun testing.
DO NOT use the tank for any purpose other than for which it is designed.
DO NOT operate the tank if any parts are missing or damaged as this may cause failure and/or possible personal injury.
DO NOT over-ll the tank.
DO NOT direct air from the air hose at yourself or others.
DO NOT operate the tank when you are tired or under the inuence of alcohol, drugs or intoxicating medication.
When cleaning is complete, ensure all controls are in the ‘off’ position and that the air supply is turned off.
R WARNING! It is operator’s responsibility to ensure that there is no uncontrolled discharge of any uids used with this unit and
that appropriate arrangements have been made for correct disposal of waste in accordance with government/local authority
regulations.
2. INTRODUCTION & SPECIFICATION
Fully automatic operation - close lid to start and open lid to stop. Corrosion resistant tank suitable for containing water and detergent necessary for
cleaning water based spray guns. Powerful and reliable piston pump system washes up to two guns simultaneously.
Operating Pressure: ................................................ 30-50 psi
Air Consumption:........................................................2-4 cfm
Weight:
........................................................................31.5kg
Cleans: ...........................................................2 pots + 2 guns
Width x Depth x Height:
........................465 x 585 x 1030mm
3. ASSEMBLY
NOTE: Item numbers in brackets are those in the attached Parts Diagram. Instructions should be read in conjunction with this diagram.
3.1. Attach legs to cabinet with screws (63), washers (64) and nuts (65) provided and t drain valve (66) to base of tank (2).
© Jack Sealey Limited
Original Language Version
SM23/2.V3 | Issue 3(S) 01/04/15
4. AIR SUPPLY
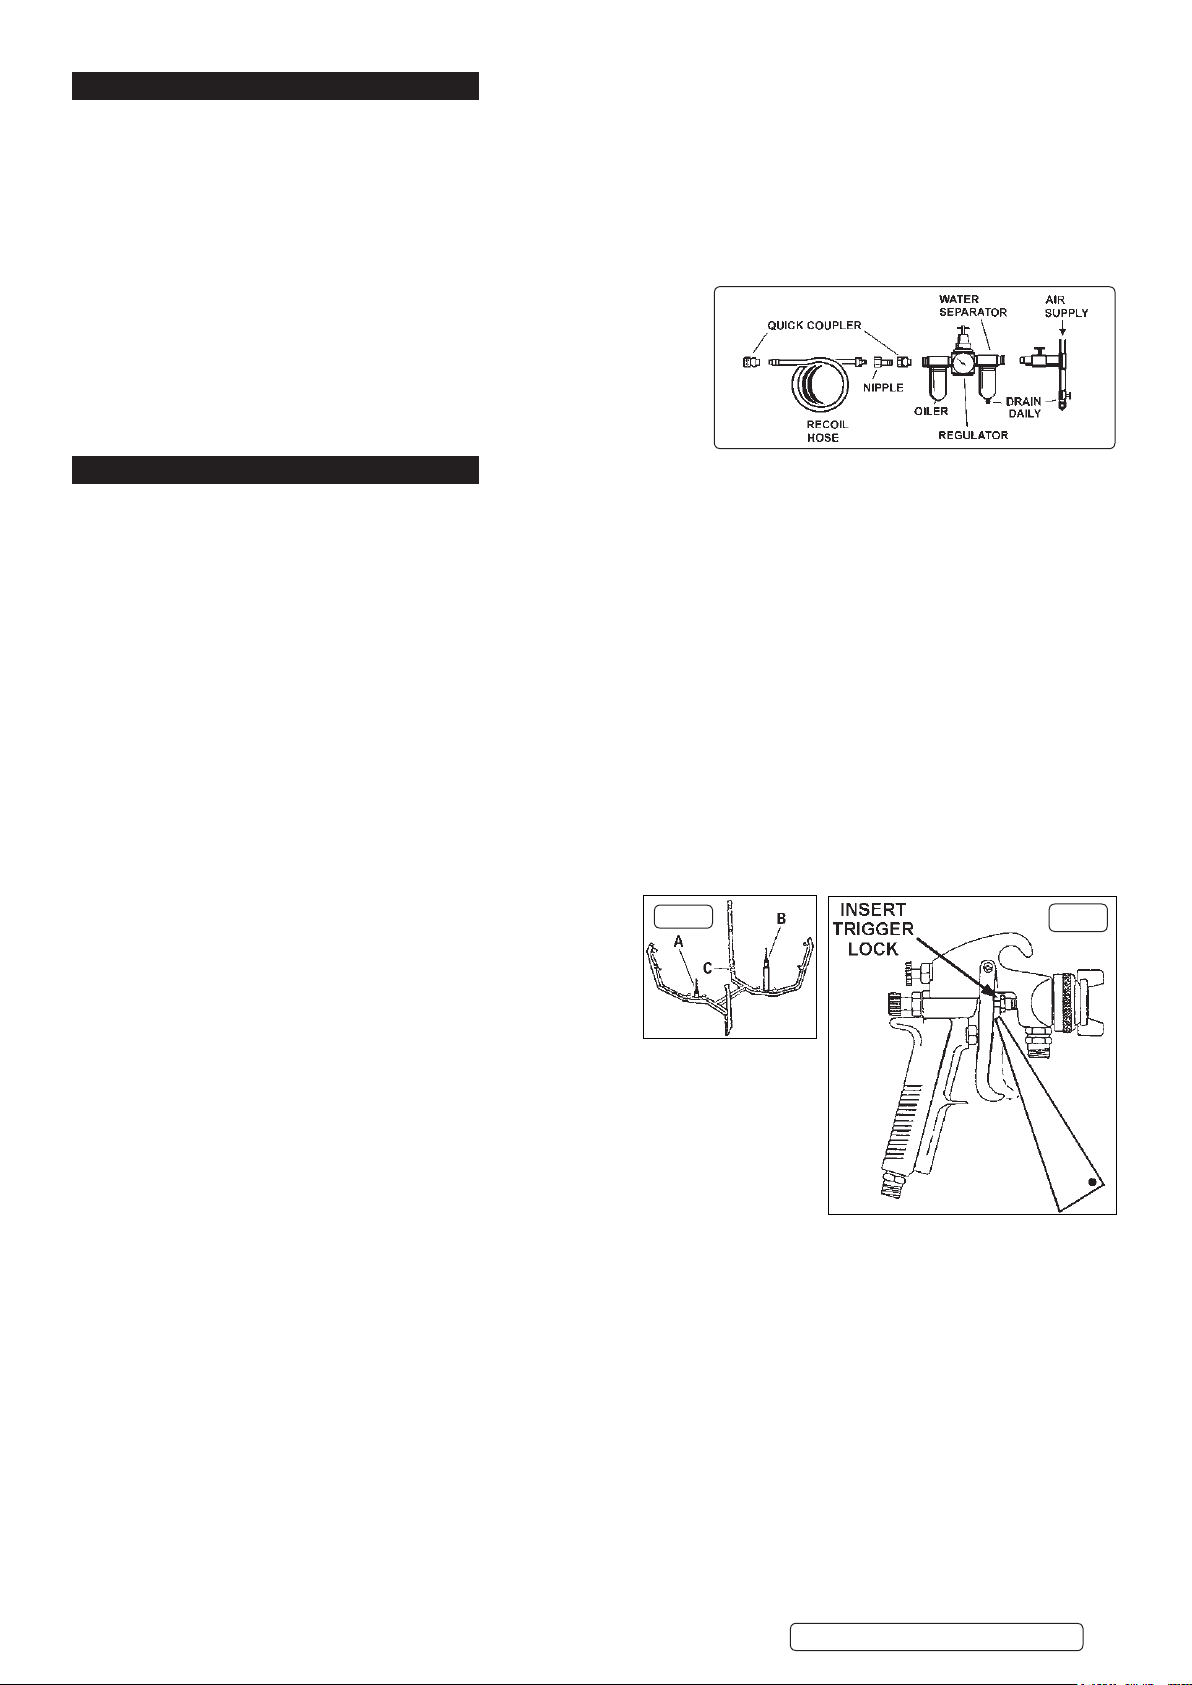
NOTE: The air supply for the SM23/2 must be equipped with a regulator, lter/separator and oiler in order to ensure safe operation and to
prolong the life of the product. These items are not supplied and must be purchased separately. Consult your local Sealey dealer for a suitable
product.
For recommended hook-up, see diagram below.
4.1. Ensure that the air valve (20) is closed before connecting the air supply.
4.2. An air pressure of 30-50psi, and an available air volume of 2-4cfm will be required to operate the unit.
R WARNING! Ensure air supply is clean and does not exceed 50psi. Too high an air pressure and/or unclean air will shorten the
product life due to excessive wear, and may be dangerous, causing possible damage and personal injury.
4.3. Drain the air supply tank daily. Water in the air line will damage the unit.
4.4. Clean the air supply lter weekly.
4.5. Line pressure should be increased to compensate for unusually long air
hoses (over 8 metres). The minimum hose internal diameter should be 10mm
and ttings must have the same internal dimension.
4.6. Keep hose away from heat, oil and sharp edges. Check hoses for wear, and
make certain that all connections are secure.
4.7. The air inlet connection is 1/4”BSP.
5. OPERATION
R WARNING! Ensure you follow the safety instructions. Wear approved safety gloves, goggles, mask, and suitable clothing.
PREPARING TANK & ITEMS FOR CLEANING
5.1. Water based paint. Ensure tank drain valve (66) is closed and then pour water into the tank (2). A suitable detergent (if required)
may be added. Refer to the detergent makers instructions for the correct amount of detergent to be added. Ensure that the nal
water level is at least 1 inch (25mm) above the pump suction strainer (59).
5.2. Conrm air valve (20) is closed and air supply pressure is regulated to not more than 50psi. Turn on air supply.
5.3. Partially open air valve (20) and allow pump to run slowly for approx. 2 minutes to purge uid used for manufacturer’s tests.
5.4. Note: Lid (1) must be closed for pump to operate.
5.5. Check the spray gun to be cleaned, empty and store any excess paint for future use. For best results clean immediately after use,
having removed as much residual paint as possible.
5.6. To open the spray gun for cleaning, squeeze trigger and t trigger lock (56) as shown in g.1.
5.7. Two gun supports are provided, one short (see g.2A) and one long (see g.2B). Use whichever support suits the conguration of
the gun to be cleaned. In general, guns which have top entry paint inlets (e.g gravity feed) can be put on either support provided
they do not foul on the underside of the lid. Guns which have bottom entry paint inlets (e.g suction feed) will usually go onto the
longer support.
5.8. If required gun cleaning nozzle (8) may be tted directly to manifold (6) without items (9) and (10) thus providing two short
nozzles.
5.9. For pressure fed guns up to 2ltr capacity place the syphon stem of the pot cover over the short support and position the gun and
hoses on the screen platform. Over this capacity disconnect the gun from the lines and place on the long support.
5.10. Place pots over nozzles ‘C’ (g.2 - Screen (11) omitted for clarity).
CLEANING
5.11. Ensure washer lid is closed and then open the pump air valve fully
(20).
5.12. The pump will now operate and expel an atomized spray through
the nozzles in the cleaning tank.
5.13. Cleaning will be complete after 45 seconds, at which time the pump
should be turned off by closing the air valve (20).
5.14. Do not operate pump for longer than 2 minutes at any one time as this will reduce seal life.
5.15. Open lid and remove cleaned equipment.
NOTE: If, during cleaning, the lid is opened, cleaning process will automatically stop.
Close the lid for cleaning to continue.
DO NOT store guns in tank.
fig. 2
fig. 1
© Jack Sealey Limited
Original Language Version
SM23/2.V3 | Issue 3(S) 01/04/15

6. CLEANING AGENT CHANGE
R WARNING! It is operator’s responsibility to ensure that there is no uncontrolled discharge of any uids used with this unit and
that appropriate arrangements have been made for correct disposal of waste in accordance with government/local authority
regulations.
R WARNING! Disconnect the air supply from the unit before changing accessories, servicing or performing any maintenance.
R WARNING! Wear approved safety gloves, goggles, mask and suitable clothing.
6.1. Replacement of cleaning water.
6.2. The number of guns that can be cleaned will depend upon the amount of residual paint which is left in the spray equipment. We
recommend however that the cleaning water is changed on a regular basis to provide optimum cleaning performance and that
paint sludge is removed weekly, as detailed below.
Sludge removal:
6.3. Drain 2 litres of water/sludge from the drain valve (66). Close the valve and add clean water to the tank to bring the level up to at
least 25mm above strainer.
W
ater change:
6.4. Drain the dirty water completely from drain valve (66). Clean inside the tank (2) and strainer (59) before relling with clean water.
Dispose of contaminated water in accordance with local authority regulations.
6.5. MAINTENANCE:
Weekly, remove pump upper cap (45) and add grease.
6.6. Regularly check that opening the washer lid automatically stops the spray.
6.7. Regularly check and top up the oil in the air supply oiler.
6.8. Keep the outside of the unit clean.
Environmental Protection
Recycle unwanted materials instead of disposing of them as waste. All tools, accessories and packaging should be sorted,
taken to a recycling centre and disposed of in a manner which is compatible with the environment.
NOTE: It is our policy to continually improve products and as such we reserve the right to alter data, specications and component parts without prior notice.
IMPORTANT: No liability is accepted for incorrect use of this product.
WARRANTY: Guarantee is 12 months from purchase date, proof of which will be required for any claim.
© Jack Sealey Limited
Sole UK Distributor, Sealey Group.
Kempson Way, Suffolk Business Park,
Bury St. Edmunds, Suffolk.
IP32 7AR
Original Language Version
01284 757500
01284 703534
www.sealey.co.uk
Web
sales@sealey.co.uk
SM23/2.V3 | Issue 3(S) 01/04/15
 Loading...