

Page 1
INSTRUCTIONS FOR:
HALOGEN AUTO SECURITY LIGHT WITH
CAMERA 300W/230V
MODEL No: SL300
Thank you for purchasing a Sealey product. Manufactured to a
high standard this product will, if used according to these instructions and properly maintained, give you years of trouble free performance.
IMPORTANT: PLEASE READ THESE INSTRUCTIONS CAREFULLY. NOTE THE SAFE OPERATIONAL REQUIREMENTS, WARNINGS, AND
CAUTIONS. USE THIS PRODUCT CORRECTLY, AND WITH CARE FOR THE PURPOSE FOR WHICH IT IS INTENDED. FAILURE TO DO SO
MAY CAUSE DAMAGE, OR PERSONAL INJURY, AND WILL INVALIDATE THE WARRANTY.
1. SAFETY INSTRUCTIONS
3. INSTALLATION
2. INTRODUCTION
Original Language Version
SL300 Issue: 2 - 18/10/12
1.2. GENERAL SAFETY.
WARNING! Turn off the mains power supply before servicing or
performing any maintenance.
Maintain the unit in good condition (Repairs must only be undertaken
by a qualified electrician).
Only use genuine replacement halogen tubes (Sealey Part No.
ML300/01).
Ensure the unit is installed correctly in accordance with these
instructions.
Only install the unit on a vertical surface. DO NOT fix the unit on any
horizontal surface i.e. ceiling, or overhang.
Ideally the Installation should be away from flammable or combustible
materials such as wood, cloth, paper etc.
DANGER! DO NOT direct the light into a persons eyes. This unit
has a very intensive light output, which if incorrectly used could
cause eye damage.
DO NOT install the unit where it is likely to be knocked or hit.
DO NOT install in bathrooms, shower rooms, sauna or such locations.
DO NOT install near an exhaust outlet. i.e. Boiler flue, dryer outlet, etc.
DO NOT touch the light when operating, allow to cool before touching,
light operates at high temperature.
DO NOT use the light without the front glass shield. Avoid touching the
glass shield as handling may reduce its serviceable life and cause the
glass to crack.
DO NOT use the unit near flammable, combustible or explosive
liquids, solids, gases or equipment.
1.1. ELECTRICAL.
WARNING! It is the user’s responsibility to read, understand and
comply with the following:
You must check all electrical equipment and appliances to ensure they
are safe before using. You must inspect power supply leads, plugs and
all electrical connections for wear and damage. You must ensure the risk
of electric shock is minimised by the installation of appropriate safety
devices. An RCCB (Residual Current Circuit Breaker) should be
incorporated in the main distribution board. You must also read and
understand the following instructions concerning electrical safety:
1.1.1. Ensure the unit is connected to an appropriate electrical on/off switch.
1.1.2. Ensure the insulation on all cables and the product itself is safe before
connecting to the mains power supply.
1.1.3. Ensure that cables are always protected against short circuit and
overload.
1.1.4. Regularly inspect power supply, leads, plugs and all electrical
connections for wear and damage, especially power connections, to
ensure that none are loose.
1.1.5. Important: Ensure the voltage marked on the product is the same as
the electrical power supply to be used.
1.1.6. DO NOT pull power cable once installed.
1.1.7. DO NOT pull power plugs from sockets by the power cable.
1.1.8. DO NOT use worn or damaged leads, plugs or connections.
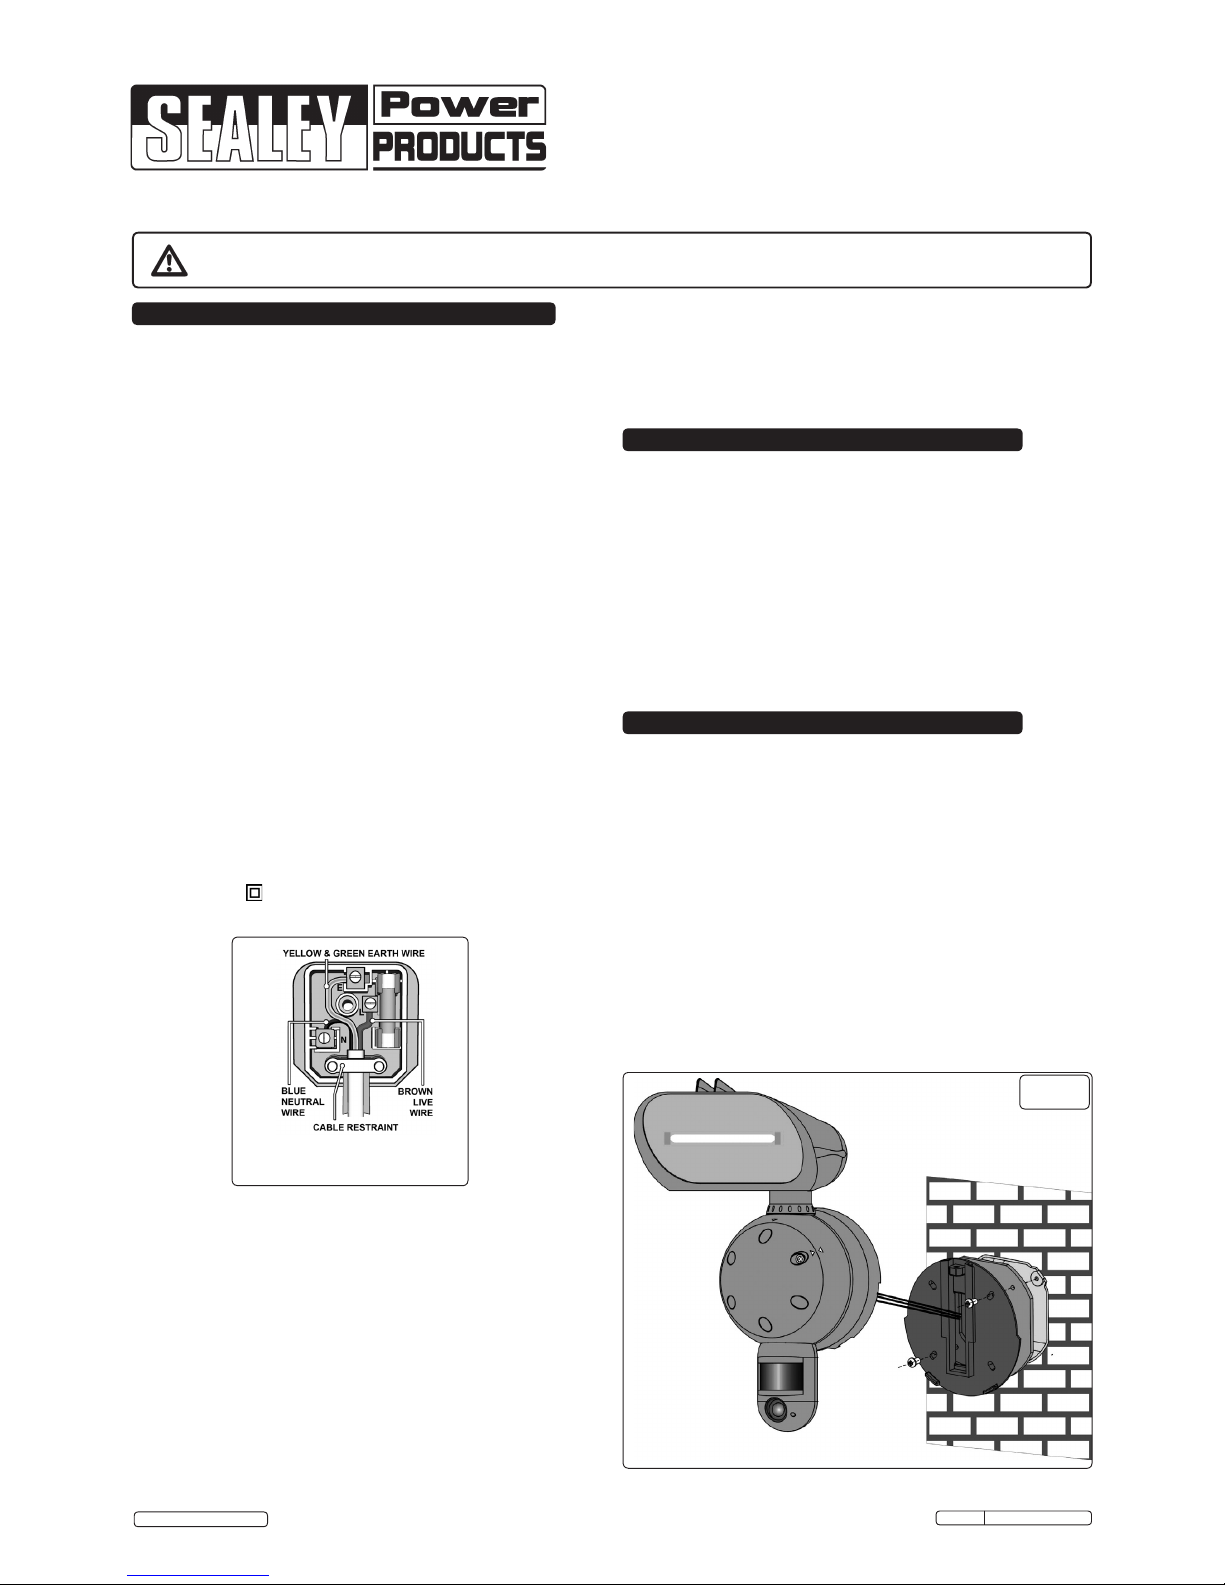
Immediately replace or have repaired by a qualified electrician. A UK 3
pin plug with ASTA/BS approval is fitted. In case of damage, cut off and
fit a new plug according to the following instructions (discard old plug
safely). (UK only - see diagram below).
a) Connect the GREEN/YELLOW earth wire to the earth terminal ‘E’.
b) Connect the BROWN live wire to live terminal ‘L’.
c) Connect the BLUE neutral wire to the neutral terminal ‘N’.
d) After wiring, check there are no bare wires, that all wires have been
correctly connected and that the wire restraint is tight.
Double insulated products are fitted with live (BROWN) and neutral
(BLUE) wires only. Double insulated products are always marked with
this symbol . To re-wire, connect the brown and blue wires as
indicated above. DO NOT connect the brown or blue to the earth
terminal.
High powered floodlight with built in security camera, fitted with a 300W
halogen tube. Features a 5 megapixel camera with PIR sensor for a
crystal clear image. Unit can be adjusted to capture 3 or 9 burst pictures
or video footage. Automatically starts capturing footage as soon as the
PIR sensor is activated and is date and time stamped for easy
distinction. All footage is stored via an on-board SD card (not supplied),
which can be removed for easy viewing on laptop/computer. Features
timing and capture setting controls allowing the user to easily adjust the
delay between the picture bursts and adjusting the length of video
capture. All settings are shown on LCD display. When SD card memory
is full, the SL300 automatically cycles through and replaces old footage
ensuring that you always have the most up to date recordings available.
Unit is fitted with protective front cover designed to hide and protect
controls and SD card. IP44 weatherproof design.
WARNING! DO NOT connect unit to the mains power supply before
installation. When properly installed, the SL300 can only then be
connected to the mains.
3.1. FITTING.
3.1.1. Give careful consideration to the position of the unit to ensure you
obtain maximum benefit from the lighting range, and that an appropriate
electrical power source can be provided.
3.1.2. Mount the SL300 to a solid vertical surface more than ½" or 12.7mm
thick in a secure location, overseeing the area to be monitored. Screws
are provided with SL300 for installation.
3.1.3. Mount the SL300 at least 2 metres above ground level with the camera
pointing at a downward angle of 15°. Avoid mounting the SL300 facing
to the East or to the West as the rising and setting of the sun may
produce false triggers and over exposed images.
NOTE! It is recommended that EVA foam is installed between the wall
mounting bracket (fig.2-10) and the wall to protect the unit.
3.1.4. Ensure the area in front of the SL300 is clear of any branches and other
obstuctions that may obscure the PIR sensor.
© Jack Sealey Limited
fig.1
RECOMMENDED FUSE RATING:
3AMP
Page 2
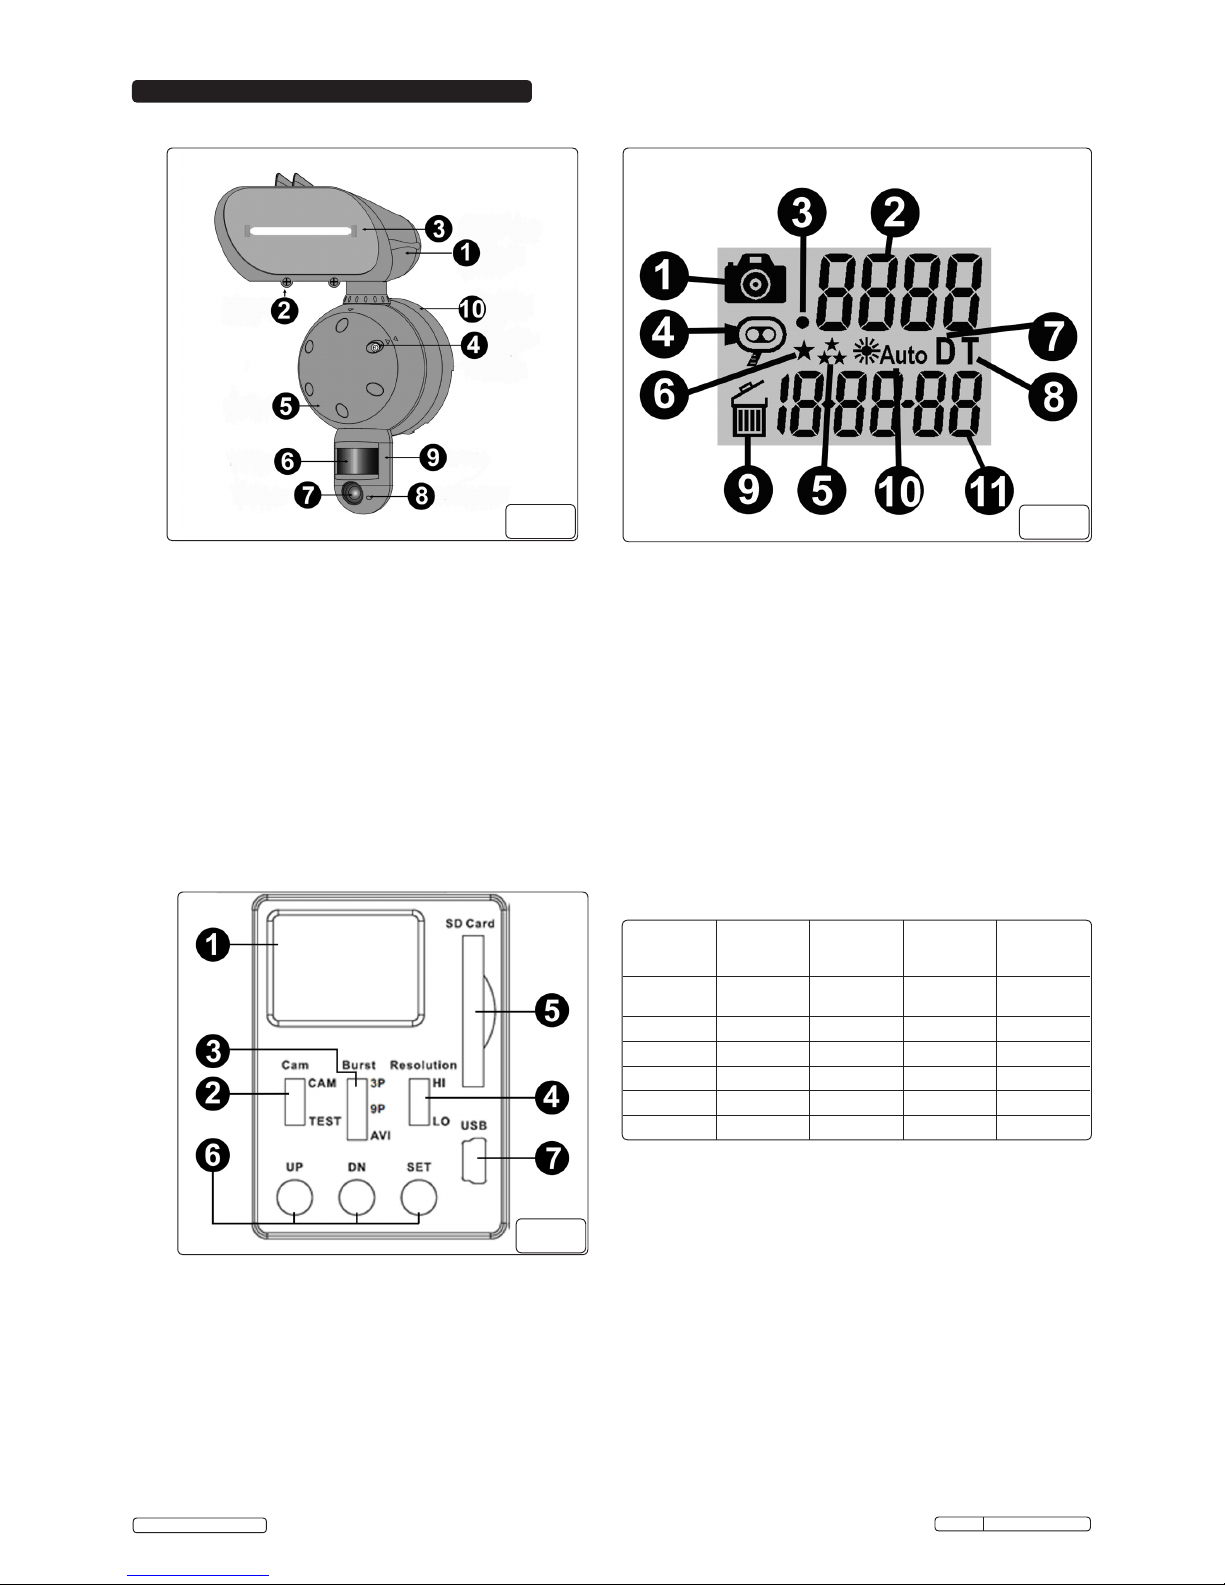
4.2. CONTROL PANEL (g.3)
4.4.1. The Picture/Image Capacity Chart shows the approximate number of
images or video clips that can be stored based on the resolution setting
and the size of the memory card. These figures may vary depending on
the amount of detail in the image. When the memory card is full, the
earliest data will be overwritten to ensure retention of the most recent
data.
4.4.2. The SL300 is equipped with 32MB of built in SDRAM memory. Any data
stored on the internal memory may be lost during a power failure.
4.4.3. The SD Memory Card Slot (fig.3-5) is capable of accepting SD cards
with up to 16GB of memory. When a SD is inserted, the internal
memory will be bypassed, and all data stored on the SD card. DO NOT
insert or remove a SD card when SL300 is connected to the power
source. This may cause a malfunction.
4.4.4. The Image Counter (fig.4-2) will indicate the number of images on
either the internal memory, or the external memory if a SD card is
inserted.
Original Language Version
SL300 Issue: 2 - 18/10/12
© Jack Sealey Limited
4. CONTROLS & FUNCTIONS
1. LCD Display: Icon display showing settings and captured image/video
quantity. Refer to Section 4.3 of this manual.
2. Cam Switch: To set the camera mode as Capture or Test.
3. Burst Switch: To set the burst of still image or video.
4. Resolution Switch: To set the still image and video resolution.
5. SD Memory Card Slot: To install a SD card. Ensure SD card is firmly
pushed in. To remove, gently press the SD card in, release and the
card will eject from the slot.
6. SET/UP/DOWN Button: To program the camera parameters as Date/
Time/Video Recording Time/Image and Video Capturing Interval Time.
7. USB Jack: To connect the USB cable from SL300 to PC for access to
captured images/video.
4.3. LCD DISPLAY (g.4)
1. Still Image Capture: Indicates that the SL300 is set to capture still
images.
2. Image Counter: Displays how many images or videos have been
captured.
3. Storage Status: Indicates that an external SD card is installed.
4. Video Capture: Indicates that the SL300 is set to video capture.
Recording time will depend on the video recording time setting.
5. High Resolution: Indicates that the SL300 is set to high resolution
image or video capturing.
6. Low Resolution: Indicates that the SL300 is set to low resolution
image or video capturing.
7. Date Setting: Indicates that the SL300 is in Date setting.
8. Time Setting: Indicates that the SL300 is in Time setting
9. Delete: Indicates that the SL300 is in delete mode.
10. Floodlight Control: Indicates that auto-enviromental brightness
detection is operating the floodlight.
11. Time Indicator: Displays the Date/Time/Video Recording Time/Image
and Video Capturing Interval Time.
NOTE! Press the SET button (fig.3-6) to exit modes.
4.1. FRONT VIEW (g.2)
1. Floodlight: Can be rotated ±30° and tilted 10°.
2. Floodlight Cover: Retained by two screws which can be removed to
replace halogen tube.
3. Halogen Tube: Must be replaced by a tube of the correct voltage and
power (Sealey Part No. ML300/01).
4. Front Cover Retaining Screw.
5. Front Cover.
6. PIR: Passive Infrared movement sensor.
7. Camera Lens: Digital camera lens. Clean with a soft cloth.
8. TEST Indicator: Red LED indicates the PIR detection coverage area.
9. Camera Body: Can be rotated and tilted to adjust PIR detection area.
Maximum rotation is ±30° and maximum tilt is 30°
10. Wall Mount Bracket: Mounts the SL300 to a wall (screws provided). It
is recommended that EVA foam is installed between the wall mounting
bracket and the wall to protect the unit.
SD Card
High 5M
2592 x
1944
High 2M
1600 x
1200
AVI VGA
10 seconds
AVI QVGA
10 seconds
Built in
Memory 12 24 1 2
1GB 512 1024 51 102
2GB 1024 2048 102 204
4GB 2048 4096 204 408
8GB 4096 8192 408 816
16GB 8192 16384 816 1632
4.4. PICTURE/IMAGE CAPACITY
fig.3
fig.2
fig.4
Page 3
Original Language Version
SL300 Issue: 2 - 18/10/12
© Jack Sealey Limited
5. SET UP PROCEDURE
5.1. INSERTING SD CARD.
WARNING! DO NOT insert the SD card when the SL300 is connected
to the power source. This may cause the SD card to malfunction.
NOTE! Ensure that the SD card does not contain any other images
before inserting.
5.1.1. Remove the front cover retaining screw (fig.2-4). Rotate the front cover
(fig.2-5) counter-clockwise and release from the main body of the
SL300.
5.1.2. Insert the SD card into the SD card memory slot (fig.3-5).
NOTE! The SD card can only be inserted in one way. If the card does
not insert into the slot, DO NOT force it. Remove the card and rotate it
to the correct orientation and re-insert.
5.1.3. To remove the SD card from the SD card slot, gently press the SD card
in, release and the card will eject from the slot.
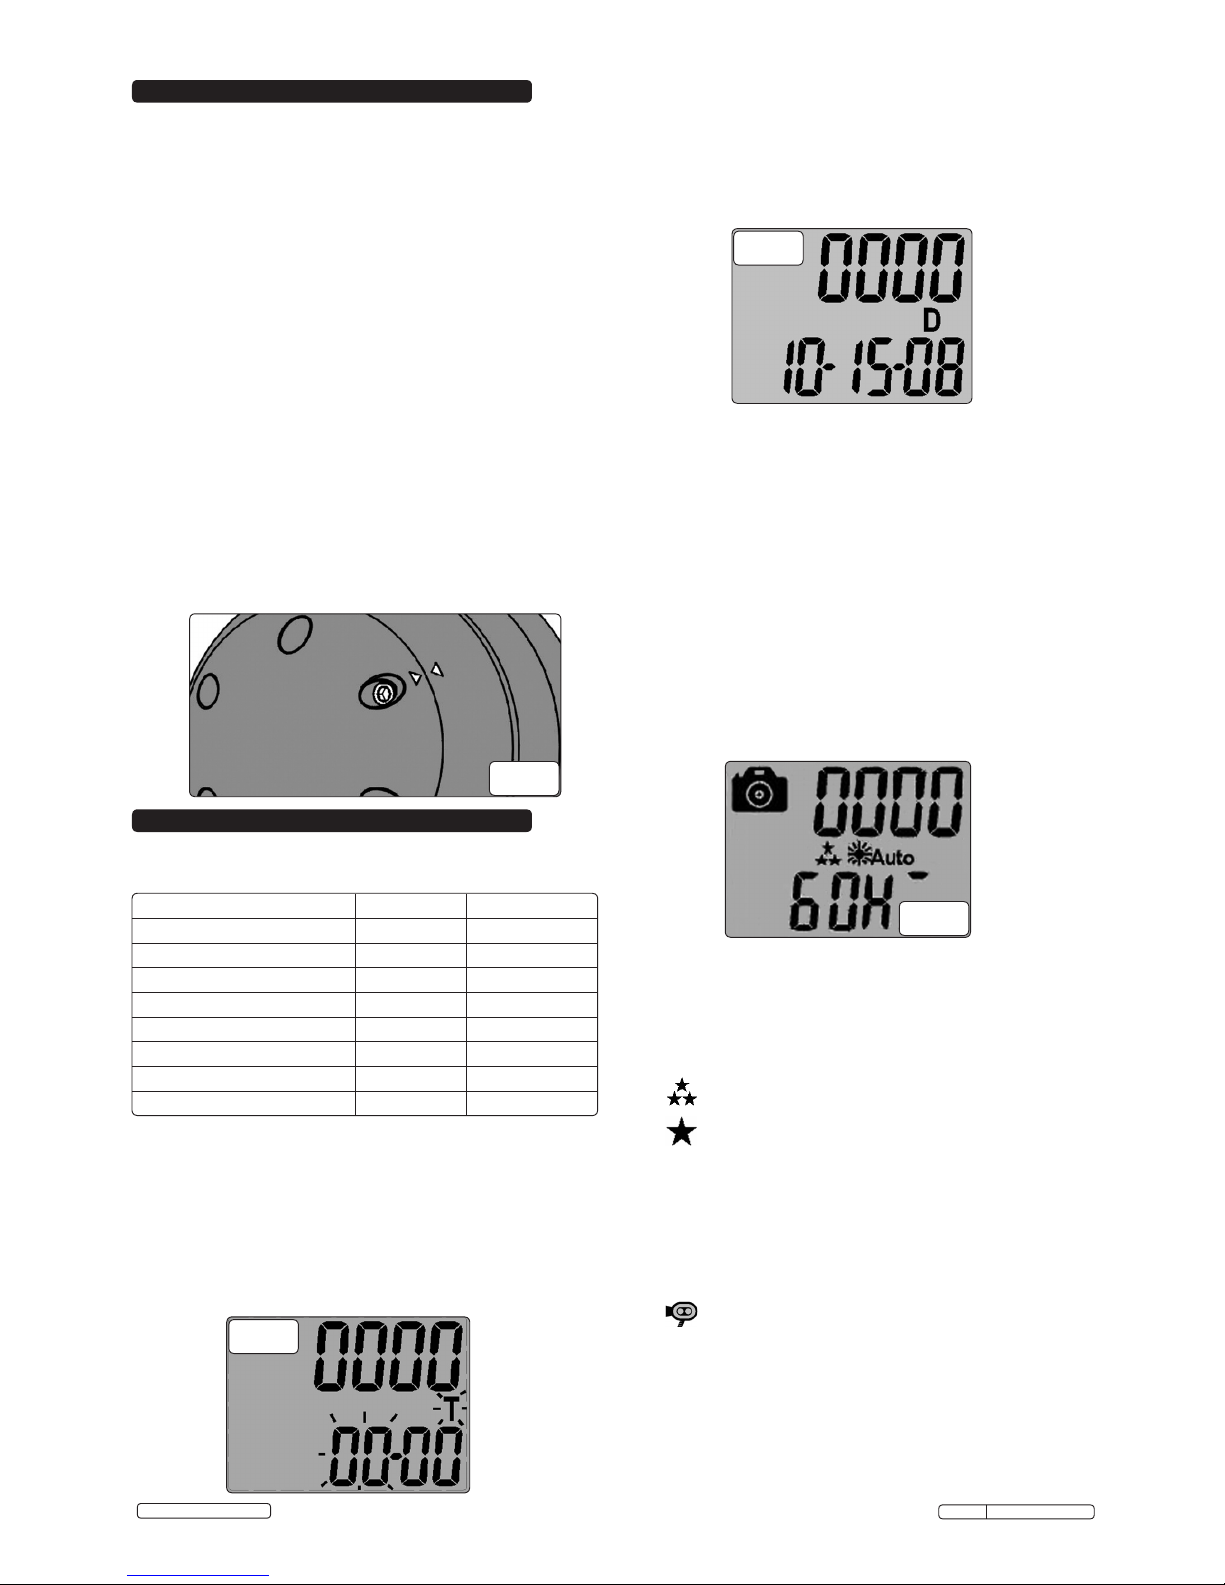
5.1.4. To replace the front cover (fig.2-5), place onto the main body of the
SL300 and rotate clockwise until the two arrows are aligned (fig.5).
Insert the front cover retaining screw (fig.2-4) and tighten.
5.2. TESTING THE PIR COVERAGE AREA.
5.2.1. Once the SL300 is correctly installed (Section 3), remove the front cover
as described above and switch on the power, the SL300 will turn on
automatically.
5.2.2. Slide the cam switch (fig.3-2) to 'TEST' and the LCD display (fig.3-1) will
show 'TEST'.
5.2.3. In 'TEST' mode, each time the PIR is triggered the test indicator LED
(fig.2-8) will flash red. Walk around the coverage area to determine
whether the SL300 is suitably mounted. Adjust the position of the
camera body (fig.2-9) until the desired coverage area is achieved.
5.2.4. Slide the cam switch (fig.3-2) to 'CAM'. The test indicator LED (fig.2-8)
will flash red and commence operation in 60 seconds.
5.2.5. Re-fit the front cover (fig.2-5) as described on paragraph 5.1.4.
6. ADJUSTING THE SETTINGS
6.1. DEFAULT SETTINGS
6.1.1. The SL300 can be used immediately with the default settings detailed
in the chart below:
SETTING DEFAULT PARAMETERS
Time 12:00 HH:MM
Date 01:01:10 MM:DD:YY
AE Frequency 50Hz 50/60
Image Capture Interval 1 second 01-99 seconds
Resolution High High/Low
Image Capture Method Video Video/Photo
Floodlight Control Auto Auto
Video Recording Time 10 seconds 10-60 seconds
NOTE! Always ensure that the cam switch (fig.3-2) is set to 'CAM'
before altering any settings. After altering any settings the test indicator
LED (fig.2-8) will flash for 60 seconds before arming.
6.2. SETTING THE TIME AND DATE.
NOTE! The SL300 uses the 24hr clock format.
6.2.1. Remove the front cover (fig.2-5) as described in Section 5 and switch on
the power. The SL300 will automatically turn on and commence the 60
second arming procedure.
6.2.2. Press and hold the SET button (fig.3-6) until 'T' shows on the display
(fig.6).
fig.5
6.2.3. Press the UP or DN buttons (fig.3-6) to adjust the HOURS. Press SET
button (fig.3-6) to confirm the HOURS setting and go to the MINUTES
setting.
6.2.4. Press the UP or DN buttons (fig.3-6) to adjust the MINUTES setting.
6.2.5. Press the SET button (fig.3-6) to confirm the MINUTES setting, and go
to the DATE setting, the display will show 'D' (fig.7)
fig.6
fig.7
6.2.6. Press the UP or DN buttons (fig.3-6) to adjust the MONTH. Press SET
button (fig.3-6) to confirm the MONTH setting and go to the DAY
setting.
6.2.7. Press the UP or DN buttons (fig.3-6) to adjust the DAY setting.
6.2.8. Press the SET button (fig.3-6) to confirm the DAY setting, and go
to the YEAR setting.
6.2.9. Press the UP or DN buttons (fig.3-6) to adjust the YEAR setting.
6.2.10. Once the time and date settings are completed, press and hold the
SET button (fig.3-6) for 2 seconds to exit.
NOTE! The time and date will stamp to captured images and the first
frame of video.
NOTE! It will be necessary to reset the time and date should the
SL300 be disconnected from the power supply.
6.3. SETTING THE AE FREQUENCY.
NOTE! For the UK the AE frequency must be set to 50Hz
6.3.1. Press the SET button (fig.3-6) once, the display will show 'ESC'.
6.3.2. Using the UP or DN buttons (fig.3-6) navigate the menu until the display
shows 'AE'.
6.3.3. Press the SET button (fig.3-6) to enter the 'AE' setting. The display will
indicate either 50Hz or 60Hz (fig.8).
6.3.4. Using the UP or DN buttons (fig.3-6) will alter the AE frequency setting.
Once the desired setting has been selected, press the SET button
(fig.3-6) to confirm and revert back to 'AE' on the display menu.
6.3.5. Navigate the display menu using the UP or DN buttons (fig.3-6) until
'ESC' is displayed and press SET (fig.3-6) to exit.
6.4. SETTING THE RESOLUTION.
6.4.1. Slide the RESOLUTION switch (fig.3-4) to either HI or LO as desired.
on the display is High Resolution 5.0M or VGA video recording.
on the display is Low Resolution 2.0M or QVGA video recording.
6.5. SETTING THE BURST CAPTURING AND VIDEO CAPTURING.
6.5.1. Slide the BURST switch (fig.3-3) to 3P for the camera to take 3 images
per trigger.
6.5.2. Slide the BURST switch (fig.3-3) to 9P for the camera to take 9 images
per trigger.
6.5.3. Slide the BURST switch (fig.3-3) to AVI for the camera to take a video
per trigger. Video recording timing can be set as described in Section
6.7.
on the display is Video Capturing.
6.6. SETTING THE CAPTURE INTERVAL TIME.
6.6.1. Press the SET button (fig.3-6) once, the display will show 'ESC'.
6.6.2. Using the UP or DN buttons (fig.3-6) navigate the menu until the display
shows 'To'.
6.6.3. Press the SET button (fig.3-6) to enter the 'To' setting. The display will
indicate 'To 01'.
6.6.4. Using the UP or DN bittons (fig.3-6) will alter the capturing interval time
from 01 to 99 seconds in increments of 1 second. Once the desired
setting has been selected, press the SET button (fig.3-6) to confirm and
revert back to 'To' on the display menu.
fig.8
Page 4
Original Language Version
SL300 Issue: 2 - 18/10/12
© Jack Sealey Limited
6.6.5. Navigate the display menu using the UP or DN buttons (fig.3-6) until
'ESC' is displayed and press SET (fig.3-6) to exit.
6.7. SETTING THE VIDEO RECORDING TIME.
6.7.1. Press the SET button (fig.3-6) once, the display will show 'ESC'.
6.7.2. Using the UP or DN buttons (fig.3-6) navigate the menu until the display
shows 'AUt'.
6.7.3. Press the SET button (fig.3-6) to enter the video recording time setting.
The display will indicate 'AUt 10'.
6.7.4. Using the UP or DN buttons (fig.3-6) will alter the video recording time
from 01 to 60 seconds in increments of 1 second. Once the desired
setting has been selected, press the SET button (fig.3-6) to confirm and
revert back to 'AUt' on the display menu.
6.7.5. Navigate the display menu using the UP or DN buttons (fig.3-6) until
'ESC' is displayed and press SET (fig.3-6) to exit.
6.8. DELETING IMAGES/VIDEO.
6.8.1. Press the SET button (fig.3-6) once, the display will show 'ESC'.
6.8.2. Using the UP or DN buttons (fig.3-6) navigate the menu until the display
shows 'dEL'.
6.8.3. Press the SET button (fig.3-6) to enter the delete setting. The display
will indicate 'd_ONE'.
6.8.4. Use the UP or DN buttons (fig.3-6) to select 'd_ONE' (delete last one),
'D_ALL' (delete all), 'F T' (format SD card) or 'D_ESC' (to exit the delete
setting).
6.8.5. Press the SET button (fig.3-6) to confirm and the display will indicate
'dONE'.
NOTE! Once an image or video has been deleted, it cannot be
recovered.
6.8.6. Navigate the display menu using the UP or DN buttons (fig.3-6) until
'ESC' is displayed and press SET (fig.3-6) to exit. When SET is
pressed, the SL300 will commence the 60 second arming process.
6.8.7. Replace the front cover as described in Section 5.
7. VIEWING IMAGES VIA PC
7.1. CONNECTION.
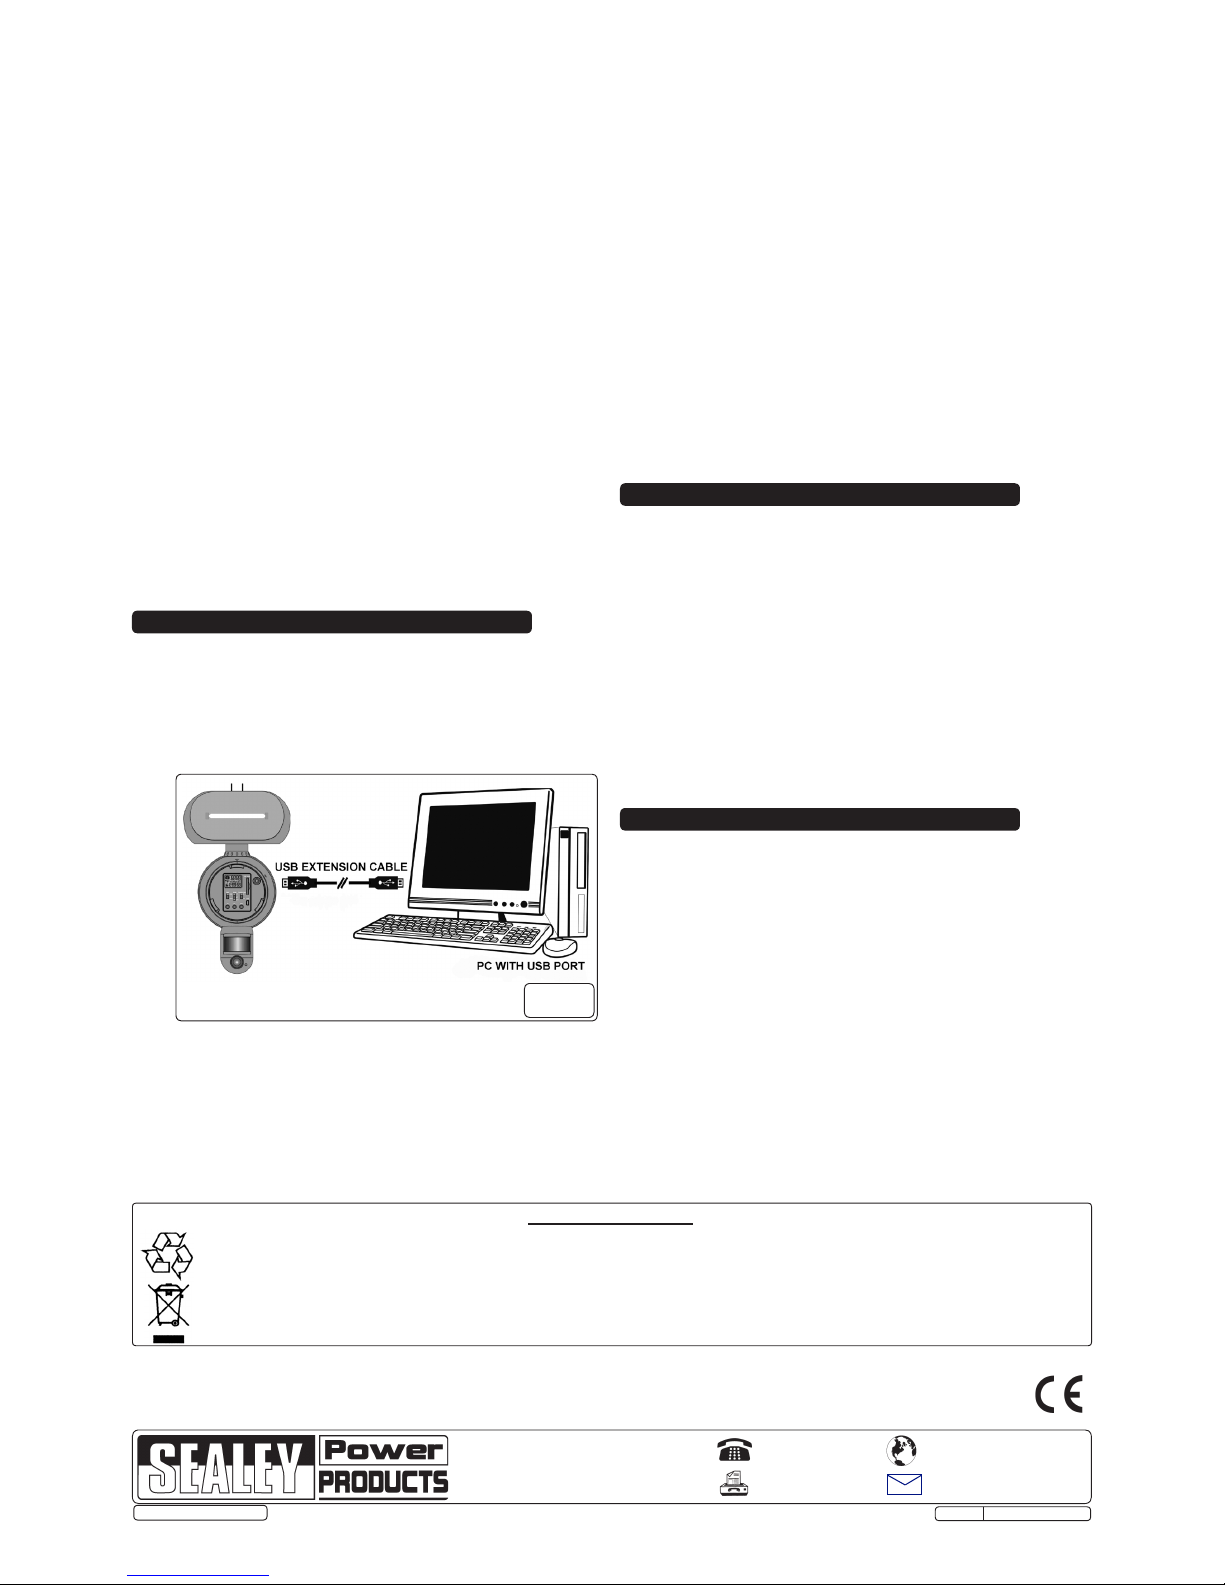
7.1.1. The SL300 can be connected to a PC using the USB lead provided
(fig.9), or by inserting the SD card into a card reader. Images may also
be viewed from the SD card using a digital camera.
7.1.2. When connected to a PC, the SD card will be shown as a removable
hard drive. Windows Explorer can be used to view the captured images
and the captured images can be copied or deleted directly using the
PC.
fig.9
7.3. USING SL300 AS A WEB CAM.
7.3.1. Install the SL300 Web Cam driver to the PC. Insert the CDROM
provided, then click SETUP.EXE to install the driver.
7.3.2. Remove the front cover (fig.2-5) as described in Section 5.
7.3.3. Slide the cam switch (fig.3-2) to 'TEST'.
7.3.4. Connect the USB lead to the USB port (fig.3-7) and to a USB port on
the PC. The SL300 will automatically change to web cam mode and the
display (fig.3-1) will indicate 'PC_C'.
7.3.5. The PC will set up the installed driver automatically. Windows
application software will now allow the viewing of live images.
NOTE! Only Win 2000, Win Me, Win XP and Win Vista will support the
viewing of live images with SL300.
NOTE! The use of an excessively long USB lead will affect picture
quality.
7.4. SYSTEM REQUIREMENTS AND COMPATIBILITY.
7.4.1. Windows 2000/Me/XP/Vista/Win 7.
NOTE! Win 7 does not support live viewing.
7.4.2. Pentium 1GMHz or equivalent processor.
7.4.3. 256MB SDRAM or above.
7.4.4. VGA Video Card with 32MB RAM minimum.
7.4.5. Colour 32 bit or higher.
7.4.6. Sound Card.
7.4.7. An available CDROM driver and spare USB Port.
7.4.8. 20GB available hard drive space.
8. MAINTENANCE
8.1. REPLACING THE HALOGEN TUBE.
WARNING! Ensure that the floodlight has cooled down before
attempting to replace the halogen tube.
8.1.1. Disconnect SL300 from the power supply.
8.1.2. Remove the two floodlight cover screws and open the floodlight
cover (fig.2-2).
8.1.3. Carefully remove the unserviceable tube.
8.1.4. Insert new tube (Sealey Part No. ML300/01) making sure that there is no
bare skin contact with the tube glass surface.
NOTE! Natural oils in the skin left on the tube glass surface will cause it
to overheat and fail.
8.1.5. Close the floodlight cover (fig.2-2) and secure with the retaining screws.
8.2. CLEANING THE SL300.
8.2.1. Clean the camera lens with a soft lens cloth. Avoid touching camera lens
with fingers.
8.2.2. Clean the exterior of the SL300 using a cloth dampened with water or a
mild detergent.
7.2. VIEWING IMAGES FROM SL300 DIRECTLY ON A PC.
7.2.1. Remove the front cover (fig.2-5) as described in Section 5.
7.2.2. Slide the cam switch (fig.3-2) to 'CAM'.
7.2.3. Connect the USB lead to the USB port (fig.3-7) and to a USB port
on the PC. The SL300 display (fig.3-1) will indicate 'USb'.
7.2.4. The internal memory or SD card will be shown on the PC as a
removable hard drive.
9. FEATURES AND SPECIFICATION
9.1. FEATURES.
9.1.1. Colour CMOS Image Sensor 5M pixels.
9.1.2. Built in 32MB SDRAM for image buffer and image storage.
9.1.3. SD Card slot for additional storage, max memory size up to 16GB.
9.1.4. Automatic exposure control, white balance and sharpness.
9.1.5. High precision 4 piece glass lens with IR coating.
9.1.6. Auto light sensor.
9.2. SPECIFICATION.
9.2.1. PIR detection angle: 52°
9.2.2. PIR detection range: 9 metres
9.2.3. Maximum resolution: 5.0M pixels, 2592 x 1944 pixels.
9.2.4. Image performance for video stream: 30 fps at 640 x 480 pixels and
30 fps at 320 x 240 pixels.
9.2.5. Focusing: 1.5 metres (minimum) to infinity.
9.2.6. Effective viewing angle: 48°
9.2.7. Interface type: USB 1.1
9.2.8. Image Format: JPEG, MPEG
9.2.9. Product weight: 1.2kg
9.2.10. Operating environment: 14-104°F (-10-40°C). 20-85% relative humidity,
non-condensation.
NOTE: It is our policy to continually improve products and as such we reserve the right to alter data, specifications and component parts without prior notice.
IMPORTANT: No liability is accepted for incorrect use of this product.
WARRANTY: Guarantee is 12 months from purchase date, proof of which will be required for any claim.
INFORMATION: For a copy of our latest catalogue and promotions call us on 01284 757525 and leave your full name and address, including postcode.
01284 757500
01284 703534
Sole UK Distributor, Sealey Group,
Kempson Way, Suffolk Business Park,
Bury St. Edmunds, Suffolk,
IP32 7AR
www.sealey.co.uk
Web
Environmental Protection.
Recycle unwanted materials instead of disposing of them as waste.
All tools, accessories and packaging should be sorted, taken to a recycle centre and disposed of in a manner which is compatible with the
environment.
When the product is no longer required, it must be disposed of in an environmentally protective way. Contact your local solid waste authority for
recycling information.
email
 Loading...