

Sealey SHY900S,SHY1200S Instructions Manual

9 Read the manufacturer's manual for the vehicle being started: the manufacturer may have specic cautions and instructions regarding
emergency starting procedures.
9 Ensure that the vehicle is in a well ventilated area.
9 Apply the handbrake and select neutral or 'park' before attempting to start.
9 Ensure that the ignition switch and all ancillary electrical equipment is switched off.
9 Keep clear of any pulleys, belts etc. that will move once the engine starts.
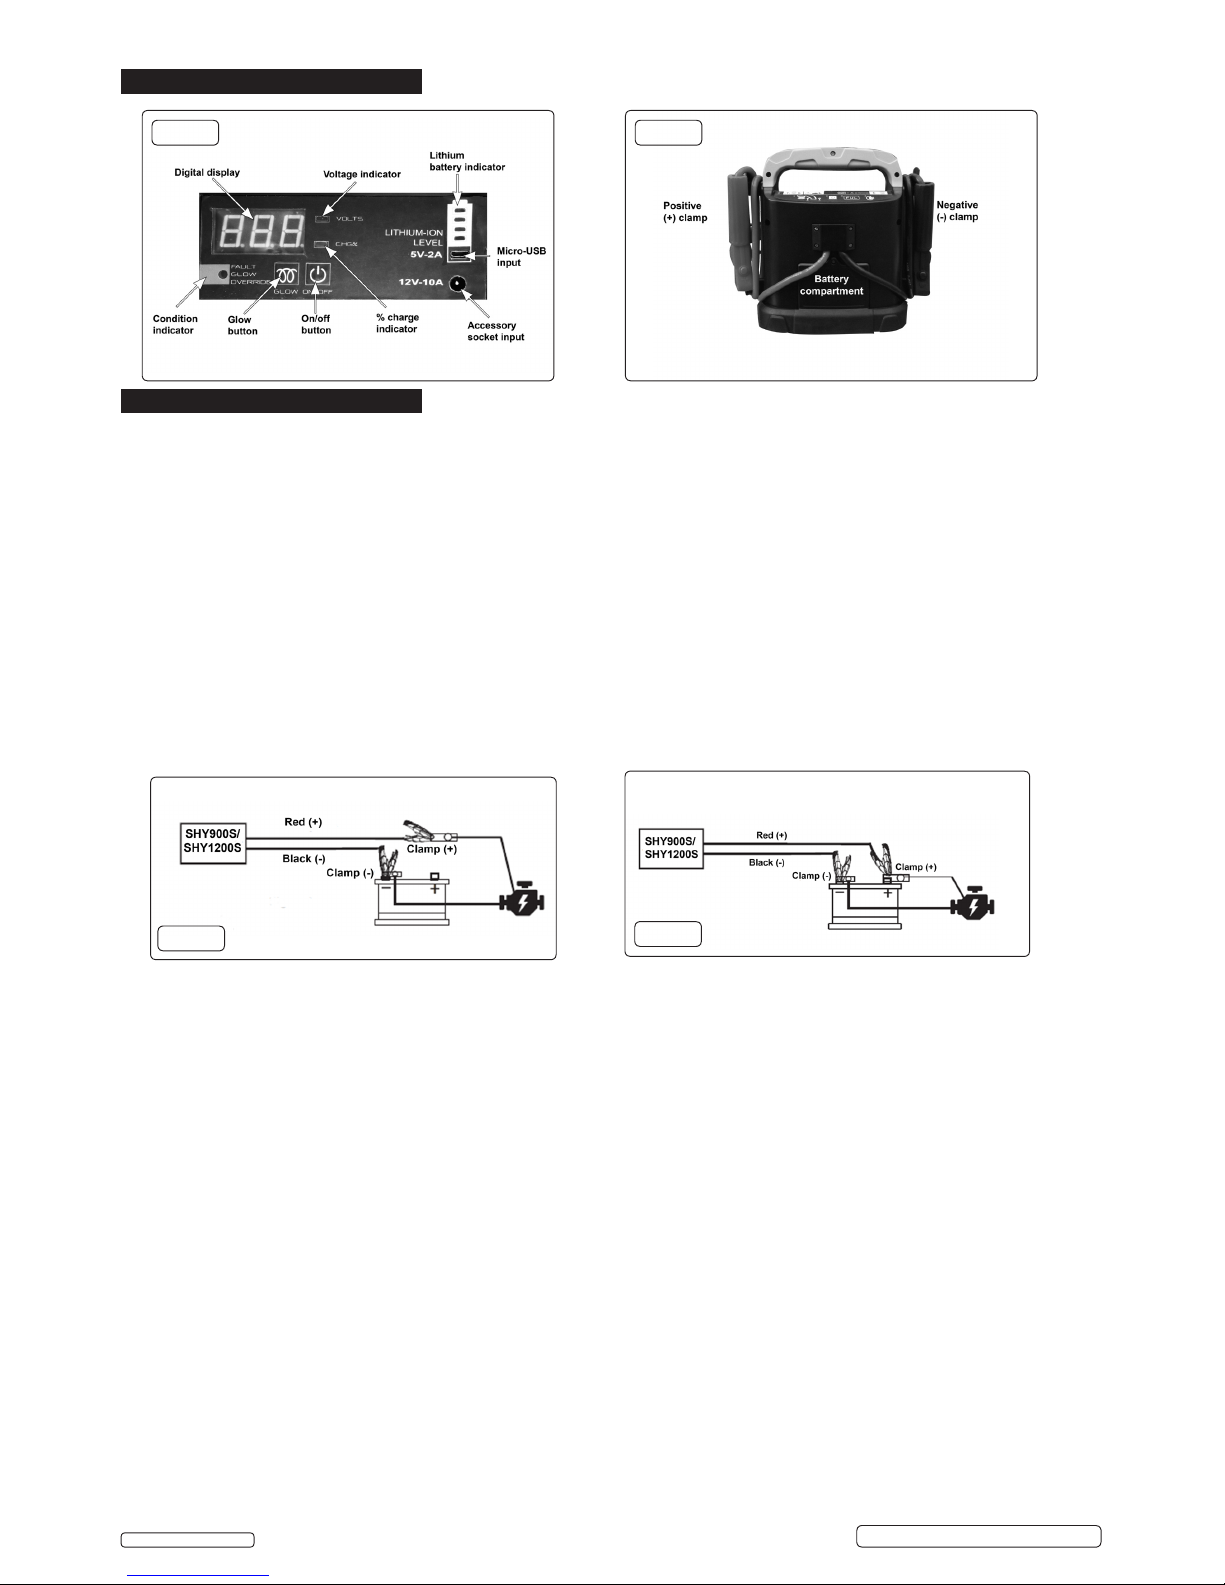
9 Take care to ensure correct connection polarity; red clamp to positive, black clamp to negative.
9 Charge the jump start only at ambient temperatures between -40°C and 65°C.
9 When not in use, switch off and store in a cool, dry place out of the reach of children.
8 DO NOT allow this jump starter to become wet.
8 DO NOT dismantle: there are no user-servicable parts inside.
8 DO NOT use in explosive atmospheres (e.g. the presence of flammable liquids, gases or dust).
8 DO NOT use if the jump starter appears damaged in any way.
8 DO NOT use this product for any purpose other than that for which it is designed.
8 DO NOT leave in direct sunlight or expose to heat.
8 DO NOT use abrasive or solvent cleaners on this product.
8 DO NOT allow children to play with this product
8 DO NOT allow the positive and negative clamps to touch.
Modern vehicles contain extensive electronic systems. It is a requirement to check with the vehicle manufacturer, for any specific
instructions regarding the use of this type of equipment on each vehicle.
No liability will be accepted for damage/injury, where this product is not used in accordance with all instructions.
BATTERY SAFETY
WARNINGS
There are no user serviceable components. Do not dismantle.
DO NOT expose to temperatures above 60°C (140°F).
Replace the battery pack with genuine Sealey replacement product only.
If in doubt about electrical safety, contact a qualied electrician.
INSTRUCTIONS FOR:
HYBRID ULTRA CAPACITOR JUMP START 12V
900A, 1200A
PART NO'S: SHY900S, SHY1200S
11
1. SAFETY
3
3. SPECIFICATION
.
Original Language Version
© Jack Sealey Limited
2
2. INTRODUCTION
SHY900S,SHY1200S Issue:2(2) - 15/12/17
Innovative capacitor technology, incorporating a 11.1V 2200mAh lithium battery pack to energise unit when vehicle battery is not sufcient to energise
capacitors. Digital display and LED front panel gives easy indication of battery voltage, capacitor charge, lithium battery charging, reverse polarity and
function selection. Simply connect to a at vehicle battery and the unit will draw power from it and energise itself fully in a matter of minutes. Full power
is then safely put back through the starting system, jump starting the vehicle. Features a glow mode for cold starts on diesel engines and a bypass
mode for use when vehicle battery is disconnected. If the vehicle battery is faulty or is holding less than 5 volts (average) the Sealey/Schumacher
Hybrid units can be pre-charged via an internal lithium battery pack, another vehicle's battery or 12V accessory lead. The lithium battery pack can be
recharged by a Micro USB charging cable (2A or over). Capable of operating between -40°C and 65°C. Internal lithium battery can hold charge whilst
not in use meaning no waiting for the battery to charge which means it is ready to use in a matter of minutes. Compact, lightweight and designed
for portability for easier handling and storage yet still delivers the same result as heavy, bulky, lead acid battery equivalents. Fitted with heavy duty
clamps and a rubber boot for durability, the capacitors in these units have a 10,000 cycle life. Ideal for both professional mechanics and DIY users.
Refer to
Instruction
Manual
Wear Eye
Protection
General
Warning
Wear
ProtectIve
Gloves
Warning:
Electricity
Model No: ......................SHY900S............................................ SHY1200S
Output: .........................12V ......................................................12V
Output Start Peak(EN): ............900A(450A) ........................................ 1200A(600A)
Lithium battery:...................11.1V 2200mAh................................... 11.1V 2200mAh
Maximum Starting Capacity: ........Petrol: 5ltr, Diesel: 2ltr (Cold Weather) .... Petrol: 6.5ltr, 4ltr (Cold Weather)
3ltr (Warm Weather) 5ltr (Warm Weather)
Cable & Clamp Length: ............940mm ................................................940mm
Size (W x D x H)..................255 x 155 x 240mm............................. 255 x 155 x 240mm
5. OPERATION
5.1. Standard mode
5.1.1. Switch off all electrical load on the vehicle.
5.1.2. Ensure that the unit is switched off.
5.1.3. Connect the battery leads (g.2) to the battery terminals by means of the battery clips.
Warning: ensure that the correct polarity is observed.
5.1.4. When connected, the jump starter will switch on automatically and display the voltage of the vehicle battery and the lithium battery
charge.
51.5. Press the on/off button (g.1) and the digital display will show the % charge of the internal capacitor.
5.1.6. When the digital display shows 'FUL' and a intermittent bleep is heard, the capacitor is full and it the starter of the vehicle can be
operated.
5.1.7. If there is insufcient charge in the vehicle battery, the internal lithium battery will automatically take over and charge the internal
capacitor. When 'FUL' shows, proceed as in 5.1.6.
5.1.8. When the engine has started, switch the unit off and remove the battery leads.
5.2. Override mode
5.2.1. When there is no battery connected to the vehicle, connect the jump starter as shown in g.3.
WARNING: There is no polarity protection in the 'override' mode; take extra care to observe correct polarity when connecting.
5.2.2. Press the on/off button for 2 seconds and then release. This will allow the internal lithium battery to charge the capacitor.
5.2.3. When the digital display shows 'Ful', press the on/off button again for 2 seconds .
5.2.4. When the condition indicator (g.1) shows a steady green aspect, operate the vehicle's starter.
Note: The ability for an engine to continue running without a battery connected will vary, depending on the make and model of the
vehicle.
Warning: Do not leave the engine running without either the jump starter or the battery being connected. Failure to comply
could result in damage to the vehicle ECU.
Sealey will not be accept responsibility for any damage caused by incorrect use of this product.
5.2.5. As soon as the engine starts, whilst keeping the jump starter clamp and battery lead connected, attach the positive lead to the
positive battery terminal and tighten the terminal clamp (g.4).
5.2.6. After the positive lead has been secured to the battery terminal, switch off the jump starter and disconnect from the battery.
5.3. Glow mode
5.3.1. In cold weather, the glow plugs on most diesel vehicles will energise rst to heat the combustion chamber before starting the engine.
This is indicated by the glow indicator on the vehicle dashboard. This process normally takes 4-6 seconds.
5.3.2. In this case, after the jump starter is fully recharged and connected, press the glow button and switch on the ignition.
Note: Glow is inactive in the override mode.
5.4. Lithium back up battery pack
5.4.1. The jump starter is equipped with a lithium battery pack. The battery pack may be recharged by means of the 5V 2A micro USB input.
Once the input lead is connected, press the on/off button to start the charge. Charging via USB will take 5-8 hours.
5.4.2. The charge state of the lithium battery pack may be checked by pressing the on/off switch, illuminating the lithium battery indicator.
5.4.3. Recharge the lithium battery fully at least once a year.
g.3
g.4
3
4. CONTROL PANEL
g.1 g.2
Original Language Version
© Jack Sealey Limited
SHY900S,SHY1200S Issue:2(2) - 15/12/17
 Loading...