

Sealey SEKC25,SEKC100,SEKC50 Instruction Manual
Thank you for purchasing a Sealey Product. Manufactured to a high standard this product will, if used according to these instructions and properly
maintained, give you years of trouble free performance.
IMPORTANT: PLEASE READ THESE INSTRUCTIONS CAREFULLY. NOTE THE SAFE OPERATIONAL REQUIREMENTS, WARNINGS AND
CAUTIONS. USE THIS PRODUCT CORRECTLY AND WITH CARE FOR THE PURPOSE FOR WHICH IT IS INTENDED. FAILURE TO DO SO MAY
CAUSE DAMAGE AND/OR PERSONAL INJURY, AND WILL INVALIDATE THE WARRANTY. PLEASE KEEP INSTRUCTIONS CABINET FOR
FUTURE REFERENCE.
INSTRUCTION MANUAL FOR:
ELECTRONIC KEY CABINETS
MODEL No’s:
SEKC25 SEKC50 SEKC100
Original Language Version
SEKC25, SEKC50, SEKC100 Issue: 2 - 31/10/11
2. INTRODUCTION
3. INSTALLATION
1. SAFETY
Heavy-duty construction with twin locking bolts. Simple to operate electronic keypad accepts numbers of between three and eight digits, giving
millions of combinations. Three LEDs show security, power and operating status.
Also supplied with two keys for manual override should batteries fail. Numbered, colour coded hook bars are adjustable to suit varying key sizes.
Includes anchor bolts. SEKC50 and SEKC100 are supplied with colour coded key rings for easy key location.
• CAUTION: If you, or an intruder, uses an incorrect group of numbers, the cabinet will not open and a yellow light will illuminate. Entering an
incorrect PIN 3 times will freeze the system for 20 seconds.
• Keepthecabinetkeyandanyrecordofthecombinationseparatefromthecabinetandunidentified.
3.1. Consideration should be given to the placing of the cabinet to ensure that it is placed in a discreet location and will not be easily found by
intruders.
3.2. Each cabinet is supplied with four anchor bolts suitable for fixing to brick and concrete.
3.3. Fixing to hollow partition walls is not recommended. If fixed to wood it must be to a solid wooden structure.
3.4. Open the door of the cabinet (see 4.1 / 4.3 for opening instructions) and with the help of a second person, position it where required and
mark the mounting positions through the pre-drilled holes in the back of the cabinet.
3.5. When mounting to a wall, ensure that the cabinet is adequately supported during the marking process.
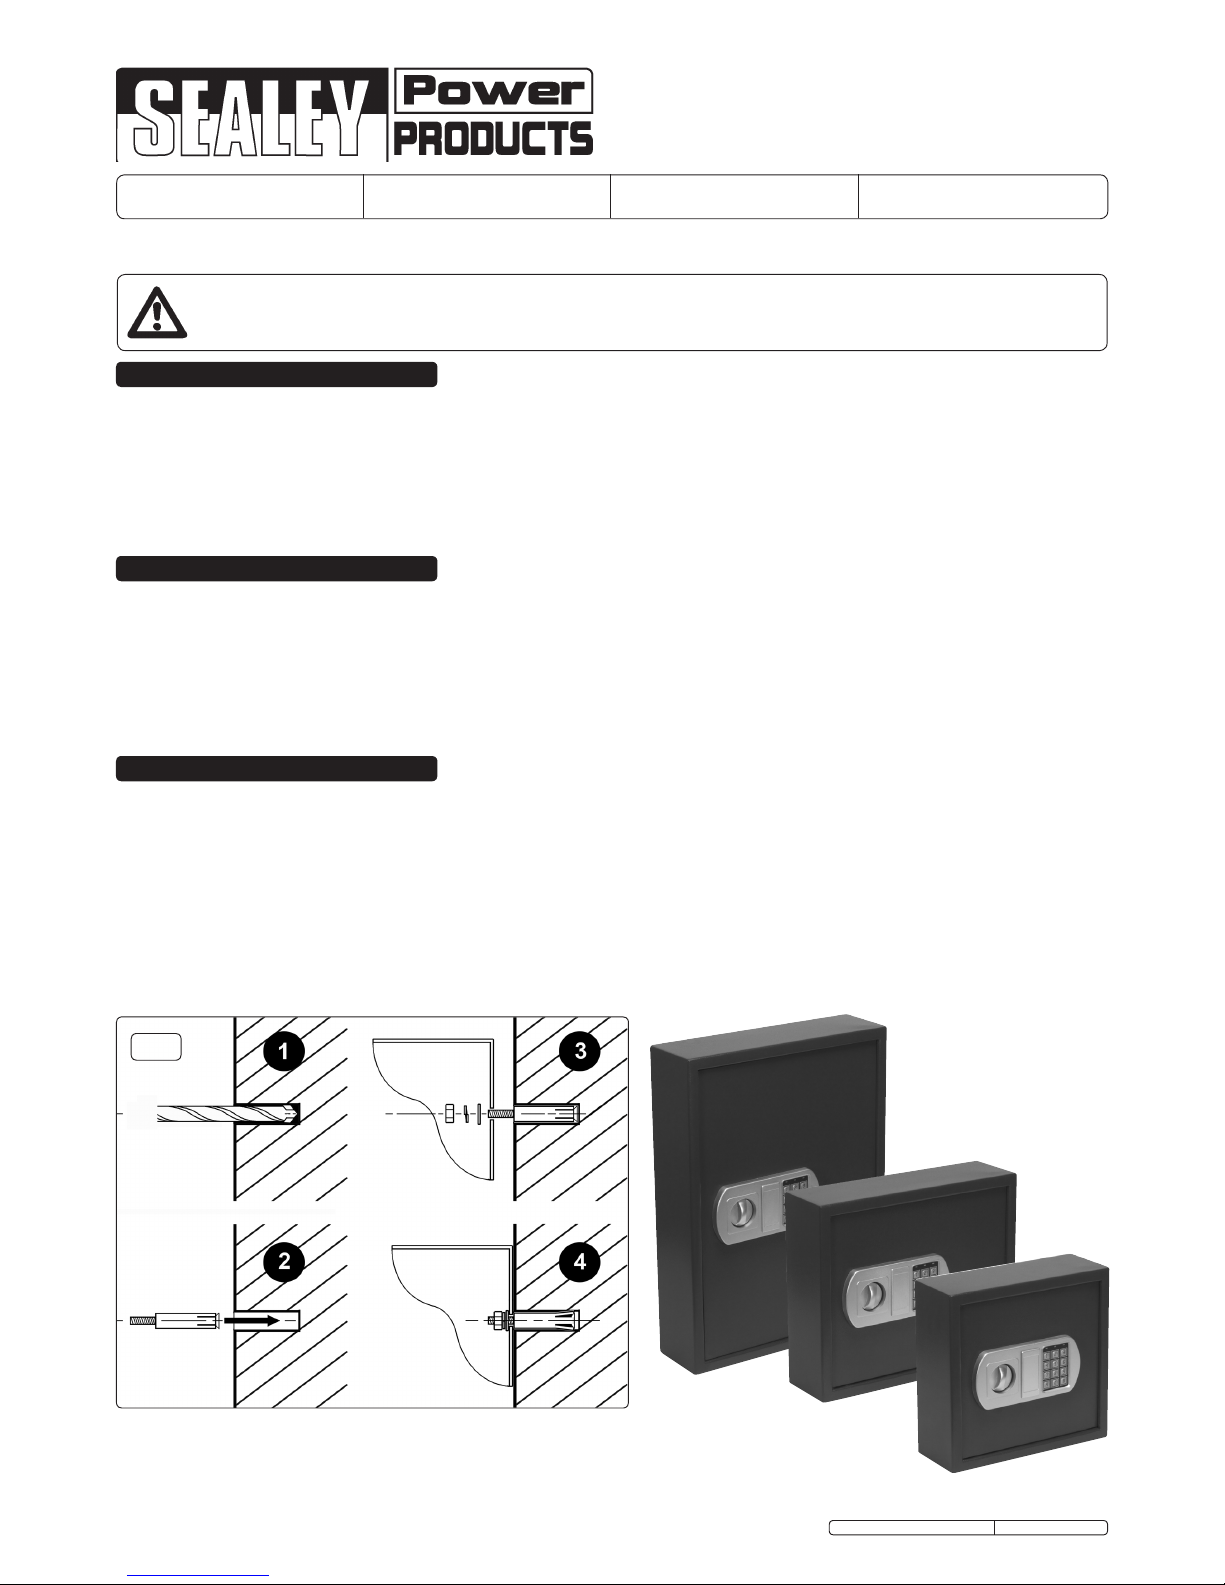
3.6. Drill 10mm holes to a depth of 38mm (fig.1.1) and insert the anchor bolts with nuts and washers removed (fig.1.2).
3.7. Position the cabinet over the four protruding mounting studs and support it there whilst placing a washer, split washer and nut
onto each stud (fig.1.3).
3.8. Continue to support the cabinet whilst tightening the fixings (fig.1.4).
WARNING! These cabinets are heavy and care should be exercised in transit and handling to ensure that no one is injured.
WARNING! The key cabinets are a 2 person job for installation.
For maximum security, these cabinets must be securely fixed to a wall.
Ensure that any wall used is sufficiently strong to carry the weight of the cabinet and its contents.
DO NOT install in areas where damp and condensation are present.
WARNING! The warnings, cautions and instructions referred to in this instruction manual cannot cover all possible conditions and situations
that may occur. It must be understood that common sense and caution are factors which cannot be built into this product, but must be applied
by the operator.
g.1
NOTE: It is our policy to continually improve products and as such we reserve the right to alter data, specifications and component parts without prior notice.
IMPORTANT: No liability is accepted for incorrect use of this product.
WARRANTY: Guarantee is 12 months from purchase date, proof of which will be required for any claim.
INFORMATION: For a copy of our latest catalogue and promotions call us on 01284 757525 and leave your full name and address, including postcode.
01284 757500
01284 703534
sales@sealey.co.uk
Sole UK Distributor, Sealey Group,
Kempson Way, Suffolk Business Park,
Bury St. Edmunds, Suffolk,
IP32 7AR
www.sealey.co.uk
Web
email
4.1. Initial opening.
4.1.1. To open the door of the cabinet for the first time enter the combination - 159B (this is the factory set combination and is not specific to this
exact cabinet).
4.1.2. Within 5 seconds of correct combination entry turn knob clockwise to open the cabinet door.
4.1.3. If the cabinet re-locks, enter combination again. Don't forget to press the letter "B" when entering combination.
4.2. Entering a new combination.
The combination must consist of between 3 and 8 numbers and should be safely recorded before being entered into the cabinet
electronics.
4.2.1. Open cabinet by inputting the factory preset combination (i.e.159B).
4.2.2. Press the red button on the inside of the door near the hinges.
4.2.3. Now enter your personal combination (3-8 numbers), and then press the letter "B" to confirm your combination. A beep will sound for each
key pressed. After the letter "B" is pressed, the green light will show to indicate your success. Be sure to record this combination
immediately, so you do not forget.
NOTE! After entering the correct combination, if you do not open the door within 5 seconds it will re-lock.
NOTE! If the incorrect combination is used 3 times the system will freeze for 20 seconds.
4.3. Key operation.
4.3.1. If you forget your combination, you can use the manual override key: DO NOT keep override key in cabinet. The override lock is situated
under the logo panel in the centre of the main control panel. Prise out the panel using a small screwdriver. Insert key and turn anti-clockwise
and the cabinet will be unlocked. Snap panel back into place afterwards.
4.3.2. Please make a note of the key number which can be found on the key or on the barrel in the cabinet.
4.4. Low battery warning and replacement.
4.4.1. If red light shows in the top right of the control panel this indicates low batteries. Change batteries by opening the cabinet and removing
them from the back of the door. Then replace all batteries with new ones.
4.4.2. If the keypad does not work because the batteries in the cabinet are exhausted, use the override key to open the cabinet, and then replace
all batteries.
4.5. Lost keys.
4.5.1. Should you lose your keys, we can supply replacements. To order these please contact our sales office on 01284 757500 and quote the
unique number on the key cabinet lock. We will also require a copy of your purchase invoice for the key cabinet to confirm that you are the
owner.
Please note that replacement keys are special order only (we do not carry these in stock for security reasons) and as such they can take
14 – 28 days to arrive.
4. OPERATION
Original Language Version
SEKC25, SEKC50, SEKC100 Issue: 2 - 31/10/11
Battery Removal.
WARNING! Dispose of batteries according to local authority guidelines
• See4.4forbatteryremoval.
Under the Waste Batteries and Accumulators Regulations 2009, Jack Sealey Ltd are required to inform potential purchasers of products
containing batteries (as defined within these regulations), that they are registered with Valpak’s registered compliance scheme.
Jack Sealey Ltd’s Batteries Producer Registration Number (BPRN) is BPRN00705
 Loading...