

Page 1
INSTRUCTIONS FOR:
DEHUMIDIFIER 10 LITRE
MODEL No :
Thank you for purchasing a Sealey product. Manufactured to a high standard this product will, if used according to these instructions and properly maintained, give you
years of trouble free performance.
IMPORTANT: PLEASE READ THESE INSTRUCTIONS CAREFULLY. NOTE THE SAFE OPERATIONAL REQUIREMENTS, WARNINGS & CAUTIONS. USE THE PRODUCT
CORRECTLY AND WITH CARE FOR THE PURPOSE FOR WHICH IT IS INTENDED. FAILURE TO DO SO MAY CAUSE DAMAGE AND/OR PERSONAL INJURY AND WILL
INVALIDATE THE WARRANTY. PLEASE KEEP THESE INSTRUCTIONS SAFE FOR FUTURE USE.
SDH10
1. SAFETY INSTRUCTIONS
1.1. ELECTRICAL SAFETY
WARNING! It is the responsibility of the owner and the operator to read, understand and comply with the following:
You must check all electrical products, before use, to ensure that they are safe. You must inspect power cables, plugs, sockets and any other
connectors for wear or damage. You must ensure that the risk of electric shock is minimised by the installation of appropriate safety devices.
A Residual Current Circuit Breaker (RCCB) should be incorporated in the main distribution board. We also recommend that a Residual
Current Device (RCD) is used. It is particularly important to use an RCD with portable products that are plugged into a supply which is not
protected by an RCCB. If in any doubt consult a qualified electrician. You may obtain a Residual Current Device by contacting your Sealey
dealer. You must also read and understand the following instructions concerning electrical safety.
1.1.1. The Electricity at Work Act 1989 requires that all portable electrical appliances, if used on business premises, are tested by a qualified
electrician, using a Portable Appliance Tester (PAT), at least once a year.
1.1.2. The Health & Safety at Work Act 1974 makes owners of electrical appliances responsible for the safe condition of those appliances and the
safety of the appliance operators. If in any doubt about electrical safety, contact a qualified
electrician.
1.1.3. Ensure that the insulation on all cables and on the appliance is safe before connecting it to the
power supply. See 1.1.1. and 1.1.2. and use a Portable Appliance Tester.
1.1.4. Ensure that cables are always protected against short circuit and overload.
1.1.5. Regularly inspect power supply cables and plugs for wear or damage and check all
connections to ensure that none is loose.
1.1.6. Important: Ensure that the voltage marked on the appliance matches the power supply to be
used and that the plug is fitted with the correct fuse - see fuse rating at right.
1.1.7. DO NOT pull or carry the appliance by the power cable.
1.1.8. DO NOT pull the plug from the socket by the cable.
1.1.9. DO NOT use worn or damaged cables, plugs or connectors. Immediately have any faulty
item repaired or replaced by a qualified electrician. When a BS 1363/A UK 3 pin plug is
damaged, cut the cable just above the plug and dispose of the plug safely.
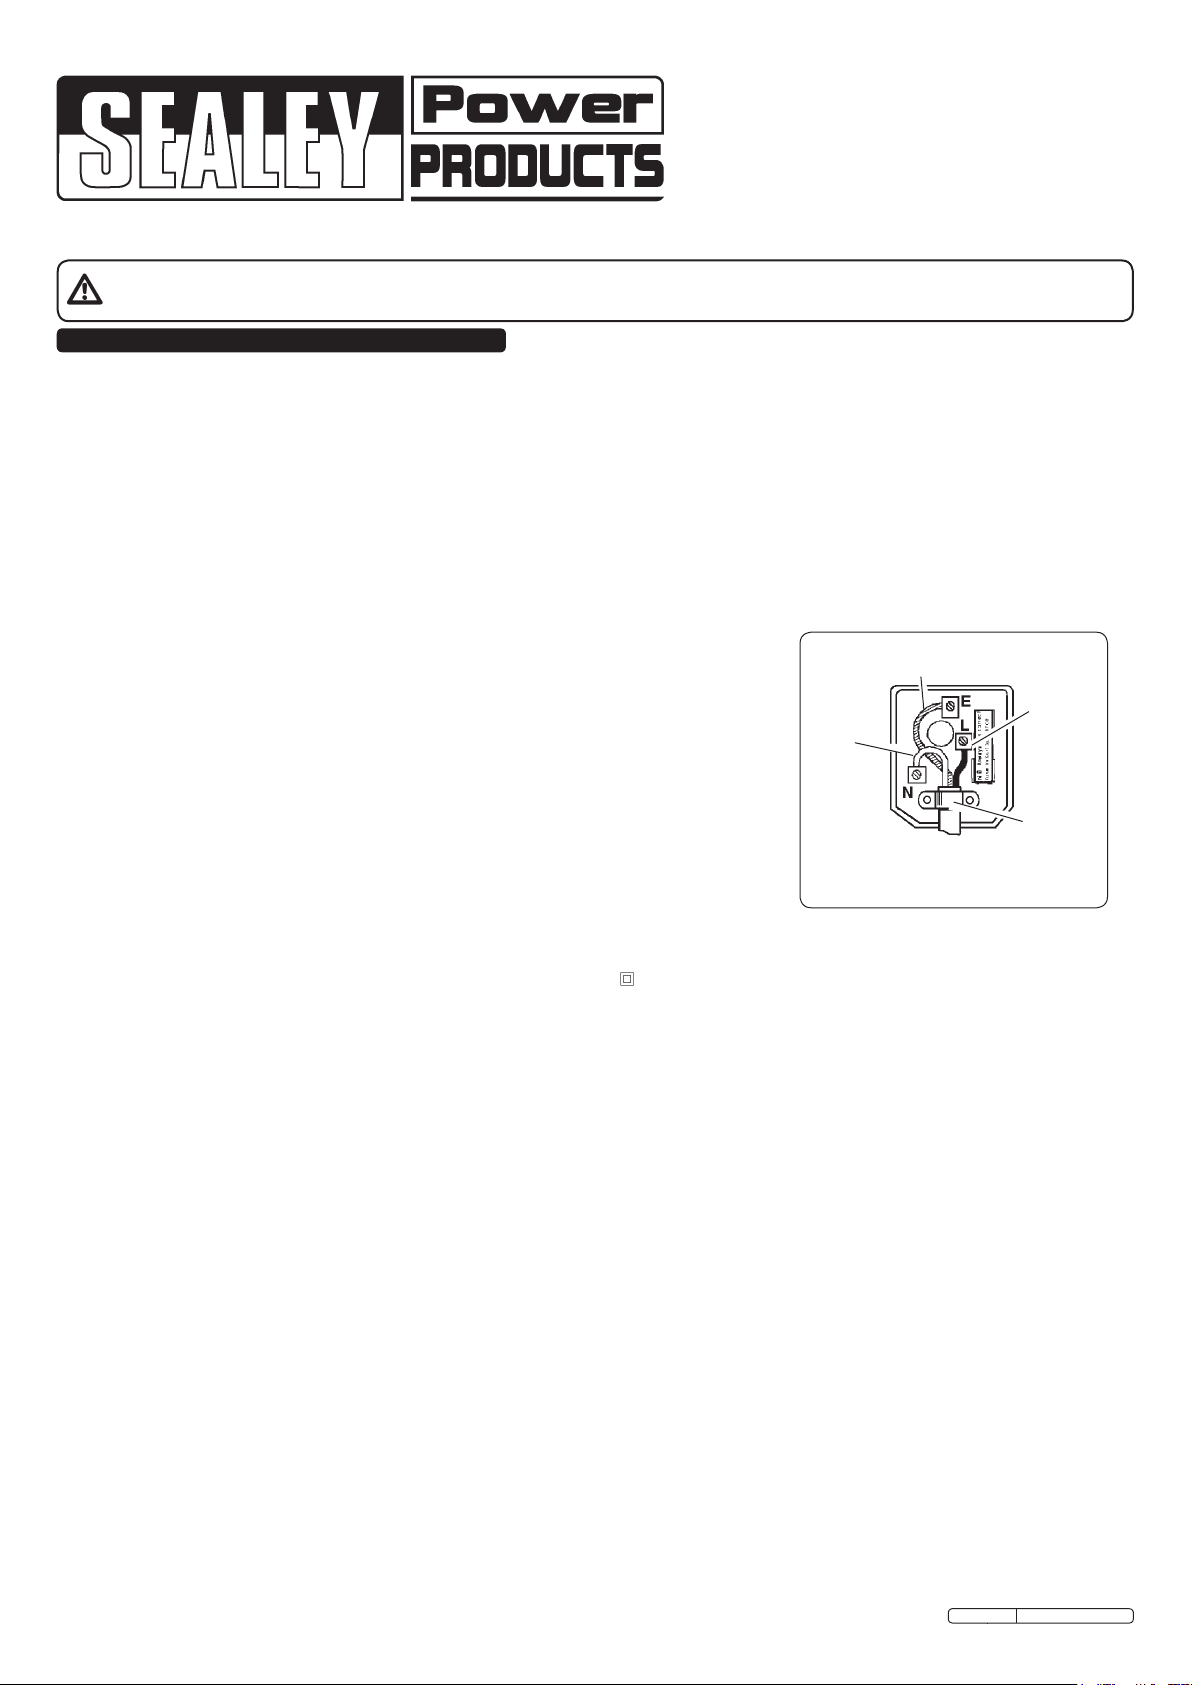
Fit a new plug according to the following instructions (UK only).
a) Connect the GREEN/YELLOW earth wire to the earth terminal ‘E’.
b) Connect the BROWN live wire to the live terminal ‘L’.
c) Connect the BLUE neutral wire to the neutral terminal ‘N’.
d) After wiring, check that there are no bare wires, that all wires have been correctly connected, that the cable outer insulation extends beyond
the cable restraint and that the restraint is tight.
Double insulated products, which are always marked with this symbol , are fitted with live (brown) and neutral (blue) wires only. To
rewire, connect the wires as indicated above - DO NOT connect either wire to the earth terminal.
1.1.10. Products which require more than 13 amps are supplied without a plug. In this case you must contact a qualified electrician to ensure
that a suitably rated supply is available. We recommend that you discuss the installation of an industrial round pin plug and socket
with your electrician.
1.1.11. If an extension reel is used it should be fully unwound before connection. A reel with an RCD fitted is preferred since any appliance
plugged into it will be protected. The cable core section is important and should be at least 1.5mm², but to be absolutely sure that the
capacity of the reel is suitable for this product and for others which may be used in the other output sockets, we recommend the use
of 2.5mm² section cable.
Blue
Neutral
Wire
Yellow & Green
Earth Wire
Brown
Live
Wire
Cable
Restraint
FUSE RATING: 3 AMP
1.2. GENERAL SAFETY
Check that the dehumidifier is in sound condition and good working order. Take immediate action to repair or replace damaged parts.
Use recommended parts only. Unauthorised parts may be dangerous and will invalidate the warranty.
DO NOT stand or place any object less than 20cm from the front of the unit, 20cm from the rear and sides of the unit, and 30cm above the unit.
DO NOT obstruct the air intakes or outlets of the dehumidifier, and do not cover with washed clothes.
DO NOT place any object into the outlets - the unit has a fan running at high speed, contact with this will cause injury.
DO NOT operate the dehumidifier when you are tired or under the influence of alcohol, drugs or intoxicating medication.
DO NOT switch the dehumidifier off by disconnecting it from the mains. ALWAYS switch to the “OFF” position first.
DO NOT remove the float lever from the water collection tank.
DO NOT connect or disconnect the plug from the mains with wet hands.
ALWAYS discard the water from the collection tank, DO NOT use it for any other purpose.
Place the dehumidifier on a level and stable surface.
To prevent water from freezing, do not use the dehumidifier at ambient temperatures below 0°C.
Do not use the dehumidifier outside.
Ensure that heating appliances are not exposed to the flow of air from the dehumidifier.
Before attempting to move the dehumidifier, empty the contents of the collection tank. Use top carrying handle when moving unit.
Switch off and disconnect it from the mains before attempting any cleaning or other maintenance work.
Ensure that the dehumidifier is correctly turned off when not in use, and stored in a safe, dry area, out of reach of children.
Original Language Version
SDH10 Issue: 2 - 13/12/11
Page 2
2. SPECIFICATION
Motor Power: ................................230V 210W
Dehumidifying Capacity:..........................10ltr/day
Working Space: .............................15 to 20mtr²
Maximum Air Flow:.............................100mtr³/hr
Refrigerant:......................................R134a
Condensate Tank Capacity: .......... 2.0ltr (with auto shut-off)
Working Temperature Range: .................. 5°C to 35°C
3. OPERATION
Compact, efficient, portable unit that extracts up to 10 litres of water per day. Removes excess moisture from air to prevent build-up of
mildew and mould. Auto-defrost function and adjustable air outlet. Refrigerant is environmentally friendly R134a.
Efficiency of the dehumidifier is influenced by the air outside the room. To operate efficiently, avoid opening and closing the windows and
doors to the room.
For best performance, operate the dehumidifier within the usable operating temperature. For safety purposes, the dehumidifying operation
will stop automatically - when the ambient temperature is higher than approximately 35°C.
Ensure that free space around the dehumidifier is kept at all times. Minimum distances of 20cm to the front, sides and rear, and 30cm above
the unit are required.
3.1. Dehumidifying
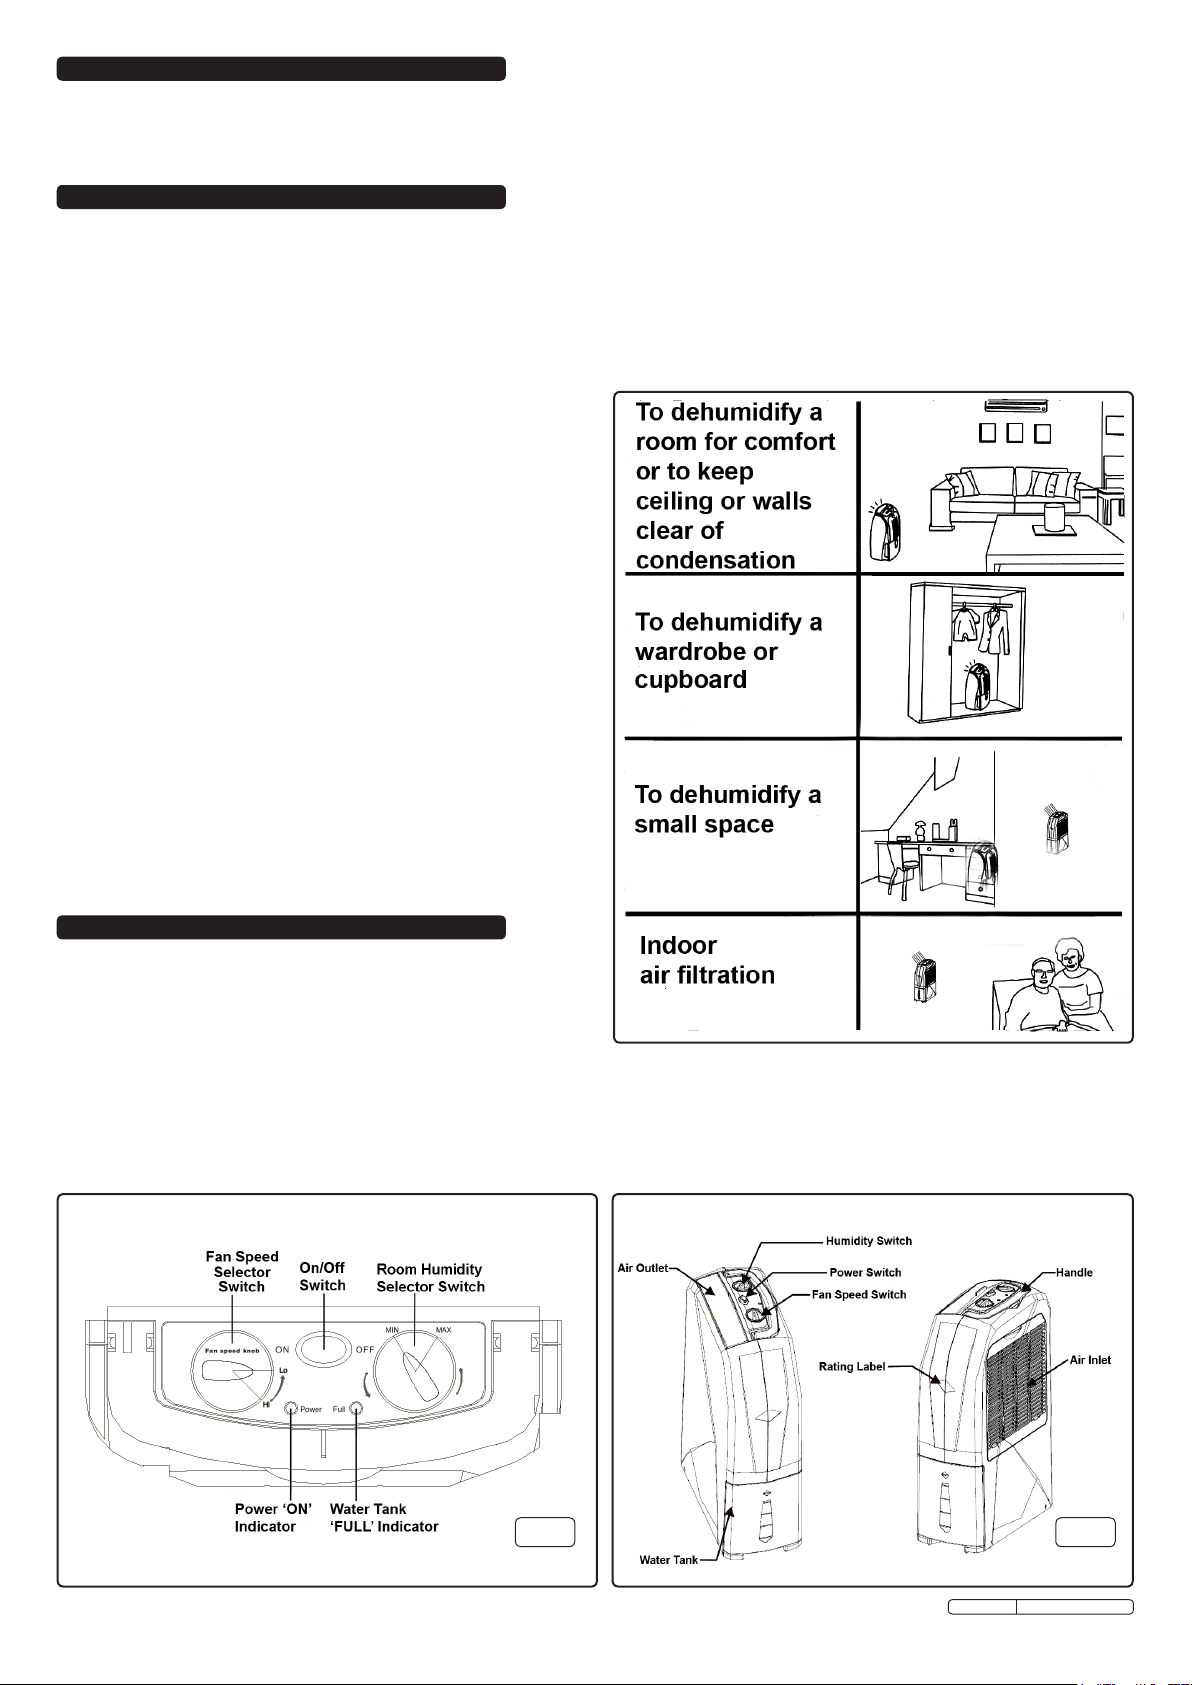
3.1.1. Set the air outlet as required.
3.1.2. Press the On/Off switch to turn unit on. Power on light will
illuminate and dehumidifying will commence.
3.1.3. Select the high or low fan speed as required with the selector
switch and the humidity extraction required with the room humidity
selector switch.
Note! When set to 'MIN' the dehumidifier extracts the most humidity
from the atmosphere, resulting in less humidity present in the
room. When set to 'MAX', less humdity is extracted from the
atmosphere, resulting in more humidity present in the room.
3.1.4. The dehumidifying operation will stop automatically when humidity
is below approximately 60%.
3.2. Defrosting Operation
The evaporator within the dehumidifier frosts during the
dehumidifying operation at a room temperature of approximately
15°C or less. To remove frost, the defrosting device works
automatically at an interval of approximately every 30 minutes
for a duration of approximately 5 minutes. Both the
dehumidifying function and the air cleaning function stop during
the defrosting operation. Do not disconnect the plug or turn off the
unit during the defrosting operation.
Note: This dehumidifier does not have a cooling function, it
produces heat during the operation and room temperature will
rise. The temperature will rise while it is operated in a cupboard,
or similar. Furthermore, room temperature will rise because doors
and windows are closed and heat is produced from other
appliances in the room and from sun radiation.
4. MAINTENANCE
4.1. Emptying the Water Collection Tank
During the dehumidifying operation, water is collected in the
water collection tank. When the tank is full of water, the
dehumidifier stops operating automatically and the water tank
full indicator illuminates. The unit will not restart until the water
collection tank has been emptied.
4.1.1. Remove water collection tank from the dehumidifier by pulling
it gently outwards by holding the sides of the tank (fig.3).
4.1.2. Hold the tank by the handle and carry it carefully to a suitable
emptying point, tilt the tank and slowly empty the water out of the
tank. DO NOT use the water for any other purpose.
4.1.3. Refit the tank in the dehumidifier, making sure it is fitted in place
correctly, the unit will not restart if it is not fitted properly.
fig.1
Original Language Version
fig.2
SDH10 Issue: 2 - 13/12/11
Page 3
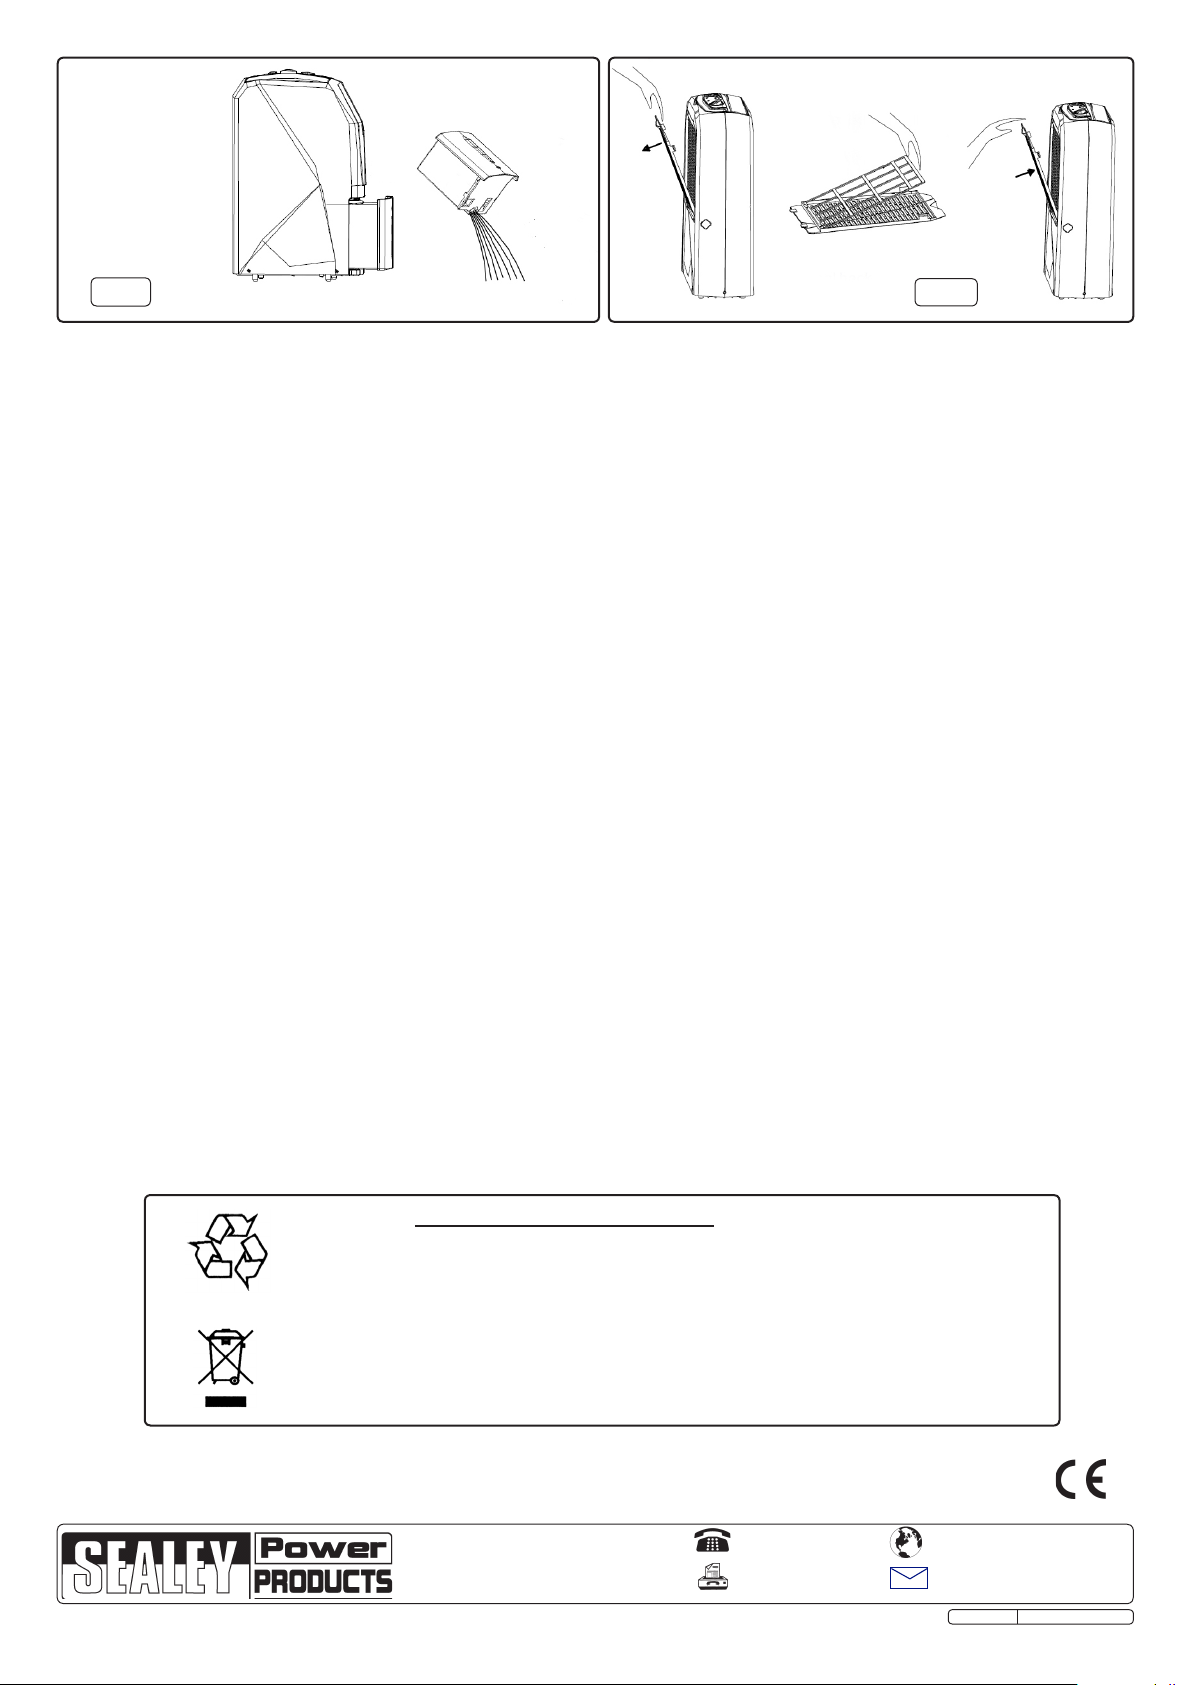
fig.3
4.2. Cleaning the Air Filter (every 2 weeks)
The dehumidifying capacity is lowered when the air cleaning filter becomes clogged or dirty.
4.2.1. Remove the rear cover from the unit by unclipping it and lifting it away from the unit.
4.2.2. Unclip the filter holder and take out the air cleaning filter (fig.4).
4.2.3. To dislodge the dust from the filter, tap it lightly or use a vacuum cleaner.
4.2.4. If the filter is very dirty, wash it carefully in water with a neutral detergent, then rinse well with clean water and leave until dry.
4.2.5. Refit the air filter to the filter holder and clip into place.
4.2.6. Refit the rear cover into the unit by sliding it into the bottom locators and gently clipping it into position at the top.
4.3. Replacing the Air Filter (every 6 months)
The life span of the air filter is approximately 6 months depending on the air conditions where the dehumidifier is located.
When replacing the filter, a genuine Sealey filter should always be fitted - Part No: SDH10.20 (see parts list).
Follow sequence in 4.2. above to remove / re-install filter. Do not deform or damage the new filter.
4.4. Storage
4.4.1. Unplug the unit, bundle the power cord, and hang the bundled cord at the back of the unit.
4.4.2. Remove the water collection tank and empty the water out of it. Remove the tank cover and wash the inside of the tank with clean water.
Do not remove the float lever from the tank. Wipe off the water on the outside of the tank with a cloth. Refit the tank cover onto the tank and
replace the tank in position.
4.4.3. Clean the air filter (see 4.2. above).
4.4.4. When the unit is to be stored for a long period of time, wipe the dehumidifier over with a dry soft cloth. To remove dirt, wipe over with a very
slightly dampened cloth (never use a wet cloth for cleaning the controls). To avoid deformation or cracking, do not use benzine, thinner or
liquid cleaners.
4.4.5. When storing, place in a safe, dry, childproof location. Stand the unit upright and avoid exposure to direct sunlight.
Before attempting any repairs, check the following:
Dehumidifier does not operate
Check to see if the plug is disconnected. - Insert the plug into an electrical outlet fully and securely - check fuse in plug is OK.
Check to see if the water tank is full of water. - Empty water out of the tank.
Check to see if the water tank is fitted properly in position. - Fit the tank to the unit in the correct position.
fig.4
Dehumidified volume is small
Check to see if the filter is dirty. - Clean the filter as specified.
Check to see if the air opening is blocked. - Remove any obstacles from the air opening.
Dehumidifier volume decreases when temperature is low. - The unit stops dehumidifying when the room temperature is below approx 5°C.
Humidity in room has reached a low level - Dehumidifying stops because the humidity level has reached the required level set.
The humidity remains too high
The room size may be too large. - Ideally unit should only be used in rooms with up to 20mtr² floor space.
The doors and windows may be opened and - Keep windows and doors shut during operation
closed frequently.
The dehumidifier is used together with a kerosene - Turn the heater off.
heater which emits water vapour.
Environmental Protection.
Recycle unwanted materials instead of disposing of them as waste. All tools,
accessories and packaging should be sorted, taken to a recycle centre and
disposed of in a manner which is compatible with the environment.
When the product is no longer required, it must be disposed of in an
environmentally protective way. Contact your local solid waste authority for
recycling information.
WARNING: Do not dispose of by fire. This could result in an explosion.
NOTE: It is our policy to continually improve products and as such we reserve the right to alter data, specifications and component parts without prior notice.
IMPORTANT: No liability is accepted for incorrect use of this product.
WARRANTY: Guarantee is 12 months from purchase date, proof of which will be required for any claim.
INFORMATION: For a copy of our latest catalogue and promotions call us on 01284 757525 and leave your full name and address, including postcode.
Sole UK Distributor, Sealey Group,
Kempson Way, Suffolk Business Park,
Bury St. Edmunds, Suffolk,
IP32 7AR
Original Language Version
01284 757500
01284 703534
www.sealey.co.uk
Web
email
SDH10 Issue: 2 - 13/12/11
 Loading...