

Sealey SA792.V3 Instructions Manual
INSTRUCTIONS FOR:
AIR NAIL/STAPLE GUN 50MM / 40MM
CAPACITY
MODEL NO: SA792.V3
Thank you for purchasing a Sealey product. Manufactured to a high standard, this product will, if used according to these
instructions, and properly maintained, give you years of trouble free performance.
IMPORTANT: PLEASE READ THESE INSTRUCTIONS CAREFULLY. NOTE THE SAFE OPERATIONAL REQUIREMENTS, WARNINGS & CAUTIONS. USE THE
PRODUCT CORRECTLY AND WITH CARE FOR THE PURPOSE FOR WHICH IT IS INTENDED. FAILURE TO DO SO MAY CAUSE DAMAGE AND/OR
PERSONAL INJURY AND WILL INVALIDATE THE WARRANTY. KEEP THESE INSTRUCTIONS SAFE FOR FUTURE USE.
1. SAFETY
WARNING! DO NOT use the nail/staple gun if damaged, has missing parts or is thought to be faulty. Contact your Service Agent.
WARNING!Disconnect from the air supply before loading or servicing.
WARNING! Always wear approved eye, face and hand protection when operating the nail/staple gun.
WARNING! Check correct air pressure is maintained and not exceeded. We recommend 70 to 110psi.
DO NOT use the nail/staple gun for a task it is not designed to perform.
DO NOT operate the nail/staple gun near flammable substances or flammable containers.
DO NOT use the nail/staple gun unless you have been instructed in its use by a qualified person.
DO NOT carry the nail/staple gun by the air hose, or yank the hose from the air supply.
DO NOT operate the nail/staple gun if you are tired or under the influence of alcohol, drugs or intoxicating medication.
DO NOT carry the nail/staple gun with your hand on the power trigger in order to avoid unintentional firing.
DO NOT direct the nail/staple gun or the air from the air hose at yourself or others.
DO NOT load bent or damaged nails/staples into the magazine.
▲ DANGER!When putting the nail/staple gun down, ensure that the trigger safety slide is not fouled, risking accidental firing.
Maintain the nail/staple gun in good condition and replace any damaged or worn parts. Use genuine parts only. Unauthorised
parts may be dangerous and will invalidate the warranty.
Keep the air hose away from heat, oil and sharp edges. Check the air hose for wear before each use and ensure that all
connections are secure.
Only use supplied 18SWG x 10-50mm Brad nails and 18SWG x 13-40mm staples. Ask your Sealey Dealer for further supplies.
Wear approved safety eye/face shield, ear defenders and hand protection.
Follow all workshop safety rules, regulations, and conditions when using the nail/staple gun.
Maintain correct balance and footing. Ensure the floor is not slippery and wear non-slip shoes.
Keep children and non essential persons away from the working area.
When not in use, disconnect from the air supply, remove the strip nails/staples from the magazine and store cased in a safe, dry,
childproof location.
WARNING! The warnings, cautions and instructions in this manual cannot cover all possible conditions and situations that
may occur. It must be understood by the operator that common sense and caution are factors which cannot be built into
this product, but must be applied by the operator.
2. INTRODUCTION
Professional air nailer/stapler with lightweight aluminium body and rubber grip handle. Features 2-stage operation trigger to fire single or
multiple staples/nails. Safety trigger device to prevent accidental firing of nails and staples. Supplied in carry-case with oiler and starter pack of
nails and staples.
3. SPECIFICATION
Model No: .................SA792.V3
Nail Capacity:. ........10-50mm 18SWG
Staple Capacity: .......13-40mm 18SWG
Maximum Pressure:.. ......... 70-110psi
Air Inlet Size:. ................ 1/4"BSP
Gun Weight: . . . . . . . . . . . . . . . . . . .1.35kg
Noise Power: ...............98.5dB(A)
Noise Pressure: .............85.5dB(A)
Vibration: ....................2.5m/s²
Uncertainty: .................1.25m/s²
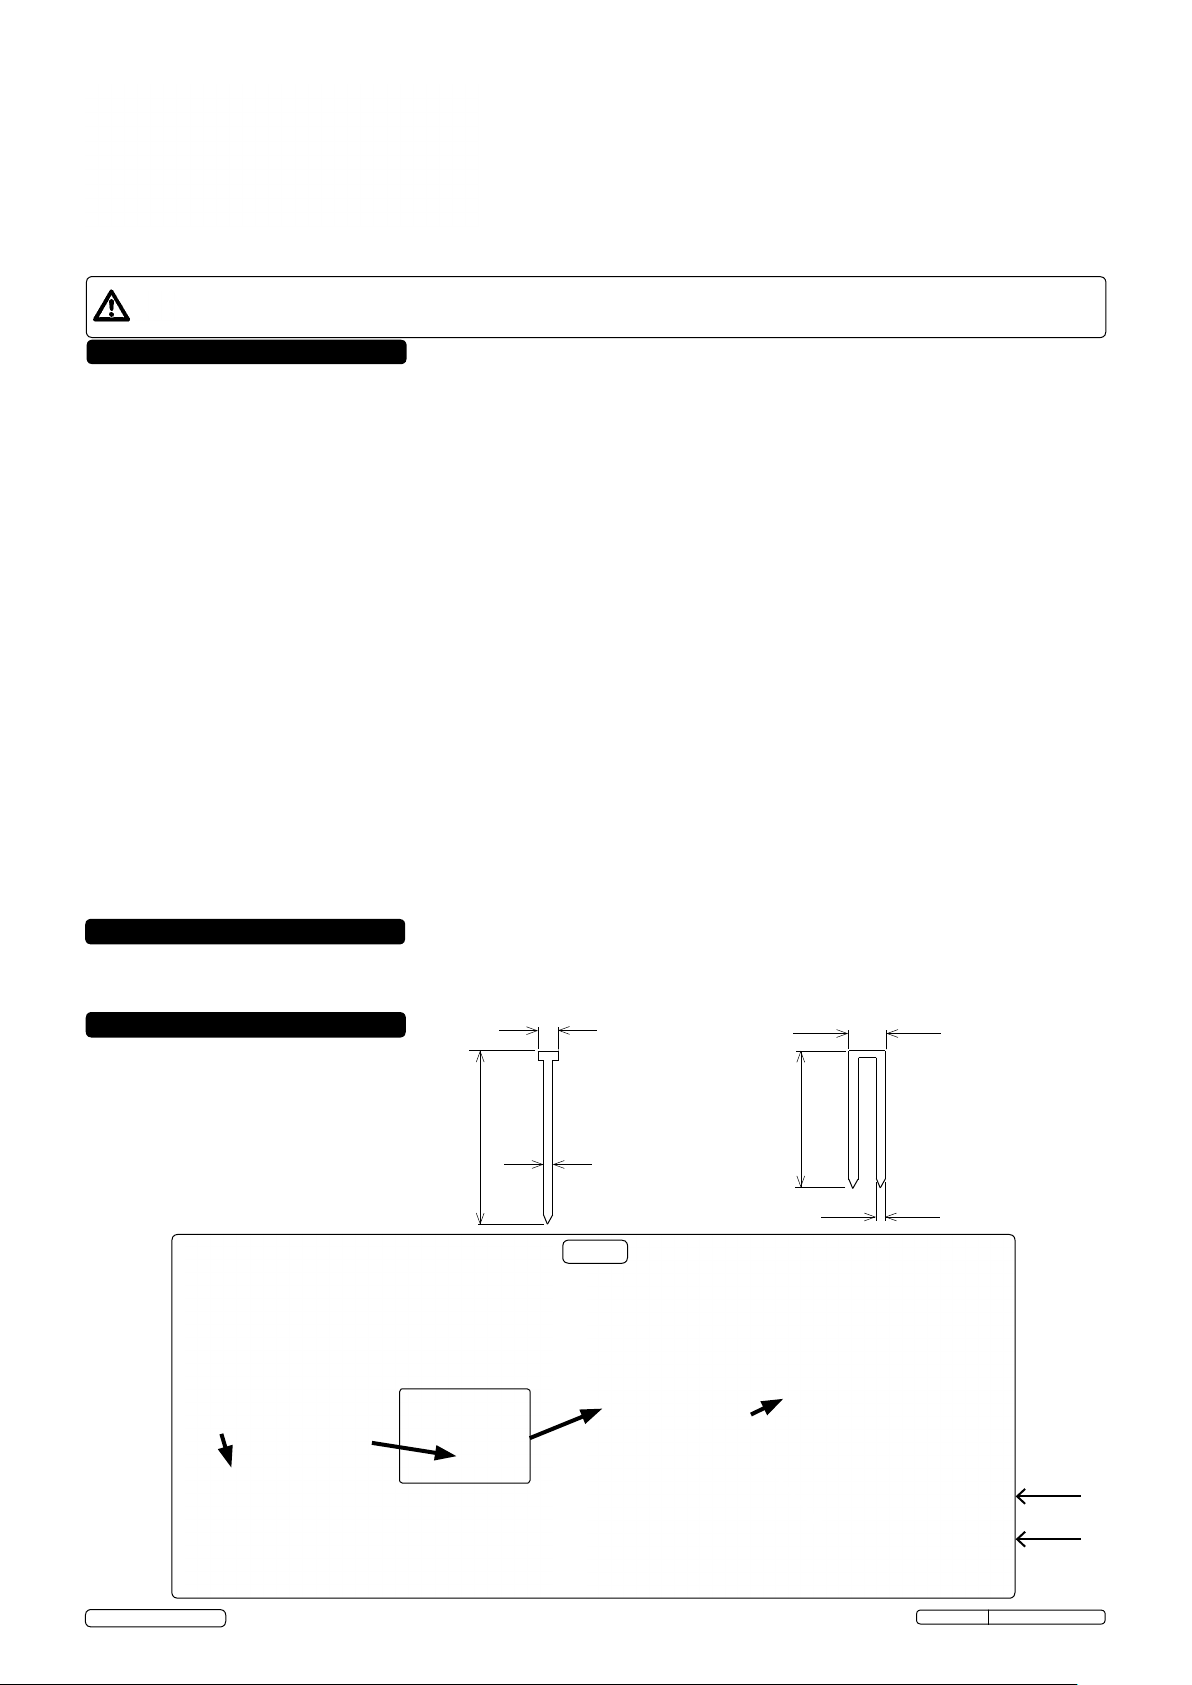
Magazine
latch
Thumb
wheel
10-50mm
2mm x 1.26mm
Fastener Type (Brad)
1.05 x 1.26mm
fig.1
Spring loaded
safety slide
5.7mm
Fastener Type (Staple)
13-40mm
1.05 x 1.26mm
Firing
position
Inoperable
position
© Jack Sealey Limited
Original Language Version
SA792.V3 Issue: 1 - 12/05/14
4. PREPARATION
WARNING! Ensure the air supply is clean, dry and between 70 - 110psi while operating the gun. Too high an air pressure and/or
unclean air will shorten the product life due to excessive wear, and may be dangerous causing damage and/or personal injury.
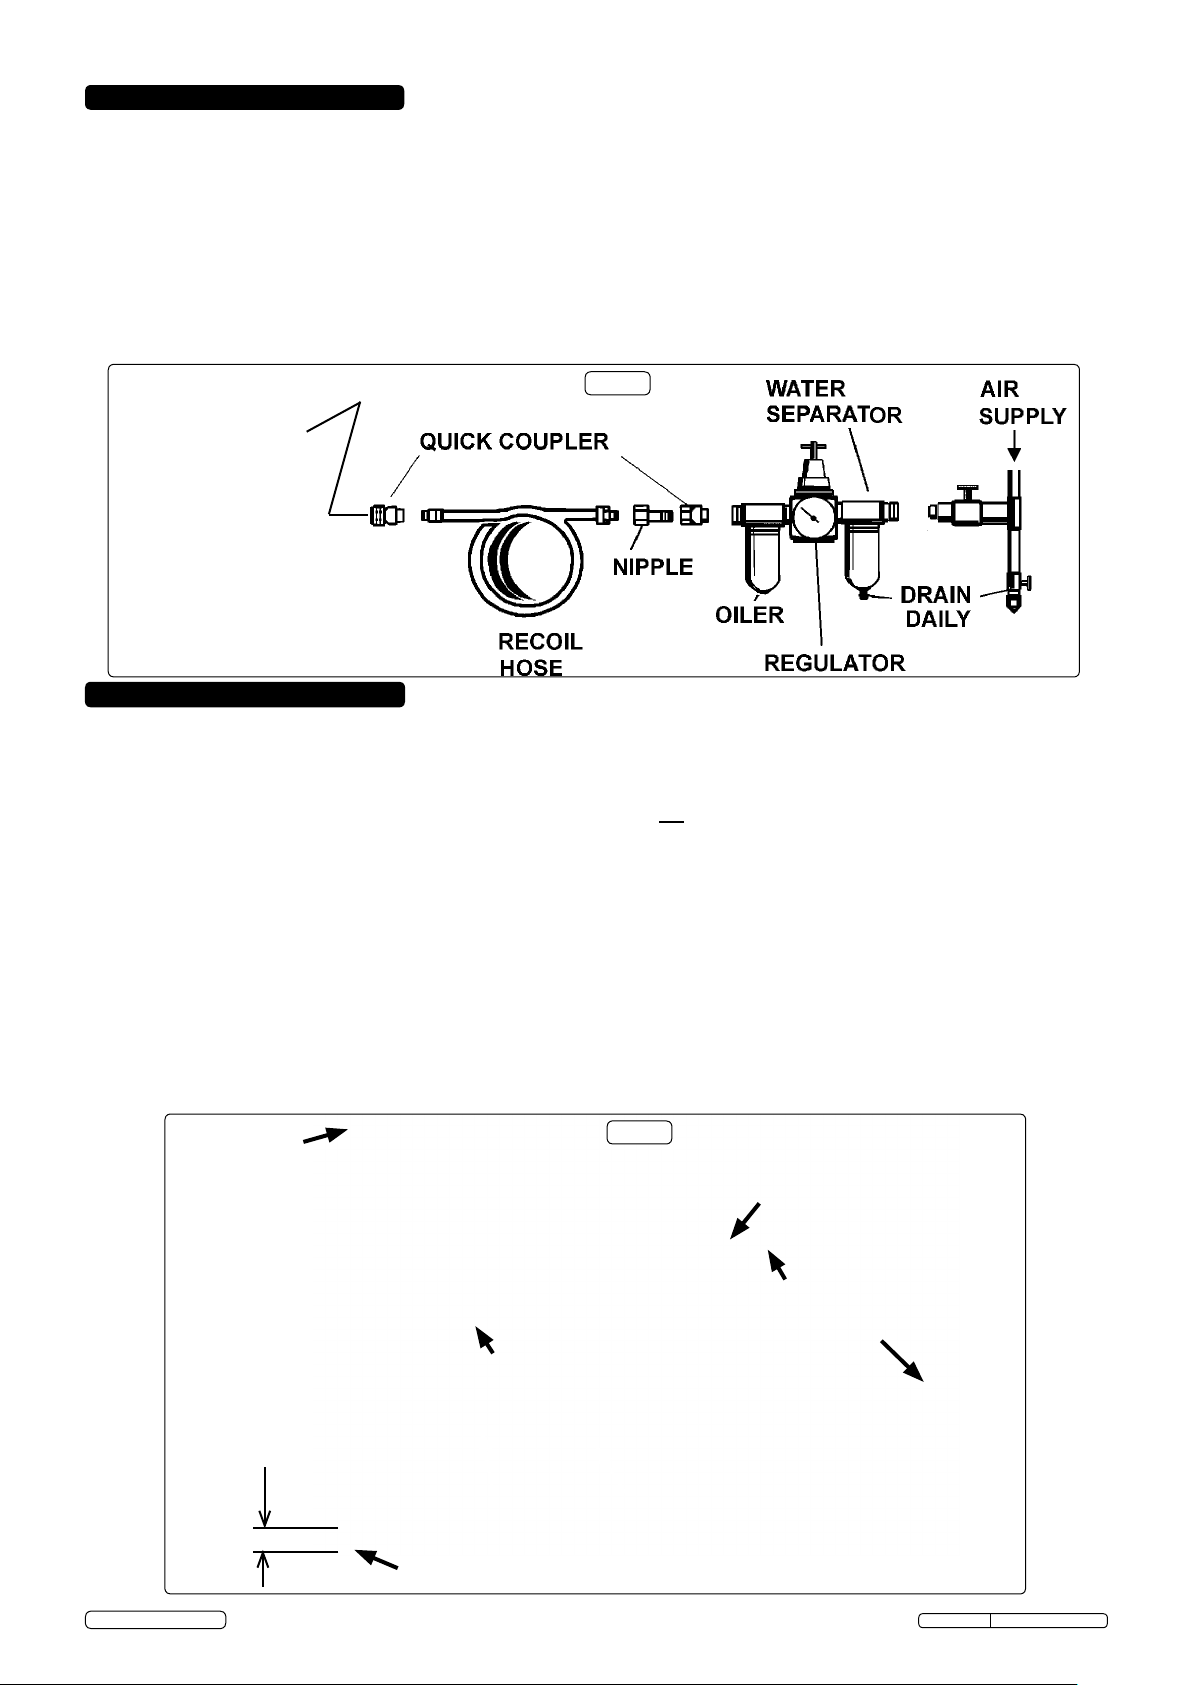
4.1. AIR SUPPLY (From a compressor not a gas bottle)
4.1.1 Ensure the nail gun trigger release slide is not depressed when connecting to the air supply. To check this see fig.1 where indication of
trigger "inoperable" and "firing" positions are shown
4.1.2 You will require an air pressure of between 70 - 110psi, and an air flow according to specification.
4.1.3 Drain your compressor air tank of water daily. Water in the air line will damage the gun.
4.1.4 Clean the compressor air inlet filter weekly. Recommended hook-up procedure is shown in fig.2.
4.1.5 Line pressure should be increased to compensate for unusually long air hoses (over 8 metres). The minimum hose diameter should be
1/4” I.D. and fittings must have the same inside dimensions.
4.1.6 Keep the hose away from heat, oil and sharp edges. Check hose for wear, and make certain that all connections are secure.
fig.2
5. OPERATION
WARNING! Ensure you read, understand and apply safety instructions before use.
5.1. Load the magazine before connecting the air line. To open the magazine, hold the gun body with the left hand, then with your
other hand, press the magazine latch lever and slide the magazine fully open. Place a “strip” of nails/staples into the open magazine
chamber, ensuring that all the nails have their points resting on the bottom of the chamber. Staples nest on the top edge of the guide.
5.2. Slide the magazine cover shut until it clicks into place behind the catch.
5.3. Before connecting to an air supply, ensure that the trigger safety slide is not depressed. See the trigger "inoperable" and "firing"
positions in fig.1.
5.4. Connect the air line to the nail/staple gun as described in Section 4.
5.5. The operating trigger is normally inoperable and cannot be used until the trigger safety slide is depressed. This happens automatically
as you position and offer the nail/stapler gun on to the timber work piece.
5.6. The trigger release slide can be seen protruding downwards just in front of the nail outlet (see fig.3). Place the tip of the slide onto the
timber work piece to be nailed/stapled and press downwards to bring the nose outlet into contact with the surface. As the slide retracts
the trigger will become operational. Never depress the safety slide projection with your finger.
5.7. Depress the trigger and release to fire one nail/staple. To fire another nail/staple in quick succession keep the trigger depressed,
reposition the gun at the next required point and offer the gun nose on to the timber work piece. Repeat as necessary.
5.8. If you need to put the gun down during the course of working, ensure that the trigger safety slide is not depressed against any
object, which will be indicated by the slide firing position in fig.1. This would enable the trigger and possible accidental firing.
5.9. When the work is complete or when you have paused for any length of time, disconnect the nail/stapler gun from the air line.
WARNING! Should a blockage occur, disconnect the nail/stapler gun from the air supply immediately. See trouble shooting in
6.2.
Rotate to change the
exhaust direction
Body
Handle
fig.3
Air line nipple
Safety slide projection
(trigger inoperable)
© Jack Sealey Limited
9mm approx.
Trigger
Magazine
Nail/staple strip
Nail/staple "empty" indicator (red)
Rubber tip for "no indent" witness marks
on workpiece. Remove if not required.
Original Language Version
Dust cap (not shown)
Magazine latch
SA792.V3 Issue: 1 - 12/05/14
 Loading...