

instructions for
MPORTANT:
PLEASE READ THESE INSTRUCTIONS CAREFULLY. NOTE THE SAFE OPERATIONAL REQUIREMENTS, WARNINGS & CAUTIONS. USE
THE PRODUCT CORRECTLY AND WITH CARE FOR THE PURPOSE FOR WHICH IT IS INTENDED. FAILURE TO DO SO MAY CAUSE DAMAGE AND/OR
PERSONAL INJURY AND WILL INVALIDATE THE WARRANTY. KEEP THESE INSTRUCTIONS SAFE FOR FUTURE USE.
air nail gun 15-50mm capacity
model no: Sa791.V2
thank you for purchasing a Sealey product. manufactured to a high standard, this product will, if used according to these
instructions, and properly maintained, give you years of trouble free performance.
refer to
instructions
Keep People
away
Wear protective
gloves
Wear safety
footwear
Wear ear
protection
Wear eye
protection
1. Safety
Warning! DO nOt use the nail gun if damaged, has missing parts or is thought to be faulty. contact your service Agent.
Warning! disconnect from the air supply before loading or servicing.
Warning! Always wear approved eye, face and hand protection when operating the nail gun.
Warning! check correct air pressure is maintained and not exceeded. We recommend 60 to 100psi.
8 DO nOt use the nail gun for a task it is not designed to perform.
8 DO nOt operate the nail gun near flammable substances or flammable containers.
8 DO nOt use the nail gun unless you have been instructed in its use by a qualified person.
8 DO nOt carry the nail gun by the air hose, or yank the hose from the air supply.
8 DO nOt operate the nail gun if you are tired or under the influence of alcohol, drugs or intoxicating medication.
8 DO nOt carry the nail gun with your hand on the power trigger in order to avoid unintentional firing.
8 DO nOt direct the nail gun or the air from the air hose at yourself or others.
8 DO nOt load bent or damaged nails into the magazine.
▲ Danger! When putting the nail gun down, ensure that the trigger safety slide is not fouled, risking accidental firing.
9 maintain the nail gun in good condition and replace any damaged or worn parts. use genuine parts only. unauthorised
parts may be dangerous and will invalidate the warranty.
9 Keep the air hose away from heat, oil and sharp edges. check the air hose for wear before each use and ensure that all
connections are secure.
9 only use supplied 18sWG x 15-50mm Brad nails. Ask your sealey dealer for further supplies.
9 Wear approved safety eye/face shield, ear defenders and hand protection.
9 follow all workshop safety rules, regulations, and conditions when using the nail gun.
9 maintain correct balance and footing. ensure the floor is not slippery and wear non-slip shoes.
9 Keep children and non essential persons away from the working area.
9 When not in use, disconnect from the air supply, remove the strip nails from the magazine and store cased in a safe, dry, childproof
location.
Warning! the warnings, cautions and instructions in this manual cannot cover all possible conditions and situations that
may occur. it must be understood by the operator that common sense and caution are factors which cannot be built into
this product, but must be applied by the operator.
Warning! – risk of Hand arm Vibration injury.
this tool may cause Hand Arm Vibration syndrome if its use is not managed adequately.
this tool is subject to the vibration testing section of the machinery directive 2006/42/ec.
this tool is to be operated in accordance with these instructions.
measured vibration emission value (a): ............. 2.2m/s²
uncertainty value (k): ............................1.1m/s²
Please note that the application of the tool to a sole specialist task may produce a different average vibration emission. We recommend that a
specific evaluation of the vibration emission is conducted prior to commencing with a specialist task.
A health and safety assessment by the user (or employer) will need to be carried out to determine the suitable duration of use for each tool.
nB: stated Vibration emission values are type-test values and are intended to be typical.
Whilst in use, the actual value will vary considerably from and depend on many factors.
such factors include; the operator, the task and the inserted tool or consumable.
nB: ensure that the length of leader hoses is sufficient to allow unrestricted use, as this also helps to reduce vibration.
the state of maintenance of the tool itself is also an important factor, a poorly maintained tool will also increase the risk of Hand Arm Vibration
syndrome.
Health surveillance.
We recommend a programme of health surveillance to detect early symptoms of vibration injury so that management procedures can be
modified accordingly.
© Jack sealey limited
Original Language Version
sA791.V2 | issue 4 06/04/17

Personal protective equipment.
We are not aware of any personal protective equipment (PPe) that provides protection against vibration injury that may result from the
uncontrolled use of this tool. We recommend a sufficient supply of clothing (including gloves) to enable the operator to remain warm and dry and
maintain good blood circulation in fingers etc. Please note that the most effective protection is prevention, please refer to the correct use and
maintenance section in these instructions. Guidance relating to the management of hand arm vibration can be found on the Hsc website
www.hse.gov.uk - Hand-Arm Vibration at Work.
2. intrODuctiOn
Professional air nailer with lightweight aluminium body and rubber grip handle. safety trigger device to prevent accidental firing of nails. supplied
in carry-case with oiler and starter pack of nails.
3. SpecificatiOn
model no: ..............................................................Sa791.V2
nail capacity:. ..............................................15-50mm 18sWG
maximum Pressure:.. .....................................................110psi
operating Pressure ................................................... 60-110psi
Air inlet size:. .............................................................. 1/4”BsP
Gun Weight:....................................................................1.35kg
noise Power: ............................................................... 99dB(A)
noise Pressure: ...........................................................86dB(A)
Vibration: ....................................................................2.2m/s²
uncertainty: ................................................................ 1.1m/s²
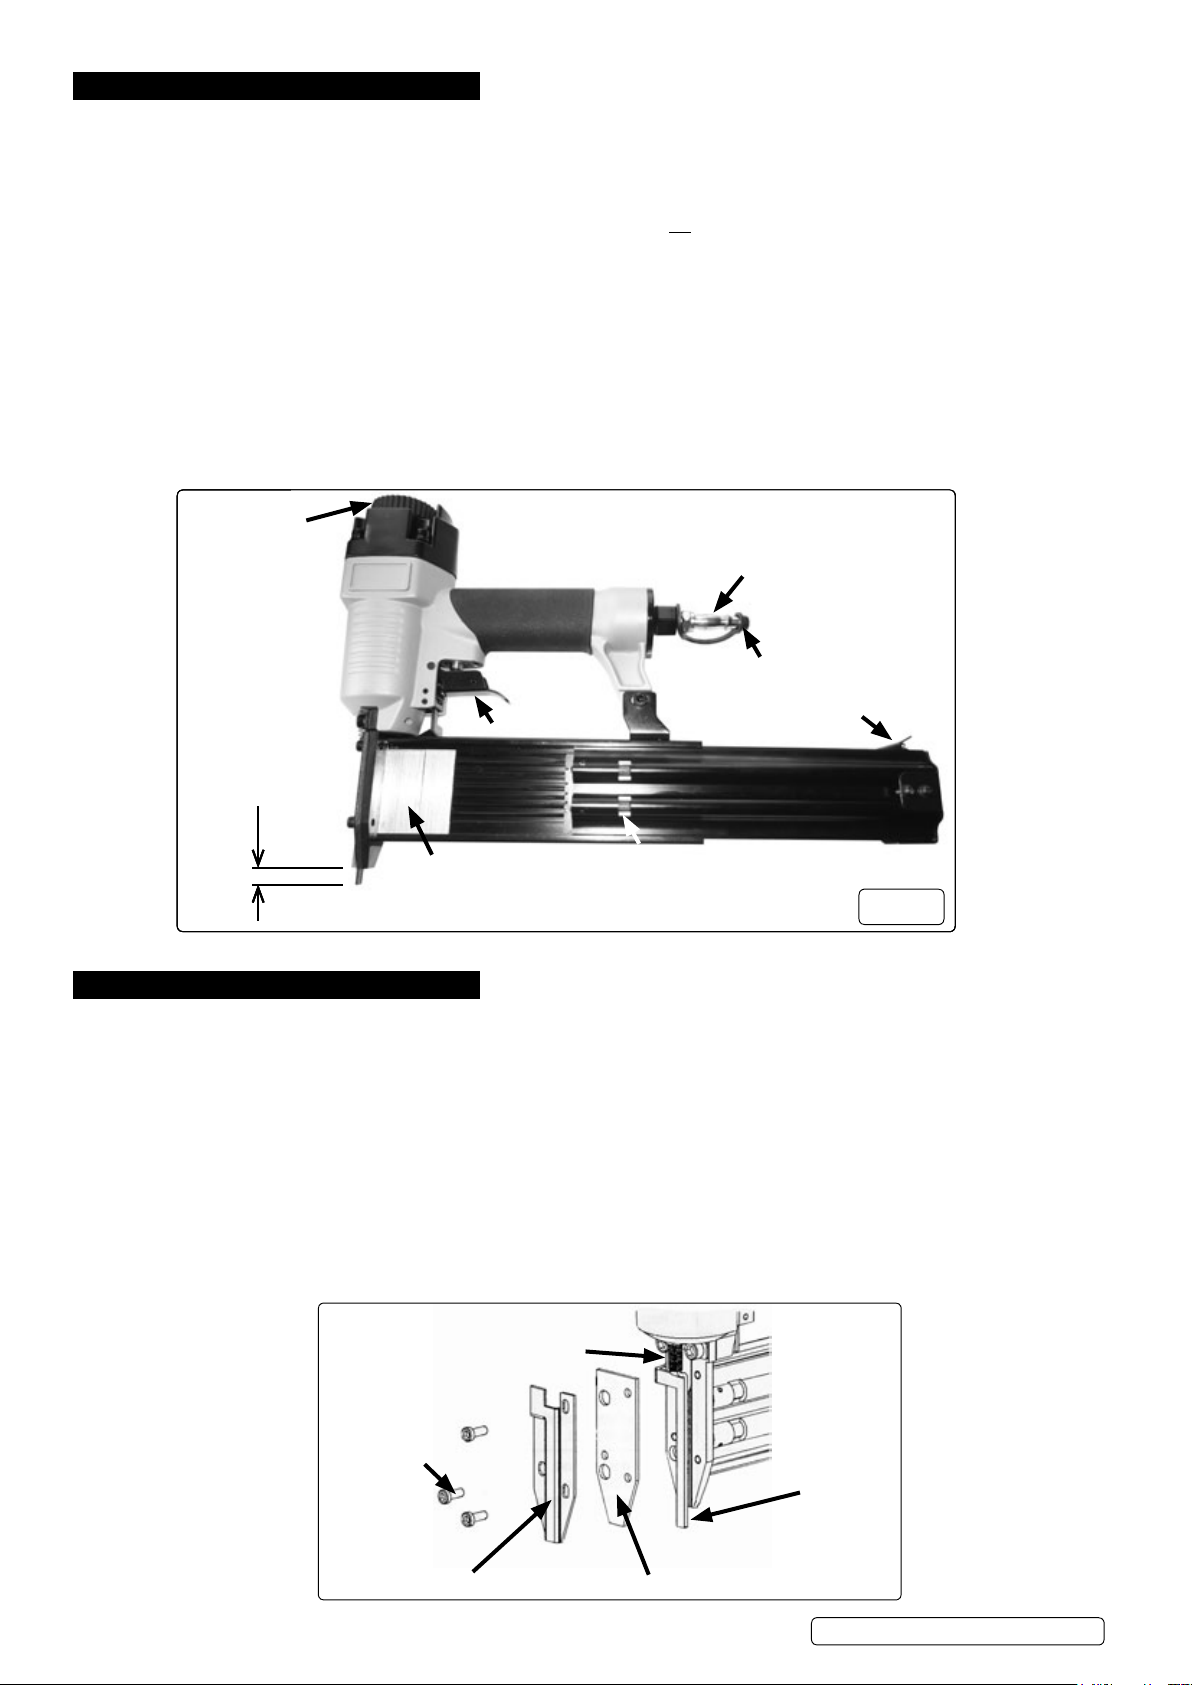
6mm safety gap
g.1
15-50mm
2mm x 1.26mm
fastener type (Brad)
1.05 x 1.26mm
spring loaded safety slide
4. preperatiOn
Warning! ensure the air supply is clean, dry and between 60 - 116psi while operating the nail gun. too high an air pressure and/
or unclean air will shorten the product life due to excessive wear, and may be dangerous causing damage and/or personal injury.
4.1. air Supply
4.1.1. ensure the nail gun trigger release slide is not depressed when connecting to the air supply. A gap of approximately 6mm between gun
housingandcatchwillbeevident(g.1).
4.1.2. You will require an air pressure of between 60 - 116psi.
4.1.3. drain your compressor air tank of water daily. Water in the air line will damage the nail gun.
4.1.4. clean the compressor air inlet filter weekly. recommended hook-up procedure is shown in fig.2.
4.1.5. line pressure should be increased to compensate for unusually long air hoses (over 8 metres). the minimum hose diameter should be
1/4” i.d. and fittings must have the same inside dimensions.
4.1.6. Keep the hose away from heat, oil and sharp edges. check hose for wear, and make certain that all connections are secure.
g.2
© Jack sealey limited
Original Language Version
sA791.V2 | issue 4 06/04/17
5. OperatiOn
Warning! ensure you read, understand and apply safety instructions before use.
5.1. load the magazine before connecting the air line. to open the magazine, hold the nail gun body with the left hand, then with your
other hand, press the magazine latch lever and slide the magazine fully open. Place a “strip” of nails into the open magazine chamber,
ensuring that all the nails have their points resting on the bottom of the chamber.
5.2. slide the magazine cover shut until it clicks into place behind the catch.
5.3. Before connecting to an air supply, ensure that the trigger safety slide is notdepressed.Seethe6mmsafetydimensioning.1.
5.4. connect the air line to the nail gun as described in section 4.
5.5. the operating trigger is normally inoperable and cannot be used until the trigger safety slide is depressed. this happens automatically
as you position and offer the nail gun on to the timber work piece.
5.6. the trigger release slide can be seen protruding downwards just in front of the nail outlet (see fig.3). Place the tip of the slide onto the
timber work piece to be nailed and press downwards to bring the nail outlet into contact with the surface. As the slide retracts the trigger
will become operational. never depress the safety slide projection with your finger.
5.7. depress the trigger and release to fire one nail. to fire another nail in quick succession keep the trigger depressed, reposition the nail
gun at the next required nailing point and offer the nail gun on to the timber work piece. repeat as necessary.
5.8. if you need to put the nail gun down during the course of working, ensure that the trigger safety slide is not depressed against any
object closing the 6mm safety gap in fig.1. this would enable the trigger and possible accidental firing.
5.9. When the work is complete or when you have paused for any length of time, disconnect the nail gun from the air line.
Warning! should a blockage occur, disconnect the nail gun from the air supply immediately. see trouble shooting 6.2.
rotate to change the
rotate to change the
rotate to change the
exhaust direction
exhaust direction
exhaust direction
Body
Body
Body
Handle
Handle
Handle
fig.3
fig.3
Air line nipple
Air line nipple
Air line nipple
dust cap
dust cap
dust cap
magazine latch
magazine latch
magazine latch
trigger
trigger
trigger
safety slide projection
safety slide projection
safety slide projection
(trigger inoperable)
(trigger inoperable)
(trigger inoperable)
9mm approx.
9mm approx.
9mm approx.
nail strip
nail strip
nail strip
magazine
magazine
magazine
nail "empty" indicators (red)
nail "empty" indicators (red)
nail "empty" indicators (red)
g.3
6. trOubleSHOOting
6.1. loss of power or erratic action:
a) excessive drain on the air line. moisture or restriction in the air pipe. incorrect size or type of hose connectors. to remedy check the
air supply and follow instructions in section 4.
b) Grit or gum deposits in the wrench may also reduce performance. flush the nail gun out with gum solvent oil or an equal mixture of
sAe no 10 oil and paraffin. Allow to dry before use.
c) Body air leaks, contact your service Agent.
6.2. nailing failure:
a) magazine empty. check for red indicators in fig.3, if red, reload with nails as described in 5.1 and 5.2.
b) Blockage in the magazine. disconnect from the air supply and open the magazine as described in 5.1. remove any obstructions,
check the nail strip, reload if necessary. close the magazine as described in 5.2.
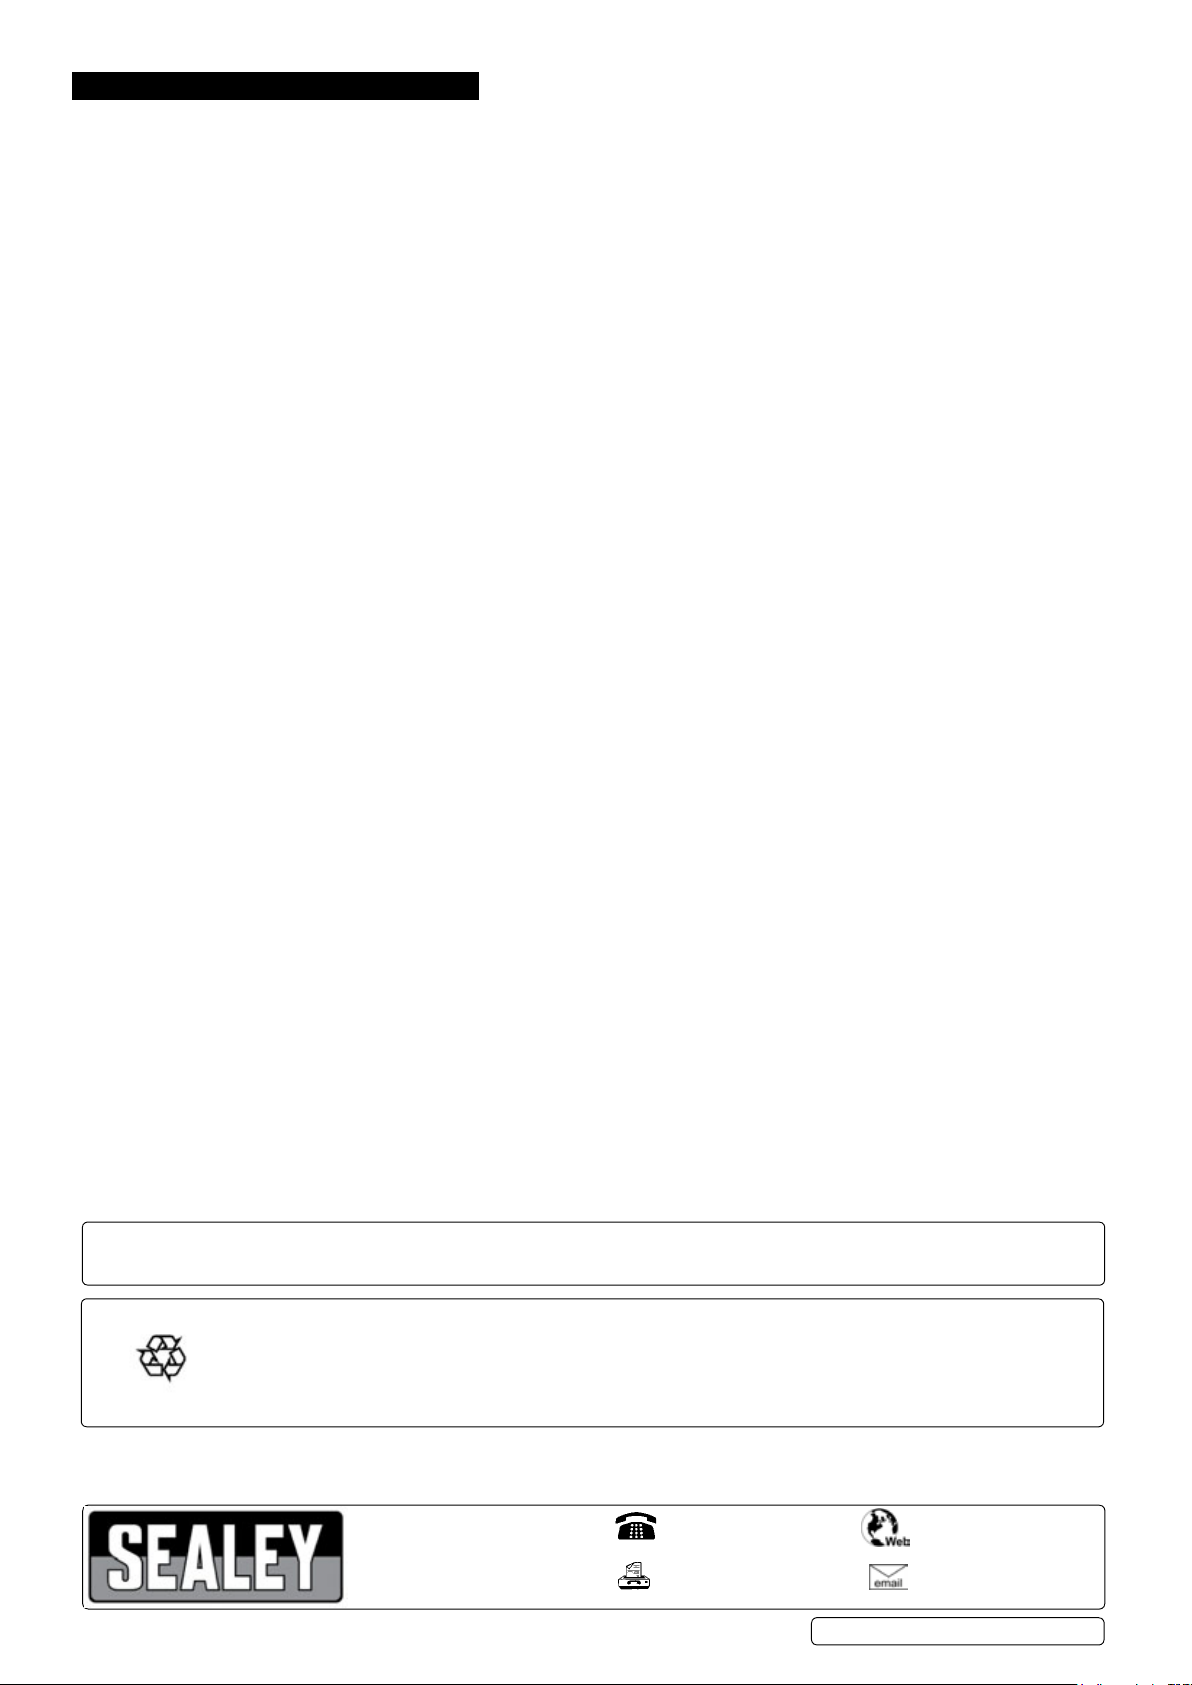
c) Blockage in the ejector nose. disconnect from the air supply and completely remove 3 cap screws, the top nose plate and
intermediate plate in fig.4. ensure the compression spring is retained. clear the jam and replace all items.
d) nails not fully penetrating work piece. timber hardness or knots, may be a factor. Adjust the air pressure between 60-100psi.
© Jack sealey limited
3 cap screws
top nose Guide Plate
compression spring
Original Language Version
safety Guide
intermediate Plate
sA791.V2 | issue 4 06/04/17
7. maintenance
Warning! disconnect the nail gun from the air supply before refilling, servicing or performing maintenance. replace or repair
damaged parts. Use genuine parts only. Unauthorised parts may be dangerous and will invalidate the warranty.
7.1. if the air system does not have an oiler, lubricate the air nail gun daily with a few drops of sealey air tool oil dripped into the air inlet.
(to re-order air tool oil use sealey part nos. A to500s or Ato1000s.)
7.2. Onaweeklybasischeckthesecurityofthexingsholdingthedriverguideplate,tightenifnecessary.
7.3. clear ingress with compressed air.
7.4. clean the nail gun metal parts, after use with a lightly oiled cloth. clean the handle with a mild detergent and a moist cloth.
7.5. for a full service contact your local sealey service agent. .
7.6. When not in use, disconnect from the air supply, remove strip nails from magazine, store cased in a safe, dry, childproof location.
parts support is available for this product. to obtain a parts listing and/or diagram,
please log on to www.sealey.co.uk, email sales@sealey.co.uk or telephone 01284 757500.
environmental protection
recycle unwanted materials instead of disposing of them as waste. All tools, accessories and packaging should be
sorted, taken to a recycling centre and disposed of in a manner which is compatible with the environment.
When the product becomes completely unserviceable and requires disposal, drain off any fluids (if applicable)
into approved containers and dispose of the product and the fluids according to local regulations.
NOTE: It is our policy to continually improve products and as such we reserve the right to alter data, specications and component parts without prior notice.
impOrtant: no liability is accepted for incorrect use of this product.
Warranty: Guarantee is 12 months from purchase date, proof of which will be required for any claim.
© Jack sealey limited
sole uK distributor, sealey Group.
Kempson Way, suffolk Business Park,
Bury st. edmunds, suffolk.
iP32 7Ar
Original Language Version
01284 757500
01284 703534
www.sealey.co.uk
sales@sealey.co.uk
sA791.V2 | issue 4 06/04/17
 Loading...