

Sealey SA2003KIT,SA21/S.V2,SA2403,SA2 Instructions Manual

INSTRUCTIONS FOR:
3PC AIR TOOL KIT
MODEL No: SA2003KIT
Thank you for purchasing a Sealey Product. Manufactured to a high standard this product will, if used according to these instructions and properly maintained,
give you years of trouble free performance.
IMPORTANT: PLEASE READ THESE INSTRUCTIONS CAREFULLY. NOTE THE SAFE OPERATIONAL REQUIREMENTS, WARNINGS AND CAUTIONS.
USE THIS PRODUCT CORRECTLY AND WITH CARE FOR THE PURPOSE FOR WHICH IT IS INTENDED. FAILURE TO DO SO MAY CAUSE DAMAGE
AND/OR PERSONAL INJURY AND WILL INVALIDATE THE WARRANTY. PLEASE KEEP INSTRUCTIONS SAFE FOR FUTURE USE.
1. SAFETY INSTRUCTIONS
WARNING! Ensure that Health & Safety, local authority and general workshop practice regulations are adhered to when using this equipment.
WARNING!Disconnect from the air supply before changing drill bits/sockets, or servicing or performing any maintenance.
Maintain the tools in good condition (use an authorised service agent).
Replace or repair damaged parts. Use genuine parts only. Unauthorised parts may be dangerous and will invalidate the warranty.
Use in a suitable work area. Keep area free from unrelated materials and ensure that there is adequate lighting.
Before each use check condition of drill bit/socket. Sharpen drills if necessary. If worn or damaged replace immediately.
Ensure that the speed rating (rpm) of the drill bit is the same as, or greater than, the speed rating of the drill.
Evaluate the work area before using the drill. Ceilings, floors and enclosures may contain hidden electrical wiring, water pipes or gas pipes.
WARNING! Always wear approved eye (and/or face) and hand protection when operating these tools.
Use face, dust, or respiratory protection in accordance with COSHH regulations.
Impact Wrench - Use only impact sockets, since these are specifically designed for use with an impact wrench. Standard sockets may shatter.
WARNING! Due to the possible presence of asbestos dust from brake linings, when working around vehicle brake systems we recommend you
wear suitable respiratory protection.
Depending on the task, the tool noise level may exceed 84dB in which case wear safety ear defenders.
Remove ill fitting clothing. Remove ties, watches, rings and other loose jewellery and contain and/or tie back long hair.
Wear appropriate protective clothing and keep hands and body clear of working parts.
Maintain correct balance and footing. DO NOT over reach, ensure the floor is not slippery and wear non-slip shoes.
Keep children and unauthorised persons away from the work area.
Check moving parts alignment on a regular basis.
Ensure that the workpiece is secure before operating the tool. Never hold a workpiece by hand.
Avoid unintentional starting.
Remove chuck key before starting the drill.
WARNING! Ensure correct air pressure is maintained and not exceeded. Recommended pressure 70-90psi.
Keep air hose away from heat, oil and sharp edges. Check air hose for wear before each use and ensure that all connections are secure.
Prolonged exposure to vibration from these tools poses a health risk. It is the owner’s responsibility to correctly assess the potential hazard and
issue guidelines for safe periods of use and offer suitable protective equipment.
DO NOT use tool for a task that it is not designed to perform.
DO NOT operate if any parts are damaged or missing as this may cause failure and/or personal injury.
WARNING! DO NOT drill materials containing asbestos.
DO NOT carry the tool by the hose, or yank the hose from the air supply.
DO NOT force, or apply heavy pressure to the drill - let the tool do the work.
DO NOT place air line attachments close to your face and do not point at other people or animals.
DO NOT operate tool when you are tired or under the influence of alcohol, drugs or intoxicating medication.
DO NOT carry tool with your finger on the trigger.
DO NOT direct air from the air line at yourself or others.
When not in use disconnect from air supply and store in a safe, dry, childproof location.
2. INTRODUCTION
Comprises 1/2” air impact wrench, 1/2” air ratchet wrench, 3/8” reversible air drill, a set of 1/2” drive impact sockets - 9, 10, 11, 13, 14, 17 & 19mm,
1/4”M x 1/4”M BSP adaptor, in-line air oiler, air tool oil, chuck key and hex. key, all in a composite carry case.
Suitable for workshop and body shop applications.
3. SPECIFICATIONS
SA2403
3/8” REVERSIBLE DRILL
Chuck ............................3/8”
Free Speed . . . . . . . . . . . . . . . . . . . 1800rpm
Air Consumption ..................4cfm
Operating Pressure ................90psi
Air Inlet ...................... 1/4”BSP
Sound Power ................102.55dBA
Sound Pressure ...............91.55dBA
Vibration Level .................2.06m/s²
Uncertainty ....................0.42m/s²
Weight ..........................0.9kg
© Jack Sealey Limited
SA2
1/2” IMPACT WRENCH
Drive .............................1/2”
Working/Max Torque...........230/270lb.ft
Ultimate Torque ................. 420lb.ft
Air Consumption...................4cfm
Operating Pressure ................90psi
Air Inlet ....................... 1/4”BSP
Sound Power ................100.01dBA
Sound Pressure ...............89.01dBA
Vibration Level .................5.67m/s²
Uncertainty ....................0.64m/s²
Weight ..........................2.2kg
Original Language Version
SA21/S.V2
1/2” RATCHET WRENCH
Drive .............................1/2”
Max Torque......................50lb.ft
Air Consumption...................4cfm
Operating Pressure ................90psi
Air Inlet ....................... 1/4”BSP
Sound Power ................108.47dBA
Sound Pressure ...............97.47dBA
Vibration ......................6.56m/s²
Uncertainty ....................0.69m/s²
Weight ..........................1.2kg
SA2003KIT Issue: 3(SP) - 16/12/13
4. AIR SUPPLY
WARNING! Ensure that the air supply is clean and does not exceed 90 psi while operating these tools. Too high an air pressure and/or
unclean air will cause excessive wear and may be dangerous, causing damage and/or personal injury.
4.1. Ensure that the tool trigger is not depressed before connecting to the air supply.
4.2. You will require an air pressure of 90psi, and an air flow of 4cfm.
4.3. Drain the air tank daily. Water in the air line will damage the tools and invalidate your warranty.
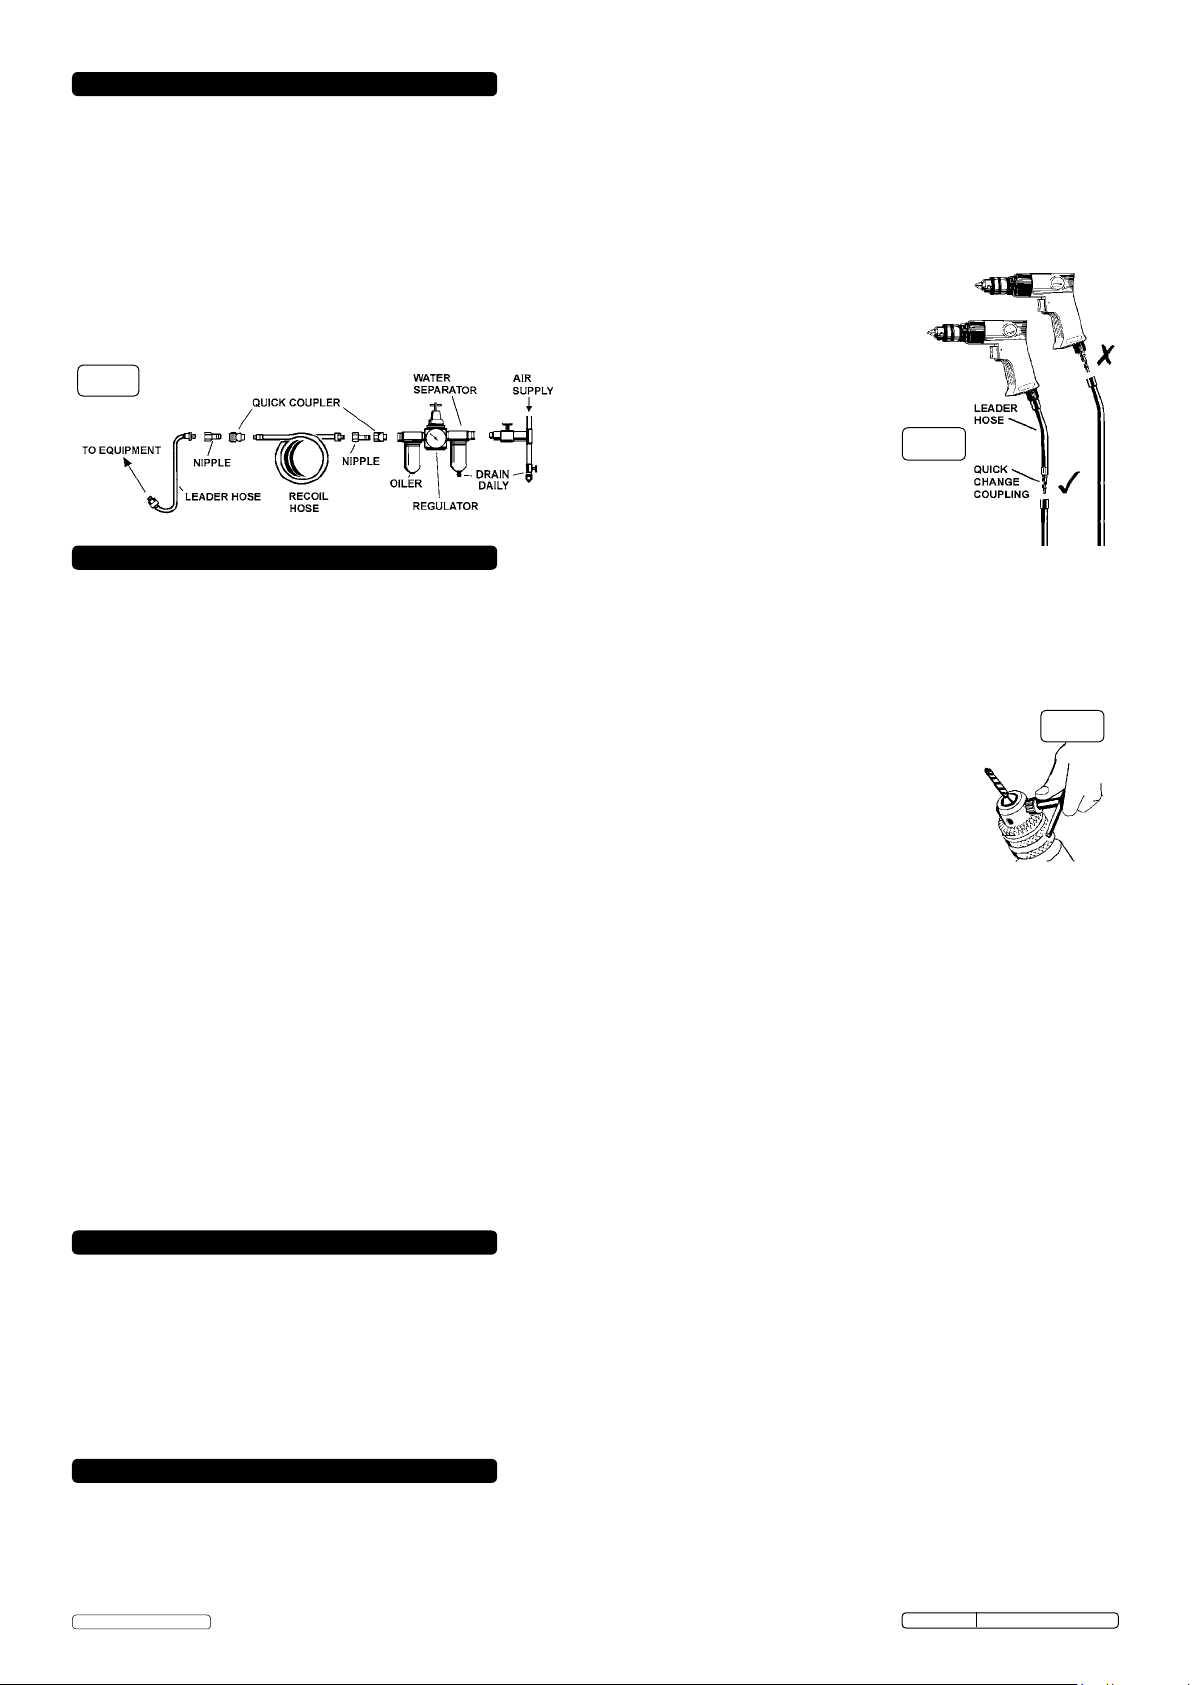
4.4. Clean the compressor air inlet filter weekly. Recommended hook-up is shown in fig. 1.
4.5. Line pressure should be increased to compensate for unusually long air hoses (over 8 metres). The minimum hose bore should be 1/4”
and fittings must have the same inside dimensions.
4.6. Keep hoses away from heat, oil and sharp edges. Check hoses for wear and make certain that all connections are secure.
4.7. Couplings - Vibration may cause failure of a quick change coupling that is connected directly to the air tool.
To overcome this, connect a leader hose - Sealey model number AH2R - to the tool. A quick change coupling
may then be used to connect the leader hose to the air line recoil hose. See figs. 1 & 2.
fig.1
fig.2
5. OPERATION - DRILL
WARNING! Ensure that you read, understand and apply the safety instructions before use.
5.1. DRILL BIT FITTING
Regularly check the drill bit and always change if worn, cracked or otherwise damaged.
WARNING! Unplug from the air supply before placing bit into chuck.
5.1.1. Open or close the chuck jaws to a point where the opening is slightly larger than the drill or tool bit (fig. 3) to be used. Also raise the
front of the drill slightly to prevent bit from falling out of the chuck jaws. Insert the drill bit into the chuck as far as it will go. Place the
chuck key in one of the chuck holes and tighten the chuck securely.
WARNING! Ensure that you remove the chuck key before starting the drill.
5.1.2. Connect air supply to drill. Squeeze the trigger to check that the drill is working correctly before starting work.
DO NOT allow drill to run freely for an extended period of time as this will shorten the life of its bearings.
5.2. DRILLING INSTRUCTIONS
WARNING! Ensure that you wear approved safety goggles and any other safety items required for the job.
Remove the chuck key before using the drill. Also ensure that all other safety requirements are followed.
5.2.1. If the material to be drilled is free standing it should be secured in a vice or with clamps to keep it from turning as the
drill bit rotates.
5.2.2. For hard smooth surfaces use a centre punch to mark the desired hole location. This will prevent bit from slipping as you start to drill.
5.2.3. Connect drill to air supply, if not already done, as in Section 4.
5.2.4. Ensure that the drill is turning in the forward direction by checking that the lever adjacent to the trigger is next to the symbol (F). If not, push
the lever over to this position.
5.2.5. Hold tool firmly and place the bit tip on the point to be drilled.
5.2.6. Depress the trigger to start drill. Move the drill bit into the workpiece applying only enough pressure to keep the bit cutting. DO NOT force
the bit or apply side pressure to elongate the hole.
5.2.7. When drilling metals, use a light oil on the drill bit to keep it from overheating. Oil will prolong the life of the bit and improve the drilling
action.
5.2.8. A pilot hole may be necessary to assist the final size drill through the workpiece.
Lock a pilot drill (smaller size drill than the finished hole size) into the chuck. Follow steps 5.2.1. to 5.2.6. above and drill a pilot hole where
the final hole is to be drilled. Insert the final sized bit in chuck. Hold drill firmly, place the bit at the entrance of the pilot hole and depress the
trigger.
WARNING! Be prepared for drill binding or break-through. When these situations occur the drill has a tendency to grab and kick
which could cause loss of control. If you are not prepared, this loss of control can result in damage and/or personal injury.
5.2.9 If the bit jams in the workpiece or if the drill stalls, release the trigger immediately. Remove the bit from the workpiece and determine the
reason for jamming. To remove the bit it may be necessary to reverse the drill by moving the lever adjacent to the trigger to the reverse
(R) position.
fig.3
6. OPERATION - IMPACT WRENCH
WARNING! Ensure that you read, understand and apply the safety instructions before use.
6.1. Only use impact sockets, which are specifically designed for use with an impact wrench.
6.2. Connect the wrench to the air hose as in Section 4.
6.3. Fit the socket onto the square drive and then place the socket over the subject nut. Squeeze the trigger to operate the wrench.
6.4. To change direction push the button at the top of the handle, direction “F” for forward and “R” for reverse.
6.5. The flow of air may be regulated by adjusting flow valve at the base of the handle.
DO NOT use any additional force upon the wrench in order to tighten or remove a nut.
DO NOT allow wrench to free run for an extended period of time as this will shorten the life of its bearings.
Take care not to over-tighten fixings.
7. OPERATION - RATCHET WRENCH
WARNING! Ensure that you read, understand and apply the safety instructions before use.
7.1. Connect the wrench to the air hose as in Section 4.
7.2. Fit the socket onto the square drive and then place the socket over the subject nut. Squeeze the trigger to operate the wrench.
7.3. To change the ratchet direction turn the switch on the tool head. F = Forward, R = Reverse.
DO NOT use any additional force upon the wrench in order to remove or tighten a nut.
DO NOT allow the wrench to run in “idle rotation” for an extended period of time as this will shorten the life of its bearings.
© Jack Sealey Limited
Original Language Version
SA2003KIT Issue: 3(SP) - 16/12/13
 Loading...