

Page 1

INSTRUCTIONS FOR:
AIR STAPLE GUN 25MM
CAPACITY
Thank you for purchasing a Sealey Product. Manufactured to a high standard this product will,
if used according to these instructions and properly maintained, give you years of trouble free
performance.
IMPORTANT: PLEASE READ THESE INSTRUCTIONS CAREFULLY. NOTE THE SAFE OPERATIONAL REQUIREMENTS,
WARNINGS AND CAUTIONS. USE THIS PRODUCT CORRECTLY AND WITH CARE FOR THE PURPOSE FOR WHICH
IT IS INTENDED. FAILURE TO DO SO MAY CAUSE DAMAGE AND/OR PERSONAL INJURY AND WILL INVALIDATE
THE WARRANTY. PLEASE KEEP INSTRUCTIONS SAFE FOR FUTURE USE.
1. SAFETY INSTRUCTIONS
WARNING! Ensure Health & Safety, local authority, and general workshop practice regulations are adhered
to when using this equipment.
WARNING!Disconnect from air supply before refilling, servicing or performing maintenance.
Maintain the staple gun in good condition (use an authorised service agent).
Replace or repair damaged parts. Use genuine parts only. Unauthorised parts may be dangerous and
will invalidate the warranty.
Use in suitable clean and tidy work area, free from unrelated materials and ensure there is adequate lighting.
WARNING! Always wear approved eye and/or face and hand protection when operating the staple gun.
Remove ill fitting clothing. Remove ties, loose jewellery, and contain and/or tie back long hair.
Wear appropriate protective clothing and keep hands and body clear of working parts.
Maintain correct balance and footing. Ensure the floor is not slippery and wear non-slip shoes.
Keep children and unauthorised persons away from the work area.
Check moving parts alignment on a regular basis.
Ensure workpiece is secure before operating the staple gun. Never hold a workpiece by hand.
When the staple gun is put down during pauses in operation ensure that the trigger catch slide is not depressed
by the weight of the staple gun or by placing the staple gun in a restricted position that could put pressure on the
trigger catch slide.
During extended breaks in operation disconnect the staple gun from the air supply.
WARNING! Ensure correct air pressure is maintained and not exceeded. Recommended pressure 60-100psi.
Keep air hose away from heat, oil and sharp edges. Check air hose for wear before each use and ensure
that all connections are secure.
Prolonged exposure to vibration from this staple gun may pose a health risk. It is the owner ’s responsibility
to correctly assess the potential hazard and issue guidelines for safe periods of use and offer suitable protective
equipment.
DO NOT point the staple discharge outlet at yourself or anyone else. Do not point at animals.
DO NOT use any power source except an air compressor.
DO NOT operate the staple gun near any flammable substance or on any container that once contained a
flammable substance.
DO NOT use the staple gun for a task it is not designed to perform.
DO NOT operate staple gun if any parts are damaged or missing as this may cause failure and/or personal injury.
DO NOT carry the staple gun by the hose, or yank the hose from the air supply.
DO NOT place the staple gun close to your face and do not point at other persons or animals.
DO NOT operate staple gun when you are tired or under the influence of alcohol, drugs or intoxicating medication.
DO NOT carry the staple gun with your finger on the trigger.
DO NOT direct air from the air hose at yourself or others.
When not in use, disconnect from air supply and store in a safe, dry, childproof location.
MODEL: SA789
2. INTRODUCTION & SPECIFICATION
Professional air stapler with lightweight aluminium body and rubber grip handle. Safety trigger device to prevent
accidental firing of staples. Supplied in blow mould case with oiler and starter pack of staples.
Staple Capacity: .....10-25mm 18SWG
Max Pressure: ......120psi
Air Inlet Size: .......1/4”BSP
Original Language Version
Weight: ............1.3kg
SA789 Issue: 2 -
12/11/09
Page 2
3. PREPARING STAPLE GUN FOR USE
3.1 Air Supply
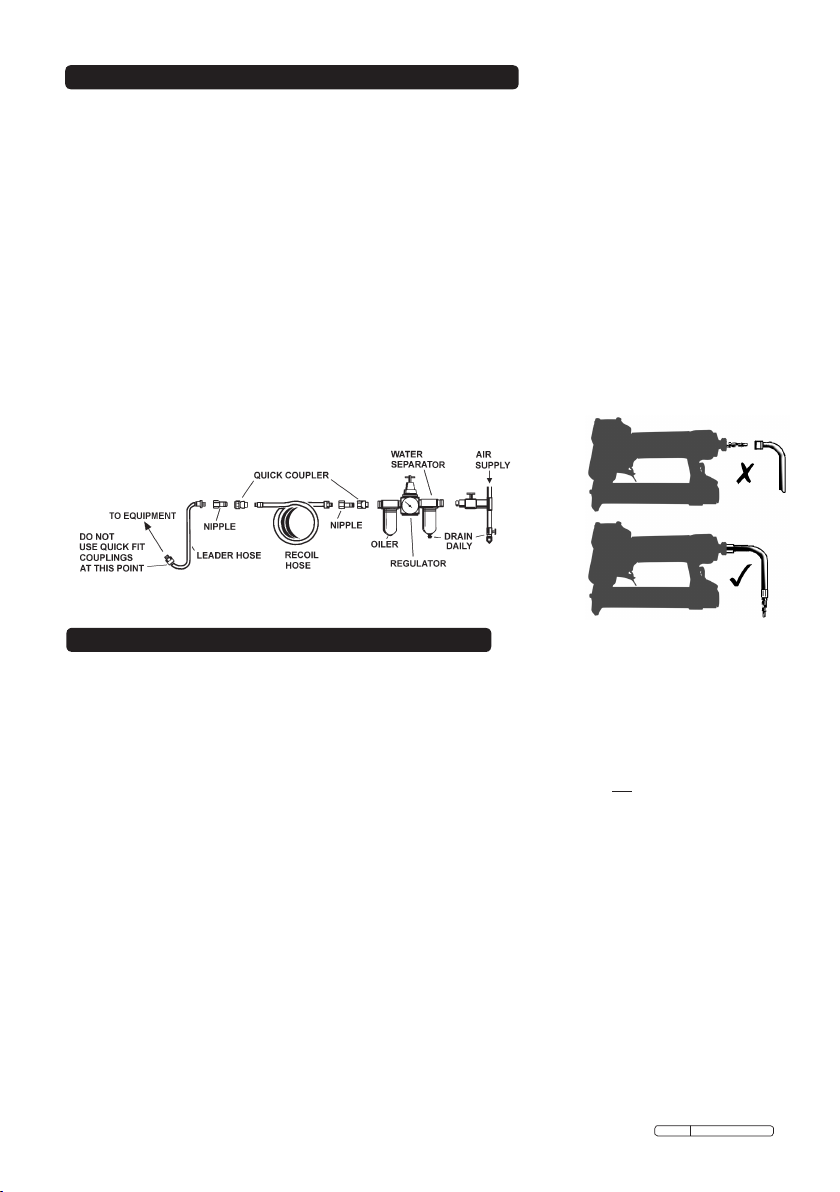
Recommended hook-up procedure is shown in fig 1.
3.1.1 Ensure tool air valve (or trigger) is in "off" position before connecting to the air supply.
3.1.2 You will require an air pressure of 90psi, and an air flow according to specification.
3.1.3 WARNING! Ensure the air supply is clean and does not exceed 90 psi while operating the tool. Too
high an air pressure and unclean air will shorten the product life due to excessive wear, and may be
dangerous causing damage and/or personal injury.
3.1.4 Drain the air tank daily. Water in the air line will damage the tool.
3.1.5 Clean air inlet filter weekly.
3.1.6 Line pressure should be increased to compensate for unusually long air hoses (over 8 metres). The
minimum hose diameter should be 1/4” I.D. and fittings must have the same inside dimensions.
3.1.7 Keep hose away from heat, oil and sharp edges. Check hose for wear, and make certain that all
connections are secure.
3.2 Couplings.
Vibration may cause failure if a quick change coupling is connected directly to the tool.
To overcome this, connect a leader hose to the tool. A quick change coupling may then be used to
connect the leader hose to the air line recoil hose. See fig 1 & 2.
fig 1
fig 2
4. OPERATING INSTRUCTIONS
Ensure you read, understand and apply safety instructions before use.
4.1.1 LOADING THE STAPLER
4.1.2 Load the magazine before connecting the airline. To open the magazine, release the magazine latch
(fig 3), be wary of spring release on the magazine. Load the staples into the loading slot with the tips
facing downwards, so the staples straddle the central ridge (fig 4).
4.1.3 Slide the magazine cover shut until it clicks into place behind the latch.
4.2.1 USING THE STAPLER
4.2.2 Before connecting to an air supply, ensure that the trigger catch release slide is not depressed. Connect
the air line to the staple gun as described in Section 3.
4.2.3 The operating trigger is normally locked and cannot be used until the safety switch is depressed. This
happens automatically as you position the staple gun.
4.2.4 Place the tip of the staple gun onto the material to be stapled and press downwards to bring the staple
outlet into contact with the surface. As the safety switch retracts the trigger will become free (fig 5).
4.2.5 Depress the trigger to fire one staple. To fire another staple, release the trigger, reposition the staple gun
at the next required stapling point and depress the trigger again. Repeat as necessary.
4.2.6 If you need to put the staple gun down during the course of working ensure that the safety switch is
not depressed against any object.
4.2.7 When the work is complete or when you have paused for any length of time, disconnect the staple gun
from the air line.
4.3.1 UNBLOCKING THE STAPLER
WARNING! Should a blockage occur, disconnect staple gun from the air supply immediately.
4.3.2 Open the magazine (as described in 4.1.1)
4.3.3 Access the blockage by unclipping the driver guide front-plate (fig 6) using the release catch provided.
4.3.4 Remove the staple and any foreign matter found within the driver guide.
4.3.5 Replace the driver guide front-plate and set the catch.
4.3.6 Ensure that all parts of the staple gun are secure and correctly positioned, then reconnect the air supply.
Original Language Version
SA789 Issue: 2 -
12/11/09
Page 3

fig 3
fig 4
fig 5
fig 6
5. MAINTENANCE
Disconnect staple gun from air supply before refilling with staples, servicing or performing
maintenance. Replace or repair damaged parts.
Use genuine parts only. Unauthorised parts may be dangerous and will invalidate the warranty.
5.1 If the air supply does not have an oiler, lubricate the air staple gun daily with a few drops of the air tool oil
supplied, dripped into the air inlet before use. To re-order air tool oil use Sealey part Nos. ATO500S or
ATO1000S.
5.2 Clean the staple gun after use.
5.3 Loss of power or erratic action may be due to the following:
a) Excessive drain on the air line. Moisture or restriction in the air pipe. Incorrect size or type of hose
connectors. To remedy check the air supply and follow instructions in chapter 3.
b) Grit or gum deposits in the staple gun may also reduce performance. Flush the staple gun out with
gum solvent oil or an equal mixture of SAE No 10 oil and kerosene. Allow to dry before use.
If you continue to experience problems, contact your local Sealey service agent.
5.4 For a full service contact your local Sealey service agent.
5.5 When not in use, disconnect from air supply, clean staple gun and store in a safe, dry, childproof location.
5.6 On a weekly basis check the security of the hex bolts holding the driver guide plate in place (can be seen
on fig 5) and tighten if necessary.
NOTE: It is our policy to continually improve products and as such we reserve the right to alter data, specifications and component parts without prior notice.
IMPORTANT: No liability is accepted for incorrect use of this product.
WARRANTY: Guarantee is 12 months from purchase date, proof of which will be required for any claim.
INFORMATION: For a copy of our latest catalogue and promotions call us on 01284 757525 and leave your full name and address, including postcode.
Sole UK Distributor, Sealey Group,
Kempson Way, Suffolk Business Park,
Bury St. Edmunds, Suffolk,
IP32 7AR
Original Language Version
01284 757500
01284 703534
www.sealey.co.uk
Web
sales@sealey.co.uk
email
SA789 Issue: 2 -
12/11/09
 Loading...