

Page 1

INSTRUCTIONS FOR:
WORKSHOP AIR POWERED CLEANING TANK
MODEL No:
Thank you for purchasing a Sealey product. Manufactured to a high standard this product will, if used according to these instructions and
properly maintained, give you years of trouble free performance.
IMPORTANT: PLEASE READ THESE INSTRUCTIONS CAREFULLY. NOTE THE SAFE OPERATIONAL REQUIREMENTS, WARNINGS AND
CAUTIONS. USE THIS PRODUCT CORRECTLY AND WITH CARE FOR THE PURPOSE FOR WHICH IT IS INTENDED. FAILURE TO DO SO MAY
CAUSE DAMAGE AND/OR PERSONAL INJURY AND WILL INVALIDATE THE WARRANTY. PLEASE KEEP INSTRUCTIONS SAFE FOR FUTURE USE.
SM22/C
1. SAFETY INSTRUCTIONS
WARNING! Ensure Health & Safety, local authority, general workshop practice regulations are adhered to when using equipment.
WARNING! Installation site must be equipped with suitable fire extinguishers (water must not be used) and escape routes.
WARNING! Disconnect the air supply from the tank before changing accessories, servicing or performing any maintenance.
Maintain the tank in good condition (use an authorised service agent).
Replace or repair damaged parts. Use genuine parts only. Unauthorised parts may be dangerous and will invalidate the warranty.
Locate the tank in a suitable work area. Ensure the tank stands on a firm level surface. Keep area clean and tidy and free from unrelated
materials. Ensure the area is well ventilated and has adequate lighting.
WARNING! Ensure specified air pressure is maintained and not exceeded.
Keep air hose away from heat, oil and sharp edges. Check air hose for wear before each use, and ensure that all connections are secure.
WARNING! This tank is recommended for use only with degreasing solvents suitable for air operated tanks. Ensure you follow
maker’s instructions for solvent use.
When cleaning parts ensure that nothing in the tank, including any parts basket, is in a position that would prevent the lid from
closing fully if and when the fusible link activates.
In case of fire in tank, do not attempt to move unit or remove parts from tank. The lid is fusible and will automatically close extinguishing fire.
Ensure solvent flash point is above 140°F. We recommend you use Sealey solvent, contact your local dealer for details.
Keep the tank clean. Remove and clean the suction filter regularly for best performance.
DO NOT modify or jam the parts washer lid open, as this will make the fusible fire link inoperative which is dangerous practice and will
invalidate the warranty and your insurance.
When cleaning parts ensure that nothing in the tank, including any parts basket, is in a position that would prevent the lid from
closing fully if and when the fusible link activates.
WARNING! DO NOT SMOKE and keep sources of ignition, such as heaters, lamps, etc. away from the unit, together with
flammable or combustible materials, as there is an explosion risk.
WARNING! Wear approved safety eye protection, mask and gloves. If solvent gets on skin or in eyes wash thoroughly with water
and take any other action as required by the solvent instructions.
Remove ill fitting clothing, ties, watches, rings and other loose jewellery, contain long hair, and wear appropriate protective clothing.
Maintain correct balance and footing. Ensure the floor is not slippery and wear non-slip shoes.
Keep non-essential persons away from the work area.
Avoid accidental starting of the washer by ensuring the unit is disconnected from the air supply when not in use.
DO NOT use the tank for any purpose other than for which it is designed.
DO NOT operate the tank if any parts are missing or damaged as this may cause failure or possible personal injury.
DO NOT over-fill the tank.
DO NOT use air line to blow dry components in tank. Only use air gun supplied. DO NOT direct air gun at yourself or others.
DO NOT leave the parts washer operating unattended.
When cleaning is complete, ensure that all controls are in the ‘off’ position and that the air supply is disconnected.
WARNING! It is operator’s responsibility to ensure that there is no uncontrolled discharge of any fluids used with this unit and that
appropriate arrangements have been made for correct disposal of waste in accordance with government/local authority regulations.
2. INTRODUCTION & SPECIFICATION
Air operated Industrial cleaning tank with 54 litre cleaning fluid capacity. Fluid re-circulated through replaceable filter element and directed onto
workpiece through flexible metal delivery nozzle. The tank lid is fitted with fusible link hinge that will automatically snap the lid shut in the event
of a fire. NOTE: This tank is considered safe for use in hazardous environments due to the absence of electricity.
Specification
Operation Pressure ........................90psi
Air Consumption........................... 6cfm
Air Inlet ............................... 1/4”BSP
Tank Height/Width/Length ..........265/500/730mm
Overall Height........................... 890mm
Min. Working Capacity ....................... 48l
Max. Working Capacity .......................55l
Max. Tank Capacity ......................... 91l
Pump Output ............................205l/h
Weight ..................................32kg
3. ASSEMBLY
As you unpack the product, check contents. Should there be any damaged or missing parts contact your supplier immediately.
3.1. Remove all parts from the carton and from inside the tank.
3.2. Lay clean cardboard on the floor to protect the tank paint work and carefully turn the tank upside down whilst holding the lid closed.
3.3. Assemble legs to the brackets on the bottom of the tank with screws and hex nuts, (hand tight only).
3.4. Set the lower shelf among the four legs and fix with screws and hex nuts. Level the shelf and tighten screws.
3.5. Now tighten the leg screws and carefully turn assembled unit up correct way onto it’s legs whilst holding the lid closed.
3.6. Position unit according to safety instructions in Section 1.
3.7. Open lid and place the pump control box through the rectangular hole on the side of tub.
3.8. Screw the 90° connector into the welded bolt on pump housing, then fit the flexible tube to the 90° connector.
3.9. Place the work shelf onto the welded supports inside the tank.
3.10. Check that the tank drain plug is correctly inserted and tightened.
3.11. Place the parts basket on work shelf. Check your installation to ensure the unit is ready for connecting to the air supply.
Original Language Version
SM22/C Issue: 2 - 17/03/10
Page 2
4. AIR SUPPLY
4.1. Ensure that the tank air valve is closed before connecting the air supply.
4.2. An air pressure of 65-125psi and an available air volume of 8-10cfm will be required to operate the unit.
WARNING! Ensure air supply is clean and does not exceed 125psi. Too high an air pressure and/or unclean air will shorten
the product life due to excessive wear and may be dangerous, causing possible damage and/or personal injury.
Air supply must be equipped with regulator, water trap and oiler.
4.3. Drain the air supply tank daily. Water in the air line will damage the unit.
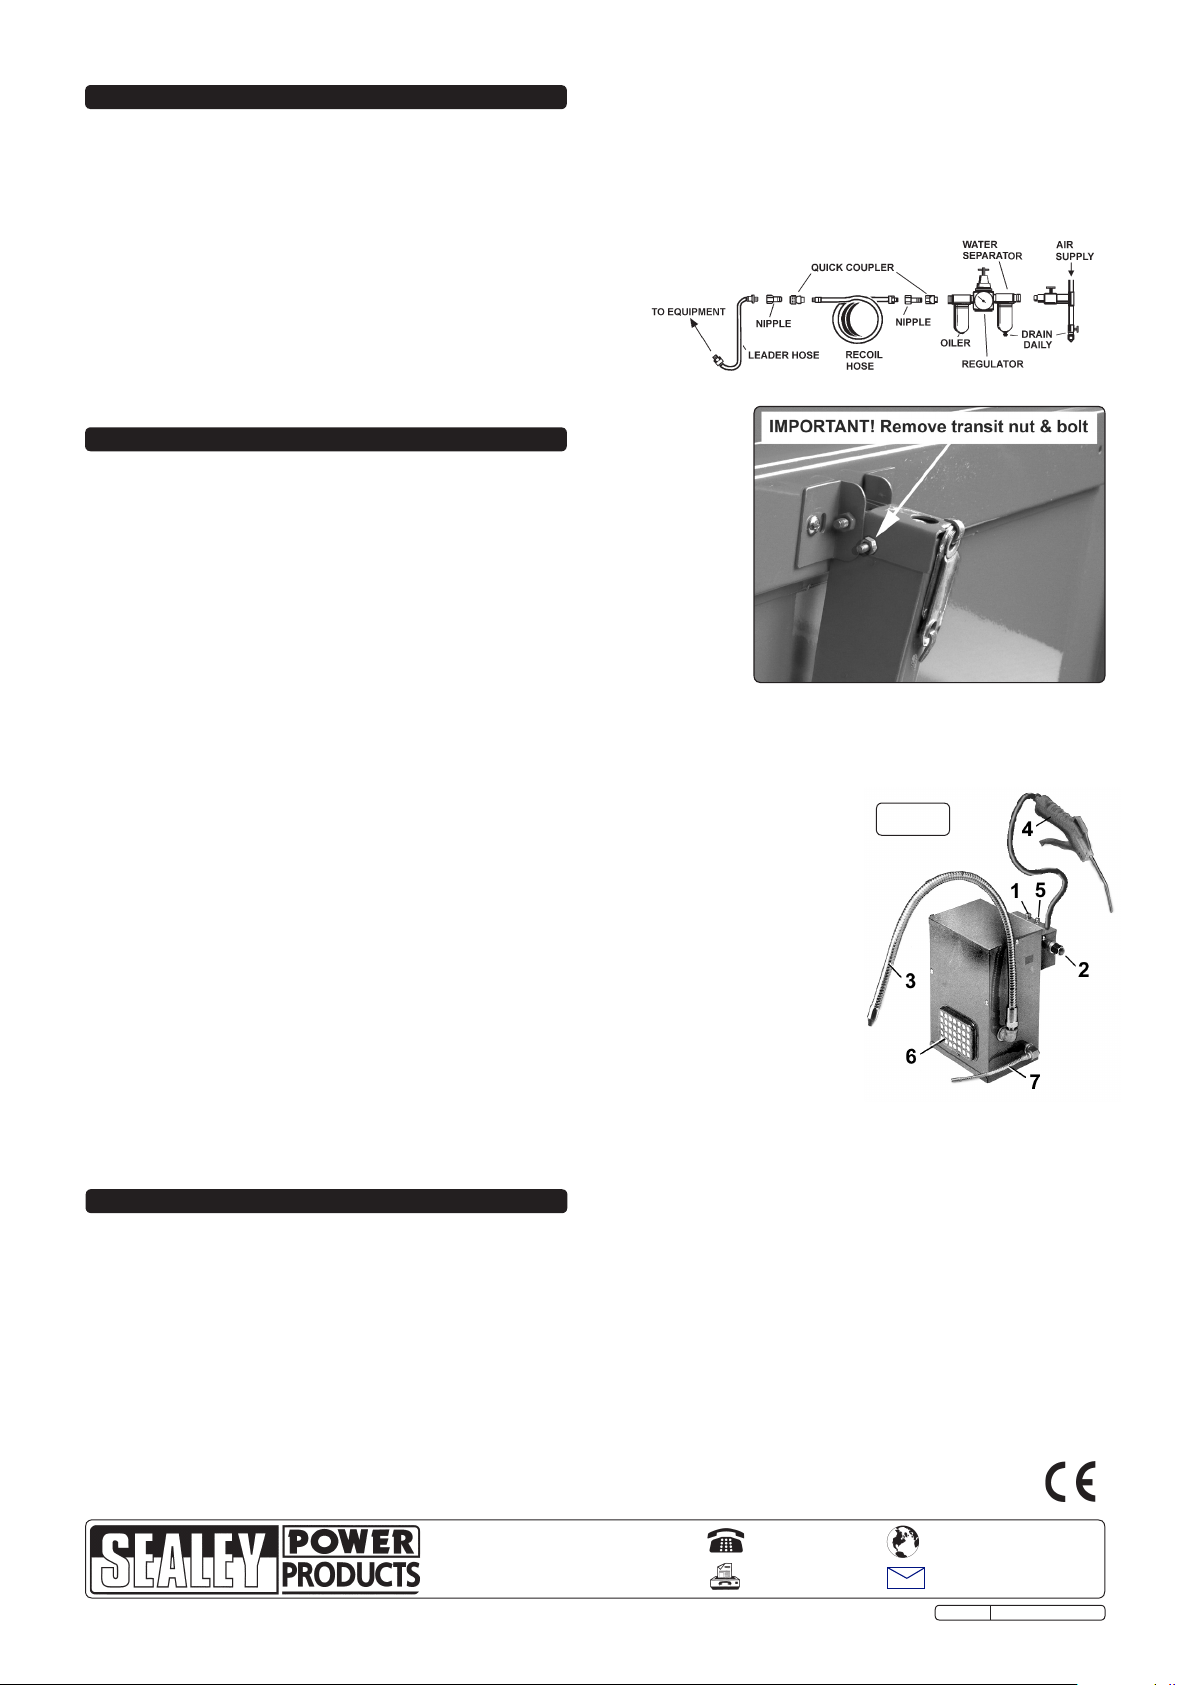
4.4. Clean the air supply filter weekly. For recommended hook-up, see diagram.
4.5. Line pressure should be increased to compensate for unusually long air
hoses (over 8 metres). The minimum hose internal diameter should be
10mm and fittings must have the same internal dimension.
4.6. Keep hose away from heat, oil and sharp edges. Check hoses for
wear, and make certain that all connections are secure.
4.7. The air inlet connection is 1/4”BSP.
HOOK-UP
5. OPERATING INSTRUCTIONS
WARNING! Read and apply Section 1 safety instructions before using the
cleaning tank.
IMPORTANT! You must remove the transit bolt from the lid stay as indicated
in fig.1 as the fire safety mechanism will not work if the bolt remains in place.
5.1. Check the air regulator valve (fig.2.1) is off, and air inlet (2) is disconnected from the
air supply.
5.2. Fill the tank to appropriate capacity (See specifications) with Sealey solvent, or a
general purpose degreaser (contact your local dealer for supply). DO NOT use any
other type of solvent.
CAUTION! Ensure you follow any instructions provided with the solvent.
5.3. Connect washer to the air supply, aim flexible nozzle (3) into tank and turn valve (1)
on. Check that solvent flows freely through the flexible nozzle.
5.4. Place parts to be cleaned into the cleaning basket. Direct spray nozzle onto parts. Ensure any splash back stays inside the tank, if not
reposition the spray nozzle. Adjust the air flow valve (1) to give the minimum output for the task.
5.5. The supplied brush may be attached to the nozzle to assisted cleaning if required.
5.6. For stubborn and ground in marks, leave the parts to soak in the bottom of the tank. Place the turbo nozzle (7) in the solvent and turn
the turbo mode valve (5) on. This will agitate the solvent and assist cleaning.
5.7. When parts are clean, turn off the pump and leave the parts to drain in the basket or on the shelf.
5.8. To assist drying the air blow gun (4) may be used.
5.9. When complete, turn the washer off and disconnect from the air supply.
5.10. SOLVENT REPLACEMENT
WARNING! It is operator’s responsibility to ensure that there is no uncontrolled discharge of
any fluids used with this unit and that appropriate arrangements have been made for correct
disposal of waste in accordance with government/local authority regulations.
WARNING!Disconnect the air supply from the unit before changing accessories, servicing or
performing any maintenance.
WARNING! Wear approved safety gloves, goggles, mask and suitable clothing.
5.10.1. To empty used solvent, loosen sediment in the bottom of the tank by use of the turbo mode, then
open base plug to drain.
Completely drain dirty solvent into appropriate receptacle. Clean inside of tank and strainer before
refilling with clean solvent.
5.10.2. Store the used solvent in accordance with regulations.
5.10.3. Wipe up any spillage immediately. When cleaning parts ensure that nothing in the tank,
including any parts basket, is in a position that would prevent the lid from closing fully if and
when the fusible link activates.
fig.2
Fig.1
6. MAINTENANCE
WARNING!Disconnect the air supply from the unit before changing accessories, servicing or performing any maintenance.
6.1. Keep the cleaning tank clean. Remove and clean the filter (fig 1.6) regularly for best and safest performance.
6.2. Regularly check and top up the oil in the air supply oiler.
6.3. Keep the outside of the unit clean.
6.4. DO NOT modify or jam the parts washer lid open, as this will make the fusible fire link inoperative which is dangerous practice and will
invalidate the warranty and your insurance.
NOTE: It is our policy to continually improve products and as such we reserve the right to alter data, specifications and component parts without prior notice.
IMPORTANT: No liability is accepted for incorrect use of this product.
WARRANTY: Guarantee is 12 months from purchase date, proof of which will be required for any claim.
INFORMATION: For a copy of our latest catalogue and promotions call us on 01284 757525 and leave your full name and address, including postcode.
Sole UK Distributor, Sealey Group,
Kempson Way, Suffolk Business Park,
Bury St. Edmunds, Suffolk,
IP32 7AR
Original Language Version
01284 757500
01284 703534
www.sealey.co.uk
Web
sales@sealey.co.uk
email
SM22/C Issue: 2 - 17/03/10
Page 3

PARTS LIST FOR:
WORKSHOP AIR POWERED CLEANING TANK
fig.2
MODEL No:
SM22/C
First Issued: 130700
Version No: 1
Date Modified: 231100
Fig.2
Item Part No. Description
1 SM22/C/01 BODY
2 SM22/C/02 COVER
3 SM22/C/03 SAFETY PLATE
4 SM22/C/04 PAN SCREW, 1/4" x 3/4"
5 SM22/C/05 TAPPING SCREW
6 SM22/C/06 SAFETY PLATE
7 SM22/C/07 HEX NUT 1/4"
8 SM22/C/08 PLUG
8.1 SM22/C/08.1 OIL SEAL
9 SM22/C/09 SHELF
10 SM22/C/10 LEG
11 SM22/C/11 PAN SCREW, 1/4" x 3/8"
12 SM22/C/12 WASHER, 1/4"
13 SM22/C/13 HEX NUT, 1/4"
14 SM22/C/14 WORK SHELF
15 SM22/C/15 BASKET
Fig. 2
Item Part No. Description
1 SM22/C/P-01 PUMP HOUSING
2 SM22/C/P-02 HOUSING FRONT COVER
3 SM22/C/P-03 FILTER, NON WOVEN FABRICS
4 SM22/C/P-04 FILTER BRACKET
5 SM22/C/P-05 HOUSING TOP
6 SM22/C/P-06 ADJUSTABLE SWITCH BOX
7 SM22/C/P-07 SWITCH BOX COVER
Fig. 2 Continued
Item Part No. Description
8 SM22/C/P-08 TAPPING SCREW
9 SM22/C/P-09 AIR PUMP
10 SM22/C/P-10 PUMP FIXED PLATE
11 SM22/C/P-11 PAN SCREW, 3/16" x 5/8"
12 SM22/C/P-12 FLUID HOSE
13 SM22/C/P-13 HOSE CLAMP
14 SM22/C/P-14 CONNECTOR, 1/4" x 1/4"
15 SM22/C/P-15 WASHER
16 SM22/C/P-16 PAN SCREW, 5/32" x 3/8"
17 SM22/C/P-17 HEX NUT, 5/32"
18 SM22/C/P-18 PU HOSE QUICK CONNECTOR, 1/8"
19 SM22/C/P-19 PU HOSE, 5 x 8
20 SM22/C/P-20 PU HOSE QUICK CONNECTOR, INSIDE THREAD
21 SM22/C/P-21 SILENCER, 1/8"
22 SM22/C/P-22 ADJUSTABLE SWITCH
23 SM22/C/P-23 INLET PIPE
24 SM22/C/P-24 PU HOSE QUICK CONNECTOR 1/4"
25 SM22/C/P-25 AIR BLOW GUN
26 SM22/C/P-26 FLEXIBLE HOSE, 1/4" x 24"
27 SM22/C/P-27 L CONNECTOR, 1/4" INSIDE THREAD
28 SM22/C/P-28 TURBO SPIGOT
29 SM22/C/P-29 L CONNECTOR, 1/8" INSIDE THREAD
30 SM22/C/P-30 CLEAR TUBE
31 SM22/C/P-31 CLEANING BRUSH
32 SM22/C/P-32 INLET CONNECTOR, 1/4" INSIDE THREAD
Sole UK Distributor, Sealey Group,
Kempson Way, Suffolk Business Park,
Bury St. Edmunds, Suffolk,
IP32 7AR
Original Language Version
01284 757500
01284 703534
www.sealey.co.uk
Web
sales@sealey.co.uk
email
fig. 2
 Loading...