

Sealey PC102,PC102HV Instructions Manual
INSTRUCTIONS FOR
IMPORTANT: PLEASE READ THESE INSTRUCTIONS CAREFULLY. NOTE THE SAFE OPERATIONAL REQUIREMENTS, WARNINGS & CAUTIONS. USE
THE PRODUCT CORRECTLY AND WITH CARE FOR THE PURPOSE FOR WHICH IT IS INTENDED. FAILURE TO DO SO MAY CAUSE DAMAGE AND/OR
PERSONAL INJURY AND WILL INVALIDATE THE WARRANTY. KEEP THESE INSTRUCTIONS SAFE FOR FUTURE USE.
VACUUM CLEANER WET & DRY 10LTR.
MODEL NO: PC102, PC102HV
Thank you for purchasing a Sealey product. Manufactured to a high standard, this product will, if used according to these instructions,
and properly maintained, give you years of trouble free performance.
Refer to
instruction
manual
1. SAFETY
1.1. ELECTRICAL SAFETY
WARNING! It is the user’s responsibility to check the following:
Check all electrical equipment and appliances to ensure that they are safe before using. Inspect power supply leads, plugs and all
electrical connections for wear and damage. Sealey recommend that an RCD (Residual Current Device) is used with all electrical
products. You may obtain an RCD by contacting your local Sealey stockist.
If the product is used in the course of business duties, it must be maintained in a safe condition and routinely PAT (Portable Appliance
Test) tested.
Electrical safety information: it is important that the following information is read and understood.
1.1.1. Ensure that the insulation on all cables and on the appliance is safe before connecting it to the power supply.
1.1.2. Regularly inspect power supply cables and plugs for wear or damage and check all connections to ensure that they are secure.
1.1.3. Important: Ensure that the voltage rating on the appliance suits the power supply to be used and that the plug is tted with the correct
fuse - see fuse rating in these instructions.
8 DO NOT pull or carry the appliance by the power cable.
8 DO NOT pull the plug from the socket by the cable.
8 DO NOT use worn or damaged cables, plugs or connectors. Ensure that any faulty item is repaired or
replaced immediately by a qualied electrician.
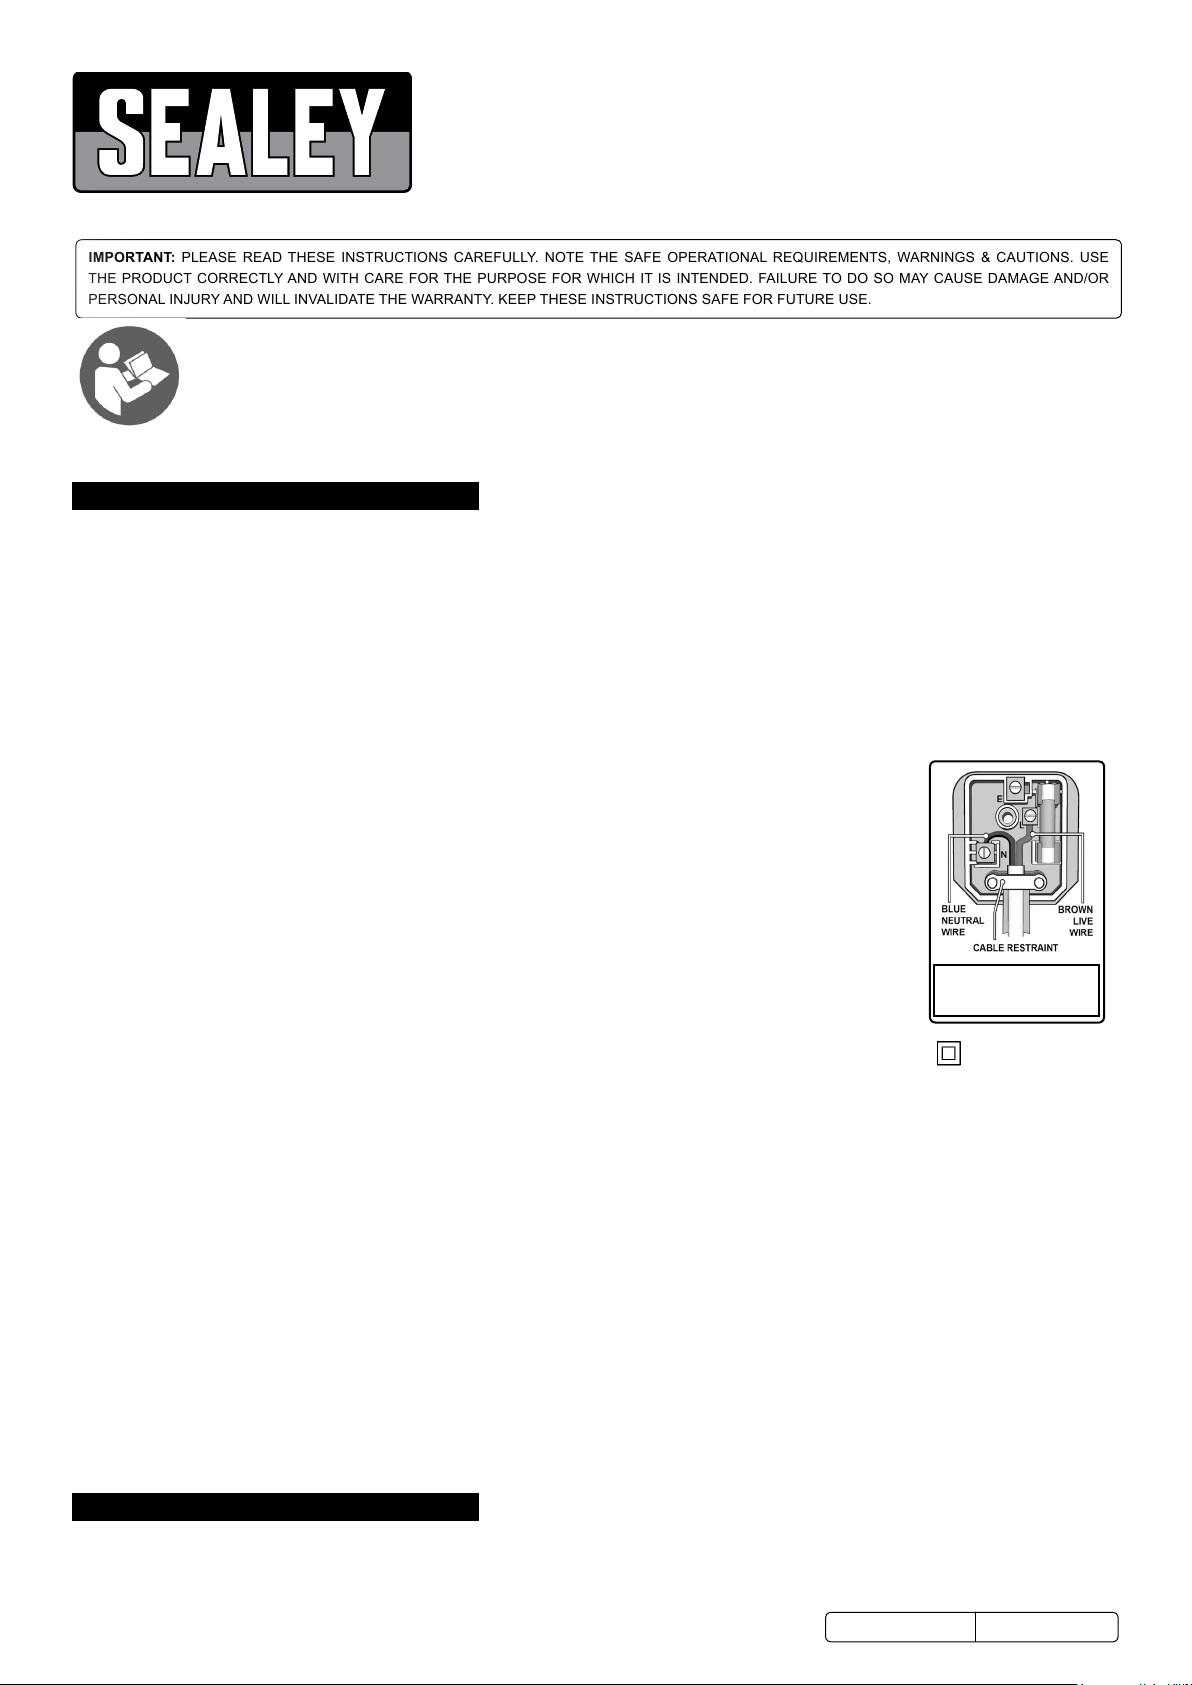
1.1.4. This product is tted with a BS1363/A 13 Amp 3 pin plug.
If the cable or plug is damaged during use, switch the electricity supply and remove from use.
Ensure that repairs are carried out by a qualied electrician.
Replace a damaged plug with a BS1363/A 13 Amp 3 pin plug. If in doubt contact a qualied electrician.
A) Connect the BROWN live wire to the live terminal ‘L’.
B) Connect the BLUE neutral wire to the neutral terminal ‘N’.
C) After wiring, check that there are no bare wires and ensure that all wires have been correctly connected.
DO NOT connect either wire to the earth terminal.
Ensure that the cable outer sheath extends inside the cable restraint and that the restraint is tight.
Class II products are wired with live (brown) and neutral (blue) only and are marked with the Class II symbol;
Sealey recommend that repairs are carried out by a qualied electrician.
If an extension reel is used it should be fully unwound before connection. A reel with an RCD fitted is
preferred since any appliance plugged into it will be protected. The cable core section is important and should be at least 1.5mm², but to
be absolutely sure that the capacity of the reel is suitable for this product and for others which may be used in the other output sockets,
we recommend the use of 2.5mm² section cable. If extension reel is to be used outdoors, ensure it is marked for outdoor use.
1.2. GENERAL SAFETY
9 Disconnect the cleaner from the power supply before servicing, changing accessories, or performing any maintenance.
9 Use only genuine parts and accessories. Unauthorised parts and accessories may be dangerous and will invalidate your warranty.
9 Maintain the cleaner in good condition. Use an authorised agent for servicing. Keep machine clean, but DO NOT use solvents.
9 For dry vacuuming ensure the filter is firmly in place before operating the cleaner.
8 DO NOT operate the unit without the cloth filter in place. Using the cleaner without the cloth filter may cause damage to the
vacuum cleaner and will invalidate your warranty.
8 DO NOT allow children or untrained persons to operate the cleaner.
8 DO NOT place attachments close to your face (especially eyes, ears, etc). DO NOT point the hose end at other persons or animals.
▲ DANGER! DO NOT vacuum hot or glowing ash, cigarette ends, inflammable, explosive, corrosive or other dangerous substances.
8 DO NOT leave machine running unattended. Turn power supply OFF, and DO NOT leave the vicinity until motor has come to a complete stop.
8 DO NOT operate the cleaner while under the influence of drugs, alcohol or impairing medication, or if you are tired.
8 DO NOT use the cleaner in the rain or in very damp conditions.
8 DO NOT use the cleaner for a task it is not designed to perform.
9 When not in use, store the cleaner in a safe, dry, childproof location.
Recommended fuse rating:
13 AMP
2. i INTRODUCTION
High powered, lightweight Wet and Dry unit with blower facility and has 10 litre capacity. Constructed from high impact composite material with tool
and hose storage points on head. Four castors to aid manoeuvrability. Ideal for vehicle, home and general workshop use. Supplied with crevice and
floor tools, washable cloth filter, 3.5 mtr. cable and 3 pin plug.
© Jack Sealey Limited
Original Language Version
PC102, PC102HV Issue 1 12/12/17
3. SPECIFICATION
Feature PC102 PC102HV
Motor Power 1000W 1000W
Supply 230V 230V
Airow 78mtr
Drum Size 10ltr 10ltr
Drum Type Plastic Plastic
Weight 4.1kg 4.1kg
Vacuum Accessories Dia. 32mm Dia. 32mm Dia.
Filter Type Cloth Cloth
Maximum Vacuum Pressure Null Null
Consumable Parts PC102CF - Washable Cloth PC102CF - Washable Cloth
Replacement Parts Null Null
Optional Accessories Null Null
Colour Red and Black Green and Black
3
/hr 78mtr3/hr
4. ASSEMBLY
4.1. Ensure the mains plug is disconnected.
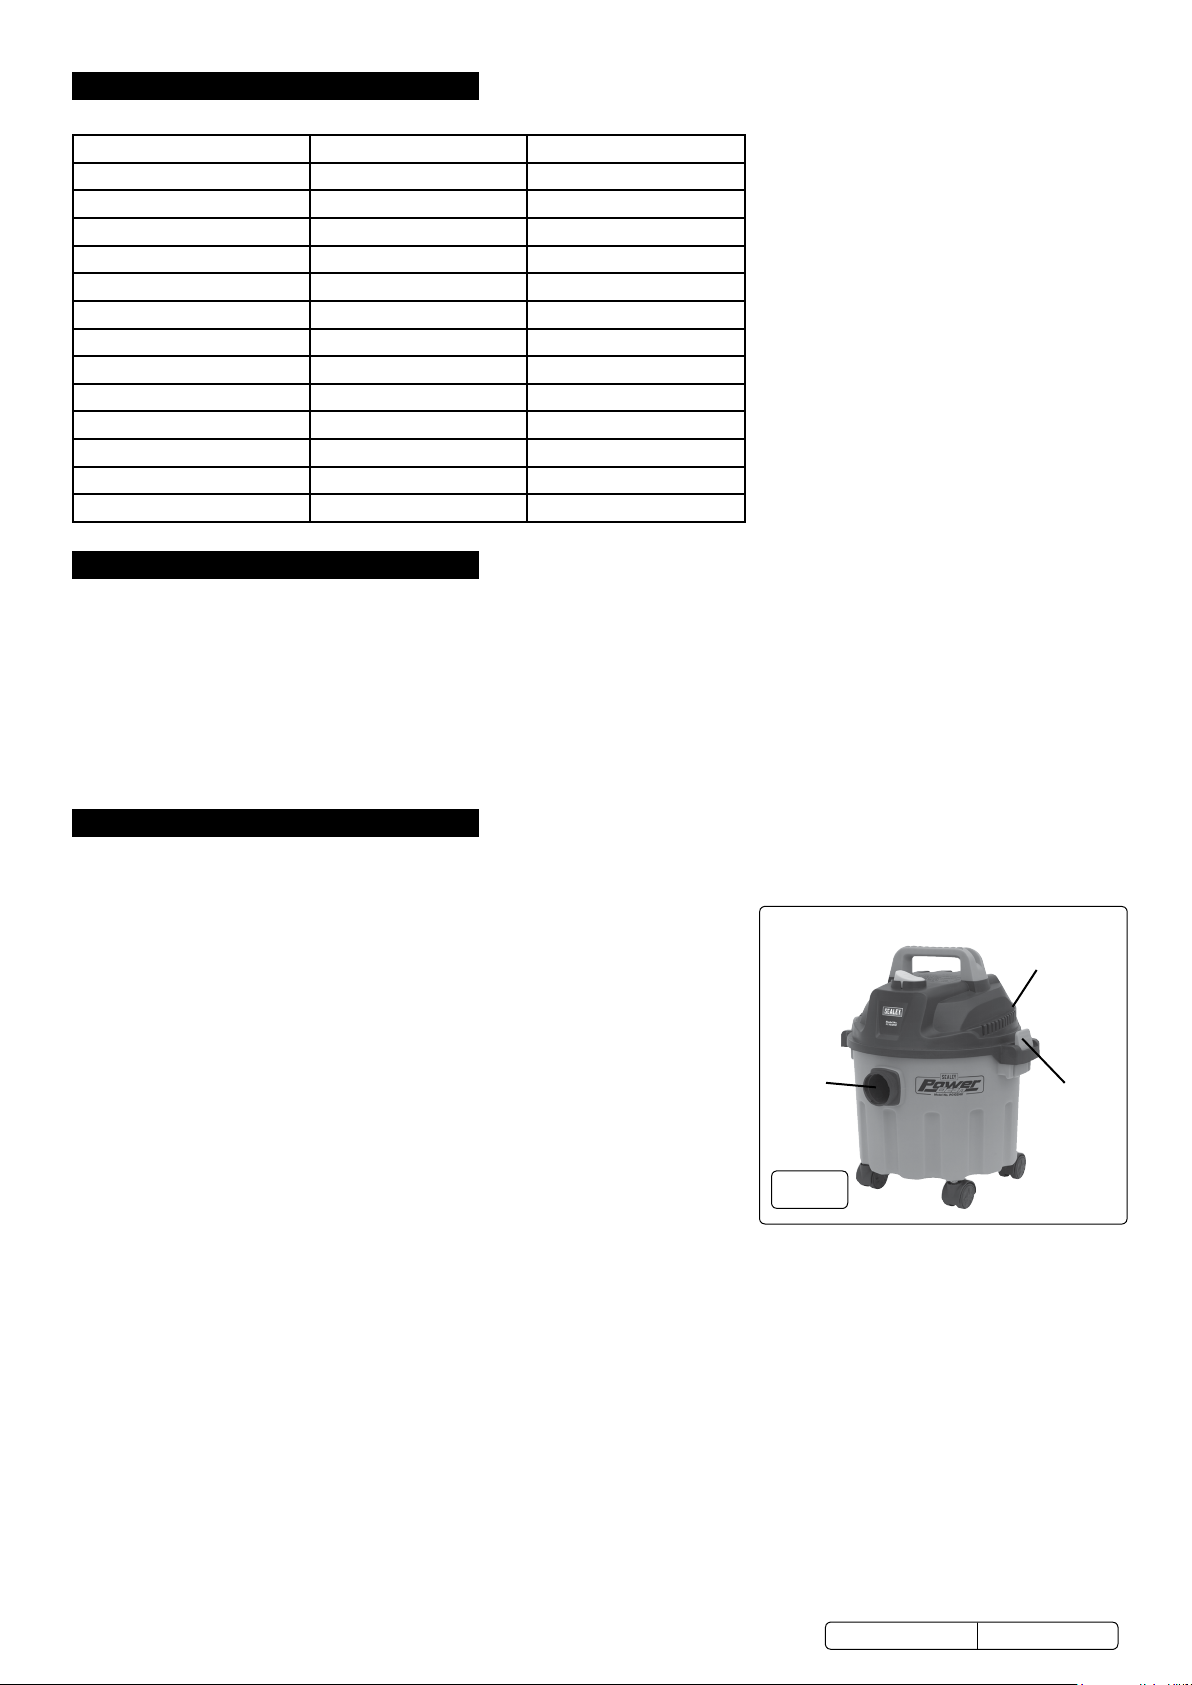
4.2. Undo two side clasps (see g.1) by squeezing them towards body and lift o top assembly.
4.3. Remove any contents from inside the body of the machine.
4.4. Turn the body upside down and press-t castors.
4.5. Stand body upright and t Air Inlet connection into side of body. Take care to aim nozzle downwards towards to the base (g.1)
4.6. Fit washable cloth lter inside ensuring full seating with rim of body.
4.7. Crimp side clasps (see g.1) and lower top assembly into place ensuring xing and rm mounting.
4.8. Attach suction hose assembly to air inlet connection (quarter turn locking).
4.9. Attach desired nozzle to suction hose.
5. OPERATION
WARNING! Ensure you read, understand and apply Section 1 ‘Safety Instructions’. Reminder: Remove plug from power supply
before opening unit. DO NOT vacuum solvents, explosives, inflammable and/or hazardous liquids such as petrol, oil, spirits,
paint, thinners, acids etc.
5.1. DRY VACUUM CLEANING
5.1.1. Ensure machine is unplugged from the power supply.
5.1.2. Ensure clean and dry lter is tted internally (see section 4.6).
5.1.3. Attach suction hose assembly to air inlet connection in body (quarter turn locking).
5.1.4. Attach desired nozzle to suction hose.
5.1.5. Connect cleaner to power supply, press start switch to ‘On’ position.
5.1.6. When vacuuming is completed press start switch to ‘O’.
5.1.7. See Section 6 for emptying and cleaning instructions.
5.2. WET VACUUM CLEANING
5.2.1. Ensure machine is unplugged from the power supply.
5.2.2. Ensure clean and dry lter is tted internally (see section 4.6).
5.2.3. Attach suction hose assembly to air inlet connection in body (quarter turn locking).
5.2.4. Attach desired nozzle to suction hose.
5.2.5. Connect cleaner to power supply, press start switch to ‘On’ position.
5.2.6. When vacuuming is completed press start switch to ‘O’.
5.2.7. See section 6 for maintenance and cleaning instructions.
Note: To vacuum large quantities of liquid from a sink or tank etc. DO NOT immerse the nozzle completely in the liquid but leave
a gap at the top of the nozzle opening to allow an air flow. The machine is fitted with a float valve that stops the suction when the tank
has reached its maximum capacity. When the tank is full the user will notice an increase in motor speed and machine note. When this
happens turn off the machine off, disconnect from the power supply, remove the machine head and empty the liquid from the body into
a suitable receptacle or drain. To continue vacuuming refit the head and continue. After wet vacuuming turn the machine off and unplug
from the power supply. Empty the container into a suitable receptacle or drain, clean and dry the inside and outside before storage. Clean
and dry the cloth filter as per section 6 instructions.
5.3. BLOWING
5.3.1. Ensure machine is unplugged from the power supply.
5.3.2. Ensure clean and dry lter is tted internally (see section 4.6).
5.3.3. Attach suction hose to the output connection in machine head (quarter turn locking) (see g.1).
5.3.4. Connect cleaner to power supply, press start switch to ‘On’ position.
5.3.5. The unit will blow through the hose and can be used to clear obstructions within the pipe.
WARNING! If after a few seconds the hose is still blocked switch o unit and clear the hose blockage manually.
Air Inlet
fig.
1
Output
Connection
(on far side)
Side Clasp
© Jack Sealey Limited
Original Language Version
PC102, PC102HV Issue 1 12/12/17
 Loading...