

Page 1
PREMIER BOTTLE JACK
IMPORTANT: PLEASE READ THESE INSTRUCTIONS CAREFULLY. NOTE THE SAFE OPERATIONAL REQUIREMENTS, WARNINGS & CAUTIONS. USE
THE PRODUCT CORRECTLY AND WITH CARE FOR THE PURPOSE FOR WHICH IT IS INTENDED. FAILURE TO DO SO MAY CAUSE DAMAGE AND/OR
PERSONAL INJURY AND WILL INVALIDATE THE WARRANTY. KEEP THESE INSTRUCTIONS SAFE FOR FUTURE USE.
20TONNE, 30TONNE & 50TONNE
MODEL NO: PBJ20, PBJ30 & PBJ50
Thank you for purchasing a Sealey product. Manufactured to a high standard, this product will, if used according to these
instructions, and properly maintained, give you years of trouble free performance.
Refer to
instructions
Wear safety
footwear
Beware crushing
hands
Jack Saddle
axis in line
(no offset load)
Use wheel
chocks
Use axle stands
1. SAFETY
WARNING! ALWAYS USE LOAD RATED STANDS TO SUPPORT LIFTED LOADS
▲ DANGER! Use the jack for lifting and lowering only.
▲ DANGER! DO NOT place any part of the body beneath the lifted load unless the load is fully supported by rated stands.
▲ DANGER! DO NOT place any part of the body beneath the load during lifting or lowering.
8 DO NOT exceed the rated capacity of the jack, load or maximum stroke.
8 DO NOT adjust the overload valve, modify or use the jack for any purpose other than for which it is designed (lifting and lowering
mechanical devices).
8 DO NOT leave elevated loads unattended, unless safe from others in a garage or workshop.
8 DO NOT modify the jack.
9 Ensure the jacking area is solid and level. Increase the jacking area with a solid flat plate (steel) if jacking on tarmacadum or grass.
9 Keep others away from the work area.
9 Ensure the jacking area is clutter free and that there is adequate lighting.
WARNING! The warnings, cautions and instructions in this manual cannot cover all possible conditions and situations that
may occur. It must be understood by the operator that common sense and caution are factors which cannot be built into
this product, but must be applied by the operator.
2. INTRODUCTION
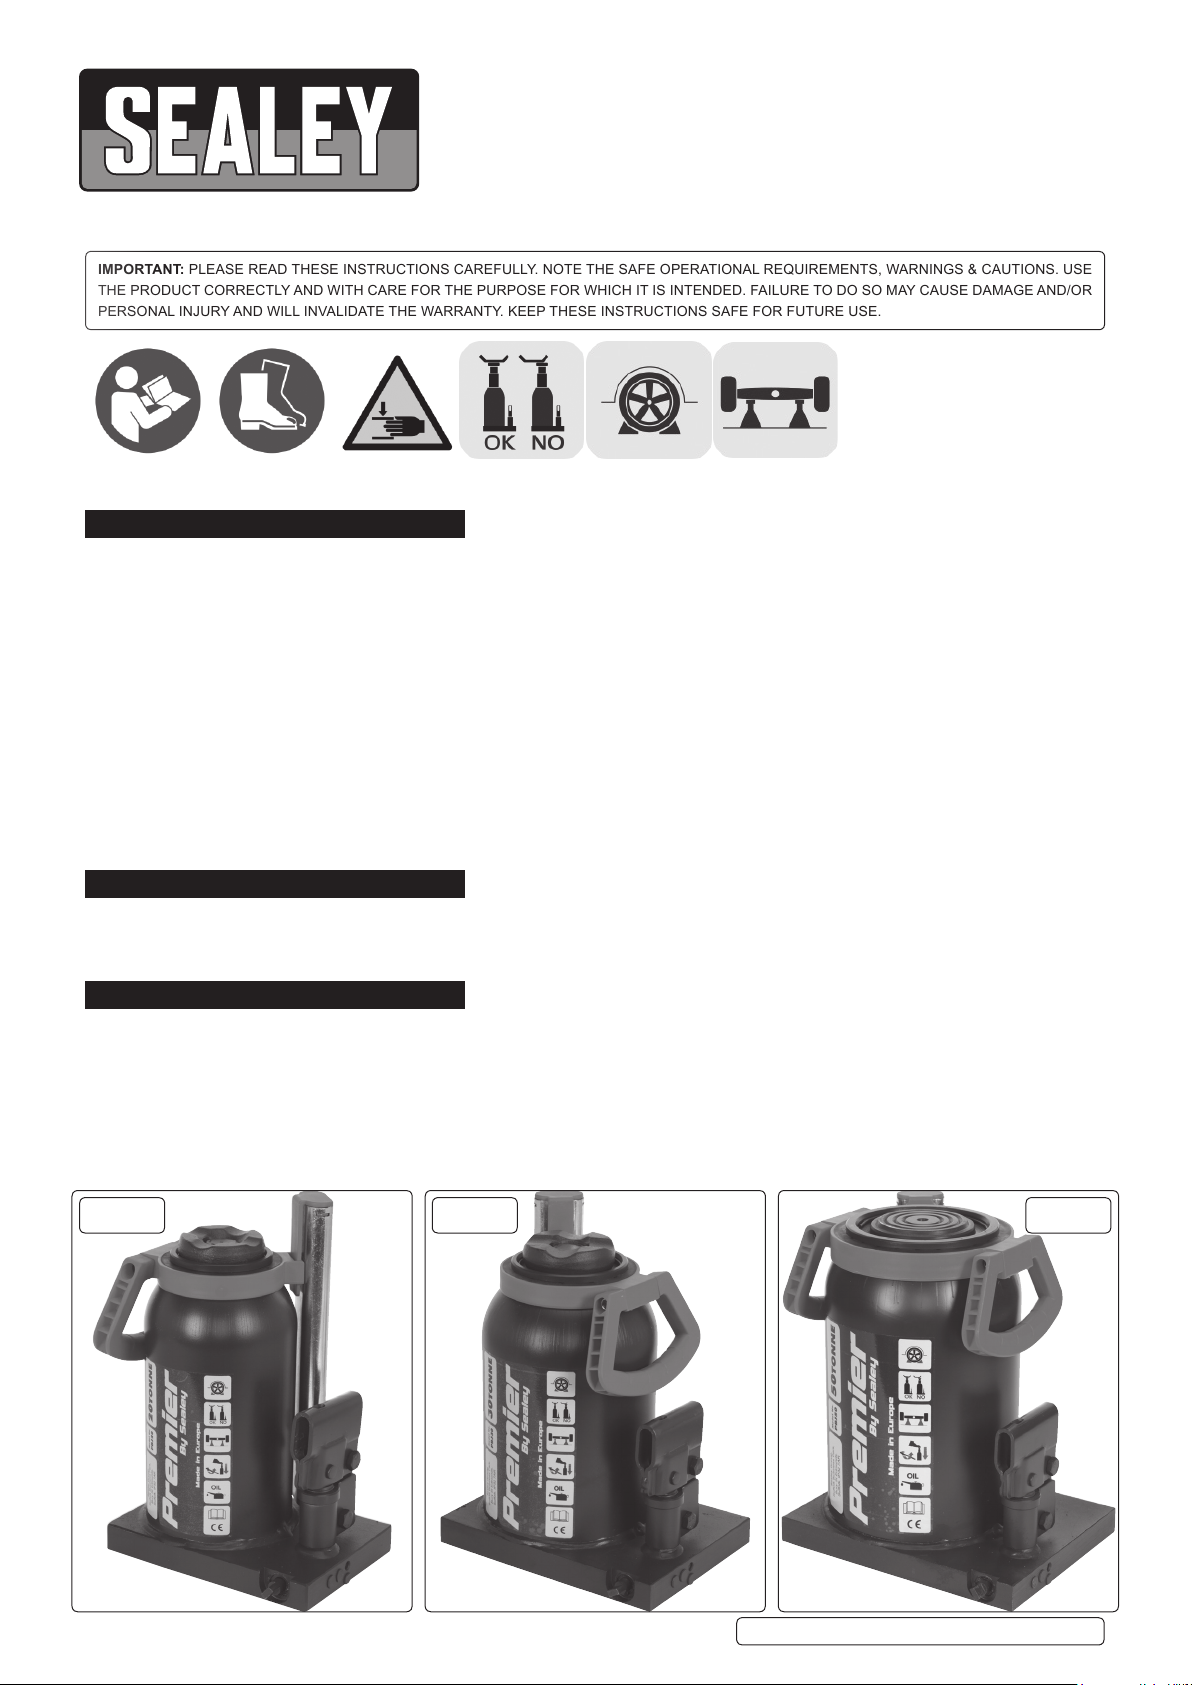
Fitted with safety overload valve and manufactured in the EU. All steel, one-piece base, reservoir and pump cylinder design gives added
strength. Fully serviceable ram piston with extension screw. All models supplied with 90° rotating pump and telescopic pump handle. Model
No’s PBJ20, PBJ30 and PBJ50 have moulded carry handles incorporating storage for the pump handle. Service kits readily available.
3. SPECIFICATION
Model No: ............................. . . . . . . PBJ20 ...........PBJ30 .......... PBJ50
Capacity:............................... . . . . . 20tonne ..........30tonne ......... 50tonne
Hydraulic Lift: .................................150mm ...........150mm ..........140mm
Maximum Height: (Leadscrew extended). . . . . . . . . . . .459mm ...........467mm ..........400mm
Minimum Height: (Leadscrew retracted) . . . . . . . . . . . .234mm ...........242mm ..........260mm
Screw Extension: ....................... . . . . . . .75mm ............75mm ..............*0 *Note: no leadscrew on Model PBJ50
Nett Weight: ............................ . . . . . 10.89kg ..........15.37kg ......... 26.77kg
PBJ20 PBJ30 PBJ50
© Jack Sealey Limited
Original Language Version
PBJ20, PBJ30, PBJ50 | Issue 3 (H,F) 17/01/19
Page 2
4. OPERATION
IMPORTANT SAFETY WARNING! ALWAYS USE RATED STANDS
Please remember a jack is a lifting and lowering device and is not designed to support a load. Never get underneath a vehicle supported
only by a jack; your life is at risk. We stock a comprehensive range of axle stands, for example, please see relevant catalogue section for
full details. The jack is not limited to vehicle use only, with many applications in the engineering and construction industries.
WARNING! Before use refer to section 1. SAFETY
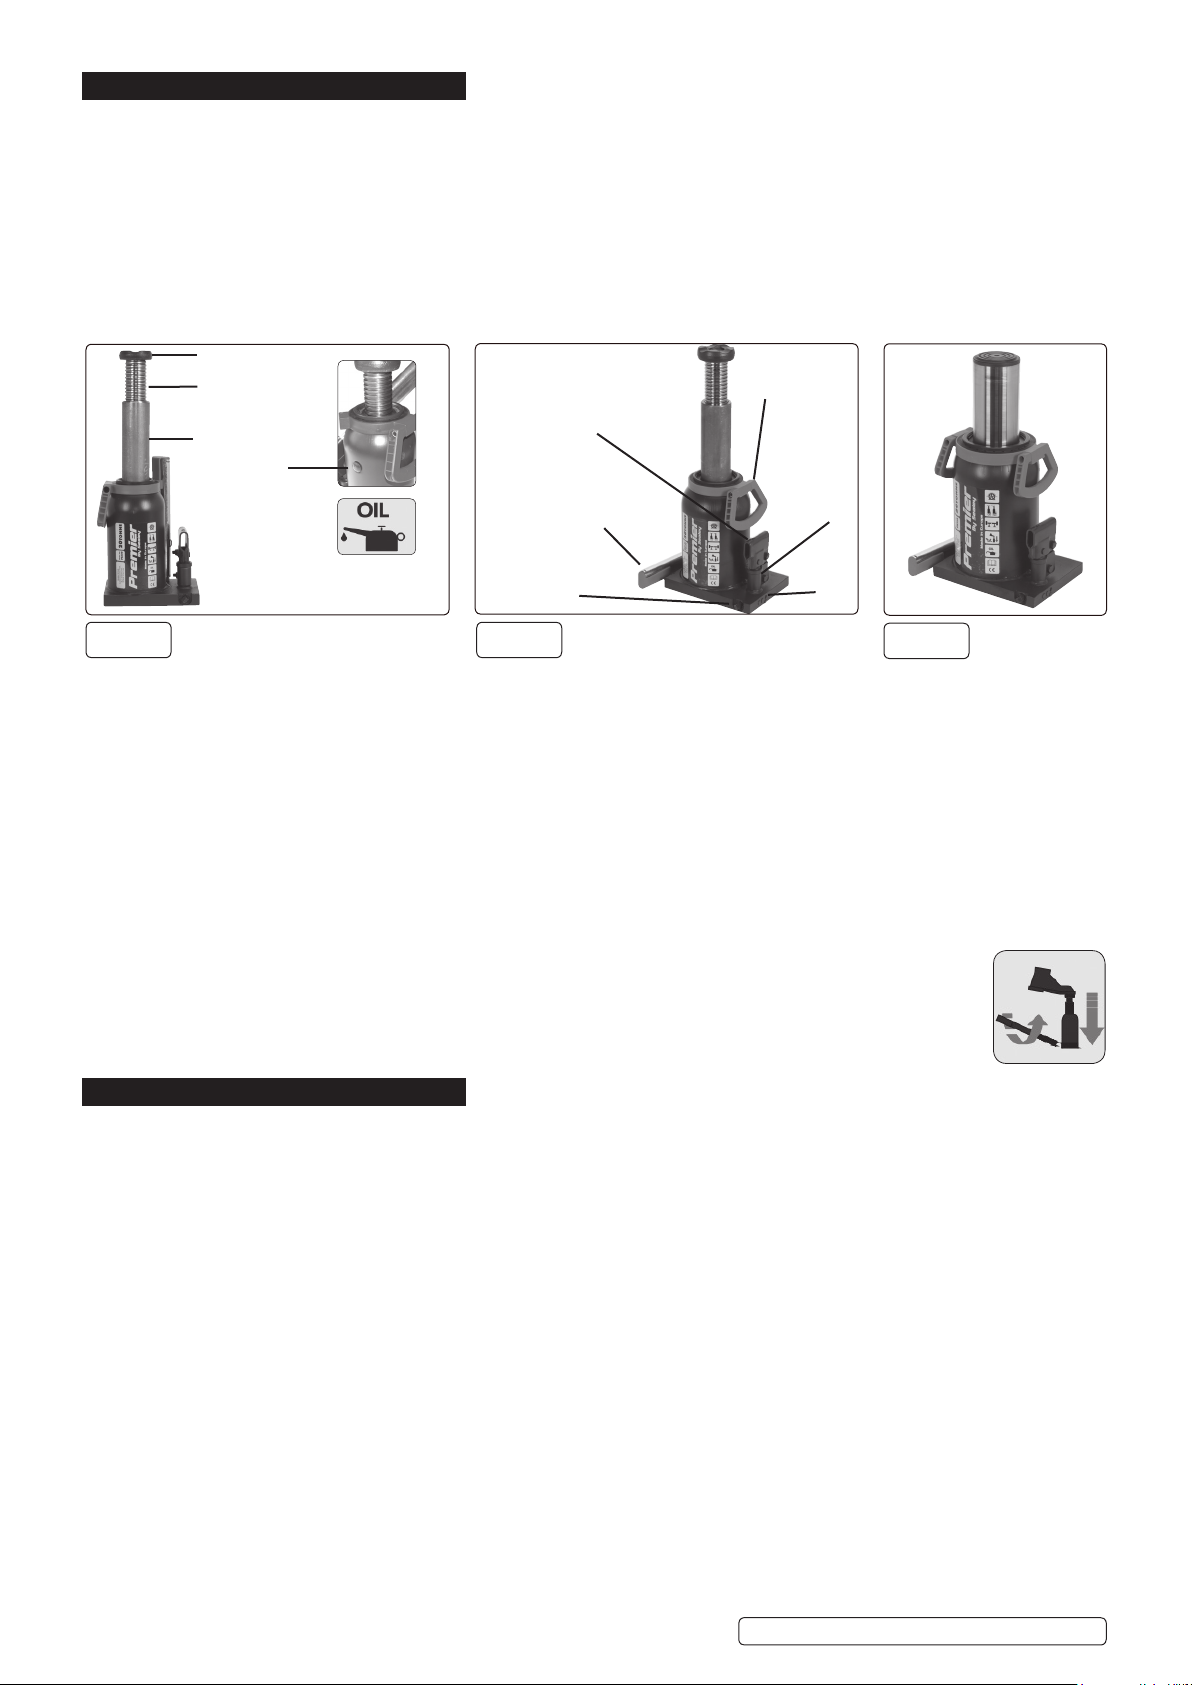
4.1. PURGING THE JACK
Purge the hydraulic system in order to eliminate any air that may have accumulated in transit or whilst stored:
a) Place the telescopic jack lever over the release valve and turn anti clockwise to open the valve.
b) Insert the telescopic jack lever into the sleeve of the hydraulic pump.
c) Pump several times to ensure complete evacuation of air from the system.
d) When complete place the telescopic lever over the release valve and turn clockwise to close.
Saddle
Leadscrew
(Not on PBJ50)
Piston Rod
Filler Plug
Spring Catch
in Sleeve Slot
Carry
Handle
Removable Telescopic
Operating Lever
Lubricate leadscrew,
piston rod, pump
spindle and linkages.
PBJ20
4.2. LIFTING THE LOAD
4.2.1. Position the jack beneath the jacking point of the load to be lifted and on to an area that is solid and level.
4.2.2. Depending upon the height to be lifted, adjust the extension screw to suit.
4.2.3. Insert the telescopic jack lever into the sleeve of the hydraulic pump until the spring catch engages. Pump the lever, full stroke range,
so that the saddle quickly reaches the load to be lifted. Depress the spring catch with a screwdriver to remove.
4.2.4. Observe carefully the load and jack whilst elevating to the required height.
4.2.5. When the load is at the required height, place correctly rated stand or stands beneath the load near the jacking point.
4.2.6. Lower the load carefully and slowly on to the stand or stands. Place the telescopic jack lever over the release valve and turn
anticlockwise to open the valve. Remove the jack if required for access.
4.3. LOWERING THE LOAD
4.3.1. Position the jack beneath the jacking point of the load to be lifted and on to an area that is solid and level.
4.3.2. Depending upon the height to be lifted, adjust the extension screw to suit.
4.3.3. Insert the telescopic jack lever into the sleeve of the hydraulic pump until the spring catch engages. Pump the lever, full stroke range,
so that the saddle quickly reaches the load to be lifted. Depress the spring catch with a screwdriver to remove.
4.3.4. Observe carefully the load and jack whilst elevating to the required height.
4.3.5. Remove the stand or stands.
4.3.6. Lowertheloadcarefullyandslowlyontotheoor.Placethetelescopicjackleveroverthereleasevalveand
turn anticlockwise to open the valve. Control the speed of descent by partially opening the valve before opening
fully. To lower with no load, use the lever and and push down with your foot. (See icon).
Valve
(open acw to descend,
cw to elevate)
PBJ30
Pump
Safety
Valve
(do not adjust)
PBJ50
5. MAINTENANCE
IMPORTANT! REPAIR AND MAINTENANCE OF THE JACK TO BE CARRIED OUT BY FULLY QUALIFIED PERSONNEL ONLY
WARNING! DO NOT usebrakeuid,oranyuidotherthanSealeyhydraulicjackuid.Useofnonpreferredjackoilmaycause
damage and invalidate the warranty.
5.1. When the jack is not in use, store with the ram and thread fully contracted, minimising ingress and corrosion.
5.2. Keep the jack clean and lubricate all moving parts with an acid free lubricating oil regularly.
5.3. Checkthejackreservoiroillevelregularlybyremovingthellerplug.Theoillevelshouldbeatthellerport.Topupasrequired.
5.4. Afterayearofextensiveuse,theoilshouldbereplacedwithnew.Todraintheoil,removethellerplugandvalve.Workcleanto
ensure zero ingress. Ensure the waste oil is recycled in accordance with local authority regulations.
5.5. Topupwithnewoilwiththeramfullyretracted.Pumptheunloadedjackveorsixtimestoexpelanyair.Pumpthejacktofull
height;allowexcessoiltoescapebeforerettingplug.
5.6. Visually check the jack before each use for mechanical integrity, cracked welds, worn parts etc... If any damage is found, remove
the jack from service.
5.7. Keep the piston rod clean and free of corrosion, clean exposed rod with a clean oiled cloth.
© Jack Sealey Limited
Original Language Version
PBJ20, PBJ30, PBJ50 | Issue 3 (H,F) 17/01/19
Page 3
6. TROUBLESHOOTING
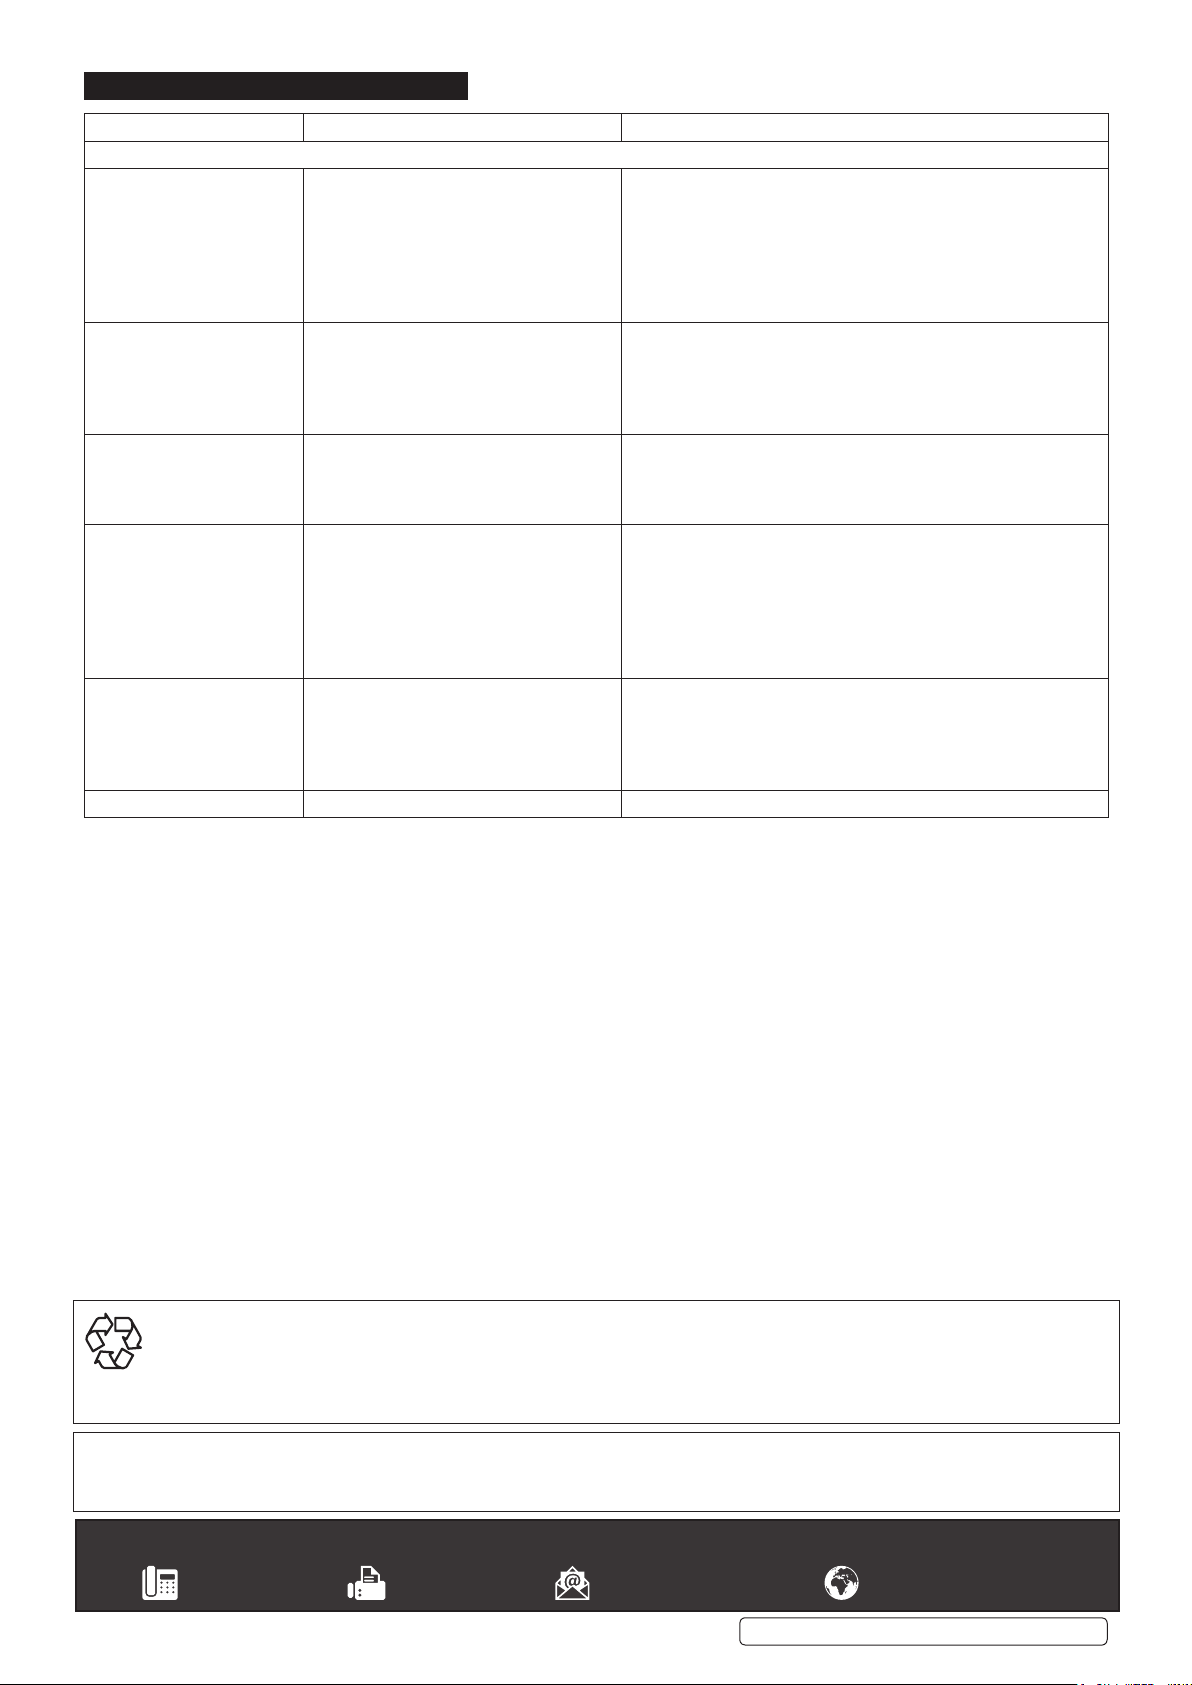
PROBLEM POSSIBLE CAUSE REMEDY
IMPORTANT: Refer to Section 4.1 - PURGING THE JACK, always try this rst!
Jack will not lift the load 1. Overloaded
2. Oil level low
3. Release valve not correctly closed
4. Air in system
5. Ram not functioning
6. Packing worn or defective
Jack does not lift high
enough or feels spongy
Jack lifts poorly 1. Pump packing or valves malfunctioning
Jack lifts but will not hold
load
Jack will not lower
completely
Jack does not lower at all 1. Release valve still closed 1. Check and open release valve
1. Oil level too low
2. Worn seals
3. Air in system
4. Release valve not closed
2. Oil is dirty
3. Air in the system
1. Release valve partially open
2. Dirt on valve seats
3. Air in stystem
4. Faulty seals
5. Packing worn or defective
1. Unit requires lubrication
2. Ram damaged
3. Air in system
4. Release valve partially open
1. Be sure to use a jack with adequate capacity
2. Top up oil level
3. Check and close release valve
4. Openreleasevalveandairvent(iftted)andpumpthe
handle a few times. Close valve and re-try
5. Clean and replace oil
6. Contact local service agent
1. Top up oil level
2. Return jack to local service agent
3. Openreleasevalveandairvent(iftted)andpumpthe
handle a few times. Close valve and re-try
4. Check and close release valve
4. Contact local service agent
5. Replace oil
6. Openreleasevalveandairvent(iftted)andpumpthe
handle a few times. Close valve and re-try
1. Check and close release valve
2. Lower jack, close release valve. Pull up lifting arm to its full
height by hand. Open the release valve to lower arm
3. Openreleasevalveandairvent(iftted)andpumpthe
handle a few times. Close valve and re-try
4. Contact local service agent
5. Contact local service agent
1. Oil all external moving parts
2. Contact local service agent
3. Openreleasevalveandairvent(iftted)andpumpthe
handle a few times. Close valve and re-try
4. Check and open release valve further
ENVIRONMENT PROTECTION
Recycle unwanted materials instead of disposing of them as waste. All tools, accessories and packaging should be sorted, taken to
a recycling centre and disposed of in a manner which is compatible with the environment. When the product becomes completely
unserviceable and requires disposal, drain any fluids (if applicable) into approved containers and dispose of the product and fluids
according to local regulations.
Note: It is our policy to continually improve products and as such we reserve the right to alter data, specifications and component parts without prior notice.
Important: No Liability is accepted for incorrect use of this product.
Warranty: Guarantee is 12 months from purchase date, proof of which is required for any claim.
Sealey Group, Kempson Way, Suffolk Business Park, Bury St Edmunds, Suffolk. IP32 7AR
© Jack Sealey Limited
Original Language Version
PBJ20, PBJ30, PBJ50 | Issue 3 (H,F) 17/01/19
 Loading...