

Page 1
IMPORTANT: PLEASE READ THESE INSTRUCTIONS CAREFULLY. NOTE THE SAFE OPERATIONAL REQUIREMENTS, WARNINGS & CAUTIONS. USE
THE PRODUCT CORRECTLY AND WITH CARE FOR THE PURPOSE FOR WHICH IT IS INTENDED. FAILURE TO DO SO MAY CAUSE DAMAGE AND/OR
PERSONAL INJURY AND WILL INVALIDATE THE WARRANTY. KEEP THESE INSTRUCTIONS SAFE FOR FUTURE USE.
INSTRUCTIONS FOR:
SHORT WAVE INFRARED PANEL DRYER
MODEL NO: IR3000.V2
Thank you for purchasing a Sealey product. Manufactured to a high standard, this product will, if used according to these instructions,
and properly maintained, give you years of trouble free performance.
Refer to
Instruction
Warning:
Electricity
Warning:
Hot Surface
Indoor
Use Only
Manual
1. SAFETY
1.1. Electrical Safety
WARNING! It is the owner’s responsibility to read, understand and comply with the following:
You must check all electrical equipment and appliances to ensure that they are safe before use. You must inspect power supply leads, plugs and
all electrical connections for wear and damage. You must ensure the risk of electric shock is minimised by the installation of appropriate safety
devices. An RCCB (Residual Current Circuit Breaker) should be incorporated in the main distribution board. We also recommend that an RCD
(Residual Current Device) is used with all electrical products. It is particularly important to use an RCD with portable products that are plugged into
an electrical supply not protected by an RCCB. If in doubt consult a qualified electrician. You may obtain a Residual Current Device by contacting
your Sealey dealer. You must also read and understand the following instructions concerning electrical safety.
1.1.1. The Electricity At Work Act 1989 requires all portable electrical appliances, if used on business premises, to be tested by
a qualified electrician, using a Portable Appliance Tester (PAT), at least once a year.
1.1.2. The Health & Safety at Work Act 1974 makes owners of electrical appliances responsible for the safe condition of the appliance
and the safety of the appliance operator. If in any doubt about electrical safety, contact a qualified electrician.
1.1.3. Ensure the insulation on all cables and the product itself is safe before connecting to the mains power supply. See 1.1.1. & 1.1.2. above
and use a Portable Appliance Tester (PAT).
1.1.4. Ensure that cables are always protected against short circuit and overload.
1.1.5. Regularly inspect power supply, leads, plugs for wear and damage and all electrical connections
to ensure that none is loose.
1.1.6. Important: Ensure the voltage marked on the product is the same as the electrical power supply
to be used and check that supply is correctly fused, see fuse rating at right.
1.1.7. DO NOT pull or carry the powered appliance by its power supply lead.
1.1.8. DO NOT pull power plugs from sockets by the power cable.
1.1.9. DO NOT use worn or damaged leads, plugs or connections. Immediately replace or have repaired
by a qualified electrician.
1.1.10. This product comes without a plug. You must contact a qualified electrician to ensure an adequate
supply is available.
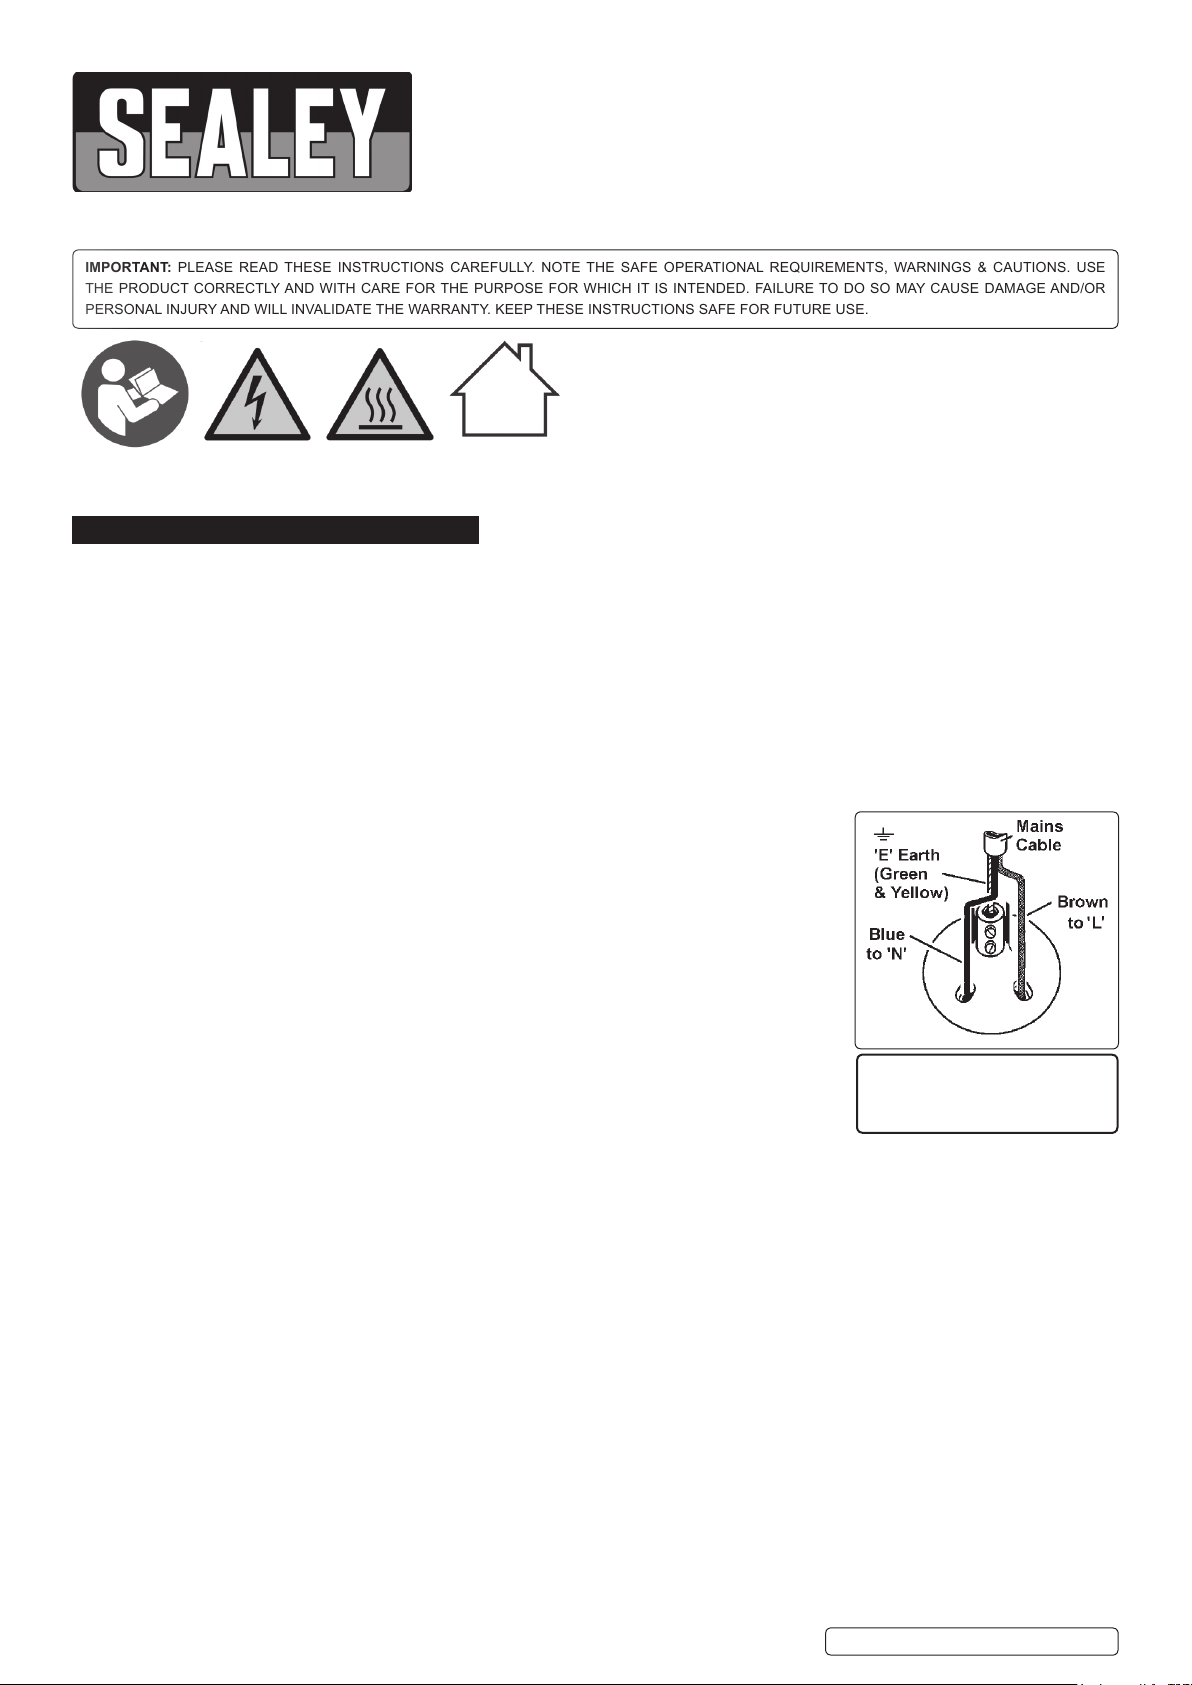
If fitting such a plug -
Ensure that the unit is correctly wired and earthed, as follows:
a) Connect the GREEN/YELLOW earth wire to the earth terminal ‘E’.
b) Connect the BROWN live wire to live terminal ‘L’.
c) Connect the BLUE neutral wire to the neutral terminal ‘N’.
d) After wiring, check there are no bare wires, that all wires have been correctly connected,
that the cable outer insulation is clamped by the cable grip and that the grip is tight.
1.1.11. Cable extension reels. When a cable extension reel is used it should be fully unwound before connection. A cable reel with an RCD
fitted is recommended since any product which is plugged into the cable reel will be protected. The section of the cores of the cable is
important. 2.5mm² section is a minimum, but to be absolutely sure that the capacity of the cable reel is suitable for this product and
for others that may be used in the other output sockets, we recommend the use of 2.5mm² section cable.
1.2. General Safety
WARNING! Ensure there is nobody in front of the lamp when it is switched on.
9 Disconnect the panel dryer from the power supply before servicing, changing accessories, or performing any maintenance.
9 Ensure that the panel dryer is in good condition before use. If in any doubt do not use the unit and contact an electrician.
9 Familiarise yourself with the application and limitations of the panel dryer.
9 Check that lamp guards are in place, undamaged and firmly attached.
9 Keep tools and other items away from the panel dryer when it is in use.
9 Keep the work area clean and clear of unnecessary items.
9 Remember that the lamp panel will get hot, allow to cool after use.
9 Maintain the panel dryer in good condition. Use authorised agent for servicing.
9 Keep the dryer clean, but DO NOT use solvents.
9 Use only genuine parts and accessories. Unauthorised parts and accessories may be dangerous and will invalidate your
warranty.
8 DO NOT use this product to perform a task for which it has not been designed.
8 DO NOT use the panel dryer outdoors, or in damp, or wet locations, and DO NOT operate within the vicinity of flammable liquids, gases or
solids.
WARNING! Never use in explosive situations.
© Jack Sealey Limited
Original Language Version
THIS PRODUCT REQUIRES A
MINIMUM 16 AMP
SUPPLY
IR3000.V2| Issue 1 06/09/16
Page 2
9 Keep children and unauthorised persons away from the work area.
9 When not in use, store the panel dryer carefully in a safe, dry, childproof location.
2. INTRODUCTIONn
Three 1000W high output short wave lamps in three individually switched cassettes. Lamps emit short wave infrared heat ideal for optimizing drying
of water based paints. This exible system allows each cassette to be adjusted and locked in position around the contours of the vehicle, ensuring
maximum area coverage. Height adjustment is made using the locking gas strut, offering near weightless movement of the cassette support arm.
Supplied with 5mtr power cable.
3. SPECIFICATION
Model No: .................................................................IR3000.V2
Number of Elements: ................................................................3
Element Power: ............................................................ 3 x 1000W
Reector Size: ...........................................................490 x 140mm
Supply: . . . . . . . . . . . . . . . . . . . . . . . . . . . . . . . . . . . . . . . . . . . . . . . . . . . . . . . . . . . . . . . . . . . . . . . . 230V
4. ASSEMBLY
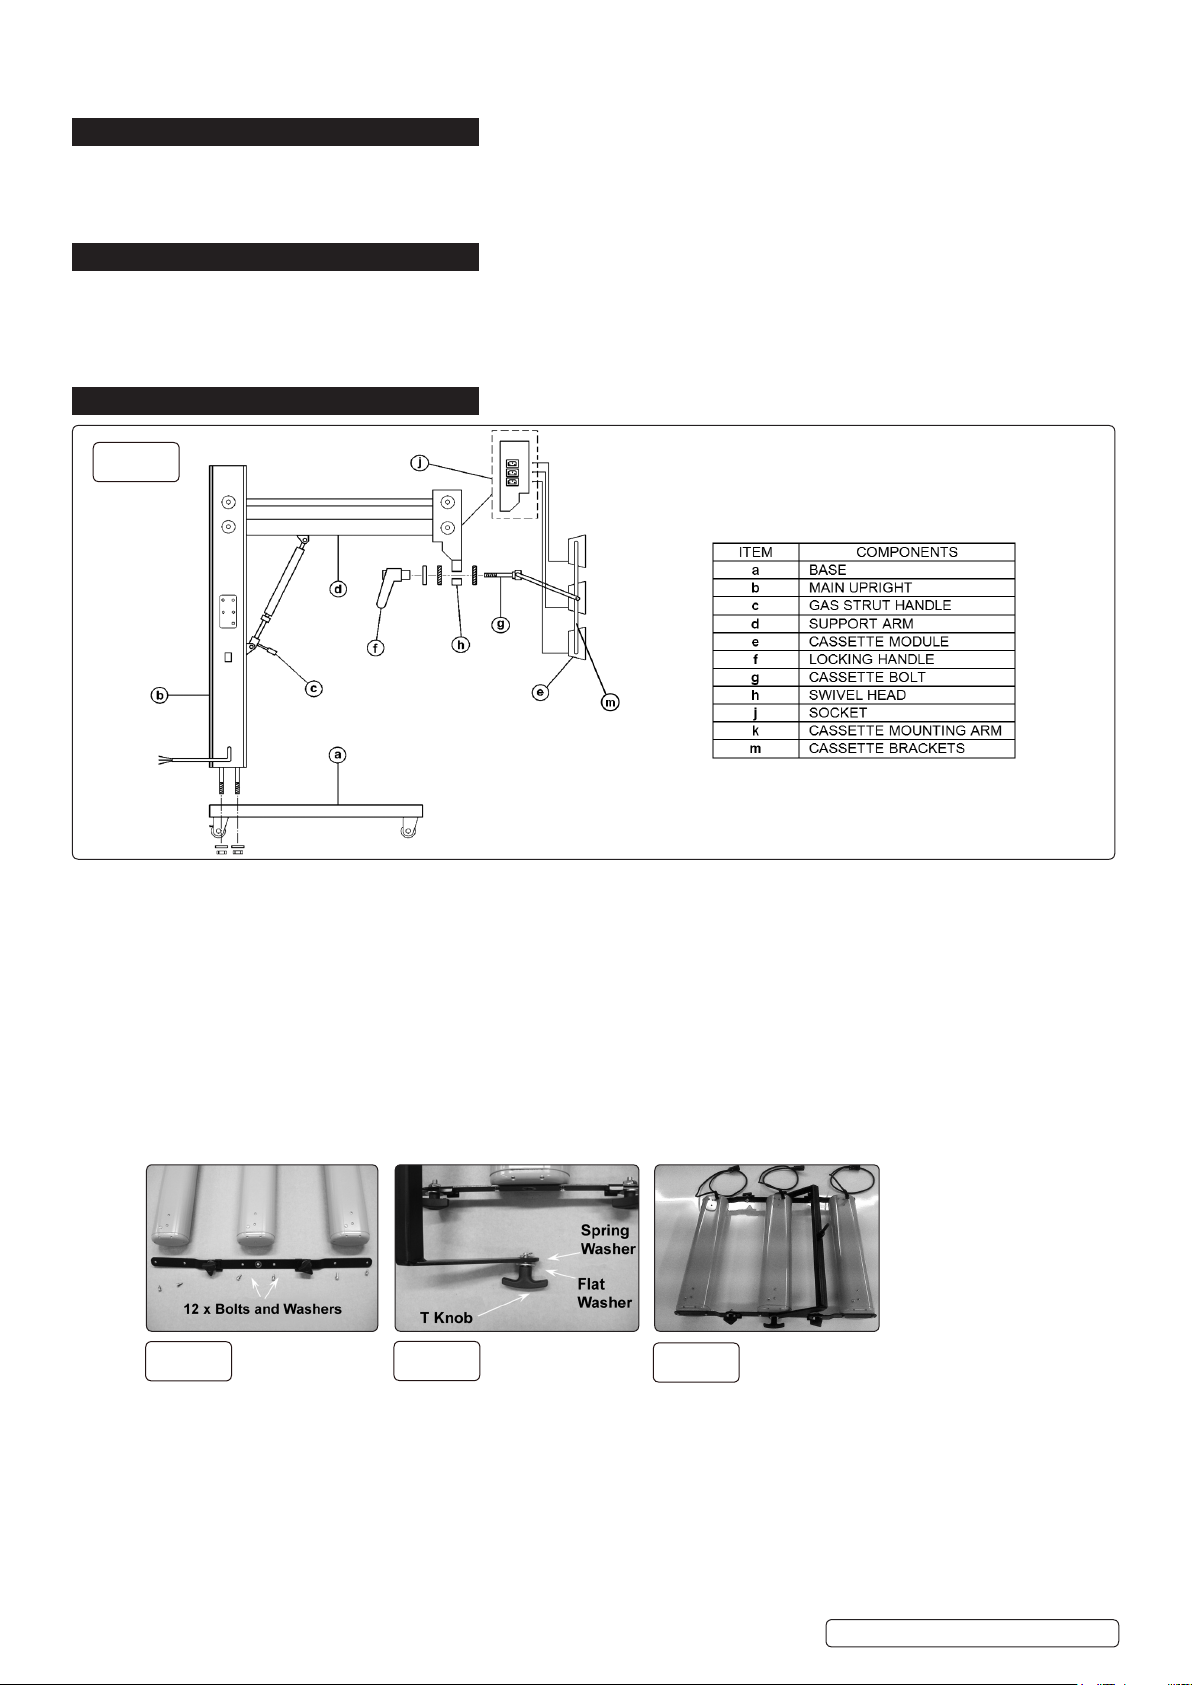
g.1
4.1. Assemble unit (fig.1).
4.1.1. Unpack U shape base (A) place on floor and lock rear wheels.
4.1.2. Unpack main upright (B) remove nuts and washers from the base of the upright. Caution! DO NOT remove safety strap.
4.1.3. Place protruding bolts on upright into pre-drilled holes in base. Hold in place lightly with washers and nuts. Cut and remove safety strap,
tighten nuts and secure being careful not to touch the gas strut handle.
4.1.4. Raise support arm (D) carefully using handle (C) on gas strut until the arm is horizontal to main upright. Ensure support arm is being
held whilst being raised.
4.2. To Assemble the Cassette Module:
Please note: before proceeding as below, remove the T-handle from the centre strap and discard the M8 nut.
4.2.1. Set out the cassettes so that all the cables are on the same side and that the centre cassette has the central holes in for the mounting
arm.
4.2.2. Fit the cassette strap assemblies with the 12 bolts and washers to the cassettes (fig.2).
4.2.3. Fit the Mounting Arm to central cassette using the T-Knob, flat washer and star washer. Make sure that the star washer fits between
the cassette strap assembly and the mounting arm (fig.3).The assembled cassette head should be as shown in fig.4
g.2
4.2.4. Once the cassette assembly is complete, place the star washer onto protruding cassette bolt (G), then fit bolt into hole on the swivel head
(H). Then place the star washer, plain washer and secure with the handle.
4.2.5. Plug cassette cables into socket (J).
4.2.6. The unit may now be operated by pushing the handle (C) on the lockable gas strut while pulling down or pushing up the support arm (D)
to the desired position.
4.2.7. IR3000 is not supplied with fitted a plug. There are three options:
• Blue Industrial IP44 2pin + Earth plug
• Have the unit hard-wired.
Important: If in any doubt, contact a competent electrician.
g.3
g.4
© Jack Sealey Limited
Original Language Version
IR3000.V2| Issue 1 06/09/16
Page 3

4.3. Lamp Replacement (fig.5). (The IR3000 is supplied with the lamps fitted, follow the procedure below when replacement lamps required)
WARNING! Before examining or carrying out any maintenance ensure the heater has cooled down and is disconnected from the mains
supply.
4.3.1. The lamp used in the fitting is robust and if knocks and shock vibrations are avoided, will last for around 5000 hours.
4.3.2. Isolate the complete unit from the power supply and then wait until the cassette body has cooled down.
4.3.3. Remove the two screws from the one end of the reflector plate and remove that end reflector plate with the guard by gripping the guard
and carefully lifting outwards.
4.3.4. Remove the other end reflector plate by removing the two screws and carefully lifting out.
4.3.5. Carefully remove the lamp from the cassette and unclip the lamp terminal ends (both ends). If necessary, use two pairs of pliers to pull
terminals apart. Do not pull apart using the cables as this may result in the wire coming away from the crimped terminals.
4.3.6. Replace with the new lamp making sure the lamp terminals are fully pushed together and insulated.
4.3.7. Re-assemble making sure all the parts are replaced and the guard is in position (see Fig.5 below).
WARNING! Failure to reassemble all the parts and use the guard will invalidate any remaining guarantee and may make the unit
dangerous.
g.5
5. OPERATION
Note: The IR lamps are fragile and therefore it is important that the IR3000 is not subjected to any unnecessary shocks or vibration
and is not moved when the lamps are on or still hot.
5.1. Digital Controller Operating Instructions
5.2. Power On. Turn on the main power switch - display indicates OFF.
5.3. Press Red On/Off button - the LED indicator shows the last memory used - e.g. Fig.6.
© Jack Sealey Limited
Original Language Version
IR3000.V2 | Issue 1 06/09/16
Page 4

g.6
5.4. Move the panel dryer into position, approximately 500mm (20 inches from the area to be heated.
5.5. Adjust cassette heads around the contours of the repair area and lock into position.
WARNING! Always ensure the cassette cables are NOT in front of the cassettes during operation.
5.6. Controller set up. See fig.6
5.6.1. Start with the Flash setting.
5.6.1.1. Press F button - display panel indicates SET: F- Time. Adjust the desired time up to 90 minutes using the Up or Down buttons.
5.6.1.2. Press F button again, display panel indicates SET:F- Temp. Adjust the desired temperature using Up or Down buttons.
5.6.2. Now to Bake setting See fig.7
5.6.2.1. Press B button- display panel indicates SET: B- Time. Adjust the desired time up to 90 minutes using the Up or Down buttons.
5.6.2.2. Press B button again, display panel indicates SET: B-Temp. Adjust the desired temperature using the Up or Down buttons.
5.7. To start.
5.7.1. Press S (Start) button. This enters your pre-set Flash settings mode. The display will read as per example Fig.7.
5.7.2. The % Power defaults to 50% in Flash mode. This can be adjusted using the Up or Down buttons.
Note: this can only be adjusted when the program is running.
© Jack Sealey Limited
Original Language Version
g.7
IR3000.V2 | Issue 1 06/09/16
Page 5

g.8
5.7.3. At the end of the Flash mode cycle, the controller switches to Bake mode at 100% power.
5.7.4. The display will read as shown in Fig.8.
5.7.5. The % power defaults to100% in the Bake mode. This can be adjusted (with 100% being the max.) using the up and down buttons.
Note: this can only be adjusted when the program is running.
5.7.6. At the end of the Bake mode, the unit switches off.
5.7.7. Memory
5.7.7.1. There are 3 memory settings available on this controller. To set a required memory, go through the setup procedure described above.
When all your desired settings have been inputted, press and hold the appropriate memory button you require – i.e. M1,M2 or M3 for
approximately 5 seconds until you here the set bleep.
5.7.7.2. To store the memory switch the Power button off and back on and it will be stored on the memory button you selected.
5.7.7.3. To stop the program at any point in the process – press the Start button or to shut down completely, the Red On/Off button.
Note: You can switch each cassette of individually using the switches on the control panel.
5.7.7.4. If any of the cassettes fail to operate, first check that they are switched on with the switches on the front panel.
5.8. WE RECOMMEND THAT A TEST PAINT PANEL IS USED FOR THE INITIAL OPERATION TO ALLOW THE OPERATOR TO
FAMILIARISE THEMSELVES WITH THE SYSTEM.
5.9. General Applications
Filler: Full power for about 5 minutes will achieve a hard sandable finish.
Etch primer: Full power for approx. 5 minutes.
Primer: For normal build of two coats use full power for about 8 min.
High build primer: For a normal minimum of three coats we suggest 5 min FLASH then full power for a min of 10 min.
Top coats: Top coats vary depending on the paint finish and colour, dark colours tend to heat rapidly and should always be used with
FLASH at just under half power- an average cure time is around 12min.
PLEASE ALWAYS REFER TO PAINT MANUFACTURER’S DRYING RECOMMENDATIONS FOR APPLICABLE DRYING TIMES
5.10. Gas Strut Movement
5.10.1. These models are all fitted with lockable gas struts, to assist in the correct positioning of the cassette heads prior to any drying.
5.10.2. ALWAYS depress the lever before attempting to move the cassette support arm. When in position and the spring lever is released, the
cassette assembly will be locked into place.
5.10.3. If the support arm is difficult to move or the arm moves downwards when the gas strut lever is depressed, a small adjustment may be
required. (This may also become necessary after the machine has been in use for any length of time).
5.10.4. To make an adjustment, loosen the locking nut just above the lever - then turn the centre spindle of the gas strut half a turn in a clockwise
rotation. This will adjust the pressure of the gas strut to improve operation.
5.10.5. The ideal setting for the strut is when the cassette arm moves neither up or down on its own when the lever is depressed.
5.10.6. If necessary the centre spindle can be adjusted in an anticlockwise direction to obtain the opposite pressure.
5.10.7. After adjustment, re-tighten the lock nut above the handle.
5.11. Dryer
5.11.1. If any cassette fails to operate when the unit is reprogrammed, first re-check all the switches on the main upright, as these may have
been switched off during the previous program.
6. MAINTENANCE
6.1. To keep your dryer in good working order always keep the unit clean and stored in a dry place.
6.2. The reflectors should be kept clean at all times to ensure maximum heat reflection. Dirty reflectors will reduce the energy transmitted and
seriously affect the recommended drying times.
© Jack Sealey Limited
Original Language Version
IR3000.V2 | Issue 1 06/09/16
Page 6

Parts support is available for this product. To obtain a parts listing and/or diagram,
please log on to www.sealey.co.uk, email sales@sealey.co.uk or telephone 01284 757500.
Environmental Protection
Recycle unwanted materials instead of disposing of them as waste. All tools, accessories and packaging should be sorted,
taken to a recycling centre and disposed of in a manner which is compatible with the environment.
WEEE Regulations
Dispose of this product at the end of its working life in compliance with the EU Directive on Waste Electrical and Electronic
Equipment (WEEE). When the product is no longer required, it must be disposed of in an environmentally protective way.
Contact your local solid waste authority for recycling information.
NOTE: It is our policy to continually improve products and as such we reserve the right to alter data, specications and component parts without prior notice.
IMPORTANT: No liability is accepted for incorrect use of this product.
WARRANTY: Guarantee is 12 months from purchase date, proof of which will be required for any claim.
Sole UK Distributor, Sealey Group.
Kempson Way, Suffolk Business Park,
Bury St. Edmunds, Suffolk.
IP32 7AR
01284 757500
01284 703534
www.sealey.co.uk
Web
sales@sealey.co.uk
© Jack Sealey Limited
Original Language Version
IR3000.V2 | Issue 1 06/09/16
 Loading...