

Page 1
1.3. GENERAL SAFETY
Disconnect the gun from the mains power before changing accessories, servicing or performing other maintenance.
Maintain the gun in good condition, use an authorised service agent.
Use recommended accessories only. Unapproved accessories can be hazardous and will invalidate your warranty.
Wear appropriate protective clothing and equipment. Work gloves and eye protection are mandatory. Protect long hair and remove loose
fitting garments and jewellery. Maintain correct balance and footing and wear non-slip shoes.
Evaluate your work area before using the gun. i.e. ceiling, floors and enclosures may contain flammable materials.
Keep the work area clean, uncluttered and well lit. Use the gun only in a well ventilated area.
Ensure that small or irregular shaped objects are secured in a vice or clamps before you work on them.
Stay alert! Always pay attention to the work in hand when operating this gun.
Guard against electric shock by not contacting grounded surfaces, i.e. pipes, radiators, etc. when using electric hand tools.
Keep the gun handle dry, clean and free from oil and grease. Clean any paint or varnish from the nozzle after use.
Allow the gun to cool before storing (only store when cold). Store the gun in a safe, dry place out of the reach of children.
DO NOT direct the hot airflow at yourself, others, animals or plants and DO NOT allow children to operate the gun.
DO NOT use the gun in rain or in a wet environment, or in areas of high humidity and dampness (i.e. bathrooms, steam rooms, etc.).
DO NOT obstruct the hot airflow by blocking or covering the air outlet.
INSTRUCTIONS FOR:
HOT AIR GUN KIT
MODEL No: HS107K
Thank you for purchasing a Sealey product. Manufactured to a high standard this product will, if used according to these instructions properly
maintained, give you years of trouble free performance.
1. SAFETY INSTRUCTIONS
1.2. LEAD PAINT WARNING! Paint once contained lead as a traditional ingredient. Paint particles, resulting from the removal of such
paint, are toxic and ingestion/inhalation must, therefore, be avoided. The following action must be taken before using this tool:
1.2.1. User must determine potential hazard relating to age of paint to be removed (modern paints do not have lead content).
1.2.2. DANGER! Keep all persons and pets away from the work area. The following are particularly vulnerable to the effects of lead paint
dust: Expectant women, babies and children.
1.2.3. We recommend personal protection by using the following safety items: Paint Spray Respirator (Sealey ref. SSP1699), PE Coated
Hooded Coverall (Sealey ref. SSP267), Latex Gloves (Sealey ref. SSP24).
1.2.4. Take adequate measures to contain the paint dust, flakes, and scrapings.
1.2.5. When task is complete continue to wear safety equipment as in 1.2.3. and thoroughly clean all areas. Ensure paint waste is disposed
of in sealed bags or containers.
IMPORTANT: PLEASE READ THESE INSTRUCTIONS CAREFULLY. NOTE THE SAFE OPERATIONAL REQUIREMENTS, WARNINGS AND
CAUTIONS. USE THIS PRODUCT CORRECTLY AND WITH CARE FOR THE PURPOSE FOR WHICH IT IS INTENDED. FAILURE TO DO SO MAY
CAUSE DAMAGE AND/OR PERSONAL INJURY AND WILL INVALIDATE THE WARRANTY. PLEASE KEEP INSTRUCTIONS SAFE FOR FUTURE USE.
1.1. ELECTRICAL SAFETY. WARNING! It is the user’s responsibility to read, understand and comply with the following:
You must check all electrical equipment and appliances to ensure they are safe before using. You must inspect power supply leads, plugs and
all electrical connections for wear and damage. You must ensure the risk of electric shock is minimised by the installation of appropriate safety
devices. An RCCB (Residual Current Circuit Breaker) should be incorporated in the main distribution board. We also recommend that an RCD
(Residual Current Device) is used with all electrical products. It is particularly important to use an RCD with portable products that are plugged
into an electrical supply not protected by an RCCB. If in doubt consult a qualified electrician. You may obtain a Residual Current Device by
contacting your Sealey dealer. You must also read and understand the following instructions concerning electrical safety.
1.1.1. The Electricity At Work Act 1989 requires all portable electrical appliances, if used on business premises, to be tested by a qualified
electrician, using a Portable Appliance Tester (PAT), at least once a year.
1.1.2. The Health & Safety at Work Act 1974 makes owners of electrical appliances responsible for the safe condition of the appliance
and the safety of the appliance operator. If in doubt about electrical safety, contact a qualified electrician.
1.1.3. Ensure the insulation on all cables and the product itself is safe before connecting to the mains power
supply. See 1.1.1. & 1.1.2. above and use a Portable Appliance Tester (PAT).
1.1.4. Ensure that cables are always protected against short circuit and overload.
1.1.5. Regularly inspect power supply, leads, plugs for wear and damage and power connections to
ensure that none are loose.
1.1.6. Important: Ensure the voltage marked on the product is the same as the electrical power
supply to be used, and check that plugs are fitted with the correct capacity fuse. A 13 amp plug
may require a fuse smaller than 13 amps for certain products, see fuse rating at right.
1.1.7. DO NOT pull or carry the powered appliance by its power supply lead.
1.1.8. DO NOT pull power plugs from sockets by the power cable.
1.1.9. DO NOT use worn or damage leads, plugs or connections. Immediately replace or have repaired
by a qualified electrician. A U.K. 3 pin plug with ASTA/BS approval is fitted. In case of damage,
cut off and fit a new plug according to the following instructions (discard old plug safely).
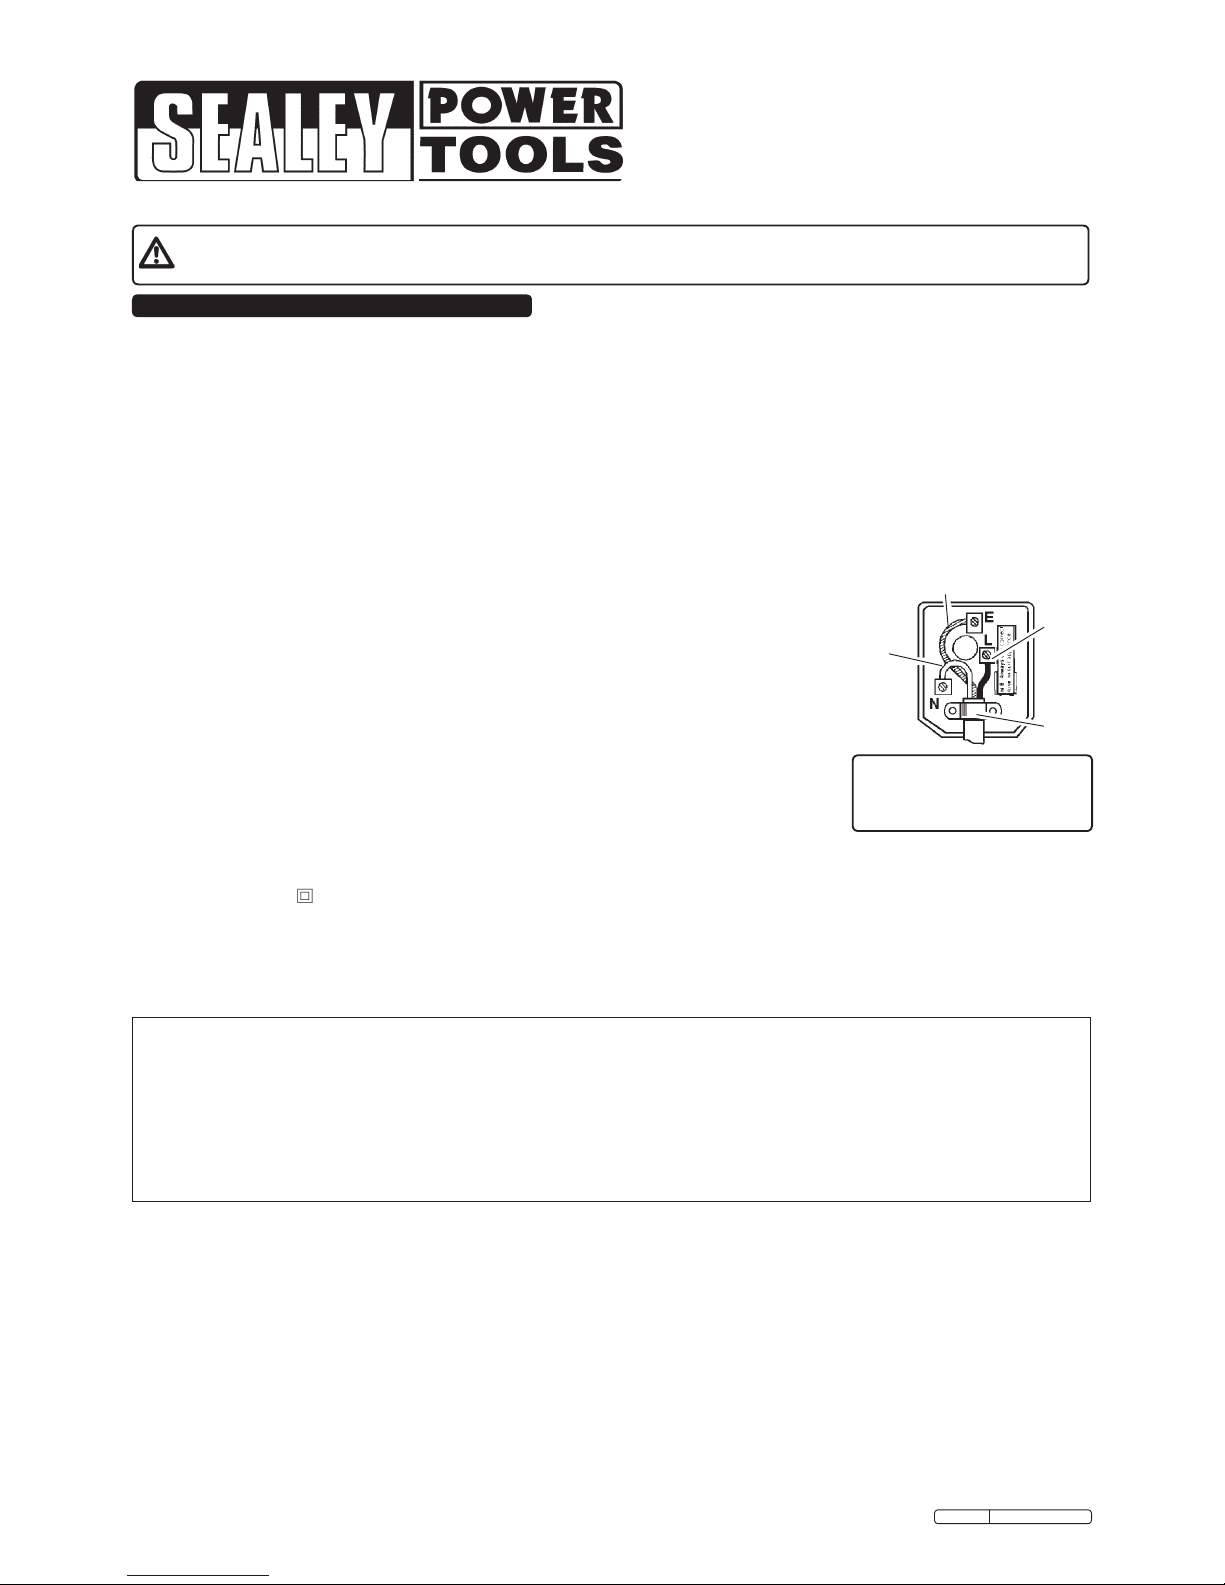
(UK only - see diagram at right). Ensure the unit is correctly earthed via a three-pin plug.
a) Connect the GREEN/YELLOW earth wire to the earth terminal ‘E’.
b) Connect the BROWN live wire to live terminal ‘L’.
c) Connect the BLUE neutral wire to the neutral terminal ‘N’.
d) After wiring, check that there are no bare wires, that all wires have been correctly
connected, that the cable outer insulation extends beyond the cable restraint and that the restraint is tight.
Double insulated products are fitted with live (BROWN) and neutral (BLUE) wires only. Double insulated products are always marked
with this symbol . To re-wire, connect the brown & blue wires as indicated above. DO NOT connect the brown or blue to the
earth terminal.
1.1.10. Cable extension reels. When a cable extension reel is used it should be fully unwound before connection. A cable reel with an RCD
fitted is recommended since any product which is plugged into the cable reel will be protected. The section of the cores of the cable
is important and should be at least 1.5mm², but to be absolutely sure that the capacity of the cable reel is suitable for this product and
for others that may be used in the other output sockets, we recommend the use of 2.5mm² section cable.
Yellow & Green
Earth Wire
Cable
Restraint
FUSE RATING
THIS PRODUCT MUST BE FITTED
WITH A
13 AMP FUSE
Brown
Live
Wire
Blue
Neutral
Wire
Original Language Version
HS107K Issue: 2 - 2/10/09
Page 2
3. OPERATING INSTRUCTIONS
2. SPECIFICATION
Specification
Power supply ............................ 230V ~ 8.6A
Power .......................................2000W
Temperature range ................. 50-450°C / 90-600°C
Air flow ................................250-500ltr/min
Unplug gun from power supply before performing any maintenance
4.1. Keep the air intake and outlet openings clean and free from dirt and peelings.
4.2. Use only a damp cloth and mild household cleaning agent to wipe the gun and nozzels clean. DO NOT use turpentine, paint thinner,
gasoline or similar substances to clean the gun.
4.3. Check the gun, power lead and nozzles for damage before storage.
4.4. Store the gun in a safe, dry, childproof area.
4. CARE AND MAINTENANCE
The gun may also be used for the following:
• Removing self-adhesive stickers and trim • Loosening rusted or over-tightened nuts and metal screws • Thawing frozen pipes, doors,
padlocks, etc. • Highlighting natural woodgrain before staining or varnishing • Fast drying of paint or varnish • Softening old putty • Soldering •
Sterilisation 500°c • Removing candle wax • Restoring candles • Repair of tarpaulin or pvc • Drying wet timber prior to repairs or finishing •
Shrinking shrink-wrap sheeting • Shrinking polyvinyl wire joints • Joining garden hose • Melting pewter, tar, bitumen or wax • Model making •
Moulding pvc, wood, copper, Plexiglass into shape • Plumbing tasks • Roofing repairs • Applying veneer strips • Control of garden path weeds
• Waxing and de-waxing skis • Chemistry, use as a bunsen-burner/and more • Important: safety is a key principle when using the gun. When
approaching a new task consider the dangers that may arise, take any necessary precautions and practice first.
5. OTHER TASKS
DO NOT touch the nozzle during, or after, use as it becomes extremely hot.
DO NOT leave the heat gun running unattended. Always turn off the power supply.
DO NOT use the gun on a task it is not designed for.
DO NOT use the gun in combination with chemical strippers.
DO NOT operate the gun when you are tired or under the influence of alcohol, drugs or intoxicating medication.
DANGER! DO NOT USE THE HEAT GUN AS A HAIR DRYER.
WARNING: The warnings, cautions and instructions discussed in this instruction manual cannot cover all possible conditions and
situations that may occur. It must be understood that common sense and caution are factors which cannot be built into this product,
but must be applied by the operator.
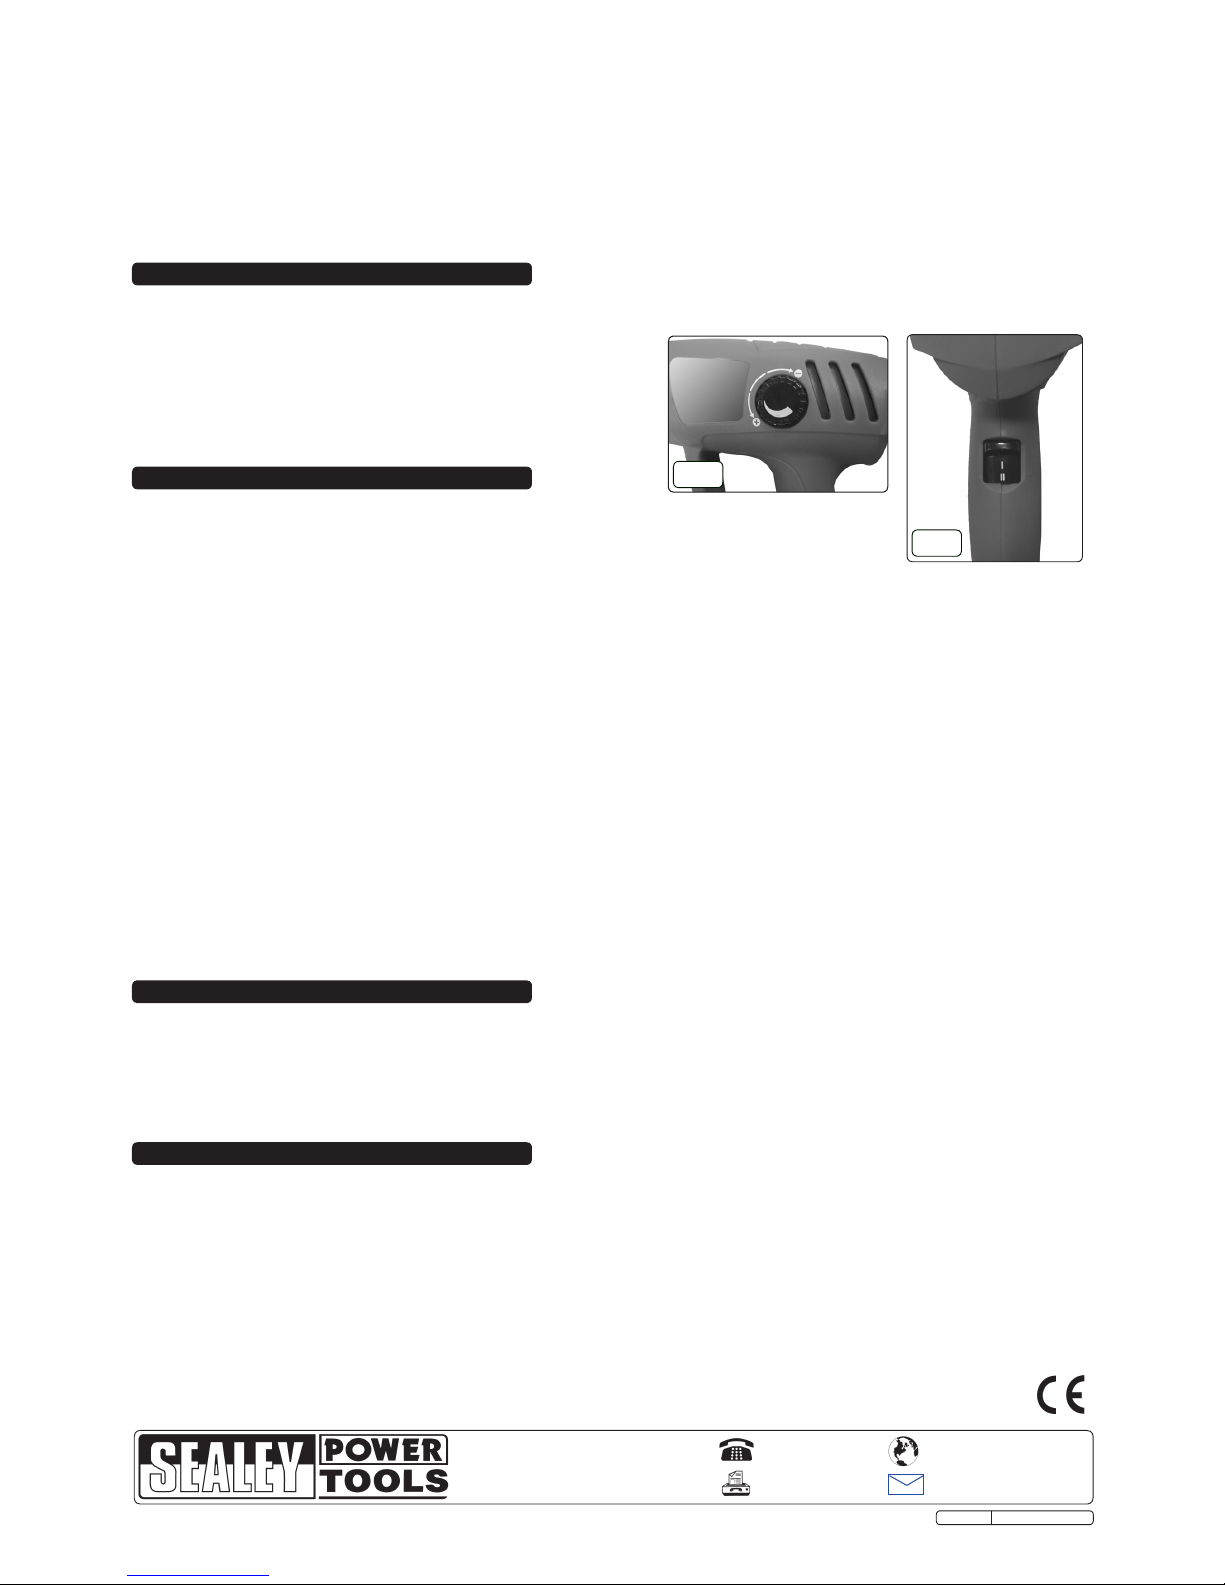
Two step air ow control switch, with variable temperature range on both levels. Gun is designed to stand vertically, allowing use as a safe
Bunsen burner alternative. Suitable for paint stripping, soft soldering, removing sticky labels and defrosting frozen pipes. Fitted BS approved 3
pin safety plug. Supplied with four nozzles and scraper, all in a storage case.
3.1. Preparing the hot air gun for use
3.1.1. Before plugging into the mains ensure the gun switch is in the off ’0' position.
3.1.2. When ready to start work, set switch to the required temperature setting (fig.1) and air flow speed (fig.2).
Allow one and a half minutes to heat.
NOTE: When new, the heat gun may generate smoke which will decrease with use.
WARNING! KEEP HANDS AWAY FROM THE IMMEDIATE NOZZLE AREA. IF LEAD PAINT IS BEING REMOVED FOLLOW THE
SAFETY WARNING AT THE BEGINNING OF THIS MANUAL. ALWAYS WEAR GLOVES AND EYE PROTECTION.
3.2. Paint and varnish removal
The easy removal of paint and varnish requires practice. Follow these simple working techniques to achieve the required result.
NOTE: The heat gun is designed to remove both oil and latex based paints and varnishes from surfaces. It will not remove stains
or primer coats that have impregnated the surface.
3.2.1. Switch the gun on and allow it to reach its operating temperature.
3.2.2. Always test on a small non-critical area first.
3.2.3. Hold the gun nozzle 3” (75mm) to 4” (100mm) from the paint to be removed.
3.2.4. After a short time the paint will soften and begin to blister.
3.2.5. Do not overheat the paint as this will cause it to burn which makes it more difficult to remove. Wear eye protection, especially
when stripping paint from overhead. If lead paint is being removed, refer to the warning at the beginning of this manual.
3.2.6. Begin scraping the paint off. Work from top to bottom. Use a scraper with smooth even strokes, warming the surface in front
of the scraper by moving the gun slightly from side to side.
3.2.7. If the correct temperature has been applied to the paint, thick, even layers can be removed in a single pass (paint should be
removed in strips equal in width to the scraper blade). Scrape paint as soon as it becomes soft, as it will re-harden very quickly.
3.2.8. Keep the scraper blade edge clean and sharp to prevent paint peelings from building up.
3.2.9. After softening, shaped or profiled surfaces may be stripped by using a wire brush.
3.2.10. To protect surrounding surfaces from the heat, cover with a non-flammable material.
IMPORTANT: Do not concentrate the heat gun on glass as the glass may crack.
g.2
g.1
NOTE: It is our policy to continually improve products and as such we reserve the right to alter data, specifications and component parts without prior notice.
IMPORTANT: No liability is accepted for incorrect use of this product.
WARRANTY: Guarantee is 12 months from purchase date, proof of which will be required for any claim.
INFORMATION: For a copy of our latest catalogue and promotions call us on 01284 757525 and leave your full name and address, including postcode.
01284 757500
01284 703534
sales@sealey.co.uk
Sole UK Distributor, Sealey Group,
Kempson Way, Suffolk Business Park,
Bury St. Edmunds, Suffolk,
IP32 7AR
www.sealey.co.uk
Web
email
Original Language Version
HS107K Issue: 2 - 2/10/09
 Loading...