

Page 1
INSTRUCTIONS FOR:
LAWN MOWER HOVER 1000W
280mm
MODEL No: GL53
Thank you for purchasing a Sealey product. Manufactured to a high standard this product will, if used according to these instructions and properly
maintained, give you years of trouble free performance.
1. SAFETY INSTRUCTIONS
IMPORTANT: PLEASE READ THESE INSTRUCTIONS CAREFULLY. NOTE THE SAFE OPERATIONAL REQUIREMENTS, WARNINGS & CAUTIONS. USE
THE PRODUCT CORRECTLY AND WITH CARE FOR THE PURPOSE FOR WHICH IT IS INTENDED. FAILURE TO DO SO MAY CAUSE DAMAGE OR
PERSONAL INJURY AND WILL INVALIDATE THE WARRANTY. PLEASE KEEP INSTRUCTIONS SAFE FOR FUTURE USE.
GL53 Issue No: 1 - 14/01/13
1.2. GENERAL SAFETY
3 Familiarise yourself with the controls and limitations of the
mower. This is a portable electric appliance, use an RCD.
3 Ensure the mower is in good order and condition before use. If
in any doubt electrically do not use the unit and contact an
electrician/service agent.
WARNING! The mower must only be serviced by an
authorised agent (except for blade replacement).
3 Maintain the mower in good condition and replace any
damaged or worn parts. Use genuine parts only.
Unauthorised parts may be dangerous and will invalidate
your warranty.
3 Inspect the lawn prior to cutting, removing obstructions including
molehills.
3 Keep children and unauthorised persons away from the
working area
7 DO NOT use this product to perform a task for which it has
not been designed. Grassed lawns only.
3 Wear safety glasses, ear defenders and in dusty conditions a
face mask.
7 DO NOT operate the hover mower barefoot or wearing open
sandles, always wear substantial footwear and long trousers.
7 DO NOT carry the mower by the cable or pull the cable to
disconnect from mains.
7 DO NOT start the mower with blades fully exposed.
7 DO NOT put your hands or feet under the cutter deck.
3 Mow only in daylight or good artificial light.
3 Avoid mowing when grass is wet, never when raining.
3 Extra care is required when mowing slopes, be sure of your
footing. Hint-: Starting at the top of the slope, mow with a
sweeping arc action from side to side across the face, not up
and down the slope.
3 Keep the cable away from the cutter deck.
3 Switch off the mower, wait for blades to stop rotating and
remove plug from socket to carry out any user tasks such as
leaving unattended,clearing, cleaning, transporting, storing and
inspecting.
3 If used with an extension lead, seek advice from a qualified
electrician on cable insulation, sizes and lengths.
1.1. ELECTRICAL SAFETY
WARNING! It is the responsibility of the owner and the operator
to read, understand and comply with the following: You must
check all electrical products, before use, to ensure that they are
safe. You must inspect power cables, plugs, sockets and any
other connectors for wear or damage. You must ensure that the
risk of electric shock is minimised by the installation of
appropriate safety devices. A Residual Current Circuit Breaker
(RCCB) should be incorporated in the main distribution board.
We also recommend that a Residual Current Device (RCD) is
used. It is particularly important to use an RCD with portable
products that are plugged into a supply which is not protected
by an RCCB. If in any doubt consult a qualified electrician. You
may obtain a Residual Current Device by contacting your
Sealey dealer. You must also read and understand the
following instructions concerning electrical safety.
1.1.1. The Electricity at Work Act 1989 requires that all portable
electrical appliances, if used on business premises, are tested
by a qualified electrician, using a Portable Appliance Tester
(PAT), at least once a year.
1.1.2. The Health & Safety at Work Act 1974 makes owners of
electrical appliances responsible for the safe condition of those
appliances and the safety of the appliance operators. If in any
doubt about electrical safety, contact a qualified
electrician.
1.1.3. Ensure that the insulation on all cables and on the appliance is
safe before connecting it to the power supply. See 1.1.1. and
1.1.2. and use a Portable Appliance Tester.
1.1.4. Ensure that cables are always protected against short circuit
and overload.
1.1.5. Regularly inspect power supply cables and plugs for wear or
damage and check all connections to ensure that none are
loose.
1.1.6. Important: Ensure that the voltage marked on the appliance
matches the power supply to be used and that the plug is fitted
with the correct fuse - see fuse rating below.
1.1.7. DO NOT pull or carry the appliance by the power cable.
1.1.8. DO NOT pull the plug from the socket by the cable.
1.1.9. DO NOT use worn or damaged cables, plugs or connectors.
Immediately have any faulty item repaired or replaced by a
qualified electrician. When a BS 1363/A UK 3 pin plug is
damaged, cut the cable just above the plug and dispose of the
plug safely.
Fit a new plug according to the following instructions (UK only).
a) Connect the GREEN/YELLOW earth wire to the earth
terminal ‘E’.
b) Connect the BROWN live wire to the live terminal ‘L’.
c) Connect the BLUE neutral wire to the neutral terminal
‘N’.
d) After wiring, check that there are no bare wires, that
all wires have been correctly connected, that the cable
outer insulation extends beyond the cable restraint and
that the restraint is tight.
Double insulated products, which are always marked with this
symbol , are fitted with live (brown) and neutral (blue) wires
only. To rewire, connect the wires as indicated in diagram.
DO NOT connect either wire to the earth terminal.
1.1.10. Some products require more than a 13 amp electrical supply. In
such a case, NO plug will be fitted. You must contact a qualified
electrician to ensure a 30 amp fused supply is available. We
recommend you discuss the installation of a industrial round pin plug
and socket with your electrician.
RECOMMENDED
FUSE RATING:
5 AMP
Original Language Version
© Jack Sealey Limited 2013
1.1.11. Cable extension reels.
When a cable extension reel is used it should be fully unwound
before connection. A cable reel with an RCD fitted is
recommended since any product which is plugged into the
cable reel will be protected. The section of the cores of the
cable is important. We suggest 1.5mm² section cable as a
minimum, but to be absolutely sure that the capacity of the
cable reel is suitable for this product and for others that may be
used in the other output sockets, we recommend the use of
2.5mm² section cable.
Page 2
3. CONTENTS AND ASSEMBLY
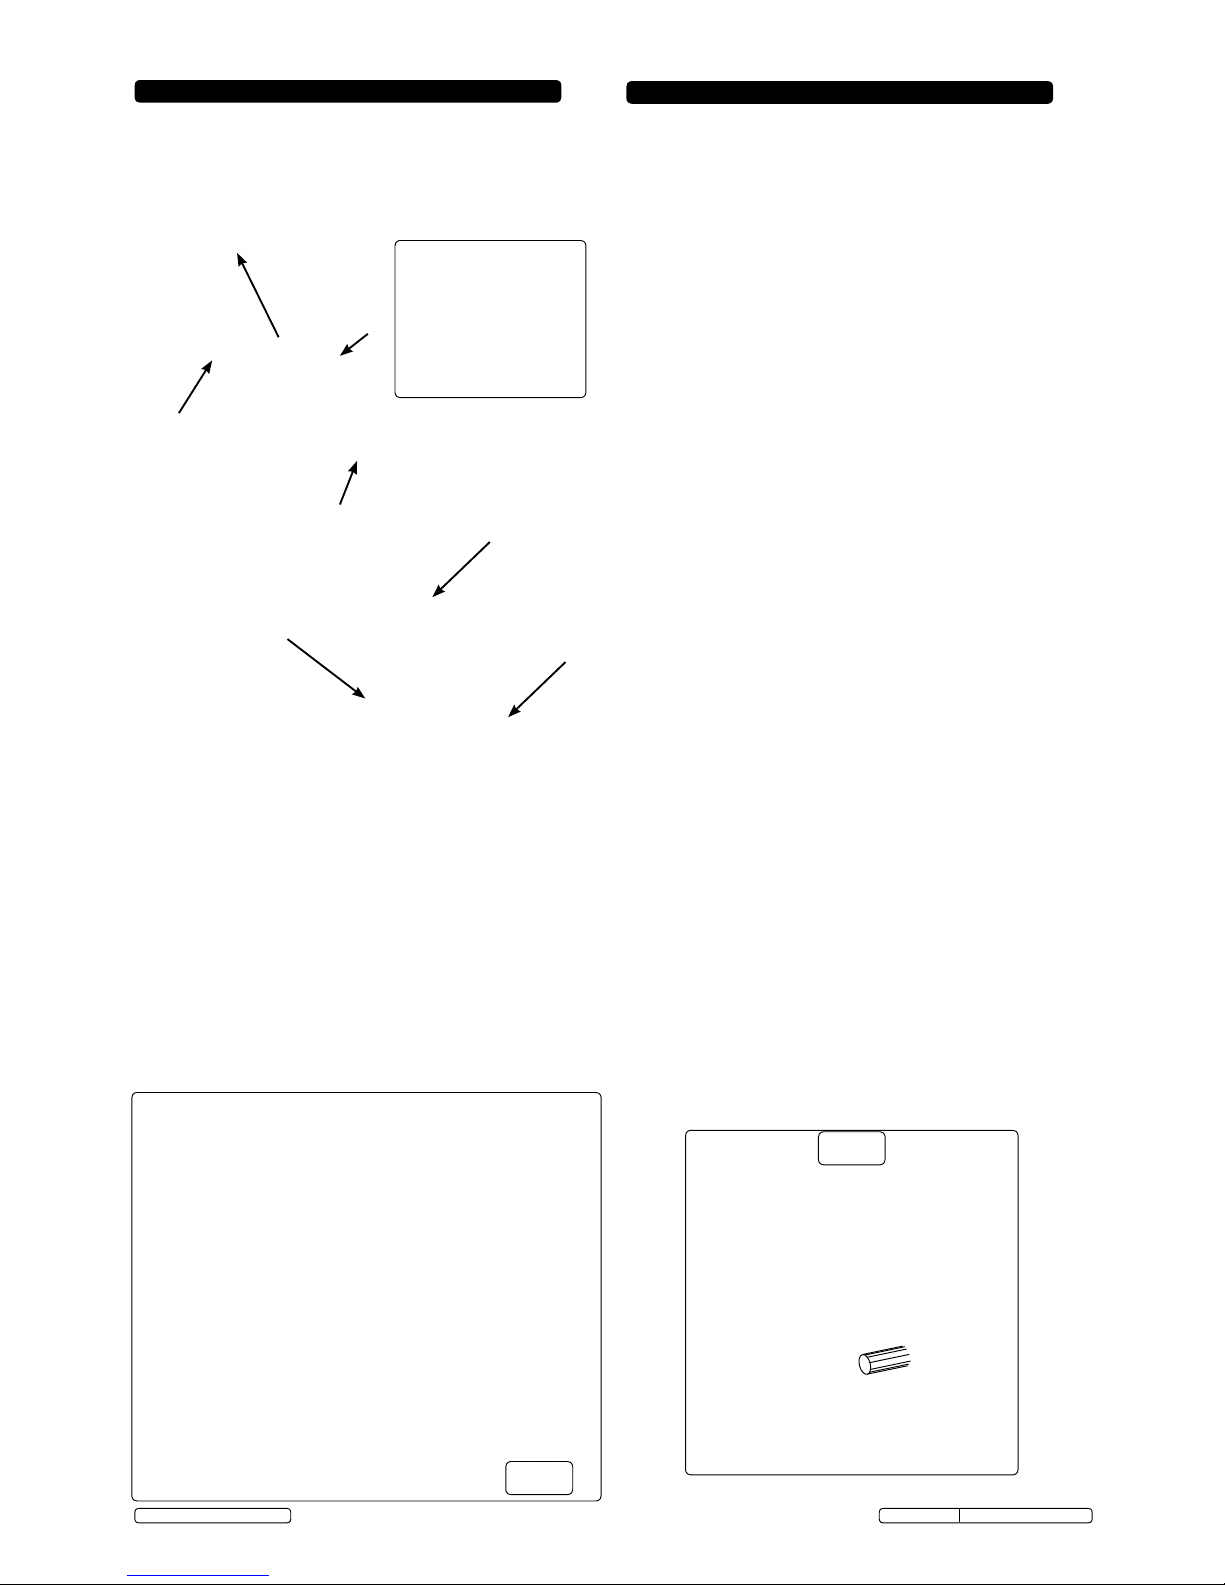
3.1. Check that you have all the above details in the packaging.
In the unlikely event of any missing or damaged parts,
contact your Sealey Dealer immediately. Retain the
packaging.
3.2 Assembly:- (no tools required)
3.2.1 Loop the cable strain relief hook (item 3) on to the upper
handle tubular frame (item 1) in the position indicated.
3.2.2. Thread the mains cable as illustrated in fig.1 through the
cable strain relief hook (item 3). This is an important safety
feature preventing the mains cable from being accidentally
pulled from switch connections.
3.2.3. Fit the lower handle frame (item 2) to the pivot lugs of the
cutter deck (item 7) using the pivot thumb screws (item 6). A
captive nut inside the motor cover enables the thumb screws
to clamp the tubular frame hand tight.
3.2.4. Fit the upper handle sub assembly (item 1) containing the
switch and cable to the lower handle (item 2) paying
attention to the cable run. Clamp the frame with (item 5)
details, see fig.2.
3.2.5 Position the three cable clips (item 4), clip to tubular frame
and finally clip the cable which runs from motor to switch.
3.3 Blade fitting and setting:- (no tools required)
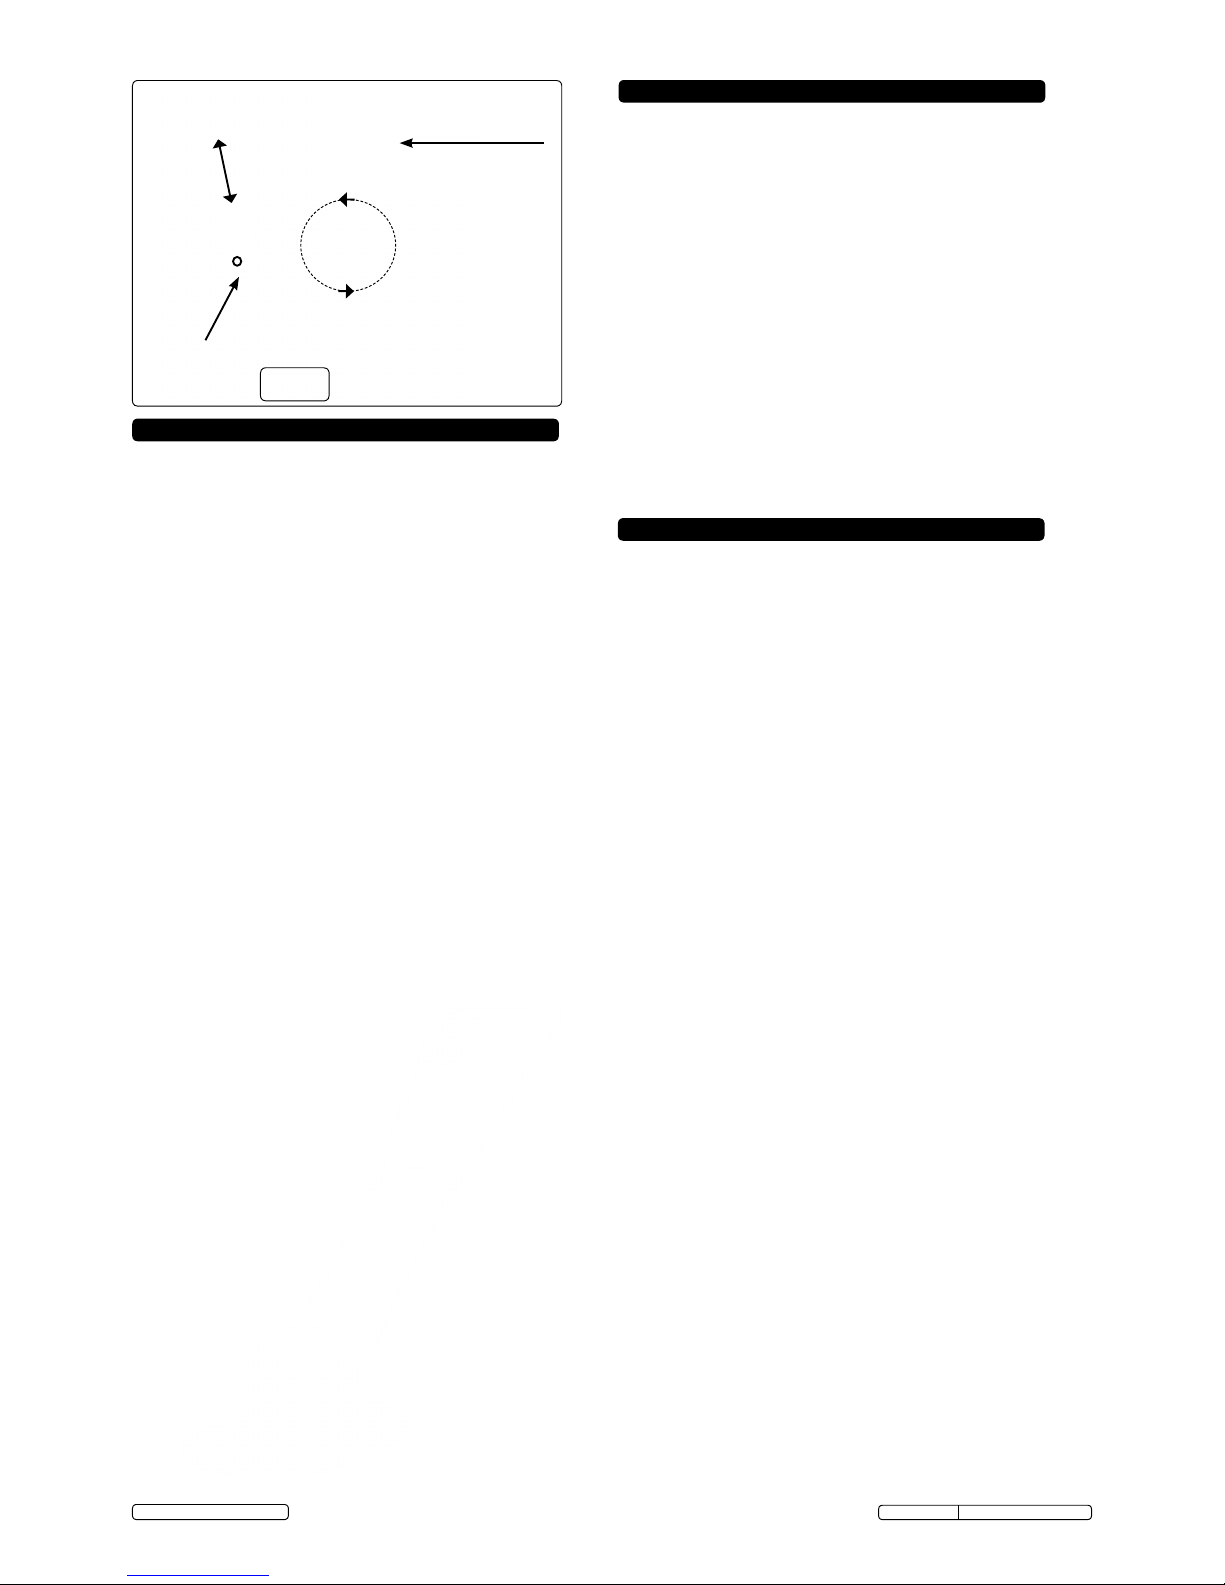
3.3.1 Decide on the grass cutting length required, a choice of
15mm or 25mm is available. In fig.3 the blades are shown at
the 15mm setting. Observe blade orientation.
3.3.2 To remove blades and set to the 25mm length, push the
blade toward the hub tab horizontally. Slide from the
keyhole slot small end to the large end and lift off.
3.3.3. Refit or change blades by the opposite approach and pull the
blade from the hub tab. The 25mm length setting is inboard
of the 15mm setting on the same hub. DO NOT remove hub.
NOTE: The blades will only fit one way, see fig.3. DO NOT
force fit the blades in the wrong way.
WARNING! Never use blades other than the spares
supplied. Never fit metal cutting elements. Further spares
available from your Sealey Dealer.
fig.1
2. INTRODUCTION & SPECIFICATION
Model No: .................................................................................... GL53
Drive Type: ..................................................................Hand Operated
Cutting Width: ............................................................... 280mm (10.5")
Cutting Deck Cover: ..............................Plastic Moulding (Composite)
Supply:................................................................................230V - 1ph
Power: ...................................................................................... 1000W
Two Cutting Heights: ................................................15mm and 25mm
Cable Length: ................................................................................10m
Cutting Blades: ...................Plastic (nylon) Moulding x 3 [21 supplied]
Ingress Protection: .......................................................................IPX4
Weight: ........................................................................................7.8kg
Measured Sound Power Level .................................................. 75dBA
Guaranteed Sound Power Level: .............................................. 96dBA
GL53 Issue No: 1 - 14/01/13
Original Language Version
© Jack Sealey Limited 2013
Electric hand-pushed hover mower with a 280mm (10.5") cutting
width. Composite deck for light weight durability. Electric motor
combined with an emergency cut-out switch for safety. Optimum
cutting height between 15 and 25mm. Supplied with 10m mains cable
and BS plug. Folding handle to enable easy storage.
This is a class II appliance and does not need an earth connection.
Cable strain
relief hook.
Cable clip
Power lever
Safety Button &
Switch Housing
Mains Cable
Tubular Handle
ITEM DESCRIPTION QTY
1 Upper handle sub assembly 1
2 Lower handle 1
3 Cable strain relief hook 1
4 Cable clips 3
5 Handle clamp c/w bolt and washer 2
6 Lower handle pivot thumb screws 2
7 Cutter deck c/w motor, impellor and 3 blades 3
8 Supplied blades 21
1
5
2
4
6
3 (see
g.1)
fig.2
See section 7
Warning symbols.
7
Page 3
Slide up to tab to remove.
Locate and pull to snap into place.
Tab
fig.3
Two position
blade pivot pegs
(over or under)
Direction
of rotation
5. MAINTENANCE
5.1 Ensure all xings are tight and secure.
5.2 Replace any damaged or worn parts immediately.
5.3 Check blades during and after each use, see section
3.3.3. for removal. Three blades must be tted at all times for
balance and reduced noise and vibration.
5.4 Check blades sweep freely about pivots
5.5 Check cable clips and cable runs, especially the strain relief
hook loop, mains plug and switch connections .
5.6 There are no customer serviceable parts other than the
blades and frame xings, use qualied service personnel for
all other aspects of maintenance.
5.7 Cleaning
5.7.1 After each use, with mower power unplugged from mains
supply, clear accumulated grass cuttings from inside cutter
deck. DO NOT allow the grass to dry on the mower.
5.7.2 Clear any accumulated grass cuttings from the airway utes
in blade hub impellor.
5.7.3 Clean any grass cuttings from the ying lead.
5.7.4 Clean the mower externally before storing with special
attention to inside the motor hood, which could affect
airow through motor and cutter deck.
6. TROUBLESHOOTING
6.1 Mower fails to operate
6.1.1 Check that the power is on.
6.1.2 Check that the start up procedure has been followed, safety
button pressed and power lever operated. See section 4.
6.1.3 Check the 5amp fuse in the plug. If blown, replace. If it
continues to blow, the mower must be checked by a qualied
electrician.
6.2 Cutter deck poor "hovering".
6.2.1 Disconnect from mains supply.
6.2.2 Clean underside of motor hood, cutter deck and hub impellor
utes.
6.2.3 Check cutter deck integrity.
6.2.4 Raise cutter blades from 15mm to 25mm. This will reduce
cutting power increasing speed of impellor hover affect.
6.2.5 Motor not running full speed with no load. This can only be
checked by qualied personnel, consult your Sealey Dealer.
6.3 Excessive vibration.
6.3.1 Disconnect from mains supply.
6.3.2 Check that 3 blades are tted and pivot freely.
6.3.3 Damaged blade, replace.
6.3.4 Plastic hub bolt has loosened, re-tighten bolt.
6.3.5 If excessive vibration persists, discontinue use and seek
advice from your Sealey Dealer.
4. OPERATION
NOTE: This appliance is not intended for use by persons (including
children) with reduced physical, sensory or mental capabilities or lack
of experience and knowledge, unless they have been given
supervision or instruction concerning the use of the appliance by a
person responsible for their safety. Children should be supervised to
ensure that they do not play with the appliance.
4.1 With the instructions to this stage read and the mower
assembled, plug the mains cable into an RCD protected and
isolated 230V AC supply.
4.2 With the mower cutter face down on the lawn to be cut, switch
on the supply. Nothing will happen until the safety (inhibit)
button has been depressed and the power lever gripped.
4.3 Now positioned at the mower handle and the cable clear of the
cutter deck, using the tubular handle frame, tip the whole
mower approximately 10° raising the cutter blades off the lawn.
Depress the safety button with one hand and hold, nothing will
happen until the power lever is gripped with the other hand.
4.4 With the motor running at full speed release the safety button,
maintaining grip on the power lever and lower the blades on to
the lawn.
4.5 Release grip on power lever to stop the motor. The blades
will rotate for a few seconds after the motor has stopped.
Mowing tip-: To prevent accidentally running over the lead with
cutter deck, trail the mains lead over one shoulder and hold
with the hand of the other shoulder. Alternate with operating
mower with both hands, always keeping the lead on your
shoulder.
GL53 Issue No: 1 - 14/01/13
Original Language Version
© Jack Sealey Limited 2013
Page 4
GL53 Issue No: 1 - 14/01/13
Original Language Version
© Jack Sealey Limited 2013
NOTE: It is our policy to continually improve products and as such we reserve the right to alter data, specifications and component parts without prior notice.
IMPORTANT: No liability is accepted for incorrect use of this product.
WARRANTY: Guarantee is 12 months from purchase date, proof of which will be required for any claim.
INFORMATION: For a copy of our latest catalogue and promotions call us on 01284 757525 and leave your full name and address, including postcode.
01284 757500
01284 703534
Sole UK Distributor, Sealey Group,
Kempson Way, Suffolk Business Park,
Bury St. Edmunds, Suffolk,
IP32 7AR
www.sealey.co.uk
Web
email
7. WARNING SYMBOLS
The mower should be used with due care. Symbols placed strategically on various parts of the machine reminds the user of the main
precautions to be taken at point of operation. Symbols and meanings are listed below. These meanings also add emphasis to the safety
regulations and safety information given in earlier sections of these instructions
Parts support is available for this product. To obtain a parts listing and/or diagram,
please log on to www.sealey.co.uk, email [email protected] or telephone 01284 757500.
Environmental Protection.
Recycle unwanted materials instead of disposing of them as
waste. All tools, accessories and packaging should be sorted,
taken to a recycle centre and disposed of in a manner which
is compatible with the environment.
WEEE Regulations.
Dispose of this product at the end of its working life in compliance
with the EU Directive on Waste Electrical and Electronic Equipment.
When the product is no longer required, it must be disposed of in an
environmentally protective way. Contact your local solid waste
authority for recycling information.
Caution! Keep the mains cable
clear of cutting blade
Switch off the motor and disconnect
the mains plug before carrying out
adjustment or cleaning work or if
the mains lead has been snagged
or damaged.
 Loading...