

Page 1

INSTRUCTIONS FOR:
ELECTROSTART® BATTERYLESS POWER
START 1600A 12V
MODEL NO: E/START1600.V2
Thank you for purchasing a Sealey product. Manufactured to a high standard, this product will, if used according to these instructions
and maintained properly, give you years of trouble free performance.
IMPORTANT: PLEASE READ THESE INSTRUCTIONS CAREFULLY. NOTE THE SAFE OPERATIONAL REQUIREMENTS, WARNINGS & CAUTIONS. USE THE PRODUCT
CORRECTLY AND WITH CARE FOR THE PURPOSE FOR WHICH IT IS INTENDED. FAILURE TO DO SO MAY CAUSE DAMAGE AND/OR PERSONAL INJURY AND WILL
INVALIDATE THE WARRANTY. KEEP THESE INSTRUCTIONS SAFE FOR FUTURE USE.
Refer to
Instruction
Manual
Warning:
Explosive
Material
Wear eye
Protection
Warning:
Corrosive
substance
Wear
Protective
Gloves
1. SAFETY
Modern vehicles contain extensive electronic systems.
YouarerequiredtocheckwiththevehicleManufacturer,foranyspecicinstructionsregardingtheuseofthistypeof
equipment on each vehicle. No liability will be accepted for damage / injury, where this product is not used in accordance
with all instructions.
9 Ensure that the vehicle is in a well ventilated area.
9 Apply the handbrake and select neutral or ‘park’ before attempting to start.
9 Ensure that the ignition switch and all ancillary electrical equipment is switched off.
9 Keep clear of any pulleys, belts etc. that will move once the engine starts.
9 Take care to ensure correct connection polarity; red clamp to positive, black clamp to negative.
9 Energise the E/START1600.V2 only at ambient temperatures between -30°C and 40°C.
9 When not in use, switch off and store in a cool, dry place out of the reach of children.
8 DO NOT allow this power pack to become wet.
8 DO NOT dismantle this E/START1600.V2: there are no user serviceable parts inside.
8 DO NOT use in explosive atmospheres (e.g. the presence of flammable liquids, gases or dust).
8 DO NOT use the E/START1600.V2 if it appears damaged in any way.
8 DO NOT use this product for any purpose other than that for which it is designed.
8 DO NOT leave in direct sunlight or expose to heat.
8 DO NOT use abrasive or solvent cleaners on this product.
8 DO NOT allow children to play with this product
8 DO NOT allow the positive and negative clamps to touch.
1.1. CHARGING SAFETY INSTRUCTIONS
9 Familiarise yourself with the application and limitations of the charger as well as the potential hazards. Also refer to the vehicle
manufacturer’s hand book. IF IN ANY DOUBT CONSULT A QUALIFIED ELECTRICIAN.
9 Ensure the charger is in good condition before use. If in any doubt do not use the unit, contact your Sealey stockist.
9 Use the starter/charger in the upright position only and ensure it is placed on a stable surface which will adequately support its weight.
9 Keep tools and other items away from the engine and ensure you can see the battery and working parts of engine clearly.
9 Ensure the output of the charger is the same voltage as the battery.
9 Ensure that during charging, the charger is placed in a location where there is sufficient ventilation to prevent the build up of explosive
gases from a lead acid battery.
9 If battery has caps to access the battery fluid, remove the caps and check the fluid level before connecting the power clamps.
9 If necessary top-up the battery with distilled water by referring to the battery manufacturer’s instructions.. If the charger receives a sharp
knock or blow the unit must be checked by a qualified service agent before using.
9 If the battery terminals are corroded or dirty clean them before attaching the power clamps.
9 Keep children and unauthorised persons away from the working area.
8 DO NOT try to charge a non-rechargeable battery.
8 DO NOT try to charge battery if battery fluid is frozen.
WARNING! To prevent the risk of sparking, short circuit and possible explosion DO NOT drop metal tools in the battery area, or allow
them to touch the battery terminals.
8 DO NOT allow power clamps to touch each other or to make contact with any metallic part of the vehicle.
8 DO NOT cross connect power leads from charger to battery. Ensure positive (+/RED) is to positive and negative (-/BLACK) is to negative.
8 DO NOT pull the cables or clamps from the battery terminals.
8 DO NOT use the charger outdoors, or in damp, or wet locations and DO NOT operate within the vicinity of flammable liquids or gases.
8 DO NOT use the charger for a task for which it is not designed.
WARNING! DO NOT simultaneously charge batteries of different capacities or discharge levels.
WARNING! If a fuse blows, ensure it is replaced with an identical fuse type and rating. Use only Sealey genuine parts.
This appliance can be used by children aged from 8 years and above and persons with reduced physical, sensory or mental capabilities or lack of
experience and knowledge if they have been given supervision or instruction concerning use of the appliance in a safe way and understand the
hazards involved. Children shall not play with the appliance. Cleaning and user maintenance shall not be made by children without supervision.
Warning:
Electricity
Protect
From
Rain
Use in
Well
Ventilated
Areas
Keep away
from sources
of ignition:
Battery could
explode
© Jack Sealey Limited
© Jack Sealey Limited
Original Language Version
Original Language Version
E/START1600.V2 Issue: 1 - 12/10/17
E/START1600.V2 Issue: 1 - 12/10/17
Page 2
2. INTRODUCTION
Vehicle jump starting made easy with innovative patented technology. Unlike traditional boosters, it has no internal batteries, as it uses
Ultracapacitors to maximise the discharged battery’s voltage. Simply connect to the vehicle’s battery, even if discharged, and the unit will draw
enough power to energise itself in a matter of minutes. Power can then be pushed safely back through the starting system to jump start the
vehicle. If the vehicle’s battery is faulty or holding less than 5 volts, the ElectroStart range can be pre-charged via another vehicle’s battery, a Micro
USB charging cable (supplied with Model No. E/START800) or the 12V accessory lead (excludes Model No. E/START1224). The digital display
indicates battery voltage, capacitor charge and faults. Safely store the unit without the need for battery maintenance, and no delay waiting for a
battery to charge, the device is ready for use within minutes. Compact and lightweight for easier handling and storage, yet still delivers the same
result as heavy, bulky, lead acid battery equivalents. Ideal for both professional mechanics and DIY users.
3. SPECIFICATION
Model No: ............................................................E/START1600.V2
Output: .......................................................................... 12V
Output start Peak(EN): ......................................................1600A(800A)
Maximum Starting Capacity: ...........................................Petrol: 6ltr, Diesel: 4ltr
Clamp & Cable Length: ...........................................................375mm
Size (W x D x H):...................................................... 190 x 60 x 235mm
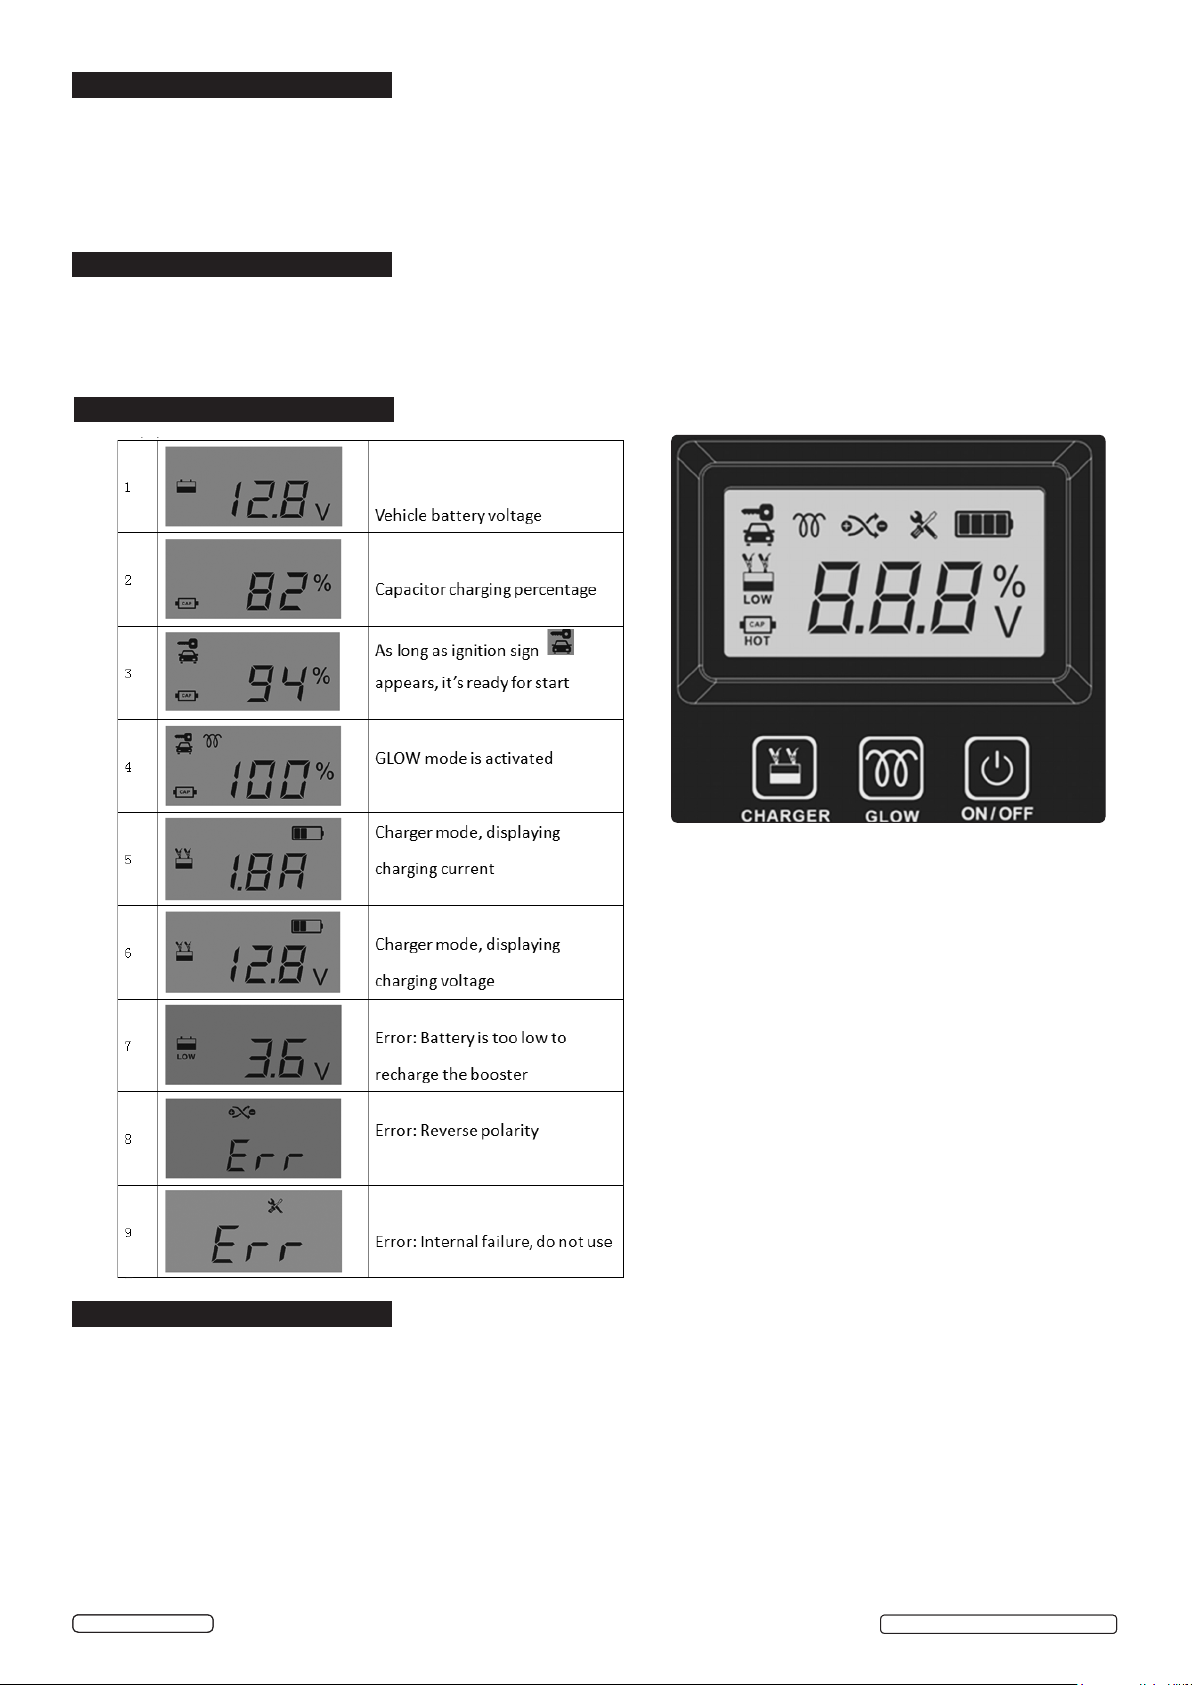
4. CONTROL PANEL
fig:
Red backlight
Red backlight
Red backlight
5. OPERATION
5.1. DUTY CYCLE
After 5 starts let the unit rest for 15 minutes.
5.2. PREPARATION
Turn off headlights, air conditioning, heated screens, audio etc.
5.2. BUZZER
5.2.1 Intermittent buzzing indicates the E/START is ready to start vehicles.
5.2.2. Continuous buzzing means there is an error.
5.3. STANDARD MODE
In most situations a weak battery on the vehicle can fully recharge the E/START.
5.3.1. Connect clamps to the battery terminals, E/START will turn on automatically and the display will show the voltage of the vehicle’s
battery, see fig.1.
© Jack Sealey Limited
© Jack Sealey Limited
Original Language Version
Original Language Version
E/START1600.V2 Issue: 1 - 12/10/17
E/START1600.V2 Issue: 1 - 12/10/17
Page 3

5.3.2. Press ON/OFF and the E/START starts to recharge itself. The display shows the E/START’s percentage, see fig.2.
5.3.3. After the ignition sign appears, see fig.3, turn on the engine.
5.3.4. When the engine fires, remove the E/START as soon as possible.
5.4. BY PASS MODE
5.4.1. In some situations the E/START may fail to start the car because the vehicle’s battery is too weak. Press ON/OFF for a few seconds
to activate BY PASS MODE.
5.4.2. After the ignition sign, fig.3 appears, turn on the engine as soon as possible.
5.5. PRE-CHARGE MODE
5.5.1. If the battery is too weak to charge the E/START, fig.7 will appear.
5.5.2. Connect the E/START to a good battery until the unit is fully charged, then remove.
5.5.3. Connect the E/START to the weak battery, the display shows the voltage in that battery.
5.5.4. Press the ON/OFF switch to activate. Fig.3 is now displayed.
5.5.5. Turn the engine on.
5.5.6 Remove the unit as soon as the engine fires.
5.6. ALTERNATIVE CHARGING METHODS.
In addition to using a 12V battery, as in 5.5.2., the E/START may be charged with either a 5V USB lead, or a 12V pin jack lead from a
vehicle accessory socket. The USB and pin jack sockets are located under a rubber flap in the base.
5.7. OVERRIDE MODE
5.7.1. If the pre-charge mode fails, use the override mode.
5.7.2. Charge the E/START as in 5.5.2./5.6.
5.7.3. Connect E/START to the vehicle with the battery lead disconnected from the battery, POSITIVE E/START lead connected to
VEHICLEBATTERYPOSITIVElead,seeg.10.
Red (+)
Clamp (+)
E/START
Black (-)
Clamp (-)
fig.10
5.7.4. Press the ON/OFF for a few seconds to activate OVERRIDE MODE.
5.7.5. Turn on the engine.
5.7.6. Put the POSITIVE E/START LEAD and VEHICLE BATTERY POSITIVE onto the BATTERY POSITIVE TERMINAL. Remove the
E/START’s POSITIVE lead after it is fastened to the battery terminal, see fig.11.
Red (+)
E/START
Black (-)
Clamp (-)
Clamp (+)
fig.11
WARNING: DO NOT leave the engine running without the E/START or battery being connected securely.
WARNING: Make sure that the terminals are not cross connected: there is no cross connection protection in the override mode.
5.8. GLOW MODE (Only use if the glow plug symbol appears on the vehicle instrument panel)
5.8.1. In cold weather the glow plugs in most diesel vehicles will be first energised to heat up the engine before it is started, as indicated by a
symbol on the instrument panel.
5.8.2. If this is the case, after the E/START is fully recharged and connected to the vehicle, press GLOW button and turn on the ignition.
5.8.3. When the glow light on dashboard goes out, start the vehicle.
NOTE: GLOW is deactivated in OVERRIDE mode (5.7.above).
5.9. BATTERY CHARGER MODE
5.9.1. To use the E/START as a battery charger; connect to a 5V outlet via the USB lead. This will produce a 12V 0.8A output. from the
charger.
5.9.2. Connect the E/START to the battery and press the ON/OFF button.
5.9.3. The display will alternate between charging current (fig.5) and charging voltage (fig.6).
© Jack Sealey Limited
© Jack Sealey Limited
© Jack Sealey Limited
© Jack Sealey Limited
Original Language Version
Original Language Version
Original Language Version
Original Language Version
E/START1600.V2 Issue: 1 - 12/10/17
E/START1600.V2 Issue: 1 - 12/10/17
E/START1600.V2 Issue: 1 - 12/10/17
E/START1600.V2 Issue: 1 - 12/10/17
Page 4

Parts support is available for this product. To obtain a parts listing and/or diagram, please log on to
www.sealey.co.uk, email sales@sealey.co.uk or telephone 01284 757500
WEEE REGULATIONS
Dispose of this product at the end of its working life in compliance with the EU Directive on Waste Electrical and Electronic Equipment
(WEEE). When the product is no longer required, it must be disposed of in an environmentally protective way. Contact your local solid
waste authority for recycling information.
Note: It is our policy to continually improve products and as such we reserve the right to alter data, specifications and component parts without prior
notice.
Important: No Liability is accepted for incorrect use of this product.
Warranty: Guarantee is 12 months from purchase date, proof of which is required for any claim.
Sealey Group, Kempson Way, Suffolk Business Park, Bury St Edmunds, Suffolk. IP32 7AR
01284 757500 01284 703534 sales@sealey.co.uk www.sealey.co.uk
© Jack Sealey Limited
Original Language Version
E/START1600.V2 Issue: 1 - 12/10/17
 Loading...