

Page 1
© Jack Sealey Limited
Original Language Version
INSTRUCTIONS FOR:
CORDLESS POLISHER/SANDER
14.4V 2Ah LITHIUM ION
2 BATTERIES 40MIN CHARGER
MODEL NOs: CP6005, CP6015 (BODY ONLY)
IMPORTANT: PLEASE READ THESE INSTRUCTIONS CAREFULLY. NOTE THE SAFE OPERATIONAL REQUIREMENTS, WARNINGS & CAUTIONS. USE THE PRODUCT
CORRECTLY AND WITH CARE FOR THE PURPOSE FOR WHICH IT IS INTENDED. FAILURE TO DO SO MAY CAUSE DAMAGE AND/OR PERSONAL INJURY AND WILL
INVALIDATE THE WARRANTY. KEEP THESE INSTRUCTIONS SAFE FOR FUTURE USE.
Thank you for purchasing a Sealey product. Manufactured to a high standard, this product will, if used according to these instructions
and maintained properly, give you years of trouble free performance.
Refer to Instruction
Manual
Wear Eye
Protection
Wear Ear Protection
Wear Protective
Gloves
Charger: Indoor
Use Only
1.1. ELECTRICAL SAFETY.
WARNING! It is the owner’s responsibility to read, understand and comply with the following electrical instructions:
You must ensure the risk of electric shock is minimised by the installation of appropriate safety devices. An RCCB (Residual Current
Circuit Breaker) should be incorporated in the main distribution board. We also recommend that an RCD (Residual Current Device)
is used with all electrical products, particularly portable equipment which is plugged into an electrical supply not protected by an RCCB.
You must also read and understand the following instructions concerning electrical safety.
1.1.1. The Electricity At Work Act 1989 requires all portable electrical appliances, if used on business premises, to be tested by a
qualified
electrician, using a Portable Appliance Tester (PAT), at least once a year.
1.1.2. The Health & Safety at Work Act 1974 makes owners of electrical appliances responsible for the safe condition of the appliance and
the safety of the appliance operator.
If in any doubt about electrical safety, contact a qualified electrician.
Ensure that the charger and cable are inspected for wear and damage, to ensure they are safe before connecting to the mains power
supply. If worn or damaged DO NOT use, replace immediately or contact a qualified electrician.
DO NOT use worn or damage cables, plugs or connectors. Have any faulty item repaired or replaced
immediately by a qualified electrician. When an ASTA/BS approved UK 3 pin plug is
damaged, cut the cable just above the plug and dispose of the plug safely.
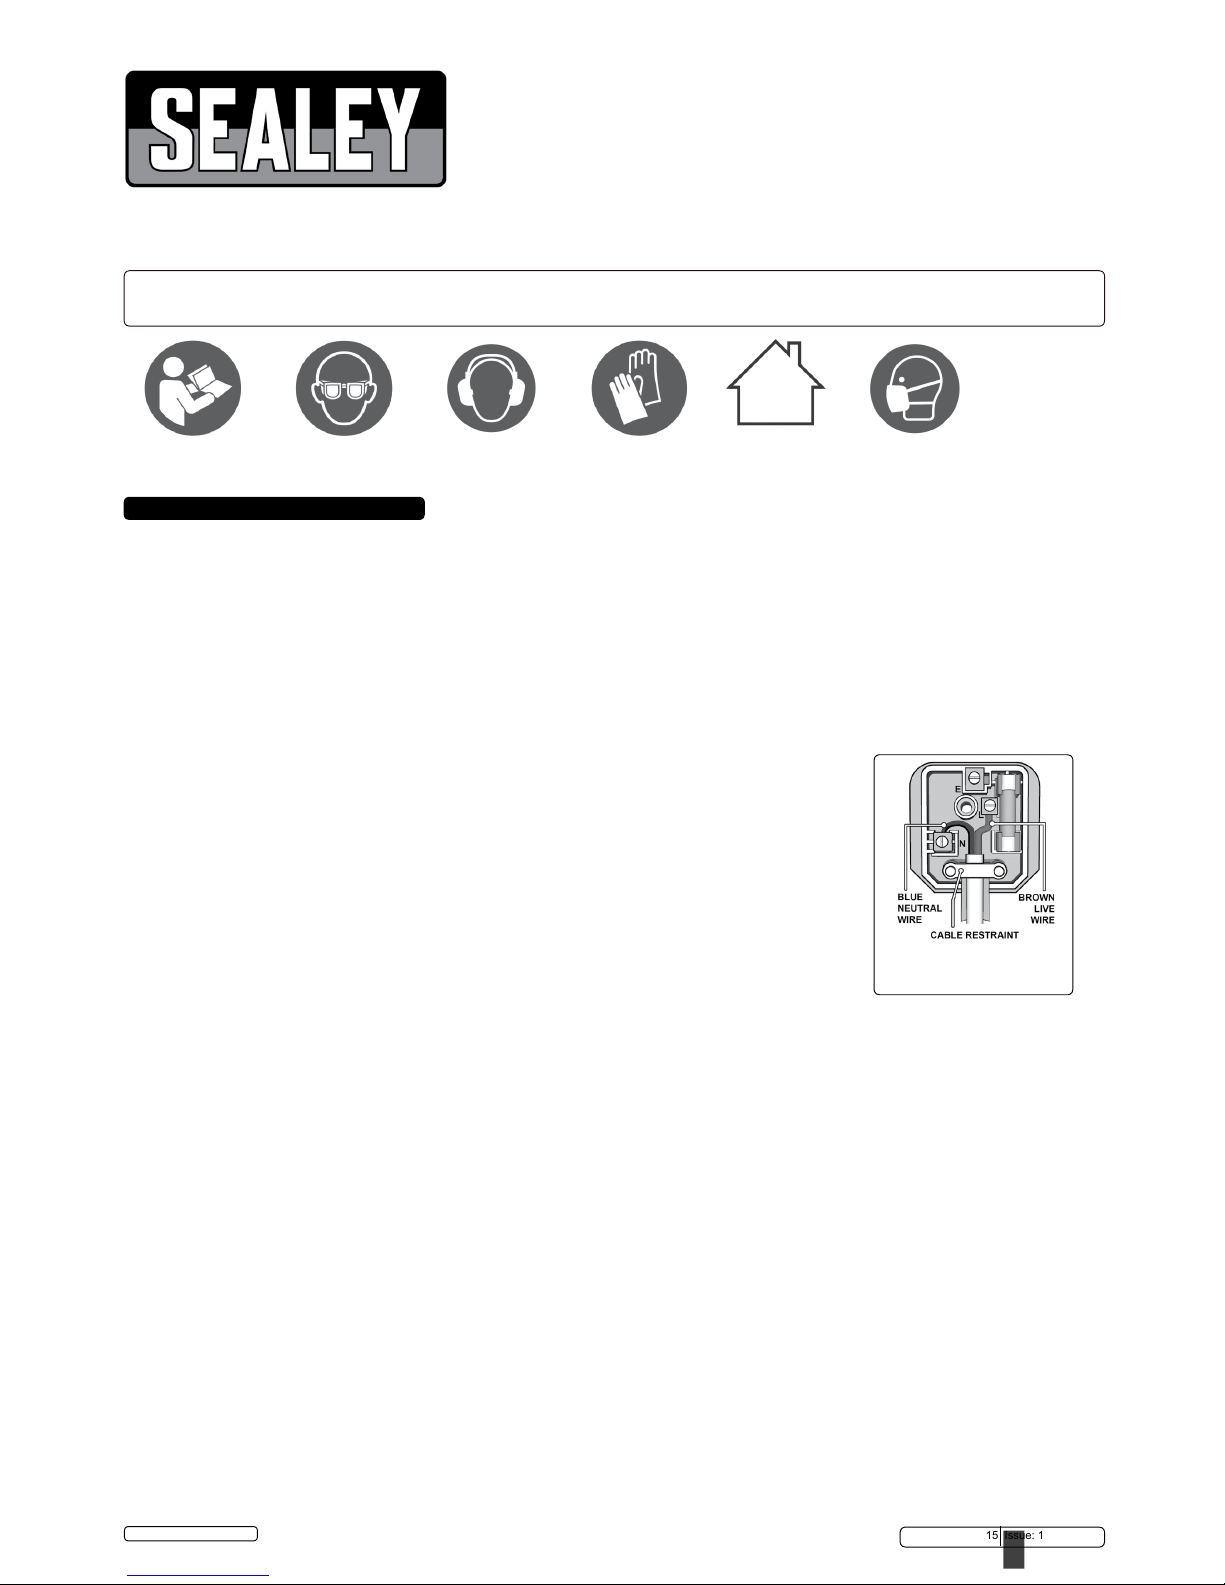
Ensure that the double insulated charger is correctly connected via a three-pin plug, as follows:
a) Connect the Brown live wire to live terminal ‘L’.
b) Connect the Blue neutral wire to the neutral terminal ‘N’.
c) After wiring, check that there are no bare wires, that all wires have been correctly connected,
that the cable outer insulation extends past the cable clamp and that the clamp is tight.
Note that the earth pin ‘E’ remains unconnected.
Check cables are always protected against short circuit and overload.
1.2. BATTERY SAFETY.
Charge battery prior to first use. The battery pack will have been shipped in a low charge state.
Use only the charger provided to charge the polisher battery.
DO NOT charge battery when room temperature is below 50°F (10°C) or above 104°F (40°C).
DO NOT attempt recharging the battery by means of a generator or a DC power source.
DO NOT short-circuit the battery by linking both terminals with conductive materials.
DO NOT store the battery (or wrench) in locations where the temperature may exceed 104°F (40°C).
▲ DANGER! DO NOT attempt to dismantle the battery pack. For safety and environmental reasons DO NOT discard in domestic
waste or by burning. ONLY discard or recycle according to local authority regulations.
WARNING! DO NOT allow a leaking battery to contact your person. If you come into contact with battery liquid take the following
immediate action:
a) Skin contact: Wash immediately with soap and water, then wash flesh in either lemon juice or vinegar.
b) Eye contact: Wash with a strong solution of boric acid, and seek immediate medical attention.
1.3. BATTERY CHARGER SAFETY INSTRUCTIONS.
WARNING: DO NOT use the charger to charge any battery other than that supplied for the polisher. Other types of batteries may
explode.
All mains electrical supply safety features must be followed as described in 1.1. above.
Disconnect the charger from the mains power supply when not in use.
Important: Check that the voltage marked on the charger is the same as the power supply to be used.
DO NOT pull or carry the charger by the power lead, or pull the plug from the mains socket by the power lead.
DO NOT use any other type of charger.
DO NOT try to open or dismantle the charger.
DO NOT get the charger wet, or use in wet, damp conditions (for indoor use only).
DO NOT operate the charger if it or the battery is damaged.
DO NOT insert foreign objects or material into the hole reserved for the battery.
DO NOT force the battery into the charger. The battery will only fit one way to ensure correct polarity alignment.
DO NOT charge a second battery immediately. Consecutive charging will overheat the charger. Allow the unit to cool for 15 minutes
before charging the next battery.
Store the charger in the same manner as the battery, see section 1.2.
1. SAFETY
Recommended Fuse
Rating: 3A
CP6005, CP6015 Issue: 1 - 28/02/17
Wear a mask
Page 2
2. INTRODUCTION
The One-Battery-Fits-All range has been carefully selected with the professional tradesman in mind. Slim, compact and lightweight designs, due
largely to the lithium-ion battery technology, punch well above their weight, delivering power and performance for most tradesmen’s requirements.
Weight for weight Li-ion batteries give an all-round better performance than standard Ni-Cd/Ni-MH cells.
• Li-ion maintains a higher energy density level (generally twice that of a Ni-Cd cell) giving more battery power per gram.
• Has a at discharge curve - performing better for longer.
• Li-ion has no memory effect - these batteries can recover from a deep discharge with no tendency to reduce overall capacity.
• Li-ion technology is lightweight and therefore perfect for the tradesman or high demand user.
Selecting the right tools from this range could not be more simple. Purchase a tool combination kit, then add your own selection of power tools and
accessories to build your own tool prole. No need to worry about battery compatibility - one battery ts all.
3. SPECIFICATION
Model No:..................................CP6005 ......................................... CP6015
Battery: ....................................14.4V 2Ah Li-ion ............... 14.4V 2Ah Li-ion (Not Supplied)
No Load Speed: .............................0-1900rpm/0-6900rpm ...................0-1900rpm/0-6900rpm
Thread Size: ................................5/16"UNF .......................................5/16"UNF
Battery Model No: ............................CP60BP .........................................CP60BP
Battery Charger Model No.: ....................CP60MC ....................................... CP60MC
Weight: ....................................2.3kg ............................................. 0.9kg
Noise Power ................................80dB ..............................................80dB
Noise Pressure ..............................69dB ..............................................69dB
Complete Kit Model No: . . . . . . . . . . . . . . . . . . . . . . . . . . . . . . . . . . . . . . . . . . . . . . . . . . . . . . . . . . . . . . . . . . . . . . . CP6005
4. CHARGING
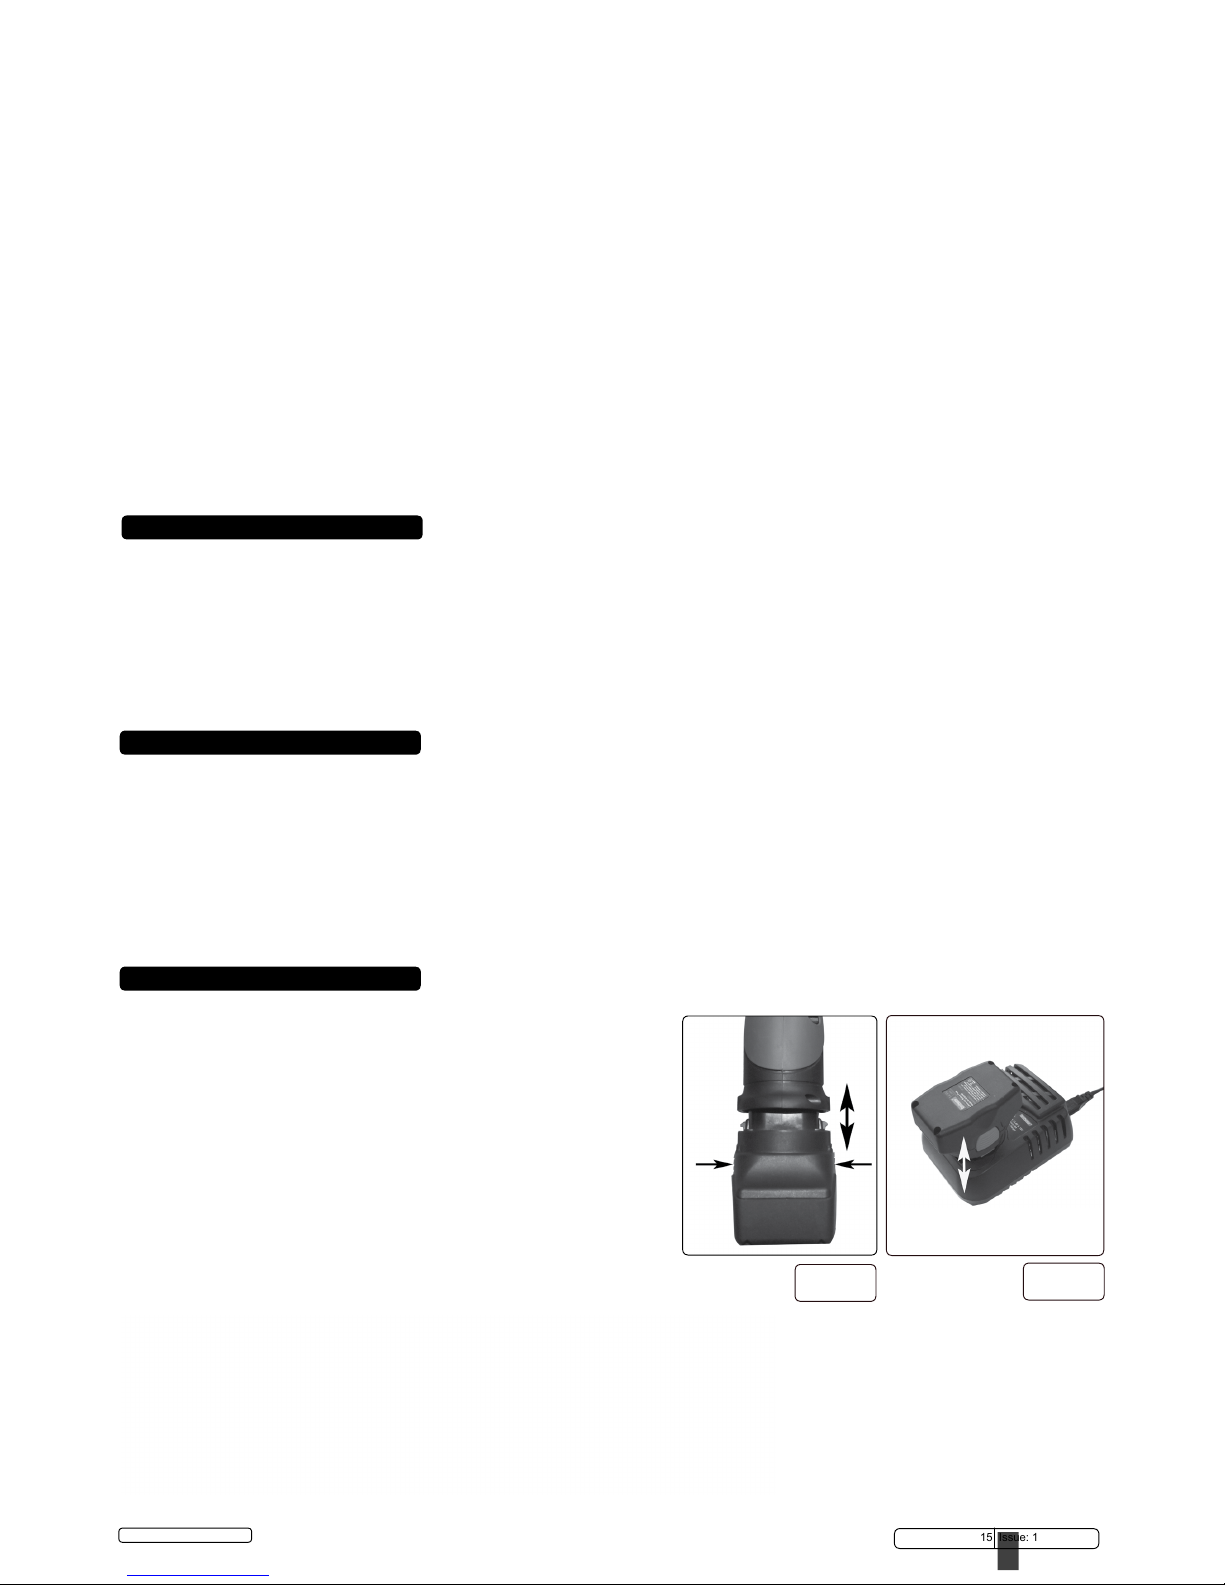
4.1. Battery Pack Removal and Replacement
4.1.1. Switch the machine off before removing the battery pack.
4.1.2. Press the battery latches in and withdraw the battery pack (g.1).
4.1.3. To replace the battery pack, push the stem into the polisher until the latches
engage. The battery pack can only be inserted in the correct orientation.
4.2. Battery Charging
Batteries that have been out of use for some time or are new may not
accept a full charge. This is not a battery fault; the battery may need to be
discharged and charged a couple of times to restore full capacity.
4.2.1. Connect the charger to the electric power supply. A ashing green LED
will show.
4.2.2. Insert the battery into the charger (g.2). A steady red light will show.
4.2.3. When the battery is 80% full, the green LED will ash.
4.2.4. When fully charged, a steady green LED will show.
4.2.5. The battery is ready for use.
4.2.6. The LED indications are:
g.1
g.2
1.1. GENERAL SAFETY.
Maintain the polisher and battery in good condition. Check moving parts alignment on a regular basis.
Replace or repair damaged parts. Use an authorised service agent and recommended parts only. Unauthorised parts may be
dangerous and will invalidate the warranty.
Ensure the polisher is switched off before installing the battery pack.
Keep the polisher and charger clean for best and safest performance.
Remove ill fitting clothing. Remove ties, watches, rings and other loose jewellery and contain long hair.
Ensure battery pack is correctly inserted into the polisher handle and latched in place before attempting to switch on polisher.
Secure loose work pieces with a clamp, vice or other adequate holding device.
Avoid unintentional starting.
Wear approved safety eye protection (standard spectacles are not adequate).
Maintain correct balance and footing. Ensure the floor is not slippery and wear non-skid shoes.
Be aware that this polisher does not need to be plugged into the mains power.
Keep children and unauthorised persons away from the working area.
DO NOT use the wrench where there are flammable liquids, solids or gases, such as paint solvents, etc.
DO NOT allow children to operate the polisher.
DO NOT operate the polisher if any parts are missing as this may cause failure and/or personal injury.
DO NOT hold unsecured work piece in your hand.
DO NOT leave the polisher operating unattended.
DO NOT carry the polisher with your finger on the power switch.
DO NOT use the polisher for a task it is not designed to perform.
DO NOT operate the polisher when you are tired or under the influence of alcohol, drugs or intoxicating medication.
DO NOT get the polisher or battery charger wet or use in damp or wet locations.
Allow temperature to stabilise.
Contact dealer or service agent
.
© Jack Sealey Limited
Original Language Version
CP6005, CP6015 Issue: 1 - 28/02/17
Page 3

g.3
5. OPERATION
5.1. USING THE POLISHER
WARNING! Ensure you read, understand and apply the safety instructions in Section 1.
5.1.1 Select required polishing/sanding head and screw (clockwise) onto drive spindle, the spindle can be locked by depressing the
spindle lock. fig.3.
5.1.2 Hold the polisher firmly with one hand on the handle grip and the other on the Side-Handle. To select the required speed slide the
speed selection switch forward or back to select either high or low speed range. fig.3.
5.1.3 To start the polisher gradually press the trigger when in the fully depressed state it can be locked on by sliding the trigger lock to
stop the polisher push lock in opposite direction and release trigger. fig.3.
5.1.4 Lock the spindle and turn the polishing/sanding head anti-clockwise
WARNING! The high speed settings are intended for sanding. If used for polishing an excessive amount of surface material may be
removed.
5.1.5 Keep the machine clean and dry. Do not use abrasives to clean the unit.
WARNING! Wear approved safety eye protection and, if necessary, respiratory protection.
Note. maintenance must only be carried out by a technically qualified person or an authorised service agent.
NOTE: It is our policy to continually improve products and as such we reserve the right to alter data, specications and component parts without prior notice.
IMPORTANT: No liability is accepted for incorrect use of this product.
WARRANTY: Guarantee is 12 months from purchase date, proof of which will be required for any claim.
Sole UK Distributor, Sealey Group.
Kempson Way, Suffolk Business Park,
Bury St. Edmunds, Suffolk.
IP32 7AR
www.sealey.co.uk
sales@sealey.co.uk
01284 757500
01284 703534
Environmental Protection
Recycle unwanted materials instead of disposing of them as waste. All tools, accessories and packaging should be
sorted, taken to a recycling centre and disposed of in a manner which is compatible with the environment.
When the product becomes completely unserviceable and requires disposal, drain off any fluids (if applicable)
into approved containers and dispose of the product and the fluids according to local regulations.
WEEE Regulations
Dispose of this product at the end of its working life in compliance with the EU Directive on
Waste Electrical and Electronic Equipment (WEEE). When the product is no longer required, it must be disposed
of in an environmentally protective way. Contact your local solid waste authority for recycling information.
Battery Removal
See section 4.1
Under the Waste Batteries and Accumulators Regulations 2009, Jack Sealey Ltd are required to inform potential
purchasers of products containing batteries (as dened within these regulations), that they are registered wih Valpak’s
registered compliance scheme. Jack Sealey Ltd’s Batteries Producer Registration Number (BPRN) is BPRN00705.
Parts support is available for this product. To obtain a parts listing and/or diagram,
please log on to www.sealey.co.uk, email sales@sealey.co.uk or telephone 01284 757500.
© Jack Sealey Limited
Original Language Version
CP6005, CP6015 Issue: 1 - 28/02/17
Page 4

WARNING! – Risk of Hand Arm Vibration Injury.
This tool may cause Hand Arm Vibration Syndrome if its use is not managed adequately.
This tool is subject to the vibration testing section of the Machinery Directive 2006/42/EC.
This tool is to be operated in accordance with these instructions.
Measured vibration emission value (a): ..........1.69 m/s²
Uncertainty value (k):...........................1.5 m/s²
Please note that the application of the tool to a sole specialist task may produce a different average vibration emission. We recommend that a
specific evaluation of the vibration emission is conducted prior to commencing with a specialist task.
A health and safety assessment by the user (or employer) will need to be carried out to determine the suitable duration of use for each tool.
NB: Stated Vibration Emission values are type-test values and are intended to be typical.
Whilst in use, the actual value will vary considerably from and depend on many factors.
Such factors include; the operator, the task and the inserted tool or consumable.
NB: ensure that the length of leader hoses is sufficient to allow unrestricted use, as this also helps to reduce vibration.
The state of maintenance of the tool itself is also an important factor, a poorly maintained tool will also increase the risk of Hand Arm Vibration
Syndrome.
Health surveillance.
We recommend a programme of health surveillance to detect early symptoms of vibration injury so that management procedures can be modified
accordingly.
Personal protective equipment.
We are not aware of any personal protective equipment (PPE) that provides protection against vibration injury that may result from the
uncontrolled use of this tool. We recommend a sufficient supply of clothing (including gloves) to enable the operator to remain warm and dry and
maintain good blood circulation in fingers etc. Please note that the most effective protection is prevention, please refer to the Correct Use and
Maintenance section in these instructions. Guidance relating to the management of hand arm vibration can be found on the HSE website
www.hse.gov.uk - Hand-Arm Vibration at Work.
 Loading...