

Page 1
INSTRUCTIONS FOR:
CORDLESS LITHIUM-ION
ANGLE GRINDER 12V
MODEL No: CP4004
Thank you for purchasing a Sealey product. Manufactured to a high standard this product will, if used according to these instructions and properly
maintained, give you years of trouble free performance.
IMPORTANT: PLEASE READ THESE INSTRUCTIONS CAREFULLY. NOTE THE SAFE OPERATIONAL REQUIREMENTS, WARNINGS, AND
CAUTIONS. USE THIS PRODUCT CORRECTLY, AND WITH CARE FOR THE PURPOSE FOR WHICH IT IS INTENDED. FAILURE TO DO SO MAY
CAUSE DAMAGE AND/OR PERSONAL INJURY AND WILL INVALIDATE THE WARRANTY.
1. SAFETY INSTRUCTIONS
1.1 GENERAL SAFETY.
Disconnect the battery from the grinder unit before changing
accessories, servicing or performing any maintenance.
Maintain the grinder and battery in good condition. Check
moving parts alignment on a regular basis.
Replace or repair damaged parts. Use an authorised service
agent and recommended parts only. Unauthorised parts may
be dangerous and will invalidate the warranty.
Ensure the grinder is switched off before installing the battery.
Keep the grinder, battery and charger clean for best and safest
performance.
Remove ill fitting clothing. Remove ties, watches, rings and
other loose jewellery and contain long hair.
Evaluate your working area before using the grinder e.g. ceiling,
floors and enclosures may contain electrical items or water piping.
Ensure battery is correctly inserted into the grinder handle
and latched in place before attempting to switch on grinder.
Secure loose workpieces with a clamp, vice or other adequate
holding device.
Avoid unintentional starting.
Wear approved safety eye protection (standard spectacles are
not adequate).
Maintain correct balance and footing. Ensure the floor is not
slippery and wear non-skid shoes.
Be aware that this grinder does not need to be plugged into the
mains power..
Keep children and unauthorised persons away from the
working area.
DO NOT use the grinder where there are flammable liquids,
solids or gases, such as paint solvents, etc.
DO NOT allow children to operate the grinder.
DO NOT operate the grinder if any parts are missing as this
may cause failure or possible personal injury.
DO NOT hold unsecured workpiece in your hand.
DO NOT carry the grinder with your finger on the power switch.
Keep trigger release button in the locked position.
DO NOT use the grinder for a task it is not designed to perform.
DO NOT operate the grinder when you are tired or under the
influence of alcohol, drugs or intoxicating medication.
DO NOT get the grinder, battery or charger wet or use in damp
or wet locations.
Keep grinder, battery and charger in a safe, dry, childproof area
where the temperature will not exceed 104°F (40°C).
1.2 ELECTRICAL SAFETY.
REGARDING DIRECT MAINS POWER USE WITH THE
CHARGING BASE AND PLUG ONLY.
WARNING! It is the owner’s responsibility to read, understand
and comply with the following electrical instructions:
You must ensure the risk of electric shock is minimised by the
installation of appropriate safety devices. An RCCB (Residual
Current Circuit Breaker) should be incorporated in the main
distribution board. We also recommend that an RCD (Residual
Current Device) is used with all electrical products, particularly
portable equipment which is plugged into an electrical supply
not protected by an RCCB.You must also read and understand
the following instructions concerning electrical safety.
The Electricity At Work Act 1989 requires all portable •
electrical appliances, if used on business premises, to be
tested by a qualified electrician, using a Portable
Appliance Tester (PAT), at least once a year.
The • Health & Safety at Work Act 1974 makes owners of
electrical appliances responsible for the safe condition of the
appliance, and the safety of the appliance operator. If in any
doubt about electrical safety, contact a qualified electrician
Battery Charger Safety Instructions•
WARNING! DO NOT use the charging base to charge any
battery other than that required for the tool. Other types of
batteries may explode!
Inspect the plug, cable and the charging base for wear
and damage to ensure items are safe before connecting to the
mains power supply. If worn or damaged DO NOT use,
immediately replace, or contact a qualified electrician.
Check cables are always protected against short circuit and
overload.
Uncoil the power cable between the plug and the charging base
before use.
DO NOT pull or carry the charging base by the charger power
lead, or pull the plug from the mains socket by the power lead.
DO NOT use any other type of transformer with the charging
base.
DO NOT try to open or dis-assemble the plug or charging base.
DO NOT use the plug to power any other electrical item.
Disconnect the plug from the charging base and the mains
power supply when not in use.
DO NOT expose the charging base to damp or wet conditions
(for indoor use only).
DO NOT pull or carry the charging base by the power lead.
DO NOT operate the charging base if it has been dropped, or
has received a sharp knock, or is damaged. Contact an
authorised service agent.
DO NOT dismantle the charging base as this may cause
damage or personal injury and will invalidate your warranty.
DO NOT insert foreign objects or material into the hole
reserved for the battery.
DO NOT immediately charge a second battery. Consecutive
charging will overheat the charging base. Allow the unit to cool
for 15 minutes before charging the next battery.
Ensure that the insulation on all cables and on the appliance is
safe before connecting it to the power supply.
Ensure that cables are always protected against short circuit
and overload.
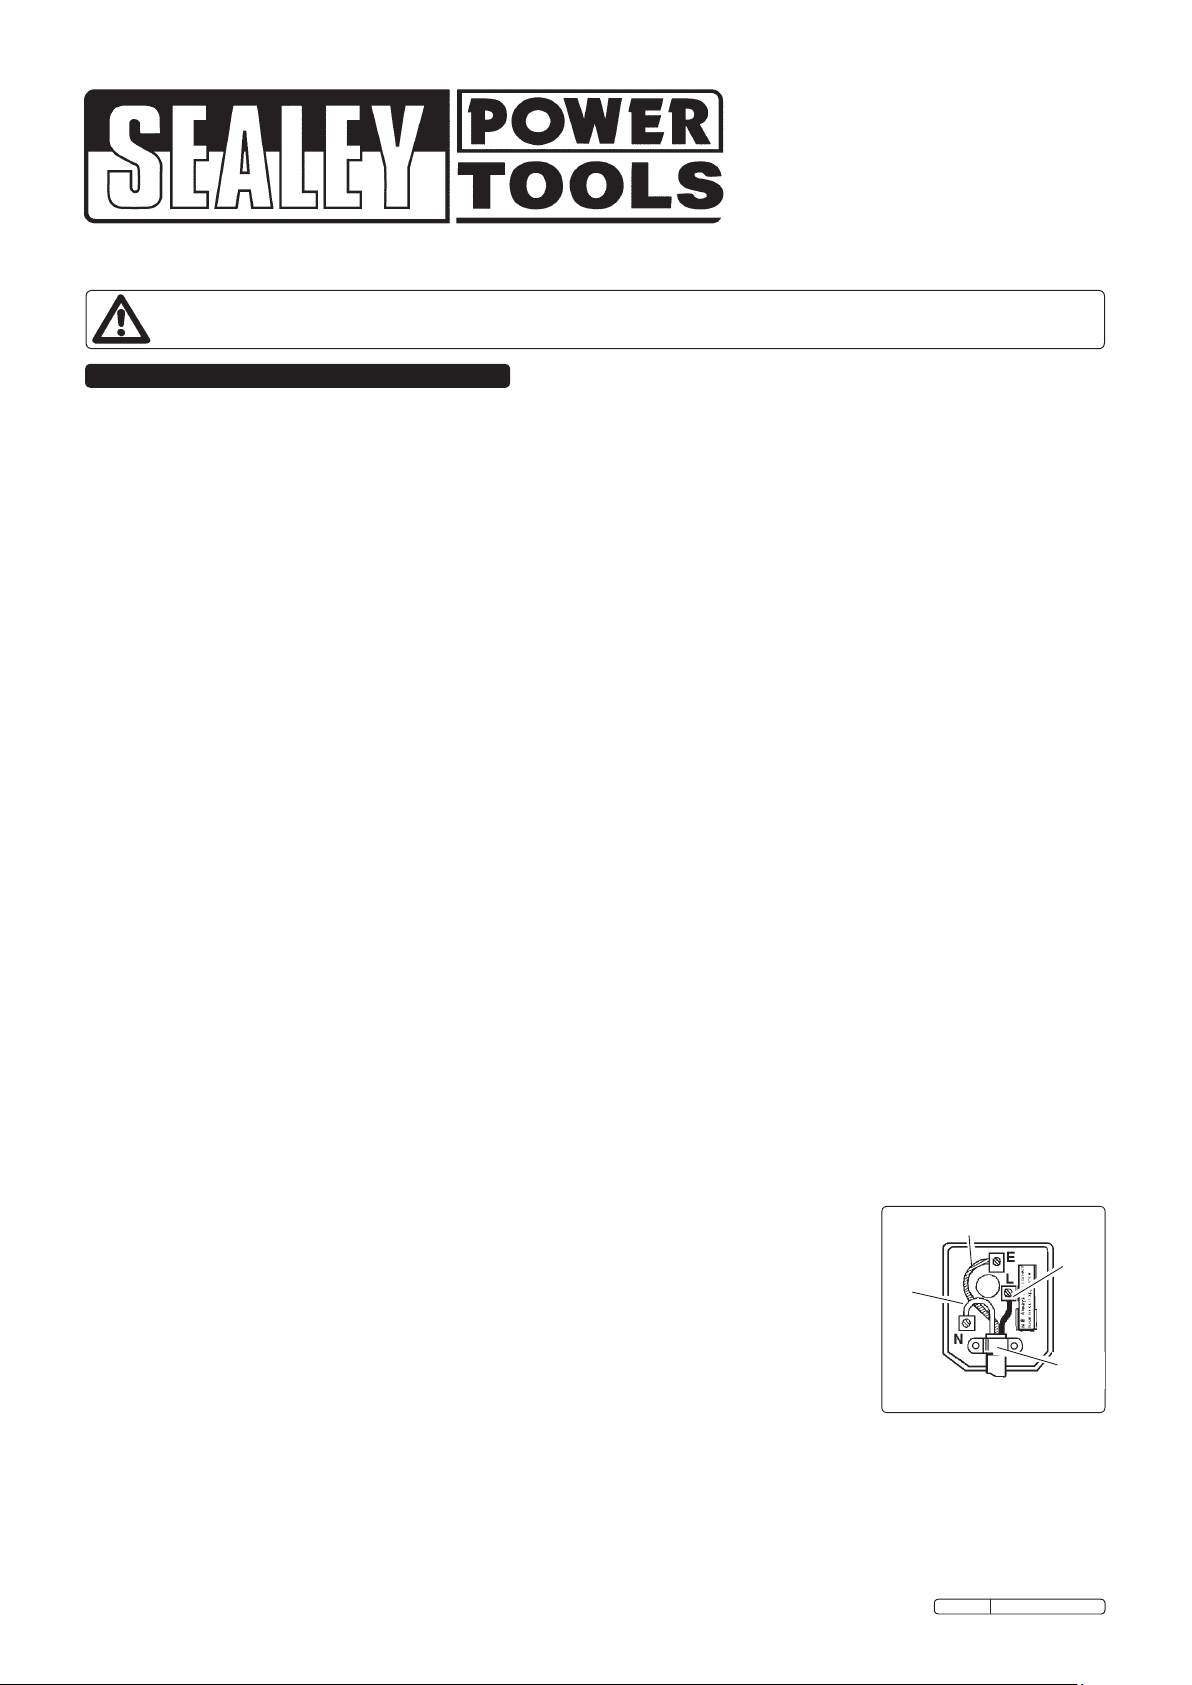
DO NOT use worn or damaged
cables, plugs or connectors.
Immediately have any faulty
item repaired or replaced by a
qualified electrician. When a
Blue
Neutral
Wire
Yellow & Green
Earth Wire
BS1363/A UK 3 pin plug is
damaged, cut the cable just
above the plug and dispose of
the plug safely.
Fit a new plug according to the
following instructions (UK only).
FUSE RATING
5 AMP
Cable
Restraint
a) Connect the GREEN/YELLOW earth wire to the earth
terminal ‘E’.
b) Connect the BROWN live wire to the live terminal ‘L’.
c) Connect the BLUE neutral wire to the neutral terminal ‘N’.
d) After wiring, check that there are no bare wires, that all
wires have been correctly connected, that the cable outer
insulation extends beyond the cable restraint and that the
restraint is tight.
Original Language Version
CP4004 Issue: 2 - 01/03/10
Page 2
Double insulated products, which are always marked with this
symbol ,are fitted with live (brown) and neutral (blue) wires
only.
DO NOT connect either wire to the earth terminal.
1.3 BATTERY SAFETY INSTRUCTIONS.
WARNING! Battery contains lithium-ion which is dangerous.
Handle with care to avoid damage, fire, corrosion or personal
injury.
Charge battery prior to its first use. The battery will have
been shipped in a low charge state.
WARNING! To reduce the risk of burns or fire:
DO NOT Attempt to open, disassemble, modify or service the
battery pack.
DO NOT Crush, puncture, short external contacts or dispose of
in fire or water.
DO NOT Expose to temperatures above 40°C (104°).
Replace only with the battery pack designated for this product.
Recycle or dispose of used battery as stipulated by local
regulation.
Use only the charging base provided to charge the grinder
battery.
DO NOT attempt recharging the battery by means of an engine
generator or a DC power source.
WARNING! Dispose of spent batteries correctly as they contain
Lithium-ion. DANGER! DO NOT attempt to disassemble the
battery. For safety and environmental reasons DO NOT discard
in domestic waste or by burning. ONLY discard or recycle
according to local authority regulations.
WARNING! DO NOT allow a leaking battery to contact your
person. If you come into contact with battery liquid take the
following immediate action:
a) Skin contact: Wash immediately with soap and water,
then wash flesh in either lemon juice or vinegar.
b) Eye contact: Wash with a strong solution of boric acid,
and seek immediate medical attention.
2. INTRODUCTION & SPECIFICATIONS
Slim, compact and lightweight design. Features spindle lock for
simple and quick disc changes. Easily adjustable disc guard. Soft
grip handle for added comfort and control. Powered by lithium-ion
battery (sold separately, order Model No: CP40BP), which maintains
a high energy density level with a flat discharge curve - performing
better and longer than a conventional Ni-CD/Ni-MH battery. No
memory effect allows the battery to recover from a deep discharge
with no tendency to reduce overall capacity. Requires 1 hour mains
charger (sold separately, order Model No: CP40MC). Suitable for
grinding and cutting applications in the workshop or on site.
No Load Speed: .................................................................. 0-7000rpm
Disc Size: ................................................................................. 100mm
Weight: .........................................................................................0.9kg
Battery Model No (not included):.............................................CP40BP
Mains Charger Model No (not included): ...............................CP40MC
Noise Power: ...........................................................................86.6dBA
Noise Pressure: .......................................................................75.6dBA
Vibration: ................................................................................. 5.1 m/s²
fig.1
Original Language Version
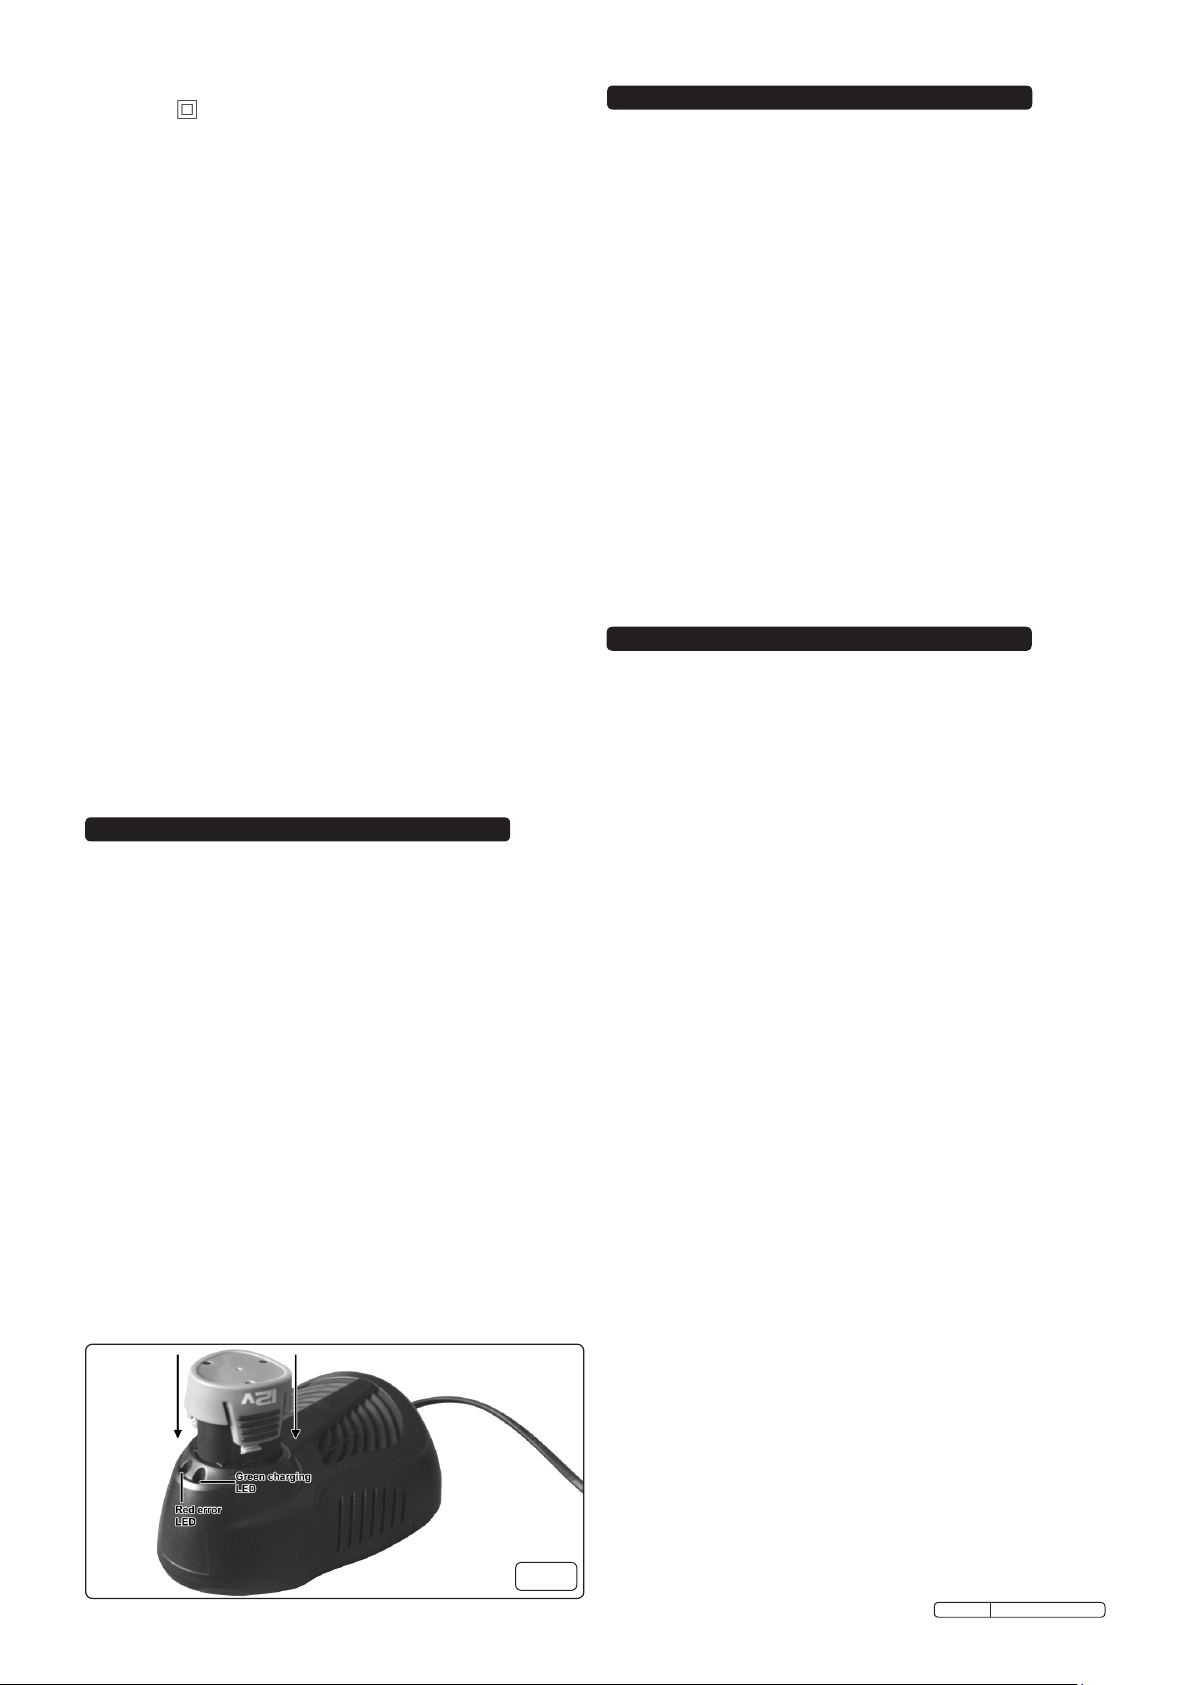
3. CHARGING
CHARGING THE BATTERY (NOT INCLUDED, ORDER
MODEL NO: CP40BP)
Note: When new, the battery will have been shipped in a low charge
state. Fully charge the battery before using your tool
3.1 To remove the battery from the grinder, depress the two side
clips on the battery. DO NOT touch the metal battery terminals.
3.2 Take the base charger (Not included, order model No:
CP40MB) and plug it into the mains.
3.3 The battery is designed to fit into the charger one way
only. This is to ensure that the positive (+) and negative (-)
polarities correspond. Insert the battery and press lightly to
seat the battery firmly into the charging base, as in fig.1.
WARNING! DO NOT try to force battery into the base the
wrong way around.
3.4 When the battery is inserted into the charger the green LED
(fig.1) will begin to flash, this indicates the battery is charging.
3.5 When the green LED (fig.1) stops flashing and is solid the
battery is fully charged.
3.6 If the red LED (fig.1) illuminates the battery is too hot to charge
and will need to cool down before the charging cycle begins.
3.7 If the red LED (fig.1) flashes this means either the battery is
not seated in the charger correctly or the battery is defective
and should be replaced.
3.8 Remove the battery from the charger. Switch off and remove
the plug from the mains. Push the battery back into the grinder.
4. OPERATION
GRINDER INSTRUCTIONS. (Ensure you have read,
understood and comply with all the safety instructions)
WARNING! Always wear approved safety glasses when
grinding.
4.1 Disc Installation
4.1.1 The guard may be orientated at any angle to suit the grinding
task required and should be positioned to allow maximum
working performance whilst providing maximum personal
protection for the operator.
4.1.2 Loosen the clamp on the guard by releasing the lever (fig.2).
Slide over the grinder housing.
Note: Inside of the guard clamp collar is a small pip which must
be aligned with a notch in the housing.
4.1.3 Rotate the guard around the head of the grinder into the
desired position for the task.
4.1.4 Close the clamp lever securing the clamp in place, if the
guard is too loose tighten the guard tightening nut (fig.2) and
retry the clamp.
4.2 Attaching a Grinding/Cutting Disc
4.2.1 Lay the grinder on it’s back and place the clamping flange
onto the centre spindle with the raised ring facing upwards.
Align the grooves in the flange to the cutouts in the spindle and
push into place.
4.2.2 Place the grinding (or cutting) disc over the spindle and onto
the clamping flange.
4.2.3 When using a grinding disc with a depressed centre portion
Screw the disc retaining nut onto the spindle with the raised
ring facing downwards.
4.2.4 When using flat cutting discs and cutting discs with a
depressed centre portion, screw the disc retaining nut onto the
spindle with the raised ring facing upwards as in fig.3.
4.2.5 Stop the spindle from turning by pushing in and holding the
spindle lock button (fig.2).
4.2.6 Lock the grinding disc into place by tightening the disc retaining
nut with the supplied wrench.
4.3 General Grinding/Cutting
4.3.1 To start the grinder push the 'On/Off' button forward. Push
the 'On' button down to lock into the 'On' position.
4.3.2 To stop the grinder release the 'On/Off' button or press the
back of the button to release from the locked on position.
DO NOT switch the grinder on whilst the disc is in contact with
the work piece. Bring the disc to the work piece when running.
4.3.3 Allow the disc to reach full speed before starting to grind/cut.
4.3.4 Grind flat surfaces at an angle of between 30° for rough areas
and 15° for finishing.
4.5 When finished remove the battery and clean the grinder with a
dampened cloth.
CP4004 Issue: 2 - 01/03/10
Page 3

fig.3
fig.2
Risk of Hand Arm Vibration Injury
The CP4004 Cordless Angle Grinder, when operated in accordance with these instructions and tested in accordance with
1:1993, ISO 8662-1:1988
and
BS EN ISO 8662-4:1995, ISO 8662-4:1994
results in the following vibration emission declared in accordance
with BS EN12096: 1996.
Measured vibration emission value: .....2.8m/s²
Uncertainty: ........................1.5m/s²
These values are suitable for comparison with emission levels of other tools that have been subject to the same test.
This tool may cause hand-arm vibration syndrome if its use is inadequately managed.
Recommended Measures to reduce risk of hand-arm vibration syndrome:
This item represents a low Hand Arm Vibration risk to users. The calculated maximum usage period exceeds 8 hours. We recommend
appropriate safety equipment is utilised and regular breaks for the operator are employed to reduce any residual risk of fatigue or repetitive
strain injury.
BS EN 28662-
Environmental Protection
Recycle unwanted materials instead of disposing of
them as waste. All tools, accessories and
packaging should be sorted, taken to a recycle
centre and disposed of in a manner which is
compatible with the environment.
NOTE: It is our policy to continually improve products and as such we reserve the right to alter data, specifications and component parts without prior notice.
IMPORTANT: No liability is accepted for incorrect use of this product.
WARRANTY: Guarantee is 12 months from purchase date, proof of which will be required for any claim.
INFORMATION: For a copy of our latest catalogue and promotions call us on 01284 757525 and leave your full name and address, including postcode.
When the product is no longer required, it must be
disposed of in an environmentally protective way.
Sole UK Distributor, Sealey Group,
Kempson Way, Suffolk Business Park,
Bury St. Edmunds, Suffolk,
IP32 7AR
Original Language Version
Battery Removal: Unclip the battery from the tool
and dispose of according to local authority
guidelines. Rechargeable battery contains
Li
Lithium-ion (Li-ion). It is recyclable. Take to your
local recycling centre to be disposed of properly.
01284 757500
01284 703534
www.sealey.co.uk
Web
sales@sealey.co.uk
email
CP4004 Issue: 2 - 01/03/10
 Loading...