

Page 1
INSTRUCTIONS FOR:
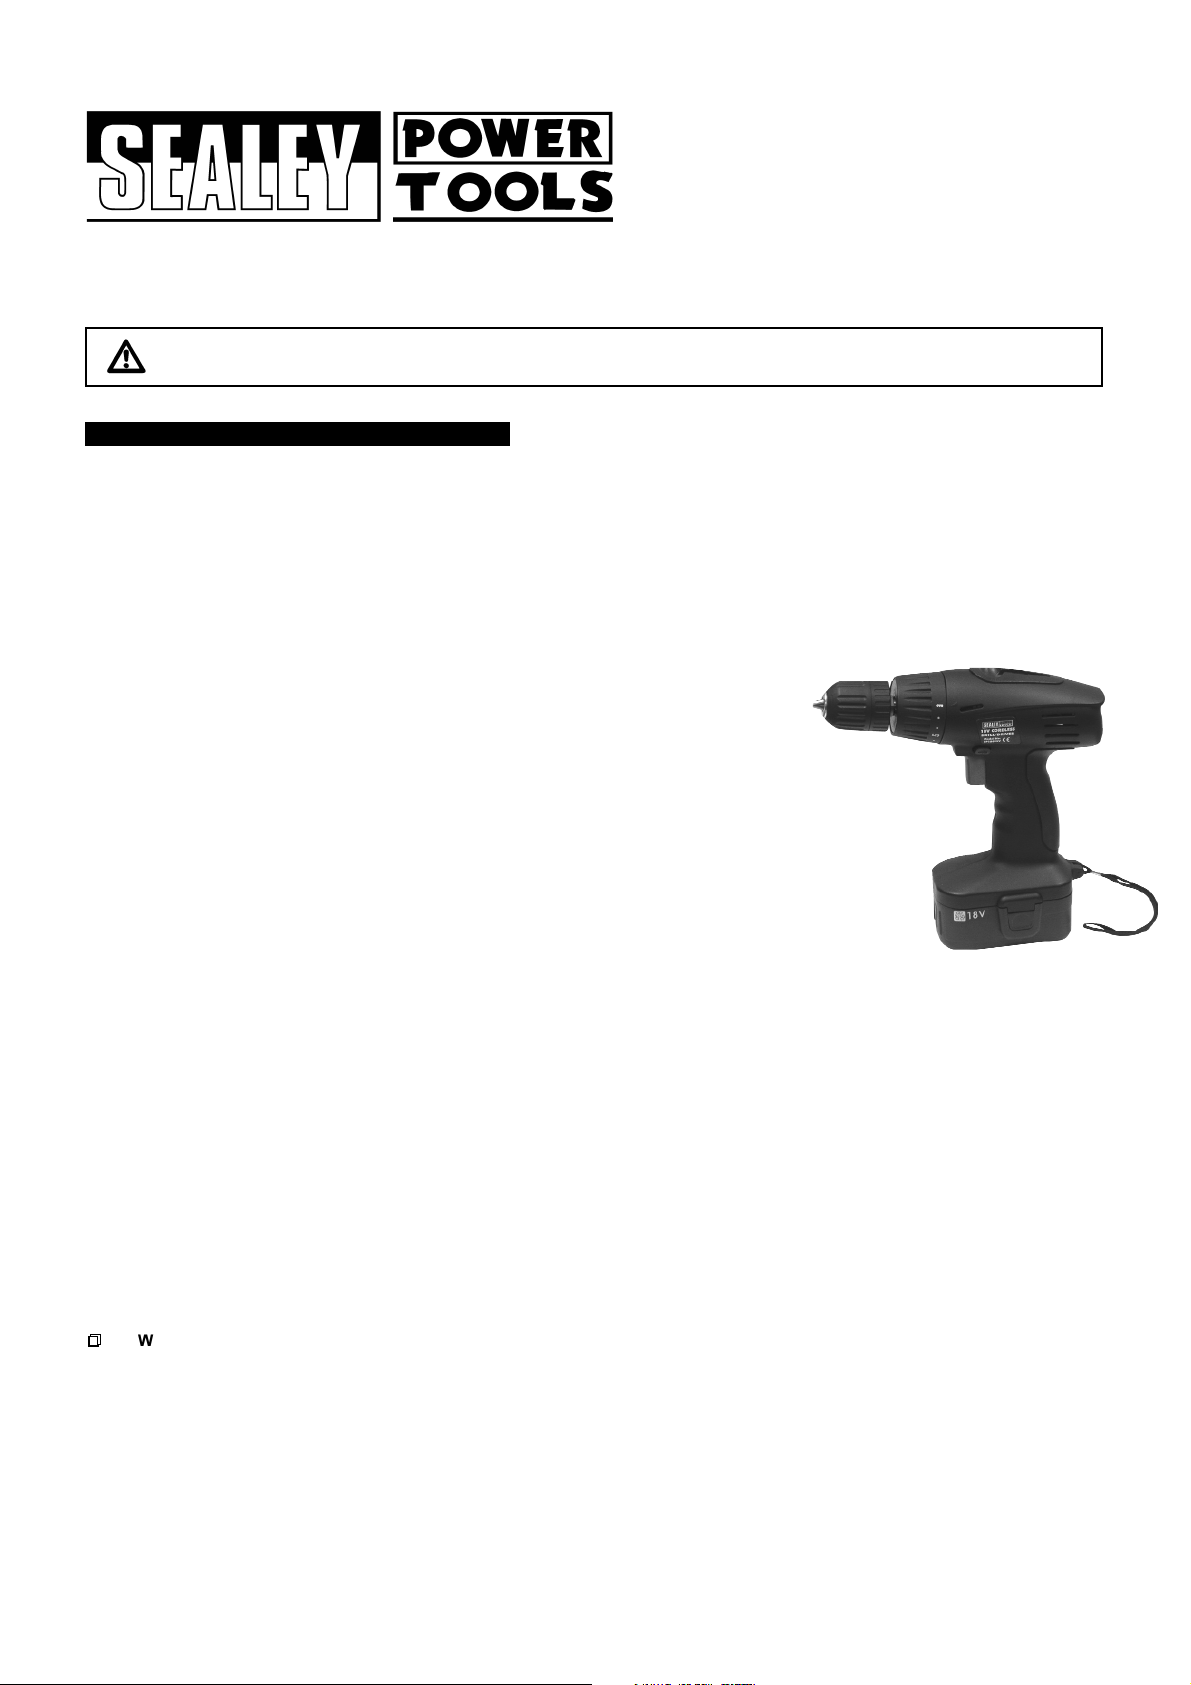
CORDLESS DRILL/DRIVER
18V - 1HR CHARGE
MODEL: CP1801V
Thank you for purchasing a Sealey product. Manufactured to a high standard this product will, if used
according to these instructions and properly maintained, give you years of trouble free performance.
IMPORTANT: PLEASE READ THESE INSTRUCTIONS CAREFULLY. NOTE THE SAFE OPERATIONAL REQUIREMENTS, WARNINGS, AND
CAUTIONS. USE THIS PRODUCT CORRECTLY, AND WITH CARE FOR THE PURPOSE FOR WHICH IT IS INTENDED. FAILURE TO DO SO
MAY CAUSE DAMAGE AND/OR PERSONAL INJURY AND WILL INVALIDATE THE WARRANTY.
1. SAFETY INSTRUCTIONS
1.1 GENERAL SAFETY
3 Disconnect the drill from the battery unit before changing accessories, servicing or performing any maintenance.
3 Maintain the drill and battery in good condition. Check moving parts alignment on a regular basis.
3 Replace or repair damaged parts. Use an authorised service agent and recommended parts only. Unauthorised parts may be
dangerous and will invalidate the warranty.
3 Ensure the drill is switched off before installing the battery pack.
3 Keep the drill and charger clean for best and safest performance.
3 Remove ill fitting clothing. Remove ties, watches, rings and other loose jewellery and contain long hair.
3 Evaluate your working area before using the drill e.g. ceiling, floors and enclosures may contain electrical items or water piping.
3 Ensure battery pack is correctly inserted into the drill handle and latched in place before attempting to switch on drill.
3 Secure loose workpieces with a clamp, vice or other adequate holding device.
3 Avoid unintentional starting.
3 Wear approved safety eye protection (standard spectacles are not adequate).
3 Maintain correct balance and footing. Ensure the floor is not slippery and wear non-skid shoes.
3 Be aware that this drill does not need to be plugged into the mains power.
3 Keep chuck direction switch in the locked position until the drill is required for use.
3 Keep children and unauthorised persons away from the working area.
7 DO NOT use the drill where there are flammable liquids, solids or gases, such as paint solvents, etc.
7 DO NOT allow children to operate the drill.
7 DO NOT operate the drill if any parts are missing as this may cause failure and/or personal injury.
7 DO NOT hold unsecured workpiece in your hand.
7 DO NOT leave the drill operating unattended.
7 DO NOT carry the drill with your finger on the power switch. Keep chuck direction switch in the locked position.
7 DO NOT use the drill for a task it is not designed to perform.
7 DO NOT operate the drill when you are tired or under the influence of alcohol, drugs or intoxicating medication.
7 DO NOT get the drill or battery charger wet or use in damp or wet locations.
3 Keep drill and charger in the case and store in a safe, dry, childproof area where the temperature will not exceed 104°F (40°C).
1.2 BATTERY SAFETY INSTRUCTIONS.
p WARNING! Battery contains nickel-cadmium which is dangerous. Handle with care to avoid damage, fire, corrosion or personal injury.
3 Charge battery prior to first use. The battery pack will have been shipped in a low charge state.
3 Use only the charger provided to charge the drill battery.
7 DO NOT charge battery when room temperature is below 50°F (10°C) or above 104°F (40°C).
7 DO NOT attempt recharging the battery by means of an engine generator or a DC power source.
7 DO NOT short-circuit the battery by linking both terminals with a metal object, or your fingers etc.
7 DO NOT store the battery (or drill) in locations where the temperature may exceed 104°F (40°C) such as outside sheds, above
heaters, or metal buildings in summer.
p WARNING! Dispose of spent batteries correctly as they contain nickel-cadmium. DANGER! DO NOT attempt to disassemble the
battery pack. For safety and environmental reasons DO NOT discard in domestic waste or by burning. ONLY discard or recycle
according to local authority regulations.
p WARNING! DO NOT allow a leaking battery to contact your person. If you come into contact with battery liquid take the following
immediate action:
p a) Skin contact: Wash immediately with soap and water, then wash flesh in either lemon juice or vinegar.
p b) Eye contact: Wash with a strong solution of boric acid, and seek immediate medical attention.
1.3 ELECTRICAL SAFETY.
REGARDING DIRECT MAINS POWER USE WITH THE CHARGER.
p
p
WARNING! It is the owners responsibility to read, understand and comply with the following electrical instructions:
You must ensure the risk of electric shock is minimised by the installation of appropriate safety devices. An RCCB (Residual Current
Circuit Breaker) should be incorporated in the main distribution board. We also recommend that an RCD (Residual Current Device) is
used with all electrical products, particularly portable equipment which is plugged into an electrical supply not protected by an RCCB.
You must also read and understand the following instructions concerning electrical safety.
1.3.1 The Electricity At Work Act 1989 requires all portable electrical appliances, if used on business premises, to be tested by
a qualified electrician, using a Portable Appliance Tester (PAT), at least once a year.
1.3.2 The Health & Safety at Work Act 1974 makes owners of electrical appliances responsible for the safe condition of the appliance,
and the safety of the appliance operator. If in any doubt about electrical safety, contact a qualified electrician.
CP1801V - 1 - 060105
Page 2
1.3.3 You must ensure that you:
3 Inspect the charger and cable for wear and damage to ensure items are safe before connecting to the mains power supply. If worn
or damaged DO NOT use, immediately replace, or contact a qualified electrician.
3 Check cables are always protected against short circuit and overload.
3 Important: Check that the voltage marked on the charger is the same as the power supply to be used.
7 DO NOT pull or carry the charger by the power lead, or pull the plug from the mains socket by the power lead.
7 DO NOT use any other type of charger.
7 DO NOT try to open or dis-assemble the charger.
7 DO NOT get the charger wet, or use in wet, damp conditions (for indoor use only).
1.4 BATTERY CHARGER SAFETY INSTRUCTIONS.
p WARNING! DO NOT use the charger to charge any battery other than that supplied for the drill. Other types of batteries may explode!
3 All mains electrical supply safety features must be followed as described in 1.3. above.
3 Disconnect the charger from the mains power supply when not in use.
7 DO NOT operate the charger if it has been dropped, or has received a sharp knock, or is damaged. Contact an authorised service
agent.
7 DO NOT insert foreign objects or material into the hole reserved for the battery.
7 DO NOT force the battery into the charger. The battery will only fit one way to ensure correct polarity alignment.
7 DO NOT immediately charge a second battery. Consecutive charging will overheat the charger. Allow the unit to cool for 15 minutes
before charging the next battery.
7 DO NOT attempt to connect two chargers together.
3 Store the charger in the same manner as battery, see section 1.2.
2. INTRODUCTION & SPECIFICATION
Electronic variable speed control, forward and reverse.
15 Torque settings plus Drill.
1 Hour charger with BS approved 3-pin plug.
Variable Speeds: . . . . . . . . . . . . . . . . . . . . . . . . . . . . .0-600rpm
Chuck Size: . . . . . . . . . . . . . . . . . . . . . . . . . . . . . . .10mm(1/2)
Battery Model No: . . . . . . . . . . . . . . . . . . . . . . . . . . .CB18VBP
Weight Inc. Battery: . . . . . . . . . . . . . . . . . . . . . . . . . . . . . .1.8kg
Charger Part No. . . . . . . . . . . . . . . . . . . . . . . . . . . .CP1801VC
10mm Keyless chuck.
Bit holder.
Supplied in carry-case complete with accessories.
Accessories:
Drills: . . . . . . . . . . . . . . . . . . . . . . . . . . . .1.5, 2.5, 3, 4, 5, 6mm,
Screwdriver Bits: . . . . . . . . . . . . . . . . . . . . . . . .Slotted 5, 6mm,
. . . . . . . . . . . . . . . . . . . . . . . . . . . . . . . . . . . . . .Phillips #1, #2,
. . . . . . . . . . . . . . . . . . . . . . . . . . . . . . . . . . . . . . . .Pozi #1, #2
. . . . . . . . . . . . . . . . . . . . . . . . . . . . . . . . . .Magnetic Bit Holder
3. OPERATING INSTRUCTIONS
Note: When new, the battery will have been shipped in a low charge state. It will take longer to charge the battery initially (about 8 hours)
and several subsequent charges may also take a little longer than when the battery reaches its optimum performance.
3.1 CHARGING THE BATTERY PACK
3.1.1 To remove the battery pack from the drill, depress the two side clips on the battery.
Do not touch the metal battery terminals.
3.1.2 Place drill in carrying case and remove the battery charger.
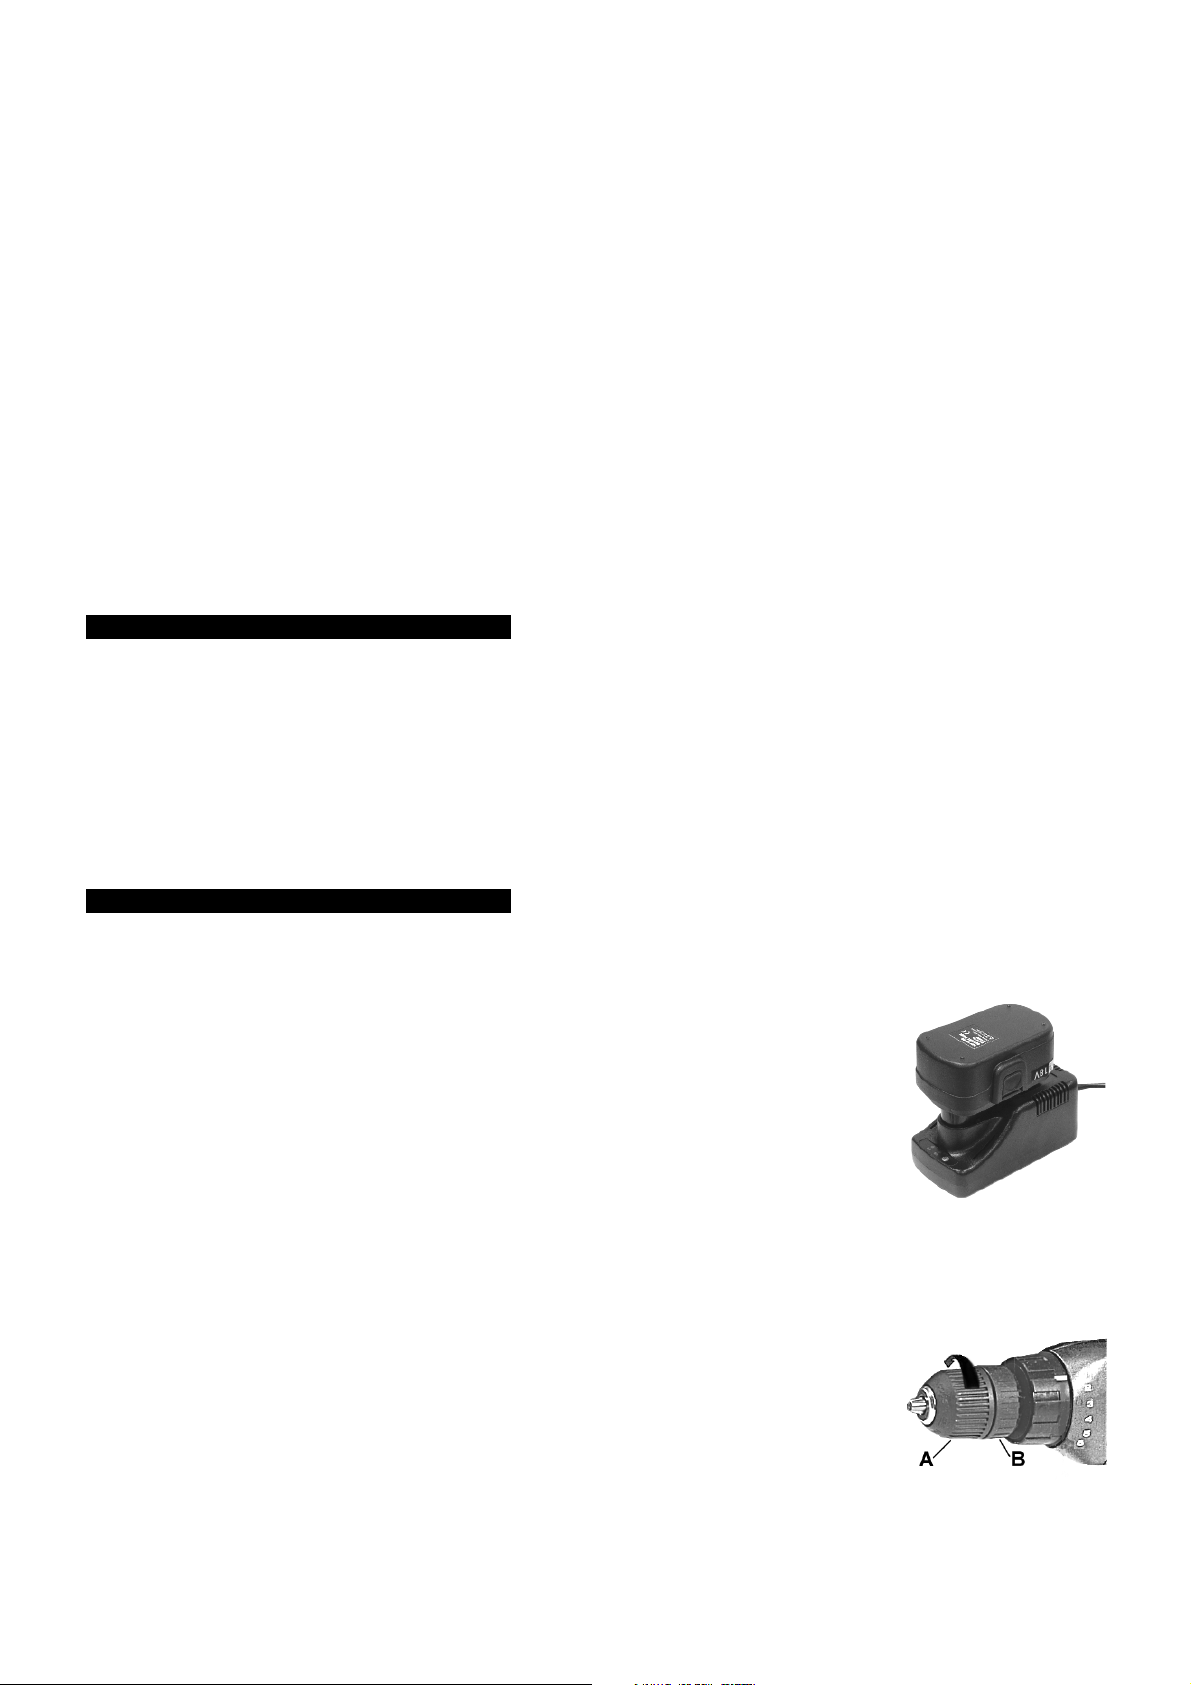
3.1.3 Place the charger on a safe flat surface and connect to the mains.
3.1.4. The battery is designed to fit into the charger one way only. This is to ensure that the
positive (+) and negative (-) polarities correspond. Align the + and - polarity marks on the base
of the battery with the + and - marks on the charger, insert the battery and press lightly to
seat the battery firmly into the charger, as in fig.1.
WARNING! DO NOT try to force battery into the charger with crossed polarities.
3.1.5 The green charge light will come on when the battery is inserted into the charger. Press the SET
button to initiate charging, the red light will now illuminate.
3.1.6 When charging is complete the green light will illuminate. Remove the battery from the charger
and the green light will go out. Switch off and unplug the charger from the mains. Push the battery
into the drill base until it latches into place. The drill is now ready for use.
3.1.7 Place the charger back into the case.
Note: Attempting to recharge a battery immediately after use may result in the red charge light not coming on. In such a case allow the
battery to cool for a time and try again.
3.2 DRILLING INSTRUCTIONS. (Ensure you have read, understood and comply with all the safety instructions)
WARNING! always wear approved safety glasses when drilling.
3.2.1 Preparation
1. Open the chuck by holding the rear collar (fig 2 B) and turning the front chuck collar (fig 2 A)
See direction arrow on chuck.
2. Insert the required drill bit into the full length of the chuck and tighten.
3. Check the drill to ensure the direction switch is in the mid (lock) position.
4. Insert the battery pack into the base of the drill and latch into place.
5. The speed of the drill is controlled by the electronic variable speed switch. After moving
direction switch to forward (or reverse) press the speed switch gently for a slow speed and progressively increase the pressure on
the switch to produce correspondingly higher speeds (try before starting to drill).
fig 1
fig 2
CP1801V - 1 - 060105
Page 3

3.2.2 Torque Setting
Torque is the amount of turning force applied when you use the drill.
Torque setting 1 (fig 3 C) is the lowest and will apply the least effort - to the final turns of a screw, for example.
The torque becomes progressively greater with increased setting numbers, up to a maximum of 6.
The combination of variable speed and torque gives maximum drilling efficiency.
Suggested torque settings: 1 - Small screws 4 - Screws into hard wood
2 - Screws into soft material 5 - Regular drilling
3 - Screws into hard material 6 - Heavy drilling
fig 3
3.2.3 To Drill Holes
Lock a pilot drill (smaller size drill than the finished hole size) into the chuck.
Select an appropriate torque setting (para. 3.2.2.).
Check to confirm the turning direction is correct.
DO NOT attempt to change direction whilst the drill is running.
Drill a pilot hole in the middle of the spot where the final hole is to be drilled.
Insert the final sized drill bit. Hold drill firmly and place the drill bit at the entrance of the pilot hole and press the trigger as in 3.2.1.
If the drill becomes stuck, release the switch and place the drill in reverse by pressing the direction switch to the other side. If this
does not work, gently work the drill bit free. If the chuck stops turning, check the torque setting.
3.2.4 As a Screw or Bolt Driver
Lock appropriate tool bit in the chuck, set appropriate torque and proceed with the task. To remove screws, bolts, etc., switch the drill
to reverse.
3.2.5 When you have finished working, remove the bit from the chuck, clean drill and bit and store in the carry case.
4. PARTS LIST
ITEM PART NO. DESCRIPTION
01. CP12035V.01 SCREW
02. CP12035V.02 CHUCK
03. CP12035V.03 SCREW
04. CP12035V.04 RING
05. CP12035V.05 TORQUE SETTING RING
06. CP12035V.06 RING SPACER
07. CP12035V.07 SPRING
08. CP12035V.08 SPACER
09. CP12035V.09 STEEL BALL
10. CP12035V.10 GEAR BOX
11. CP12035V.11 SCREW
12. CP12035V.12 CONNECTION CLIP FOR GEAR
13. CP12035V.13 MOTOR GEAR
14. CP12035V.14 SCREW
15. CP12035V.15 MOTOR
16. CP12035V.16 HOUSING (RIGHT)
17. CP12035V.17 SCREW
18. CP12035V.18 SWITCH ASSY
19. CP12035V.32 HOUSING (LEFT)
20. CB18VBP BATTERY 18V
21. CP1801VC MAINS ADAPTOR & CHARGER
Issue: 1
Issue Date: 060105
NOTE: It is our policy to continually improve products and as such we reserve the right to alter data, specifications and component parts
without prior notice. IMPORTANT: No liability is accepted for incorrect use of this equipment. WARRANTY: Guarantee is 12 months from
purchase date, proof of which will be required for any claim. INFORMATION: For a copy of our latest catalogue and promotions call us on
01284 757525 and leave your full name and address, including postcode.
Declaration of Conformity We, the sole importer into the UK, declare that the products listed here are in conformity with the following standards and directives.
CORDLESS DRILL/DRIVER AND
Models: CP1801V, CP1801VC
CHARGER
73/23/EEC LV Directive
89/336/EEC EMC Directive
93/68/EEC Marking Directive
The construction files for these products are held by the Manufacturer and may be inspected,
by a national authority, upon request to Jack Sealey Ltd.
Signed by Mark Sweetman
6th January 2005
For Jack Sealey Ltd.
Sole importer into the UK
of Sealey Power Tools.
Sole UK Distributor, Sealey Group, Bury St. Edmunds, Suffolk.
01284 757500
01284 703534
www.sealey.co.uk
Web
sales@sealey.co.uk
email
CP1801V - 1 - 060105
 Loading...