

Page 1
INSTRUCTIONS FOR:
CERAMIC HEATER 1.4/2.8KW
MODEL No: CH2800
Thank you for purchasing a Sealey product. Manufactured to a high standard this product will, if used according to these instructions and properly
maintained, give you years of trouble free performance.
IMPORTANT: PLEASE READ THESE INSTRUCTIONS CAREFULLY. NOTE THE SAFE OPERATIONAL REQUIREMENTS, WARNINGS, AND CAUTIONS.
USE THIS PRODUCT CORRECTLY, AND WITH CARE FOR THE PURPOSE FOR WHICH IT IS INTENDED. FAILURE TO DO SO MAY CAUSE DAMAGE
AND/OR PERSONAL INJURY AND WILL INVALIDATE THE WARRANTY.
1. SAFETY INSTRUCTIONS
1.1 ELECTRICAL SAFETY
WARNING! It is the responsibility of the owner and the operator to read, understand and comply with the following:
You must check all electrical products, before use, to ensure that they are safe. You must inspect power cables, plugs, sockets and
any other connectors for wear or damage. You must ensure that the risk of electric shock is minimised by the installation of
appropriate safety devices. A Residual Current Circuit Breaker (RCCB) should be incorporated in the main distribution board. We also
recommend that a Residual Current Device (RCD) is used. It is particularly important to use an RCD with portable products that are
plugged into a supply which is not protected by an RCCB. If in any doubt consult a qualified electrician. You may obtain a Residual
Current Device by contacting your Sealey dealer.
You must also read and understand the following instructions concerning electrical safety.
1.1.1 The Electricity at Work Act 1989 requires that all portable electrical appliances, if used on business premises, are tested by a qualified
electrician, using a Portable Appliance Tester (PAT), at least once a year.
1.1.2 The Health & Safety at Work Act 1974 makes owners of electrical appliances responsible for the safe condition of those appliances
and the safety of the appliance operators. If in any doubt about electrical safety, contact a qualified electrician.
1.1.3 Ensure that the insulation on all cables and on the appliance is safe before connecting it to the power supply. See 1.1.1 and 1.1.2
and use a Portable Appliance Tester.
1.1.4 Ensure that cables are always protected against short circuit and overload.
1.1.5 Regularly inspect power supply cables and plugs for wear or damage and check all
connections to ensure that none are loose.
1.1.6 Important: Ensure that the voltage marked on the appliance matches the power supply to be
used and that the plug is fitted with the correct fuse - see fuse rating at right.
1.1.7 DO NOT pull or carry the appliance by the power cable.
1.1.8 DO NOT pull the plug from the socket by the cable.
1.1.9 DO NOT use worn or damaged cables, plugs or connectors. Immediately have any faulty item
repaired or replaced by a qualified electrician. When a BS 1363/A UK 3 pin plug is damaged,
cut the cable just above the plug and dispose of the plug safely.
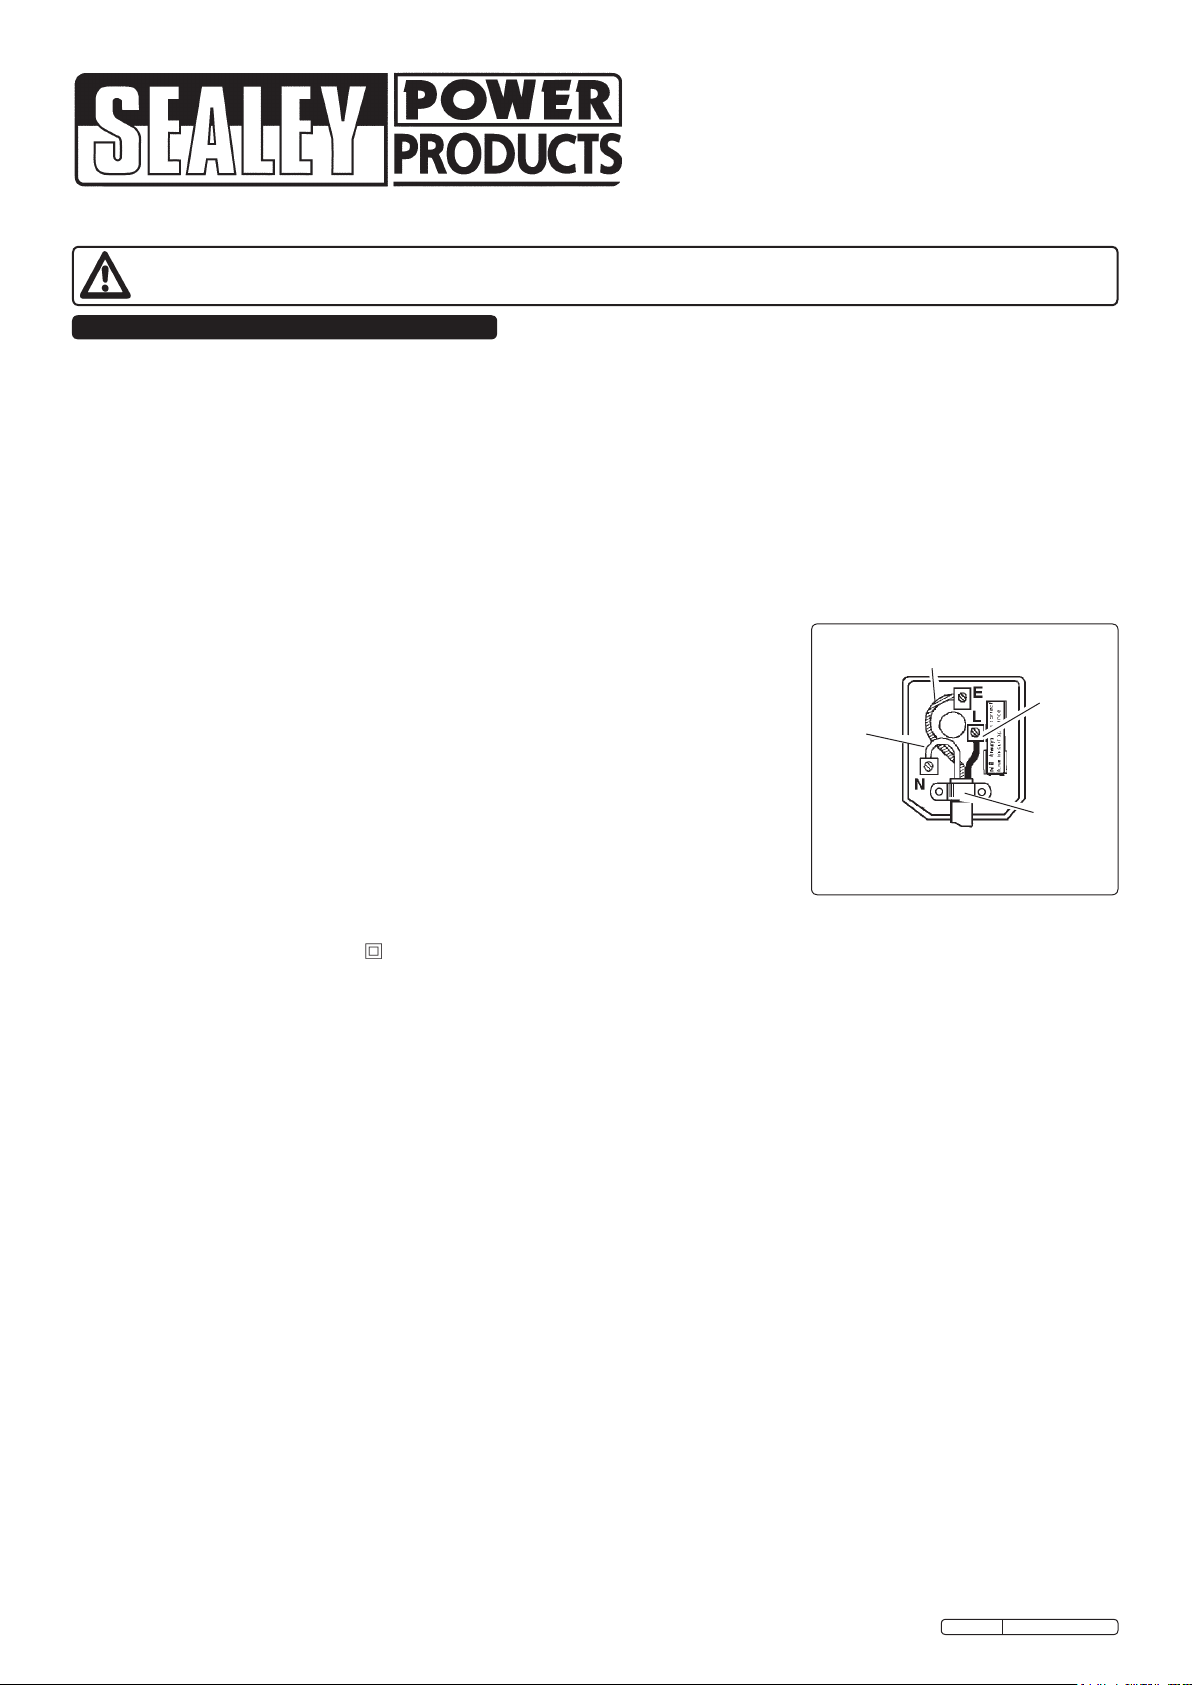
Fit a new plug according to the following instructions (UK only).
a) Connect the GREEN/YELLOW earth wire to the earth terminal ‘E’.
b) Connect the BROWN live wire to the live terminal ‘L’.
c) Connect the BLUE neutral wire to the neutral terminal ‘N’.
d) After wiring, check that there are no bare wires, that all wires have been correctly connected, that the cable outer
insulation extends beyond the cable restraint and that the restraint is tight. Double insulated products, which are always
marked with this symbol , are fitted with live (brown) and neutral (blue) wires only. To rewire, connect the wires as
indicated above - DO NOT connect either wire to the earth terminal.
1.1.10 Products which require more than 13 amps are supplied without a plug. In this case you must contact a qualified electrician to ensure
that a suitably rated supply is available. We recommend that you discuss the installation of an industrial round pin plug and socket with
your electrician.
1.1.11 Use of an extension cord is not recommended. If an extension reel must be used it should be fully unwound before connection. A reel with
an RCD fitted is preferred since any appliance plugged into it will be protected. The cable core section is important and should be at least
2.5mm².
Blue
Neutral
Wire
FUSE RATING
Yellow & Green
Earth Wire
Brown
Live
Wire
Cable
Restraint
13 AMP
1.2 GENERAL SAFETY INSTRUCTIONS
Familiarise yourself with the applications and limitations of the heater.
Ensure that heater body is positioned on a rm, horizontal dry surface.
Keep away from ammable objects/materials/surfaces. This product gets very hot during use. Use in a location where accidental contact
(particularly by children) is unlikely.
Ensure on/off switches are set to ‘off’ before connecting power cord to power supply.
Ensure the heater is in good order and condition before use. If in any doubt do not use the unit and contact an electrician.
Only use recommended attachments and parts. To use unauthorised parts may be dangerous and will invalidate your warranty.
Check that element guard is in place, undamaged and firmly attached.
Keep tools and other items away from the heater when it is in use.
Keep the work area clean and clear of unnecessary items.
Keep children and unauthorised persons away from the heater, as it gets very hot.
Disconnect from mains and allow to cool before moving or attempting any cleaning or maintenance.
DO NOT get the heater wet or use in damp or wet locations or areas where there is condensation.
DO NOT locate the heater below the power outlet.
DO NOT remove plug from mains supply by pulling on power cord.
DO NOT move the heater whilst in operation or even when still warm.
DO NOT touch the heater elements, even when cold.
Always switch off heater, disconnect from power supply and allow cooling for at least one hour before attempting to touch heater cassette
or elements.
DO NOT remove safety guard whilst heater is switched on. Turn off and allow cooling (as above) before servicing.
DO NOT disassemble the heater for any reason. The heater must be checked by qualified personnel only.
DO NOT use this product to perform a task for which it has not been designed.
DO NOT operate heater without safety guard or elements installed.
WARNING! If a fuse blows, ensure it is replaced with an identical fuse type and rating.
DO NOT place any object on the safety guard of the heater cassette at any time.
Original Language Version
CH2800 Issue: 1 - 21/05/10
Page 2
GENERAL SAFETY INSTRUCTIONS CONT.
WARNING! Ensure the heater is at least 200cm from any object.
DO NOT leave unattended.
When not in use, store the heater carefully in a safe, dry, childproof location.
2. INTRODUCTION & SPECIFICATION
Powder coated metal construction with two ceramic heating elements
providing instant heat when required. Ideal for workshop, garages etc.
Features chemically polished reflectors to provide maximum heat
emission. Controllable power output with rocker switches on the side of
the unit. Fitted with sturdy frame and carry handle. Supplied with cable
and BS1363 approved plug.
Max. Power: 2800W
Min. Power: 1400W
Input supply: 230V 13A
Dimensions (W x D x H): 360 x 370 x 555mm
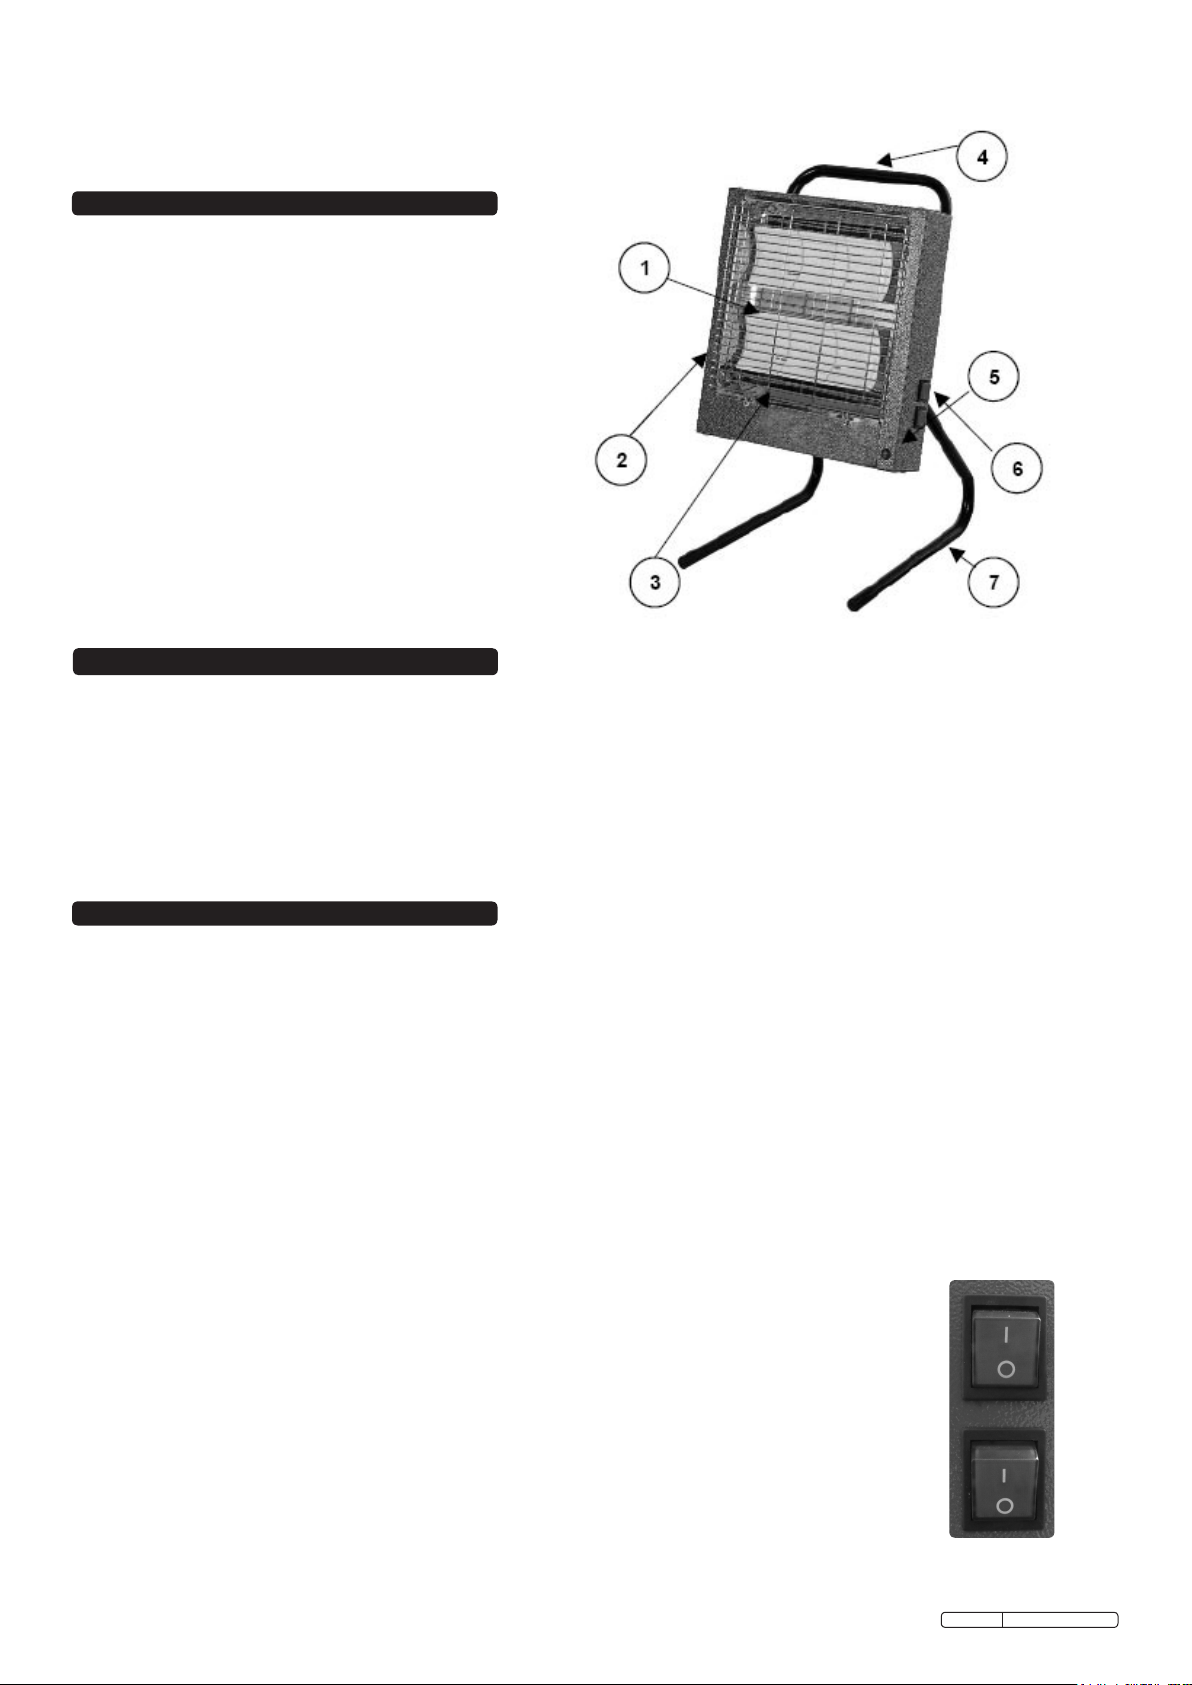
Heater Identification Fig.1
1) Heater Element 5) Power on Neon
2) Safety Guard 6) Power On/Off
3) Heater Body 7) Stand
4) Handle
Fig.1
3. CERAMIC ELEMENTS
DO NOT touch an element just after switching ‘off’ power supply. Allow to cool.
Ensure that the heating elements are:
• Free of fractures and cracks and good general condition.
• Maximum of 1.4kW
WARNING! There are no user serviceable components inside this heater, if an element requires replacing please return to an authorised
Sealey dealer.
4. OPERATION
WARNING! Ensure you read, understand and apply the safety instructions in Section 1 before using the heater.
NOTE! The ceramic element is fragile and therefore it is important that it is not subjected to any unnecessar y shocks or vibration and is not
moved when it is on or until cooled down.
IMPORTANT: DURING RELOCATION, THE HEATER SHOULD REMAIN SWITCHED OFF AND DISCONNECTED FROM THE POWER
SUPPLY.
In the event of the heater being knocked over, a safety cut-out switch, which activates at an angle of 35º (±10º), will disable the heater.
Follow these steps to re-start the heater.
a) Switch ‘off ’ the heater at the on/off switches. As Fig.2.
b) Disconnect the power cord from the power supply.
c) Return the heater to a standing position.
d) If no damage has occurred to elements, replace safety guard if applicable, re-connect power cord to the power supply and switch the
heater back on.
Should the power cord require replacement, a complete wiring loom should be purchased and fitted by a suitably qualified person.
4.1 Ensure the heater is at least 200cm from any object.
4.2 Plug in the heater and switch it on.
4.3 The heater has the following settings: See Fig.2.
Position 0:0 Off position.
Position I:0 Upper element only.
Position 0:I Lower element only.
Position I:I Both elements.
4.4 Make sure the heater plug is disconnected from the mains supply before any cleaning is attempted.
Also allow the heater to cool completely. Do not use water or other liquids, or harsh abrasive cleaners to
clean the heater.
4.5 Clean the exterior with a soft damp cloth with some mild detergent.
4.6 When the heater is no longer required, switch off and unplug the unit.
4.7 To replace any of the element, contact your authorised Sealey dealer.
Fig.2
On
Off
On
Off
Original Language Version
CH2800 Issue: 1 - 21/05/10
Page 3

5. TROUBLE SHOOTING
FAULT DESCRIPTION SUGGESTED SOLUTION
HEATER DOES NOT OPERATE • Check power supply.
OTHERS Consult a qualied electrician or contact a Sealey authorised dealer.
• Check for damage or misalignment.
• Check all wiring connections.
6. MAINTENANCE
ELECTRICAL TEST, MAINTENANCE & STORAGE WARNING: THIS IS A CLASS 1 TESTED APPLIANCE
• When earth bond testing, the readings should be 0.10Ω and below.
• DO NOT perform a ash test, as this will reduce the life of the elements.
• DO NOT use abrasive cleaners or polishes.
• Always switch ‘off’, disconnect the heater from the power supply and allow cooling for recommended time before cleaning. Clean the heater with a
damp cloth.
• When not in use, store the heater carefully in a safe, dry, childproof location.
Environmental Protection.
Recycle unwanted materials instead of disposing of them as waste. All tools, accessories and packaging should be sorted,
taken to a recycle centre and disposed of in a manner which is compatible with the environment.
When the product is no longer required, it must be disposed of in an environmentally protective way.
Parts support is available for this product. To obtain a parts listing and/or diagram,
please log on to www.sealey.co.uk, email sales@sealey.co.uk or phone 01284 757500.
NOTE: It is our policy to continually improve products and as such we reserve the right to alter data, specifications and component parts without prior notice.
IMPORTANT: No liability is accepted for incorrect use of this product.
WARRANTY: Guarantee is 12 months from purchase date, proof of which will be required for any claim.
INFORMATION: For a copy of our latest catalogue and promotions call us on 01284 757525 and leave your full name and address, including postcode.
Sole UK Distributor, Sealey Group,
Kempson Way, Suffolk Business Park,
Bury St. Edmunds, Suffolk,
IP32 7AR
Original Language Version
01284 757500
01284 703534
www.sealey.co.uk
Web
sales@sealey.co.uk
email
CH2800 Issue: 1 - 21/05/10
 Loading...