

Page 1
INSTRUCTIONS FOR
CERAMIC FAN HEATER 1400W/230V 2 HEAT
SETTINGS.
MODEL NO: CH2013.V2
Thank you for purchasing a Sealey product. Manufactured to a high standard, this product will, if used according to these
instructions, and properly maintained, give you years of trouble free performance.
IMPORTANT: PLEASE READ THESE INSTRUCTIONS CAREFULLY. NOTE THE SAFE OPERATIONAL REQUIREMENTS, WARNINGS & CAUTIONS. USE
THE PRODUCT CORRECTLY AND WITH CARE FOR THE PURPOSE FOR WHICH IT IS INTENDED. FAILURE TO DO SO MAY CAUSE DAMAGE AND/OR
PERSONAL INJURY AND WILL INVALIDATE THE WARRANTY. KEEP THESE INSTRUCTIONS SAFE FOR FUTURE USE.
1. SAFETY
1.1. Electrical Safety
WARNING! It is the user’s responsibility to check the following:
Check all electrical equipment and appliances to ensure that they are safe before using. Inspect power supply leads, plugs and
all electrical connections for wear and damage. Sealey recommend that an RCD (Residual Current Device) is used with all electrical
products. You may obtain an RCD by contacting your local Sealey dealer.
if the used in the course of business duties, it must be maintained in a safe condition and routinely PAT (Portable Appliance Test)
tested.
Electrical safety information, it is important that the following information is read and understood.
9 Ensure that the insulation on all cables and on the appliance is safe before connecting it to the power supply.
9 Regularly inspect power supply cables and plugs for wear or damage and check all connections to ensure that they are secure.
9 Ensure that the voltage rating on the appliance suits the power supply to be used and that the plug is tted with the correct fuse - see
fuse rating in these instructions.
8 DO NOT pull or carry the appliance by the power cable.
8 DO NOT pull the plug from the socket by the cable. Remove the plug from the socket by maintaining a rm grip on the plug.
8 DO NOT use worn or damaged cables, plugs or connectors. Ensure that any faulty item is repaired or replaced immediately by a
qualied electrician.
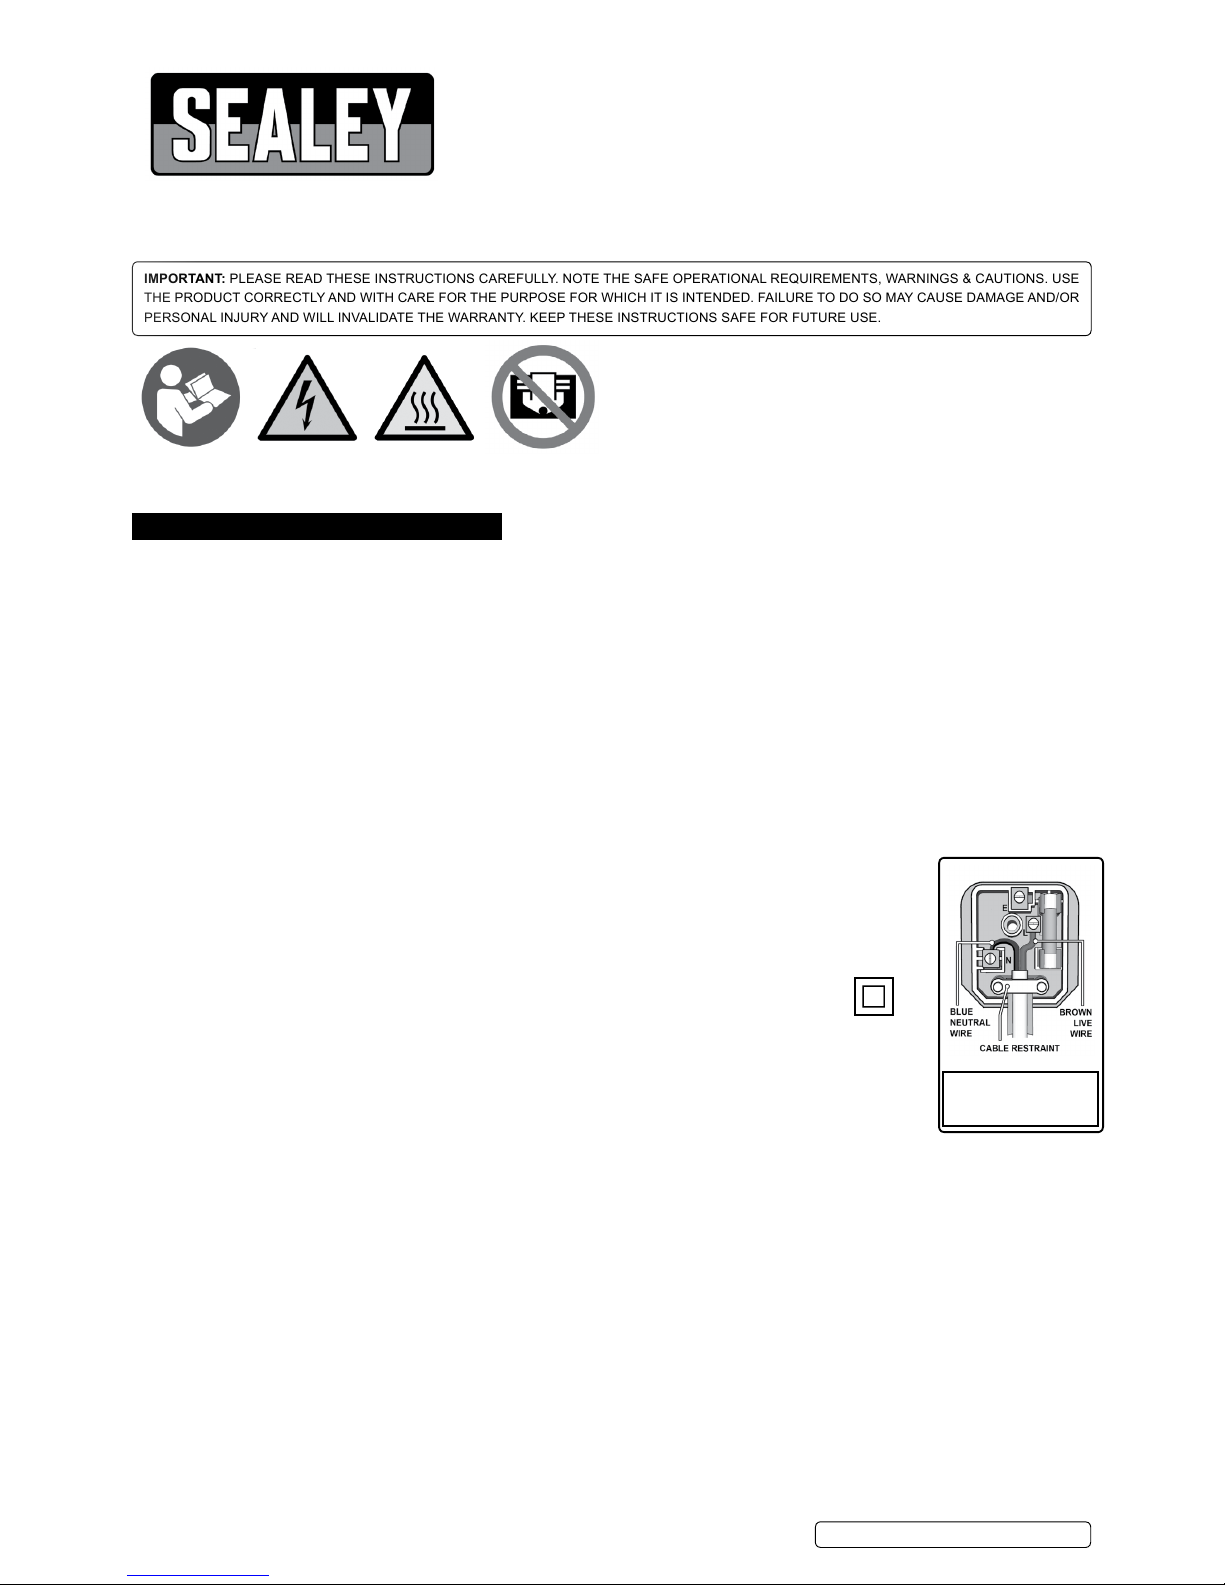
This product is tted with a BS1363/A 13 Amp 3 pin plug.
If the cable or plug is damaged during use, switch the electricity supply and remove from use.
Replace a damaged plug with a BS1363/A 13 Amp 3 pin plug. If in doubt contact a qualied electrician.
Class II products are wired with live (brown) and neutral (blue) only are marked with the Class II symbol;
A) Connect the BROWN live wire to the live terminal ‘L’.
B) Connect the BLUE neutral wire to the neutral terminal ‘N’.
C) After wiring, check that there are no bare wires and ensure that all wires have been correctly connected.
Ensure that the cable outer sheath extends inside the cable restraint and that the restraint is tight.
DO NOT connect either wire to the earth terminal.
Sealey recommend that repairs are carried out by a qualied electrician.
1.2. General Safety Instructions
9 Familiarise yourself with the applications and limitations of the heater.
9 Ensure that heater housing is positioned with feet and tilt switch on a rm, horizontal dry surface.
9 Keep away from ammable objects/materials/surfaces. This product gets very hot during use. Use in a location where accidental
contact (particularly by children) is unlikely.
9 Ensure the 4 position switch is set to ‘off ‘ before connecting power cord to power supply.
9 Ensure the heater is in good order and condition before use. If in any doubt DO NOT use the unit and contact an electrician.
9 Keep tools and other items away from the heater when it is in use.
9 Keep the area clean and clear of unnecessary items.
9 Keep children and unauthorised persons away from the heater, as it gets very hot.
9 Disconnect from mains and allow to cool before moving or attempting any cleaning.
8 DO NOT get the heater wet or use in damp or wet locations or areas where there is condensation.
8 DO NOT remove plug from mains supply by pulling on power cord.
8 DO NOT move the heater whilst in operation or even when still warm.
8 DO NOT disassemble the heater for any reason. The heater must be checked by qualified personnel only.
8 DO NOT use this product to perform a task for which it has not been designed.
WARNING! If a fuse blows, ensure it is replaced with an identical fuse type and rating. If it blows again DO NOT use the unit and
contact an electrician
8 DO NOT place any object on the heater at any time.
CH2013.V2 | Issue 3 31/10/16
Original Language Version
© Jack Sealey Limited
Refer to
Instructions
Electrical
Shock
Hazard
Hot Surfaces
Do Not Cover
Recommended fuse rating
13 Amp
Page 2
WARNING! Ensure any object is at least 200cm from the heater front face.
8 DO NOT leave unattended. When not in use, store the heater carefully in a safe, dry, childproof location.
NOTE: This appliance is not intended for use by persons (including children) with reduced physical, sensory or mental capabilities
or lack of experience and knowledge, unless they have been given supervision or instruction concerning the use of the appliance by a
person responsible for their safety. Children should be supervised to ensure that they do not play with the appliance.
2. INTRODUCTION
Stylish modern design heater with 2 heat settings of 700/1400W. Features PTC heat conducting ceramic elements to achieve an instant, odour-free
heat. Includes overheating protection and safety tilt switch, protecting the user, product and environment. Supplied with 13Amp plug.
3. SPECIFICATION
Model No. ................................................................. CH2013
Min. Power ....................................................................700W
Max. Power .................................................................1400W
Input Supply .................................................. 230V-13A-50Hz
Size (WxHxD)....................................................210x115x250
4. OPERATION
WARNING! Ensure you read, understand and apply the safety instructions in Section 1 before using the heater.
4.1 . NOTE! The ceramic element is fragile and therefore it is impor tant that it is not subjected to any unnecessary shocks or vibration
and is not moved when it is hot.
4.1.1. Unwrap the mains lead, place where required on its six feet and safety tilt switch and plug it into the power supply.
4.1.2. For fan only select switch position
4.1.3. Choose the required heat output by selecting the appropriate switch.
Low setting: Select switch with the Roman Numeral “I”.
High setting: Select switch with the Roman Numeral “II”.
4.1.4. To switch the unit off, turn the heat selecting switch off “O”and unplug from the mains. Allow the unit to cool before handling or storage.
4.1.5. Safety cut-outs. The heater is fitted with a thermostatic safety cut-out which will automatically turn the heater off should it be
placed in circumstances that cause overheating or malfunction. Should this happen, switch the heater off and disconnect it from the
mains.
4.1.6. Allow the heater to cool before handling. Do not use the heater again until the cause has been identified and remedied. If necessary
return he heater to your Sealey dealer for servicing.
In the event of the heater being knocked over or raised from the ground, a safet y
tilt switch, will disable the heater.
4.1.7. When used for the first time, it is suggested that you set the heater to maximum power for a few minutes in a well ventilated room to
eliminate the newness smell typical of this type of heater.
9 Important: during relocation, the heater should remain switched off and disconnected from the power supply.
4.1 . 8 . In the event the heater has been accidentally knocked over, follow these steps to re-start the heater.
a) Switch ‘off’ the heater at the “O” position (Fig.1).
b) Disconnect the power cord from the power supply.
c) Return the heater to a standing position on its four feet.
d) If no damage has occurred to elements, re-connect power cord to the power supply and switch the heater back on. Should the
power cord require replacement, a complete wiring loom should be purchased and fitted by a suitably qualified person.
CH2013.V2 | Issue 3 31/10/16
Original Language Version
© Jack Sealey Limited
Off
Fan Only
Illuminates
when heater
is operating
700W-Fan
1400W-Fan
g.1
Tilt safety
switch
Feet
g.2
Page 3

NOTE: It is our policy to continually improve products and as such we reserve the right to alter data, specications and component parts without prior notice.
IMPORTANT: No liability is accepted for incorrect use of this product.
WARRANTY: Guarantee is 12 months from purchase date, proof of which will be required for any claim.
Sole UK Distributor, Sealey Group.
Kempson Way, Suffolk Business Park,
Bury St. Edmunds, Suffolk.
IP32 7AR
www.sealey.co.uk
sales@sealey.co.uk
01284 757500
01284 703534
Environmental Protection
Recycle unwanted materials instead of disposing of them as waste. All tools, accessories and packaging should be
sorted, taken to a recycling centre and disposed of in a manner which is compatible with the environment.
When the product becomes completely unserviceable and requires disposal, drain off any fluids (if applicable)
into approved containers and dispose of the product and the fluids according to local regulations.
WEEE Regulations
Dispose of this product at the end of its working life in compliance with the EU Directive on
Waste Electrical and Electronic Equipment (WEEE). When the product is no longer required, it must be disposed
of in an environmentally protective way. Contact your local solid waste authority for recycling information.
Parts support is available for this product. To obtain a parts listing and/or diagram,
please log on to www.sealey.co.uk, email sales@sealey.co.uk or telephone 01284 757500.
CH2013.V2 | Issue 3 31/10/16
Original Language Version
© Jack Sealey Limited
5. TROUBLE SHOOTING
Fault Description Suggested Solution
Heater does not operate Check power supply/fuse if fails again, Check for cracked casing
snagged wiring/connections,
Check for tilt safety switch engagement, if switch works (clicks) but
heater does not.
For the above Consult a qualied electrician for all suspected electrical
faults or contact a Sealey authorised dealer.
6. MAINTAINANCE
6.1. Disconnect from the mains and allow to cool before moving or attempting any cleaning or maintenance.
6.2. Clean the heater with a moist cloth and some mild detergent.
6.3. Use a vacuum cleaner outside grille to clean dust from internal parts.
6.4. When not in use, store the heater carefully in a safe, dry, childproof location.
6.5. To replace any of the elements, contact your authorised Sealey dealer.
8 DO NOT perform a ash test, as this will reduce the life of the elements.
8 DO NOT use abrasive cleaners or polishes on casing or grille.
 Loading...