

Page 1
INSTRUCTIONS FOR:
CONVECTOR HEATER 400W/230V
MODEL NO: CD400
Thank you for purchasing a Sealey product. Manufactured to a high standard, this product will, if used according to these
instructions and properly maintained, give you years of trouble free performance.
IMPORTANT: PLEASE READ THESE INSTRUCTIONS CAREFULLY. NOTE THE SAFE OPERATIONAL REQUIREMENTS, WARNINGS & CAUTIONS. USE THE PRODUCT
CORRECTLY AND WITH CARE FOR THE PURPOSE FOR WHICH IT IS INTENDED. FAILURE TO DO SO MAY CAUSE DAMAGE AND/OR PERSONAL INJURY AND WILL
INVALIDATE THE WARRANTY. KEEP THESE INSTRUCTIONS SAFE FOR FUTURE USE.
1. SAFETY
Refer to
Instructions
1.1. ELECTRICAL SAFETY
WARNING! It is the responsibility of the owner and the operator to read, understand and comply with the following:
You must check all electrical products, before use, to ensure that they are safe. You must inspect power cables, plugs, sockets and any other
connectors for wear or damage. You must ensure that the risk of electric shock is minimised by the installation of appropriate safety devices.
A Residual Current Circuit Breaker (RCCB) should be incorporated in the main distribution board. We also recommend that a Residual Current
Device (RCD) is used. It is particularly important to use an RCD with portable products that are plugged into a supply which is not protected by
an RCCB. If in any doubt consult a qualified electrician. You may obtain a Residual Current Device by contacting your Sealey dealer.
You must also read and understand the following instructions concerning electrical safety.
1.1.1. The Electricity at Work Act 1989 requires all portable electrical appliances, if used on business premises, to be tested by a qualified
electrician, using a Portable Appliance Tester (PAT), at least once a year.
1.1.2. The Health & Safety at Work Act 1974 makes owners of electrical appliances responsible for the safe condition of those appliances
and the safety of the appliance operators. If in any doubt about electrical safety, contact a qualified electrician.
1.1.3. Ensure that the insulation on all cables and on the appliance is safe before connecting it to
the power supply. See 1.1.1. and 1.1.2. and use a Portable Appliance Tester.
1.1.4. Ensure that cables are always protected against short circuit and overload.
1.1.5. Regularly inspect power supply cables and plugs for wear or damage and check all
connections to ensure that none is loose.
1.1.6. Important: Ensure that the voltage marked on the appliance matches the power supply to be
used and that the plug is fitted with the correct fuse - see fuse rating at right.
1.1.7. DO NOT pull or carry the appliance by the power cable.
1.1.8. DO NOT pull the plug from the socket by the cable.
1.1.9. DO NOT use worn or damaged cables, plugs or connectors. Immediately have any faulty item repaired or
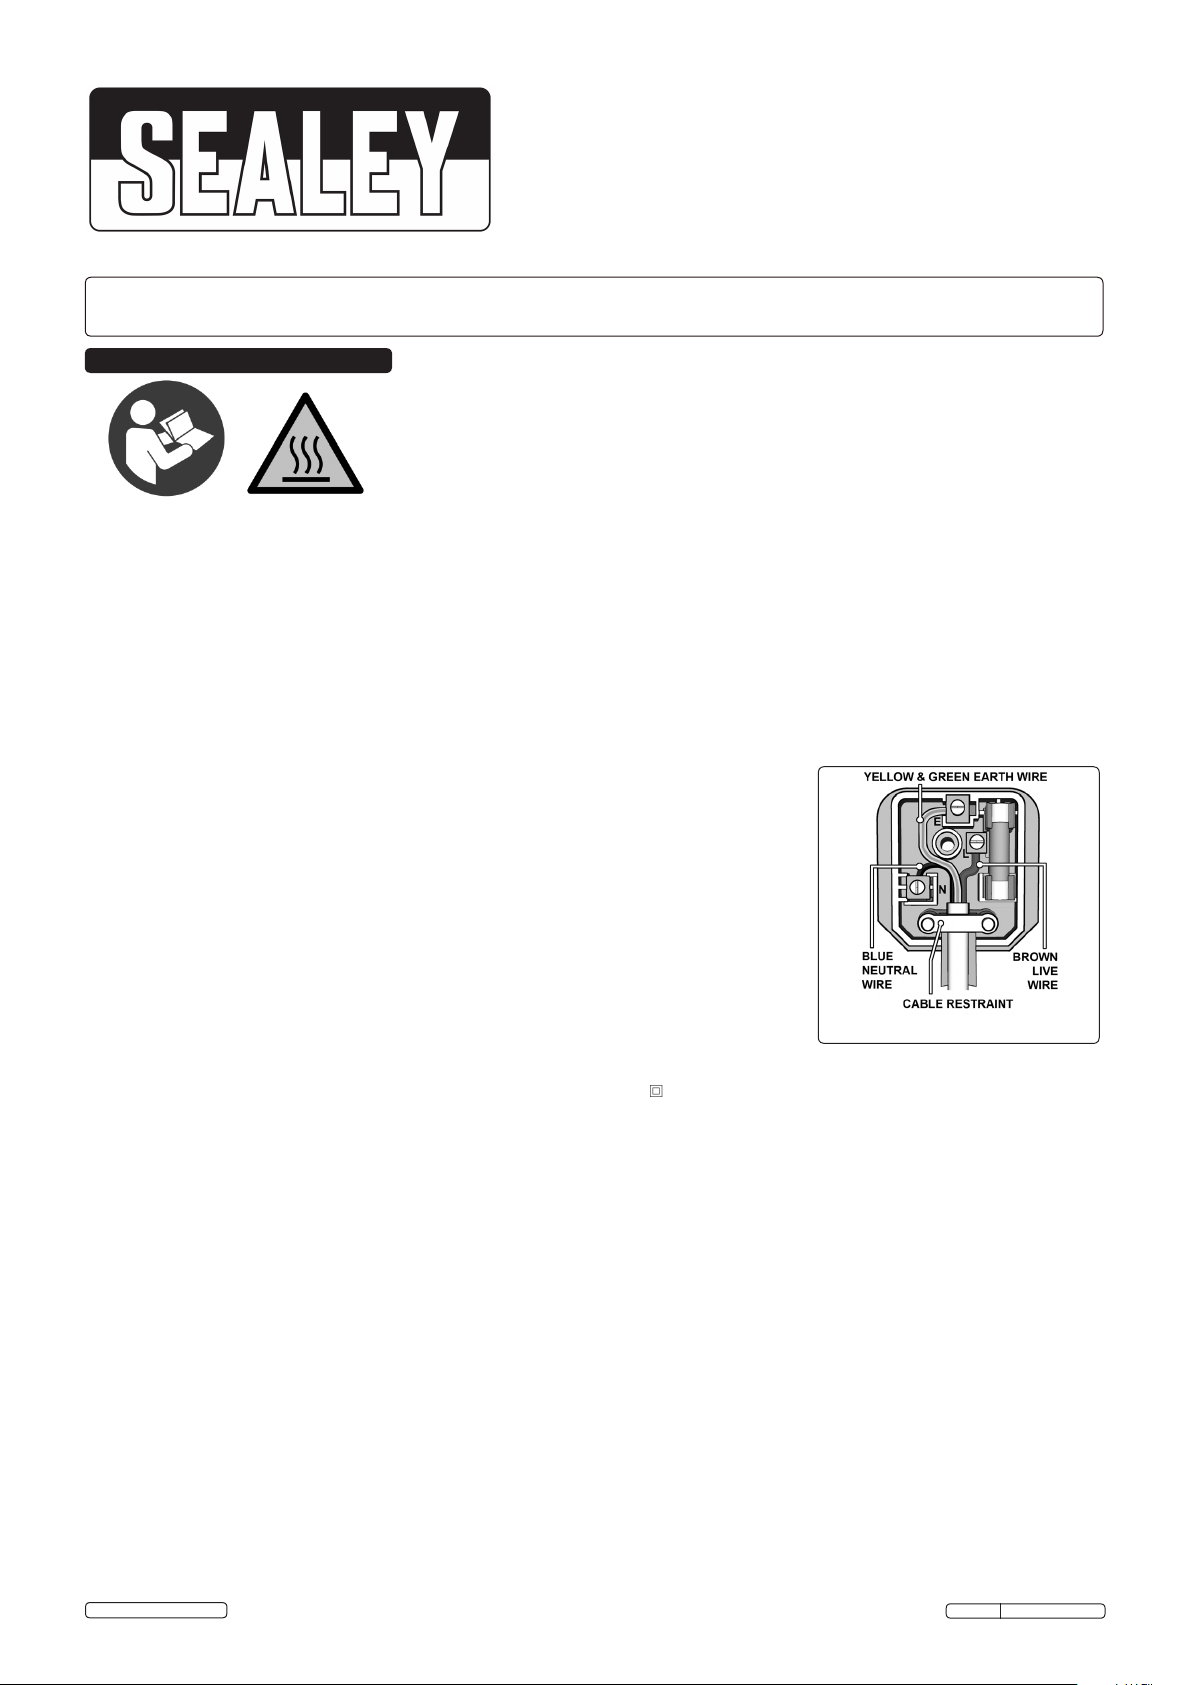
replaced by a qualified electrician. When an ASTA/BS approved UK 3 pin plug is damaged,
cut the cable just above the plug and dispose of the plug safely.
Fit a new plug according to the following instructions (UK only).
a) Connect the GREEN/YELLOW earth wire to the earth terminal ‘E’.
b) Connect the BROWN live wire to the live terminal ‘L’.
c) Connect the BLUE neutral wire to the neutral terminal ‘N’.
d) After wiring, check that there are no bare wires, that all wires have been correctly connected, that the cable outer
insulation extends beyond the cable restraint and that the restraint is tight.
Double insulated products, which are always marked with this symbol , are fitted with live (brown) and neutral (blue) wires only. To
rewire, connect the wires as indicated above. DO NOT connect either wire to the earth terminal.
1.1.10. If an extension reel is used it should be fully unwound before connection. A reel with an RCD fitted is preferred since any appliance
plugged into it will be protected. The cable core section is important and should be at least 1.5mm², but to be absolutely sure that the
capacity of the reel is suitable for this product and for others which may be used in the other output sockets, we recommend the use of
2.5mm² section cable.
1.2 GENERAL SAFETY
WARNING!Disconnect the heater from the mains power supply before carrying out any servicing or maintenance.
Disconnect the heater from the power supply before handling or cleaning.
Maintain the heater in good order and clean condition for best and safest performance.
Replace or repair damaged parts. Use genuine parts only. Unauthorised parts may be dangerous and will invalidate the warranty.
Ensure there is adequate lighting and keep the immediate area in front of the outlet grille clear.
Only use the heater in the upright position.
DO NOT allow any untrained or incompetent persons to use the heater. Ensure they are familiar with the controls and hazards of the
heater.
DO NOT let power lead hang over an edge (i.e. table), or touch a hot surface, lie in heater hot air flow, or run under a carpet.
DO NOT touch the outlet grille (top) or the casing of the heater during and immediately after use as it will be hot.
DO NOT place the heater near items that may be damaged by heat.
DO NOT place heater too close to yourself or any object and allow the air to circulate freely.
DO NOT use the heater for any purpose other than for which it is designed.
DO NOT use heater on very deep pile carpets.
DO NOT use the heater outdoors. These heaters are designed for indoor use only.
DO NOT use heater if the power cord, plug or the heater is damaged, or if the heater has become wet.
DO NOT use in bathroom, shower room, or in any wet or damp environments or where there is high condensation.
DO NOT operate the heater when you are tired or under the influence of alcohol, drugs or intoxicating medication.
DO NOT allow the heater to get wet as this may result in an electric shock and personal injury.
DO NOT insert or allow objects to enter any openings of heater as this may cause an electric shock,a fire or damage to heater.
Warning:
Hot Surface
SUGGESTED FUSE RATING:13A
© Jack Sealey Limited
Original Language Version
CD400 Issue: 1 -09/12/14
Page 2
DO NOT use the heater where there are flammable liquids, solids or gases such as petrol, solvents, aerosols etc, or where heat sensitive
materials may be stored.
DO NOT place the heater immediately below any electrical outlet.
DO NOT cover heater when in use, and do not obstruct the air inlet and outlet grille.
Allow the unit to cool before storage. When not in use, disconnect from the mains power supply and store in a safe, cool, dry, childproof
area.
NOTE:This appliance can be used by children aged from 8 years and above and persons with reduced physical, sensory or mental capabilities
or lack of experience and knowledge if they have been given supervision or instruction concerning use of the appliance in a safe way and
understand the hazards involved. Children shall not play with the appliance. Cleaning and user maintenance shall not be made by children
without supervision
2. INTRODUCTION
Modern, slimline design with rotary controlled room thermostat to maintain ambient temperature at pre-set level. Wall mountable with brackets
included or floor standing with wide feet for added stability. Ideal for home, light industrial and office environments. Supplied with 13Amp ASTA/
BS approved non-rewirable plug.
3. SPECIFICATION
Model No: .............................................................................CD400
Power:..................................................................................400W
Supply: ..................................................................................230V
Size (W x D x H inc feet): ..............................345 x 70 x 320mm (100mm Depth inc.Wall Brackets)
Weight: ................................................................................. 1.9kg
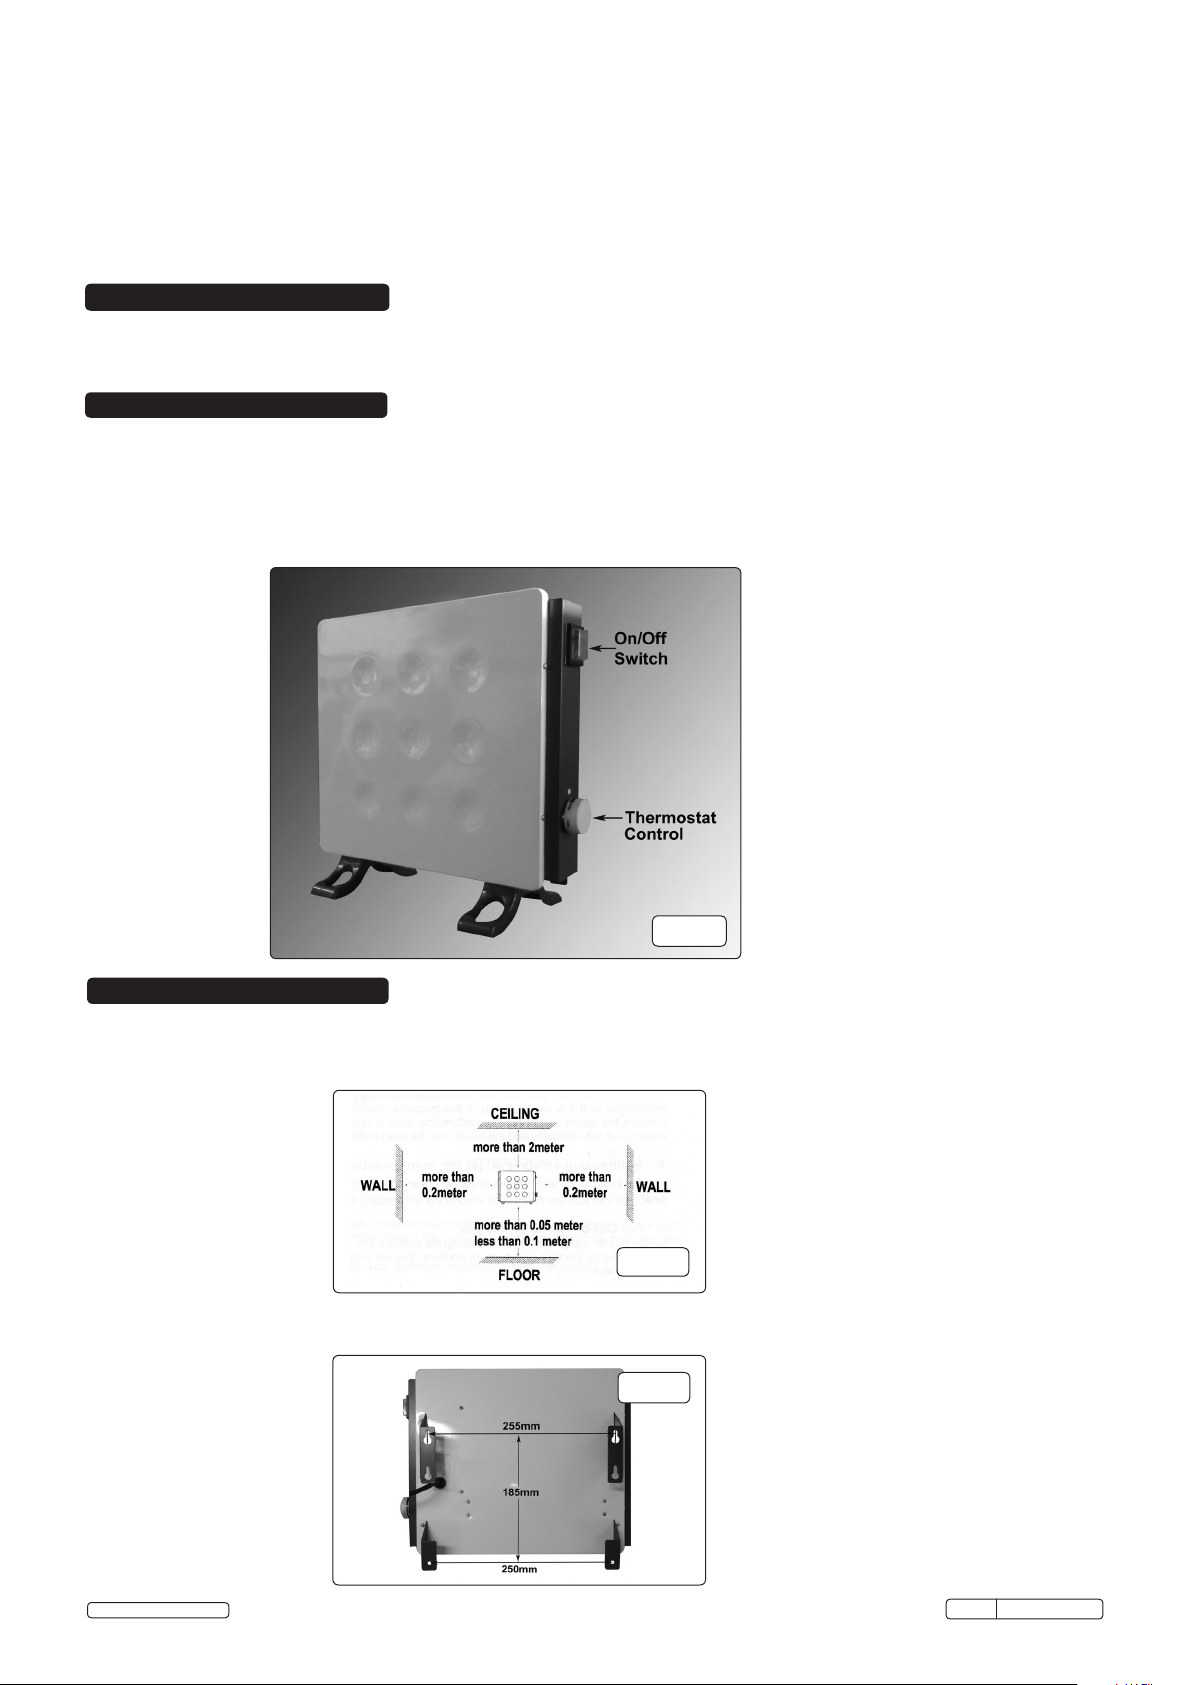
fig.1
4. ASSEMBLY
4.1. Free Standing: attach the feet by securing them to the base using the self tapping screws provided (fig.1).
4.2. Wall Mounted: do not attach the feet.
4.2.1. Choose a location suiting the provisions of fig.2.
fig.2
4.2.2. Having ensured that the area chosen is free from hidden cables and pipes, mark the centres of the upper fixing holes as in fig.3. Use a
spirit level to ensure accuracy.
fig.3
© Jack Sealey Limited
Original Language Version
CD400 Issue: 1 -09/12/14
Page 3

4.2.3. Using a suitable drill bit, drill on the centres marked and insert two of the enclosed wall plugs.
4.2.4. Insert two of the enclosed screws into the wall plugs, leaving the heads approximately 2mm proud of the wall.
4.2.5. Hang the heater by the upper keyhole shaped hole, allowing the bracket to sit with the screw at the top of the heyhole.
4.2.6. Check again for level; if correct, mark through the lower screw locations in the bottom brackets.
4.2.7. Remove the heater from the upper screws and drill suitable holes for the remaining wall plugs, then insert them.
4.2.8. Hang the heater again by the top brackets and secure by inserting and tightening the remaining screws through the two bottom brackets.
5. OPERATION
5.1. Plug the heater into the mains supply.
5.2. Switch the on/off switch (fig.1) to the "I" position.
5.3. Turn the thermostat control (fig.1) clockwise to its maximum position.
5.4. When the desired air temperature has been reached, turn the thermostat control back until the thermostat is heard to click.
The heater will switch on and off automatically around this temperature.
5.5. When the heater is not required to be working, return the on/off switch to the "O" position. If free standing; allow to cool down,unplug
from the mains supply and store in a safe, dry childproof place.
5.6. The heater is fitted with an overheat thermostat. If this thermostat activates, switch the heater off and remove the plug from the mains
supply.
5.6.1. Investigate the reason for the overheat and remedy it.
5.6.2. When cool, reconnect to mains power and switch back on.
6. MAINTENANCE
Before attempting any maintenance ensure the unit is unplugged from the mains power supply and that it is cool.
6.1. Clean the unit with a soft dry cloth. DO NOT use abrasives or solvents.
6.2. Check the air inlet and outlet periodically to ensure that the air way is clear.
Environmental Protection
Recycle unwanted materials instead of disposing of them as waste. All tools, accessories and packaging should be
sorted, taken to a recycling centre and disposed of in a manner which is compatible with the environment.
When the product becomes completely unserviceable and requires disposal, drain off any fluids (if applicable)
into approved containers and dispose of the product and the fluids according to local regulations.
WEEE Regulations
Dispose of this product at the end of its working life in compliance with the EU Directive on
Waste Electrical and Electronic Equipment (WEEE). When the product is no longer required, it must be disposed
of in an environmentally protective way. Contact your local solid waste authority for recycling information.
Parts support is available for this product. To obtain a parts listing and/or diagram, please log on to:
www.sealey.co.uk, email: sales@sealey.co.uk or phone: 01284 757500.
NOTE: It is our policy to continually improve products and as such we reserve the right to alter data, specifications and component parts without prior notice.
IMPORTANT: No liability is accepted for incorrect use of this product.
WARRANTY: Guarantee is 12 months from purchase date, proof of which will be required for any claim.
© Jack Sealey Limited
Sole UK Distributor, Sealey Group,
Kempson Way, Suffolk Business Park,
Bury St. Edmunds, Suffolk,
IP32 7AR
Original Language Version
01284 757500
01284 703534
www.sealey.co.uk
sales@sealey.co.uk
CD400 Issue: 1 - 09/12/14
 Loading...