

Page 1
INSTRUCTIONS FOR:
BOTTLE JACK LOW ENTRY TELESCOPIC
10tonne
CAPACITY
MODEL NO: BJ10LE
Thank you for purchasing a Sealey product. Manufactured to a high standard, this product will, if used according to these instructions
and maintained properly, give you years of trouble free performance.
IMPORTANT: PLEASE READ THESE INSTRUCTIONS CAREFULLY. NOTE THE SAFE OPERATIONAL REQUIREMENTS, WARNINGS & CAUTIONS. USE THE PRODUCT
CORRECTLY AND WITH CARE FOR THE PURPOSE FOR WHICH IT IS INTENDED. FAILURE TO DO SO MAY CAUSE DAMAGE AND/OR PERSONAL INJURY AND WILL
INVALIDATE THE WARRANTY. KEEP THESE INSTRUCTIONS SAFE FOR FUTURE USE.
Refer to Instruction
Manual
1. SAFETY
Inspect and lubricate the jack regularly to ensure it is in good working order. DO NOT use the jack if damaged or a fault is suspected.
Check chapter 6 troubleshooting. If necessary, repair or replace damaged parts immediately.
Use authorised parts only, the use of unauthorised parts may be dangerous and will invalidate your warranty.
Ensure the jacking area is clean and tidy and free from unrelated materials and there is adequate lighting.
Use jack on level and solid ground, preferably concrete. Avoid tarmacadam since the jack may sink in.
Park the vehicle and apply hand brake; if automatic, place in Park (P) mode. Switch off the engine, and place chocks under the wheels.
Ensure minimum distance of 0.5m between vehicle tilt and static objects such as doors, walls, etc.
Ensure all persons are out of the vehicle before jacking. DO NOT enter vehicle whilst it is supported on the jack or axle stands.
Check vehicle weight and recommended lifting points by referring to the vehicle owner’s manual. Ensure the lifting point is not corroded.
Check jack saddle is centred and stable on lifting point, (off-centre loads can slip). Position jack to avoid operating it from under vehicle.
DANGER! Use the jack for lifting only, NOT for supporting the lifted load. ALWAYS USE PROPERLY RATED AXLE STANDS.
Keep hands etc. clear of moving parts during raising and lowering of the vehicle.
Use properly rated axle stands under the vehicle before proceeding with any task.
DANGER! Roadside wheel change is hazardous. Be extra vigilant. You may not be able to avoid jacking on tarmacadam. Get everyone
out of vehicle. NEVER go under vehicle, traffic may cause vehicle to rock. Use hazard warning lights. If in doubt call professional help.
When changing a wheel, slightly loosen wheel nuts prior to jacking vehicle. Screw wheel nuts back before lowering vehicle.
Use a competent person to lubricate and maintain the jack.
DO NOT exceed the rated capacity of the jack, andDO NOT operate the jack beyond its maximum pump stroke.
WARNING! DO NOT allow the vehicle to move during jacking. DO NOT start the engine when vehicle is jacked up.
DO NOT jack a vehicle if it may result in the spillage of fuel, battery acid, or other dangerous substances.
DO NOT place any part of your body under vehicle whilst supported by jack. Wait until properly rated axle stands have been correctly
positioned.
DO NOT use jack to support extensions or cradles. DO NOT modify jack in any way. DO NOT use the jack for any other purpose than that
for which it is designed.
DO NOT top up jack hydraulic system with brake fluid. Use hydraulic oil only, and DO NOT adjust the safety overload valve.
Ensure there are no persons or obstruction beneath the vehicle before lowering.
Clean, and stow the jack securely, with the ram in the down position. Ensure stowage area is dry.
WARNING! Remember, It is very dangerous to get under a vehicle supported by a jack even if additional supports are used.
DO NOT go under a vehicle without the support of properly rated axle stands. NOTE: Seek advice before jacking caravans or trailers.
2. INTRODUCTION
Fully tested and tted with overload valve to comply with the latest CE regulations. Base and reservoir machine welded for increased strength
and reduced chance of leakage. Threaded pump assembly allows for easy disassembly and maintenance. Supplied with 3pc handle. Fitted with
carrying handle. Service kits readily available.
3. SPECIFICATION
Model No: ............................................BJ10LE
Capacity: .............................................10Tonne
Minimum Height: ........................................128mm
Maximum Height:........................................223mm
Hydraulic Lift:............................................95mm
Screw Extension:...........................................N/A
4. ASSEMBLY
4.1 Before using the jack, purge the hydraulic circuit, in order to eliminate any air from the system
that may have accumulated during transit, as follows:
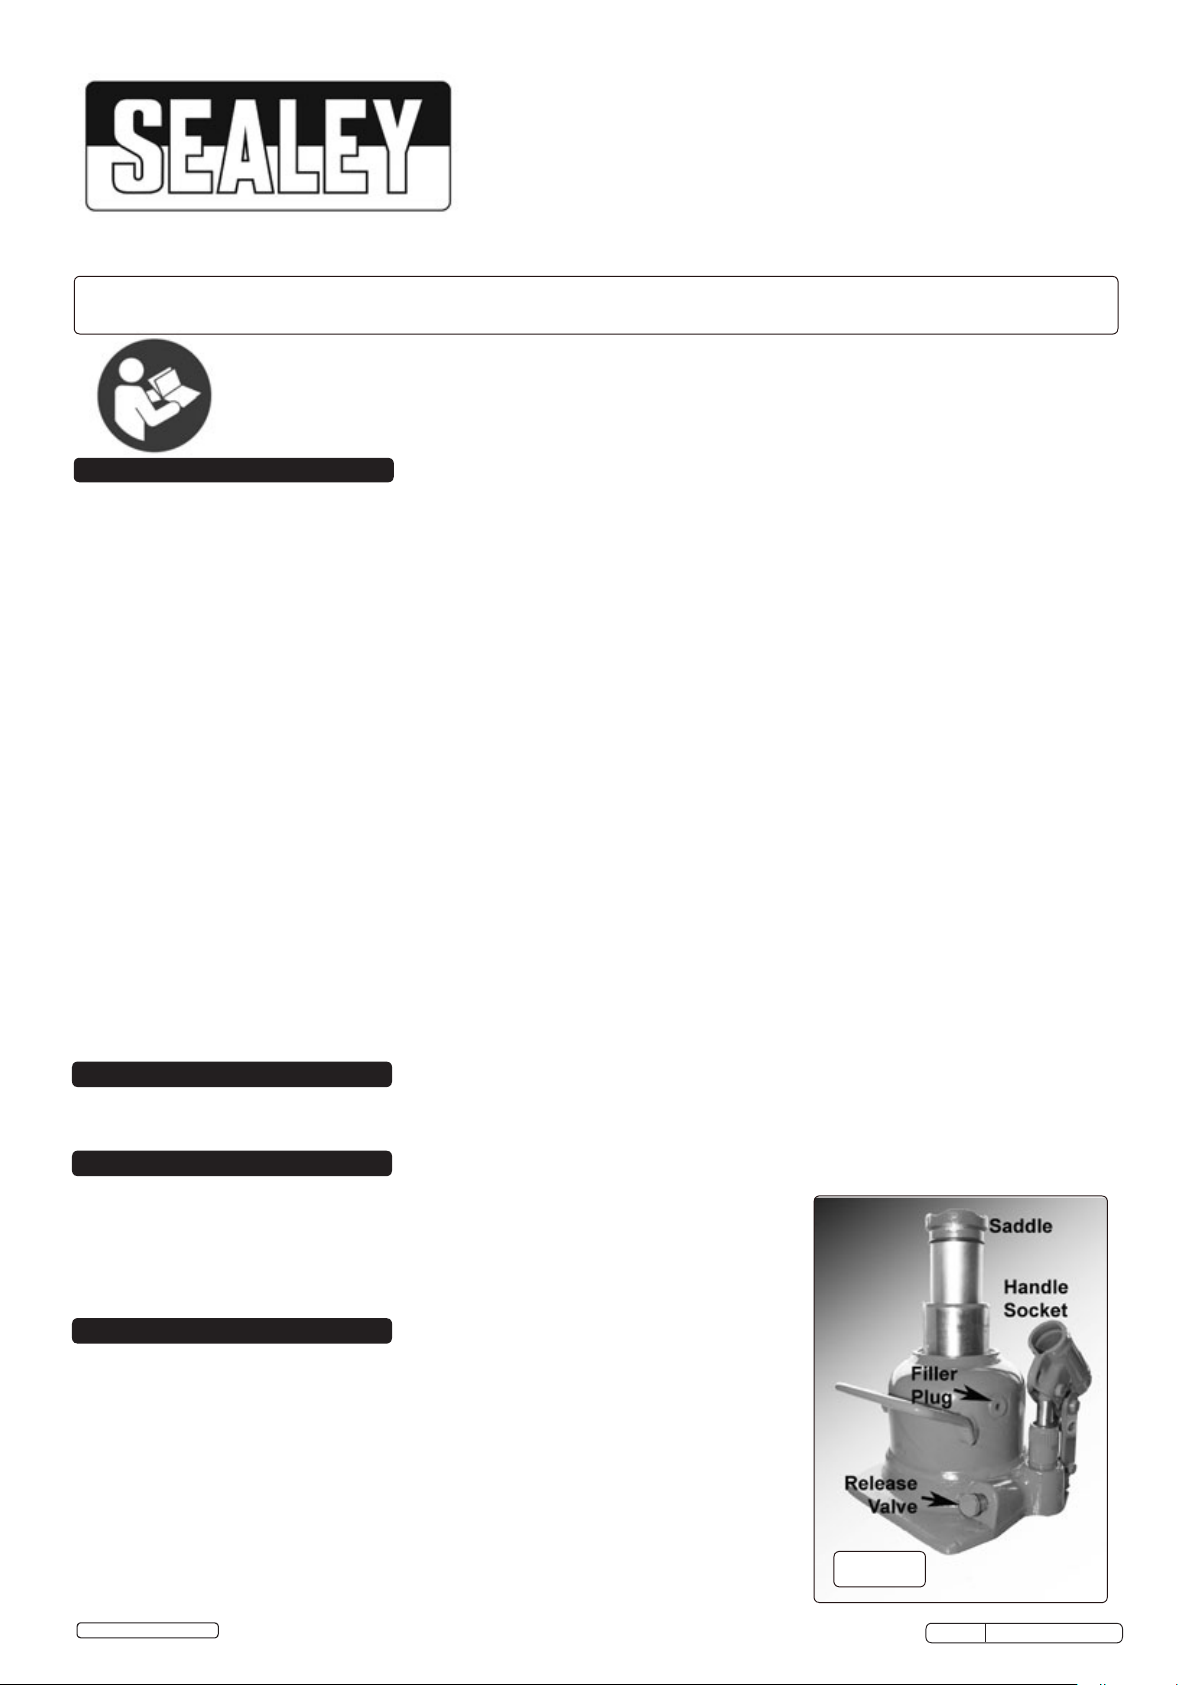
a) Insert jack handle over release valve (fig.1) and turn anti-clockwise to open valve.
b) Insert jack handle into the handle socket (fig.2) and pump several times to ensure full
internal lubrication and to bleed air from the system.
c) When complete place the handle back over the release valve and turn clockwise to close.
WARNING! Ensure you prepare vehicle and use jack according to chapter 1 SAFETY
INSTRUCTIONS.
Check that the supporting ground upon which the jack will stand is level and solid and not
tarmacadam.
4.2. Position the jack saddle (fig.1) under the vehicle manufacturer’s recommended lifting point
ensuring the saddle is correctly centred beneath the load. Ensure jack is positioned to avoid
having to operate it from under the vehicle, and that the handle is free to move up and down.
© Jack Sealey Limited
Original Language Version
g.1
BJ10LE Issue: 1 - 27/01/16
Page 2
4.3. Pump the handle up and down using full stroke range so that the saddle reaches the working height quickly.
4.4. Should the jack become overloaded, a safety overload valve will open, and stop the vehicle from lifting.
4.5. Position axle stands under the vehicle before attempting any work.
4.6. Lowering the load
4.6.1. Ensure the axle stands are removed and that there are no persons or obstacles beneath the vehicle, or in the path of its descent.
4.6.2. The lowering speed is controlled by the amount you turn release valve. Turn anti-clockwise and lower carefully, avoiding sudden release.
5. MAINTENANCE
IMPORTANT: Only fully competent personnel should attempt maintenance or repair.
WARNING: DO NOT use brake fluid. Use only a good quality jack oil, such as SEALEY HYDRAULIC JACK OIL. Failure to do this may
cause serious damage to the jack and will invalidate the warranty!
Note: Ensure waste oil is disposed of in accordance with local authority regulations.
5.1. When the jack is not in use, the ram must be in the lowest position to minimise ram and piston corrosion.
5.2. Keep the jack clean and lubricate all moving parts with acid free oil on a regular basis.
5.3. To check oil level, lower the jack fully. Remove the filler plug. The correct oil level should be to the same level as the filler opening.
5.4. After a year of extensive use, the oil should be replaced in order to extend the life of your jack. To drain the oil, remove the filler
plug and release valve. Make sure that no dirt is allowed to enter the oil reservoir.
5.5. Replace release valve and refill with fresh oil. Pump the unloaded jack 5 or 6 times to expel air. Check level as in 5.3. Refit filler plug.
5.6. Before each use check for broken, cracked, bent, or loose parts. Also check for any visible damage to welds, ram, pump, body,
stand, and all parts. If any suspect item is found remove the jack from service and take necessary action to remedy the problem.
DO NOT use the jack if it is believed to have been subjected to abnormal load or shock. Inspect and take appropriate action
5.7 Check the pump piston and piston periodically rod for signs of corrosion. Clean exposed areas with a clean oiled cloth.
IMPORTANT: NO RESPONSIBILITY IS ACCEPTED FOR INCORRECT USE OF THE JACK.
Owing to their size and weight, hydraulic products should ideally be repaired by local service agents. we have service / repair agents in
most parts of the UK. Before returning your product please call our technical helpline on 01284 757505 for advice and trouble shooting
guidance.
If the jack is under guarantee please contact your dealer.
5.8. De-commissioning the jack: Should the jack become completely unserviceable and require disposal, draw off the oil into an approved
container and dispose of the jack and the oil according to local regulations.
6. TROUBLESHOOTING
PROBLEM POSSIBLE CAUSE REMEDY
Jack will not lift
the load
Jack does not lift
high enough or
feels “spongy”
Jack lifts poorly
Jack lifts but will
not hold load
Jack will not lower
completely
1) Overloaded
2) Oil level low
3) Release valve not correctly closed
4) Air in system
5) Ram not functioning
6) Packing worn or defective
1) Oil level too too low
2) Worn seals
3) Air in system
4) Release valve not closed
1) Pump packing or valves malfunctioning
2) Oil is dirty
3) Air in the system
1) Release valve partially open
2) Dirt on valve seats
3) Air in system
4) Faulty seals
5) Packing worn or defective
1) Unit requires lubrication
2) Ram damaged
3) Air in system
4) Release valve partially open
1) Release valve still closed
1) Be sure to use jack with adequate capacity
2) Top up oil level
3) Check and close release valve
4) Open release valve and air vent (if fitted) and pump the handle a few times. Close valve and re-try
5) Clean and replace oil
6) Replace packing
1) Fill oil
2) Return jack to local service agent
3) Open release valve and air vent (if fitted) and pump the handle a few times. Close valve and re-try
4) Check and close release valve
1) Replace packing and/or clean valves
2) Replace oil
3) Open release valve and air vent (if fitted) and pump the handle a few times. Close valve and re-try
1) Check and close release valve
2) Lower jack, close release valve. Pull up ram to its full height by hand. Open the release valve to lower arm.
3) Open release valve and air vent (if fitted) and pump the handle a few times. Close valve and re-try
4) Replace packing or contact local service agent
5) Replace packing
1) Oil all external moving parts
2) Contact local service agent
3) Open release valve and air vent (if fitted) and pump the handle a few times. Close valve and re-try
4) Check and fully open release valve
1) Check and fully open release valve
Parts support is available for this product. To obtain a parts listing and/or diagram,
please log on to www.sealey.co.uk, email sales@sealey.co.uk or telephone 01284 757500.
and disposed of in a manner which is compatible with the environment. When the product becomes completely unserviceable and requires disposal,
Recycle unwanted materials instead of disposing of them as waste. All tools, accessories and packaging should be sorted, taken to a recycling centre
drain off any fluids (if applicable) into approved containers and dispose of the product and the fluids according to local regulations.
Environmental Protection
NOTE: It is our policy to improve products continually and as such we reserve the right to alter data, specifications and component parts without
prior notice.
IMPORTANT: No liability is accepted for incorrect use of this product.
WARRANTY: Guarantee is 12 months from purchase date, proof of which will be required for any claim.
© Jack Sealey Limited
Sole UK Distributor, Sealey Group,
Kempson Way, Suffolk Business Park,
Bury St. Edmunds, Suffolk,
IP32 7AR
Original Language Version
01284 757500
01284 703534
www.sealey.co.uk
sales@sealey.co.uk
BJ10LE Issue: 1 - 27/01/16
 Loading...