

Page 1
INSTRUCTIONS FOR
IMPORTANT: PLEASE READ THESE INSTRUCTIONS CAREFULLY. NOTE THE SAFE OPERATIONAL REQUIREMENTS, WARNINGS & CAUTIONS. USE
THE PRODUCT CORRECTLY AND WITH CARE FOR THE PURPOSE FOR WHICH IT IS INTENDED. FAILURE TO DO SO MAY CAUSE DAMAGE AND/OR
PERSONAL INJURY AND WILL INVALIDATE THE WARRANTY. KEEP THESE INSTRUCTIONS SAFE FOR FUTURE USE.
MODULAR FULL HEIGHT FLOOR CABINET 930MM
HEAVY DUTY
MODEL NO: APMS05.V2
Thank you for purchasing a Sealey product. Manufactured to a high standard, this product will, if used according to these instructions,
and properly maintained, give you years of trouble free performance.
Refer to
instructions
1. SAFETY
WARNING! Ensure Health & Safety, local authority, and general workshop practice regulations are adhered to when using this cabinet.
9 Locate cabinet in a suitable work area.
9 Keep the work area clean, uncluttered and ensure there is adequate lighting.
WARNING! Use cabinet on level and solid ground, preferably concrete.
9 Keep the cabinet clean and tidy in accordance with good workshop practice.
9 Keep children and unauthorised persons away from the work area.
8 DO NOT use the cabinet for any purpose other than that for which it is designed.
8 DO NOT use the cabinet outdoors.
8 DO NOT place the cabinet in a damp or wet location or an area where there is condensation.
8 DO NOT clean the cabinet with any solvents which may damage the surfaces or the protective coating.
88 88 DO NOT move the cabinet when there are items placed inside.
88 88 DO NOT step on the shelves.
88 88 DO NOT8overload the cabinet.
2. INTRODUCTION
• Use as part of a complete professional garage storage system or as an individual storage unit.
• All steel construction with a graphite powder coat nish.
• Heavy-duty full height 2 door cabinet.
• 3 Adjustable shelves.
• 4 Level-adjusting feet.
• Added security provided by cylinder lock, supplied with two keys.
• Overall measurements (W x D x H): 930 x 610 x 2110mm.
3. CONTENTS
No. Description Quantity
1 Top panel 1
2 Left back panel 1
3 M6 x 12 cross head bolt 44
4 Right back panel 1
5 Right side panel 1
6 Shelf 3
7 Door handle 2
8 Shelf support 12
9 Bottom panel 1
10 Adjustable feet 4
11 Metal feet 4
12 Lock 1
13 Right door 1
14 Skirting board 1
15 M4 x 8 crosshead bolt 4
16 Left door 1
17 Left side panel 1
© Jack Sealey Limited
Original Language Version
APMS05.V2 | Issue 1 09/02/17
Page 2
4. ASSEMBLY
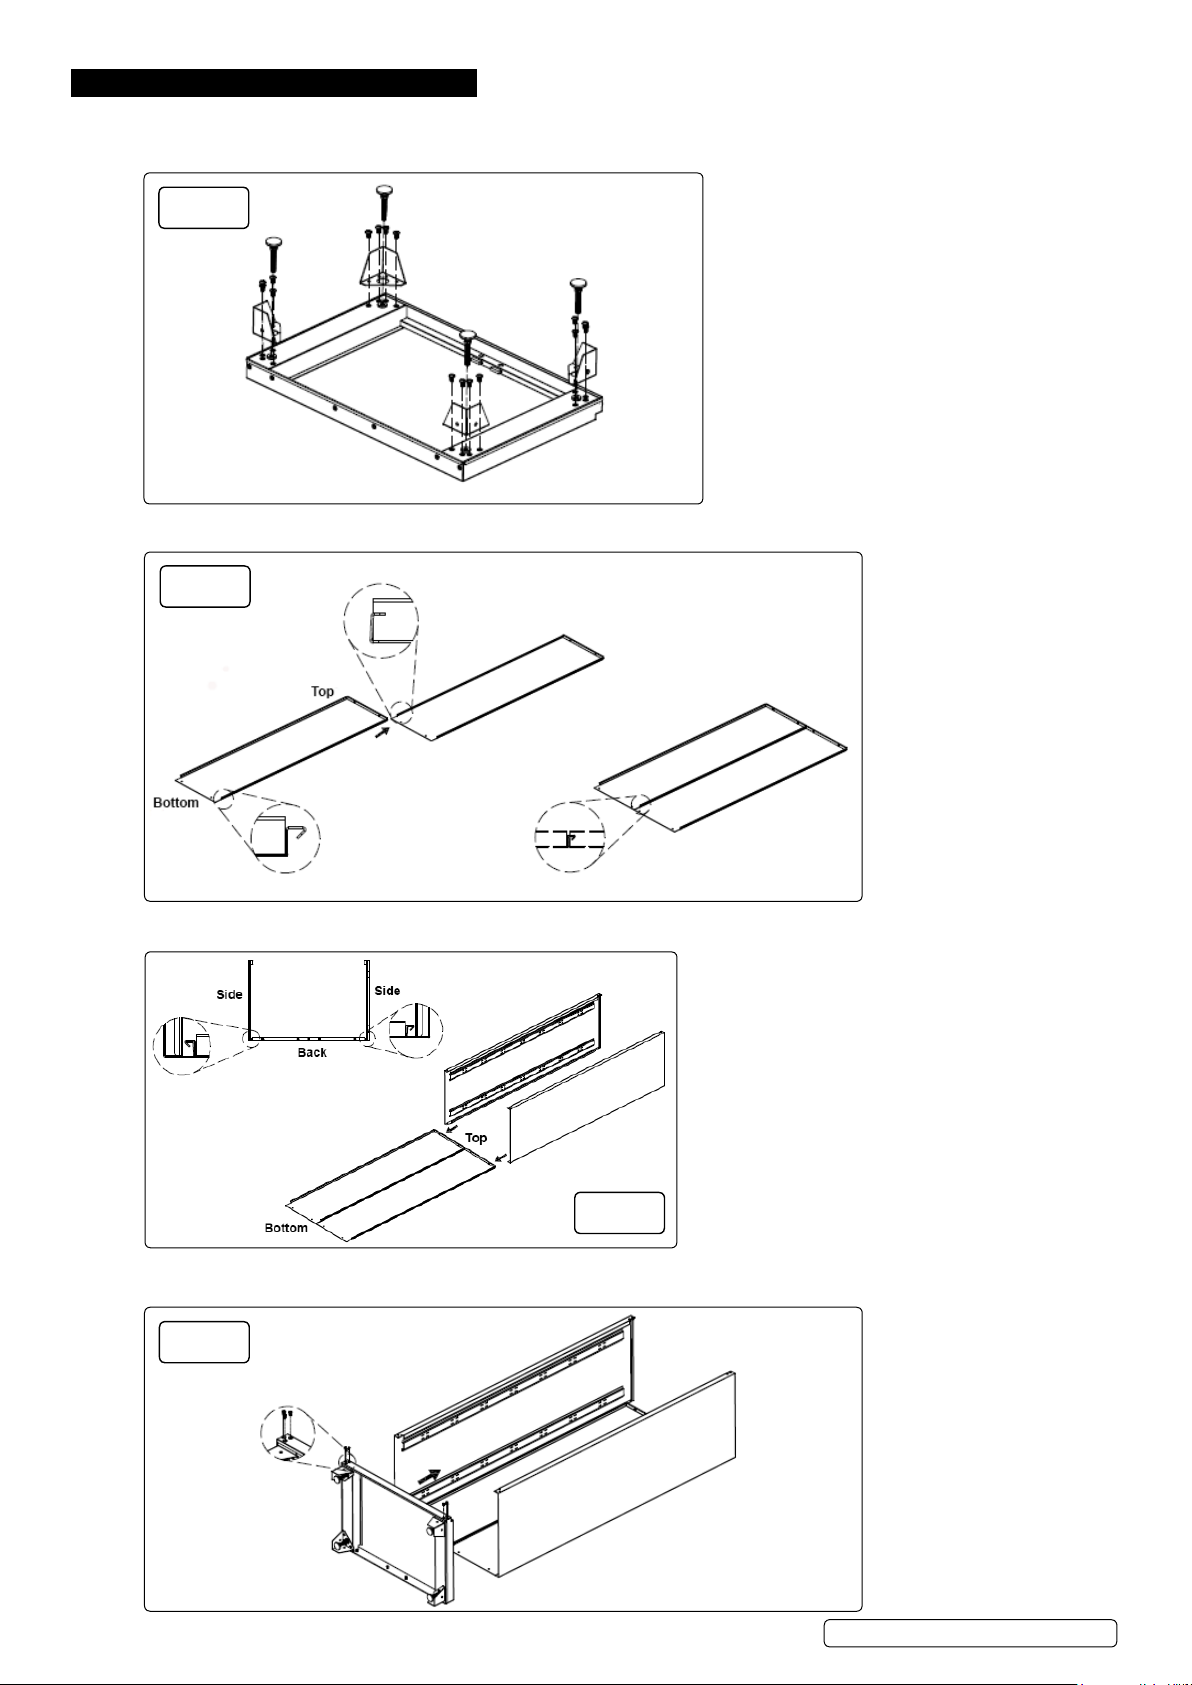
4.1. The initial assembly is easier if carried out with cabinet horizontal. Lay a soft mat or similar on the oor to protect the paint nish.
4.2. Attach the four metal feet to the bottom panel using 16pcs of M6X12mm cross head bolt, g.1.
4.3. Screw four adjustable feet into the bottom panel, g.1.
Fig.1
4.4. Lay down the two back panels on their backs with a soft mat underneath, g.2.
4.5. Attach the right back panel and left back panel by sliding the left back panel’s edge into the groove of the right back panel, g.2.
Fig.2
4.6. Attach the left side panel to the left back panel by sliding the left side panel’s edge into the groove of the left back panel. Repeat the
same procedure to attach the right side panel to the right back panel, g.3.
Fig.3
4.7. Attach the bottom panel to the side panels. Tighten securely with 6pcs of M6X12mm cross head bolt in the front of the side panels,
g.4.
Fig.4
© Jack Sealey Limited
Original Language Version
APMS05.V2 | Issue 1 09/02/17
Page 3
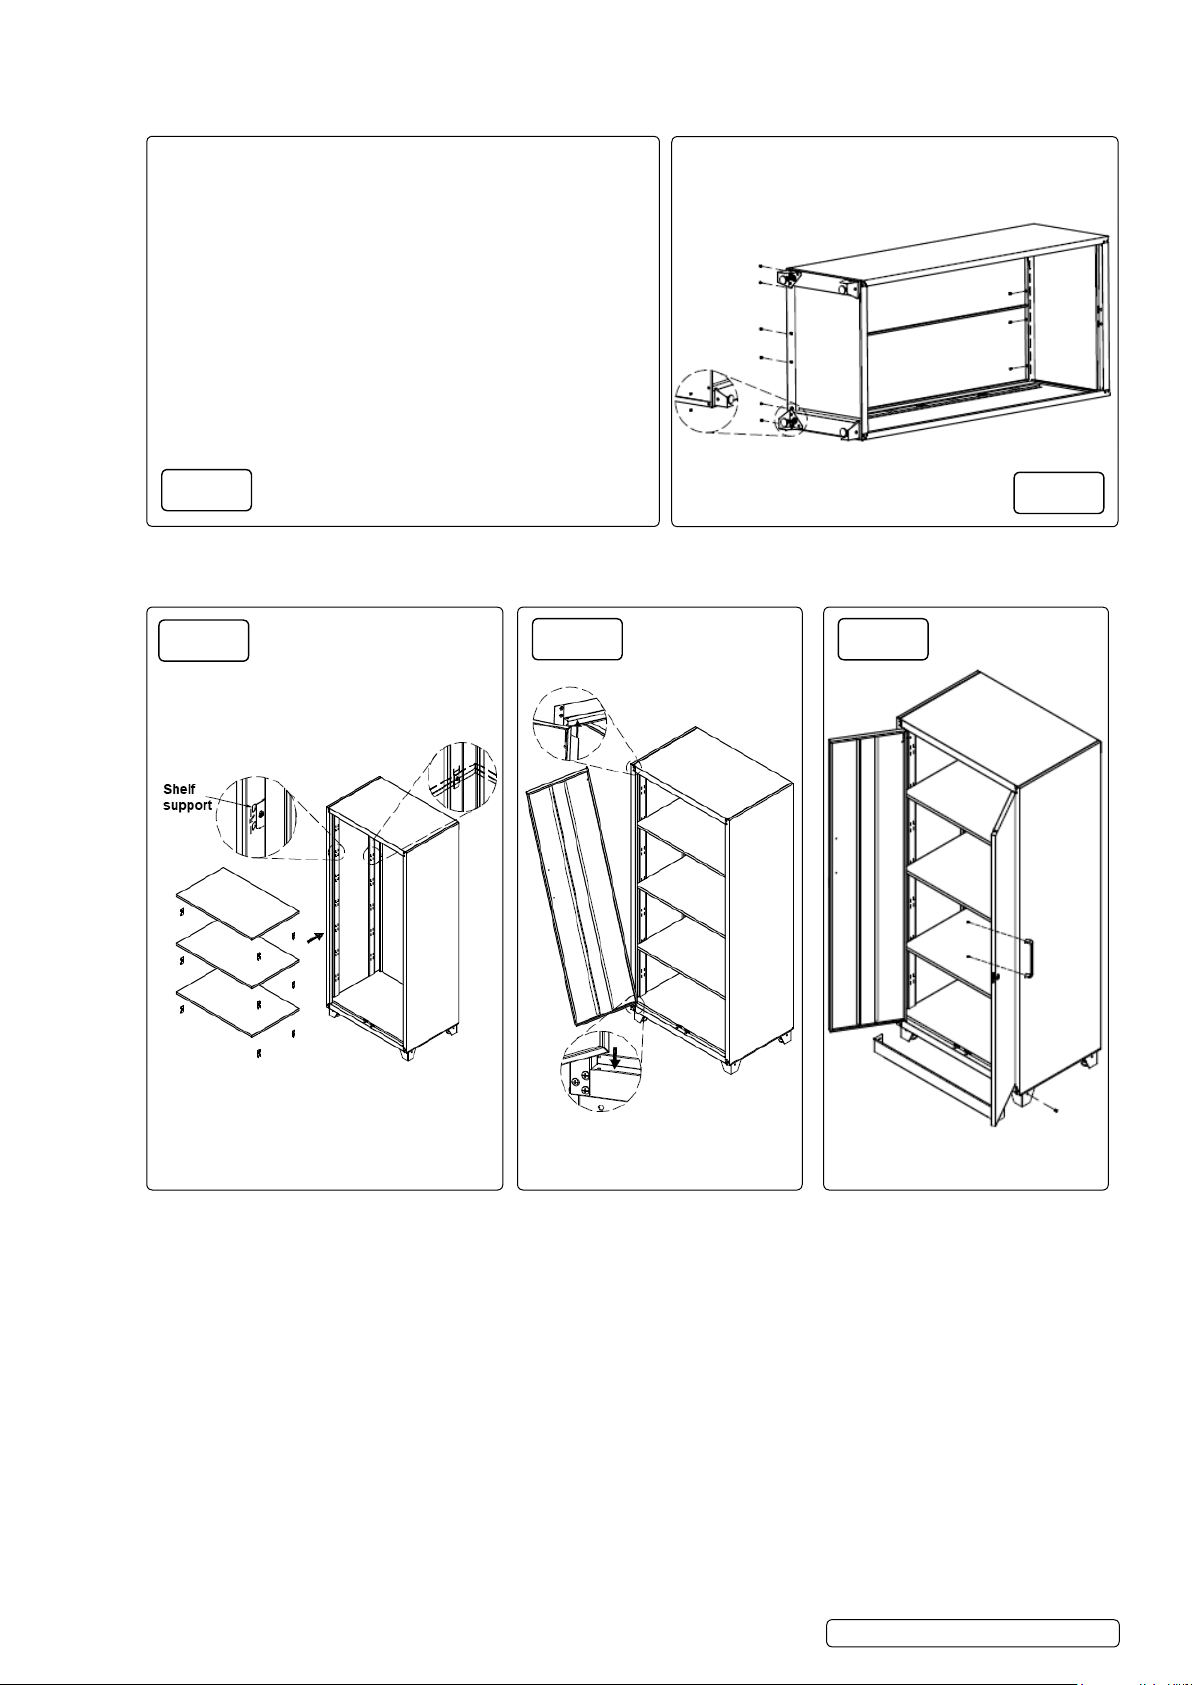
4.8. Attach the top panel to the side panels with 6pcs of M6X12mm cross head bolt, g.5.
4.9. Fix the front of the top panel and the front of the side panel together using 4pcs of M6X12mm cross head bolt, g.5.
Fig.5
4.10. Tilt the cabinet on to its side and secure the bottom panel to the back panel with 6pcs of M6X12mm cross head bolt, g.6.
4.11. Tighten the top panel and back panels securely with 4pcs of M6X12mm cross head bolt, g.6.
4.12. Stand the cabinet upright. Use two people to complete this task.
Fig.7
Fig.8
Fig.9
Fig.6
4.13. Fit the shelves at the desired heights by lowering the shelf onto the appropriate set of shelf supports. Press the shelf rmly until locked
onto the shelf support, g.7.
4.14. The shelves can be adjusted at any time by lifting them off and repositioning, g.7.
4.15. The doors have a pin at the bottom and a spring bolt at the top. To t the doors, drop the pin into the hole in the front of the base and
then pull the bolt until it locates in the hole in the top rail. Release the bolt to attach the door, g.8.
4.16. Install both door handles with M4x8mm cross head bolts, see g. 9.
4.17. Adjust the four adjustable feet to level the cabinet, see g. 9.
4.18. Install the skirting board with 2pcs of M6X12mm cross head bolt, see g. 9.
© Jack Sealey Limited
Original Language Version
APMS05.V2 | Issue 1 09/02/17
Page 4
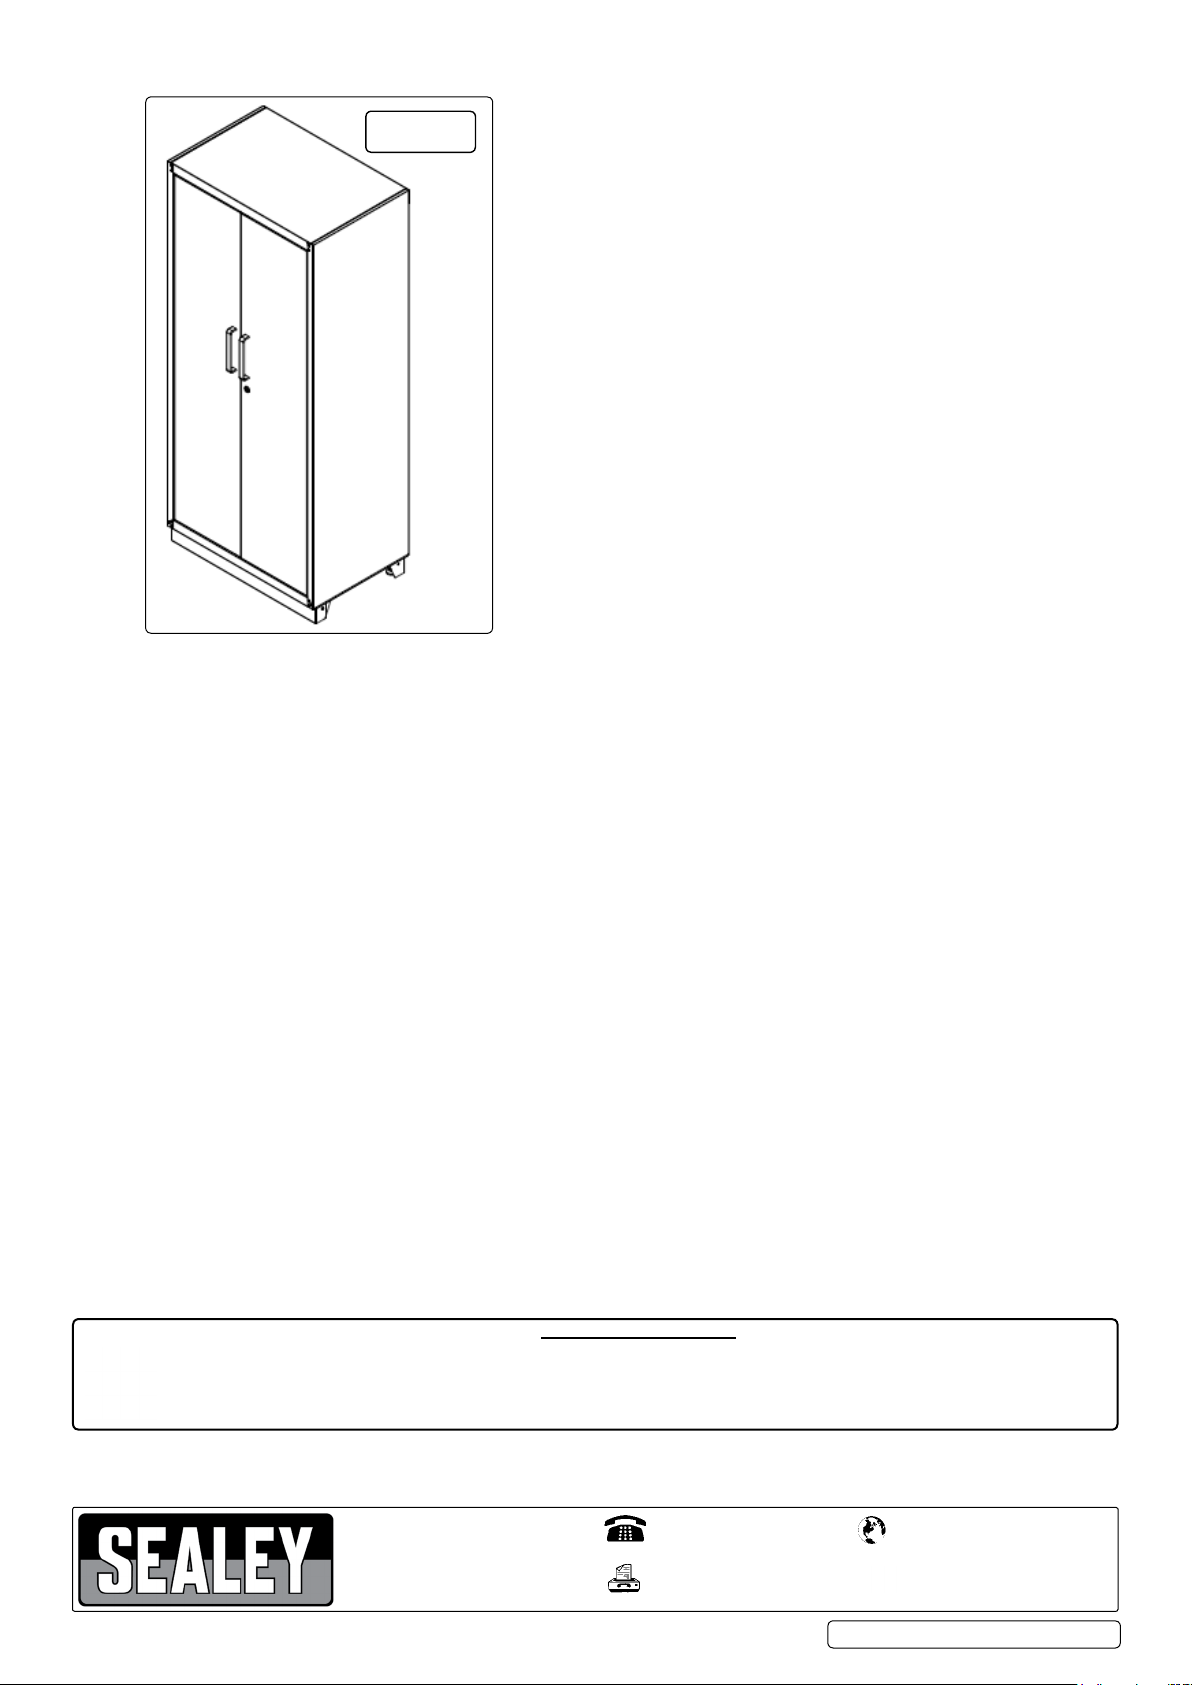
Fig.10
NOTE: It is our policy to continually improve products and as such we reserve the right to alter data, specications and component parts without prior notice.
IMPORTANT: No liability is accepted for incorrect use of this product.
WARRANTY: Guarantee is 12 months from purchase date, proof of which will be required for any claim.
© Jack Sealey Limited
Recycle unwanted materials instead of disposing of them as waste. All tools, accessories and packaging should be
sorted, taken to a recycling centre and disposed of in a manner which is compatible with the environment.
When the product becomes completely unserviceable and requires disposal, drain off any fluids (if applicable)
into approved containers and dispose of the product and the fluids according to local regulations.
Sole UK Distributor, Sealey Group.
Kempson Way, Suffolk Business Park,
Bury St. Edmunds, Suffolk.
IP32 7AR
Original Language Version
Environmental Protection
01284 757500
01284 703534
www.sealey.co.uk
Web
APMS05.V2 | Issue 1 09/02/17
 Loading...