

Page 1
InstructIons for:
industrial steel workbenches
MoDEL nos: aPi1500, aPi1800, aPi2100
thank you for purchasing a sealey product. Manufactured to a high standard this product will, if used according to these instructions and properly maintained,
give you years of trouble free performance.
IMPORTANT: Please read these instructions careFullY. note the saFe oPerational reQuireMents, warninGs & cautions.
use the Product correctlY and with care For the PurPose For which it is intended. Failure to do so MaY cause
daMaGe and/or Personal inJurY and will inValidate the warrantY. Please keeP instructions saFe For Future use.
1. saFetY instructions
1.1 General saFetY
warninG! Ensure Health & Safety, local authority, and
general workshop practice regulations are adhered to when
using this workbench.
warninG! use workbench on level and solid ground, preferably
concrete. Avoid tarmacadam since the workbench may sink into
the surface.
Locate workbench in a suitable working area.
Keep the work area clean, uncluttered and ensure there is
adequate lighting.
Keep the workbench clean and tidy in accordance with good
workshop practice.
Keep children and unauthorised persons away from the
working area.
do not use the workbench for any purpose other than that for
which it is designed.
do not undertake work on the workbench without the
workpiece being adequately secured. use clamps or a vice (not
included) to secure the workpiece. Available from your sealey
dealer.
do not use the workbench out of doors.
do not get the workbench wet or use in damp or wet
locations or areas where there is condensation.
do not clean the workbench with any solvents which may
damage the work surface or the painted surfaces.
Note! The assembly of this product will require assistance.
2. introduction and sPeciFications
2.1 introduction: Manufactured from heavy gauge steel,
these benches are the top end of our range with a weight
capacity of 1000kg (evenly distributed). fitted with adjustable
feet to ensure work surface is level even if your floor is not.
40mm thick laminate worktop is edged with double thick trim.
optional single or two drawer unit, vice support or back
panels easily attach converting the workbench into a
workstation.
2.2 sPeciFication:
Model no: ................width ....depth...height
API1500 ..................1500 ......750 .......850mm
API1800....................1800 ......750 .......850mm
API2100....................2100 ......750 .......850mm
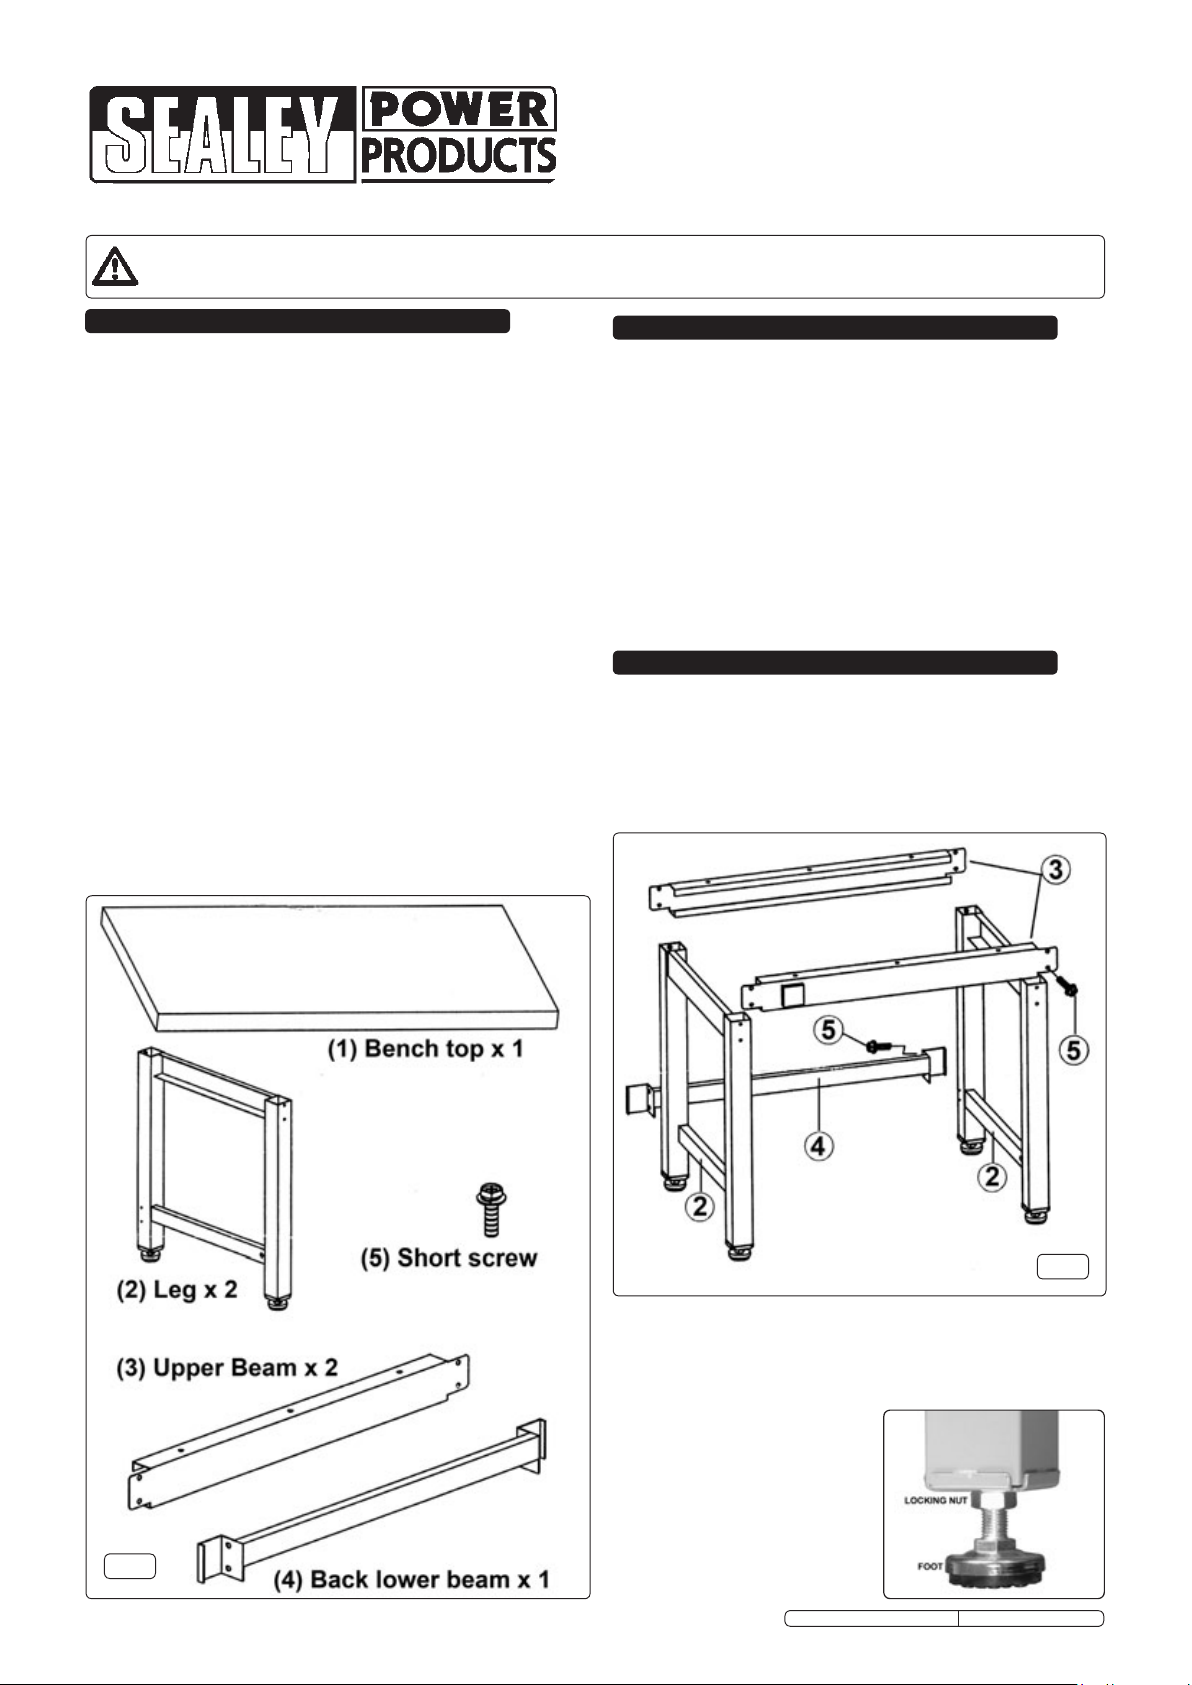
3. workbench asseMblY
3.1 see fig.2. Join the two leg frames (2) together using one of
the upper beams (3) and four short screws (5). Ensure that
the open sections on all components are facing inwards. fix
the second upper beam (3) in place using four short screws
(5). Align the fixing holes in the lower beam with the holes in
the two leg frames and fix in place using four short screws (5).
fig.1
3.2 see fig.3. Lay the bench top (1) face down on a smooth
clean surface. Invert the assembled frame and place it
centrally onto the bench top. Align the holes in the upper
beams with the holes in the underside of the bench top and
fix the frame onto the bench top using six short screws (5).
3.3 turn the assembled bench
onto its feet as shown in fig.4.
3.4 site the bench in the
workplace observing the
advice given in section 1.
3.5 Adjust the feet to compensate
for uneven surfaces and lock
each foot using the locking
nut shown in the adjacent
diagram.
Original Language Version
fig.2
API1500, API1800, API2100 Issue no.1 20/05/10
Page 2
fig.3
fig.4
take the three back panel supports and clamp them to the
back edge of the bench ensuring that a clamping plate is
inserted between the clamping knob spindle and the underside
of the bench top as shown in fig.6. Adjust the positions of the
uprights until the tool panels can be slotted into position
followed by the bin panels above them as shown in fig.5 . on
the outer uprights the back panels should occupy the inner line
of slots leaving one row of slots visible.
fig.6
4. shelF asseMblY
4.1 three widths of shelf unit can be purchased as an optional
extra to match the three back panel kits. the shelves hook
into the outer uprights as shown in fig.7 and stand away from
the panels slightly allowing them to be put at any height.
3. back Panel asseMblY
3.1 see fig.5. Back panel kits are available for all three sizes of
bench and are an optional extra to be purchased separately.
aPibP1500 ..............Back panel assembly for API1500
aPibP1800 ..............Back panel assembly for API1800
aPibP2100 ..............Back panel assembly for API2100
aPi11........................shelf for APIBP1500
aPi12 .......................shelf for APIBP1800
aPi13 .......................shelf for APIBP2100
fig.7
5. Vice MountinG claMP asseMblY
5.1 A Vice Mounting clamp aPi10 can be purchased as an
optional extra to provide a base plate to which a vice can be
mounted. the mounting clamp also allows the vice to be
stored out of the way, below the bench, when a full free work
surface is required.
5.2 fig.8 below shows the clamp in the stowed away orientation.
the mounting bars have to be removed from the clamp and
positioned under the bench as shown in fig.9-V. Place each
bar in a diagonal orientation under the bench top then turn it
so that the ends are over the upper beams. Allow the slots in
the ends of the mounting bars to rest over the upturned edges
of the beams.
fig.5
fig.8
Page 3

fig.9
5.3 the main clamp is attached to a tube which is a sliding fit
inside the main mounting tube. Withdraw the clamp from the
mounting tube and fix the mounting tube to the two bars 'V',
under the work top using four short bolts as shown in fig.10
fig.10
5.5 Loosen and remove the four bolts on the front of the clamp
and lift the top plate away. Bolt the chosen vice to the top plate
ensuring that the fixings are within the depth of the plate.
Place the vice and plate back onto the top of the bench over
the lower part of the clamp and bolt the two parts back
together again. tighten the clamping knob on the underside of
the clamp assembly. see fig.11-Z.
fig.12
5.6 to stow the vice under the bench loosen the clamping knob
on the underside of the clamp assembly. see fig.11-Z. Keeping
a firm hold on the assembly pull the vice and top plate
forwards until they are clear of the bench edge. Allow the
assembly to slowly rotate through 180º until it is hanging
downwards. Push the assembly under the front edge of the
bench until it is in the orientation shown in fig.8.
5.4 Insert the clamp tube into the mounting tube as shown in
fig.11-Y and rotate the clamp so that it is uppermost. Push the
clamp tube into the mounting tube until the clamp comes up
against the edge of the bench and laps over the top of it as
shown in fig.12.
fig.11
6. drawer oPtions
fig.13
6.1 Drawer units can be purchased as an optional extra. single
and double drawer units can be suspended from the underside
of the bench using two draw support bars as shown in fig.13.
Larger drawer units will be free standing under the bench. see
overleaf for other drawer options.
Original Language Version
fig.14
aPi8 single draw unit (bench mounted).
API1500, API1800, API2100 Issue no.1 20/05/10
Page 4

aPi9 double drawer unit (bench mounted).
see our website for full details and specification
for these drawer units as well as the other
optional extras found in this manual.
www.sealey.co.uk
aPi5655a Five drawer unit(Free standing) (Free standing)
(Free standing) (Free standing)
aPi5656 six drawer unit aPi7238 eight drawer unit
aPi5655b Five drawer unit
NOTE: It is our policy to continually improve products and as such we reserve the right to alter data, specifications and component parts without prior notice.
iMPortant: no liability is accepted for incorrect use of this product.
warrantY: Guarantee is 12 months from purchase date, proof of which will be required for any claim.
inForMation: for a copy of our latest catalogue and promotions call us on 01284 757525 and leave your full name and address, including postcode.
sole uk distributor, sealey Group,
Kempson Way, suffolk Business Park,
Bury st. Edmunds, suffolk,
IP32 7Ar
Original Language Version
01284 757500
01284 703534
API1500, API1800, API2100 Issue no.1 20/05/10
www.sealey.co.uk
Web
sales@sealey.co.uk
email
 Loading...